Sharper Image SM088 Instruction Manual

Model #: SM088 G-B-R
SM088
STEAM MOP
With SAP Technology
Instruction Manual and
Warranty Information
2 year
LIMITED WARRANTY
Printed in China

SAVE THESE INSTRUCTIONS
When using an electrical appliance, basic safety precautions
should always be observed, including the following:
Read all instructions before using this appliance.
WARNING:
To reduce the risk of re, electrical shock, or injury:
1. This appliance is authorized for household/residential use only.
2. Do not use outdoors. Do not immerse the Steam Mop in water or other liquids.
3. Do not allow to be used as a toy. Close attention is necessary when used by or
near children. Do not leave Steam Mop unattended. Always unplug unit when
not in use.
4. Use only as described and for the uses described in this manual. Use only
manufacturer’s approved and supplied parts and accessories. Use of other
accessories is not recommended and will void warranty.
5. Keep cord away from heated surfaces (e.g., cooking surfaces), and sharp
edges and corners.
6. Do not use if power cord or plug has been damaged, or if any part of appli-
ance has been dropped, damaged, left outdoors, or dropped in water. Do not
attempt to disassemble or repair appliance. Return it to manufacturer or an
authorized service center for examination or repair.
7. Do not wrap cord too tightly around appliance. Never carry by the cord, or yank
to disconnect from an outlet. To unplug, always grasp plug to remove from
outlet – do not pull on cord.
8. Do not handle cord or appliance with wet hands or without shoes on.
9. Look closely at Steam Mop and follow all labels and marking instructions.
10. Do not put any objects into openings. Do not use with any opening blocked.
11. Keep hair, loose clothing, ngers, and all parts of body away from
openings and moving parts.
12. Use caution near the Base of the appliance while in use. Contact with steam
may cause burns.
13. Be sure Tank Cap is inserted and remains inserted during use.
14. Never use cleaning solutions, perfumes, oils or other chemical substances other
than tap or distilled/demineralized water in the Steam Mop. Use of chemicals
may damage Steam Mop and will void your warranty.
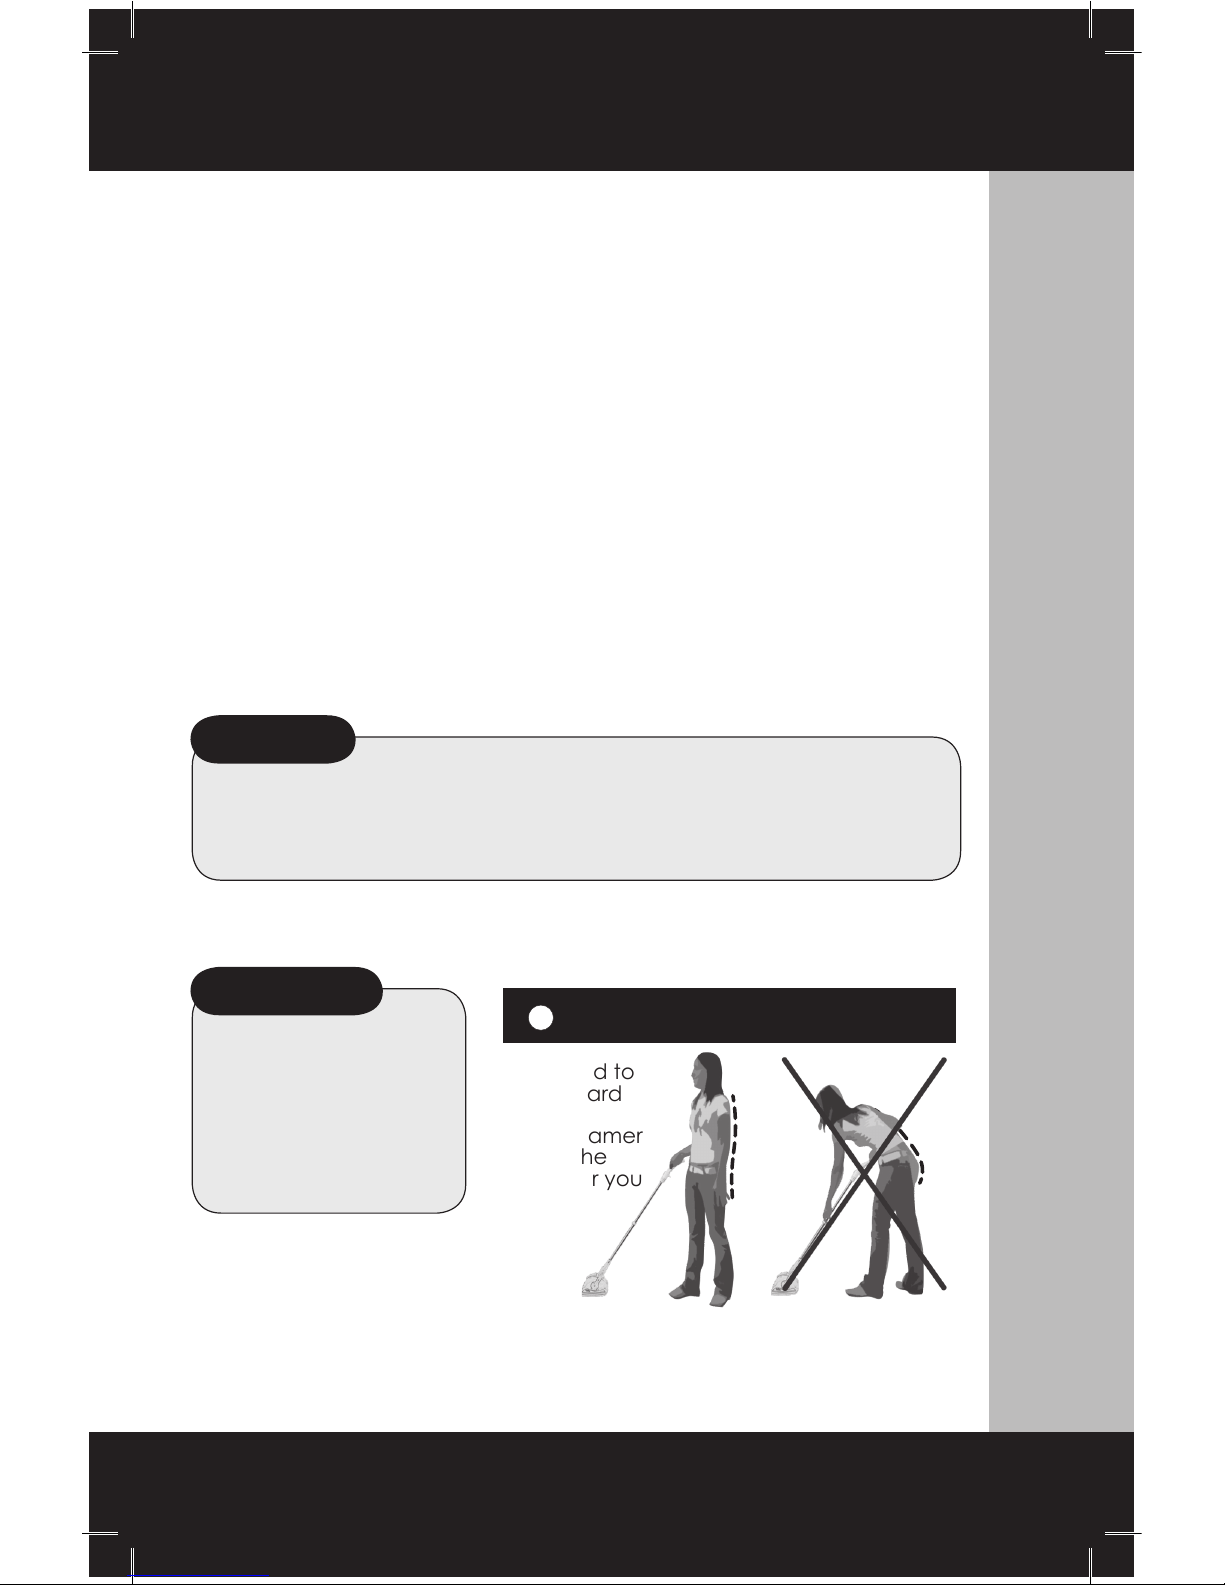
15. When in use, never turn the appliance on its side. Do not direct steam at
people, animals or other electrical equipment (i.e, inside an oven).
16. Do not operate around ammable or combustible liquids such as gasoline, or in
areas where fumes may be present.
17. Not for space heating purposes.
IMPORTANT SAFE TY INSTRUCTIONS
2
Safety Instructions

SAVE THESE INSTRUCTIONS
IMPORTANT SAFE TY INSTRUCTIONS
18. To reduce the likelihood of circuit overload, do not operate another high
wattage appliance on the same circuit. Plug in to a standard (120V, 60Hz)
electrical outlet.
19. Do not use extension cords or outlets with inadequate voltage. Use only heavy
duty, high-rated extensions cords.
20. Store appliance indoors in a cool, dry place.
21. If appliance is damaged, it must be repaired by manufacturer or its service
agent or a similarly qualied person in order to avoid safety issues to the
operator.
22. This appliance is not intended for use by persons (including children) with
reduced physical, sensory or mental capabilities, or lack of experience and
knowledge, unless they have been given supervision or instruction concerning
use of appliance by a person responsible for their safety.
23. Read and follow all important notices in this guide.
3
Safety Instructions
*IMPORTANT*
Please read all of the
instructions for use
and Important Safety
Instructions carefully.
Remove and discard all
packaging materials and
keep them out of the
reach of children.
CAUTIONS
•
Do not use your Steam Mop without a Cleaning Pad/SAP Sleeve or Carpet
Slide and Carpet Pad attached to the Mop Base.
• Never leave your Steam Mop in one spot on any surface for any period of
time. Always keep the Steam Mop moving or unplug it when not in use.
Save your back
No need to
press hard
The steamer
does the
work for you

Product Features
4
What’s Inside? & Product Description
Customer Service: 866-947-8326
One (1) Steam Mop
1
10
4
2
1 - Upper Cord Hook/Release
2 - Expandable Handle
3 - Handle Extension Lock
4 - Handle Extension Tube
5 - Power Cord
6 - Power Cord Clip
7 - Water Tank Cap
8 - Steam Mop Body/Water Tank
9 - Water Level Window
10 - Power Indicator Light
11 - Lower Cord Hook
12 - Mop Base
13 - Carpet Slide
14 - Carpet Pad
15 - Cleaning Pad/SAP Sleeve
16 - SAP (Super Absorbent Pad)
17 - Water Cup
Technical Data
Adapter Input: 120V~, 60Hz
Power: 1500 watts
Tank Capacity: 340 ml/11.5 oz
17
7
8
9
11
12
13
3
5
6
14
15
16

Before Use
5
Before Use
Steam Mop Assembly
IMPORTANT: FOLLOW THESE INSTRUCTIONS CAREFULLY!
1
• Once the Handle is inserted, adjust it
to the desired length.
• Snap the Extension Tube Lock down
to secure the Handle in position.
A. Assemble Handle
• Insert the Handle into the Handle Extension Tube. Be sure the Exten-
sion Handle Lock is open (as shown).
B. Insert Handle/Extension Tube into
Steam Mop Body/Water Tank
• Insert the open end of the Handle
Extension Tube into the opening at the top
of the Steam Mop Body/Water Tank.
NOTE: Be sure to match the shape of the
end of the Extension Tube with the shape
of the opening at the top of the Steam Mop
Body. Do not force the Extension Tube into
the Steam Mop Body opening.
• You will hear a “Click” when the
Extension Tube is securely locked
in place.
CLICK!
NOTE: Match the shape of the end of the Handle with the shape of the opening at the
top of the Extension Tube. Do not force Handle into Extension Tube opening.
FOR EASY STORAGE –
Open the Extension Tube Lock and push the
Handle down to shorten. Snap Lock down to maintain Handle’s position.
HANDLE ASSEMBLY IS ONLY DONE ONE TIME. ONCE HANDLE IS INSERTED IN
PLACE, YOU WILL NOT BE ABLE TO REMOVE IT.

6
Before Use
Before Use
Customer Service: 866-947-8326
C. Fill Water Tank with Water
We recommend lling the Water Tank before plugging in your Steam Mop
and getting started. You can rell the Water Tank at any time during use.
•
Remove Water Tank Cap by grasping it
rmly and pulling it from the Tank opening.
*IMPORTANT*
Use tap water – distilled or demineralized water if tap water is too hard.
NEVER add detergents, perfumes, oils or other chemical substances to the
Water Tank for regular operation.
M
A
X
F
I
L
L
M
I
N
I
M
U
M
• Use the provided Water
Cup to add tap, distilled or
demineralized water ONLY
to the Water Tank.
• Fill to the “MAX FILL” line on the Water Level
Window.
DO NOT overll Water Tank.
•
Replace Tank Cap by rmly pressing it back
in the Tank opening.
CAUTION
Do not plug in your Steam Mop until you are ready to begin cleaning.
Because the SM088 Steam Mop is equipped with a pump, the water
heats up very quickly (approximately 25 seconds).

7
Before Use
A. The Steam Mop Base
Before Use
Customer Service: 866-947-8326
To use your accessories, you must
afx the Cleaning Pad/SAP Sleeve or
Carpet Pad (and Carpet Slide) to the
Base of the Steam Mop.
The Steam Mop Base has six
(6) “grip strips” that hold the
Accessory Pads in place.
Bottom view of Steam Mop Base
showing six (6) “grip strips”
IMPORTANT CAUTIONS!
TO ENSURE A SURFACE IS SUITABLE FOR STEAM CLEANING,
ALWAYS TEST A SMALL, INCONSPICUOUS PORTION OF THE
SURFACE BEFORE USING STEAM ON IT.
• LINOLEUM FLOORS:
Pre-test all Linoleum oors, as steam can cause
wax to be stripped from, and consequently damage some varieties of
linoleum ooring.
• PAINTED WOOD, GLOSSY LEATHER & PLASTIC SURFACES:
These
surfaces may be dulled or bleached by the use of steam.
•
MISCELLANEOUS FABRICS:
Use caution with steam on fabrics as many
fabrics are sensitive to heat and steam, and can be easily damaged.
WARNINGS
• To prevent oor damage, ALWAYS attach either the Cleaning Pad/SAP
Sleeve or the Carpet Slide with Carpet Pad to your Steam Mop. NEVER
use Mop without one of these accessories afxed to the Base.
• To ensure a surface is suitable for steam cleaning, ALWAYS test a small,
inconspicuous portion of the surface BEFORE using steam on it.
M
A
X
F
I
L
L
M
I
N
I
M
U
M
REMEMBER
• You can add water to the Water Tank at any time during operation.
• Be sure the Steam Mop is not seated on a painted or unsealed wood
surface while it is heating up.
• Do not allow Steam Mop to sit in the same location for too long while it
is in use, as this can cause damage to surfaces.
Accessories – Attachment and Usage
2

Before Use
8
Before Use
Customer Service: 866-947-8326
ATTACH CLEANING PAD/SAP SLEEVE TO MOP BASE
• Place Cleaning Pad/SAP Sleeve face down
on the oor, wide side forward. Hold Steam
Mop about 2” above Pad and gently place
Steam Mop on the Pad.
• Firmly press Steam Mop down to assure Pad
is securely adhered to the Mop Base.
USE ON HARDWOOD FLOORS
For hardwood oors, use only on “sealed”
hardwood surfaces. Carefully control steam –
too much water could damage wood oors.
FOR “Super” MOISTURE ABSORPTION, USE
THE SAP (see “C” on next page).
WARNINGS
• To prevent oor damage, ALWAYS attach either the Cleaning Pad/SAP
Sleeve or the Carpet Slide with Carpet Pad to your Steam Mop. NEVER
use Mop without one of these accessories afxed to the Base.
• To ensure a surface is suitable for steam cleaning, ALWAYS test a small,
inconspicuous portion of the surface BEFORE using steam on it.
B. The Cleaning Pad/SAP Sleeve
ABOUT CLEANING PAD/SAP SLEEVE
• This Pad can be used on it’s own
to clean any hard oor surface.
Or...
• The “Cleaning Pad” also doubles as
the “SAP Sleeve” – the sleeve that
encases the SAP (Super Absorbent
Pad) (see “E” on next page
for insertion instructions).
Front of Cleaning Pad/
SAP Sleeve.
Back of Cleaning Pad/
SAP Sleeve.

Before Use
9
Before Use
C. The SAP (Super Absorbent Pad)
The SAP (Super Absorbent Pad)
contains extra-absorbent bers.
This added absorption helps control
moisture on sensitive surfaces such as
hardwood oors.
We recommend using the SAP when
steam cleaning hardwood oors and any
other moisture-sensitive surfaces.
INSERT SAP INTO CLEANING PAD/SAP SLEEVE
•
Place Cleaning Pad/SAP Sleeve face down.
• Open Sleeve and hold ap open.
• Insert SAP (wider side rst) into
the SAP Sleeve. Be sure to place
the Pad completely inside the Sleeve.
Once SAP is in place, the Cleaning
Pad/SAP Sleeve should look like this.
• Afx Cleaning Pad/SAP Sleeve
with SAP to Mop Base in the
same way as shown on page 8.
*IMPORTANT*
The SAP (Super Absorbent Pad) is a disposible Pad that SHOULD NOT
be washed, rinsed or placed in a dryer. It is meant to be used one (1)
time on large areas, or up to three (3) times on smaller jobs.
See more about Removal and Re-Use of the SAP on next page.
Continued on next page
NOTE: See “Maintenance & Cleaning” for care
and cleaning instructions for Cleaning
Pad/SAP Sleeve and Carpet Pad.
Customer Service: 866-947-8326

Before Use
10
Before Use
Customer Service: 866-947-8326
D. The Carpet Pad and Carpet Slide
C. The SAP (Super Absorbent Polymer) Pad (continued)
ATTACH CARPET PAD AND CARPET SLIDE
TO MOP BASE
• Place Carpet Slide face up on oor.
Center and place Carpet Pad on top of
Carpet Slide, wide side forward.
• Hold Steam Mop about 2” above Pad and
gently place Steam Mop on the Pad.
• Firmly press down to assure Carpet Pad
is attached to Steam Mop Base and Mop
Base is securely seated on Carpet Slide.
NOTE: See “Maintenance & Cleaning” for care and
cleaning instructions for Cleaning Pads.
Use the Carpet Slide and Carpet Pad to clean carpets and rough surfaces.
Placing the Carpet Slide over the Carpet Pad enables your Steam Mop to
slide easily over rough, textured surfaces.
ALWAYS TEST A SMALL, INCONSPICIOUS PORTION OF THE
SURFACE BEFORE APPLYING STEAM.
Carpet Pad
Carpet Slide
REMOVAL OF SAP
When you have nished using your Steam Mop, remove the SAP from the
Sleeve and discard. Or, if it was only used for a small area, leave it in the
Sleeve to use again (see below).
RE-USE OF SAP
We understand that on occasion you will only need to use the SAP for
small jobs. Use your judgement when re-using the SAP, and keep in mind
that too much moisture buildup will cause the Pad to lose it’s absorption
capabilities. We recommend limiting re-use of the SAP to three (3) times.

11
Using Your Steam Mop
Using the SM088 Steam Mop
3
A. Release the Power Cord for Use
Before using the Steam Mop, completely unwind the Power Cord.
Release Power Cord using the Upper Cord Hook/Release.
Simply turn the Upper Cord Hook/Release
right or left to release the Power Cord.
Customer Service: 866-947-8326
B. Starting the Appliance
WARNINGS
• ALWAYS attach either the CLEANING PAD or the CARPET PAD
with CARPET SLIDE to your Steam Mop. NEVER use Mop without
one of these accessories afxed to the Base.
• To ensure a surface is suitable for steam cleaning, ALWAYS test a
small, inconspicuous portion of the surface BEFORE using steam
on it.
• Never leave Steam Mop in the same location for too long while it
is in use, as this can cause damage to surfaces.
• NEVER add detergents, perfumes, oils or other chemical sub-
stances to the Water Tank for regular operation.
• Be sure the Water Tank is lled to “MAX
FILL” with tap, distilled or demineralized
water and the Water Tank Cap is
securely in place (see “C” on page 6 of
this manual for instructions).
• Plug in the SM088 Steam Mop.
• The Power Indicator Light on the front of
the Steam Mop Body will illuminate (white)
when the Mop is plugged in.

12
Using Your Steam Mop
Customer Service: 866-947-8326
D. Steam Cleaning Carpets and Rough Surfaces
Use the Carpet Slide and Carpet Pad to clean carpets and rough surfaces.
Placing the Carpet Slide over the Carpet Pad enables your Steam Mop
to slide easily over rough, textured surfaces (see “D.” on page 10 of this
manual for attachment instructions).
ALWAYS TEST A SMALL, INCONSPICIOUS PORTION OF THE
SURFACE BEFORE APPLYING STEAM.
• Unplug the Steam Mop before placing it on the Carpet Slide.
• Once plugged in and Mop has heated, begin cleaning.
• Keep the Steam Mop moving in a slow and steady motion over
carpets and rough surfaces.
C. Steam Cleaning Floors
• Be prepared for the Steam Mop to produce steam very quickly
(approximately 25 seconds).
• Once Mop has heated, begin cleaning and disinfecting your
pre-tested surface.
• Keep the Steam Mop moving in a slow and steady motion.
For stubborn oor stains:
• Dampen the stain with a detergent that is compatible with the oor
surface (check manufacturer’s recommendations).
• UNPLUG MOP WHILE APPLYING DETERGENT TO STAIN, then plug
Steam Mop in and steam clean area.
• Wipe up any excess detergent with a damp cloth, and then dry the area
with a clean, dry cloth.
NOTE: Steam Mop will stop producing steam when the Water Tank is empty. When
this happens rell Water Tank with water up to the “MAX FILL” line on the
Water Level Window.
*IMPORTANT*
We recommend using the SAP when steam cleaning hardwood oors
and any other moisture-sensitive surfaces (see “C” on page 9 of this
manual for instructions).

13
Using Your Steam Mop Using Your Steam Mop
E. Relling Water Tank During Use
• Remove Water Tank Cap.
• Fill Water Tank to “MAX FILL” with tap, distilled or demineralized water
using the Water Cup provided.
• Firmly push Tank Cap in the Tank opening and allow about 25
seconds for steam to be produced, then resume steaming.
REMINDERS
• Always use tap water – if tap water is too hard, use distilled or
demineralized water to avoid damaging surfaces, and possibly the
Steam Mop.
• NEVER add detergents, perfumes, oils or other chemical substances
to the Water Tank for regular operation.
F. The Upper Cord Hook/Release
Use the Upper Cord Hook/Release to quickly
release and unwrap the Power Cord.
• Simply turn the Upper Cord Hook/Release
right or left to release the Power Cord.
• When nished using your Steam Mop, wrap the
cord up and around the Cord Hook/Release.
G. The Power Cord Clip
Once the Power Cord has been wrapped
around the Upper Cord Hook/Release,
clip it to itself for convenient storage.
Using Your Steam Mop
Customer Service: 866-947-8326

14
Maintenance & Cleaning
Customer Service: 866-947-8326
Maintenance & Cleaning
Cleaning and Rinsing Steam Mop
If distilled or demineralized water is regularly used there is no
need to clean the Water Tank.
Rinsing the Water Tank
We recommend you periodically rinse the Steam Mop to prevent the accu-
mulation of calcium and sediment caused by hard water use. After 10-15
uses:
• Fill Water Tank 3/4 full with hot tap water
• Shake unit several times.
• Plug in Steam Mop and ush out steam into a sink or bathtub.
• Wipe the Steam Mop Base with a damp cloth and wipe dry.
NEVER HOLD THE STEAMER UNDER TAP TO FILL. Use the Water
Cup provided to ll.
Cleaning the Water Tank
If you use tap water, we reccomend cleaning the Water Tank every 3-4
months (depending on mineral buildup). Use a Hard Water Mineral Remo-
ver (found in most hardware or small appliance stores).
• Plug in and run Steam Mop in sink or bathtub until all water has ushed
from the Water Tank.
• Follow manufacturer’s instructions on cleaner package, and ll tank with
specied amount of cleaner.
• Flush cleaner from Water Tank and ll with water. Rinse thoroughly and
ush water from Tank. Repeat ushing with water until water from Tank
comes out clear.
• Replace Tank Cap and store appliance properly.
Cleaning of Water Tank and Steam Mop is the sole responsibility of appliance owner
and is not covered by the product warranty.
4
5
Carpet Slide Care & Cleaning
Wash the Carpet Slide accessory using a mild detergent and warm water.
Rinse throughly and dry completely before storing away.
Before rst use after cleaning the Water Tank, hold Steam Mop so it is
facing downward and direct steam into a sink or standing shower to
clear any leftover residue from Tank. When clean drops of water appear,
wipe clean with soft cloth. Your Steam Mop is now ready for use.

15
Maintenance & Cleaning Maintenance & Cleaning & Notes
Customer Service: 866-947-8326
Maintenance & Cleaning Notes
6
Accessory Pad Care & Cleaning
Your Cleaning Pad/SAP Sleeve and Carpet Pad are designed for hundreds
of uses. Clean Pads regularly, following the instructions printed on the Pad
label found on each Pad.
Notes
*IMPORTANT*
The SAP is disposible and is NEVER meant to be washed, rinsed or
placed in a dryer.

SM088 1/7/11
EFLX-SIQVC- 001AA
2-YEAR LIMITED WARRANTY
Sharper Image warrants this product to be free from defects in material
and workmanship for a period of two (2) years from the date of the original
purchase, when utilized for normal household use, subject to the following
conditions, exclusions and exceptions.
Should any defect covered by the terms of the limited warranty be
discovered within two (2) years, Sharper Image will repair or replace
any defective part provided the unit is returned by the original purchaser,
freight prepaid, to:
Sharper Image Returns, 3795 Lamar Avenue, Memphis, TN 38118 USA
Proof of purchase and $9.95 for handling and return packing/shipping
charges must be included.
The liability of Sharper Image under this warranty is limited solely to the
cost of the replacement parts or the complete unit at our option. LABOR
CHARGES ARE NOT INCLUDED.
This warranty does not cover normal wear of parts and does not apply to
any unit that has been tampered with or used for commercial purposes.
This warranty does not apply to any defect arising from misuse of the
product, negligence, failure to follow Sharper Image’s instructions, use
on current or voltage other than that stamped on the product, alteration
or repair not authorized by Sharper Image, or damage due to faulty
packaging or mishandling in transit (by any common carrier). Repair or
disassembly by anyone other than a Sharper Image authorized service
center will void the warranty.
This warranty is extended to the original purchaser of the unit and
excludes all other legal and/or conventional warranties. The responsibility
of Sharper Image, if any, is limited to the specic obligations expressly
assumed by it under the terms of the limited warranty. In no event is
Sharper Image liable for incidental or consequential damages of any
nature whatsoever. Some States/Provinces do not permit the exclusion or
limitation of incidental or consequential damages, so the above may not
apply to you.
This warranty gives you specic legal rights which vary from state to state
or province to province.
If you have questions or concerns regarding your Sharper Image
appliance, please contact Customer Service. Please do not return any
product without contacting Sharper Image for return authorization.
Unauthorized returns, as well as C.O.D. shipments, will be refused.
*Important: After receiving return authorization, carefully pack item to
avoid damage in shipping. Be sure to include your name, complete
address and phone number with note giving purchase information, model
number and what you believe is the problem with item. We recommend
you insure the package (as damage in shipping is not covered by your
warranty). Mark the outside of your package “ATTENTION CUSTOMER
SERVICE”.
We are constantly striving to improve our products, therefore the
specications contained herein are subject to change without notice.
Patents Pending
Mail To:
Sharper Image Returns
3795 Lamar Avenue
Memphis, TN 38118 USA
For Customer Service
Call: 866-947-8326
THE SHARPER IMAGE ® name and logo are registered trademarks.
Marketed and distributed by Euroex Americas under license. ©The Sharper Image.
All rights reserved.
Table of contents
Other Sharper Image Steam Cleaner manuals

Sharper Image
Sharper Image SI-470 User manual

Sharper Image
Sharper Image SI-380 User manual

Sharper Image
Sharper Image S1570 User manual

Sharper Image
Sharper Image In-Home Professional Jewelry Steam Cleaner Instruction Manual

Sharper Image
Sharper Image Steam Wizard SM420 User manual

Sharper Image
Sharper Image THREAD EXPRESS User manual

Sharper Image
Sharper Image THREAD PASSPORT User manual

Sharper Image
Sharper Image SI-160 User manual