Shimmer 3 User manual

Copyright © Shimmer Research 2013
Realtime Technologies Ltd IMU User Manual
All rights reserved Rev 1.1
1
ECG User Guide
Revision 1.12

Copyright © Shimmer 2018
Realtime Technologies Ltd ECG User Guide
All rights reserved Rev 1.12
Legal Notices and Disclaimer
Redistribution IS permitted provided that the following conditions are met:
Redistributions must retain the copyright notice, and the following disclaimer. Redistributions in electronic form
must reproduce the above copyright notice, this list of conditions and the following disclaimer in the
documentation and/or other materials provided with the document.
Neither the name of Shimmer Research, or Realtime Technologies Ltd. nor the names of its contributors may
be used to endorse or promote products derived from this document without specific prior written permission.
THIS DOCUMENT IS PROVIDED BY THE COPYRIGHT HOLDERS AND CONTRIBUTORS "AS IS" AND
ANY EXPRESS OR IMPLIED WARRANTIES, INCLUDING, BUT NOT LIMITED TO, THE IMPLIED
WARRANTIES OF MERCHANTABILITY AND FITNESS FOR A PARTICULAR PURPOSE ARE DISCLAIMED.
IN NO EVENT SHALL THE COPYRIGHT OWNER OR CONTRIBUTORS BE LIABLE FOR ANY DIRECT,
INDIRECT, INCIDENTAL, SPECIAL, EXEMPLARY, OR CONSEQUENTIAL DAMAGES (INCLUDING, BUT
NOT LIMITED TO, PROCUREMENT OF SUBSTITUTE GOODS OR SERVICES; LOSS OF USE, DATA, OR
PROFITS; OR BUSINESS INTERRUPTION) HOWEVER CAUSED AND ON ANY THEORY OF LIABILITY,
WHETHER IN CONTRACT, STRICT LIABILITY, OR TORT (INCLUDING NEGLIGENCE OR OTHERWISE)
ARISING IN ANY WAY OUT OF THE USE OF THIS DOCUMENT, EVEN IF ADVISED OF THE
POSSIBILITY OF SUCH DAMAGE.

Copyright © Shimmer 2018
Realtime Technologies Ltd ECG User Guide
All rights reserved Rev 1.12
Table of Contents
1. Introduction.............................................................................................................................. 4
2. General Information ................................................................................................................. 5
2.1. Safety Information ............................................................................................................. 5
2.2. Pre-Requisites.................................................................................................................... 5
2.3. ECG Unit Specification Overview ........................................................................................ 5
3. Using the ECG Unit .................................................................................................................... 6
3.1. Basic System Overview....................................................................................................... 6
3.2. ECG Leads .......................................................................................................................... 7
Electrode Positioning................................................................................................................. 7
Wilson's Central Terminal .......................................................................................................... 9
3.3. Configuration Options and Recommended Settings............................................................ 9
Data Rate................................................................................................................................. 10
Gain......................................................................................................................................... 10
Input Multiplexer..................................................................................................................... 11
Right-Leg Drive ........................................................................................................................ 11
Test Signal ............................................................................................................................... 12
Respiration demodulation ....................................................................................................... 12
Lead-off detection configuration.............................................................................................. 12
4. Measuring ECG Signals ............................................................................................................ 14
4.1. Best Practice on How to Acquire a High Quality ECG signal............................................... 14
Skin Preparation ...................................................................................................................... 14
Sampling Frequency................................................................................................................. 14
Wires....................................................................................................................................... 14
Filtering ................................................................................................................................... 14
4.2. Basic ECG Waveform Features.......................................................................................... 15
4.3. How to Determine the Heart Rate from ECG .................................................................... 15
Example HR Calculation ........................................................................................................... 16
Overview of Popular QRS Detection Methods .......................................................................... 17
4.4. Aliasing Error and Sampling Rate...................................................................................... 18
4.5. Signal Calibration ............................................................................................................. 19
ADC Offset Measurement ........................................................................................................ 20

Copyright © Shimmer 2018
Realtime Technologies Ltd ECG User Guide
All rights reserved Rev 1.12
Gain Measurement.................................................................................................................. 20
5. Hardware Considerations........................................................................................................ 20
5.1. Board Layout.................................................................................................................... 20
5.2. Channel assignment......................................................................................................... 22
5.3. Data considerations ......................................................................................................... 23
6. Firmware Considerations ........................................................................................................ 23
7. Troubleshooting...................................................................................................................... 23
7.1. Verifying That Your ECG Unit Works ................................................................................. 23
7.2. Signal Quality ................................................................................................................... 23
8. References .............................................................................................................................. 24
9. Appendices ............................................................................................................................. 25
9.1. Legacy Hardware.............................................................................................................. 25
Board Layout ........................................................................................................................... 25
Channel assignment................................................................................................................. 26
Trouble shooting...................................................................................................................... 26
9.2. Opening the Shimmer3 expansion enclosure.................................................................... 27

Copyright © Shimmer 2018
Realtime Technologies Ltd ECG User Guide
All rights reserved Rev 1.12
1. Introduction
This document is an accompaniment to the Shimmer3 ECG Unit (called ECG Unit in the rest of this
document). Its purpose is to aid the user in getting started with ECG measurements.
The ECG Unit can be configured to measure electrical signals from the skin, including ECG
(Electrocardiograph). Any user who wishes to use Shimmer hardware to record EMG
(Electromyograph) signals from the skin should refer to the Shimmer3 EMG User Guide, which is
available for download from http://www.shimmersensing.com.
The five-wire, four-lead ECG Unit can be configured to record the pathway of electrical impulses
through the heart muscle. This data can be recorded on resting and ambulatory subjects, or during
exercise to provide information about the heart’s response to physical exertion. Signals are collected
from the skin via five wires, which are connected externally to the ECG Unit, and to which should be
attached conventional disposable electrodes. The ECGUnit uses a low-power, multichannel analog
front-end especially designed for biopotential measurements, consisting of delta-sigma analog-to-
digital converters and programmable gain amplifiers.

Copyright © Shimmer 2018
Realtime Technologies Ltd ECG User Guide
All rights reserved Rev 1.12
2. General Information
2.1. Safety Information
As a precaution it is important to note that the ECG leads are not to be applied to the subject's body
while unit is in a USB dock or multi-charger.
2.2. Pre-Requisites
A Shimmer3 ECG Unit programmed with appropriate firmware. For example, LogAndStream
(v0.7.0 or greater) can be used to stream data over Bluetooth and/or log data to the SD card
or SDLog (v0.13.0 or greater) can be used to log data to the SD card; both are available for
download from www.shimmersensing.com.
Five DIN snap leads.
-9-inch and 18-inch leads are shipped with the ECG Development Kit and ECG
Bundles.
-Replacements can be purchased from www.shimmersensing.com.
Surface ECG electrodes.
-Disposable electrodes are shipped with the ECG Development Kit and ECG Bundles.
-For replacements, see www.shimmersensing.com. Alternatively, the Covidien
Kendall Disposable Surface EMG/ECG/EKG electrodes 1" (24mm) or Covidien Kendall
Disposable Surface EMG/ECG/EKG electrodes 1 3/8" (35mm), available on www.bio-
medical.com with product codes 'BRD H124SG' and 'BRD H135SG', respectively, and
the Ambu Blue Sensor T electrodes, available from various suppliers, are all suitable
options and have been validated for use with Shimmer equipment.
2.3. ECG Unit Specification Overview
For specifications on the general Shimmer3 part (i.e. microprocessor, radio, data storage and
inertial sensors) of the Shimmer3 ECG Unit, please refer to the Shimmer User Manual.
Gain: Configurable (1, 2, 3, 4, 6, 8, 12)
Data rate: software configurable (125, 250, 500, 1000, 2000, 4000, 8000 SPS)
Input differential dynamic range
1
: approx 800 mV (for gain = 6).
Bandwidth
2
: 8.4 kHz
Ground: Wilson Type Driven Ground
Input Protection: ESD and RF/EMI filtering; Current limiting; inputs include defibrillation
protection (survive only, not repeat). NOTE: For inputs LA and RA the defibrillation
protection is not present in order to facilitate Respiration demodulation.
Connections: Input RA, Input LA, Input LL, Input Vx, Reference (RL)
oAll Hospital-Grade 1mm Touchproof IEC/EN 60601-1 DIN42802 jacks.
Ultra-lightweight (31 grams); Compact Dimensions (65 x 32 x 12 mm).
EEPROM memory: 2048 bytes.
1
Calculated specification; exact value subject to environmental and component variation. ADS1292R is
optimized for power with a differential input signal of approx. 300 mV when gain = 6.
2
Specifications from ADS1292R datasheet; exact value subject to environmental and component variation.

Copyright © Shimmer 2018
Realtime Technologies Ltd ECG User Guide
All rights reserved Rev 1.12
3. Using the ECG Unit
3.1. Basic System Overview
Figure 3-1: Simplified Block Diagram
Electrodes: Each ECG board connects to RA (white), LA (black), RL (green), LL (red) and Vx
(brown) electrodes.
Defibrillation protection: Survive only; not repeat. No defibrillation protection is present for
inputs RA and LA to facilitate Respiration demodulation.
EMI Filter: Reduces electromagnetic interference; -3dB filter bandwidth is approximately
3MHz.
Right-Leg Drive Amplifier (RLD Amp): Counteracts common-mode interference (e.g. from
mains power lines, fluorescent lights and other sources).
Programmable Gain Amplifier (PGA): Increases amplitude of input signal; seven gain
settings available. See Section 4.5 to accurately calculate the gain of your device. Default
gain is configurable in software.
Analog to Digital Converters ( ADC): Converts the input analogue signals to a digital
representation of this signal by a 24-bit signed integer value to each sample. These values
are fed to the Shimmer3 processor to be saved to the SD card or transmitted over Bluetooth.

Copyright © Shimmer 2018
Realtime Technologies Ltd ECG User Guide
All rights reserved Rev 1.12
3.2. ECG Leads
In the context of electrocardiography, the word "lead" is used to refer to the signal of the voltage
difference between two electrodes (i.e. the signal produced by the ECG recorder). In order to avoid
any confusion, the wires that are used to physically connect the electrodes to the ECG Unit are
referred to throughout this document as just that - "wires".
The ECG Unit provides a four-lead ECG solution, with the following leads being measured in the
recommended configuration:
Bipolar limb leads:
oLead I (LA-RA) is the ECG vector signal measured from the RA (right arm) position to
the LA (left arm) position. This is output on the ExG1 Ch2 channel of the ECG Unit.
oLead II (LL-RA) is the ECG vector signal measured from the RA (right arm) position to
the LL (left leg) position. This is output on the ExG1 Ch1 channel of the ECG Unit.
oLead III (LL-LA) is the ECG vector signal measured from the LA (left arm) position to
the LL (left leg) position. This is derived by subtracting Lead I from Lead II.
Unipolar leads:
oVx-WCT is the ECG vector signal measured from the Wilson's Central Terminal (WCT)
voltage to the Vx position
3
. For more information on the WCT voltage, see the
description below. This is output on the ExG2 Ch2channel of the ECG Unit.
Electrode Positioning
The inputs to the ECG Unit are labelled according to the suggested placement, in order to measure
the four channels listed above:
Bipolar limb lead electrodes:
oLA Left Arm
oRA Right Arm
oLL Left Leg
oRL Right Leg
Unipolar lead electrode positions:
oVx V1, V2, V3, V4, V5or V6, on the chest
3
Any of the unipolar Vx leads (i.e. V1, V2, V3, V4, V5and V6) can be measured on the ExG2 Ch2 channel by
positioning the electrode at the Vx input with the appropriate placement on the body.
Copyright © Shimmer 2018
Realtime Technologies Ltd ECG User Guide
All rights reserved Rev 1.12
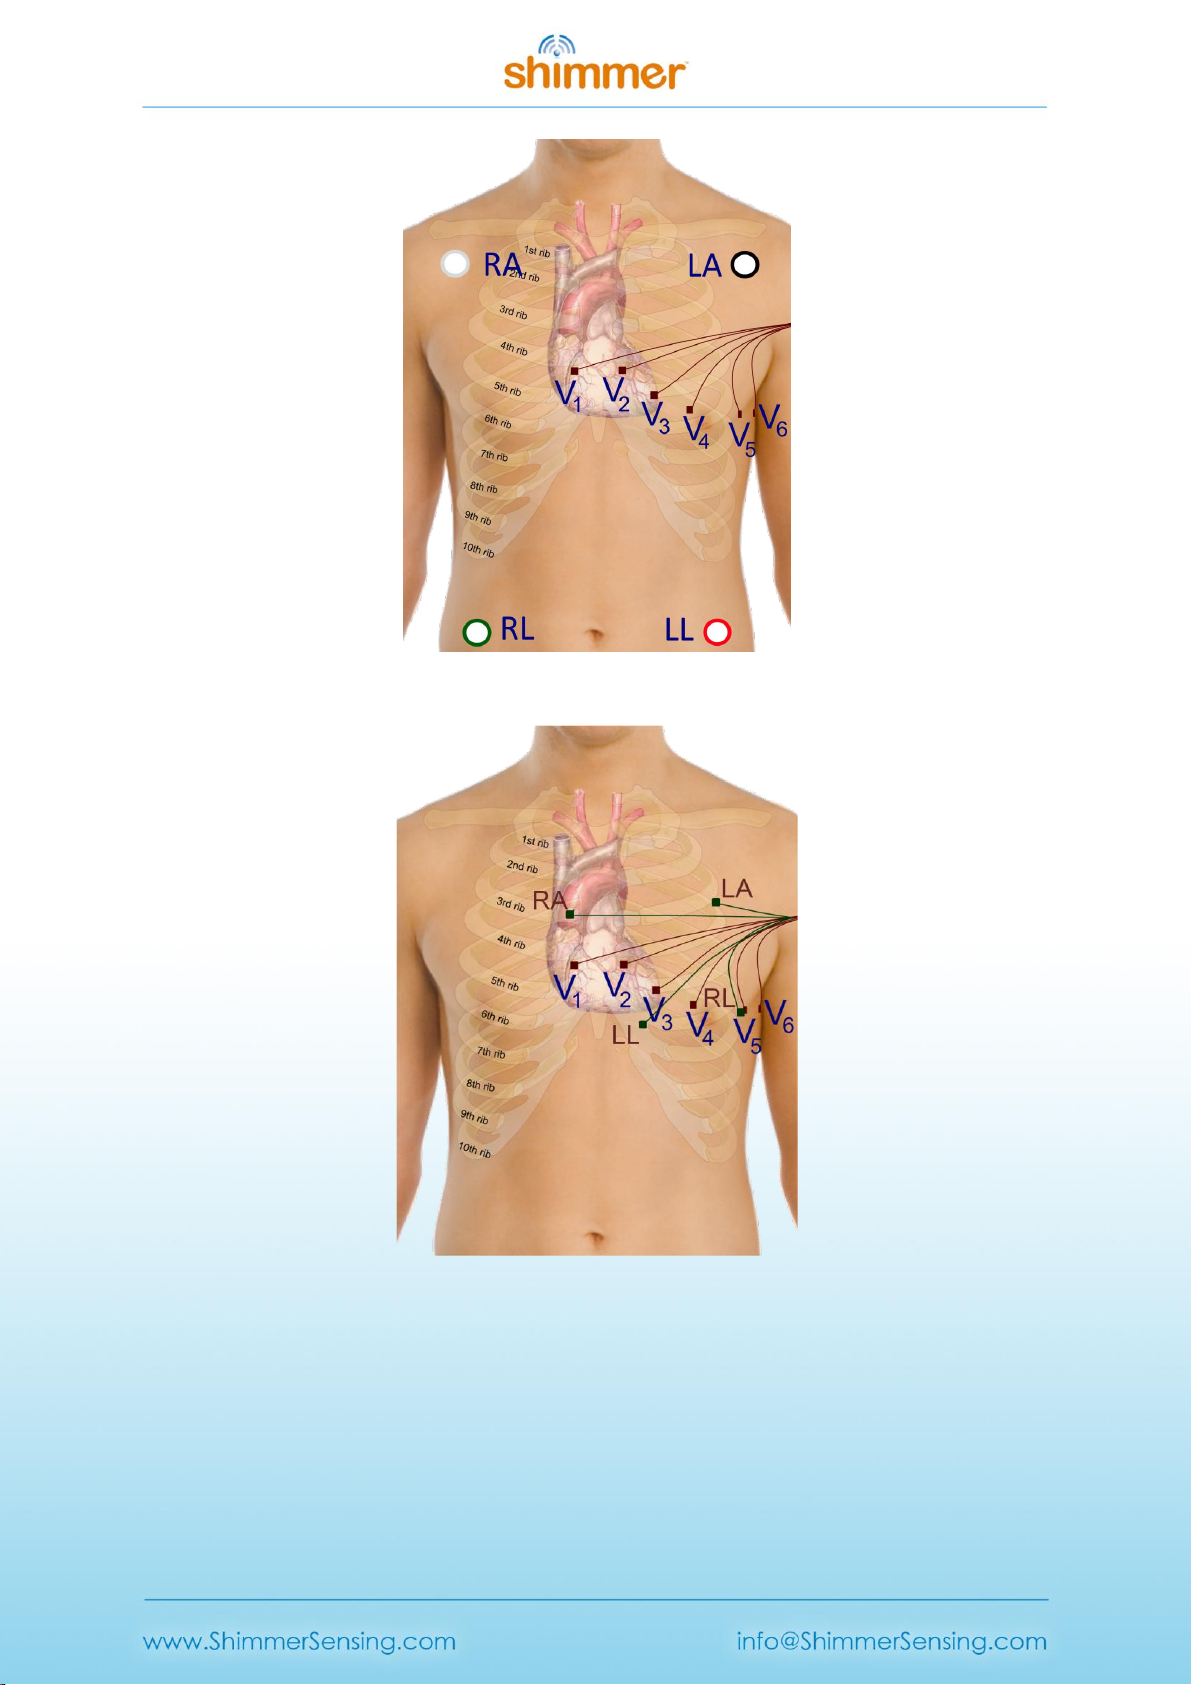
Figure 3-2 Example positioning of the electrodes for ECG measurement with 18″ leads
Figure 3-3: Example positioning of the electrodes for ECG measurement with 9” leads
Figure 3-2 shows an example of how the electrodes should be positioned on the body. The
electrodes for the bipolar limb leads (LA, RA, LL and RL) are represented by green nodes and wires,
whilst the V1, V2, V3, V4, V5and V6positions for the unipolar leads, are represented by brown nodes
and wires.
Although it is common practise to place the limb electrodes on the arms/legs, according to their
names, in reality, all of the limb electrodes can be placed on the chest. The important thing is that

Copyright © Shimmer 2018
Realtime Technologies Ltd ECG User Guide
All rights reserved Rev 1.12
each electrode should be placed on the body, away from the heart and in the direction of the joint
to the relevant limb. For example, the RA electrode can be placed anywhere on the chest as long as
it is positioned away from the heart in the direction of the right shoulder, as shown in Figure 3-3.
The reference electrode (RL) can be placed anywhere on the body as long as it is outside of the
triangle formed by the 3 other limb electrodes (i.e. RA, LA and LL). In the diagram below it is placed
at the V5position, laterally on the left side of the torso. This position allows for the highest quality
capturing of R waves. [1]
The Vx electrode can be placed at any of the positions, V1, V2, V3, V4, V5or V6, depending on the
user's requirements.
Wilson's Central Terminal
The Wilson's Central Terminal (WCT) is a voltage that represents the average potential of the body
and acts as a reference point, with respect to which the voltage difference for the unipolar leads is
measured. It is calculated by averaging the voltage measured at the RA, LA and LL electrodes.
The inverted WCT voltage is driven to the body via the RL electrode to create a negative feedback
loop in the measurement system and provide common mode interference rejection.
3.3. Configuration Options and Recommended Settings
The ECG Unit contains two ADS1292R chips from Texas Instruments; these have a very wide and
varied range of available configuration options. These chips are referred to as "Chip1" and "Chip2"
throughout this document. This section aims to provide recommended settings, which will suit the
needs of most ECG measurement applications. The experienced user who wishes to have full control
over all of the configuration settings should refer to the ADS1292R datasheet from Texas
Instruments for more details.
There are two ADS1292R chips on the ECG Unit and each of these chips has eleven bytes of
configurable register settings. Ten of these configurable bytes are listed in Table 3-1 and their
recommended values are discussed in this section. The final byte, which pertains to GPIO settings, is
dealt with in firmware and not discussed here.
Byte
Name
Bit 7
Bit 6
Bit 5
Bit 4
Bit 3
Bit 2
Bit 1
Bit 0
0
CONFIG1:
Configuration Register 1
0
0
0
0
0
Data Rate
(DR2, DR1, DR0)
1
CONFIG2:
Configuration Register 2
1
0
1
0
X4
0
INT_T
EST
TEST_F
REQ
2
LOFF:
Lead-Off Control Register
0
0
0
1
0
0
0
0
3
CH1SET:
Channel 1 Settings
0
Gain1
(G1_2, G1_1, G1_0)
MUX1
(M1_3, M1_2, M1_1, M1_0)
4
CH2SET:
Channel 2 Settings
0
Gain2
(G2_2, G2_1, G2_0)
MUX2
(M2_3, M2_2, M2_1, M2_0)
5
RLD_SENS:
Right Leg Drive Sense Selection
0
0
PDB_RL
D
RLD_LO
FF_SENS
RLD Settings
(RLD2N, RLD2P, RLD1N, RLD1P)
4
The Bit 3 in CONFIG2 denotes “X=0” for SR47-1 revision, and “X=1” for SR47-4 and greater revisions. This
feature has been configured automatically in both LogAndStream 0.11.0 and SDLog_v0.19.0 (and newer).

Copyright © Shimmer 2018
Realtime Technologies Ltd ECG User Guide
All rights reserved Rev 1.12
6
LOFF_SENS:
Lead-Off Sense Selection
0
0
0
0
0
0
0
0
7
LOFF_STAT:
Lead-Off Status Selection
0
0
0
0
0
0
0
0
8
RESP1:
Respiration Control Register 1
0
0
0
0
0
0
1
0
9
RESP2:
Respiration Control Register 2
0
0
0
0
0
0
RLDRE
F_INT
1
Table 3-1 ADS1292R configuration register bytes - recommended values
Table 3-1 lists the recommended values of the ADS1292R configuration register bytes. The values of
the individual bits are listed in the columns labelled Bit 7 (MSB), Bit 6, and so on to Bit 0 (LSB). The
recommended values of some sets of bits, like multiplexer (MUX) settings, channel gain settings and
others, differ depending on the type of signal being measured (e.g. ECG or EMG), and others, like
output data rate and test signal, depend on the user's preferences.
Data Rate
The Data Rate for each chip can be set by modifying the three LSBs of the CONFIG1 register (Byte 0).
Table 3-2 lists the valid options and their corresponding data rate value in units of samples per
second (SPS). For ECG, a data rate of 500 SPS or more is recommended, although the needs of a
given application may vary.
Data Rate (SPS)
DR2
DR1
DR0
125
0
0
0
250
0
0
1
500 (recommended)
0
1
0
1000
0
1
1
2000
1
0
0
4000
1
0
1
8000
1
1
0
DO NOT USE
1
1
1
Table 3-2 ECG Data Rate options
Gain
The Gain setting can be configured independently for each of the two data channels on each chip by
modifying bits 4 - 6 of the CH1SET byte for channel 1 and of the CH2SET byte for channel 2,
respectively. The gain bits for channel 1 of a given chip are listed as G1_2 (MSB), G1_1 and G1_0
(LSB) in Table 3-1, whilst the equivalent for channel2 of the chip are listed as G2_2, G2_1 and G2_0,
respectively. These are collectively referred to as Gx_2, Gx_1 and Gx_0, respectively, in Table 3-3,
which lists the valid options and the corresponding gain value for each. For ECG, a gain value of 4 is
recommended.
Gain
Gx_2
Gx_1
Gx_0
6 (default)
0
0
0
1
0
0
1
2
0
1
0
3
0
1
1
4 (recommended)
1
0
0

Copyright © Shimmer 2018
Realtime Technologies Ltd ECG User Guide
All rights reserved Rev 1.12
8
1
0
1
12
1
1
0
DO NOT USE
1
1
1
Table 3-3 ECG Channel Gain options
Input Multiplexer
The multiplexer (MUX) settings can be configured independently for each of the two data channels
on each chip; the MUX bits for channel 1 of a given chip are listed as MUX1_3 (MSB), MUX1_2,
MUX1_1 and MUX1_0 (LSB) in Table 3-1, whilst the equivalent for channel2 of the chip are listed as
MUX2_3, MUX2_2, MUX2_1 and MUX2_0, respectively. Table 3-4 lists the recommended MUX
configuration for each chip and channel for ECG data collection.
Chip
MUX1_3
MUX1_2
MUX1_1
MUX1_0
MUX2_3
MUX2_2
MUX2_1
MUX2_0
Chip1
0
0
0
0
0
0
0
0
Chip2
0
0
0
0
0
1
1
1
Table 3-4 Recommended MUX settings for ECG
Right-Leg Drive
The right-leg drive (RLD) settings determine the voltage that should be used at the input of the right-
leg drive amplifier for common-mode interference rejection and can be configured independently
for each chip. The RLD Settings bits for a given chip are listed as RLD2N, RLD2P, RLD1N and RLD1P in
Table 3-1. For ECG configuration, the recommended setting is to choose the Wilson's Central
Terminal voltage ((RA + LA + LL)/3) as the negative input to the RLD amplifier on Chip1 and no RLD
signal on Chip2. This can be achieved by setting the configuration listed in Table 3-5.
Chip
RLD2N
RLD2P
RLD1N
RLD1P
Chip15
1
1
0
1
Chip2
0
0
0
0
Table 3-5 Recommended RLD channel selection settings for ECG - Wilson terminal voltage.
Table 3-6 gives an alternative configuration in which, rather than using the Wilson terminal voltage,
the voltage on the RLD electrode is held at a fixed potential - in this case half of the Shimmer3 supply
voltage (approximately 1.5 V).
Chip
RLD2N
RLD2P
RLD1N
RLD1P
Chip1
0
0
0
0
Chip2
0
0
0
0
Table 3-6 Alternative RLD channel selection settings for ECG - fixed potential.
The PDB_RLD bit of the RLD_SENS byte (byte 5, bit 5) determines if the RLD buffer is powered on (1)
or not (0).
5
Note that for ECG Chip1, choosing 0111 for the RLD channel selection settings will also provide the Wilson's
Central Terminal voltage.

Copyright © Shimmer 2018
Realtime Technologies Ltd ECG User Guide
All rights reserved Rev 1.12
The RLDREF_INT bit of the RESP2 byte (byte 9, bit 1) controls the RLDREF signal source for the RLD
amplifier. If the value of the bit is 0, the reference signal is fed externally. If the value of the bit is 1,
an internally generated reference signal is generated.
For ECG data collection, the settings in Table 3-7 are recommended for PDB_RLD, RLD_LOFF_SENS
and RLDREF_INT.
Chip
PDB_RLD
RLD_LOFF_SENS
RLDREF_INT
Chip1
1
0
1
Chip2
0
0
0
Table 3-7 Recommended RLD settings for ECG
Test Signal
In order to test the ECG output channels, a test signal can be internally generated by each chip. This
signal can either be a DC voltage or a 1Hz square wave. The enable the test signal, the two LSBs of
the CONFIG2 byte (byte 1, bits 1-0) for each chip should be set as in Table 3-8. Furthermore, the
MUX1 or MUX2 bits should be set to 0000 so that the test signal will appear on channel 1 or channel
2, respectively.
Test signal
INT_TEST
TEST_FREQ
DC test signal
1
0
1 Hz square wave test signal
1
1
No test signal
0
0
Table 3-8 Test signal settings for ECG
Respiration demodulation
The ADS1292R from Texas Instruments includes logic for respiration demodulation from ECG signals.
Support for this advanced functionality can be obtained by contacting the Shimmer support team via
www.shimmersensing.com. In the meantime, interested users may refer to the ADS1292R datasheet
for more details.
Lead-off detection configuration
The ADS1292R from Texas Instruments provides the ability to detect if an electrode has be
disconnected from the body. This is implemented inside the chip by enabling a constant DC current
source and sink on each pair of bipolar inputs. Once enabled, when one of the electrodes is
disconnected from the body, the voltage at that electrode will be pulled high or low - this will be
apparent on the measured voltage signal.
Note: due to the nature of the measurement method, by enabling lead-off detection the
measurement system will be more susceptible to thermal noise and a small DC voltage
offset is introduced into the ECG signal measurements.
To enable lead-off detection, the following changes to the recommended ECG configuration bytes
should be made.

Copyright © Shimmer 2018
Realtime Technologies Ltd ECG User Guide
All rights reserved Rev 1.12
Chip - Byte
Mask (hex)
Mode
DC Current
Byte Value (hex)
Off
Byte Value (hex)
Source
Chip 1 - Byte 2
Chip 2 - Byte 2
0x01
0x00 (DC Current)
N/A
General comparators
(Enable/disable)
Chip 1 - Byte 1
Chip 2 - Byte 1
0x40
0x40 (On)
0x00 (Off)
Comparators on
each input
Chip 1 - Byte 6
0x0F
0x07 (2P, 1N, 1P)
0x00 (Off)
Chip 2 - Byte 6
0x0F
0x04 (2P)
0x00 (Off)
RLD sense
Chip 1 - Byte 5
0x10
0x10 (On)
0x00 (Off)
Table 3-9 The changes required to the recommended ECG configuration bytes in order to enable lead-
off detection.
The level of DC current used for lead-off detection can be set by changing configuration bytes as
shown in Table 3-10. From lab testing we have found 22nA to be a suitable level for lead-off
detection.
Chip 1 - Byte 2 and Chip 2 Byte 2
Current
Mask (hex)
Byte Value (hex)
Byte Value (dec)
6nA
0x0C
0x00
0
22nA
0x0C
0x04
4
6uA
0x0C
0x08
8
22uA
0x0C
0x0C
12
Table 3-10 The available options for setting the level of current used lead-off detection.
The ADS1292R has built-in voltage comparators that are connected to each of the electrode inputs
and can be enabled or disabled in the configuration bytes - see Table 3-9. The voltage threshold at
which these comparators are triggered - given as a percentage of the supply voltage - can be
configured as shown in Table 3-10 below. From lab testing we have found a comparator threshold of
"Pos:90% - Neg:10%" to be a suitable level for lead-off detection.
Chip 1 - Byte 2 and Chip 1 Byte 2
Comparator threshold
Mask (hex)
Byte Value (hex)
Byte Value (dec)
Pos:95% - Neg:5%
0xE0
0x00
0
Pos:92.5% - Neg:7.5%
0xE0
0x20
32
Pos:90% - Neg:10%
0xE0
0x40
64
Pos:87.5% - Neg:12.5%
0xE0
0x60
96
Pos:85% - Neg:15%
0xE0
0x80
128
Pos:80% - Neg:20%
0xE0
0xA0
160
Pos:75% - Neg:25%
0xE0
0xC0
192
Pos:70% - Neg:30%
0xE0
0xE0
224
Table 3-11 The available options for setting the lead-off comparator thresholds.
The outputs of the voltage comparators are stored in the status byte channel from each chip where
a '0' represents a connected electrode and a '1' indicates a disconnected electrode.

Copyright © Shimmer 2018
Realtime Technologies Ltd ECG User Guide
All rights reserved Rev 1.12
ECG electrode
Chip input
Lead-Off Status Byte
LA
Chip 1 - 2P
Chip 1 - Bit2
RA
Chip 1 - 1N
Chip 1 - Bit3
LL
Chip 1 - 1P
Chip 1 - Bit0
Vx
Chip 2 - 2P
Chip 2 - Bit2
RLD
Chip 1 - RL
Chip 1 - Bit4
Table 3-12 The relevant bits in each of the status bytes that represent the lead-off status of each of
the electrodes for ECG mode.
4. Measuring ECG Signals
4.1. Best Practice on How to Acquire a High Quality ECG signal
Skin Preparation
Skin preparation is not essential for ECG measurements; however, ensuring a good electrode to skin
contact improves signal quality and minimises the likelihood of signal interference from electrodes
falling off or sporadic contact caused by hairs or dirt particles. As such, if an improved signal quality
is required, any hairs at the contact point can be shaved off and the skin should be cleaned with
alcohol or sanitizer to remove oils and sweat which can interfere with the signal [2].
Sampling Frequency
Although the choice of sampling frequency is entirely up to the user, a sampling rate of 512Hz is
recommended for clinical grade ECG data acquisition. Lower rates can be used for ambulatory ECG
measurements [3].
Wires
Because ECG signals have a very low voltage, it is recommended that the minimum feasible wire
length is used to minimise signal interference. Simply put, the shorter the wire, the less interference
will be experienced in the signal. Interference can come from motion artifact, mains interference
(50/60Hz) and other wireless signals and becomes much more significant with longer wires. Should
you require longer wires for your application, it is likely you will require mains notch filtering (as
described below).
Wires can also be secured to reduce noise from motion artefact and eliminate the possibility of them
pulling on electrodes which can cause them to fall off and reduce electrode to skin contact quality.
Filtering
Mains Notch Filtering
If your signal is experiencing interference from mains electricity, a software band-stop filter should
be applied. Eliminate the 50Hz frequency in most parts of the world or 60Hz frequency in the
Americas. The APIs and Instrument Drivers, provided by Shimmer for development of software in
Java/Android, LabVIEW, Matlab and C#, include the implementation of optional mains filtering in the
example code.
Copyright © Shimmer 2018
Realtime Technologies Ltd ECG User Guide
All rights reserved Rev 1.12
High Pass Filtering
In order to eliminate low frequency components of the signal, high pass filtering is recommended. A
cut-off frequency of 0.05 Hz is recommended for diagnostic ECG, whilst a cut-off frequency of 0.5 Hz
is suitable for longer term ECG monitoring. Care should be taken in the design of filters and it should
be remembered that the filters may impose the requirement for a settling time after data collection
starts. The APIs and Instrument Drivers, provided by Shimmer for development of software in
Java/Android, LabVIEW, Matlab and C#, include the implementation of optional high pass filtering in
the example code.
4.2. Basic ECG Waveform Features
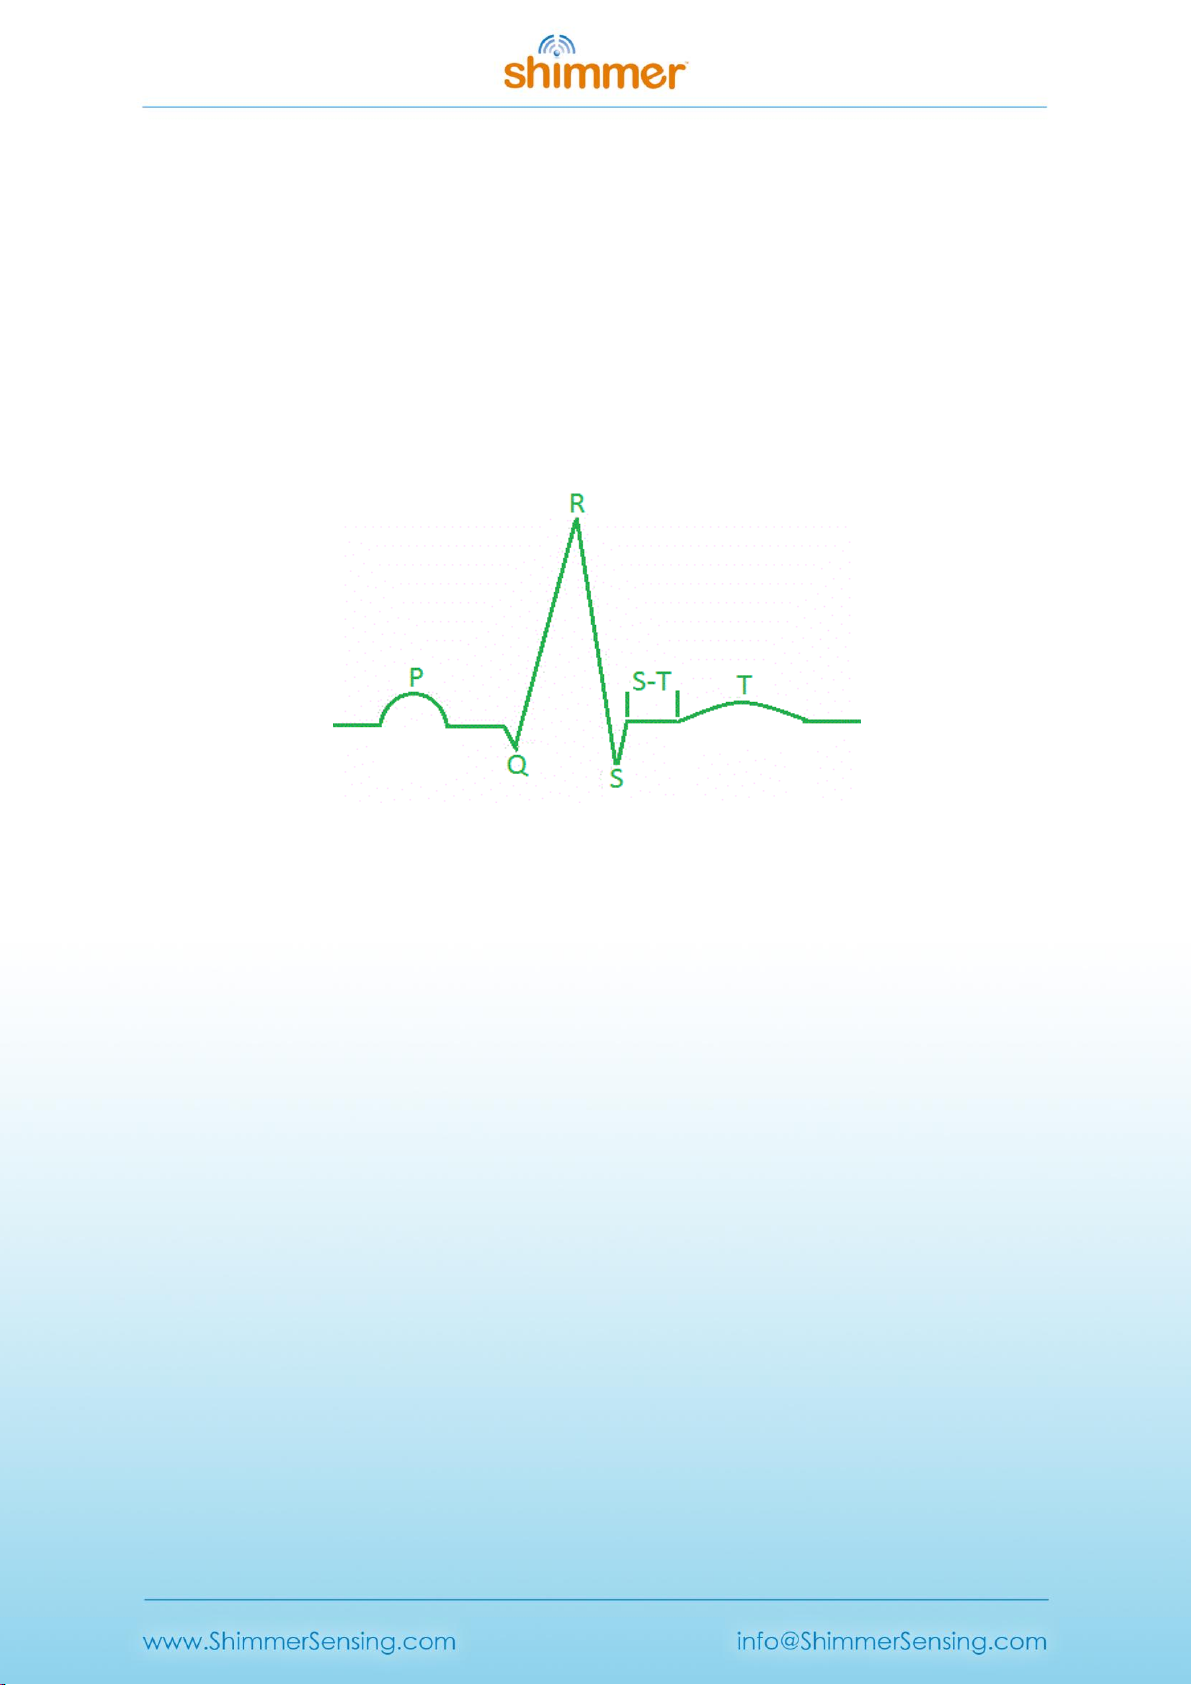
Figure 4-1: ECG Waveform of one heart beat.
Baseline: No overall depolarization or repolarization.
P Wave: Atrial depolarization.
Duration = 80-100ms.
PR Segment: AV nodal delay.
Duration = 120-200ms.
QRS Complex: Ventricular depolarization (atria repolarizing simultaneously).
Duration = 80-120ms.
ST Segment: Time during which ventricles are contracting and emptying.
Duration =70-80ms.
T Wave: Ventricular repolarization. Duration ≈200ms.
TP Interval: Time during which the ventricles are relaxing and filling. [4]
4.3. How to Determine the Heart Rate from ECG
It is a simple process to calculate heart rate (HR) in beats per minute (BPM) from the
electrocardiogram using the R waves (which are part of the QRS complex described above).
Shimmer’s proprietary software, ConsensysPRO implements an ECG-to-HR algorithm to give users’
access to HR from their Shimmer ECG, see Figure 4-2 for reference.
First, make a note of the sampling rate in Hz (Fs) of the signal. Then, note the sample number of the
first R wave detected (S1) and the sample number of the last R wave detected (S2). Count the total
number R waves (NR) between S1and S2, including the waves at both S1and S2.

Copyright © Shimmer 2018
Realtime Technologies Ltd ECG User Guide
All rights reserved Rev 1.12
The HR in BMP is then given by the following equation:
HR (BPM) = 60*( NR–1)/(( S2–S1)/ Fs)
Example HR Calculation
Figure 4-2 shows an example ECG signal with two distinct R waves and the following parameters:
NR= 2, S2 = 843, S1 = 331, Fs= 512 Hz.
HR = 60*(2-1)/((843-331)/512) = 60 BPM.
Figure 4-2: Diagram of ECG signal captured with ‘Multi-Shimmer Sync’ for HR calculation example.
Figure 4-3: Diagram of ECG signal and derived HR signal using ConsensysPRO software

Copyright © Shimmer 2018
Realtime Technologies Ltd ECG User Guide
All rights reserved Rev 1.12
Overview of Popular QRS Detection Methods
The following are examples of some of the most commonly used QRS detection algorithms. QRS
detection algorithms are the foundation of ECG signal analysis and can be used to estimate heart
rate, as shown above, among many other things. QRS detection algorithms started being developed
about 40 years ago and now come in many forms. Those outlined below are intended to aid the user
in getting started with investigating the topic and to direct them towards some of the appropriate
literature on the subject.
Köhler et al. completed a comprehensive overview of many different techniques of software QRS
detection; their paper serves as a good introduction to the subject matter [5].
Please note that free software solutions for QRS detection analysis are not currently provided by
Shimmer and the information below is intended as a starting point for the new user to aid their
software development. Should you require a ‘pre-packed’ software solution, please contact the
Shimmer team to discuss it further (www.shimmersensing.com).
(i) The Pan-Tompkins Algorithm [6]
This is the most widely known real-time QRS detection algorithm. The method combines
filtering, differentiator, squaring and integrator processes to detect each QRS complex. The
method was developed in 1985 and is very reliable; it is no longer the state-of-the art in QRS
detection but is suitable for many applications. M. Lascu and D. Lascu have published a very
useful paper about implementing the algorithm in LabVIEW [7]. Portet et al. [8], among others
[2, 6], have comparatively evaluated the algorithm.
(ii) Wavelet Analysis Algorithms
Wavelet Analysis Algorithms are an increasingly popular option for QRS detection. There are
multiple methods involving wavelet analysis, e.g. a multi-stage method which has shown higher
sensitivity (99.93%) than the Pan-Tompkins algorithm (99.75%) [9] and the method used by
Zidelmal et al. [10] involving wavelet coefficient analysis which has shown an increased positive
predictivity (99.82%) in comparison to the Pan-Tompkins algorithm (99.54%). There can be
advantages to wavelet analysis algorithms but they are more complex and less widely
documented than the Pan-Tompkins algorithm so may require more time and expertise to
implement.
(iii) Cross-Correlation Algorithms
Cross-correlation (C-C) algorithms and multi-stage cross-correlation methods are also popular
QRS detection techniques. Multi-stage C-C algorithms are particularly useful for applications
where the P and T waves (see Figure 4-1) are required to be detected in addition to the QRS
complex. Last et al. [11] showed that, by including templates for each wave component, it is
possible to record precise timings of each stage of the cardiac cycle. In summary, cross-
correlation algorithms, in particular, multi-component based ones, allow for a high level of detail
in analysis but require more computing power than simple algorithms like Pan-Tompkins and are
not always suitable for real-time analysis.

Copyright © Shimmer 2018
Realtime Technologies Ltd ECG User Guide
All rights reserved Rev 1.12
(iv) Others
Many other approaches exist in order to detect the QRS complex. These can be found by a
literature search with keywords, such as ‘Neural Network Approaches’, ‘Adaptive Filters’,
‘Hidden Markov Models’, ‘Mathematical Morphology’, ‘Hilbert Transform based QRS detection’
and ‘Length and Energy Transforms’. Before selecting the methodology you wish to use, it is
highly recommended that you consider the accuracy your data requires and the amount of
computer processing you can facilitate.
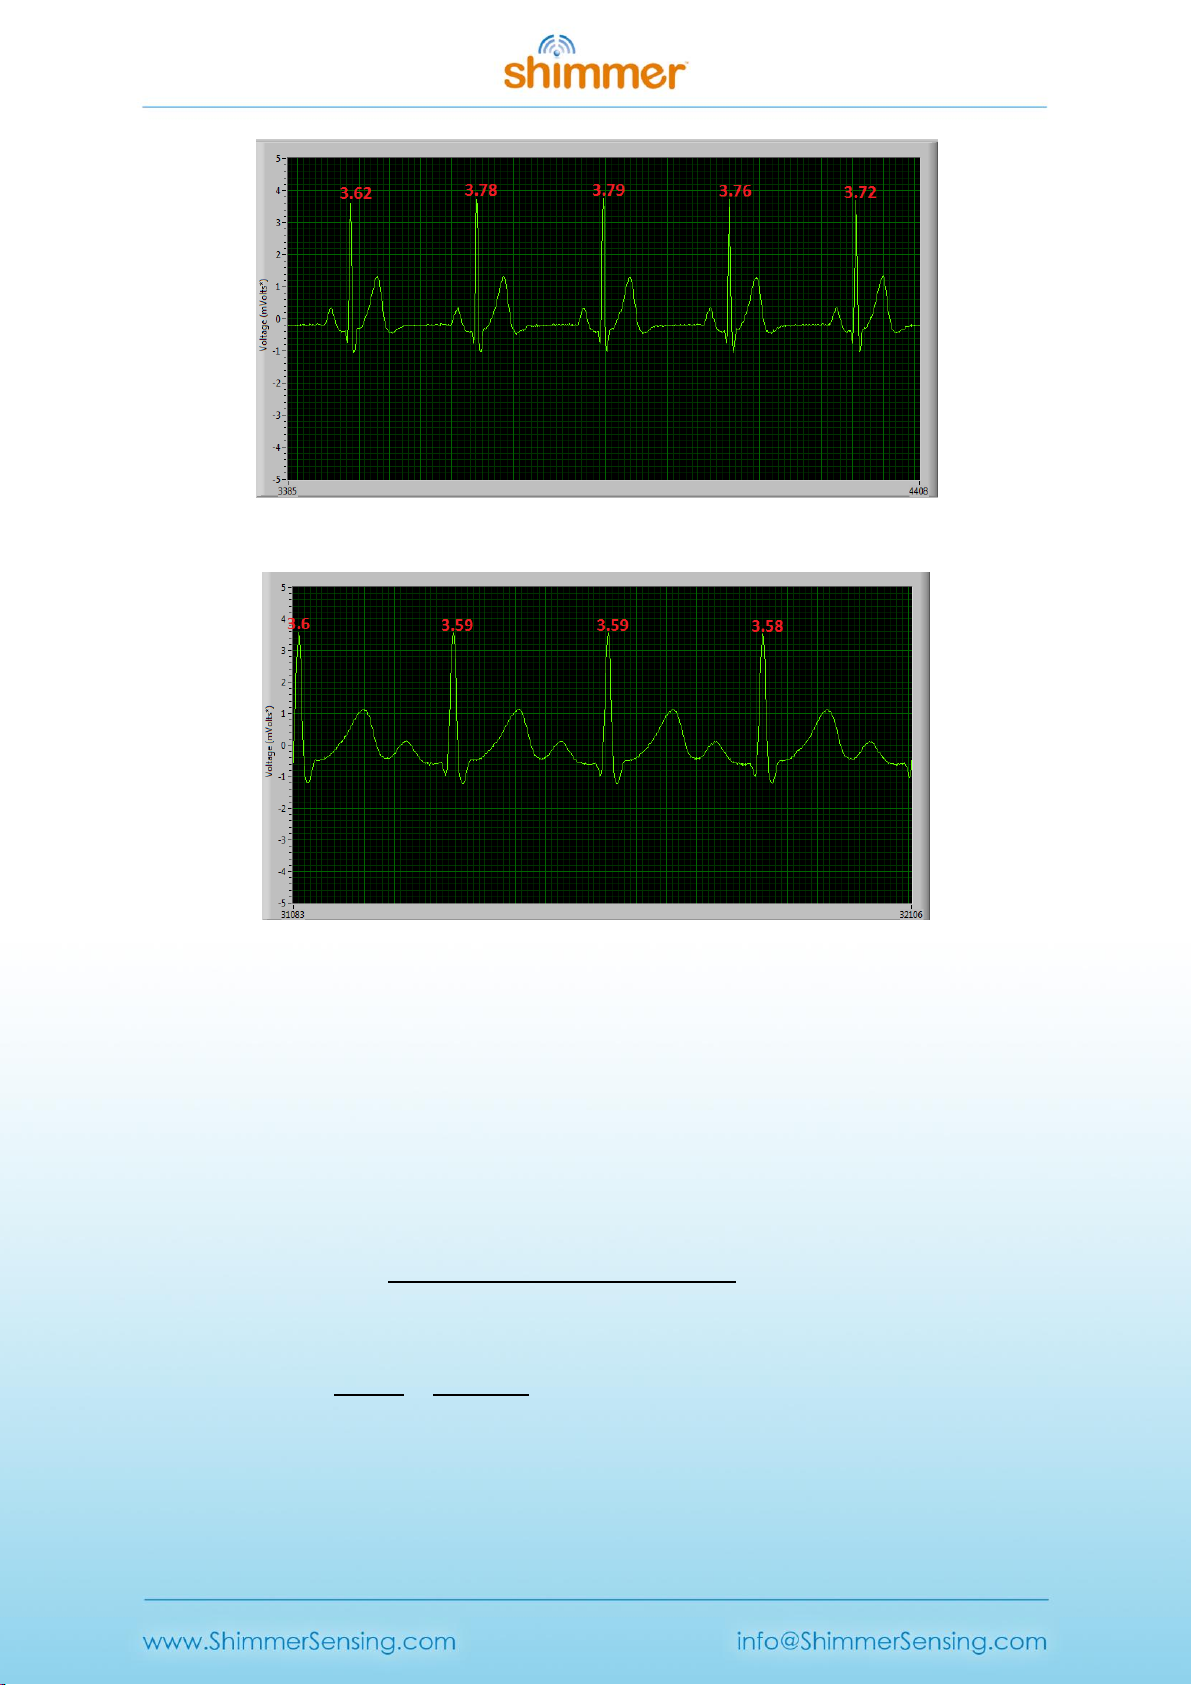
4.4. Aliasing Error and Sampling Rate
At low sampling rates, ECG signal quality is significantly reduced. One effect of this is R wave height
variation. Figure 4-3, Figure 4-4 and Figure 4-5 below show a 30 BPM ECG recording at 102.4Hz, a 60
BPM recording at 204.8Hz and an 120 BPM recording at 512Hz respectively. It is noticeable that the
variation in R wave height variation is minimised with increased sampling frequency. Whilst the
512Hz sampling rate allows for clinical grade signal recordings it may not be necessary for your
application. If a lower sampling rate is used less data is stored saving memory space and computer
usage, a higher sampling rate provides a much better replication of the real ECG signal but increases
computer usage and memory used.
Figure 4-3: 30 BPM ECG signal sampled at 102.4Hz, showing high R wave height variation.
Copyright © Shimmer 2018
Realtime Technologies Ltd ECG User Guide
All rights reserved Rev 1.12
Figure 4-4: 60 BPM ECG signal sampled at 204.8Hz, showing reduced R wave height variation.
Figure 4-5: 120 BPM ECG signal sampled at 512Hz, showing minimal R wave height variation.
4.5. Signal Calibration
The ADC output for each channel from the ECG Unit has a signed 24bit digital format. The
relationship between the ADC output and the ECG Signal in mVolts is given by the formula:
Equation 1
In order to convert the ADC output signal to mVolts which is the standard unit for an ECG signal, the
above formula can be rearranged as follows:
, Equation 2
where
. Equation 3
Considering that the ADC sensitivity is known and that the ADC Output is measured from the
Shimmer, in order to calculate the ECG signal in mVolts, the values for the Gain and ADC Offset must
simply be inserted into Equation 2.
Other manuals for 3
4
Table of contents
Other Shimmer Medical Equipment manuals


Popular Medical Equipment manuals by other brands


Getinge
Getinge Arjohuntleigh Nimbus 3 Professional Instructions for use

Mettler Electronics
Mettler Electronics Sonicator 730 Maintenance manual

Pressalit Care
Pressalit Care R1100 Mounting instruction

Denas MS
Denas MS DENAS-T operating manual

bort medical
bort medical ActiveColor quick guide

AccuVein
AccuVein AV400 user manual


