Sealey IRC153.V5 User manual

INFRARED CABINET HEATER 1.5/3KW 230V
MODEL NO: IRC153.V5
Thank you for purchasing a Sealey product. Manufactured to a high standard, this product will, if used according to these
instructions, and properly maintained, give you years of trouble free performance.
IMPORTANT: PLEASE READ THESE INSTRUCTIONS CAREFULLY. NOTE THE SAFE OPERATIONAL REQUIREMENTS, WARNINGS & CAUTIONS. USE
THE PRODUCT CORRECTLY AND WITH CARE FOR THE PURPOSE FOR WHICH IT IS INTENDED. FAILURE TO DO SO MAY CAUSE DAMAGE AND/OR
PERSONAL INJURY AND WILL INVALIDATE THE WARRANTY. KEEP THESE INSTRUCTIONS SAFE FOR FUTURE USE.
1. SAFETY
This product is not suitable for primary heating purposes. This product is only suitable for well insulated spaces or
occasional use.
1.1. ELECTRICAL SAFETY
WARNING! It is the user’s responsibility to check the following:
9Check all electrical equipment and appliances to ensure that they are safe before using. Inspect power supply leads, plugs and
all electrical connections for wear and damage. Sealey recommend that an RCD (Residual Current Device) is used with all electrical
products. You may obtain an RCD by contacting your local Sealey dealer. If the heater is used in the course of business duties, it
must be maintained in a safe condition and routinely PAT (Portable Appliance Test) tested.
Electrical safety information, it is important that the following information is read and understood.
9Ensure that the insulation on all cables and on the appliance is safe before connecting it to the power supply.
Regularly inspect power supply cables and plugs for wear or damage and check all connections to ensure that they are secure.
9Ensure that the voltage rating on the appliance suits the power supply to be used.
8DO NOT pull or carry the appliance by the power cable.
8DO NOT pull the plug from the socket by the cable.
8DO NOT use worn or damaged cables, plugs or connectors. Ensure that any faulty item is
repairedorreplacedimmediatelybyaqualiedelectrician.
9 ThisproductshouldbettedwithaBS EN 60309 (230volt 16amp) plug (not supplied).
9If the cable or plug is damaged during use, switch the electricity supply and remove from use.
9Replace a damaged plug with a BS EN 60309 (230volt 16amp) plug If in doubt contact a
9 qualiedelectrician.
a) Connect the GREEN/YELLOW earth wire to the earth terminal ‘E’.
b) Connect the BROWN live wire to the live terminal ‘L’.
c) Connect the BLUE neutral wire to the neutral terminal ‘N’.
9Ensure cable outer sheath extends inside the cable restraint and that the restraint is tight.
Sealeyrecommendthatrepairsarecarriedoutbyaqualiedelectrician.G
1.2. GENERAL SAFETY.
WARNING! Disconnect the heater from the mains power supply before carrying out any servicing or maintenance.
9Maintain the heater in good order and clean condition for best and safest performance. Replace or repair damaged parts.
9Locate heater in a suitable work area and keep area clean, tidy and free from unrelated materials. Ensure there is adequate
lighting and keep the immediate area in front of the outlet grille clear.
9Allow the unit to cool before storage. When not in use, disconnect from the mains power supply and store in a safe, cool, dry,
childproof area.
9Only use the heater standing in the upright position on a level surface.
8DO NOT use the heater where there are flammable liquids, solids or gases such as petrol, solvents, aerosols etc, or where heat
sensitive materials may be stored.
8DO NOT place the heater near items that may be damaged by heat, allow at least 2mtr clearance in front of the heater.
8DO NOT allow the heater to get wet as this may cause an electric shock, causing damage to the heater and possible personal
injury.
8DO NOT let power lead hang over an edge (i.e. table), or touch a hot surface, lie in the beam of heat, or run under a carpet.
8DO NOT use in bathroom, shower room, or in any wet or damp environments or where there is high condensation.
8DO NOT operate the heater when you are tired or under the influence of alcohol, drugs or intoxicating medication.
8DO NOT insert or allow objects to enter any openings of heater as this may cause an electric shock, fire or damage to heater.
8DO NOT use heater if the power cord, plug or the heater is damaged, or if the heater has become wet.
8DO NOT use the heater for any purpose other than for which it is designed.
8DO NOT use a timer or other remote device to operate the heater.
8DO NOT touch the lamps, even when cold.
8DO NOT use the heater without the wheels fitted and locked.
8DO NOT allow children to touch or to operate the heater.
8DO NOT site the heater below an electrical socket outlet.
Original Language Version
© Jack Sealey Limited
Refer to
Instruction
Manual
Hot surfaces Warning
electricity
Brown
(L)
Yellow/
Green
(E)
Cable
restraint
Blue(N)
IRC153.V5 | Issue 4 (1) 08/06/20
NOTE:
Plug NOT
supplied
Do not cover Indoor use only

8DO NOT use the heater without the grille fitted.
8DO NOT use the heater out of doors. These heaters are designed for indoor use only.
8DO NOT cover heater when in use, and do not obstruct the air inlet and outlet grilles.
8DO NOT place heater too close to yourself or any object, allow the air to circulate freely.
8DO NOT touch the outlet grille of the heater during and immediately after use as it will be hot.
9Children of less than 3 years should be kept away unless continuously supervised.
9Children aged from 3 years and less than 8 years shall only switch on/off the appliance provided that it has been placed or installed in
its intended normal operating position and they have been given supervision or instruction concerning the use of the appliance in a safe
way and understand the hazards involved. Children aged from 3 years to less than 8 shall not plug in, regulate and clean the appliance or
perform user maintenance.
This appliance can be used by children aged from 8 years and above and persons with physical, sensory or mental capabilities or lack
of experience and knowledge if they have been given supervision or instruction concerning the use of the appliance in a safe way and
understand the hazards involved. Children shall not play with the appliance. Cleaning and user maintenance shall not be made by
children without supervision.
2. INTRODUCTION P
Powder coated metal cabinet with two ruby halogen infrared elements and chemically polished reflectors for maximum heat emission. Controllable
power output by rocker switches on the side of the cabinet. Features easy-rolling castors (two locking). Suitable for a wide range of heating
including restorative applications. Supplied with power cable only.
3. SPECIFICATION
Model No...............................................................IRC153.V5
Power output (2 heat settings) ...................... 1500/3000 Watt
Size WxDxH................................................560x490x885mm
Supply.....................................................................230V-16A
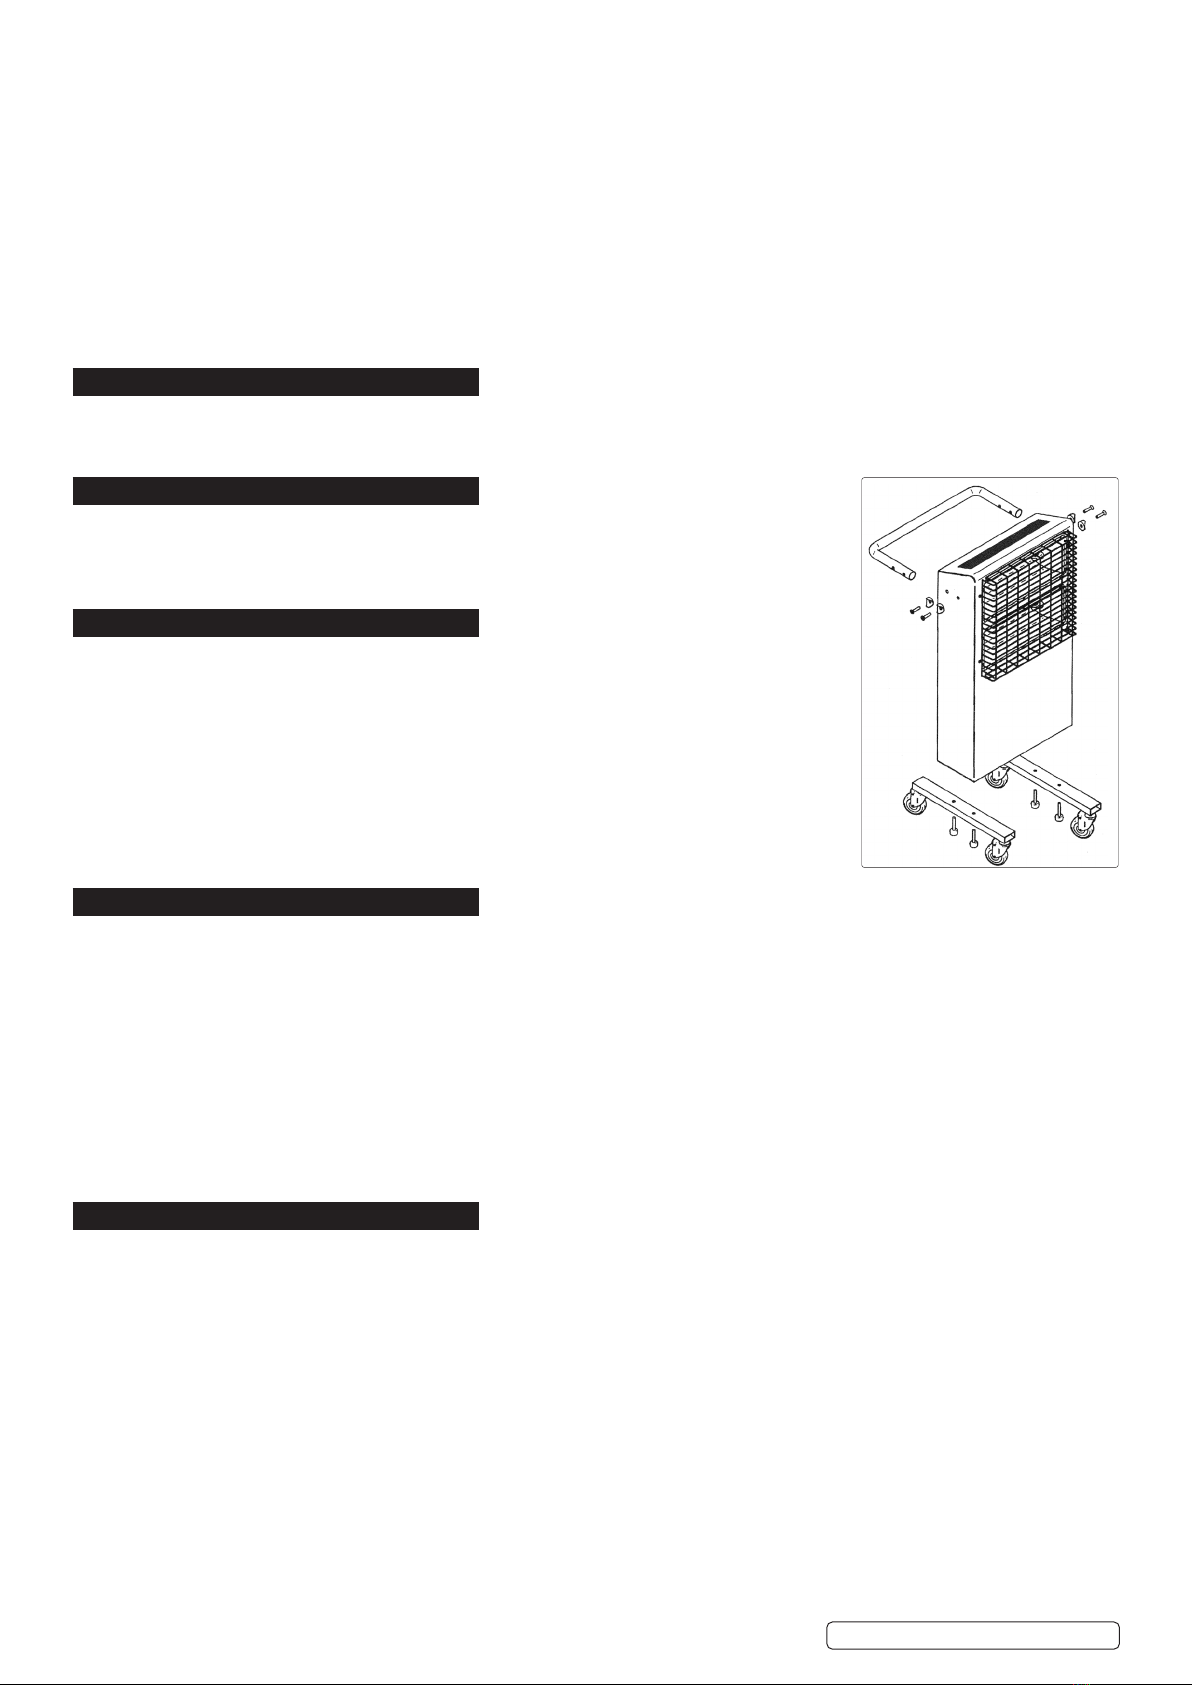
4. ASSEMBLY
4.1. Attach the wheel sub-assemblies to the base of the heater using the bolts provided. Ensure the
lockable wheels are to the rear of the heater.
4.2. Attach the handle to the top of the heater using the bolts provided, ensuring the shaped spacers
are fitted between the heater and the handle as shown.
4.3. Remove the front grille by unscrewing the retaining screws.
4.4. Extract the lamps from the shipping carton.
WARNING! Never touch lamp glass directly with fingers, only touch the ceramic ends or use a soft
cloth, otherwise elements could be damaged.
4.5. Carefully insert each lamp into the two push-in side fittings with a gentle pressure.
4.6. Check the lamps are properly located.
4.7. Reassemble front grille.
5. HEATER OPERATION
5.1. Place the heater on a level floor in the area you require to heat. Allow a minimum of 2mtr between the heater and adjacent objects.
5.2. Plug the heater into the mains supply and select the required output by using the two rocker switches on the side which switch the
elements on and off. Each lamp has an output of 1500W.
5.3. To switch the unit off, select “0” on both the rocker switches and unplug from the mains. Allow the unit to cool before handling or storage.
WARNING! DO NOT touch the top of the heater when in use as it becomes hot.
WARNING! Always allow elements to cool before moving the units. Use only on a smooth even surface. Failure to do so will cause premature
wear to the lamps and reduce their working life.
5.4. The heater has a built in tilt switch safety mechanism that switches off the unit if it is tilted beyond 25° either forwards or backwards.
This prevents fire in the event of the unit being knocked over. If the unit does not turn on again when returned to the vertical, tip it
approximately 25° in the opposite direction until you hear the internal switch operate. As the heater switches on return it to the vertical
position.
WARNING! This heater is not equipped with a device to control the room temperature. DO NOT use this heater in small rooms when they
are occupied by persons not capable of leaving the room on their own, unless constant supervision is provided.
6. MAINTENANCE
WARNING! Before attempting any maintenance ensure the unit is unplugged from the mains power supply, it is cool and on level
ground.
8DO NOT touch the element glass, even when cold.
8DO NOTusetheheaterwithoutthegrillstted.
6.1. Tocleanthereector,removethefrontgrillbyunscrewingtheretainingscrewsandwipethereectorwithacleandrycloth.DO NOT
useabrasivesorsolvents.Thesurfaceofthereectorisverysoftandscratchesmaycauseittooverheat.Replacethegrille.
6.2. To change the element remove the front grille by unscrewing the retaining screws.
6.2.1. Ease the sprung sockets on the ends of the element back and pull the element forward so that it clears the socket, remove element.
WARNING! Never touch element glass directly with fingers, only touch the ceramic ends or use a soft cloth, to prevent damage.
6.2.2. Carefully insert the replacement lamp into the two push in side fittings with gentle pressure.
6.2.3. Check the element is properly located, then replace front grill.
Original Language Version
© Jack Sealey Limited IRC153.V5 | Issue 4 (1) 08/06/20

Note: It is our policy to continually improve products and as such we reserve the right to alter data, specifications and component parts without prior
notice.
Important: No Liability is accepted for incorrect use of this product.
Warranty: Guarantee is 12 months from purchase date, proof of which is required for any claim.
Sealey Group, Kempson Way, Suffolk Business Park, Bury St Edmunds, Suffolk. IP32 7AR
01284 757500 01284 703534 sales@sealey.co.uk www.sealey.co.uk
WEEE REGULATIONS
Dispose of this product at the end of its working life in compliance with the EU Directive on Waste Electrical and Electronic Equipment
(WEEE). When the product is no longer required, it must be disposed of in an environmentally protective way. Contact your local solid
waste authority for recycling information.
ENVIRONMENT PROTECTION
Recycle unwanted materials instead of disposing of them as waste. All tools, accessories and packaging should be sorted, taken to
a recycling centre and disposed of in a manner which is compatible with the environment. When the product becomes completely
unserviceable and requires disposal, drain any fluids (if applicable) into approved containers and dispose of the product and fluids
according to local regulations.
Original Language Version
© Jack Sealey Limited IRC153.V5 | Issue 4 (1) 08/06/20
This manual suits for next models
1
Table of contents
Other Sealey Heater manuals

Sealey
Sealey CD2013TT.V3 User manual

Sealey
Sealey IWMH1809R User manual

Sealey
Sealey IRH2200W User manual

Sealey
Sealey PEH5001 User manual

Sealey
Sealey IWMH2000R User manual

Sealey
Sealey RD1500.V6 User manual

Sealey
Sealey IR14 User manual

Sealey
Sealey PEH3001 User manual

Sealey
Sealey IR37.V4 User manual

Sealey
Sealey AB1008.V3 User manual

Sealey
Sealey RD1500.V6 User manual

Sealey
Sealey RD1500 User manual

Sealey
Sealey CD2005T.V2 User manual

Sealey
Sealey CH2013.V2 User manual

Sealey
Sealey IWMH2003 User manual

Sealey
Sealey EH2001 User manual

Sealey
Sealey AB100E User manual

Sealey
Sealey CD2005TT User manual

Sealey
Sealey LP35 User manual

Sealey
Sealey CD2013.V2 User manual