Sibata LV-250R User manual

OPERATION MANUAL
CODE 080040-710
Thank you for purchasing this product.
This operation manual describes precautions that are important for preventing accidents as well as the
procedures used to handle the product.
To ensure safety, read this operation manual and the attached warranty thoroughly before use, and
use the product correctly.
After reading this operation manual and the warranty, keep them in a safe place where they can be
referred to at any time.
PM2.5 Sampler
L
V
-250R

Contents
Before Use·······································································································1
Safety Precautions ····························································································2
Product Overview······························································································5
Features··········································································································5
Names of Parts·································································································6
Main Unit ······································································································6
Main Unit Interior····························································································7
Control Panel ································································································8
Instructions for Use····························································································9
Installation Procedure ·····················································································9
Wiring Procedure ························································································· 10
Installing and Cleaning the PM10 Impactor ······················································· 11
Removing the Filter holder support and PM2.5 Impactor ····································· 14
Replacing the PM2.5 Impactor········································································ 15
Replacing the Filter Holder············································································· 16
Attaching the Filter holder support and PM2.5 Impactor······································· 17
Plug Valve ·································································································· 18
Airtight Test ································································································· 18
How to Operate the Control Panel··································································· 19
How to View the LCD···················································································· 20
Sampling Method (Basic Operations)·································································· 21
Suction Flow Rate Setting·············································································· 21
Timer Selection···························································································· 22
Sampling Start Time Setting (ON Timer) ··························································· 23
Sampling Stop Time Setting (OFF Timer)·························································· 24
Starting Sampling ························································································· 25
Operation Methods·························································································· 26
Overview of Screen Display ··········································································· 26
Before Sampling ·························································································· 28
Sampling Start Stanby··················································································· 43
During Sampling ·························································································· 44
After Sampling is Stopped·············································································· 48
Power Failure Processing ·············································································· 50
Fault Stop Function······················································································· 52
Maintenance ·································································································· 53
Troubleshooting ······························································································ 54
Main Specifications·························································································· 55
Options and Consumables················································································ 56
Warranty and Repair························································································ 57
Disposal of the Product ···················································································· 58
Inquiries········································································································· 58
Trouble Notification Sheet ················································································· 59

-1-
Check the contents of the package before using the product.
Before Use
Be sure to read this operation manual thoroughly before
using the product, and be sure to use the product
correctly.
Keep this operation manual in a safe place where it can be
referred to at any time.
Be sure to familiarize yourself with and observe the safety
precautions given in this operation manual.
Observe usage procedures that are suitable for the product
and that are specified in this operation manual.
Be sure to observe the above instructions.
Not following these instructions may result in an accident or injury.
About This Operation Manual
In the interests of product improvement, the contents of this operation manual may be
changed without notice.
Every effort has been made to ensure that the information contained in this operation
manual is correct. If you discover any errors or omissions, however, please contact your
Sibata representative.
The copyright of this operation manual belongs to Sibata Scientific Technology Ltd.
The reproduction of all or part of this operation manual without prior written permission
from Sibata Scientific Technology Ltd. is prohibited.
Checking the Package
●PM2.5 Sampler unit ···································· 1
●Filter holder··············································· 1
●PM10 Impactor ···········································1
●PM2.5 Impactor ·········································· 1
●Spare fuse 2A ············································1
●Operation manual (this document) ··············· 1

-2-
Safety Precautions
The precautionary information that appears in this operation manual is for ensuring that the
product is used safely and for preventing injury to you and other people and damage to
equipment. It is all important for ensuring safety and so be sure to read it thoroughly before using
the product and observe it during use.
Users (Important)
This product must be operated only by persons with adequate specialist skills, training, and
experience to understand the potential dangers of operating the product. Persons who are
untrained or still undergoing training may operate the product only under guidance from a
trained person or a person with specialized experience.
This operation manual was written on the assumption that the product will be operated only
by users who fully understand the potential dangers of operating the product.
Warning Labels
In this operation manual, precautionary information is labeled. The degree of damage or
injury that may occur if the product is used without consideration of the corresponding item of
precautionary information is indicated by one of three labels: DANGER, WARNING and
CAUTION. These labels indicate precautionary information that is important for ensuring
safety and so be sure to observe them.
Labels Indicating Degrees of Damage or Injury
Indicates a potentially hazardous situation which, if
not avoided, could result in serious injury or possibly
death.
Indicates a potentially hazardous situation which, if
not avoided, could result in serious injury.
Indicates a potentially hazardous situation which, if
not avoided, may result in minor to moderate injury or
equipment damage.

-3-
Do not use this product near highly flammable or potential fire hazards. Doing so might cause
explosion or fire.
No Fires Allowed! Do not put this product into fires. Doing so might cause explosion or fire.
Install this product on at level, stable location, and be sure to fasten it with ropes to prevent it
from tipping over. Failure to do so might cause malfunction, accidents, or abnormal operation.
This product is waterproofed but only against rainwater falling from above. Avoid direct contact
with water from the side. Failure to do so might cause malfunction or fire.
This product is designed for outdoor installation. However, it should not be used on very windy
or rainy days. Such conditions could cause the product to tip over, resulting in malfunction.
Do not subject this product to strong impact or drop it. Doing so might cause malfunction or
accidents.
Never dismantle or modify this product. Doing so might cause malfunction or accidents.
If an abnormality occurs during operation, immediately stop operation and remove the cause of
the abnormality. When the abnormality is judged to be caused by this product, turn the power
switch OFF, disconnect the power plug and contact your Sibata agent. Do not use this product
in an abnormal state or allow it to be dismantled for repair by non-service personnel. Doing so
might cause malfunction or accidents.
Do not run this product wrapped in a cloth or bedding, or enclosed in a box. Doing so might
cause heat to build up, resulting in fire or malfunction.
Do not connect the power adapter to a multi-plug power strip. Doing so might cause electric
shock or fire.
Do not use this product when the power cord is damaged or the plug inlet on the power outlet is
loose. Use in this state might cause fire or electric shock.
Do not touch the power cord or power outlet with wet hands. Doing so might cause electric
shock.
This product is installed outdoors. Accordingly, if an extension cord is used, ensure that it is
waterproofed. Sibata assumes absolutely no responsibility for accidents resulting from
extension cords.
This product uses a Panasonic WF7515K waterproof plug (for 100 V). Using a Panasonic
WA3519K waterproof outlet with the same rating as the inlet will ensure that the plug and
outlet section is thoroughly waterproof.
Be sure to ground this product. During the installation process, remove the power cord from the
outlet. Failure to do so might cause malfunction or electric shock. Also, never attach it to a gas
pipe. Doing so might cause an explosion or fire.
Do not use a non-specified fuse. Doing so might cause malfunction or accidents.
Do not block the exhaust and suction ports. Doing so will prevent the required airflow into the
product, and cause heat to build up inside, resulting in malfunction or fire.
Covering your head with the plastic bag that this product is packed in could cause suffocation.
Never do this.

-4-
This product is an air sampler. Do not use the product for any purpose not described in this
manual. Doing so might cause malfunction.
Do not store this product where it will be exposed to direct sunlight, or near fire. Doing so might
cause abnormal operation or malfunction.
If this product is exposed to strong sunlight, the product may become hot. When handling it, be
careful to avoid burning your hands.
When assembling this product, be careful not to get your hands caught in the equipment, or to
bump into the equipment.
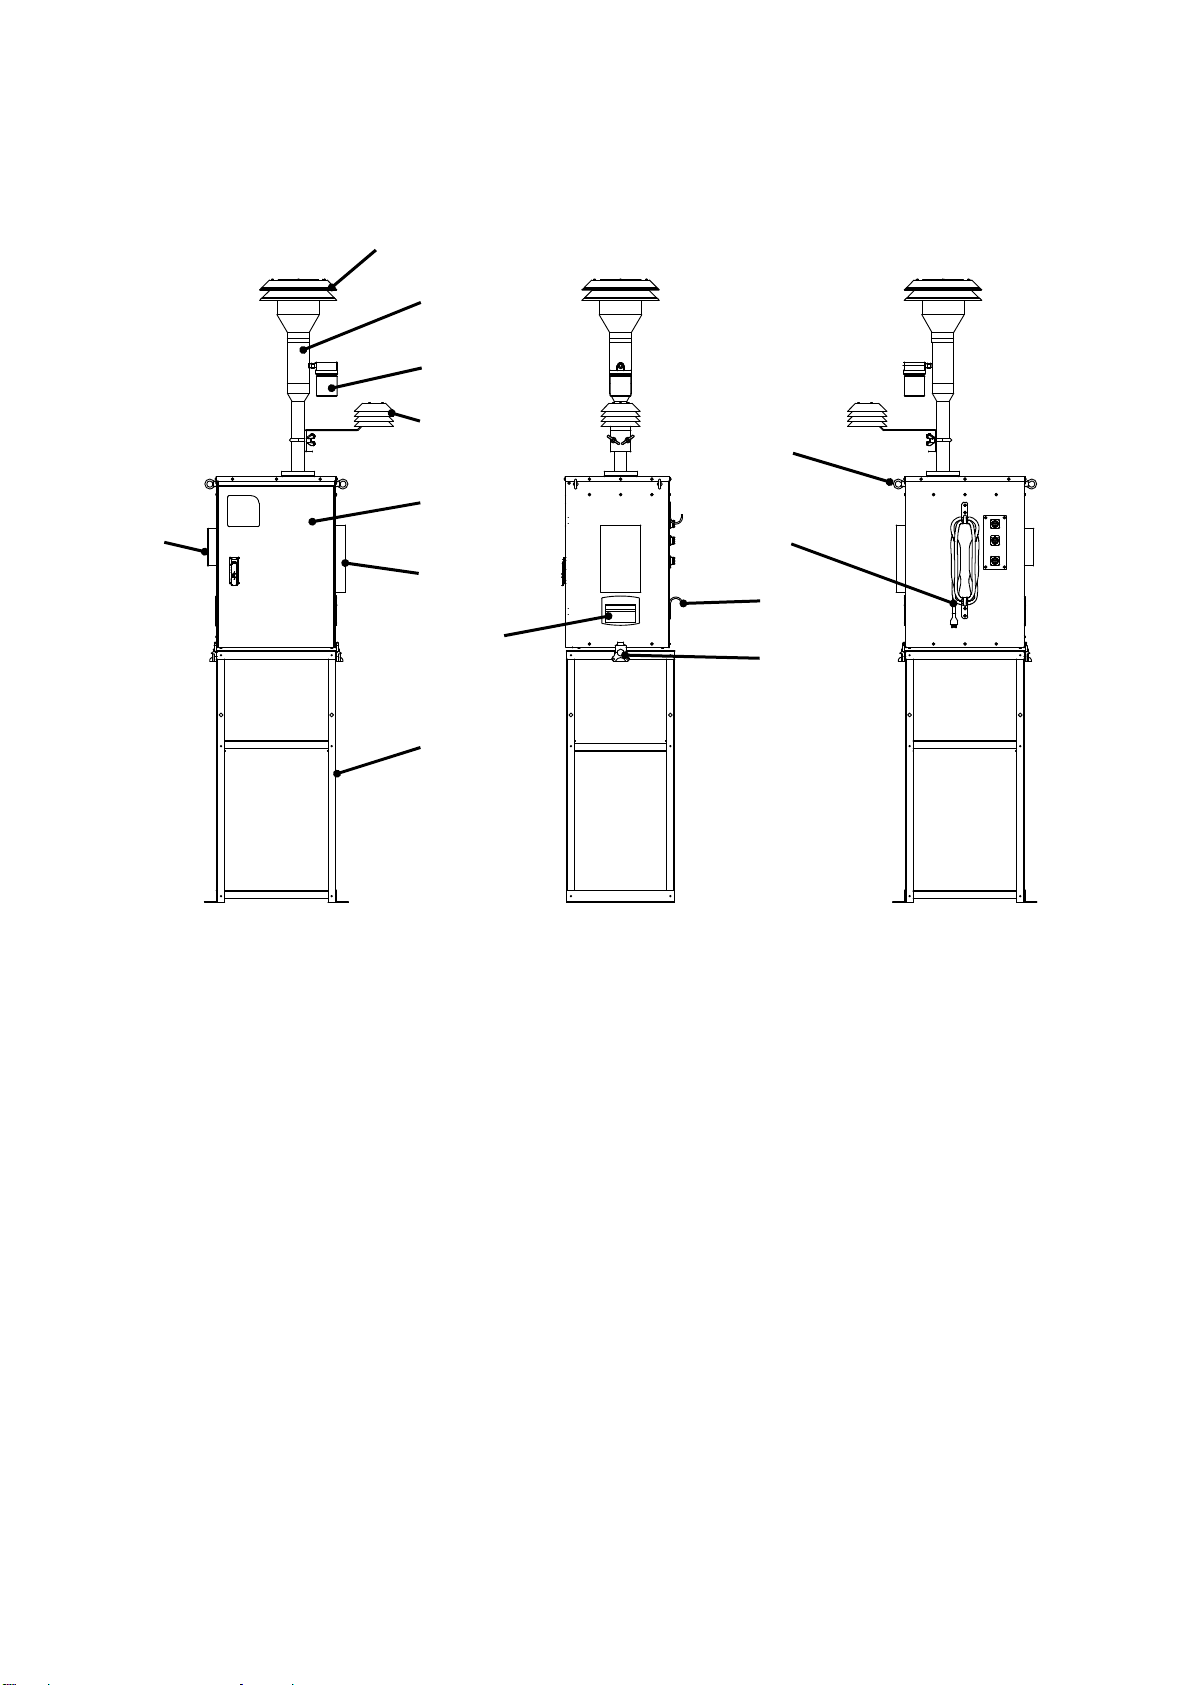
Never transport the equipment with the main unit attached to the stand. There is a risk that the
twist fasteners will be damaged.
Do not place objects on top of this product. Doing so might cause the product to tip over or
deform the product, resulting in accident or malfunction.
Before cleaning or inspecting this product, disconnect the power plug from the power outlet.
Failure to do so might cause electric shock, electric leak or other abnormalities.
Do not use chemicals to wipe down unspecified parts of this product. Also, do not use
unspecified chemicals. Doing so might cause malfunction.
The main unit can be used with a single-phase 100 V to 240 V (85 V to 264 V) power source,
but the power outlet is only designed for 100 V. Contact your Sibata representative or the
vendor if you will be using the equipment at a voltage outside of these specifications.
When not using this product, disconnect the power plug from the power outlet. Failure to do so
might cause fire or malfunction.
When disconnecting the power plug, be sure to hold the power cord by the power plug. Pulling
the cord might damage it and cause electric shock or fire.
Before use, check the sheath of the power adapter cord for scratches or other abnormalities.
Also, do not place heavy objects or step on the power cord. Use in an abnormal state might
cause fire or electric shock.
Do not use wires, other metallic objects, or any other connection method not specified in this
manual. Doing so might cause malfunction.
Do not allow water and other liquids, and gases other than air to be sucked in. Also, do not
allow corrosive gases (e.g. salt air) or chemicals to be sucked in. Doing so might cause
malfunction or fire.
Be sure to install a backup filter in the main unit interior before operating the product.
Malfunction might result from direct, long term intake of air.
Do not insert screws or other foreign objects into the suction and exhaust ports. Doing so might
cause malfunction. Should foreign objects get inside this product, immediately turn the power
switch OFF, disconnect the power plug, and contact your Sibata agent.
The operating temperature and humidity ranges of this product are 0 to 40 °C and 10 to 90 % rh
(no condensation), respectively. Use of this product outside of these ranges might impair its
performance and service life, resulting in malfunction.
Do not bring this product close to equipment that generates electrical noise. Also, do not install
it at locations subject to string magnetic fields, or lots of dust or humidity. Doing so might
damage the hardware, for example.
Note that, should some nonconformity occur, Sibata does not assume any liability whatsoever
for compensation of data or content that could not be acquired or logged as a result, loss of data
or other content, and other direct and indirect damages relating to the preceding. Periodically
back up data as a precaution against malfunction or accidents.

-5-
Product Overview
The LV-250R is a PM2.5 sampler. It is capable of mass concentration measurements of
particulate matter (PM2.5) using a filter, based on the interim measurement manual
designated by the Japanese Ministry of the Environment. With this sampler, airborne
particulates in environmental air are sucked in at a constant flow rate via a suction port.
PM2.5 particles (particulate matter with an aerodynamic diameter of 2.5 μm, and a 50 %
cut) passed through an impactor are then captured on a filter. Suction flow rate changes
are minimized by a constant flow rate unit equipped with temperature and ambient
pressure correction features, so the sizing characteristics of the impactor are kept
constant. The temperature of the filter unit is controlled so that it is always within 5 °C of
the external ambient temperature. This prevents revaporization of volatile matter
contained in the PM2.5 particle sample.
Features
The constant flow rate unit keeps the suction flow rate constant, thus maintaining the
sizing characteristics of the impactor.
Automatically corrects the suction flow rate for changes in the external ambient
temperature or ambient pressure.
The suction pump provides a high suction pressure and maintains a stable suction
flow rate even with increases in filter pressure loss.
To prevent revaporization of volatile matter, the temperature of the filter unit is always
controlled to within 5 °C of the external ambient temperature.
The ON/OFF timer feature enables the user to set the sampling start time and stop
time.
Displays the flow rate, time, temperature, pressure and other measurement values.
The measurement values (total flow rate, average flow rate, flow rate coefficient of
variation, ambient pressure, pressure loss, ambient temperature, and filter
temperature) are imported to a PC for display or storage. (A special communications
cable and software are optionally available.)
If a power outage causes a temporary stop, or problems with the flow rate or filter
temperature occur, the time of the occurrence is recorded.
The equipment can use across a wide voltage range, from 100 V to 240 V. If a DC
power supply and cable are available, it can be battery operated.
Note: For use at anything other than 100 V AC, the DC power supply and cable
must be custom-ordered, so contact your Sibata sales representative or
the vendor.

-6-
Names of Parts
Main Unit
(1) Sample air inlet (8) Stand
(2) PM10 impactor (9) Main unit grip
(3) Rainwater trap (10) Twist fastener
(4) Ambient temperature sensor (11) Cord stopper
(5) Door (12) Power cord
(6) Cooling air intake port (13) Eye bolt
(7) Cooling air exhaust port
(ambient pressure measurement port built in)
(13)
(12)
(11)
(10)
(1)
(3)
(4)
(5)
(7)
(6)
(8)
(9)
(2)

-7-
Main Unit Interior
(1) Control panel (7) Plug valve
(2) RS-232C connector (8) Catch clip
(3) Fuse (9) Filter holder support lower section
(4) Power switch (10) Torque hinge
(5) PM2.5 impactor (11) Backup filter
(6) Filter holder support upper section
(10)
(11)
(1)
(2)
(3)
(4)
(5)
(8)
(7)
(6)
(9)

-8-
Control Panel
(1) LOW BATTERY :Battery out caution lamp
(2) KEY LOCK :Key lock lamp
(3) COM. :COM key. This is used to output data to a PC, etc.
(4) MENU/ESCAPE :Menu, escape key
(5) UP :Key for incrementing set values
(6) DOWN :Key for decrementing set values
(7) ENTER :Enter key
(8) START/STOP :Measurement start/stop key
(9) BACK LIGHT :LCD backlight key
(10) LCD screen :LCD screen display
(10)
(1)
(2)
(3)
(4) (5)
(8)
(7)
(6)
(9)

-9-
Instructions for Use
Installation Procedure
Install this equipment at a flat, stable location. To prevent it from overturning, be sure to
fasten it by staking the legs of the stand to the floor.
There are four anchor bolt holes in the bottom of the stand, and eight rope fastening
holes in the stand support column.
After installing the stand, place the sampler unit on it.
Lock the grips on the twist fasteners on the left and right sides of the main unit, fastening
the main unit to the stand.
Check that the twist fastener grip is raised (perpendicular to the front).
As shown in the figures, place the catch into the hook, and then rotate the grip 180
degrees. The fastener will now be hooked, so lower the grip.
Note: The eye bolts in the main unit top are used when fastening the air inlet port with
ropes. Never use these to fasten the main unit.
Note: Do not transport the equipment when the main unit is attached to the stand. This
is dangerous, as there is a risk that the grips will be damaged.
Rope fastening holes
Anchor bolt holes
Check that
the grip is raised.
The catch fits into the hook.

-10 -
Wiring Procedure
The main unit can be used with a single-phase 100 V to 240 V (85 V to 264 V) power
source. It can be used with voltages other than 100 V. However, the power outlet noted
below will not be compatible. Replace the power outlet with one suited to the
applicable voltage. For safety's sake, contact your Sibata representative or the vendor if
you will be using the equipment at a voltage other than 100 V. Also, be sure to ground
the power supply.
If you are using this product outdoors, be sure that the outlet and extension cord used
are waterproof. This product uses a Panasonic WF7515K waterproof plug. Using a
Panasonic WA3519K waterproof outlet with the same rating as the inlet will ensure that
the plug and outlet section is thoroughly waterproof.
Note: Ensure that the power supply has sufficient electrical capacity. Two to three
times the regular power consumption occurs in the instant directly after startup.
Note: Do not connect the power adapter to a multi-plug power strip. Doing so might
cause electric shock or fire.
Note: Be sure to ground this product. Failure to do so might cause electric shock,
malfunction, or fire.
Note: Check that the power cord is securely connected to the product. If the
connection is loose, it will not be waterproofed, which might cause electric leak
or malfunction.
Note: If you are using it at a different voltage, it may not be possible to waterproof the
outlet installed, depending on its shape. Pay attention to the specifications when
wiring the equipment.

-11 -
Installing and Cleaning the PM10 Impactor
The PM10 impactor can be disassembled as described below.
Hold the upper section of the PM10 impactor (the parasol-shaped end) securely. Rotate
the lower section of the impactor counterclockwise, and then remove it.
If the interior is dirty, clean it with a soft cloth or paper, or by using pure water to damp
them. If the dirt resists cleaning with pure water, use ethanol or acetone.
Coarse dust may adhere to the mesh over the suction port at the top of the impactor, so
give it a quick clean with an air blower.
Reverse the procedure to reassemble the impactor.
Im
p
actor u
pp
er section
Im
p
actor lower section
A
rea to clean
A
rea to clean

-12 -
Attach the glass rainwater trap to the reassembled PM10 impactor. At this point, check
that the packing is attached securely.
Insert the PM10 impactor, with the rainwater trap attached, into the inlet pipe on the top
of the main unit. Insert it securely, all the way in.
Rainwater trap
Packing
Inlet pipe

-13 -
As shown in the figure, attach the ambient temperature sensor to the right side when
facing the main unit. After adjusting the position of the ambient temperature sensor,
tighten the wing nut securely to fasten the sensor.
Connect the cable for the ambient temperature sensor to the connector on the back of
the main unit. Align the cable with the connector port, and insert the cable until you hear
a click.
Enlarged View of the Back Connector Area
Note: If the sampling height will be 3 m, attach the sampling pipe joint (custom-ordered)
to the top of the inlet pipe on top of the main unit. Then connect a 1-m sampling
pipe (custom-ordered), and attach the PM10 impactor onto this.
In this case, the eye bolts on the top of the main unit should be used to fasten the
sample air inlet port with ropes.
A
mbient tem
p
erature senso
r
Power connecto
r
Connector for the
ambient temperature
senso
r

-14 -
Removing the Filter holder support and PM2.5 Impactor
Open the door on the main unit. Remove the PM2.5 impactor and the filter holder
support installed inside.
Unfasten the catch clips on the left and right
sides of the filter holder support.
Lower the lower section of the filter holder
support, and remove the filter holder from
inside.
Hold the PM2.5 impactor securely. Slowly extract the upper section of the filter holder
support and remove it.
In the same way, extract the PM2.5 impactor.
Note: The PM2.5 impactor and the upper section of the filter holder support are
fastened with an O-ring. It may be a little stiff, but if you use too much force to
withdraw it, you may end up colliding with the lower section of the filter holder
support, hurting yourself. Be very careful when handling these components.
Filter holde
r
Filter holder support
lower section
PM2.5 im
p
acto
r
PM2.5 im
p
acto
r
Filter holder support
upper section

-15 -
Replacing the PM2.5 Impactor
To maintain the particle-sizing characteristics at 2.5 μm and 50 % cut by using the PM2.5
impactor, mount the impactor filter (a φ37-mm fiberglass filter) in the impactor well
(coarse particle catcher). Then cover the filter surface with a layer of impactor oil to
prevent the re-scattering of coarse particles.
While holding the lower section of the PM2.5 impactor, rotate the upper
section of the impactor counterclockwise. Loosen the screws and
separate the upper and lower sections of the impactor.
Note: The impactor well (coarse particle catcher) is placed on top of the lower section
of the PM2.5 impactor. Be careful not to drop the impactor well when the upper
and lower sections of the impactor are separated.
Separate the upper and lower sections of the PM2.5 impactor well.
Attach the impactor filter (φ37-mm fiberglass filter) onto the catcher at the lower section
of the PM2.5 impactor well. Drop 1 mL of impactor oil onto the surface of the filter to coat
it with a layer of oil.
Reverse the procedure to reassemble the impactor well.
Attach each part carefully, ensuring an airtight seal.
Note: To minimize the re-scattering of coarse particles and changes in sizing
characteristics as the inside of the PM2.5 impactor becomes dirty, replace the
impactor filter and clean the inside of the impactor about once per week. Clean it
with soft cloths or paper, or by using pure water to damp them. If the dirt resists
cleaning with pure water, use ethanol or acetone.
Im
p
actor u
pp
er section
Im
p
actor well
Im
p
actor lower section
Im
p
actor well u
pp
er section
Im
p
actor filte
r
Im
p
actor well lowe
r
section

-16 -
Replacing the Filter Holder
The filter holder is structured as shown in the figure below.
As shown in the figure, position the filter, and then attach the filter clamp.
When positioning the quartz fiberglass filter, first place PTFE packing on top of the wire
mesh, followed by the filter, and then more PTFE packing.
PTFE packing does not need to be used if a PTFE filter is used.
Note: Be sure to attach a filter before operating the sampler.
Never operate the equipment if there is no filter inside the filter holder.
Filter clamp
PTFE packing
Filter
PTFE packing
Wiremesh
Filter holder lower section

-17 -
Attaching the Filter holder support and PM2.5 Impactor
With the lower section of the filter holder support lowered, insert the PM2.5 impactor all
the way into the hole in the upper section of the main unit.
Next, attach the upper section of the filter holder support by inserting it into the lower
section of the PM2.5 impactor.
Place the filter holder on the lower section of the filter holder support. Raise the lower
section of the filter holder support until it touches the upper section of the filter holder.
Securely fasten the catch clips on the left and right of the filter holder support. Rotate the
upper section of the filter holder support to adjust the alignment of the catch clips.
PM2.5 im
p
acto
r
Filter holder support
upper section
Filter holder
Catch clip
Filter holder support
lower section

-18 -
Plug Valve
Check that the plug valve is positioned vertically (valve open position) as shown in the
figure. If it is horizontal, the plug valve will be closed.
Note: Never perform sampling with the plug valve closed. This will cause malfunctions.
Airtight Test
Airtight tests can be performed by attaching a hose joint (optionally available, item code:
080180-2525) and manual vacuum pump (optionally available, item code: 080870-10)
using the tube as shown in the figure.
(1) Close the plug valve.
(2) Using the manual vacuum pump, apply suction
until approximately 0.04 MPa is reached.
(3) Release the handle on the manual vacuum
pump. Check that the needle on the pressure
gauge does not drop (check that there is no
leak).
(4) After finishing the airtight test, reopen the plug
valve.
Plu
g
valve closed
Plu
g
valve o
p
en
Hose
j
oint
Manual vacuum pump
Tube
This manual suits for next models
1
Table of contents
Other Sibata Sampler manuals
Popular Sampler manuals by other brands

Akai
Akai MPX16 user guide

KC
KC Van Veen Grab12.110 manual

Teledyne
Teledyne Everywhereyoulook BLZZRD Installation and operation guide

Met One Instruments
Met One Instruments LVS-100 user manual

Spectrex
Spectrex PAS-500 operating manual

Endress+Hauser
Endress+Hauser Liquistation CSF48 Brief operating instructions