manuals.online logo
Brands
  1. Home
  2. •
  3. Brands
  4. •
  5. Siemens
  6. •
  7. Control Unit
  8. •
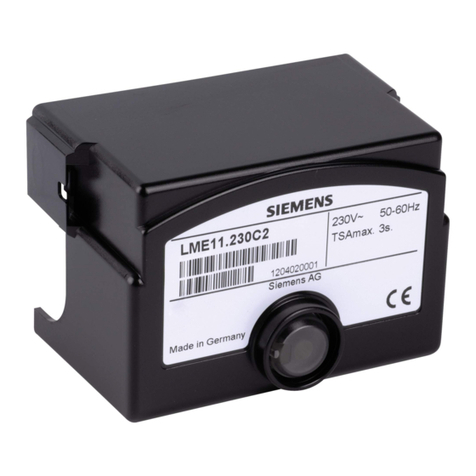
  9. Siemens LGI16 Series User manual

Siemens LGI16 Series User manual

CC1N7786en
07.08.2013
Building Technologies Division
Infrastructure & Cities Sector
7786
Burner Controls
LGI16...
Burner controls
•For use on industrial furnaces
•For burners in continuous operation
•Without fan control and air pressure supervision
•Flame supervision
- with QRA53... / QRA55…, flame detector
- with ionizations probe
•With self-supervising flame signal amplifier
•Quick startup
•1-stage operation with interrupted pilot burner or 2-stage operation
•Common or separate ionization probe and ignition electrode (single- or
double-electrode operation)
•Automatic restart (repetition) or lockout after loss of flame during operation
•Indication of program sequence
•Remote reset facility
•Programming mechanism in plastic housing, plugs into the base
The LGI16... and this Data Sheet are intended for use by OEMs which integrate
the burner controls in their products.
Use
Supervision and control of oil or gas burners for use on industrial furnaces that operate
continuously for longer periods of time (>24 hours) without controlled shutdown.
-QRA53... / QRA55... flame detector
-Ionization probe
-QRA53... / QRA55... flame detector and ionization probe together, e.g. with burner
with ignition burner, refer also to Data Sheet N7712
Flame supervision
2/13
Building Technologies Division CC1N7786en
Infrastructure & Cities Sector 07.08.2013
Warning notes
To avoid injury to persons, damage to property or the environment, the following
warning notes must be observed!
Do not open, interfere with or modify the unit!
•All activities (mounting, installation and service work, etc.) must be performed by
qualified staff
•Before making any wiring changes in the connection area, completely isolate the
plant from mains supply (all-polar disconnection). Ensure that the plant cannot be
inadvertently switched on again and that it is indeed dead. If not disconnected,
there is a risk of electric shock hazard
•Ensure protection against electric shock hazard by providing adequate protection
for the burner control’s terminals
•Each time work has been carried out (mounting, installation and service work, etc.),
heck to ensure that wiring is in an orderly state and make the safety checks as
described in «Commissioning notes».
•Press the lockout reset button / operation button only manually (applying a force of
no more than 10 N), without using any tools or pointed objects
•Do not press the lockout reset button on the unit or the remote reset button
(input 21) for more than 10 seconds, since this would damage the lockout
relay inside the unit
•Fall or shock can adversely affect the safety functions. Such units must not be put
into operation, even if they do not exhibit any damage
Mounting notes
•Ensure that the relevant national safety regulations are complied with
Installation notes
•Always run the high-voltage ignition cables separately while observing the greatest
possible distances to the unit and to other cables
•Do not mix up live and neutral conductors
•Install switches, fuses and earthing, in compliance with local regulations
•Make certain that the maximum permissible current rating of the connection
terminals will not be exceeded
Caution!
•Observe the polarity
Burner controls LGI16... are not able to detect wrong polarity of live and
neutral conductors
•When used in connection with UV detector QRA53... / QRA55..., terminal 22 must
be earthed
•For repetitive operation, remove wire link «J» between terminals 8 and 11 in base
AGM15
Warning!
•Danger - high voltage
In single-electrode operation, measurement of the ionization current is not
possible. During the ignition times, the ionization current path carries high
voltage.
3/13
Building Technologies Division CC1N7786en
Infrastructure & Cities Sector 07.08.2013
Electrical connection of flame detectors
It is important to achieve practically disturbance-free signal transmission:
•Never run the detector cable together with other cables
– Line capacitance reduces the magnitude of the flame signal
– Use a separate cable
•Observe the permissible length of the detector cables (refer to «Technical data»)
•It is not permitted to connect 2 flame detectors QRA53... / QRA55... in parallel
•When using the QRA53... / QRA55..., earthing of terminal 22 is mandatory
•The ionization probe does not offer protection against electric shock hazard
•Locate the ignition electrode and ionization probe such that the ignition spark
cannot arc over to the ionization probe (risk of electrical overloads) and that it
cannot adversely affect the supervision of ionization
•Supervision with ionization probe and QRA53… / QRA55... flame detector is
possible but, for safety reasons, both must not be active at the same time, with the
exception of the second safety time «t9». At the end of the second safety time, one
of the detected flames must extinguish, e.g. by shutting down the pilot gas valve
connected to terminal 17
•For cable lengths, refer to «Technical data», section «Detector and flame
supervision»
•Insulation resistance
– Must be a minimum of 50 MΩbetween ionization probe and ground
– Soiled detector holders reduce the insulation resistance, thus supporting
creepage currents
•Earth the burner in compliance with the relevant regulations; earthing the boiler
alone does not suffice
Commissioning notes
•When commissioning the plant or when doing maintenance work, make the
following safety checks:
Safety check
Anticipated response
a) Burner startup with flame detector darkened Lockout at the end of safety
time (TSA)
b) Burner startup with flame detector exposed to
extraneous light
Lockout after no more than 40
seconds
c) Burner operation with simulated loss of flame;
for that purpose, darken the flame detector
during operation
Restart followed by lockout at
the end of safety time (TSA) if
wire link (J) (terminals 8...11)
is removed, otherwise
immediate lockout
Standards and certificates
Conformity to EEC directives
- Electromagnetic compatibility EMC (immunity)
- Low-voltage directive
- Directive for gas-fired appliances
2004/108/EC
2006/95/EC
2009/142/EC
ISO 9001: 2008
Cert. 00739
ISO 14001: 2004
Cert. 38233
Identification code to EN 298 A B L / C L X K
4/13
Building Technologies Division CC1N7786en
Infrastructure & Cities Sector 07.08.2013
Service notes
•UV detector current measuring unit KF8832 is not suited for continuous operation
Life cycle Burner control have a designed lifetime* of 250,000 burner startup cycles which, under
normal operating conditions in heating mode, correspond to approx. 10 years of usage
(starting from the production date given on the type field).
This lifetime is based on the endurance tests in the standard EN 230 / EN 298.
A summary of the conditions has been published by the European Control
Manufacturers Association (Afecor) (www.afecor.org).
The designed lifetime is based on use of the burner controls according to the
manufacturer’s Data Sheet. After reaching the designed lifetime in terms of the number
of burner startup cycles, or the respective time of usage, the burner control is to be
replaced by authorized personnel.
* The designed lifetime is not the warranty time specified in the Terms of Delivery
Disposal notes The unit contains electrical and electronic components and must not be disposed of
together with household waste.
Local and currently valid legislation must be observed.
5/13
Building Technologies Division CC1N7786en
Infrastructure & Cities Sector 07.08.2013
Mechanical design
•Plug-in design
•Exchangeable unit fuse (including spare fuse)
•Impact-proof plastic housing
•Synchronous drive motor
•Lockout relay with electric, remote reset facility
•Self-supervising electronic flame signal amplifier with flame relay
•Program indication in the viewing window by means of disk on the spindle of the
sequence switch (refer to «Control and function diagram»
•Lockout warning lamp in the viewing window
•Reset after lockout by slightly pressing on the viewing window
•Printed circuit board with electronic components
•Programming mechanism with fixed settings
•Made of impact-proof and heat-resistance black plastic
•Lockout reset button with viewing window; located behind it:
– Lockout warning lamp
– Lockout indicator
- coupled to the spindle of the sequence switch
- visible in the transparent lockout reset button
- uses easy-to-remember symbols to indicate the type of fault and the point
in time lockout occurred
Ordering
Burner control, without plug-in base
- AC 220...240 V LGI16.053A27
- AC 100...110 V LGI16.053A17
Plug-in base is not included in standard delivery, must be ordered as a separate item!
Accessories for medium-capacity burner controls refer to Data Sheet N7230
- Plug-in base AGM15 with Pg11 thread for cable entry glands
- Plug-in base AGM15.1 with M16 thread for cable entry glands
Flame detector
- UV detector QRA53... / QRA55… refer to Data Sheet N7712
- Ionizations probe supplied by the burner manufacturer
UV detector current measuring instrument KF8832
- Only for measurements of short duration
- Not suited for continuous operation
Caution!
The KF8832 negates the self-supervision function.
LGI16...
Housing
6/13
Building Technologies Division CC1N7786en
Infrastructure & Cities Sector 07.08.2013
Technical data
Mains voltage
AC 220 V –15 %...AC 240 V +10 %
AC 100 V –15 %...AC 110 V +10 %
Mains frequency
50...60 Hz ±6 %
Unit fuse, built-in
T6,3H250, DIN EN 60 127 (5 x 20 mm)
External primary fuse
Max. 16 A, slow
Weight
Approx. 1,000 g
Power consumption
Approx. AC 3.5 VA
Perm. mounting position
Optional
Degree of protection IP40,
when fitted, with the exception of the
connection area (terminal base)
Safety class
II
Perm. input current at terminal 1
Max. 5 A (peaks of 20 A / 20 ms)
Perm. current load on control terminals
Max. 4 A (peaks of 20 A / 20 ms)
Required switching capacity of the switching
devices connected to terminals 4 and 5 Depending on the loads connected to
terminals 16...19
Min. 1 A, AC 250 V
QRA5x.C...
QRA5x.E...
QRA5x.D...
QRA5x.G...
Ionization probe
Operating voltage
AC 280 V ¹) ±10 %
AC 280 V ¹) ±10 %
AC 245 V ¹) ±10 %
Min. detector current required
DC 35 µA
DC 120 µA
DC 12 µA
Max. detector current possible
DC 50 µA
DC 270 µA
DC 100 µA
Short-circuit current
---
---
ca. AC 300 µA
Max. length of detector cable, laid separately
²)
²)
60 m
Mounting position
Optional
Optional
---
1)
Alternating current, measured with no detector current at AC 110V / AC 230 V mains
voltage.
Internal resistance of measuring instrument: 10 MΩ.
Shutter drive of UV detector QRA53... / QRA55… operates on mains voltage
2)
•Detector cable laid at a distance of at least 50 mm from other mains carrying
cables:
– As a multicore cable: max. 50 m
– With 5 single wires: max. 70 m
•Detector cable laid directly adjacent to other mains carrying cables:
– With shielded 3-core control cable connected to pins 3, 4 and 5 of the
QRA53... / QRA55…; for the mains connection (pins 1 and 2), a normal mains
cable can be used max. 15 m
– With 3 screened 3-core coaxial cables (93 Ω; 45 pF/m) connected to pins 3,
4 and 5 of the QRA53... / QRA55…; for the mains connection (pins 1 and 2), a
normal mains cable can be used max. 60 m
– If possible, connect cable shielding at both ends of the cable
General unit data
Detector and flame
supervision
7/13
Building Technologies Division CC1N7786en
Infrastructure & Cities Sector 07.08.2013
Technical data (cont'd)
Storage
DIN EN 60721-3-1
Climatic conditions
class 1K3
Mechanical conditions
class 1M2
Temperature range
-20...+60 °C
Humidity
<95 % r.h.
Transport
DIN EN 60 721-3-2
Climatic conditions class 2K2
Mechanical conditions
class 2M2
Temperature range
-40...+60 °C
Humidity <95 % r.h.
Operation
DIN EN 60 721-3-3
Climatic conditions
class 3K5
Mechanical conditions
class 3M2
Temperature range
-20...+60 °C
Humidity
<95 % r.h.
Caution!
Condensation, formation of ice and ingress of water are not permitted!
Detector current measurement
Use the KF8832 measuring device (not suited for continuous operation).
There is no self-checking while measurements are made.
The KF8832 is not required when using the QRA5x.D... / QRA5x.G...
With QRA5x.C...
With QRA5x.D...
22
DC 35...50 µA
+
A
+
470 µF/25 V
7785v04/1008
22
DC 120...270 µA
+
A
+
470 µF/25 V
7785v01/1008
With QRA5x.E...
With QRA5x.G...
22
DC 35...50 µA
+
A
+
470 µF/25 V
7785v04/1008
22
DC 120...270 µA
+
A
+
470 µF/25 V
7785v01/1008
Environmental
conditions
LGI16... / QRA53... /
QRA55...
8/13
Building Technologies Division CC1N7786en
Infrastructure & Cities Sector 07.08.2013
Detector current measurement (cont'd)
The measuring device must be connected between terminal 24 and the detector
electrode (+pole to terminal 24).
With ionization
24 ION
+A
7785v03/1008
DC 12...100 µA
2
Burner control
LGI16... base
Burner
Terminals in the
burner compartment
QRA5...
Terminals in
the control panel
Mains cable 3 x 1.5 mm
Single-wire coaxial cable
(e.g. RG62)
Shielding
Max. 60 m
Cable AGM19
A
Ammeter
QRA5...
Flame detector
ION
Ionization probe
LGI16... / ionization
probe
Legend
9/13
Building Technologies Division CC1N7786en
Infrastructure & Cities Sector 07.08.2013
Function When power is supplied to the burner control and the control loop (terminals 4 and 5) is
closed, the LGI16… will start the program sequence as shown in «Control and function
program», the most important program steps being the following:
•Waiting time
– No external function
– Internal flame simulation test
•Release of ignition
•Release of pilot gas valve
– Establishment of pilot flame during the first safety time (TSA)
– Release of gas valve stage 1
•Release of gas valve stage 1
– Establishment of pilot flame during the first safety time (TSA)
– Release of gas valve stage 2
– Establishment of main flame during the second safety time (t9)
•Burner operation
The burner control maintains its operating position and continuously checks the
presence of flame
•Shutdown
when the control loop between terminals 4 and 5 opens.
The signal to the gas valves will immediately be cut off.
During the time home run (t20), the programming mechanism returns to its start
position
•Flame signal on startup
causes the burner control to initiate lockout
•No flame signal at the end of the first or second safety time
causes the burner control to initiate lockout
•Loss of flame during operation
Wire link «J», between terminals 8...11 in the base
– Wire link fitted: burner control will initiate lockout
– Without wire link: burner control will automatically execute a restart (repetition)
Base AGM15 is supplied with wire link «J» fitted.
In the event of lockout, the signals to the gas valves will be cut off in less than one
second and the burner control locked.
Resetting is always to be made manually by pressing lockout reset button «EK1» or
«EK2».
In the case of repetition, the signals to the gas valves will also be cut off in less than
one second. Then, the programming mechanism will automatically return to its start
position (home run) to make a new start.
(Single-electrode operation, ionization probe, connected to terminal 7)
In the period between the ignition time (tz) and the end of the first safety time (TSA),
the secondary side of the ignition transformer is switched from earthing to the flame
signal amplifier.
Program sequence
Control program in the
event of fault
Common ignition probe
and ionization electrode
10/13
Building Technologies Division CC1N7786en
Infrastructure & Cities Sector 07.08.2013
Control and function diagram
7786f01/0305
M
+
QRA5...
2)
22 24
ION
FEZ
22 5 3 4 1
1
J
4)
Z I
GP
W
R
SB
Z
3)
ZBV
H
L
N
EK2
1
AL
P S F
A
B
C
D
A
AS
tz
TSA
twt3
t4t9
t5t20
1 2 21 3 4 5 16 17 18 19 11 8 7 22 23 15
BV1
BV1
BV2
12
Si
2
Caution!
Do not press lockout reset button (EK...) for more than 10 seconds!
Legend
•
Valid for expanding flame burner
•• Valid for interrupted pilot burner
F Flame signal amplifier
P Programming mechanism
S Indication of program sequence in viewing window
TSA Ignition safety time 5 s ¹
)
tw Waiting time
4.5 s ¹)
tz Ignition time
2.5 s ¹)
t3 Preignition time
2.5 s ¹)
t4 Interval between start of release of the valve connected to terminal 17 or 18 and release of the valve connected
to terminal 19
7,4 s ¹)
t5
Interval up to the self-shutdown of the programming mechanism in the operating position
t9 Transition time from pilot burner to main burner second safety time (2. safety time (t9) plus safety time in
operation)
3.5 s ¹)
t20 Home run time until the startup position after a controlled shutdown is reached
15 s ¹
)
1) Data valid at 50 Hz, at 60 Hz, the times are 20 % shorter
2) When used in connection with QRA53... / QRA55…, terminal 22 must be earthed
3) Connection with separate ignition electrode and ionization probe (double-electrode operation)
4) Connection with common ignition electrode and ionization probe (single-electrode operation)
Control signals of burner control at nominal voltage
Required input signal
Terminal connected to earth
11/13
Building Technologies Division CC1N7786en
Infrastructure & Cities Sector 07.08.2013
Connection diagram and internal diagram
LGI16... 1
AS
br1
ab
ar1
4
III
ab
I
a b
GPmin.
W
R
SB
5
fr1
ababa
XII
IV
ab
XI
8
J
11 XIII
EK1 L1
ab
AR
a
VI
br2 M
EABR
ab ab
IX II
ab
a b
XVIII
NTC
fr2 fr3 FR
VII
b a ba
ar3 ar4
MSM
V
ab
V
22 2415 23
54
2
3
1+M
UV QRA5...2)
22 24 15 23
ION
3)
321 216 17 18 19 7
22
FEZ
I
Z
4)
BV2
BV1
BV1
ZBV
3)
Z
AL
EK2
1
H
N
7786a01/0305
LSi
Caution!
Do not press lockout reset button (EK...) for more than 10 seconds!
Legend
•
Valid for expanding flame burner
••
Valid for interrupted pilot burner
2)
When used in connection with QRA53... / QRA55…, terminal 22 must be earthed
3)
Connection with separate ignition electrode and ionization probe (double-electrode operation)
4)
Connection with common ignition electrode and ionization probe (single-electrode operation)
12/13
Building Technologies Division CC1N7786en
Infrastructure & Cities Sector 07.08.2013
Legend
A
Start of program; control loop between terminals 4 and 5 closed
A – B
Startup program
B – C
Burner operation
C
Controlled shutdown; control loop between terminals 4 and 5 open
C – D
Home run of programming mechanism
D
Ready for restart
AL
Remote indication of lockout (alarm)
AR
Main relay (load relay) with contacts (ar)
AS
Unit fuse
BR
Lockout relay with contacts (br)
BV...
Fuel valve
EK...
Lockout reset button
ION
Ionization probe
FEZ
Ignition electrode and ionization probe
FR
Flame relay with contacts (fr)
GP
Gas pressure switch, minimum gas pressure switch
H
Main switch
J Wire link between terminals 8 and 11 in the base of the LGI16..., in the event of loss of flame during
operation:
Wire link fitted:
Lockout
Without wire link:
Automatic restart (repetition)
L1
Lockout warning lamp on the burner control
M
Fan motor
NTC
Resistor with negative temperature coefficient
QRA5...
Flame detector
R
Temperature or pressure controller
SB
Manual reset safety limiter
Si
External fuse
SM
Synchronous motor of programming mechanism
UV
UV radiation
V
Flame signal amplifier
W
Limit thermostat or pressure switch
Z
Ignition transformer for double-electrode operation
ZBV
Pilot gas valve
ZI
Ignition transformer for single-electrode operation
Control signals delivered by the burner control
Permissible input signals
Terminal grounded
13/13
Building Technologies Division CC1N7786en
Infrastructure & Cities Sector 07.08.2013
Dimensions
Dimensions in mm
1,5
108,5
27,5 27,5
37
7,5
103
103
7786m04/0305
123
LGI16...
2013 Siemens AG Infrastructure & Cities Sector Building Technologies Products GmbH
Subject to change!
Plug-in base AGM15 / AGM15.1

This manual suits for next models

2

Other Siemens Control Unit manuals

Siemens NIM-1W User manual

Siemens

Siemens NIM-1W User manual

Siemens AC75 User manual

Siemens

Siemens AC75 User manual

Siemens SIMATIC ET 200S User manual

Siemens

Siemens SIMATIC ET 200S User manual

Siemens SINAMICS RAILCTRL Parts list manual

Siemens

Siemens SINAMICS RAILCTRL Parts list manual

Siemens VXP45 Series Owner's manual

Siemens

Siemens VXP45 Series Owner's manual

Siemens SIMATIC ET 200S User manual

Siemens

Siemens SIMATIC ET 200S User manual

Siemens SITOP UPS1600 User manual

Siemens

Siemens SITOP UPS1600 User manual

Siemens SIMADYN D FM 458 User manual

Siemens

Siemens SIMADYN D FM 458 User manual

Siemens SIMATIC ET 200SP IM 155-6 PN/2 HF User manual

Siemens

Siemens SIMATIC ET 200SP IM 155-6 PN/2 HF User manual

Siemens 4AI RTD User manual

Siemens

Siemens 4AI RTD User manual

Siemens SINUMERIK 840D Simodrive  611 digital User guide

Siemens

Siemens SINUMERIK 840D Simodrive 611 digital User guide

Siemens SIMATIC NET PG-5412 User manual

Siemens

Siemens SIMATIC NET PG-5412 User manual

Siemens SIMATIC IM 153-2 User manual

Siemens

Siemens SIMATIC IM 153-2 User manual

Siemens Simatic S7-300 User manual

Siemens

Siemens Simatic S7-300 User manual

Siemens GAMMA 5WG1118-4AB01 Service manual

Siemens

Siemens GAMMA 5WG1118-4AB01 Service manual

Siemens SIMOCODE pro User manual

Siemens

Siemens SIMOCODE pro User manual
Siemens SIMADYN D SS52 User manual

Siemens

Siemens SIMADYN D SS52 User manual

Siemens TX-I/O TXM1.8D Parts list manual

Siemens

Siemens TX-I/O TXM1.8D Parts list manual

Siemens SIMATIC ET 200eco PN Technical Document

Siemens

Siemens SIMATIC ET 200eco PN Technical Document

Siemens SINUMERIK 808D User manual

Siemens

Siemens SINUMERIK 808D User manual

Siemens SIMATIC EMS400S PSB-S User manual

Siemens

Siemens SIMATIC EMS400S PSB-S User manual

Siemens LMV52 series User manual

Siemens

Siemens LMV52 series User manual

Siemens SIMOCODE pro User manual

Siemens

Siemens SIMOCODE pro User manual

Siemens FDCL221-M User manual

Siemens

Siemens FDCL221-M User manual

Popular Control Unit manuals by other brands

Aaeon PFM-540I user manual

Aaeon

Aaeon PFM-540I user manual

Jetter JXM-IO-EX30 user manual

Jetter

Jetter JXM-IO-EX30 user manual

Rotex E PAC Series installation manual

Rotex

Rotex E PAC Series installation manual

Racal Instruments 1260 VXI manual

Racal Instruments

Racal Instruments 1260 VXI manual

DeZurik VPB V-PORT instruction manual

DeZurik

DeZurik VPB V-PORT instruction manual

Lush Projects LushOne Inca manual

Lush Projects

Lush Projects LushOne Inca manual

Wilo Smart Connect Module BT user manual

Wilo

Wilo Smart Connect Module BT user manual

ADLINK Technology EGX-MXM-P2000 user manual

ADLINK Technology

ADLINK Technology EGX-MXM-P2000 user manual

Kessel 28701X manual

Kessel

Kessel 28701X manual

RIB S1 manual

RIB

RIB S1 manual

Graco 24R021 Instructions - parts

Graco

Graco 24R021 Instructions - parts

REXROTH IndraControl L25 operating instructions

REXROTH

REXROTH IndraControl L25 operating instructions

RED RFMOD user manual

RED

RED RFMOD user manual

Agilent Technologies N5532A User's and service guide

Agilent Technologies

Agilent Technologies N5532A User's and service guide

MSA 9010 quick start guide

MSA

MSA 9010 quick start guide

Behringer 2500 Series quick start guide

Behringer

Behringer 2500 Series quick start guide

Crest Audio CC-STS datasheet

Crest Audio

Crest Audio CC-STS datasheet

Burkert 6027 operating instructions

Burkert

Burkert 6027 operating instructions

manuals.online logo
manuals.online logoBrands
  • About & Mission
  • Contact us
  • Privacy Policy
  • Terms and Conditions

Copyright 2025 Manuals.Online. All Rights Reserved.