manuals.online logo
Brands
  1. Home
  2. •
  3. Brands
  4. •
  5. Sierra Designs
  6. •
  7. Tent
  8. •
  9. Sierra Designs OMEGA User manual

Sierra Designs OMEGA User manual

S I E R R A D E S I G N S
SIERRA DESIGNS 2011 Cherry Street, Unit 202 Louisville, CO 80027 Phone: 303-262-3050 Fax: 303-262-3051 Toll Free: 800-635-0461
lowing the tent seams between points A and C, and B and D
attach all of the Swift Clips
™
to their corresponding tent poles
(Swift Clips are the Clips without cords). Passing the arched
pole over the two long poles, place its ends into the grommets
at points F and G. Once the arched pole is in place; hook the
Clip-Locs at points H and I, with the open gate of the clip
pointing towards the rear of the tent. Now attach the cord at
points H, I & E, by wrapping the cord in the direction cross-
ing the open gate of the Clip-Loc. Wrap the cord around the
pole intersection two to four times, depending on desired firm-
ness, then slide the cord into the groove on the back-side of
the clip to hold it taut (Figure 3).
Fly Sheet
Drape the fly over the tent making sure the zippered, vestibule
end is over the door (Figure 4). At points H, I, J, K, L and M
on the inside of the tent fly you will find 1"side release buck-
les. Attach these points to their mates on the tent body. At
point N on the fly you will find a Velcro
®
attachment. Attach
this to the apex of the arched pole. Now at points A, B, C, D,
G and F you will find 1"LadderLocs with adjustable grommet-
ed webbing straps. Slip the grommets under the pole ends at
these points (Figure 5). Now working your way around the
tent a few times, tighten these adjustable straps until you have
achieved the desired tautness. Point O may be staked out to
increase ventilation. Lastly, stake out points Q and R to form
your vestibule.
First Pitch
In order to familiarize yourself with your new tent, we
suggest that you “test pitch” it before embarking on a
wilderness trip.
Select a Site
Look for a level spot that is protected from the wind in
order to ensure sleeping comfort. Clear the area of debris such as
sharp stones and sticks which might abrade or puncture the tent
floor. Choose an area that will drain well when it rains.
Unfurl the Tent and Assemble the Poles
Unfurl the tent and lay the tent floor flat on the ground with
the door unzipped. Carefully unfold the shock corded pole sec-
tions and allow them to slide together. Do not allow the poles
to snap together: This can lead to serious pole damage. Make
certain that the insert of each pole section is fully inserted into
the next pole section (Figure 1). You will have two straight
poles of equal length and one arched pole.
Stake out the Tent Floor
The Omega is a completely freestanding tent. It is not necessary
to stake down the tent floor in order to pitch it. However, we
recommend that the tent be staked down at points A, B, C and
D for stability, especially in high winds (Figure 2).
Erect the Tent
Insert the metal tips of one of the two long poles into the
grommets at points A and C (Figure 2). Insert the metal tips of
the other long pole into the grommets at points B and D. Next
hook the Clip-Loc
™
at point E (do not attach the cord yet). Fol-
OMEGA
Your Sierra Designs
OMEGA tent is very easy to pitch
and maintain. Follow these in-
structions to pitch your tent
quickly, safely and easily.
Figure 2: Tent Body (top view)
Figure 4: Tent Fly (top view)
Figure 3: Clip-Loc
Figure 1: Correct Pole Assembly
Figure 5: LadderLoc
OMEGA TENT CONTENTS
Tent Body & Rainfly: 1 Line Tighteners: 6
Tent Poles: 3 Pitching Instructions: 1
Tent Stakes: 9* Stake Sack: 1
Guy Cord: 6 Pole Sack: 1
* Sierra Designs tents include stakes for pitching the body and fly under normal conditions.
Additional stakes may be required in severe conditons.
S I E R R A D E S I G N S
SIERRA DESIGNS 1255 Powell Street Emeryville, CA 94608 Phone: 510-450-9555 Fax: 510-654-0705 Toll Free: 800-635-0461
The 2 Modes of the Omega
Figure 8: Shock-cert
Figure 6: Internal Guy System
Figure 7: Line Tightener
3-Season Mode
4-Season Mode
In full 4-Season mode the Omega is capable of withstanding
some of natures toughest onslaughts. At 6 lbs. 8 oz. the Omega
is one of the lightest 4-Season tents on the market.
Internal Guy System
Years ago, Sierra Designs was the first to introduce the revolu-
tionary Internal Guy System. This system remains a very
important feature in our Convertible and 4-Season tents. When
installed this simple system will greatly increase the strength
of your tent with the weight of a few guy cords. This system is
very useful in extreme weather conditions, but is not necessary
under normal conditions.
Installation: All attachments are made inside the tent. All
that is needed are 4 pieces of guy cord of 72" lengths or longer
(line tighteners may be used but are optional). Some of these
items have been provided complimentary with your tent. The
internal loops that will be used in this system are the four
loops in the corners of the tent at points A, B, C and D as well
as four of the seven loops in the ceiling at points S, T, H and I.
Start by tying one end of a cord through the webbing loop
in the floor at point C. Secure the other end at point I with a
double-half-hitch or a line tightener (Figure 7). Repeat this
procedure for lines between points B and H, A and S (or H in
extreme conditions) and D and T (or I in extreme conditions).
The Internal Guy System will partially obstruct the doorway. If
you want to stow the cord out of the way when entering or ex-
iting the tent, simply loosen the cord and pass it through the
loop in the ceiling.
3-Season Mode
In 3-Season mode you are able to leave two pole sections at
home for a weight savings of 6 oz. In addition to a weight
savings, there is a large ceiling panel which folds back to
give you a tremendous amount of ventilation. The front rip-
stop door can also be folded away to reveal a large no-see-um
panel for venting.
Please note that 9 tent stakes and 6 guy cords were provided
with this tent as a courtesy. If you choose to use more than this
when pitching your tent, additional stakes and cord may be
purchased at the store where you originally purchased your tent.
Converting the Omega into a 3-Season Shelter
The Omega can easily be transformed into a lighter, well vented
3-Season tent. To begin, simply remove the black-color pole
segments on the sides of the tent by pulling the Shok-cert out
of the black pole section. To do this, first remove the black
pole sections from the grommets and undo the Clip-Locs along
the silver-black pole. Next, pull the black sections downward
until the shock cord appears. Grasp the shock cord and pull
gently to completly remove the Shok-cert (Figure 8). Repeat for
the other silver-black pole sections and place the silver pole
ends into the pole buckets at points I and H (Figure 2).
Finally, to maximize ventilation in warmer weather condi-
tions, the Omega comes equipped with a large ceiling panel.
Unzip this panel and roll it towards the rear of the tent clip-
ping it out of the way with the 5 panel clips in the ceiling of
the tent.
4-Season Mode

Other Sierra Designs Tent manuals

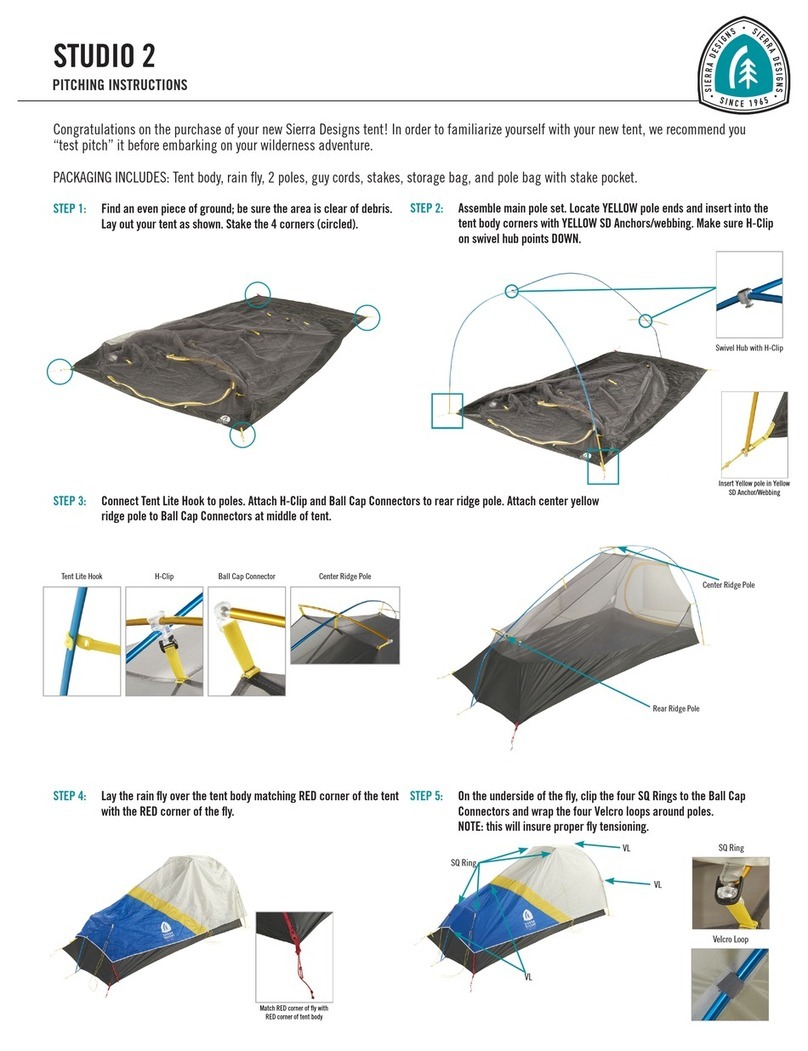
Sierra Designs STUDIO 2 Configuration guide

Sierra Designs

Sierra Designs STUDIO 2 Configuration guide

Sierra Designs Alpha User manual

Sierra Designs

Sierra Designs Alpha User manual

Sierra Designs Clip Flashlight 2 Configuration guide

Sierra Designs

Sierra Designs Clip Flashlight 2 Configuration guide

Sierra Designs FLASHLIGHT 2 Configuration guide

Sierra Designs

Sierra Designs FLASHLIGHT 2 Configuration guide

Sierra Designs Sweet Suite 2/3 User manual

Sierra Designs

Sierra Designs Sweet Suite 2/3 User manual

Sierra Designs 90154420T User manual

Sierra Designs

Sierra Designs 90154420T User manual

Sierra Designs FLASHLIGHT 1 Configuration guide

Sierra Designs

Sierra Designs FLASHLIGHT 1 Configuration guide

Sierra Designs TENSEGRITY 1 Configuration guide

Sierra Designs

Sierra Designs TENSEGRITY 1 Configuration guide

Sierra Designs LIGHTNING 2 Configuration guide

Sierra Designs

Sierra Designs LIGHTNING 2 Configuration guide

Sierra Designs 90154820T User manual

Sierra Designs

Sierra Designs 90154820T User manual

Sierra Designs ORIGAMI 2 ULTRALIGHT User manual

Sierra Designs

Sierra Designs ORIGAMI 2 ULTRALIGHT User manual

Sierra Designs Clip Flashlight 2 Configuration guide

Sierra Designs

Sierra Designs Clip Flashlight 2 Configuration guide

Sierra Designs 90154720T User manual

Sierra Designs

Sierra Designs 90154720T User manual

Sierra Designs HIGH ROUTE 1 User manual

Sierra Designs

Sierra Designs HIGH ROUTE 1 User manual

Sierra Designs CONVERT 2 Configuration guide

Sierra Designs

Sierra Designs CONVERT 2 Configuration guide

Sierra Designs METEOR 2 Configuration guide

Sierra Designs

Sierra Designs METEOR 2 Configuration guide

Sierra Designs 90155020T User manual

Sierra Designs

Sierra Designs 90155020T User manual

Popular Tent manuals by other brands

Nordcap Easy Up 400 Build-up instructions

Nordcap

Nordcap Easy Up 400 Build-up instructions

Zempire Neo Series instructions

Zempire

Zempire Neo Series instructions

CampTrails Grand Manan Assembly instructions

CampTrails

CampTrails Grand Manan Assembly instructions

Maanta ULISSE 90 Instructions and warnings

Maanta

Maanta ULISSE 90 Instructions and warnings

OZTENT JV SIGNATURE EDITION owner's manual

OZTENT

OZTENT JV SIGNATURE EDITION owner's manual

GigaTent Summer Chalet Mini Tent owner's manual

GigaTent

GigaTent Summer Chalet Mini Tent owner's manual

Outsunny 84C-230 manual

Outsunny

Outsunny 84C-230 manual

Crivit Outdoor 96716 instruction manual

Crivit Outdoor

Crivit Outdoor 96716 instruction manual

Reimo Marina instructions

Reimo

Reimo Marina instructions

Outsunny 84C-063 Assembly instruction

Outsunny

Outsunny 84C-063 Assembly instruction

EuroTrail ATLANTIS PRO manual

EuroTrail

EuroTrail ATLANTIS PRO manual

TiiTENT TB300 manual

TiiTENT

TiiTENT TB300 manual

Coleman 2000033134 Assembly & instruction manual

Coleman

Coleman 2000033134 Assembly & instruction manual

Ozark Trail W784.1 Assembly instructions and owner's manual

Ozark Trail

Ozark Trail W784.1 Assembly instructions and owner's manual

SlingFin CrossBow 2 instructions

SlingFin

SlingFin CrossBow 2 instructions

Coleman 9600-141 instructions

Coleman

Coleman 9600-141 instructions

Palram Arizona 5000 Wave - WINGS manual

Palram

Palram Arizona 5000 Wave - WINGS manual

COVERPRO 56184 Owner's manual & safety instructions

COVERPRO

COVERPRO 56184 Owner's manual & safety instructions

manuals.online logo
manuals.online logoBrands
  • About & Mission
  • Contact us
  • Privacy Policy
  • Terms and Conditions

Copyright 2025 Manuals.Online. All Rights Reserved.