SIP Fireball Turbofan 2000 User manual

20
Ref: 210716
FOR HELP OR ADVICE ON THIS PRODUCT PLEASE CONTACT YOUR DISTRIBUTOR,
OR SIP DIRECTLY ON:
TEL: 01509500400
EMAIL: sales@sip-group.com or technical@sip-group.com
www.sip-group.com
Please dispose of packaging for the product in a responsible
manner. It is suitable for recycling. Help to protect the
environment, take the packaging to the local amenity tip and
place into the appropriate recycling bin.
Never dispose of electrical equipment or batteries in with your
domestic waste. If your supplier offers a disposal facility please
use it or alternatively use a recognised re-cycling agent. This will
allow the recycling of raw materials and help protect the envi-
ronment.
1
Fireball
Turbofan 2000
Please read and fully understand the instructions in this manual
before operation. Keep this manual safe for future reference.
09128

2
19
Declaration of Conformity
We
SIP (Industrial Products) Ltd
Gelders Hall Road
Shepshed
Loughborough
Leicestershire
LE12 9NH
England
As the manufacturer's authorised representative within the EC
declare that the
Fireball Turbofan 2000 - SIP Part No. 09128
Conforms to the requirements of the following directive(s), as indicated.
2014/35/EU Low Voltage Directive
2014/30/EU EMC Directive
2011/65/EU RoHS Directive
And the relevant harmonised standard(s), including:
EN 60335-1:2012+A11
EN 60335-2-30:2009+A11
EN 62233:2008
EN 55014-1:2006+A1+A2
EN 55014-2:1997+A1+A2
EN 61000-3-3:2013
EN 61000-3-2:2014
Signed: …………………………………...
Mr P. Ippaso - Director - SIP (Industrial Products) Ltd
Date: 13/06/2016.
DECLARATION OF CONFORMITY

18
NOTES
3
CONTENTS
Page No. Description
4. Safety Symbols Used Throughout This Manual
4. Safety Instructions
7. Electrical Connection
8. Guarantee
9. Technical Specifications
10. Getting to Know Your Heater
11. Operating Instructions
12. Maintenance
13. Troubleshooting
14. Wiring Diagram
15. Exploded Drawing
16. Parts List
19. Declaration of Conformity

4
When using your heater, basic safety precautions should always be followed to re-
duce the risk of fire, electric shock, personal injury and / or damage to the heater.
Read all these instructions before operating the heater and save this user manual for
future reference.
SIP recommends that this heater should not be modified or used for any application
other than that for which it was designed. If you are unsure of its relative applications
do not hesitate to contact us and we will be more than happy to advise you.
KNOW YOUR HEATER: Read and understand the owner's manual and labels affixed to
the heater. Learn its applications and limitations, as well as the potential hazards spe-
cific to it.
DO NOT USE THE HEATER IN DANGEROUS ENVIRONMENTS: Do not use your heater in
damp or wet locations, including bathrooms or similar or expose it to rain. Always pro-
vide adequate space around the heater.
DO NOT OPERATE THE HEATER IN EXPLOSIVE ATMOSPHERES: Do not use the heater in
the presence of flammable liquids, gases, dust or other combustible sources.
KEEP CHILDREN AND UNTRAINED PERSONNEL AWAY FROM THE WORK AREA: All visitors
should be kept at a safe distance from the work area.
STORE THE HEATER SAFELY WHEN IT IS NOT IN USE: The heater should be stored in a dry,
locked cupboard, or similar when not in use wherever possible and out of the reach of
children.
STAY ALERT: Always watch what you are doing and use common sense.
SAFETY SYMBOLS USED THROUGHOUT THIS MANUAL
Danger / Caution: Indicates risk of personal injury and/or the possibility of
damage.
Note: Supplementary information.
Warning: Risk of electrical injury or damage!
SAFETY INSTRUCTIONS
IMPORTANT: Please read the following instructions carefully, failure to do
so could lead to serious personal injury and / or damage to the heat-
er.
17
NOTES

16
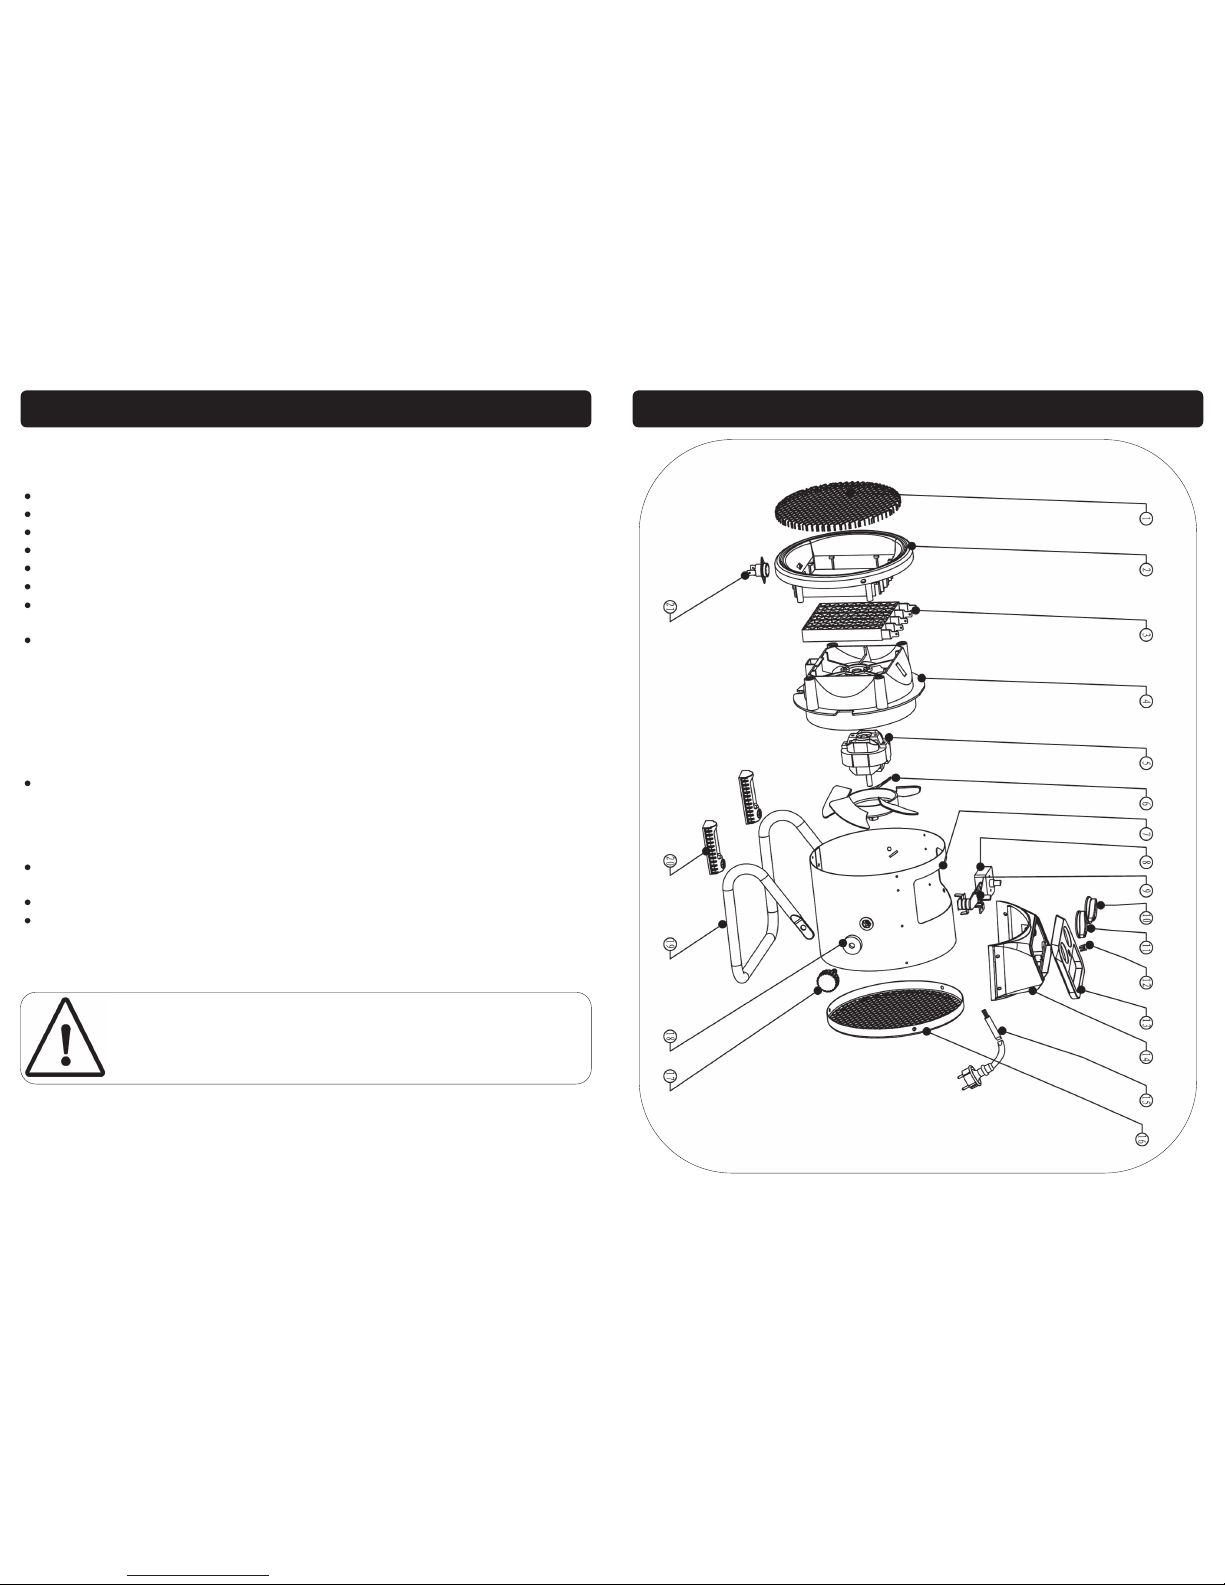
Ref No. Description SIP Part No.
1. Outlet Grill PW09-00025
2. Fixed Ring PW09-00026
3. PTC Heating Element PW09-00027
4. Air Flue PW09-00028
5. Fan Motor PW09-00029
6. Fan PW09-00030
7. Outer Casing PW09-00031
8. On/Off Switch PW09-00032
9. Thermostat PW09-00033
10. Switch Knob PW09-00034
11. Thermostat Knob PW09-00035
12. Power Indication Light PW09-00036
13. Control Box Cover PW09-00037
14. Control Box PW09-00038
15. Mains Lead PW09-00039
16. Rear Grill PW09-00040
17. Thumb Screw PW09-00041
18. Spacer PW09-00042
19. Stand PW09-00043
20. Foot PW09-00044
21. Safety Thermostat PW09-00045
PARTS LIST
5
DISCONNECT THE HEATER FROM THE MAINS SUPPLY: When not in use.
AVOID UNINTENTIONAL STARTING: Make sure the switch is in the OFF position before
connecting the heater to the mains supply.
DO NOT ABUSE THE MAINS LEAD: Never carry the heater by the mains lead or pull it to
remove the plug from the mains socket. Keep the mains lead away from heat, oil and
sharp edges. If the mains lead is damaged, it must be replaced by the manufacturer
or its service agent or a similarly qualified person in order to avoid unwanted hazards.
HAVE YOUR HEATER REPAIRED BY A QUALIFIED PERSON: The heater is in accordance
with the relevant safety requirements. Repairs should only be carried out by qualified
persons using original spare parts, otherwise this may result in considerable danger to
the user.
DANGER! Check that the heater is in sound condition and good working order. Take
immediate action to repair or replace damaged parts.
Use recommended parts only - Unapproved parts may be dangerous and will invali-
date the warranty.
WARNING! Do not direct the front of the heater towards any combustible materials
(e.g. wooden items, cloth, plastics, paper, etc).
Only operate on a level and stable surface.
WARNING! Do not use the heater near flammable material, liquids, solids, gases or
compressed gas cylinders.
Do not allow untrained persons to operate the heater and do not operate the heater
without all covers etc. correctly fitted.
Do not move or handle the heater when it is running or still hot - always turn it off and
allow it to cool.
Do not leave the heater unattended when in use. Switch the heater off and unplug
from the mains supply before leaving the work area.
Do not obstruct the air inlet (rear) and air outlet (front) of the heater.
Do not use any form of ducting in front or at the rear of the heater.
Do not allow children or animals near the heater, particularly when in use, or while still
hot.
WARNING! RISK OF ELECTRIC SHOCK. Do not expose the heater to water spray, rain,
dripping water or moisture of any kind.
Do not touch the heater outlet or any internal parts when first switched off as these
can be hot and will take time to cool.
Ensure that the heater is correctly turned off when not in use and store in a safe, dry
area, out of reach of children.
Do not unplug the heater to switch it off - always use the on/off switch.
NEVER use this heater where flammable vapours may be present.
Keep all combustible materials away from this heater.
When using the heater for the first time, you may notice a slight emission of smoke, or
a slight burning smell. This is normal and will stop after a short time. The heating ele-
SAFETY INSTRUCTIONS….cont

6
ment is made of stainless steel and was coated with protection oil during produc-
tion. The smoke / smell is caused by any small residue of this oil which was left on
the element.
NEVER cover the heater.
NEVER move or handle heater while still hot.
ALWAYS locate heater on a stable and level surface.
ALWAYS keep children and animals away from heater.
Never stand on the heater.
Never connect any other electrical appliances to the same socket as the heater.
DO NOT dismantle or tamper with the heater, as this may be dangerous and will in-
validate the warranty.
Understand the operating environment; Before each use the operator should assess,
understand and where possible reduce the specific risks and dangers associated
with the operating environment. Bystanders should also be made aware of any risks
associated with the operating environment.
If a problem with the heater is experienced, or if the mains lead or plug become
damaged, stop operation and contact your distributor for repair.
If the heater is used in a place of work all rules and laws etc. relating to the use of
portable electrical appliances should be followed.
WARNING: Risk of Electric Shock!
Use only the electrical power (voltage and frequency) specified on the specification
label of the heater.
Use only a three-prong, grounded outlet.
ALWAYS unplug the heater when not in use.
SAFETY INSTRUCTIONS….cont
Caution: The warnings and cautions mentioned in this user manual can not
cover all possible conditions and situations that may occur. It must be under-
stood by the operator that common sense and caution are factors which can-
not be built into this product, but must be applied.
15
EXPLODED DRAWING

14
WIRING DIAGRAM
7
WARNING! It is the responsibility of the owner and the operator to read, understand
and comply with the following:
You must check all electrical products, before use, to ensure that they are safe.
You must inspect power cables, plugs, sockets and any other connectors for wear or
damage.
You must ensure that the risk of electric shock is minimised by the installation of appro-
priate safety devices; A residual current circuit Breaker (RCCB) should be incorporated
in the main distribution board. We also recommend that a residual current
Device (RCD) is used. It is particularly important to use an RCD with portable products
that are plugged into a supply which is not protected by an RCCB. If in any doubt
consult a qualified electrician.
Connecting to the power supply:
This SIP heater is fitted with a standard 230v ~ 13 amp type plug. Before using the
heater, inspect the mains lead and plug to ensure that neither are damaged. If any
damage is visible have the heater inspected / repaired by a suitably qualified per-
son. If it is necessary to replace the plug a heavy duty impact resistant plug would be
preferable.
The wires for the plug are coloured in the following way:
Yellow / green Earth
Blue Neutral
Brown Live
As the colours of the wires may not correspond with the markings in your plug, pro-
ceed as follows: The wire which is coloured blue, must be connected to the terminal
marked with N or coloured black. The wire which is coloured brown, must be connect-
ed to the terminal, which is marked L or coloured red. The wire which is coloured yel-
low / green should be connected to the terminal which is coloured the same or
marked
Always secure the wires in the plug terminal carefully and tightly.
Secure the cable in the cord grip carefully.
ELECTRICAL CONNECTION

8
ELECTRICAL CONNECTION….cont
Warning: Never connect live or neutral wires to the earth terminal of the plug.
Only fit an approved plug with the correct rated fuse. If in doubt consult a
qualified electrician.
Note: Always make sure the mains supply is of the correct voltage and the
correct fuse protection is used. In the event of replacing the fuse always
replace the fuse with the same value as the original.
Note: If an extension lead is necessary in order to reach the mains supply; The
cross section should be checked so that it is of sufficient size so as to reduce
the chances of voltage drops. Always fully unwind the lead during use.
GUARANTEE
This SIP heater is covered by a 12 month parts and labour warranty covering failure
due to manufacturers defects. This does not cover failure due to misuse or operating
the heater outside the scope of this manual - any claims deemed to be outside the
scope of the warranty may be subject to charges Including, but not limited to parts,
labour and carriage costs.
The warranty does not cover consumables such as fuses.
In the unlikely event of warranty claims, contact your distributor as soon as possible.
Note: Proof of purchase will be required before any warranty can be hon-
oured.
Note: If an extension lead is necessary it should be as short as possible. Never
connect any other electrical items to the same mains lead, or mains outlet.
13
TROUBLESHOOTING
Symptom Possible cause Corrective Action
The heater does not op-
erate, even when it is
plugged in and the
switch and thermostat
are switched on / set.
The plug is loose, bad con-
nection.
No power in socket outlet.
Pull out the plug, check the
connection of the plug and
socket. Then connect again.
Insert the plug in a correctly
powered socket.
The heating element is
glowing.
The input voltage is too
high or too low.
The air inlet grill is blocked.
Insert the plug in a correctly
powered socket.
Inlet or outlet flow restricted;
See minimum clearances on
page 9.
The heater does not get
hot.
The switch is not set to 1 of
the 2 heat settings.
Safety thermostat has oper-
ated.
Check and adjust the switch
accordingly.
The internal temperature is
too high; Check and clear
any obstructions. The heater
will begin to run normally
once the internal tempera-
ture has reduced.
Heater does not turn on. Thermostat is set below
ambient temperature.
Fuse blown.
Loose connection in wiring.
Turn the thermostat up above
ambient temperature.
Check / replace the fuse.
Have the heater checked by
a competent person.

12
Before cleaning or maintenance operations always run the heater for a short while in
fan mode to allow it to cool.
Turn the heater off and remove the plug from the mains supply.
Clean the heater with a soft dry cloth only.
DO NOT use abrasives or solvents.
Periodically check the heater grill to ensure that it is not blocked.
MAINTENANCE INSTRUCTIONS
Note: Dry compressed air could be used to blow away any dust etc. that
may build up inside the turbofan 2000.
Caution: Whilst using compressed air, dust and / or other particles may become air borne;
carry out the operation in a well ventilated area and use the appropriate eye and ear pro-
tection and a dust mask.
No other maintenance is necessary.
DO NOT dismantle or tamper with the heater, as this may be dangerous and will invali-
date the warranty.
If a problem with the heater is experienced, or if the mains lead or plug become
damaged, contact your distributor for repair.
When you store the heater, let it cool down, ensure that it is dry, cover with a plastic
bag, put in a packing box and store it in a dry, ventilated place.
9
Top - 500 mm
Minimum Clearance Around
Heater
Sides - 500 mm
Rear - 750 mm
Front - 1800 mm
TECHNICAL SPECIFICATIONS
Part Number 09128
Input Voltage 230v ~ 50Hz
Power (Max.) 2000 Watts
Fuse Rating 13 Amps
Settings - Fan 25 watts
Settings - Heat 1 1000 watts
Settings - Heat 2 2000 Watts
Protection IP20
Heater Dimensions 225 x 220 x 160 mm
Net Weight 1.7 Kg

10
A B C D E
F
GH H
I
A. Mode Selection Knob
B. Power Indication Light
C. Temperature Selection Knob
D. Handle
E. Inlet
F. Heating Element
G. Outlet Grill
H. Feet
I. Angle Adjust Knob
GETTING TO KNOW YOUR HEATER
11
Position the heater so that it stands upright on a firm surface and at a safe dis-
tance from wet environments and flammable objects / materials.
Connect the heaters plug to a correctly rated mains supply.
Select the desired mode - First setting for just fan with no heat, 2nd setting for
half power and third setting for full power.
Select the desired temperature.
Once the room reaches the required temperature, the heater will stop running and
the power light will go off; When the temperature has decreased enough, the heater
will resume operation and the power light will illuminate.
The Turbofan 2000 heater now starts and stops automatically and thus keeps the room
temperature constant.
On / Off / Mode selection switch
Temperature selection
OPERATING INSTRUCTIONS
Note: The power light will only illuminate when the heater is running; Take care
not to leave the heater in automatic (thermostat control) mode thinking that it
is turned off.
After operation in heat mode; Set to fan mode and run the heater for a short while to
allow it to cool before turning it off.
Note: The thermostat will still function in fan mode, and will need to be set
above the ambient temperature; you will hear a click when it is set above /
below ambient temperature.
This manual suits for next models
1
Table of contents
Popular Electric Heater manuals by other brands

DeLonghi
DeLonghi HCO series instructions

THERMOBILE
THERMOBILE IMA 61 user manual

IOTA
IOTA IISCN3P Series user manual

Harvia
Harvia KM60SE Instructions for installation and use

Weil-McLain
Weil-McLain Therma Trim Electric Baseboard Heater Assembling instructions

Olimpia splendid
Olimpia splendid CROMO Instructions for installation, use and maintenance

EOS
EOS 38.AS Installation and operation guide

Trane
Trane BAYHTR1405A Installer's guide

Trotec
Trotec TEH 20 T Original instructions

Varma Tec
Varma Tec HED66GBK-120PS Installation, operation & maintenance instructions

LifeWay
LifeWay Electric Heater user manual

Vornado
Vornado Automatic Vortex Heat AVH2 owner's guide