Sirius XM RAdio Universal Home Kit User manual

Universal Home Kit
User Guide

2
Table of Contents
Compatibility ...................................................3
Introduction ....................................................4
Safety and Care Information .................................................. 5
What’s in the Box? ........................................................... 6
Home Dock Color-Coded Connections .......................................... 7
Remote Control Functions .................................................... 8
Remote Control Battery Replacement .......................................... 9
Home Installation. . . . . . . . . . . . . . . . . . . . . . . . . . . . . . . . . . . . . . . . . . . . . . . 10
Step 1: Insert the Radio Dock Adapter Into the Dock ..............................10
Step 2: Connect the Home Dock and Dock the Radio..............................13
Step 3: Place and Aim the Indoor/Outdoor Home Antenna .........................15
Step 4: Connect the Home Dock to a Stereo System or Powered Speakers ...........19
Troubleshooting ................................................22
Product Specifications ..........................................25
Patent and Environmental Information .............................26
Patent Information..........................................................26
Environmental Information...................................................26
IC Statement ..................................................27
Copyrights and Trademarks ......................................28
Indoor/Outdoor Home Antenna Template. . . . . . . . . . . . . . . . . . . . . . . . . . . . 29

3
Compatibility
This Universal Home Kit is compatible with the following Dock & Play Radios:
SiriusXM:
• Onyx Plus
• Edge
XM:
• Onyx
• Onyx EZ
• XpressRCi
• XpressRC
• XpressR
Sirius:
• Sportster 5
• Starmate 8, 5, 4, 3
• Stratus 7, 6, 5
• Stratus

4
Introduction
Thank you for purchasing the SiriusXM Universal Home Kit!
The Home Kit lets you play your compatible XM or SiriusXM Dock & Play Radio
through your home stereo system or powered speakers.
• There is no need for a second subscription. Just connect this Home Kit to a
stereo system or set of powered speakers - and then simply move your Radio
from any location to your home or office.
• This Home Kit works with a set of powered speakers or any stereo system
with audio input jacks.
And for the latest information about this and other SiriusXM products and
accessories, visit www.siriusxm.ca or your favorite retailer.
Please read the entire User Guide before installing your Universal Home Kit!

5
Safety and Care Information
IMPORTANT! Self installation instructions and tips are provided for your
convenience. It is your responsibility to determine if you have the knowledge, skills,
and physical ability required to properly perform an installation. SiriusXM shall
have no liability for damage or injury resulting from the installation or use of any
SiriusXM or third party products. SiriusXM product warranties do not cover the
installation, removal or reinstallation of any product.
• Do not expose to extreme temperatures (above 140°F or below -4°F, or above
60°C or below -20°C).
• Do not expose to moisture. Do not use device near or in water. Do not touch
the device with wet hands.
• Do not let any foreign matter spill into device.
• Do not store in dusty areas.
• Do not expose to chemicals such as benzene and thinners. Do not use liquid
or aerosol cleaners. Clean with a soft damp cloth only.
• Do not expose to direct sunlight for a prolonged period of time, and do not
expose to fire, flame, or other heat sources.
• Do not try to disassemble and/or repair the device yourself.
• Do not drop your device or subject it to severe impact.
• Do not place heavy objects on device.
• Do not subject device to excessive pressure.
WARNING!
• Opening the case may result in electric shock.
• Make sure that you insert the Home Power Adapter’s plug all the way into the
outlet.
• This product contains chemicals known to the State of California to cause
cancer and birth defects or other reproductive harm.
Introduction

6
Introduction
What’s in the Box?
Indoor/Outdoor
Home Antenna Stereo Audio
Cable
Home Power
Adapter
Remote Control
8
5
2
7
4
1
9
6
3
mute
t-mix
memo
t-scn
fm
jump
menu
0bank
direct
display
IR
PULL
Home Dock
Sirius Radio Dock Adapter
XM & SiriusXM Radio Dock
Adapter

7
AUDIOANT PWR
Introduction
Home Dock Color-Coded Connections
The color-coded Home Dock makes it simple to connect the cables to the
appropriate connectors at the rear of the dock.
ANT (Silver)
Connection for
the Indoor/
Outdoor Home
Antenna.
AUDIO (Green)
Connection for
stereo system or
powered speakers.
POWER (Red)
Connection for
Home Power
Adapter.
Rear View

8
Introduction
Remote Control Functions
8
5
2
7
4
1
9
6
3
mute
t-mix
memo
t-scn
fm
jump
menu
0bank
direct
display
IR
PULL
Pause and Replay Buttons
For Radios which have these features, pause,
rewind, and replay live radio and smart
favorite channels.
Power Button
Press to turn Radio on and off. Arrow Buttons Up/Down
Press to preview and tune to channels through
the channel lineup; also press to scroll through
lists and highlight menu items.
Arrow Buttons Left/Right
Press to search for channels by category.
Menu Button
Press to access advanced features and
configuration options.
Select Button
When in a menu or list, press to confirm
selection of highlighted item; for SiriusXM
Radios which have these features, when in
TuneMix or TuneScan, press to end TuneMix/
Scan and continue playing the currently
tuned channel; for some Sirius Radios, press
to directly enter a channel number.
Bank Button
For Radios which have this feature, press to
switch between favorite channel banks or bands.
Jump Button
For Radios which have these features,
directly access traffic and weather of the
chosen city; access the previous channel or a
favorite channel.
TuneMix/Memo Button
For SiriusXM Radios which have this feature,
press to begin TuneMix; for Sirius Radios
which have this feature, press to save
artists or songs.
Number Buttons
Press to tune to a stored favorite channel;
for Radios which have this feature, also used
to enter a channel number and directly tune
to that channel.
FM Button
For Radios which have this feature, press to
access and cycle through FM presets. (Vehicle
Dock only).
Direct/Display Button
For XM and SiriusXM Radios which have this
feature, press to directly enter a channel number;
for Sirius Radios which have this feature, press
to customize the way you view content on the
display.
Mute Button
Press to silence the audio. Press again to hear
to the audio.
TuneScan Button
For SiriusXM Radios which have this feature, press
to begin TuneScan.
IMPORTANT!
Pull tab and remove
before using Remote
Control.

9
Introduction
Remote Control Battery Replacement
The Remote Control has a child resistant battery compartment which requires a
pointed object to open the battery compartment. A paper clip is recommended,
as shown.
To Replace the Battery:
1. Press the paper clip or
other object into the
lock release opening
on the Remote Control,
and slide the battery
compartment cover off
of the Remote Control.
2. Slide the battery
out of the battery
compartment.
3. Replace with a new
battery. Observe the correct
orientation of the battery; the
+ positive side of the battery
should be facing up.
4. Replace the battery
compartment cover.
Paper Clip
Lock Release
Battery
Compartment
Cover
Battery
10
Home Installation
There are several steps to setting up your Home Kit. Follow these steps for an
easy installation.
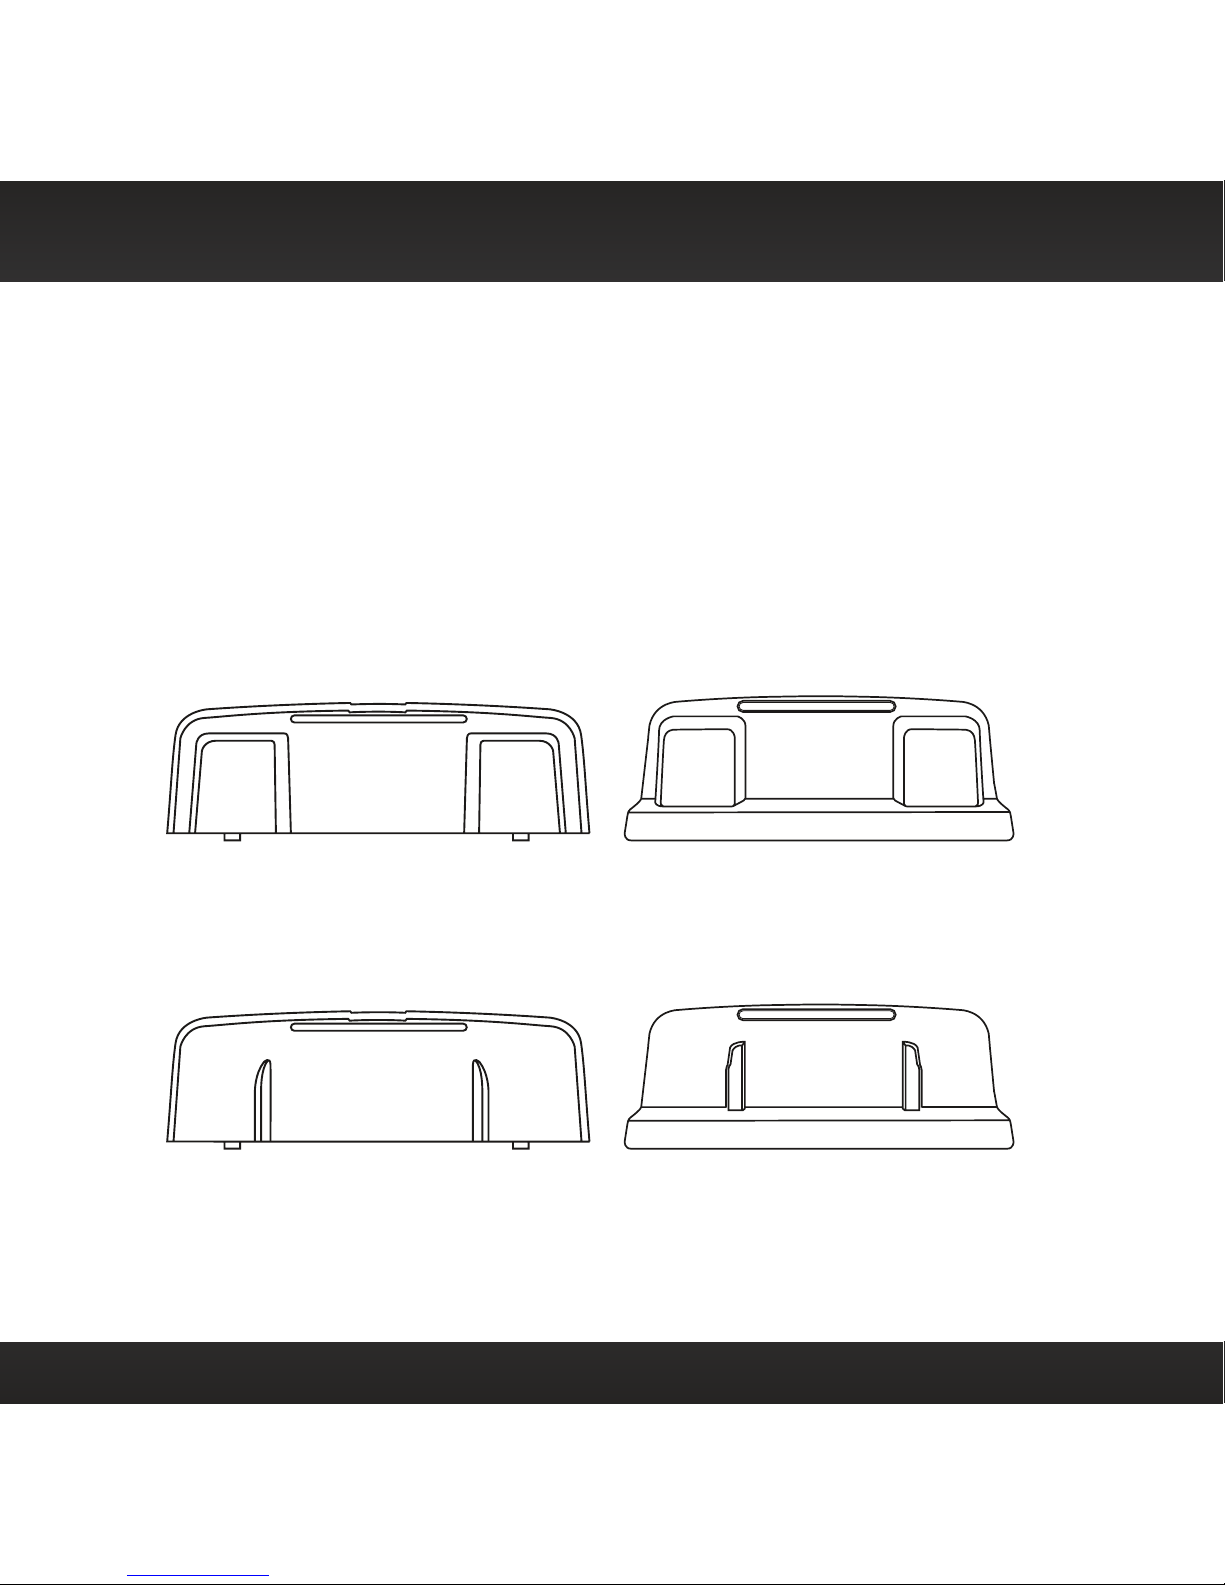
Step 1: Insert the Radio Dock Adapter Into the Dock
You’ll need to insert the Radio Dock Adapter that is compatible with your Radio
into the Home Dock.
1. Locate the Radio Dock Adapter that is compatible with your Radio.
If you have an XM or SiriusXM Radio: If your Radio is branded as XM* or
SiriusXM*, select the Radio Dock Adapter marked XM & SIRIUSXM on the
back of the adapter.
If you have a Sirius Radio: If your Radio is branded as Sirius*, select the
Radio Dock Adapter that is marked SIRIUS on the back of the adapter.
2. Orient and place the Radio Dock Adapter that you selected into the Home
XM & SIRIUSXM
Front View Correct OrientationBack View
SIRIUS
Front View Correct OrientationBack View
*If you are unsure whether your Radio is an XM, SiriusXM, or Sirius Radio, check the label
on the back of the Radio. If the label on your Radio says XM Radio ID or Radio ID, and has an
8-digit alphanumeric number, it is an XM or SiriusXM Radio. If the label on your Radio says
Sirius ID, SID, or ESN, and has a 12-digit numeric number, it is a Sirius Radio.

11
Home Installation
Dock. Be sure the adapter is centered, and is seated all the way down into
the dock.
3. Once the adapter is seated correctly in the Home Dock, gently press the top
of the adapter against the dock with your finger until it clicks into place. The
Radio Dock Adapter is now installed.

12
Should it become necessary to remove the Radio Dock Adapter from the Home
Dock, use your fingernail to gently press down on the top of the adapter, and then
use a long thin object such as a paper clip, a screw driver or something similar to
pry the adapter away until it releases from the dock. Then lift the adapter up and
out of the dock.
Home Installation

13
Step 2: Connect the Home Dock and Dock the Radio
When installing the Home Dock in your home, choose a location in close proximity
to your stereo system or powered speakers, and also where the cable from the
Indoor/Outdoor Home Antenna can reach the Home Dock. The location should
be easily accessible and provide good visibility of the display, but should not be
located where it will be in direct sunlight, which will affect the visibility of the
display screen.
A. Connect the Indoor/Outdoor Home Antenna
Once you have selected a location for the dock, connect the antenna to the silver
ANT connector at the rear of the Home Dock.
We will work on the location and aiming of the antenna in the next step.
AUDIOANT PWR
Home Installation
14
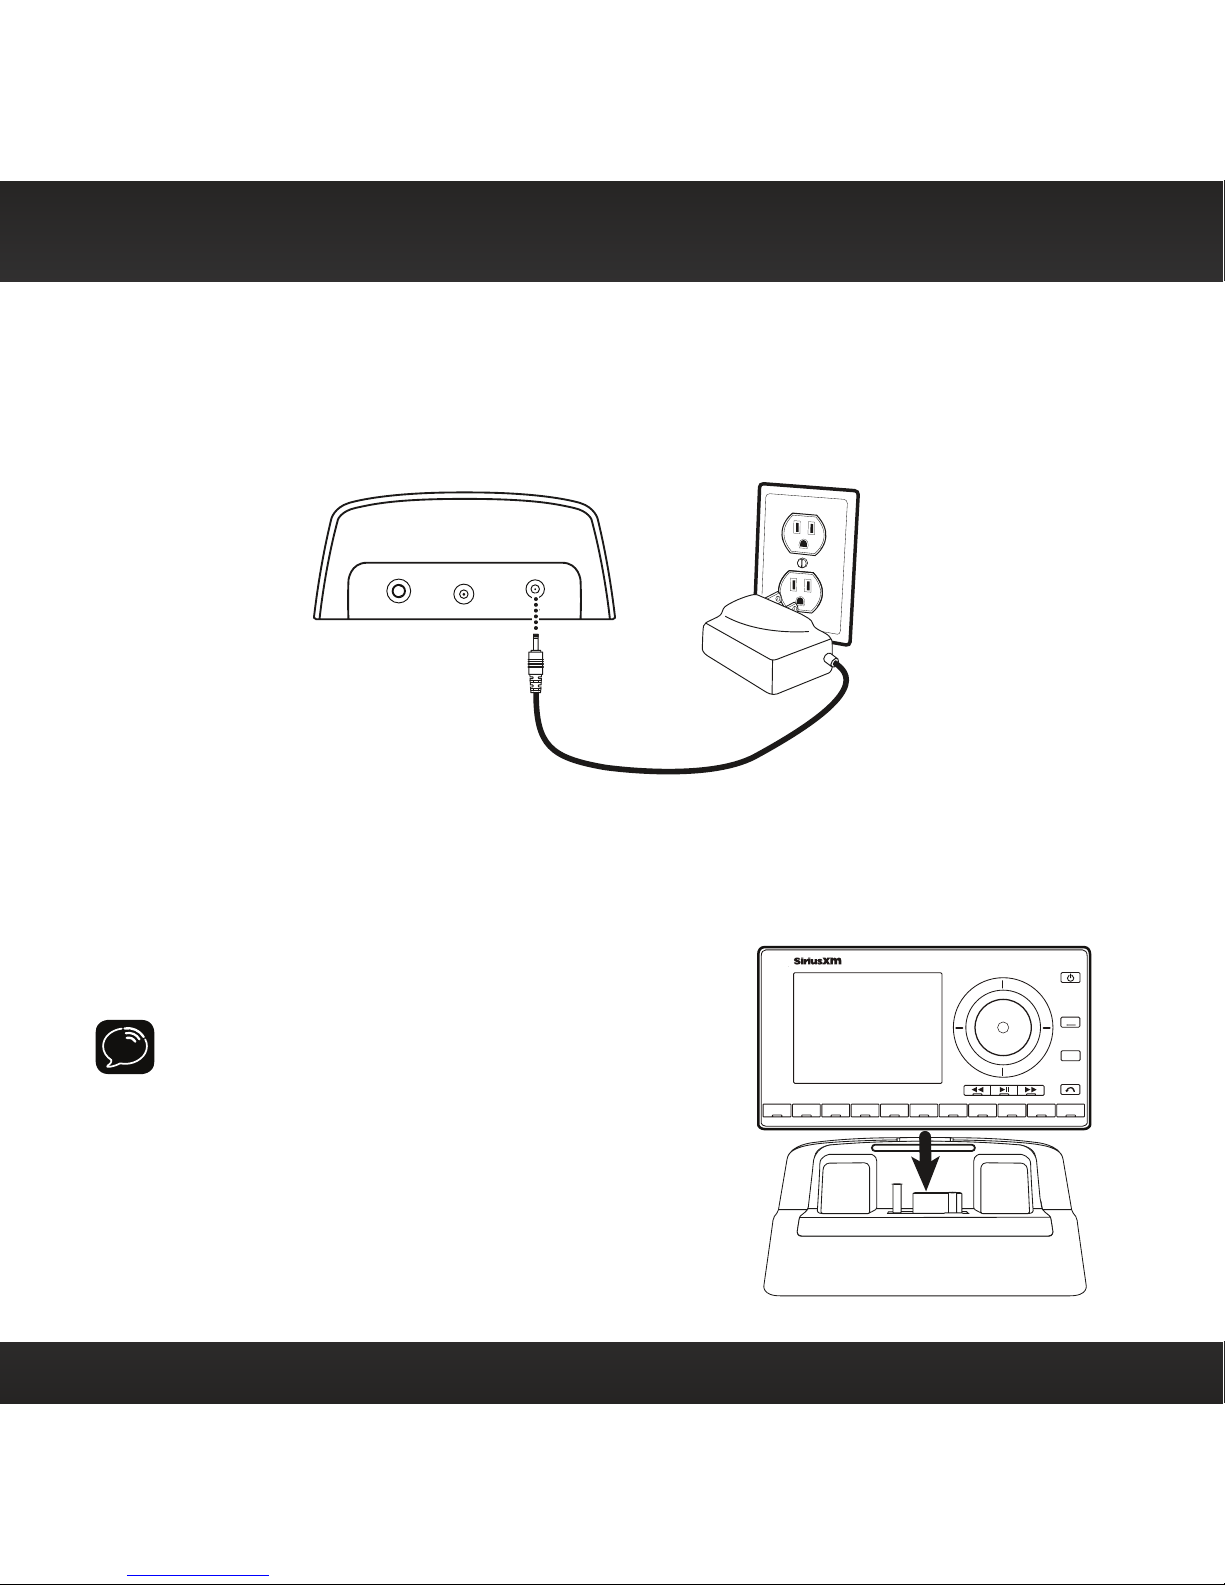
B. Connect the Home Power Adapter
Connect the Home Power Adapter to the red Power connector at the rear of the
Home Dock, and plug it into a wall outlet.
C. Dock Your Radio
Insert your Radio into the Home Dock as shown, and
turn the Radio On by pressing the Power button.
NOTE: Your Radio may be a different model than
the Radio shown here.
AUDIOANT PWR
234567890
b / #
alerts
twx
FM
menu
t-mix
t-scn
1
PLUS
Home Installation

15
Home Installation
Step 3: Place and Aim the Indoor/Outdoor Home Antenna
To begin, try experimenting with the Indoor/
Outdoor Home Antenna to get a feel for the
reception in your location. In major metropolitan
areas, you might find that you get great reception
in several locations without worrying too much
about aim and placement. If 2 or 3 vertical bars of
signal strength are being displayed, continue with
step 4 on page 19.
If there is not at least two bars of signal strength
displayed, refer to your Radio’s User Guide (go
to www.siriusxm.com/guides) for instructions on
accessing the Signal Indicator,Signal, or Antenna
Aiming screen of your Radio, to see a visual
indication of signal strength. Move the antenna
around the room or from room to room. Aim it from
different windows. If you find a location where you
are receiving good Satellite or Terrestrial signal
strength (or both), exit the Signal Indicator,Signal,
or Antenna Aiming screen. Continue with step 4 on
page 19.
If you are unable to find a location where you
are receiving good Satellite or Terrestrial signal
strength, try some of the suggestions which follow.
*The screens shown above are
representative and may differ
from the screens displayed on
your Radio.
Signal Indicator
S
ATELLIT
E
TERRESTRIA
L
Press menu to exit
866-635-2349
siriusxm.com
1
b
A

16
Other Indoor/Outdoor Home Antenna Installation Suggestions
Try moving the Indoor/Outdoor Home Antenna closer to a window, ideally one
that is facing due south.
Not sure which way is south? Think about where the sun rises (in the east) and
sets (in the west). Then stand so that east is to your left and you’ll be facing south.
Is there a window in the direction you’re facing? Move the antenna closer to the
window.
TIP! Still not sure which way is south or where to place your Indoor/Outdoor Home
Antenna? Look up your location on an online mapping website that offers satellite
views of street addresses where you can easily see which way is south, and what
window may offer an unobstructed view of the sky.
Another easy method is to start at any window, then work from window to
window in a simple pattern to find the window that gives the best signal strength.
Note that the antenna must also have an unobstructed view, with no trees or
buildings blocking its aim. If the antenna is aimed through a window, be aware
that blinds, screens, or any other non-glass elements such as thermal insulation
can sometimes cause reception issues. If this is the case, you may want to use
another window or place the antenna outside of the window.
If you find a window that gives you
good signal strength, you can place the
antenna on the windowsill. The antenna
may need to be placed on something to
raise it above the level of the window
frame.
If you don’t have a window where
you receive a consistent signal, or
placing the antenna in a window is not
a practical solution for you, BETTER
Home Installation

17
reception can be achieved by placing the antenna outside on a window ledge,
porch, table, or patio. The location you choose should provide the antenna with a
clear view of the southern sky.
If none of the previous solutions work for you,
then the BEST reception can be achieved by
mounting the antenna outdoors, with a clear
view of the southern sky.
Note that you will want to consider any
potential hazards when you choose the
mounting location, and possibly consider
professional installation. Sirius XM Canada
Inc. is not liable for any damages.
To mount the antenna, you will need four
screws (not included) with a 1/4” head (e.g.,
an M3 screw), and that are suitable
for the material onto which you are
affixing the antenna, (e.g., wood,
metal, etc.). The screws should be
spaced 1-3/8” apart horizontally
and 1-1/8” vertically. Refer to the
template on “Indoor/Outdoor Home
Antenna Template” on page 29.
Once you have found a suitable
location for the antenna, route the
antenna cable to the Home Dock.
Be sure you avoid any obstructions
that could crimp, kink, or twist the
cable. Use protective grommets
SOFFIT
SOUTH
SOUTH
Home Installation

18
wherever rough openings are
encountered. If the antenna
is installed outdoors, route
the cable from the antenna
location to the interior of
the home, working the cable
through the basement, under
a window sill, etc., and make
adjustments to take up cable
slack as necessary.
TIP! If your Indoor/Outdoor Home
Antenna’s cable isn’t long enough, visit
www.siriusxm.ca, or your favorite retailer,
and consider a 50 ft. Home Antenna
Extension Cable or a Wireless Home Signal
Repeater.
Verify that the antenna is pointed south, and
that the antenna’s view of the sky is not blocked
by a tree, a building, a bridge, or anything else.
Try various locations until you find one where
you are receiving a good signal.
The Indoor/Outdoor Home Antenna’s reception
can also be tweaked by opening or closing the
antenna clamshell, and turning the antenna.
While observing the signal strength, make small adjustments to the angle of tilt
of the clamshell until the highest possible signal strength is achieved. If you have
not wall-mounted the antenna, turn the antenna slightly to the right or left and
observe if the signal strength increases. For each tweak, allow a few seconds in
each position to determine if the signal strength increases.
1-3/8 in
1-1/8 in
OUTDOORS
SOUTH
Home Installation

19
Step 4: Connect the Home Dock to a Stereo System or
Powered Speakers
The Home Dock can be connected to your stereo system, or to a set of powered
speakers. If you are connecting to a stereo system, see the following section. If
you are connecting to a set of powered speakers, see “To Connect the Home Dock
to Your Powered Speakers” on page 21.
To Connect the Home Dock to Your Stereo System
The Home Dock can be connected to your stereo system through the Aux In or
Line In connection of your stereo system, using the provided Stereo Audio Cable.
1. Take the provided Stereo Audio Cable and connect the single 1/8” (3.5 mm)
connector to the green AUDIO connector at the rear of the Home Dock.
2. Connect the white left and red right Stereo Audio Cable connectors (“L” and
“R” are also on each respective tip) to any available input other than PHONO
on your stereo system. (If your stereo’s inputs are marked red and black,
SOUTH
Home Installation

20
simply connect the white plug to the black input.)
3. Turn the stereo system On, and make sure you select the correct input on
your stereo system for the Aux In or Line In connection.
4. If you have connected everything correctly, and you are receiving signal, you
should hear the SiriusXM audio.
5. The audio level of your Radio can also be adjusted, if necessary. Refer to
your Radio’s User Guide (go to www.siriusxm.ca/help/user-guides) for
instructions on how to adjust the audio level. The installation is complete.
Home Installation
AUDIOANT PWR
Other manuals for Universal Home Kit
1
Table of contents
Other Sirius XM RAdio Docking Station manuals

Sirius XM RAdio
Sirius XM RAdio SCHDOC1 - Sirius Connect Home Dock User manual

Sirius XM RAdio
Sirius XM RAdio XMP3i User manual

Sirius XM RAdio
Sirius XM RAdio DV2 User manual

Sirius XM RAdio
Sirius XM RAdio Universal Home Kit User manual

Sirius XM RAdio
Sirius XM RAdio Home Kit User manual

Sirius XM RAdio
Sirius XM RAdio DH3 User manual

Sirius XM RAdio
Sirius XM RAdio Lynx LH1 User manual

Sirius XM RAdio
Sirius XM RAdio Portable speaker dock User manual

Sirius XM RAdio
Sirius XM RAdio Portable speaker dock User manual

Sirius XM RAdio
Sirius XM RAdio Onyx Plus User manual


