Siruba ASK-ASM100 User manual

ASK-ASM100
ORIGINAL
使用說明書與零件圖
INSTRUCTIONS BOOK & PARTS LIST


ENGLISH
ENGLISH

For the sewing machine, automatic mechanic system, and auxiliary devices (hereinafter referred as “machine"), it is
inevitable to conduct work near moving parts of the machine. This means that there is always a potential risk from the
moving parts. Operators actually operating the machine and service technicians performing maintenance and repair
are strongly advised to read and understand fully the following instructions in advance.
The safety instructions include items which are not listed in the specifications of your product. It is the manager/
supervisor´s responsibility to have their fellow workers fully understand before operation.
Fail to follow the instructions may cause damage to properties, severe injure or even death.
Explanation of warning indications and labels.
GENERAL SAFETY INSTRUCTION
HIGH VOLTAGE DANGER
Do not open the power
cabinet within 10 minutes
after the power off.
Machine moving area!
Stay away and keep clear
to avoid injury.
High speed moving area!
Stay away and keep clear
to avoid injury.
CAUTION
機械作動部份請注意裝上
保護裝置
穿線、換線、調整、清潔
時請注意關閉電源.
Moving parts may cause in jury.
Operate with safety devices.
Turn off main switch before
threading, changing bobbin and
needle, cleaning etc.
WARNING LABELS WARNING LABELS
A risk of cut and injury from moving
parts. Stay away and keep clear.
Be aware that holding the sewing
machine during operation can hurt your
hands.
A risk of electric shock. Stay away and
keep clear.
There is a risk of entanglement in the belt
resulting in injury.
A risk of burn from the high temperature
area. Stay away and keep clear.
There is a risk of injury if you touch the
button carrier.
Avoid direct eye contact with the laser
beam or other light source.
GENERAL SAFETY INDICATIONS
The correct direction is indicated.
A risk of injury to head from upper
contact.
Apply proper protection (helmet) and
keep clear.
Grounding connection as indicated.
please register your Siruba machine online or through Siruba App at once, as to
gain the full warranty protection. You may also acquire more useful information
through Siruba APP.
A WARM REMINDER
Apple Store
APP
Google Play
APP

Danger
An accident means "to cause personal injury or death, or damage to property. "
When it is necessary to perform service on electrical parts, be sure to turn the power off and wait for 5 minutes or more
before opening the power cabinet/box in order to avoid electrical shock.
Caution
1. Basic precaution
(1) Read the manual and other papers supplied with accessories of the machine before operation. Keep the manual
and papers at hand for quick reference.
(2) The content of this section includes items which are not listed in the specification of your product.
(3) Always wear safety goggles and gloves to avoid accident caused by parts breakage.
(4) For those who use a heart pacer, please consult the medical specialist first.
2. Safety devices and warning labels
(1) Check to ensure all safety devices are correctly installed in place and properly before operation.
(2) If any of the safety devices is removed for service cause, please be sure to replace it back to position and verify
that is works normally before resuming operation.
(3) Always keep the warning labels adhered on the machine clearly visible. If any of the labels missing or
contaminated, replace with a new one at soon.
(4) Fail to obey instructions above may cause severe injury or death to the operators.
3. Application and modification
(1) It is prohibited to use the machine for any application other than its original intention, or in any manner other than
that prescribed in the instruction manual.
(2) Never modify or alter the machine. Any unauthorized change of the specification will not be covered by the
warranty.
(3) Our company assumes no responsibility/liability to damages, injuries, or death resulting from the machine which
has been modified or altered.
4. Education and training
(1) The plant managers/supervisors are obliged to provide education and training to operators and service
technicians. A good education/training plan not only avoids personal injury but also prevent damage to the
property.
(2) Only a well-trained operator is allowed to operate the machine.
(3) Only a certified technician is allowed to perform service to the machine.
5. Situations that you must turn off the power
Turning off the power: press EMG Stop (if there is one), switch off the power, and remove the power plug from the
outlet.
(1) When there is a failure or abnormality, press EMG Stop (if there is one), switch off the power.
(2) To prevent accident resulting from abrupt start of the machine, before operating the machine, always turn off the
power and switch on again.
(3) When cleaning or inspecting the machine, make sure the machine stops completely after turning off the power.
(4) When performing service (i.e. changing of adjusting any component), make sure the power is off and the
machine stops completely.
SAFETY PRECAUTIONS

6. Remove the power plug by holding the plug section instead of the cord to avoid electrical shock, leakage, or fire
accident.
7. Turn off the power whenever the machine is left unattended between works.
8. In case of a power failure or black out, turn off the power to avoid damage or accident.
1. Transportation
(1) When lift or move the machine, please take the machine weight into consideration and apply a safe manner.
Refer to the specification for the information you need for transportation.
(2) Apply sufficient safety measures when lifting or moving the machine to avoid falling or dropping.
(3) To avoid unexpected accident, do not reuse the packing material for transportation.
2. Unpacking
(1) Before proceeding to unpacking, check the balance of the machine and apply necessary tools to hold the proper
position.
(2) When unpacking, follow the instruction printed on the cartoon. Be careful of the nails and chips when unpacking
from a wooden rack.
3. Installation:
3A. Table and Stand
(1) Only adopt a qualified genuine table and stand to assure the holding support. In case you need to leave the
machine on a surface temporarily for service, make sure the surface is strong enough to hold the weight.
(2) If casters are applied to the table stand, adopt casters with a locking mechanism only and lock them well to
secure the machine during the operation and service.
3B. Cable and Wire
(1) The cables and wires must comply with the specification and requirement.
(2) The cables and wires shall be free from bending or extra force. Reserve a free space of at least 30mm between
cables/wires and the moving parts.
(3) Do not apply starburst connection when wiring.
(4) All connectors must be fixed securely. And always hold the connector body when removing it.
3C. Grounding
(1) Grounding is necessary and must be done by a certified technician. (2) Check and ensure the grounding is
secured before operation.
3D. Motor
(1) The motor must comply with the specification and requirement.
(2) If there is a belt in the motor transmission, adopt or apply a proper protector to avoid entangling.
4. Before Operation
(1) Before turning on the power, make sure all the connectors, cables, and wires are free from damage, dropout, or
looseness.
(2) Check and make sure the pulley rotation follows the same direction as labels.
PRECAUTIONS TO BE TAKEN IN VARIOUS OPERATION STAGES

(3) Make sure all the stand casters are locked or fixed in position.
(4) Keep the working area clean from obstacles.
5. During Operation
(1) Always keep your fingers, hair, or clothing away from the moving components and moving area. Do not place
your personal belongings on the machine.
(2) The machine is designed to run at high speed. Always keep your hands away from the moving area. Do not
resume the work cycle until the machine stops completely.
(3) Be careful not to be caught by the machine or components when removing or resetting the machine.
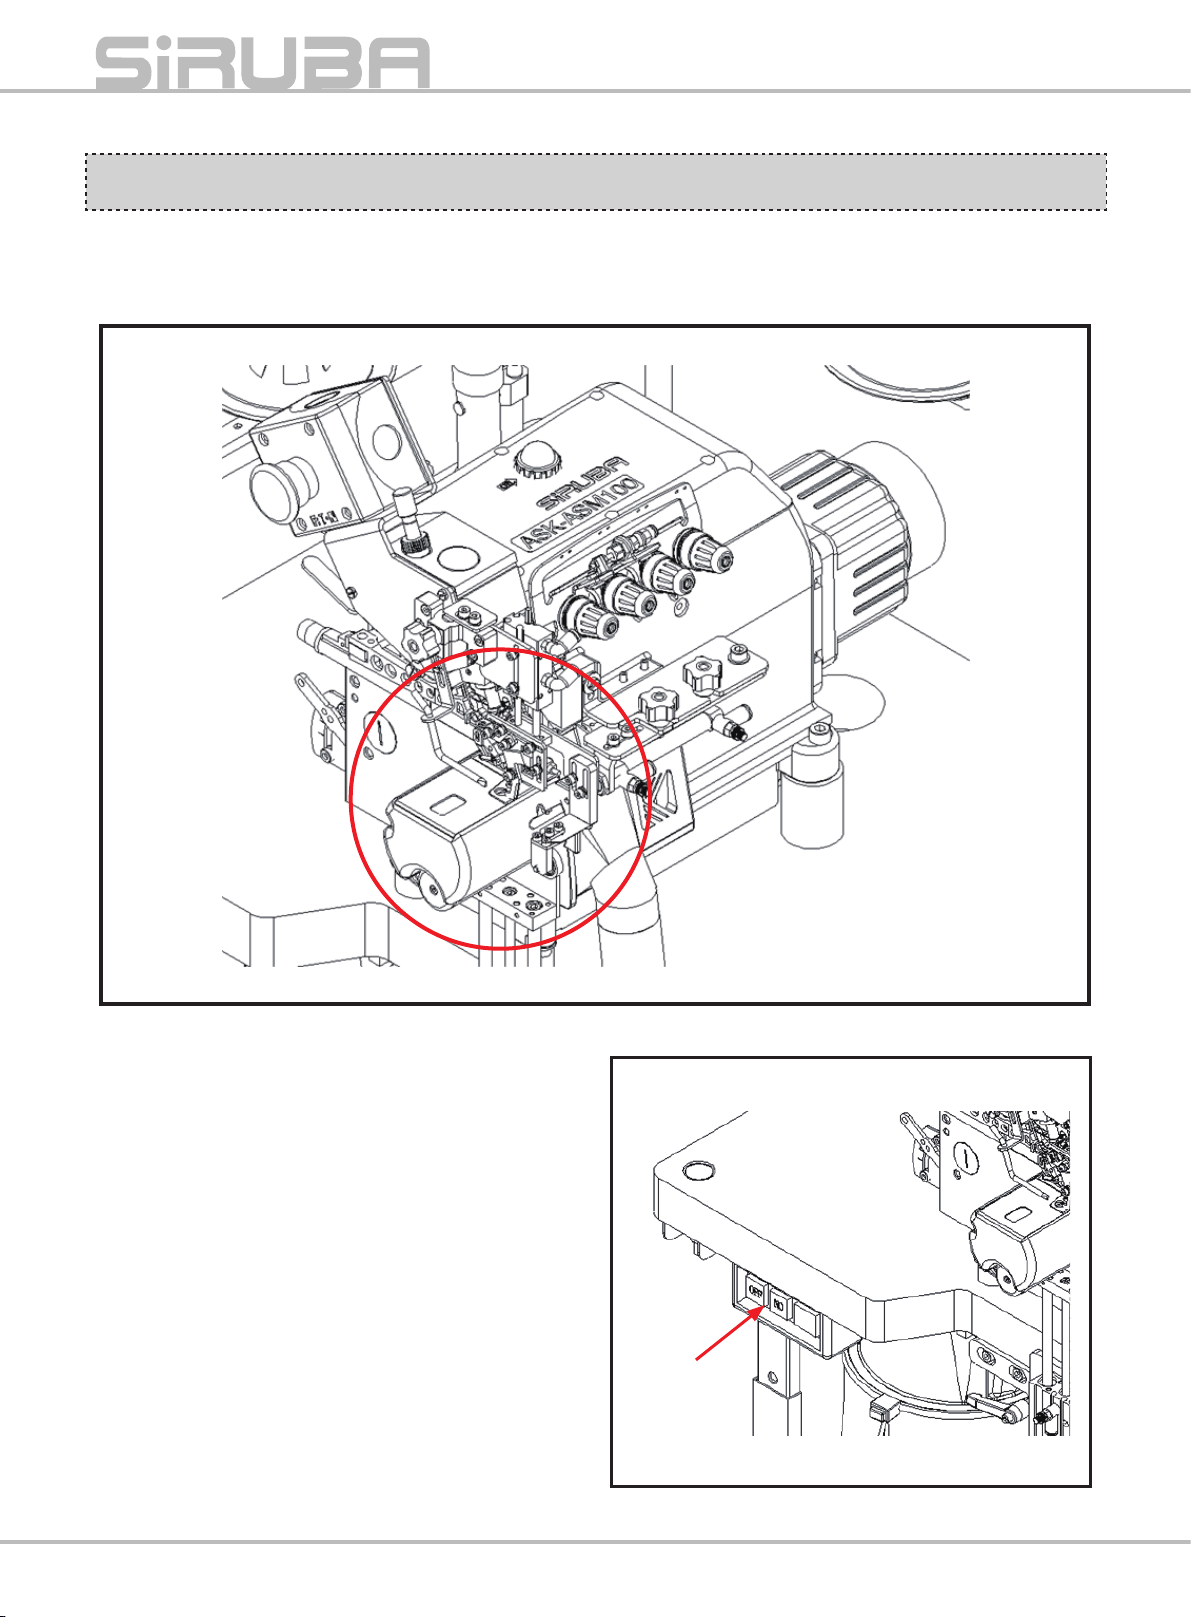
(4) To avoid accident caused by abrupt start, when performing service on the motor or belt, make sure the power is
off and the machine stops completely.
(5) A servo motor is silent as the machine stops. Be sure to turn off the power to avoid an abrupt start. (6) Always
keep the fan and airway of the power cabinet clean from any obstacle.
6. Lubrication
(1) Apply only qualified oil and grease onto the parts as instructed in the manual.
(2) If the lubricant contacts your eye or body, wash it off immediately. Consult a medical care if necessary.
(3) If the lubricant goes into your body accidentally, go to the nearby medical care immediately.
7. Service
(1) Only a certified engineer/technician is allowed to perform service to the machine, including adjusting and
repairing. Use only genuine parts for replacement. Our company assumes no responsibility/liability for any
accident caused by improper repair or adjustment, or the use of any parts other than genuine one.
(2) Only a certified technician or authorized engineer is allowed to repair or maintenance the electric system.
(3) When performing service to air-driven parts, like an air cylinder, first disconnect the air supply and expel the air
completely to avoid abrupt start.
(4) Check all screws and nut are fixed well after adjusting and replacement.
(5) A periodical cleaning is necessary. Make sure the power is off and the machine stops completely before cleaning.
(6) If the machine functions poorly or abnormally, stop the operation and turn off the power. Contact the authorized
dealers or us to request for a technical service support.
(7) When there is a fuse failure, turn off the power, find out the cause of the failure and apply solution to it, then
replace with a new one with the same spec.
(8) Periodically check and clean the fan airway and the cable/wiring.
8. Working Environment
(1) The machine should be free from the affection of electro-magnetic wave.
(2) The power supply should be in good and reliable condition, the fluctuation of rated voltage should be less than
10%.
(3) Always check the air pressure and quality. Some extra device might be needed if the supply is not reliable.
(4) The machine is designed to be used with ambient temperature 5°C ~ 35°C, relative humidity 35%~85%.
(5) To protect the electronic components and for safety cause, when there is a frost resulting from a dramatic
temperature rise, disconnect the power and wait until it dry completely.
(6) For safety cause, when there is a thundering or lightening, stop the operation and disconnect the power supply.
(7) Do not use TV or radio nearby the machine as to avoid interference.
(8) Apply necessary protection during operation. Follow applicable regulations set by local administration.
(9) For disposal of packages, lubricant, and product, please follow the applicable regulations set by local
administration.

SAFETY INSTRUCTION FOR AMS SERIES
Power Switch
Always turn off the power when:
1. Performing service.
2. The machine is left unattended between works.
Parts moving area
Always keep the moving area clean and free from any object.

Operation Stop
In urgent case, press emergency button to stop the machine immediately. The START button will flicker to
indicate the status.
Power Cabinet
Only certified engineers or technicians are allow to
open the power cabinet for service purpose. Turn off
the power and disconnect the power source when
performing service.
Electric shock alert pictorial marking
操作中停止
如果有緊急事件,在操作中急按紅色急停按鈕,機器將立即停止運作。同時運轉開關將會閃爍來提示現在為急停狀
態。

INDEX PAGE
SPECIFICATION 1
INSTALLATION 2
OPERATION FLOW 4
ADJUSTING & SETTING 5
PANEL & PARAMETERS 7
OPERATION 11
TROUBLE SHOOTING 13
SERVICE PARTS POLICY 15
PARTS LIST 16
PNEUMATIC FLOW 25
ELECTRIC DIAGRAM 26

Model ASK-ASM100
Machine Head SIRUBA 747KST
Sewing Speed 5500 SPM ( Max )
Needle Type DC×27 #11
Needle Distance 2mm
Presserfoot Height 7.5mm
Overedge Width 4mm
Fabric Thickness 6.5mm ( Max )
Air Consumption 35 L/min
Air Pressure 0.5 Mpa
Power Supply Single Phase 1ΦAC200~240V 50/60Hz
Power Consumption 500 W ( Max )
Machine Dimensions (W)825×(D)640×(H)1622mm
( With table and thread stand )
SPECIFICATION
Rib Size (mm)
Sewing Position
Height
20~90mm
Perimeter
225~440mm
P1

Install the Thread Holder ②onto the Table ①. ( Please refer to the operation manual of Siruba 747KST)
INSTALLATION
THREADING
②
①
P2

Power Connection
(1) Check and set the power and air supply.
Rated Voltage: AC220V +/-10%
Air Pressure: 0.5Mpa (5kg/cm2)
(2) Check and make sure the grounding wires are well connected.
(3) Check and make sure the power switch is set OFF .
(4) Power Connection: Single Phase Connection
Air Connection:
Plug the air supply. The air
pressure is preset. In case you
need to reset, pull up the switch
and rotate
to the setting value.
Brown Wire
Blue Wire
Green/Yellow Wire (PE)
Power Line
Power ON
L1 L2
PE
P3

OPERATION FLOW
P4
Semi-auto
Material loading
Right pedal / Finishing cloth
Left pedal – start sewing
Sewing Flow
Abnormal
Cycle Abort Press to STOP
Trouble Shooting
TRIAL
Setting
Setting complete
Sewing?
Power ON
YES
Cycle Complete
Mode Selection
Continue END
NO
NO
NO
YES
YES

ADJUSTING & SETTING
1. Stretching System
(1) Release Lever ①and adjust
Cylinder Block ②to the
working position. The Cylinder
Block ②must closely move
along to Cylinder during the
adjustment. Tighten Lever ①
when complete.
2. Aligning System
Apply inner hex driver #2.5 to
release the screws ①. Adjust
the Cylinder Set ②to proper
position.
P5
②
②
①
①

3. Pulling Roller
(1) Apply inner hex driver#2.5 to
release screws ③.
P6
③

PANEL & PARAMETERS
A. Control Panel
1 Suction / Aux. Stitch Function
2 Presser Foot Function
3 Needle Position Selection
4 N/A
5 Parameter Setting
6 Parameter Saved and Quit
7 LED Light Switch
8Parameter Function, Content and Bit
Adjustment
9 Value Up / Down
10 Motor Speed Setting
11 Soft Start Mode Selection
12 Sewing Mode Selection
13 N/A
14 Single Seam Detection
15 Double Seam Detection
16 N/A
17 Safety Switch Indicator
1 10
3 12
2
5
7
8 9
11
4613
14 1615 17
B.Parameter Setting and Adjustment
1. In Trial Mode, press P Key to enter
Parameter Selection Mode.
2. Press or to select parameter.
3. Press S Key to enter Parameter Adjustment
Mode.
4. Press or to adjust the parameter.
5. Press to go back to Trial Mode. Or
press to go back to Parameter Selection
Mode.
6. Press and hold and turn power on, it will
reset to default setting.
7. In Trial Mode, long press , then enter the
password 168 so as to go to the second level
parameter.
P7

Parameter List
※DO NOT CHANGE THOSE PARAMETERS THAT MARKED "DO NOT CHANGE" !
※Some parameters require passwords. Refer to instruction above for passwords input.
Item Code Function Range Default Unit Description
1 H Speed Adjustment 200~5500 3000 rpm Setting limited by the highest speed limit “56.HL."
2 LMS Selection of slow start
function ON/OFF OFF // ON: turn on
OFF: turn off
3 L Slow Start speed 200~5500 3000 rpm Setting of starting sewing speed
4 LSS Stitch setting of slow
start 1~100 30 STH Setting of stitches
5 KMS Selection of stitch
counter mode NOP/UTS NOP // NOP: deactivate UTS: activate
6 KT Setting of counter
target value 1~9999 99 time Setting of target counter numbers
7 KV Counter display 1~9999 0 time Instantaneous display
8 SV Machine speed
display 200~5500 0 rpm Instantaneous display the motor exact rotary speed.
9 TMD Sewing Mode select
NOP:
Ordinary
sewing
CUF: Cuff
PAN: Trouser
bottom
CUF //
NOP: Ordinary sewing CUF: Cuff PAN: Trouser
bottom
The sewing mode selection will not being influenced
by pressing arrow key to back to default
setting-up
10 MRM Setting of motor rotary
mode NOP/MA MA // MA: Manual
11 AA Stepping Motor Delay 0000 ~9999 1 ms Setting the time to enable the stepping motor after
pressing the start switch.
12 BB Stretching wheel delay 0000 ~9999 5 ms Setting the time to enable the stretching wheel
solenoid valve after pressing the start switch.
13 CC Presser Foot delay 0000
~9999 10 Setting the time to enable Presser Foot after pressing
the start switch.
14 DD Overlapping sewing
stitch 0000 ~9999 20 Setting the stitch number after sensor detects the
seam.
15 EE Loose stop stitch 0000 ~9999 15 Setting the stitch number to disable the Loose Stop
after motor starts. (Loose Stop enable as default)
16 FF Ejecting Rod timer 0000 ~9999 1000 ms Set the running time of ejecting rod.
17 GG Ejecting Rod delay
time 0000 ~9999 75 ms Set the time to enable ejecting rod after cross seam
sensor activates.
18 HH Suction, Cut and loose
Stitch 0000 ~9999 50 Set the stitch to run suction, cutting, and loose stitch
after parameter#14.
19 IRD Stepping motor speed 320~800 350
20 BIR Double overlapping ON/OFF ON
OFF: Enabling the Cutting & Suction after once
overlapping
ON: Enabling the Cutting & Suction after twice
overlapping
21 SS Unload materials, air
blow time 0-200 2
22 SWC Suction Mode 1/2/3/4/5 4
1. No suction 2. Only Front suction
3. Only Back suction 4. Front and Back suction
5. Mechanical suction(only for manual mode)
23 FOR Lever back delay time 0000 ~9999 150
P8

24 TN1 Needle Location U/D/UD U //
U: The highest location D: The lowest location
UD: The lowest location, but presser foot rises when
fully pedal.
25 BUZ Buzzer ON/OFF ON // When presser foot protection On for 30 seconds (or
set time), the buzzer will beep twice.
26 LE Overlapping loose
close stitch 200~6000 60 Set stitch to run loose stitches after overlapping and
parameter 14.
27 ABC Long Suction ON/OFF OFF Enable suction continuously during operation when
set ON.
30 ATF Start mode selection ON/OFF ON ON: Pedal
OFF: Speed controller
31 INF Laser light marker ON/OFF ON ON
OFF
32 TFD Solenoid Valve Check 0~9 0 //
Each code refers to:
1. Presser Foot on (2 seconds).
2. All Off
3. Cut / Suction (50ms)
4. Stretching (2 seconds)
5. Cross Seam
6. Loose Stitch (2 seconds)
7. Ejecting Rod (ref. parameter 82)
8. Aligning
9. Stepping Motor
10. Reserved
11. Reserved
12. Speed Controller Voltage (ref. parameter 82)
33 TIN Presser foot motion
stimulation 0、1、2、3 0~3 Stimulated mechanism adjustment for seam thickness
34 FT
The initial full output
time of presser
electromagnet
0~990 250 ms Presser Foot Magnetic Setting.
DO NOT CHANGE
35 FD Presser Foot Cycle % 10~50% 25 % The motion cycle of the presser foot electromagnet
36 FPM Presser Foot
ProtectionON/OFF ON // Protecting functions when the presser foot
electromagnet activates.
37 FP Presser Foot
Protection Time 1~300 Solenoid:120
E.Mag :30 Second Set the protection time when the presser foot
electromagnet performs.
38 FMM Presser Foot Mode ON/OFF ON // When #38 FMM is set ON (presser foot Up), set the
delay time to lower the presser foot.
39 FMS Presser foot down
delay time. 1~3000 10 ms
40 HT half pedaling
confirmation time 0~990 100 ms Set the time of delaying as half pedaling
48 FMD Motor start delay time. 50~500 500 ms Set the time to start motor after presser foot down.
50 MSW Safety switch ON/OFF OFF //
ON: Enable (When removing the proximity switch,
stop all functions and motors)
OFF: Disable
53 SDA The stop angle as the
needle descending 0-360 220 Angle DO NOT adjustment
54 SUA The stop angle as the
needle rising 0-360 30 Angle DO NOT adjustment
55 ER Error code display 0~9 Set To save the last error codes up to 10 sets
P9

56 HL Speed limit of sewing
machine head 200~5500 3000 rpm
Speed limit ( first priority). After configure “56.HL"
as 5500rpm, and the parameter “01.H"can be
configured as the highest speed.
57 ACR Motor speed of
assistant trimming 200-5000 3000 rpm Under VTE/CTE mode, after the sewing completes,
press Manual Trimming to activate “trimming and
assistant suction"
58 ACS Rotary stitches of
assistant trimming 1-99 20 Stitch
59 CS Pedal sensitivity 1-10 2 level
IN OT/A mode, set 〝#59.CS〞to decide
the depth of pedaling as to initiate the motor.
The bigger the setting, the deeper you need to pedal.
60 NUF Needle auto-rising
after power on ON/OFF ON // ON: Enable the needle to rise automatically to the
highest position after power on. OFF: Disable
61 LSH Safety switch of side
plate ON/OFF OFF // ON: Enable OFF: Disable
62 HVR Highest voltage record
display // // //
“62HVR"and “63LVR"can record the highest
and the lowest current effective value of the control
box AC.
63 LVR Lowest voltage record
display // // //
64 PV Present voltage record
display // Realtime
display //
65 AOT Time setting of auto
running test 1~500 240 hr Set time of auto running test
66 AO1 Auto running start time 1~20 2 s Set time to start the auto running
67 AO2 Auto running stop time 1~20 2 s Set time to stop the auto running
68 AOS Auto Running ON/OFF OFF //
ON: Enable the auto running test
OFF: Disable the auto running (Resume to OFF after
power off.)
69 UTT Time display of auto
running 1~1000 Instantaneous
display hr Accumulate running time
70 VER Software version
The display controller firmware version is SXEX.
If press key then display UI firmware version
71 GHT Functional automatic
operation ON/OFF OFF
ON
OFF
* Parameters unable to make changes while the
motor is working.
78 PS Password // OFF //
When Password Lock is ON, all parameters cannot be
changed. The unlock password: 0168
Note: To go to the parameter setting, press S and
input the password, hold S till the monitor shows.
79 FED
The front sensor
rotation lock without
fabric
ON/OFF OFF // Under the OT/A mode, motor stops when the front
sensor detects no fabric.
80 BKL LCD Backlight 0%~100% 40% //
81 LAN Language // English // English / Traditional Chinese / Simplified Chinese
82 FOO Speed controller´s
voltage display 0~4096 Instantaneous
display //
83 UEG start / stop complex
switch ON/OFF ON OFF: Only starting function.
ON: Start and stop function.
91 LDL Motor speed slope
165、200、
250、300、
350
200 ms Motor Acceleration / deceleration slope
165ms, 200ms, 250ms, 300ms, 350ms
P10
Table of contents
Other Siruba Sewing Machine manuals

Siruba
Siruba FA007 Datasheet

Siruba
Siruba 700LQ User manual

Siruba
Siruba DL7300 User manual

Siruba
Siruba PK511 User manual

Siruba
Siruba LZ457A Datasheet

Siruba
Siruba DT828L User manual

Siruba
Siruba PK522 Datasheet

Siruba
Siruba Sew Reach D007S User manual

Siruba
Siruba 700K User manual

Siruba
Siruba 700QD User manual

Siruba
Siruba DL918 User manual

Siruba
Siruba ASP-EBJ100 User manual

Siruba
Siruba C007L User manual

Siruba
Siruba VC008A User manual

Siruba
Siruba C007KP User manual

Siruba
Siruba DL7200B User manual

Siruba
Siruba VC008 DVU1-0 User manual

Siruba
Siruba C007K User manual

Siruba
Siruba ACS200 User manual

Siruba
Siruba ASP-EBJ100S User manual