Siruba HSM-2517 User manual


11
12
13
17
23
24
21
22
11.Spool pin
12.Hand wheel
13.Stitch selector
14.Power/light switch
15.Plug socket
16.Presser foot lever
17.Thread cutter
18.Automatic needle threader
19.Needle
20.Presser foot screw
21.Thread guide
22.Needle clamp screw
23.Foot release lever
24.Presser foot
25.Feed dogs
26.Foot control
27.Drop feed lever
25
-3-
14
15
16
18
20
19
26
27

ACCESSORIES
1.Needle set
2.Bobbins
3.Spool pin cap (large)
4.Spool pin cap (small)
5.Screwdriver (small)
6.Screwdriver (large)
7.Buttonhole opener with brush
8.Oiler
9.Buttonhole Foot
10.Overcasting Foot
11.Zipper Foot
12.Straight stitch foot
123
4
OPENING THE ACCESSORY CASE
To open the accessory case, lift up on the
top left side of the table and pull toward you.
56
10 11
7
8
Some accessories are provided in the accessory case.
-4-
9
12

a.REMOVING THE EXTENSION TABLE
Hook your finger to the bottom of extension
table and slid to the left. To attach, insert to
the right.
b.OPENING THE ACCESSORY CASE
Hook your finger to the left side of accessory
case and pull toward you.
DUST COVER (OPTIONAL)
Cover the machine with dust cover when it is
not in use.
This manual will be stored on the holder
provided on the side of the cover.
-5-

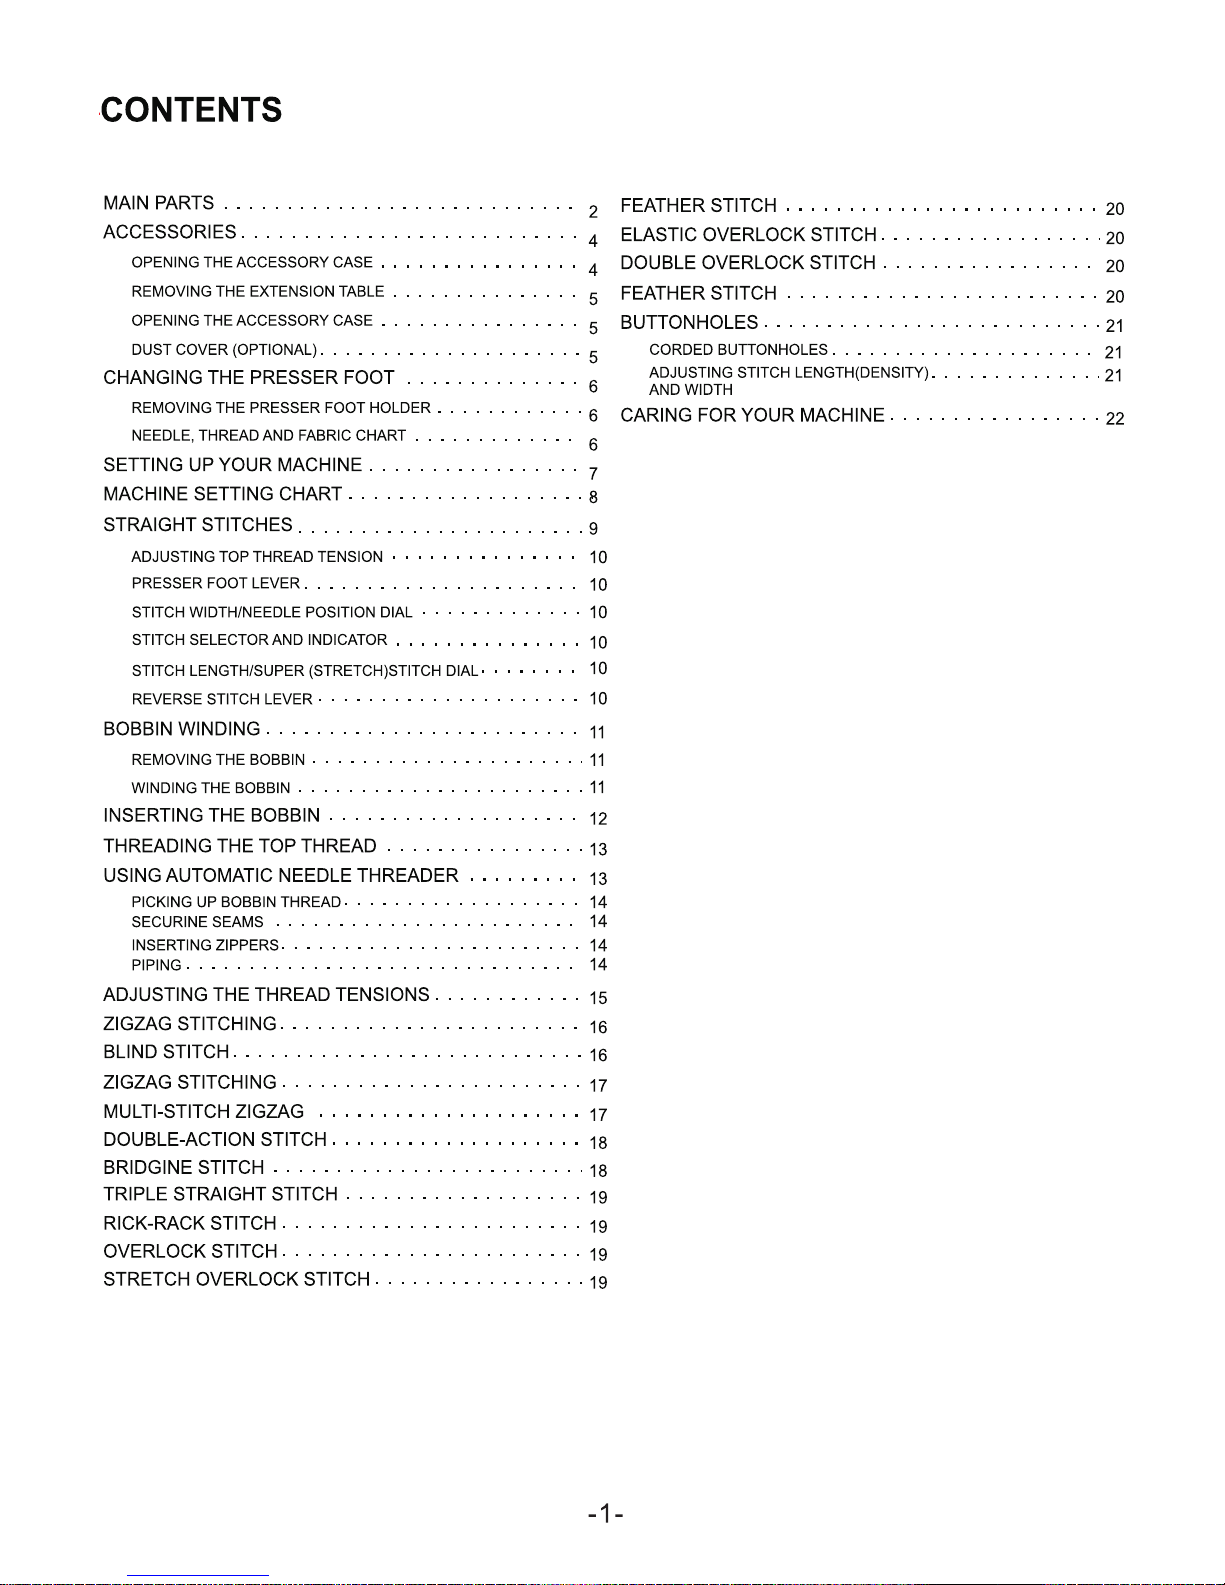
CHANGING THE PRESSER FOOT
The presser foot must be changed according to the stitch you sew, or work you do.
CAUTION:To prevent accidents.
Turn off the power switch before you change the presser foot.
1.Turn the hand wheel toward you until the
needle is at its highest point.
2.Raise the presser foot lifter.
3.Remove the presser foot by pushing the
presser foot release lever toward you.
4.Place desired foot with its pin directly under
the slot in presser foot holder.
5.Lower the presser foot lifter and the presser
foot will snap into place.
REMOVING THE PRESSER FOOT HOLDER
5
A
3
4
1
!
You may need to remove the presser foot holder to use
some presser feet.
To remove, raise the presser foot lifter and loosen the
presser foot thumb screw (A).
To attach, tighten the screw after raising the presser foot
holder.
2
-6-
weight woolens,linen.
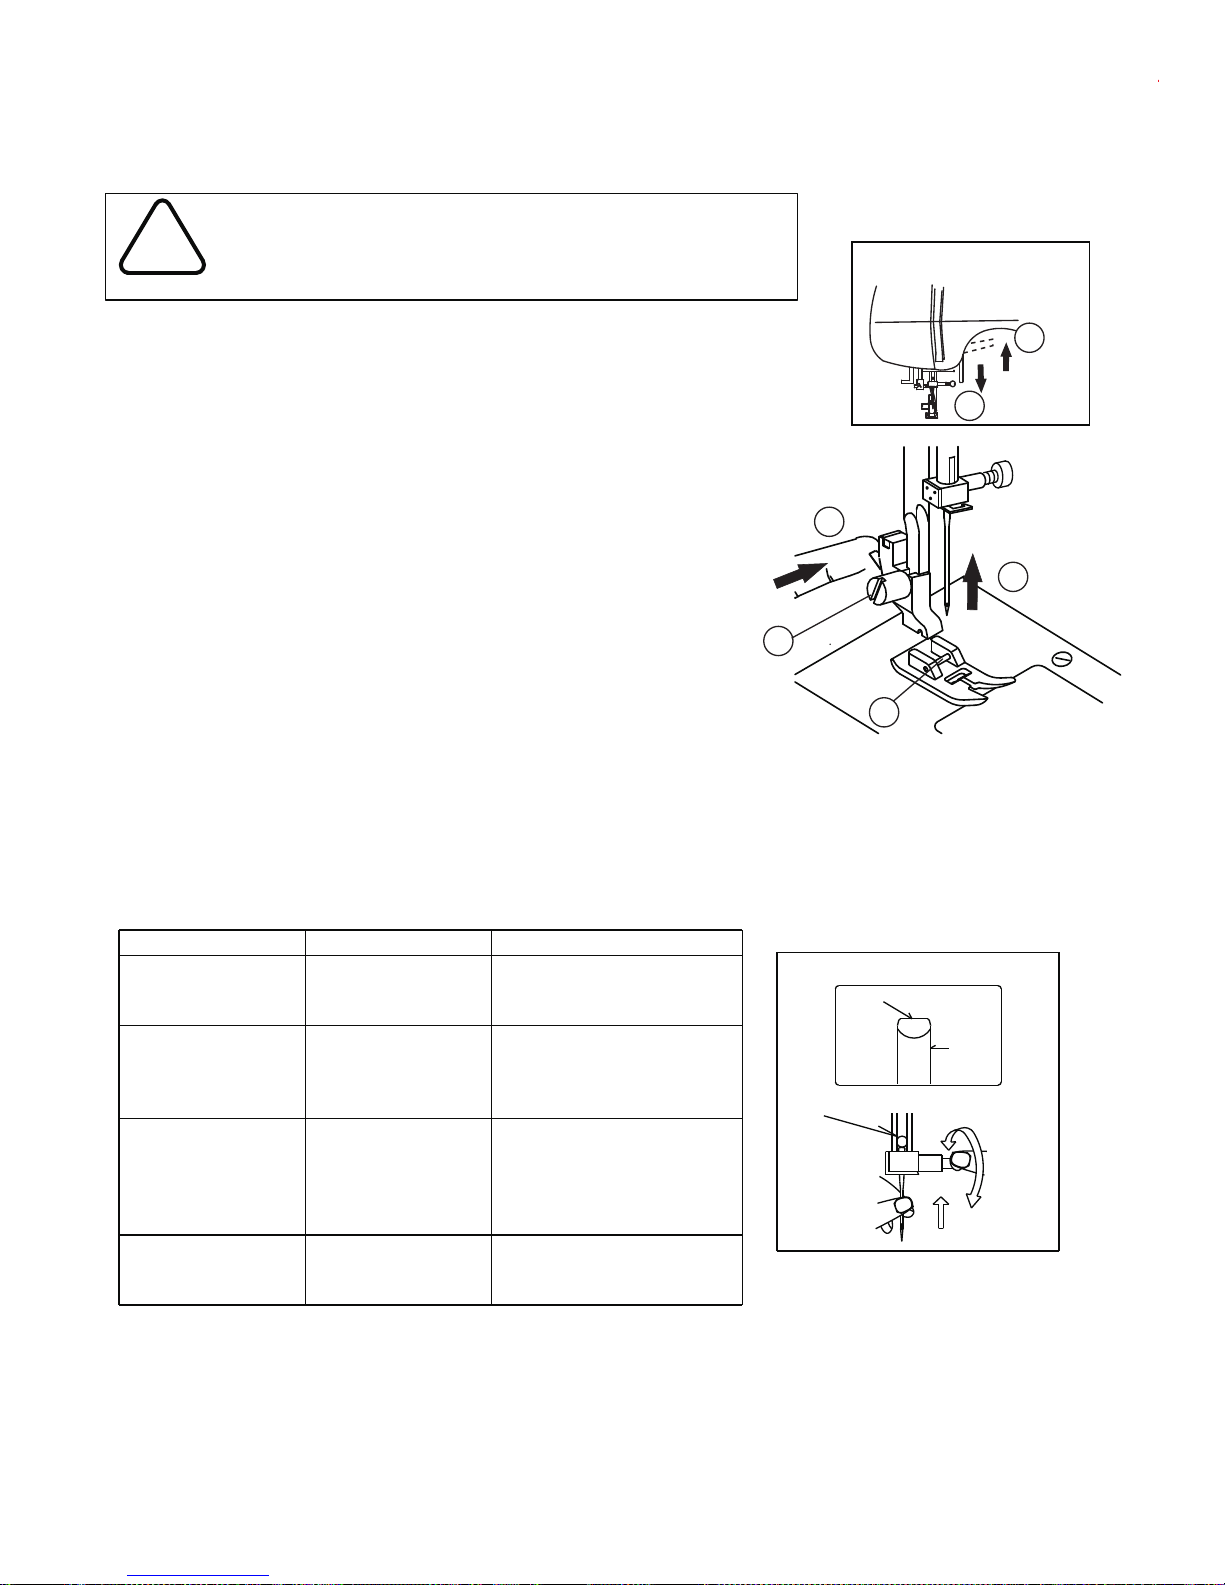
1.Raise the needle bar to its highest position by turning the hand wheel towards you.
weight woolens,denim
Heavy weight cotton,
2: Needle
illustration 1: Flat side 3.Stop
6.Tighten the needle clamp screw firmly with the screw driver.
5.Push the needle up as far as itcan go.
4.Insert the new needle into the needle clamp with the flat side away from you.
3.Remove the needle by pulling it downward.
2.Loosen the needle clamp screw by turning it towards you.
Changing the needle
Mercerized heavy
duty
Cotton 30-60
100 medium to heavy
gingham,velvet,light
poplin,seersucker,
medium weight synthetics,
Medium weight cottons,
synthetics,fine laces,
For normal sewing,the same size and type of thread should be used in the bobbin as
Use the standard needle.The size of your needle should match the size of the thread
Mercerized 50-60
Machine embroidery
Machine embroidery
For successful sewing of stretch fabrics use stretch needles.
Never use a bent or blunt needle.
on the upper part of the machine.
and both should match the fabric.
NEEDLE,THREAD AND FABRIC CHART
Cotton 60-100
Sillk A
Synthetic
Cotton 60-80
Synthetic
Cotton
Synthetic
Thread Size
All stretch fabrics.
Stretch
80
or
90
80
or
70
Needle
batiste,dimity.
Sheer cottons silk
Needle Size Needle Size
3
2
1

SETTING UP YOUR MACHINE
-7-
Be sure to wipe off any surplus oil from needle plate area before using your
machine the first time.
12
Power/light switch
Foot control
FOOT CONTROL
Connect the plug of the foot control into the machine socket and
your wall outlet as illustrated.
1
2
(OFF) (ON)
Power/light switch
POWER/LIGHT SWITCH
Your machine will not operate until the power/
light switch is turned on.
The same switch controls both the power and
the light.
When servicing the machine, or changing
needles or lamps, etc.,
Machine mush be disconnected from the wall
outlet.

MACHINE SETTING CHART
-8-
4
3
3
4
M
2
2
1
-
S
+
1.INDICATOR
2.LENGTH CONTROL
3.STITCH WIDTH CONTROL
4.PRESSER FOOT
A. B. C.
Straight stitch
foot
Buttonhole foot Zipper foot
Zigzag foot Overcasting
foot
D. E.
INSERTING ZIPPERS
DOUBLE OVERLOCK
ELASTIC OVERLOCK
STRETCH OVERLOCK
FEATHER
BUTTONHOLE
FEATHER
OVERLOCK
G
1
H
2,4
F
E
D
C
1-4
3
3-5
M
S1-5
D
C
B
B
B.C
INDICATOR
TRIPLE STRAIGHT
RICK-RACK
SHELL
BLIND
ZIGZAG
F
H
A
B
G
D
E
C
B
STITCH
STRAIGHT A
A
1.
L,R
M
1-51-4
0.5-4
B
B
B
A,B
L,R
M
CONTROL
WIDTH
STITCH
1-4
CONTROL
LENGTH
2.
STITCH
3.
PRESSER
FOOT
A,B
B
4.
B.C
MULTI-STITCH
ZIGZAG
DOUBLE ACTION
FAGGOTING

-9-
C
H
Reverse stitch lever
Presser foot lever
Hand wheel
Stitch lendth dial
Power/light switch
Stitch selector
Stitch width/needle
position dial
Stitch indicator
2
4
3
I
J
F
J
I
H
G
D
E
hand wheel toward you.
Take-up lever
Tension dial
highest position by turning the
Raise the take-up lever to its
Thread tension - 3
Stitch length - 2 - 3
Stitch indicator - A
Straight stitch most frequently used for every aspect of sewing.Learn the correct method of your
machine following the steps below.
Stitch Length
Stitch Width
Stitch Selector
STRAIGHT STITCHES
1
F
BA DC
G
E
B
A
1.SETTINGS 2.Pull both threads under the
3.Place the fabric under the
4.Turn the hand wheel toward
presser foot and lower the
presser foot lever.
you until the needle enters the
fabric.
presser foot toward the back
of the machine.
Needle position for straight stitching
5
L
4
3
1
12
2
1
4
3
M
3
R
2
Straight stitch at right needle position with needle
Straight stitch at middle needle position with needle
Straight stitch at left needle position with needle position
position control set at M.
position control at R.
3
control at L.
2
1
56
machine by releasing the foot control.
presser foot, leaving 4 inches (10cm) thread tail.
d. Pull both threads under and to the back of the
cut off excess threads.
c. Use the thread cutter above the presser foot to
b. Raise the presser foot by pushing the lever up.
6. a. Turn the hand wheel to raise the needle.
c. When you reach the end of the fabric, stop the
b. Guide the fabric gently with your hand.
5. a. Start to sew stepping on the foot control.
A
2-3
3

-10-
6.REVERSE STITCH LEVER
It is recommended to begin, or end seams with several stitches
in reverse
for reinforcement. As long as you are pressing down this lever
while sewing, the machine will continue to feed the fabric
backwards.
4
2
1
3
to S mark where fine adjustment can be made.
Super (stretch) stitch patterns can be selected by turning the same
dial
and type of fabric.
Stitch length can be selected easily according to thickness
5.STITCH LENGTH / SUPER (STRETCH) STITCH DIAL
2.Then turn the selector until the required stitch is indicated on
the indicator
1.To select a stitch, be sure needle is out of fabric at its highest
position.
4.STITCH SELECTOR AND INDICATOR
5
4
panel.
6
3.STITCH WIDTH / NEEDLE POSITION DIAL
shows the center position.
with the same control dial. The triangle marking between 2 and 3
The width of all the stitches produced on this machine can be
made narrower or wider by adjusting the stitch width control.
When sewing straight stitching, you can select various needle
positions from 0 (right needle position) to 5 (left needle position)
2
thick fabric.
3.Lift it to its highest position to change the presser foot or
to remove
2.Raise the lever to the middle position to insert or remoye
fabric.
1.Lower the presser foot to sew.
There are three positions for your presser foot.
2.PRESSER FOOT LEVER
The higher the number,the tighter the tension.
Decrease or increase the tension of the top thread by
using this control.
1.ADJUSTING TOP THREAD TENSION
4
2
1
2
3
4
3
M
L
5
3
-
S
+
F

BOBBIN WINDING
WINDING THE BOBBIN
Pivot spool pin into highest position.
2.Pass thread from spool through thread guides as shown.
3.Pull end of thread through hole in bobbin as shown.
4.Move bobbin winder shaft to the left. Place bobbin onto shaft till it clicks into position
with the end of thread coming from top of bobbin. Push bobbin winder
shaft to right until it clicks. Hold onto end of thread.
5.Start machine to wind the bobbin. Stop machine after a few turns to trim the
thread tail with scissors. Bobbin will stop turning when completely filled.
Cut the thread and push shaft to the left to remove bobbin.
45
3
2
1
REMOVING THE BOBBIN
1.Remove the bobbin cover by sliding the
release lever to right and push down
the left corner of bobbin cover at the
same time.
2.Remove the bobbin from the machine.
Place a spool of thread on the spool pin.
Secure it with the spool cap to ensure smooth flow of thread.
Use a spool cap closest in size to the spool of thread being used.
1.Raise presser foot lever.
-11-
2
1

2
C
B
3
4
A
1
INSERTING THE BOBBIN
1. Place bobbin into bobbin holder with the
thread unwinding counter clockwise.
2. Draw thread into notch (A).
3. Pull thread toward the left and along the
inside of spring (B) until it slips into notch
(C) being sure that thread does not slip out
of notch (A).
C
B
A
-12-
4. Pull thread out about 10 inches and replace
the bobbin cover by inserting the left side and
lowering the right side till snaps into position.

-13-
5
4
6
2
26
5
4
3.Thread the machine in the order as illustrated.
2.Raise the needil to its highest position by rotating the hand
wheel towards you.
1.Raise the presser foot lever.
THREADING THE TOP THREAD
3
1
1
3
at straight stitching (middle
NOTE: For smooth threading it is
Pull loop of thread to back of machine.
3.Release the lever and needle will be
2.Guide thread into hooked end and pull
push lever until the hooked end passes
1.Pull down lever and hook thread to
Raise the needle to its highest position by rotating the
USING AUTOMATIC NEEDLE THREADER
2
1
3
it upward.
position) when using needle
recommended to set the machine
threaded automatically.
threader.
through the needle eye.
thread guide as illustrated. Continue to
hand wheel towards you.

-14-
To sew down the left side. attsch right side
so that needle passes through the opening
To pipe soft furnishings,cover cord with a
bias strip of fabric and pin or tack it to the
Attach right side of zipper foot to foot holder
of foot to foot holder.
on the right side of the foot.
main piece of fabric.
PIPING
Reverse stitch lever
of zipper foot to presser foot holder so that
To sew down the right side, attach left side
the needle passes through the opening on
Lower the reverse lever for back tacking.
Reverse the machine at the end your seams
to go forward. This is called back tacking.
stitches in reverse. Then allow the machine
Secure your seams by taking the first few
INSERTING ZIPPERS
the left side of the foot.
as well.
SECURINE SEAMS
3.Pull both top and bobbin threads together towards back of machine
under the presser foot, leaving about 6 inch thread tail (15cm).
This will pull a loop of bobbin thread through the needle plate slot.
2.Lightly pull up on the needle thread.
comes to its highest position.
towards you one revolution with your right hand untial the needle
Holding needle thread loosely with your left hand, turn hand wheel
1.Raise the presser foor lever.
PICKING UP BOBBIN THREAD
2
1
3

ADJUSTING THE THREAD TENSIONS
3
4
2
3
4
2
3
4
2
3
4
2
3
4
2

-16-
Thread tension dial
Stitch length
0.5-1 1 2 3 4
Top side
Under side
thread must never appear on
the top of the fabric.
sewing speed, but the bobbin
on the thread, fabric and
on the under side depending
The top thread may appear
ZIGZAG STITCHING
Stitch Selector B
Stitch Width 1-5
Stitch Length 1-4
Use a backing stabilizer interfacing for the sheer
materials to avoid puckering.
tension for satin stitching.
This is a closely spaced attractive stitch used for
applique,bar-tacking,etc. Slightly loosen top thread
SATIN STITCH
figure 3.Turn the hand wheel to take a few stitches and
(Fig.3)
4.Press both sides of the finished hem.The right side should
barely show the stitches.
titch just catches the fold.
turn the screw on the foot to adjust the guide so the s-
(Fig.4)
of the hem against the guide in the foot as illustrated in
3.Place the wrong side of the garment under the blind hem
presser foot with the extension to the right and the fold
side leaving about 1/4 inch of the wrong side of the hem
edge extending.Figure 2.
2.Press the hem in place.Fold the hem toward the right
zag to overcast the edge).Figure 1.
inch to the wrong side,for heavier fabric,use multiple zig
1.First finish the hem edge(for lightweight fabric,press 1/4
Stitch Selector C,F
Stitch Width 1-5
Stitch Length 1-4
BLIND STITCH CF
(Fig.1) (Fig.2)
6mm(1/4")
1
0
Stitch indicator
B

-17-
ZIGZAG STITCHING
Turn under the raw edge and press. Place the fabric right side up
pulling the fabric in to form a shell hem. Trim away excess fabric
so that the zigzag part of the stitch sews just over the folded edge,
close to the stitching line.
presser foot so that the zig-zag part of the stitch sews just over the
Place the right sides of the fabric together and position under the
Shell stitch is for seaming and overcasting sheer, soft fabrics in
one operation. It also produces a delicate shell hem on lingerie
SEAM AND OVERCAST IN ONE
SHELL TUCKS
raw edge.
and other fine garments.
D
Stitch Width 1-5
Stitch Length 1-4
Stitch Selector D
At 0 stitch length the 3-step zigzag makes an excellent bartack.
work and attaching flat elastic.
It is also ideal for mending tears, patching, sewing towelling, patch-
Stitch Width 1-5
Stitch Length 1-4
Stitch Selector E
For this reason it is highly recommended for overcasting all types
This is a strong stitch because as its name implies, it makes three
short stitches where the normal zigzag makes only one.
MULTI-STITCH ZIGZAG
of fabrics.
E

-18-
Stitch Length 1-4
catching the fabric fold on both sides with needle. Remove bastings
space between. Stitch over the 1/8 inch (0.3cm) allowance,just
Baste folded edges to stabilizer with about 1/8 inch (0.3cm)
Fole under the seam allowances on the cut edges, and press.
This is a popular decorative stitch (used in sleeves or fronts of
together, leave a little space in between. To prepare the fabric:
blouses and dresses.) To attach two separate pieces of fabric
and stadilizer then press.
on almost any type of fabric A bolder effect will result from
Stitch Width 1-5
Stitch Selector H
BRIDGINE STITCH
sewing with contrasting thread.
H
Double-action stitch is ideal for producing flat overlapped seams
Stitch Selector G
Stitch Width 1-5
Stitch Length 1-4
G
DOUBLE-ACTION STITCH

-19-
TRIPLE STRAIGHT STITCH
ordinary straight stitch because it locks
Triple straight stitch is far stronger than
three times- forwards, backwards and
Stitch Selector A
Stitch Length -S+
Stitch Width 3
It is particularly suitable for reinforcing the
seams of sportswear in stretch and non-
strech fabrics, and for curved seams which
forwards.
lapels,collars and cuffs to give a
Use this stitch also to top-stitch around
take a lot of strain.
professional finish to your garments.
A
1 2 3 4 5 6 7 8
TRIPLE STRAIGHT
1
RICK-RACK
2
OVERLOCK
STRETCH OVERLOCK
3
4
HONEYCOMB
FEATHER
DOUBLE OVERLOCK
ELASTIC OVERLOCK
7
8
5
6
STRETCH STITCHES
Stretch stitches are mainly for use on knit, or stretch fabrics,
but can also be sewn on woven fabrics.
ADJUSTING STRETCH STITCH BALANCE
Stitch length / super (stretch) stitch dial should be at S mark for most
materials. Depending upon the type of fabric used, you may need
to adjust this dial to match forward stitches of stretch sewing with
reverse motion stitches. If the stitches are too open, turn the dial
to + position; if the stitches overlap, turn the dial to - position.
Rick-rack Stitch
towelling, jersey and cotton jersey.
C
This is the same type stitch used by the
garment industry in making sportswear - it
It's very effective for use in repairing raw or
worn edges of older garments.
forms and finishes the seam in one operation.
STRETCH OVERLOCK STITCH
Stitch Length -S+
Stitch Width 1-5
Stitch Selector C
edge and providing a decorative top-stitch
OVERLOCK STITCH
Stretch overlock seams and overcasts in
one to produce a narrow, supple seam,
particularly suited to swimwear, sportswear,
T-shirts, babywear in stretch nylon, stretch
bands, armholes,sleeves and hems.
in one operation.lt is ideal for edging neck-
Stitch Width 1-5
Stitch Length -S+
Stitch Selector D
D
Rick-rack is a quick method of finishing a raw
RICK-RACK STITCH
Stitch Length -S+
Stitch Width 1-5
Stitch Selector B
B
-
S
+
Table of contents
Other Siruba Sewing Machine manuals

Siruba
Siruba VC008A User manual

Siruba
Siruba C007K User manual

Siruba
Siruba 700KS-LFD6-K User manual

Siruba
Siruba D007R User manual

Siruba
Siruba ASP-BST100 User manual

Siruba
Siruba L381 User manual

Siruba
Siruba C007K User manual

Siruba
Siruba DL7200B User manual

Siruba
Siruba DL7200B User manual

Siruba
Siruba 700KT User manual

Siruba
Siruba 700L User manual

Siruba
Siruba VC008 VSQ User manual

Siruba
Siruba HF008A User manual

Siruba
Siruba VC008B User manual

Siruba
Siruba ASP-EBJ100 User manual

Siruba
Siruba 700K User manual

Siruba
Siruba L818F-BM1 User manual

Siruba
Siruba DL7200 User manual

Siruba
Siruba PK511 User manual

Siruba
Siruba ASP-PTA100 User manual