SJÖBLOMS 015-2050 User manual
Ver 170815
USER MANUAL
COMBI-GYN
COMBINATION GYNAECOLOGY CHAIR - EXAMINATION TABLE
For models
015-2050, 016-2050
NOTE!
The operator must read the user manual
carefully BEFORE the product is used,
to avoid unnecessary risks to the patient and operator.

Combi-Gyn Table of contents
TABLE OF CONTENTS
Foreword, warranty, important information
1. Function Description
1.1 General description
2. Operation
2.1 Connection
2.2 When the patient is seated
2.3 Height adjustment
2.4 Adjusting the back support
2.5 Adjusting the seat section/Trendelenburg position
2.6 Replacing the paper-roll
2.7 The function of the castors
2.8 Patient handles
2.9 Leg supports
2.10 The function of the siderail and leg support handles
2.11 Colposcope attachment
2.12 Proctology/rectoscopy attachment, assembly and operation
3. Maintenance & Cleaning
3.1 Routine examinations
3.2 Cleaning
3.3 Lubrication scheme
3.4 Spare-part list
3.5 Accessories list
3.6 Solutions for lubrication, cleaning and disinfecting
4. Technical specification
4.1 Dimensions
4.2 Motors and controllers
4.3 Battery backup
4.4 Labels
5. EU-Declaration of Conformity
6. Contact details

Combi-Gyn Foreword, warranty, important information
FOREWORD
Welcome as the owner of a gynecology chair manufactured by Sjöbloms Medical
Equipment AB. We hope that you will be pleased and satisfied with our quality
product.
If a problem should arise with any of our products, you are always welcome to
contact us, and our service department will assist you with the expertise needed to
solve the problem.
The user manual that you have in your hand contains all the information needed to
use, maintain and service the product. The document is continuously updated as
the products are modified. Therefore we reserve against possible changes in the
user manual.
WARRANTY
Sjöbloms provides a two-year warranty for material, design and manufacturing
defects, provided the products are not subjected to tampering or excessive wear.
For the guarantee to apply, the product must have been used in accordance with
the user manual, and the maintenance performed as specified.
IMPORTANT INFORMATION
This product is intended for professional medical use. The user manual should be
read carefully before using the product, to avoid unnecessary risks for the patient
and operator.
The user manual contains warnings where there is a risk of personal injury, which
should be noted. Improper handling can be fatal.
A warning triangle is shown where particularly important information can be found.
Warning triangle

Combi-Gyn Operation
Adjusting the backrest
1. FUNCTIONAL DESCRIPTION
This Combi-gyn is meant for professional use in health care, for examination of the
patient.
It is designed to be a functional and user-friendly tool for the operator and patient.
Note that the product must only be used by competent health
professionals who read the user manual, for correct handling.
General description
Combinated examination table and gynaecology chair with electrical control of
height and Trendelenburg position/seat section. Chromed or white- coated chassis
of all-welded steel tubes. The backrest is controlled with a gas spring or an electric
motor. The cushions are stuffed with foamed plastic and upholstered with
imitation leather.
The leg supports are available in two versions and are attached to the accessory rail
that runs along the seat cushion, which may also be used to attach certain
accessories.
125mm central-locking castors; various accessories such as neck pillows, patient
handles etc. are also available.
Combi-Gyn Operation
Connection, height adjustment
2. OPERATION
2.1 Connection of Combi-gyn
The plug should be connected to a grounded 230V outlet. The product is now
ready for use.
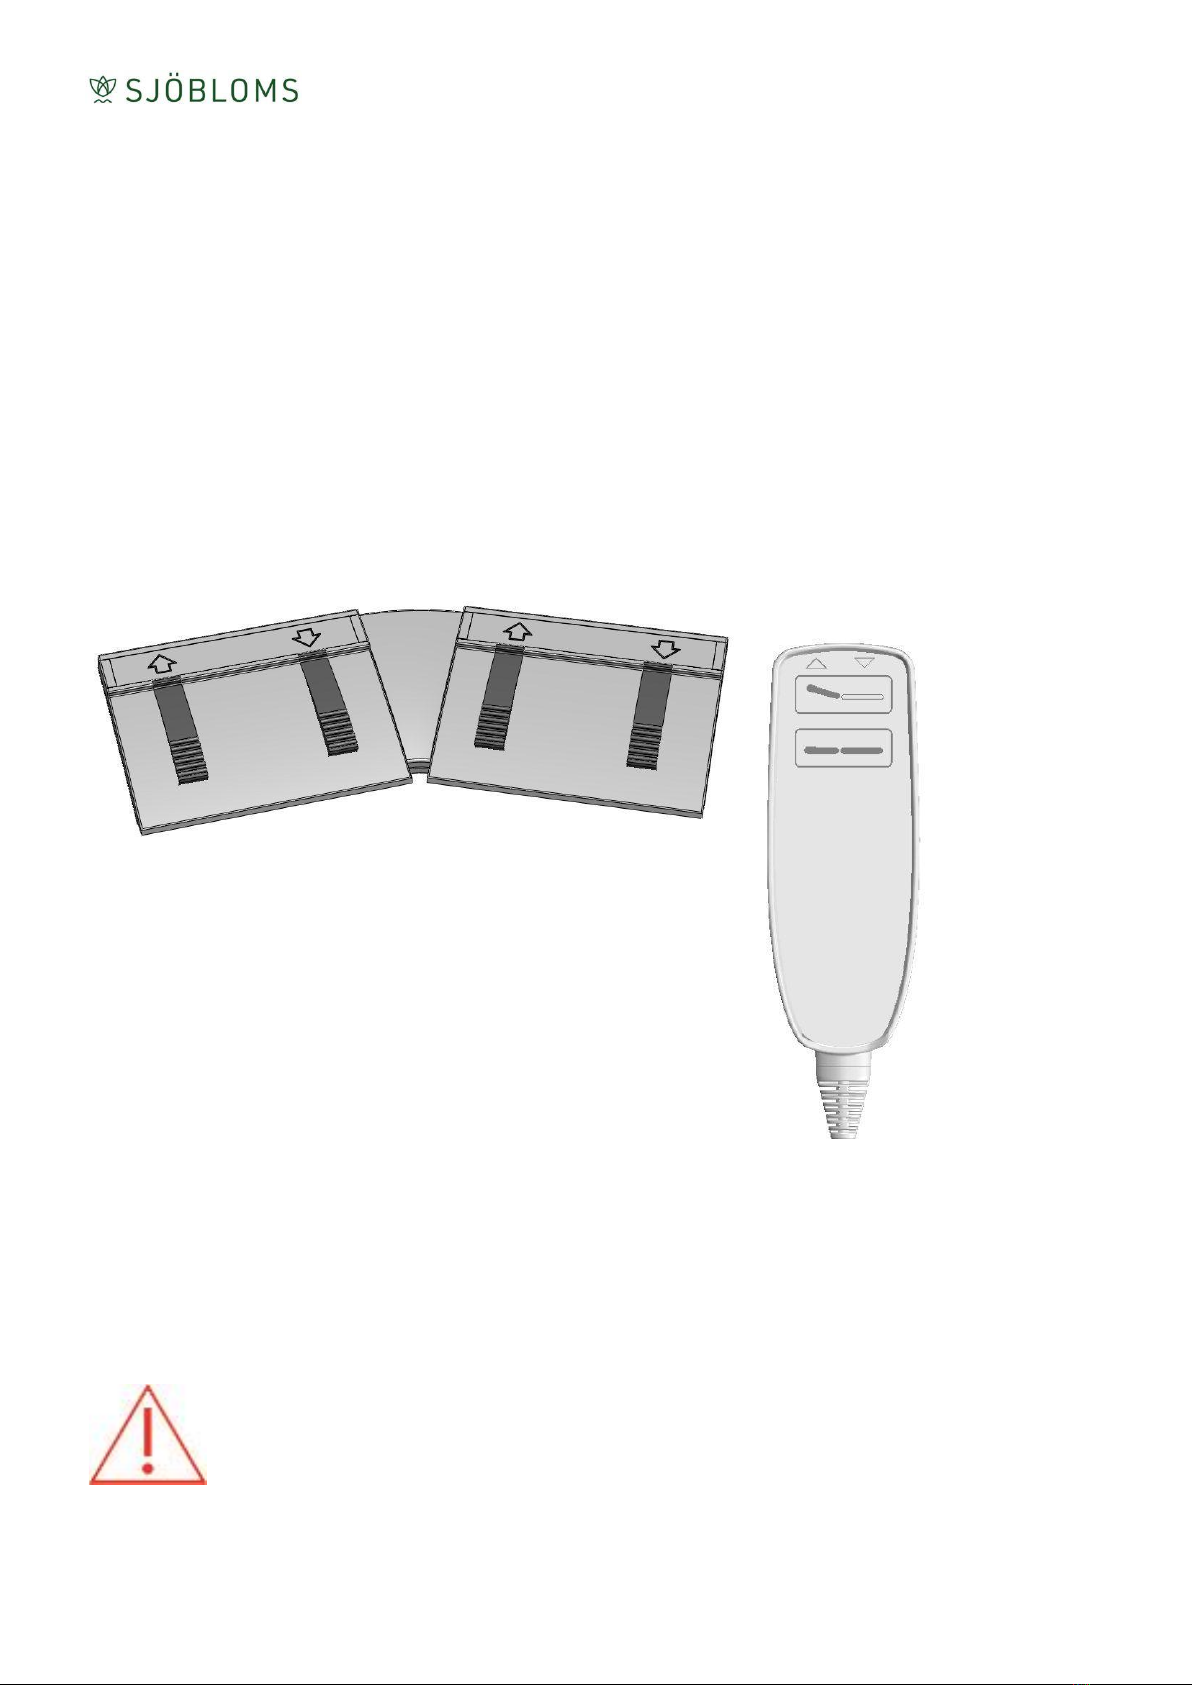
2.2 Height adjustment
Hand control
(optional)
Foot control
(the foot control is standard)
Follow the arrows to
adjust the couch up and
down.
Note!
Ensure that no unauthorized persons are in the couch's working range, as
a pinch hazard exists when raising and lowering the product.
Combi-Gyn Operation
When the patient is being seated
2.3 When the patient is seated
To maximize safety, it is important that the staff helps the patient be seated
correctly and that the product is placed correctly while doing so.
Before examination:
1. Place the castors in the direction shown in the picture.
2. Lock the central lock by pressing down the arc. Always keep the wheels
locked during the examination!
3. Lower the seat to its lowest position. Help the patient to sit down in the
middle of the seat cushion AND lean against the back support before you
raise the chair.
4. When the patient is getting up again, it is important to grip the patient
handles (optional, figure 4) and not the leg supports. The leg supports are not
designed for this purpose.
1
3
4
Use caution when examining slightly heavier patients. For
maximum balance of the chair, be sure to follow steps 1-4 above.
Combi-Gyn Operation
Adjusting the backrest
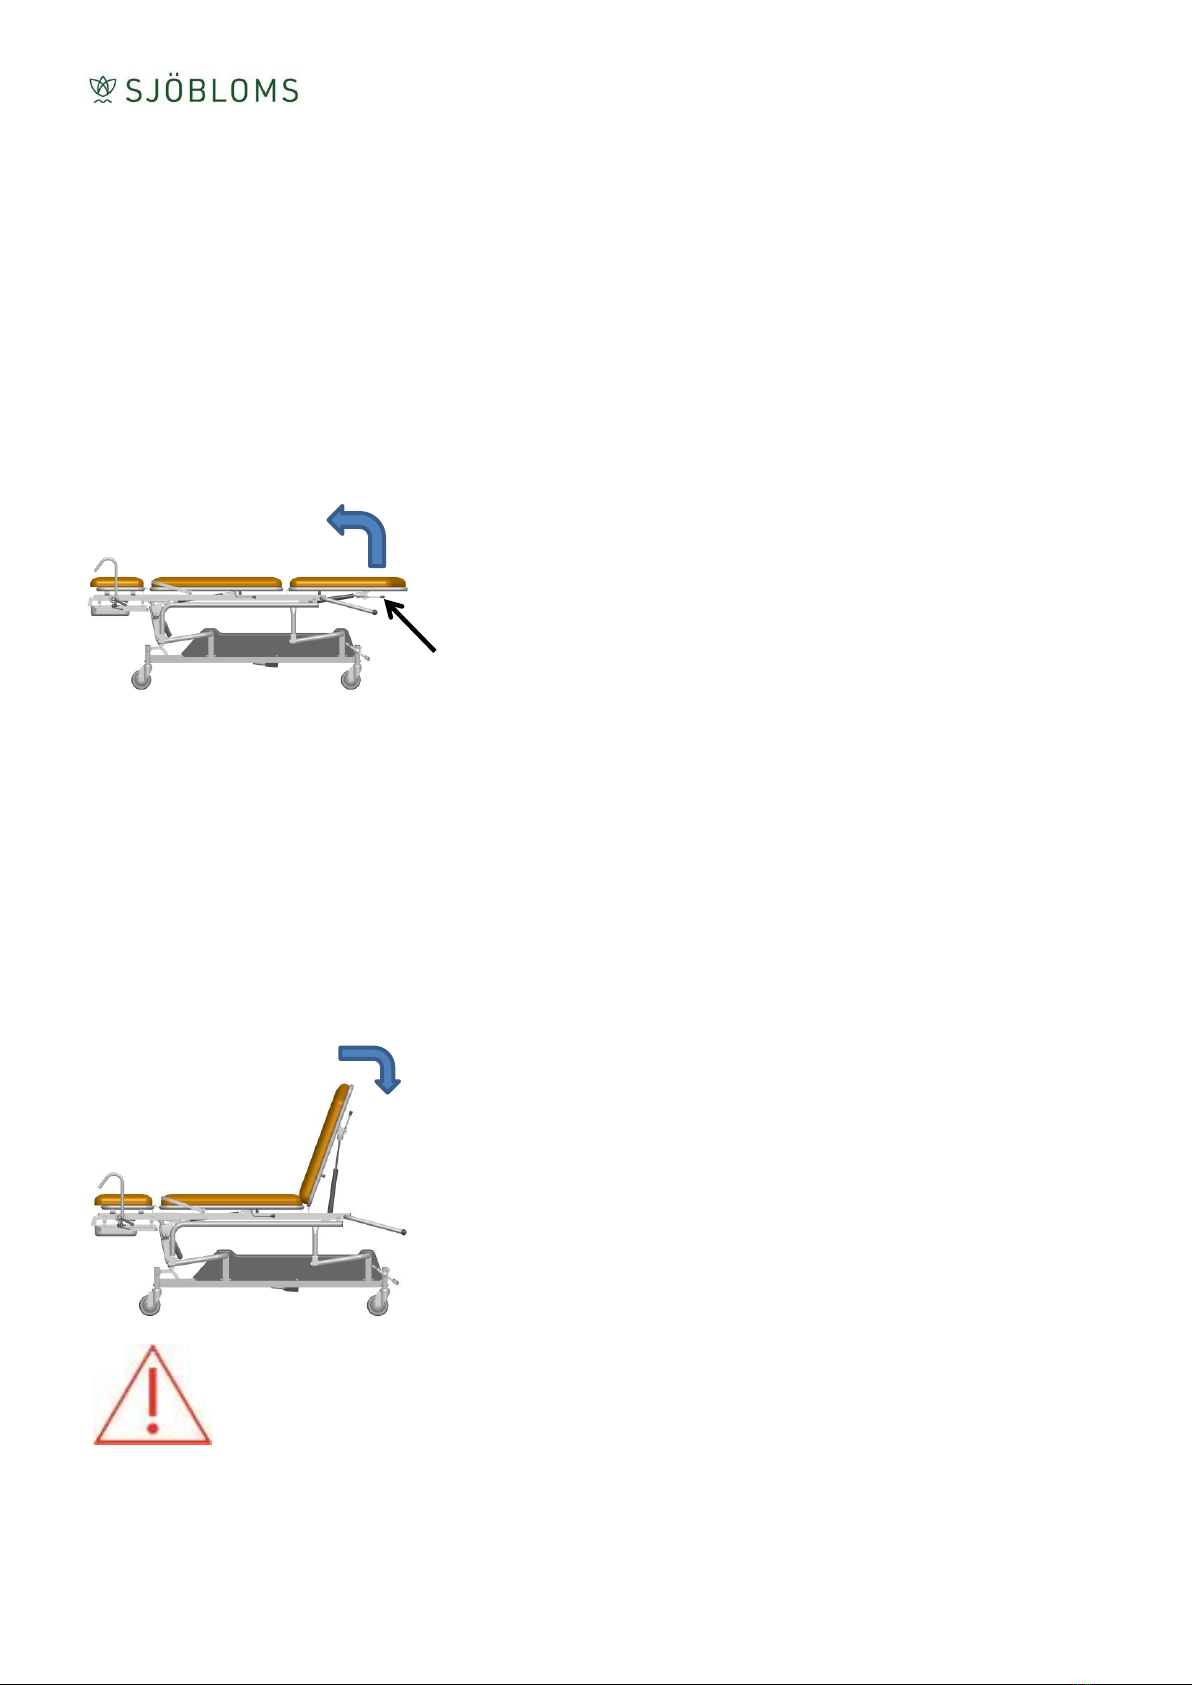
2.4 Adjusting the backrest
Gas spring
Hydraulics/gas spring
Grab at least one of the
handles that are
positioned on the side of
the back rest.
Push the handle up and
the gas spring helps to
raise the back rest
(variably adjustable).
Lowering the backrest
Push the handle in again
and push the back rest
down.
Note!
Ensure that no unauthorized persons are in the couch's working range, as a
pinch hazard exists when raising and lowering the product.
Combi-Gyn Operation
Adjusting Trendelenburg
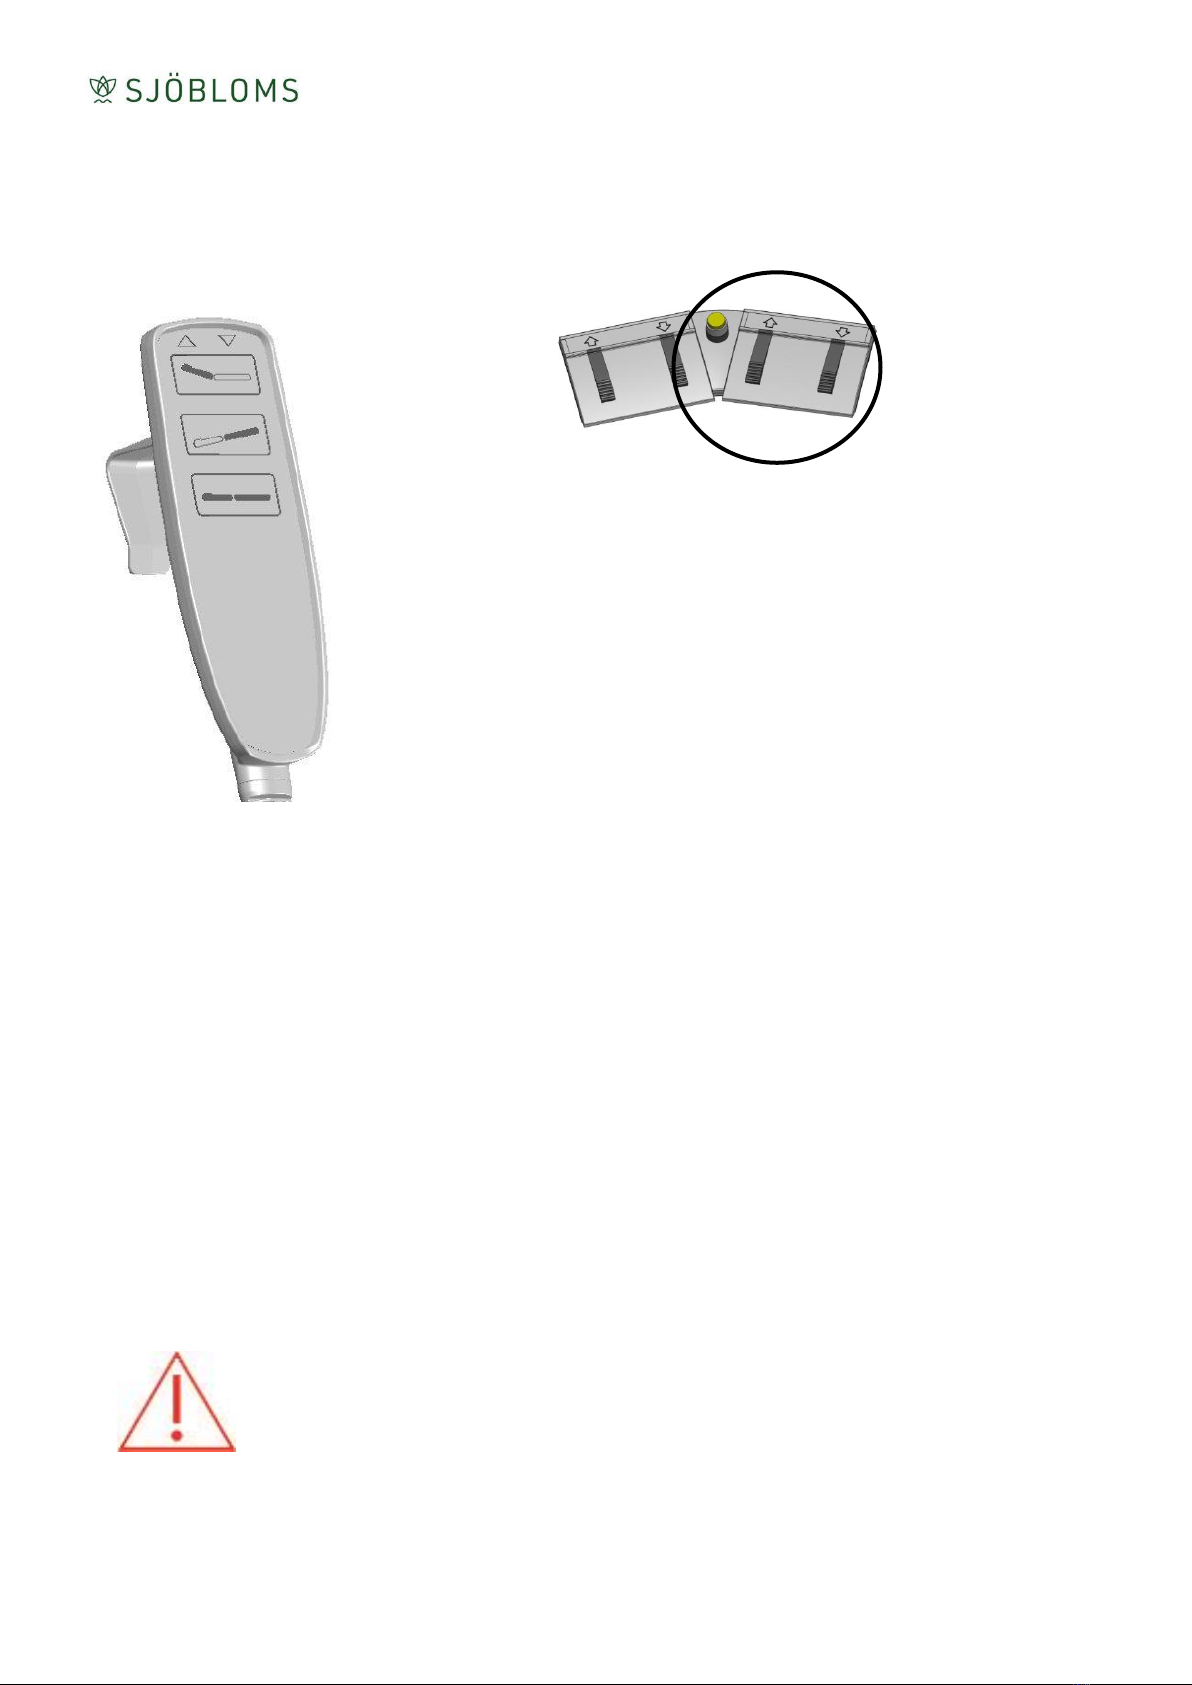
2.5 Adjusting the seat section/Trendelenburg position
Electric, hand control
Electric, foot control
The right pair regulates
the back rest or the seat
section/shock position.
Press the yellow button in
the middle to switch
between these functions.
The left pair adjusts the
height of the gynecology
chair.
Look at the symbols and
follow the arrows to
regulate the different.
Note!
Ensure that no unauthorized persons are in the couch's working range, as a
pinch hazard exists when raising and lowering the product.
Combi-Gyn Operation
Replacing the paper-roll
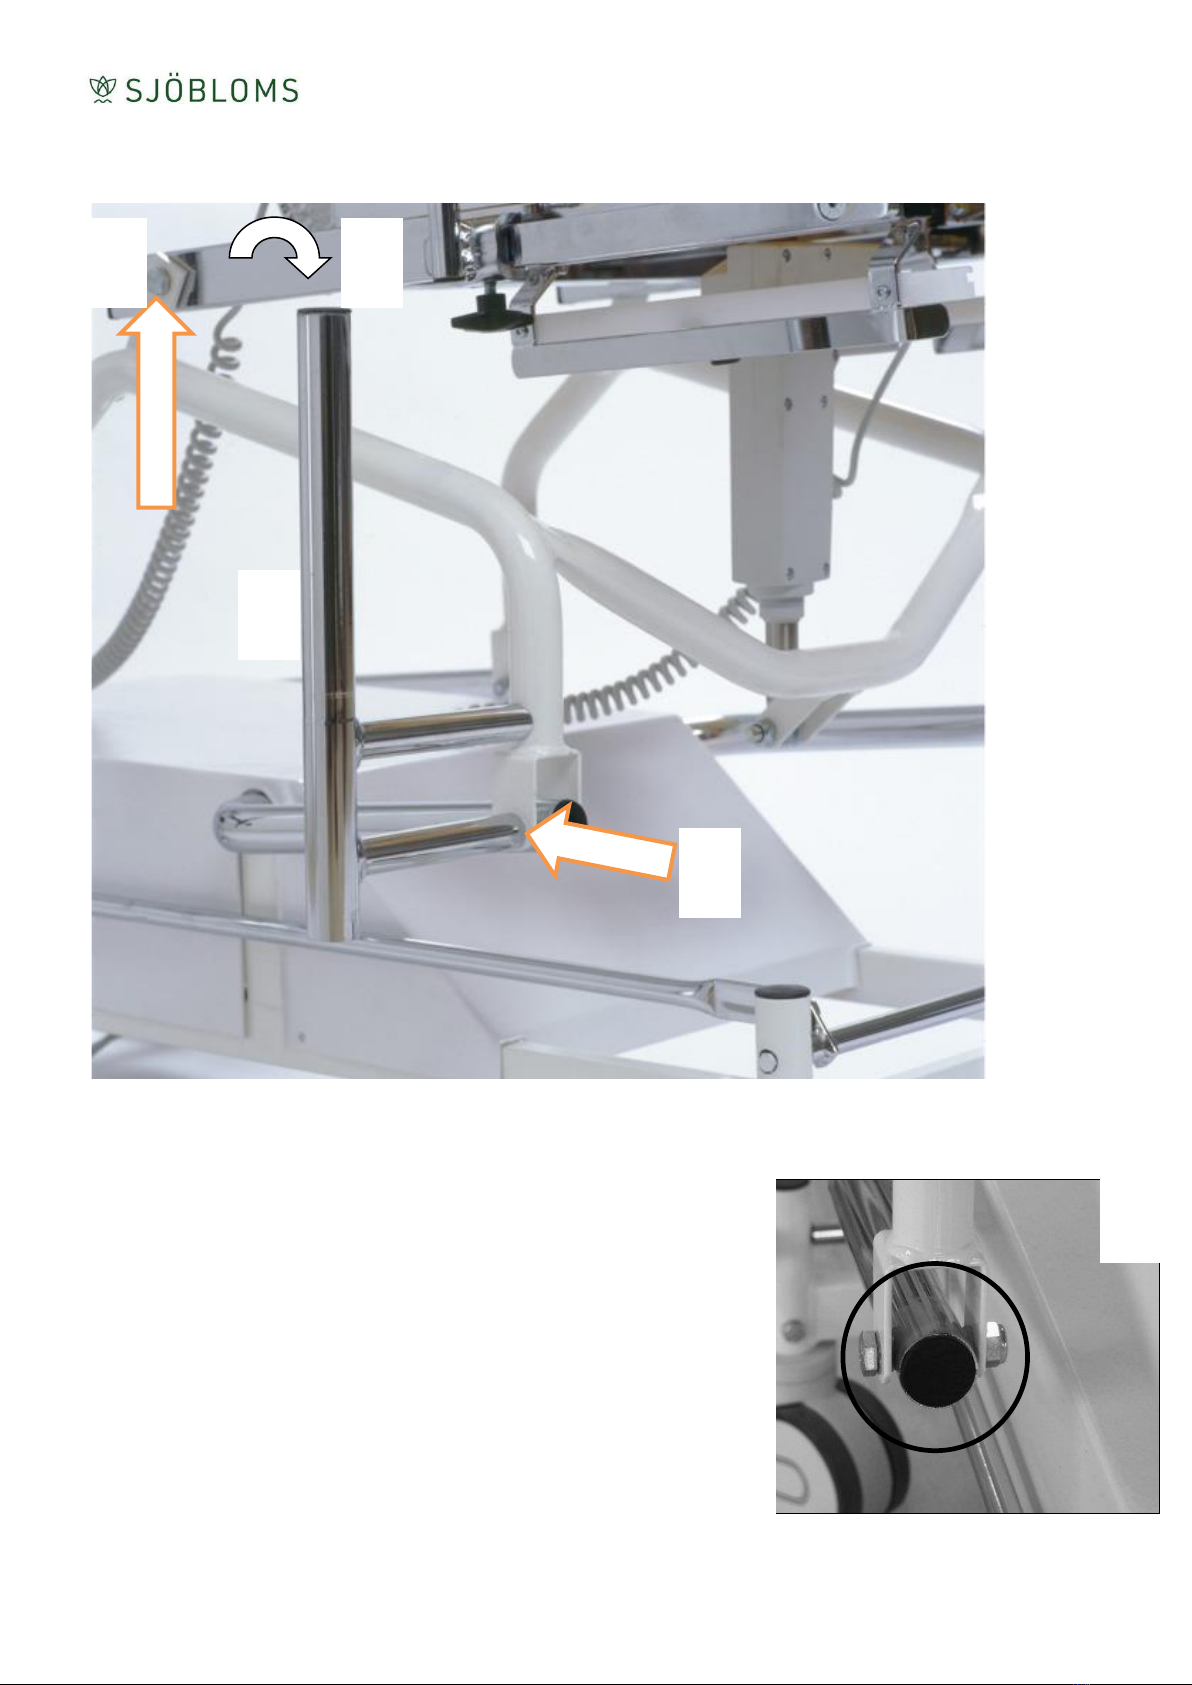
2.6 Replacing the paper-roll
Paper dispenser
Pull out new paper from the paper-roll. Fasten the paper. Tear off the used
paper. DONE!
A. Unwind the black ball without
fully removing it.
B. Push the metal rod to the left.
C. Pull the metal rod gently towards
you, it will then detach from the
right-hand side placement.
D. Pull the rod fully from the left-
hand side placement and place a
new paper-roll on the holder.
E. Mount the paper-roll holder in
reverse order.
DONE!

Combi-Gyn Operation
The function of the castors
2.7 The function of the castors
The gynecology chair is equipped with central locking castors.
Free castors
Braked castors
Combi-Gyn Operation
Patient handles, leg supports
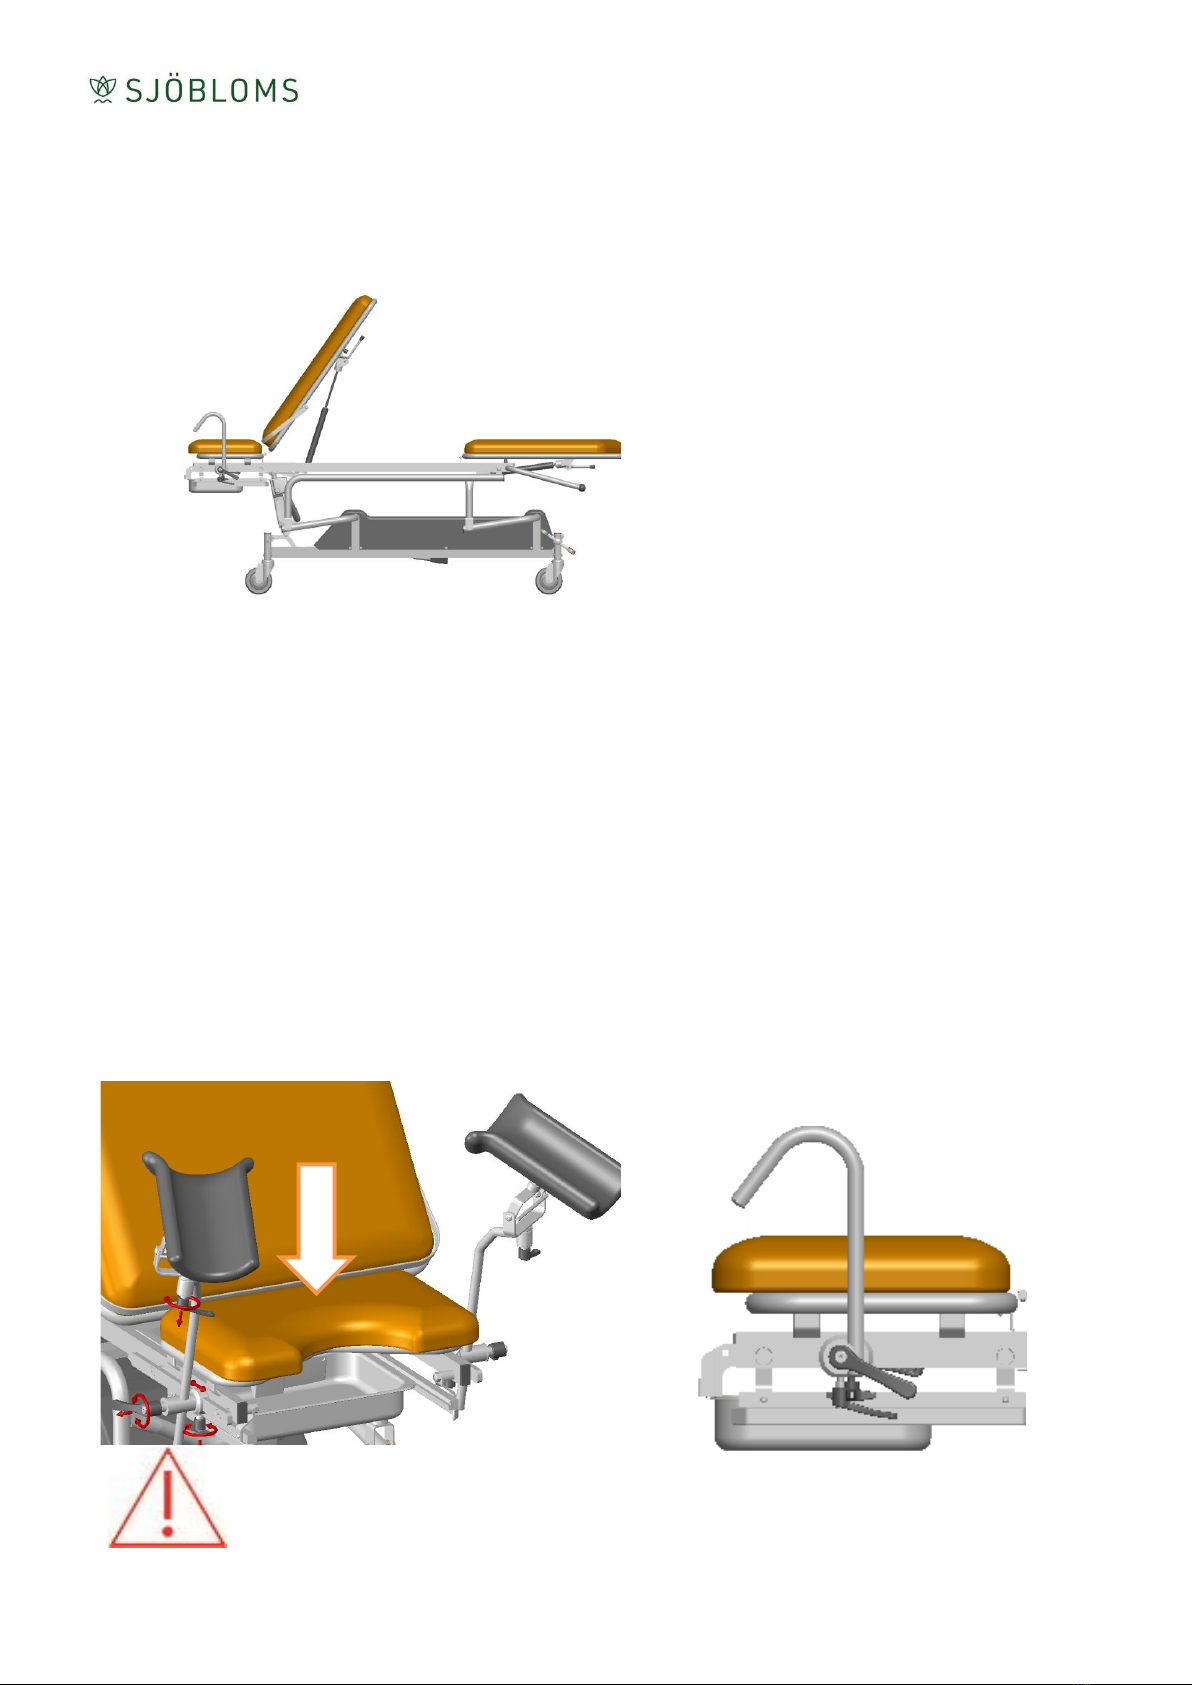
2.8 Patient handles
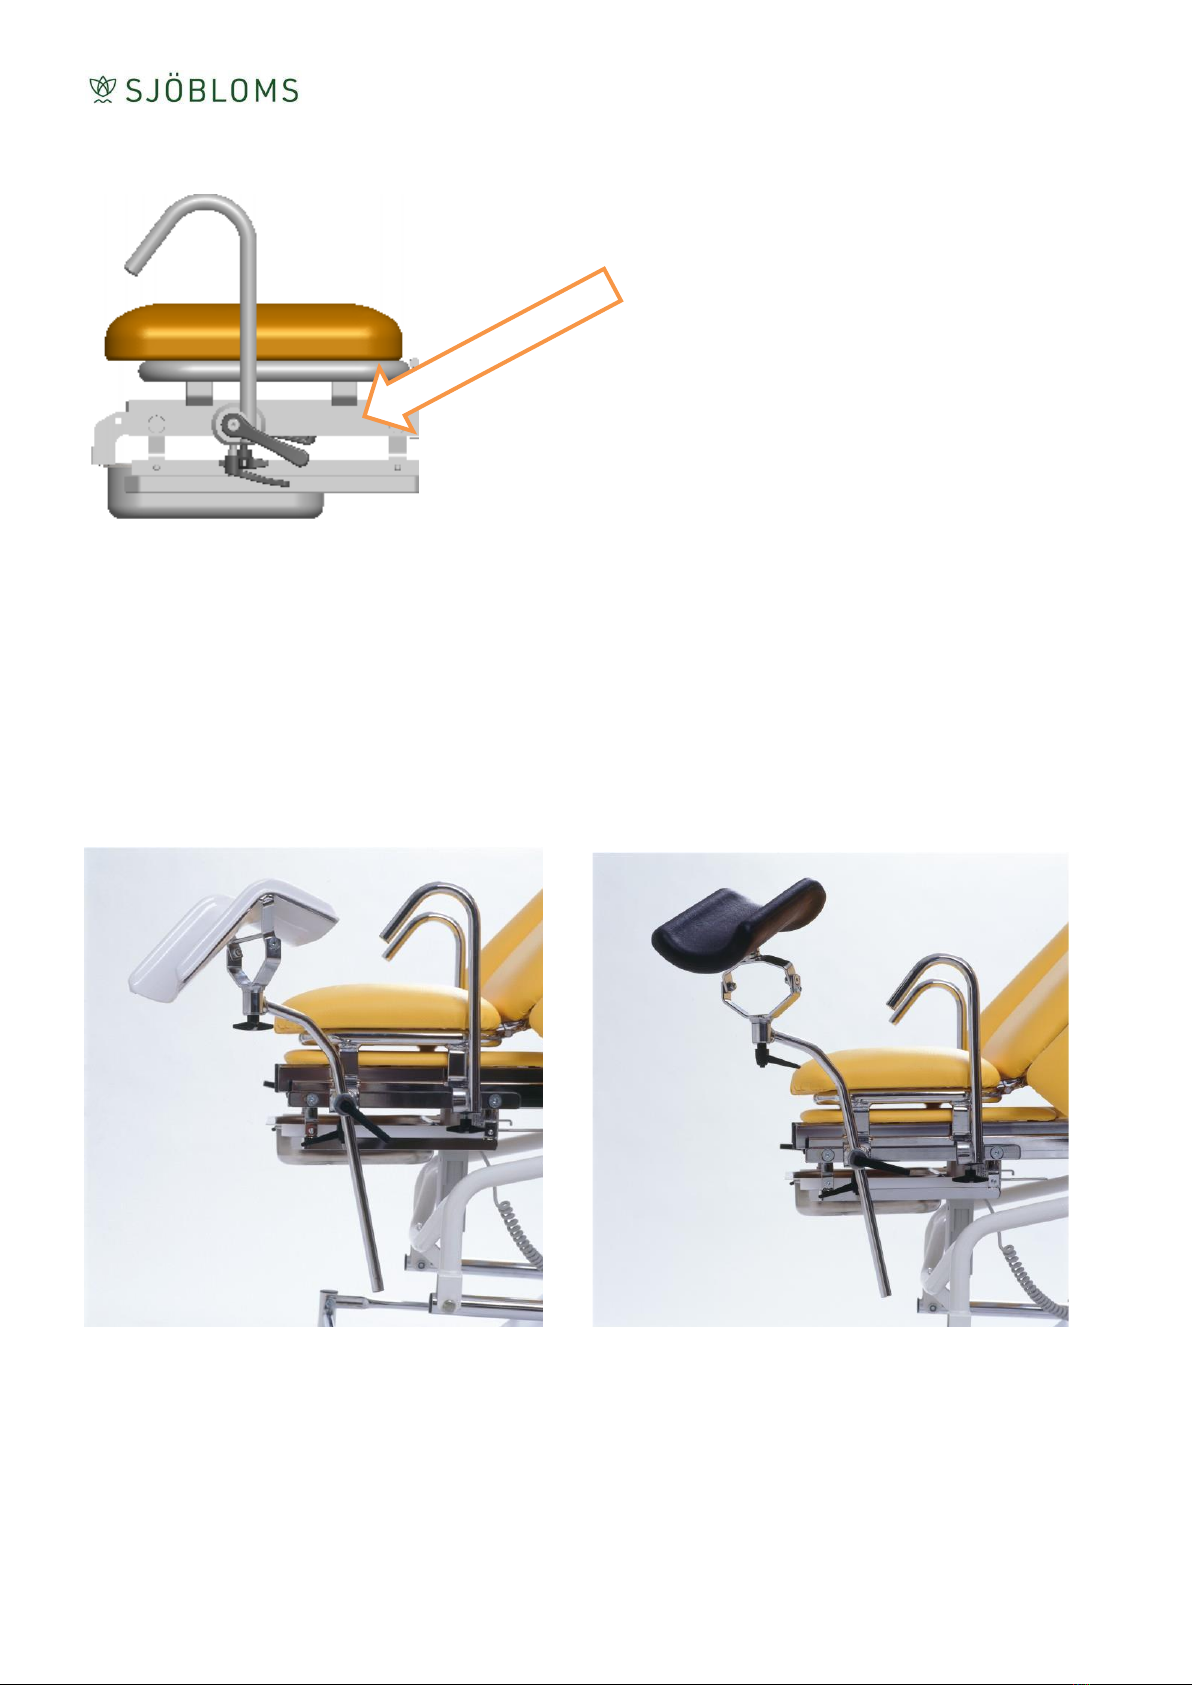
2.9 Leg supports
The patient handles can be adjusted
along the accessory rail (arrow), and also
be completely removed from the rail
when necessary.
Standard
Integral
The Combi-Gyn is available with two different types of leg supports, Standard and
Integral. Both models can be adjusted variably in all directions, up and down and
forward and backward along the accessory rail.
Combi-Gyn Operation
The handles
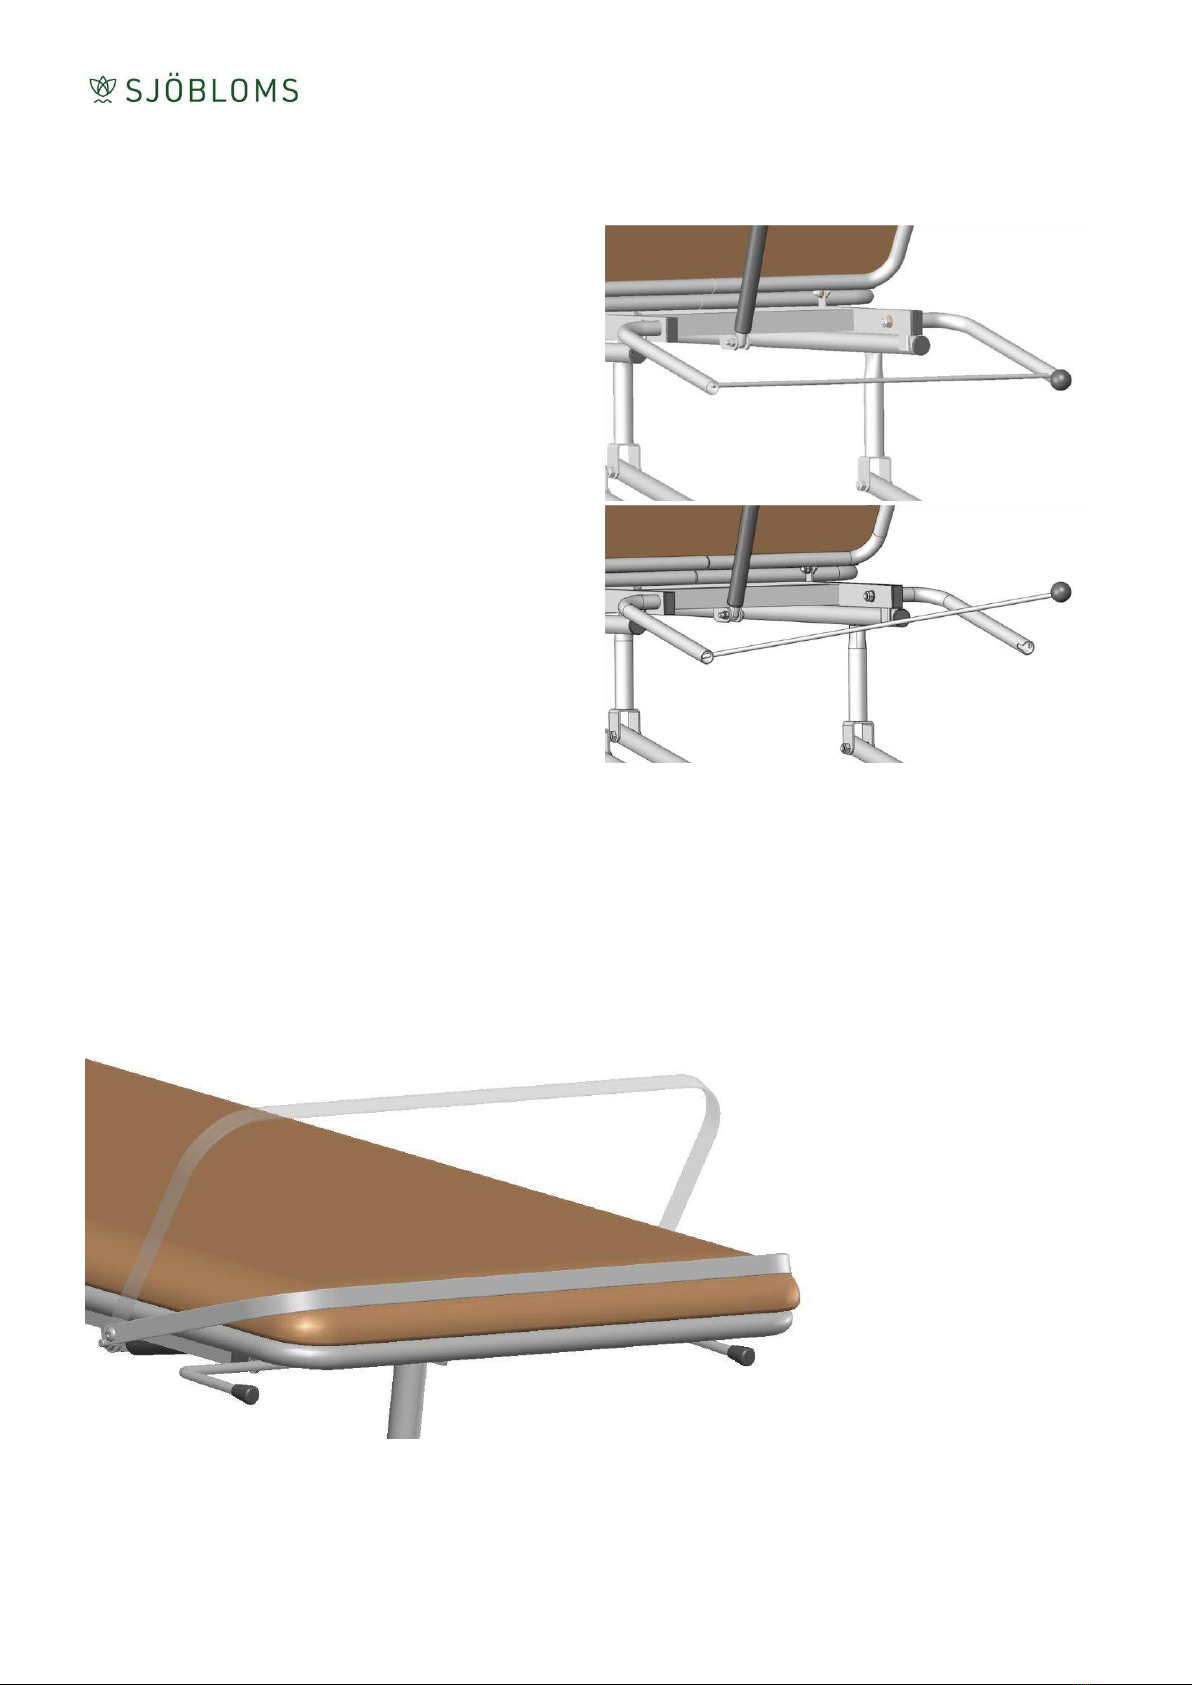
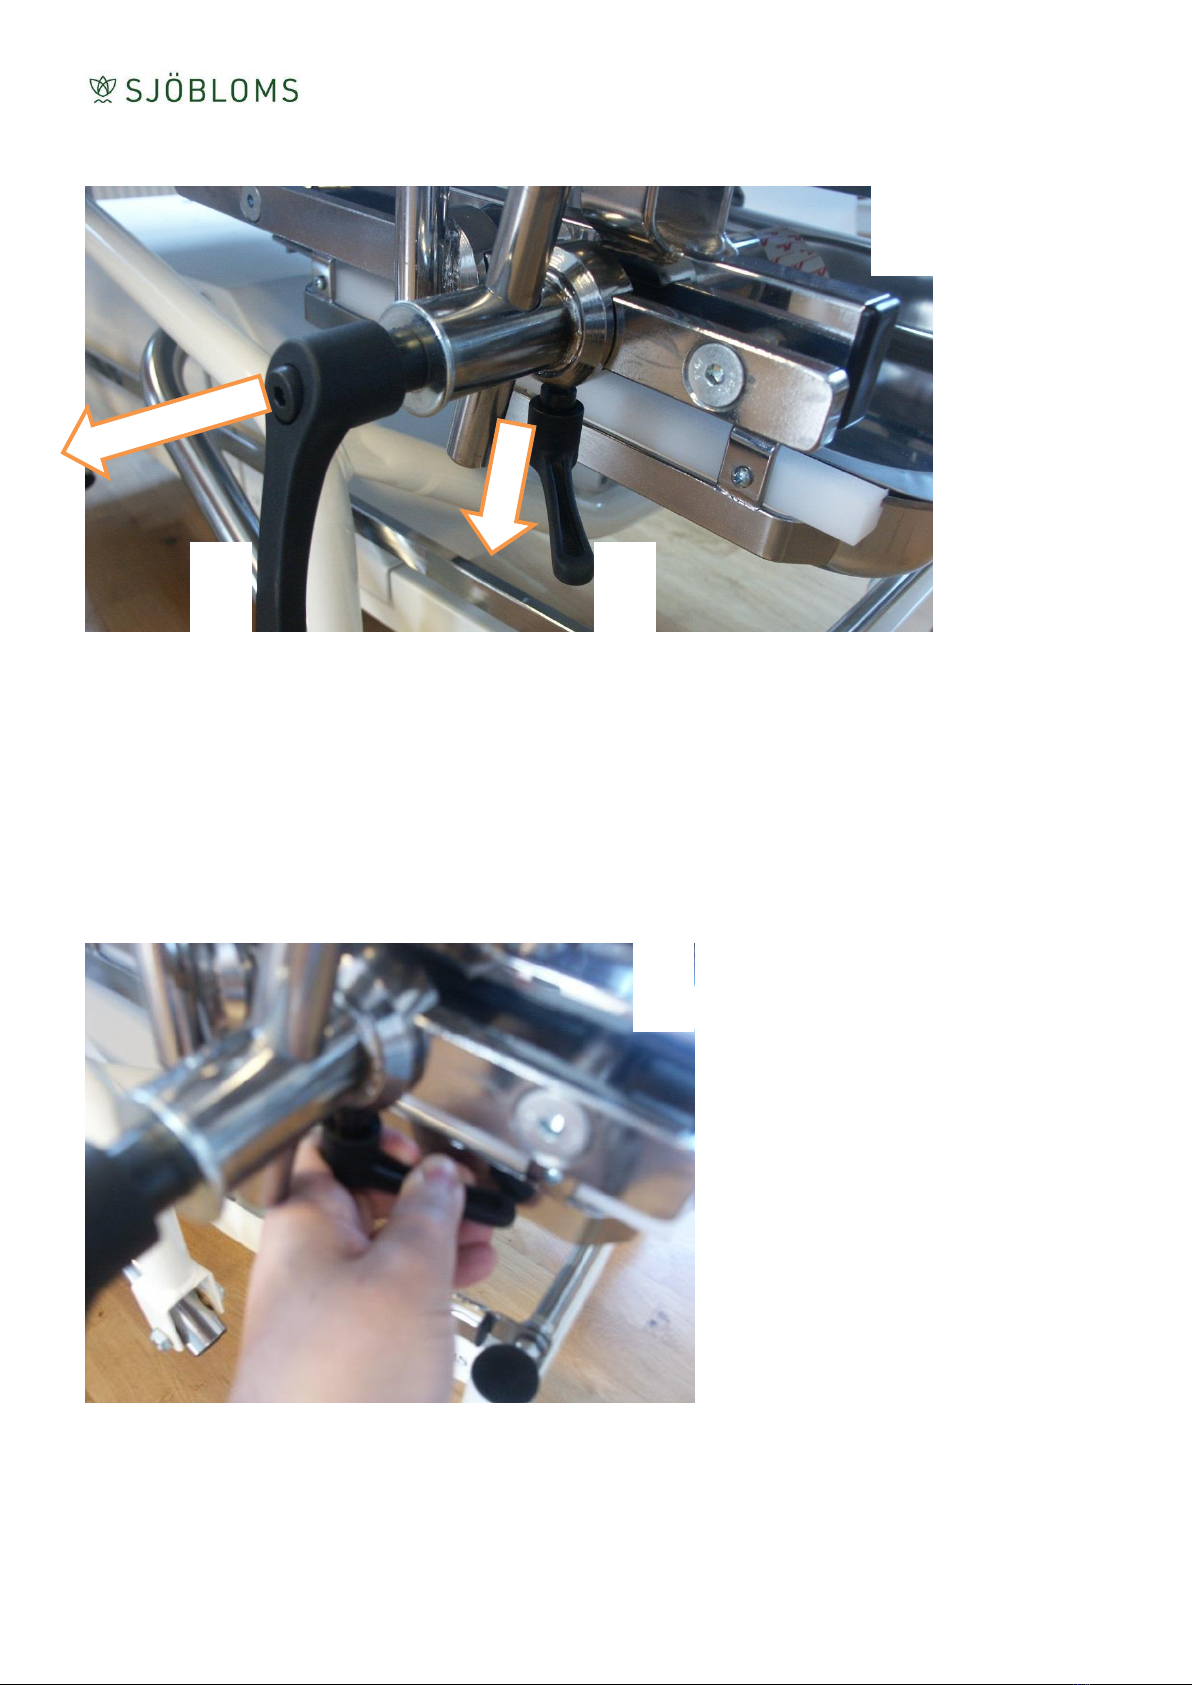
2.10 Function of the siderail and leg support handles
The handles are tightened clockwise and eased counterclockwise. If you have
to turn more than once, but you can not gain access because of the frame
being in the way etc. as the picture two, pull the handle down (applies to
handle A) or towards yourself (applies to handle B), then the tension mode is
opened and you can turn back the handle without the achieved tension being
released. When you then release the handle, it returns to the operational
mode, and you can "repeat" your hold.
1
A
B
2
Combi-Gyn Operation
Colposcope attachment
2.11 Colposcope attachment
C
B
D
E
1. Remove the bolt and nut from the lift arm joint (A).
2. Remove the bolt and nut that are located on the lower
part of the colposcope (B).
3. Place the colposcope attachment fixed bolt through
the lift arm joint and the supplied loose bolt in the top
pre-drilled hole (C).
4. Tighten the bolt and nut. The bolt in the top hole
should be very tight. The bottom nut should not be
too tight, so that the joints are not too heavy to move.
5. Fit the colposcope on the attachment (B).
6. Insert the included top support in the tube end of the
colposcope (D).
7. Tighten the top support with the bolt (E).
A
Combi-Gyn Operation
Procto/recto attachment
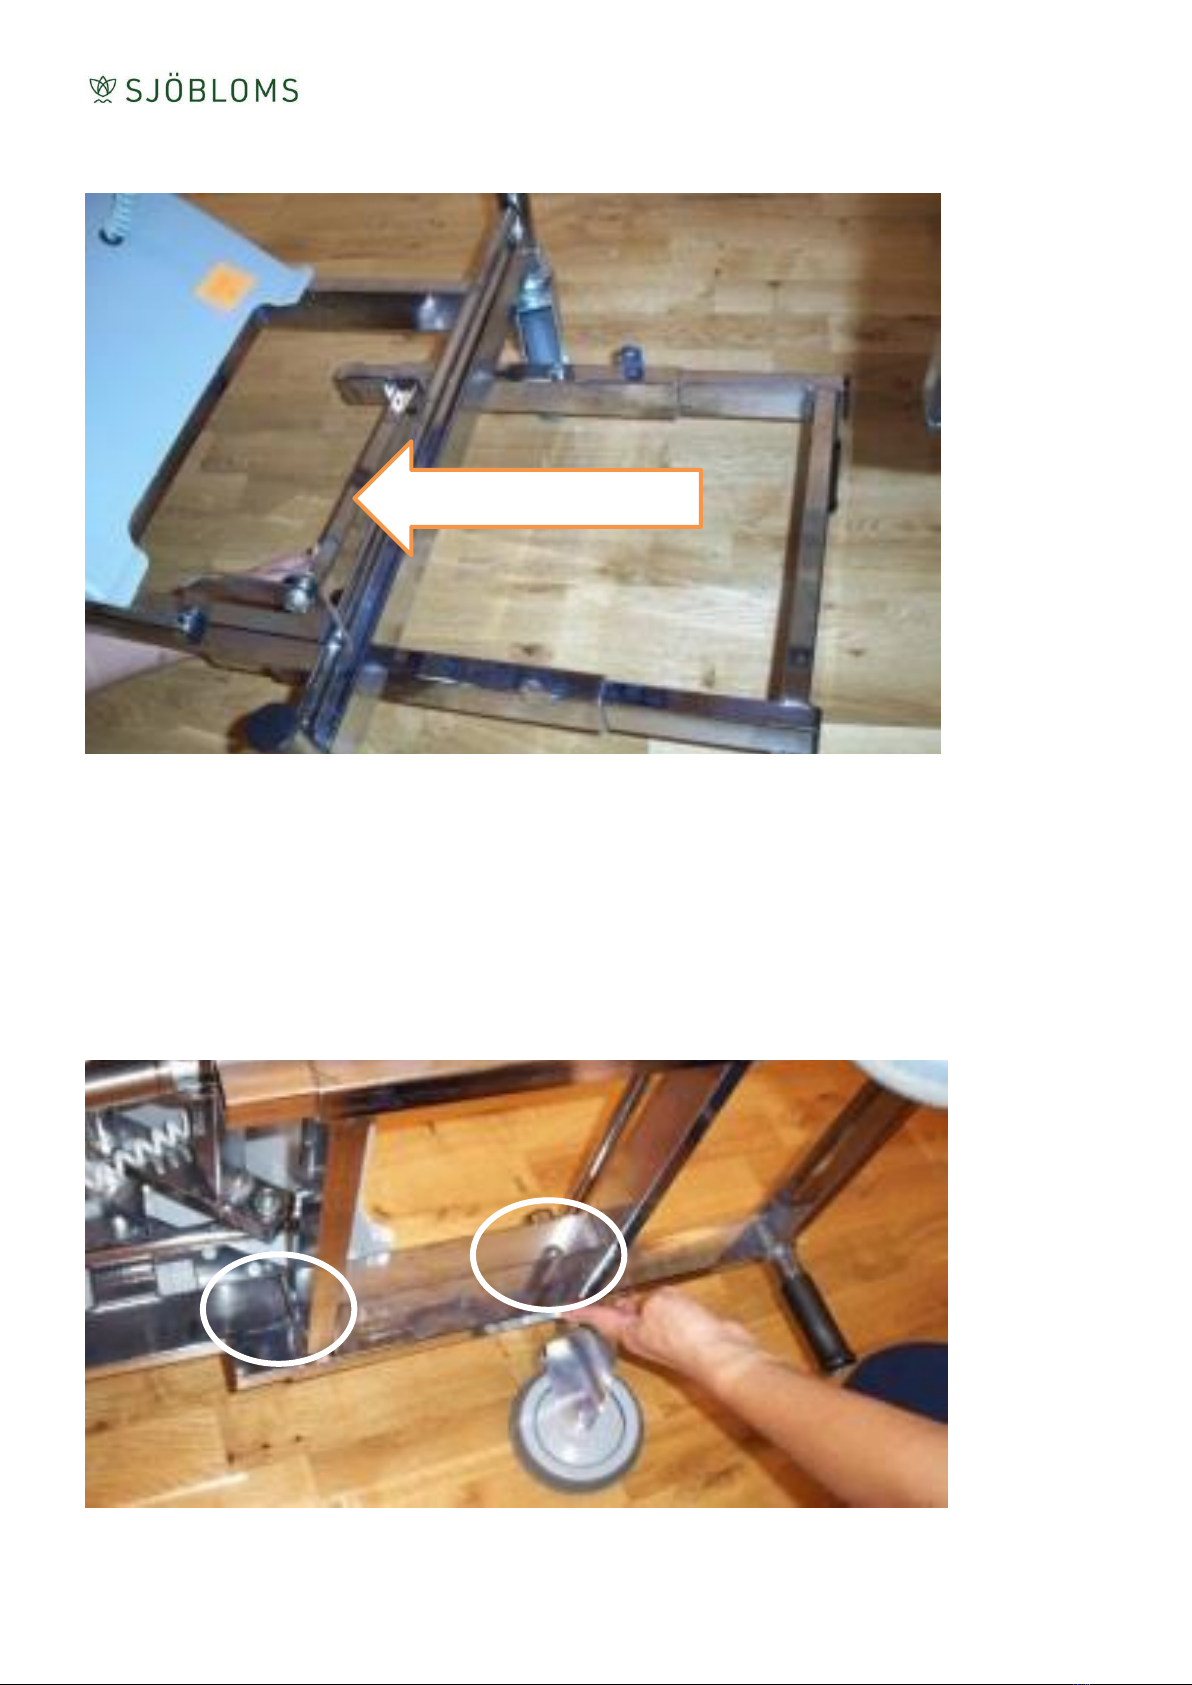
2.12 Proctologi/rerectoscopy attachment
Guide in the supplied support legs of the procto/recto attachment
under the gynecology chair from the short side.
Get assistance from another person and turn the gynecology chair so
that it rests on the side.
Attach using the enclosed screws.
Combi-Gyn Operation
Procto/recto attachment
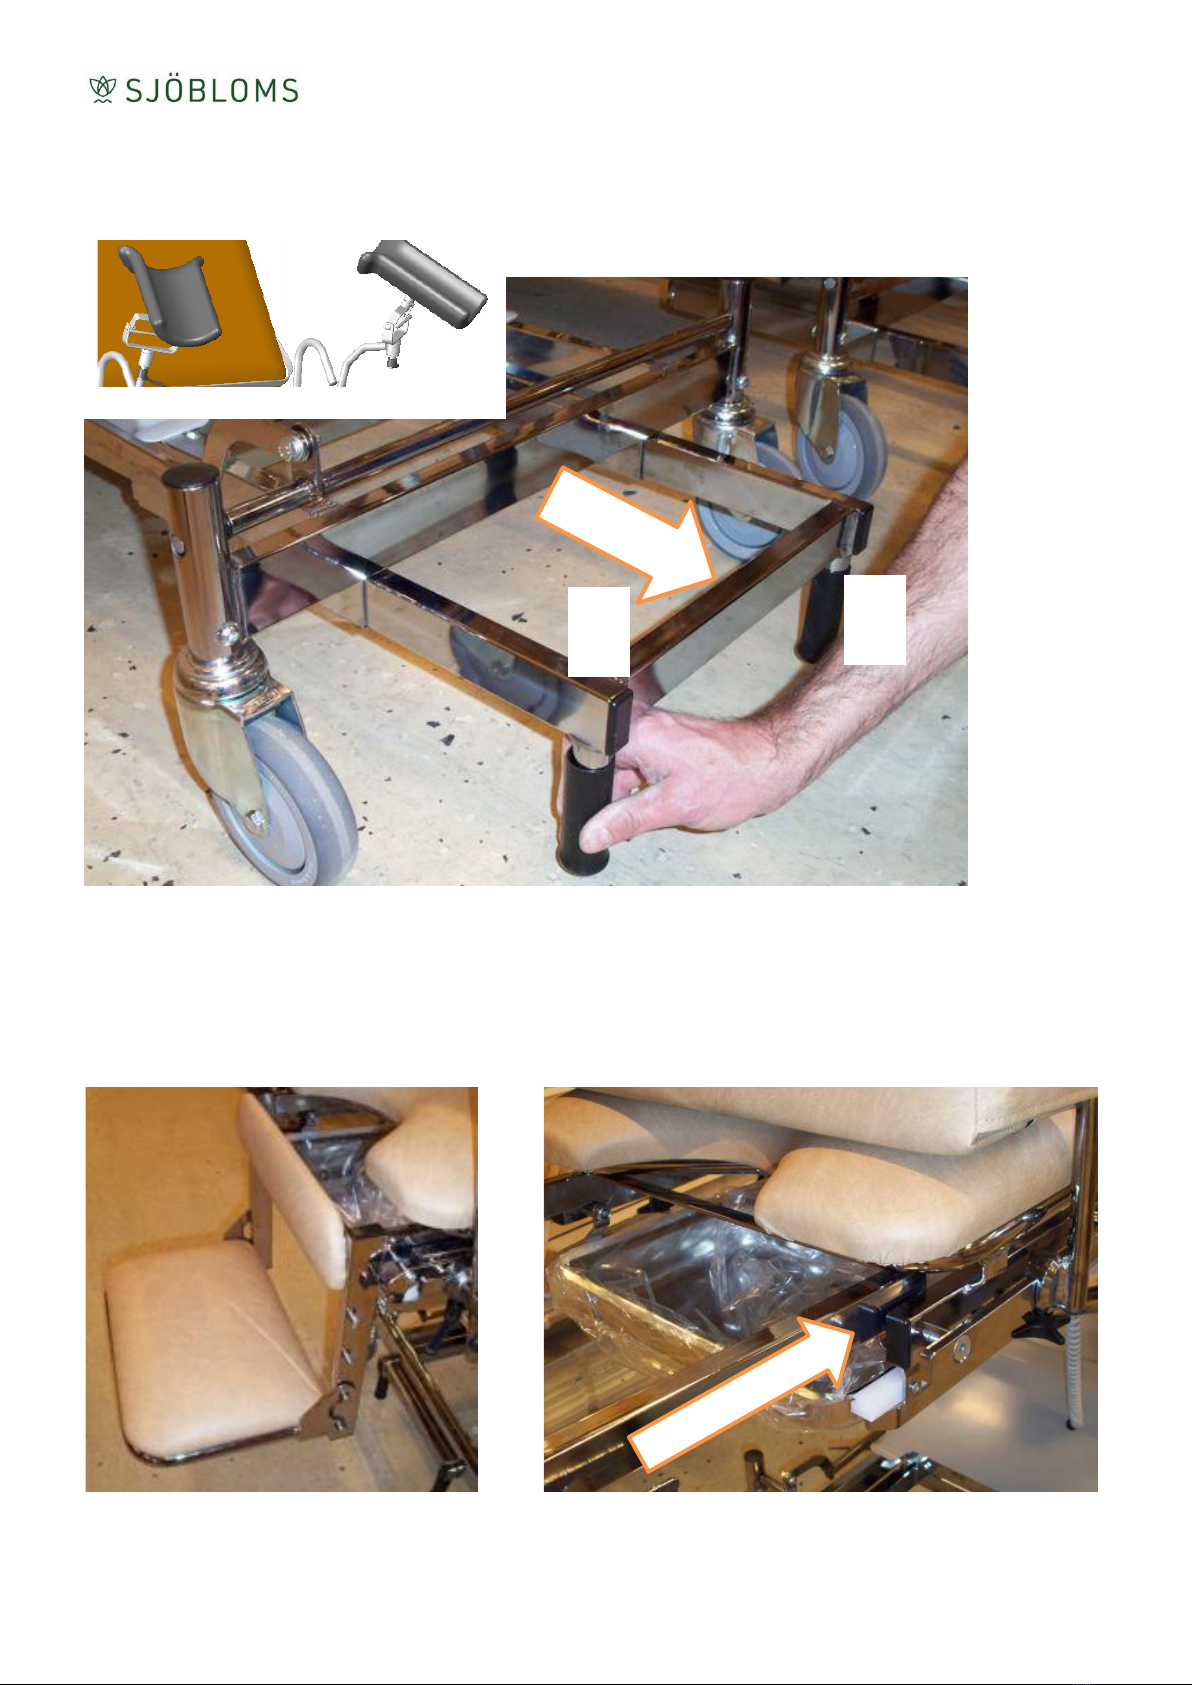
Proctologi/rerectoscopy attachment
Maximum recommended patient weight: 120 kg.
Guide in the square tube in the direction of
the arrow.
The attachment should look
like this when it is fitted.
A
A. Lower the gynecology chair to its lowest position and remove the leg
supports.
B. Pull out the support legs.
C. Adjust the feet so that both are resting solidly against the floor.
D. For maximum stability the wheels should be directed as shown.
B
C
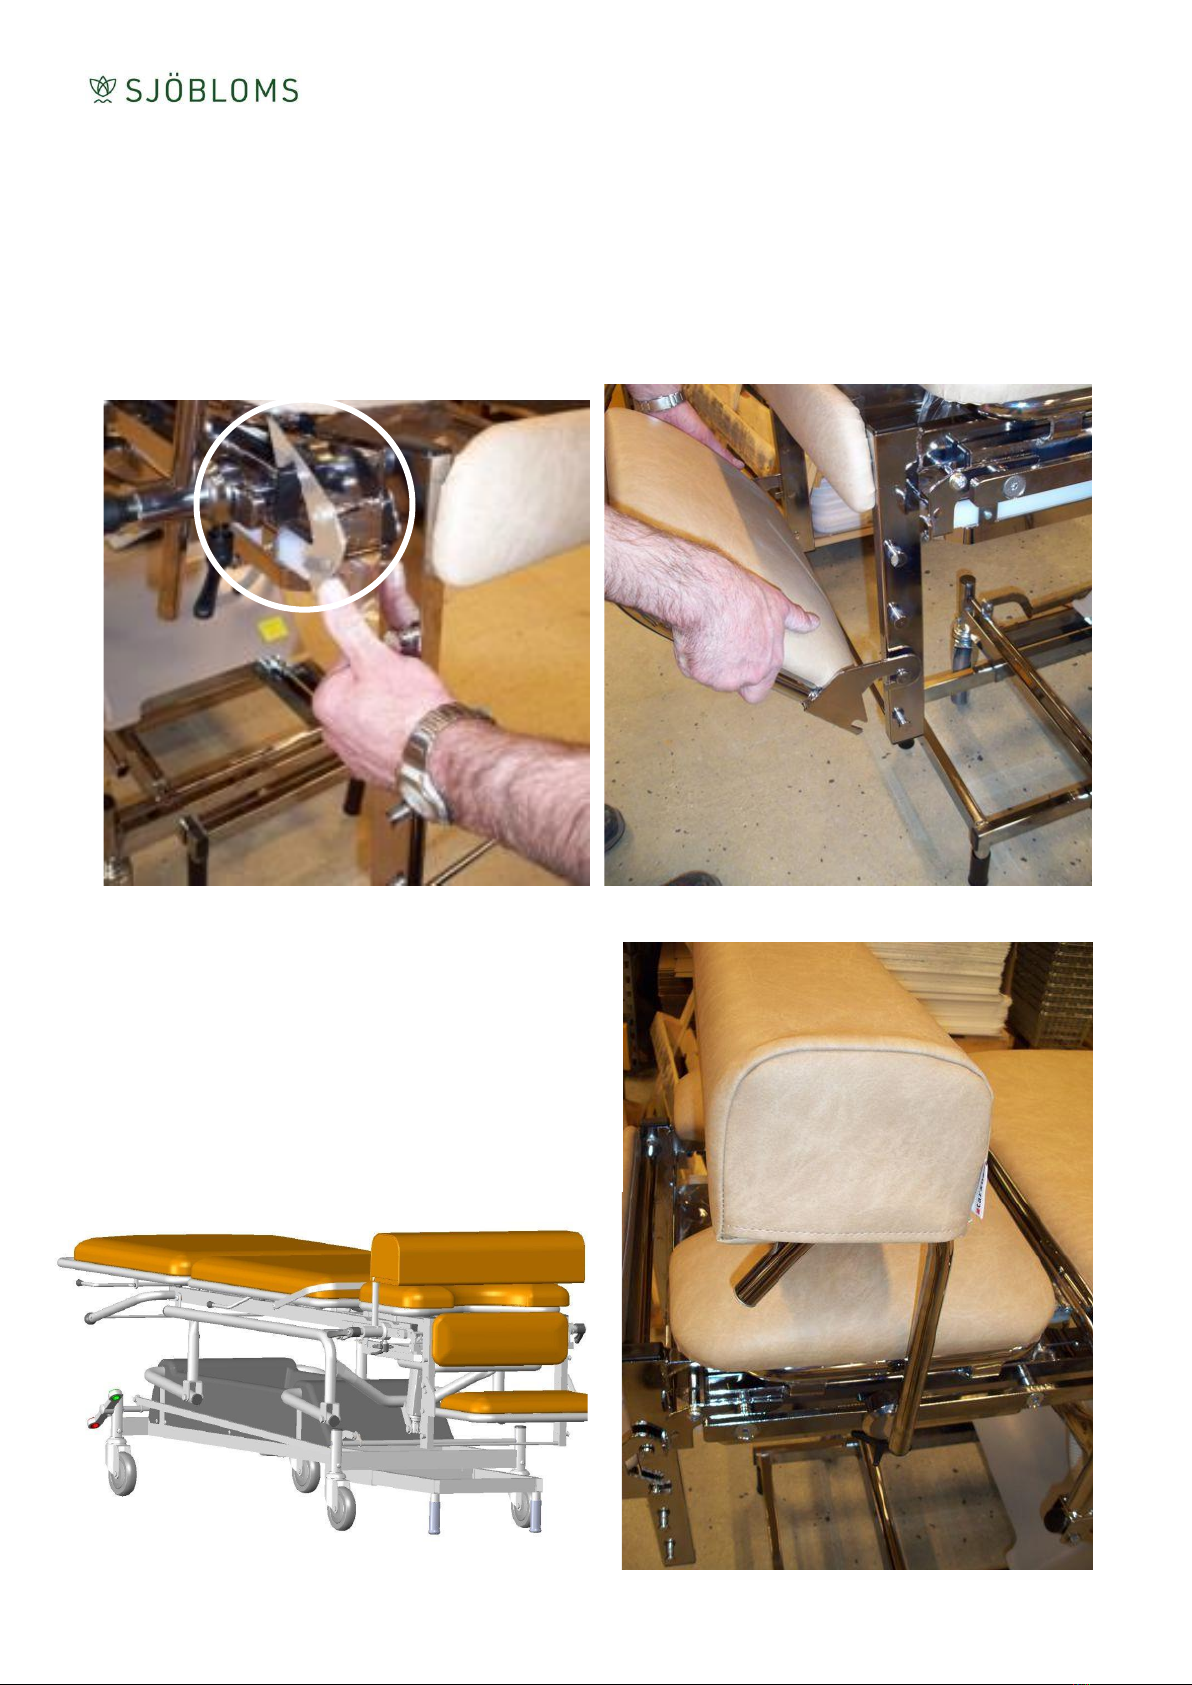
The metal lock (see circle)
automatically locks when you press in
the procto/recto attachment. Only
press the metal lock if necessary. Make
sure that the attachment has been
locked in the installed position.
Place the knee supports at the desired
height. Ensure that both sides are
fitted correctly before placing weight
on the product.
The chrome plated patient handles can
be adjusted along the accessory rail.
Place them so that the pillow end up
close to the seat edge.
Place pillows on each patient handle as
shown in the figure.
The product is ready to use!

Gynaecology chair Maintenance & Cleaning
Routine check-ups
3. MAINTENANCE AND CLEANING
3.1 Routine check-ups
Routine inspections should be made to ensure proper functionality.
Important!
Failure to perform the following routine can cause the patient and/or operator to
be exposed to unnecessary risks and the couch may have a reduced life expectancy.
Please check all functions and parts on a regular basis.
Check the following:
Any unusual sounds.
Gas spring functions.
Castors and castor locking mechanisms.
Any damage to electrical cables.
Motor functions.
That joints and fittings are lubricated according to the lubrication chart.
3.2 Cleaning
Cleaning artificial leather
Water and a mild soap solution is recommended.
Disinfection
If the product needs to be disinfected, use a diluted alcohol solution. Too strong an
alcohol solution can have a drying effect and the imitation leather may deteriorate
and crack.
Chlorine
Chlorine-base solutions are not recommended as a general rule, since it effects
products and environment negatively, differently depending on concentration. If
chlorine-based solutions are used, always wipe afterwards with damp cloth.
Combi-Gyn Maintenance and cleaning
Lubrication scheme
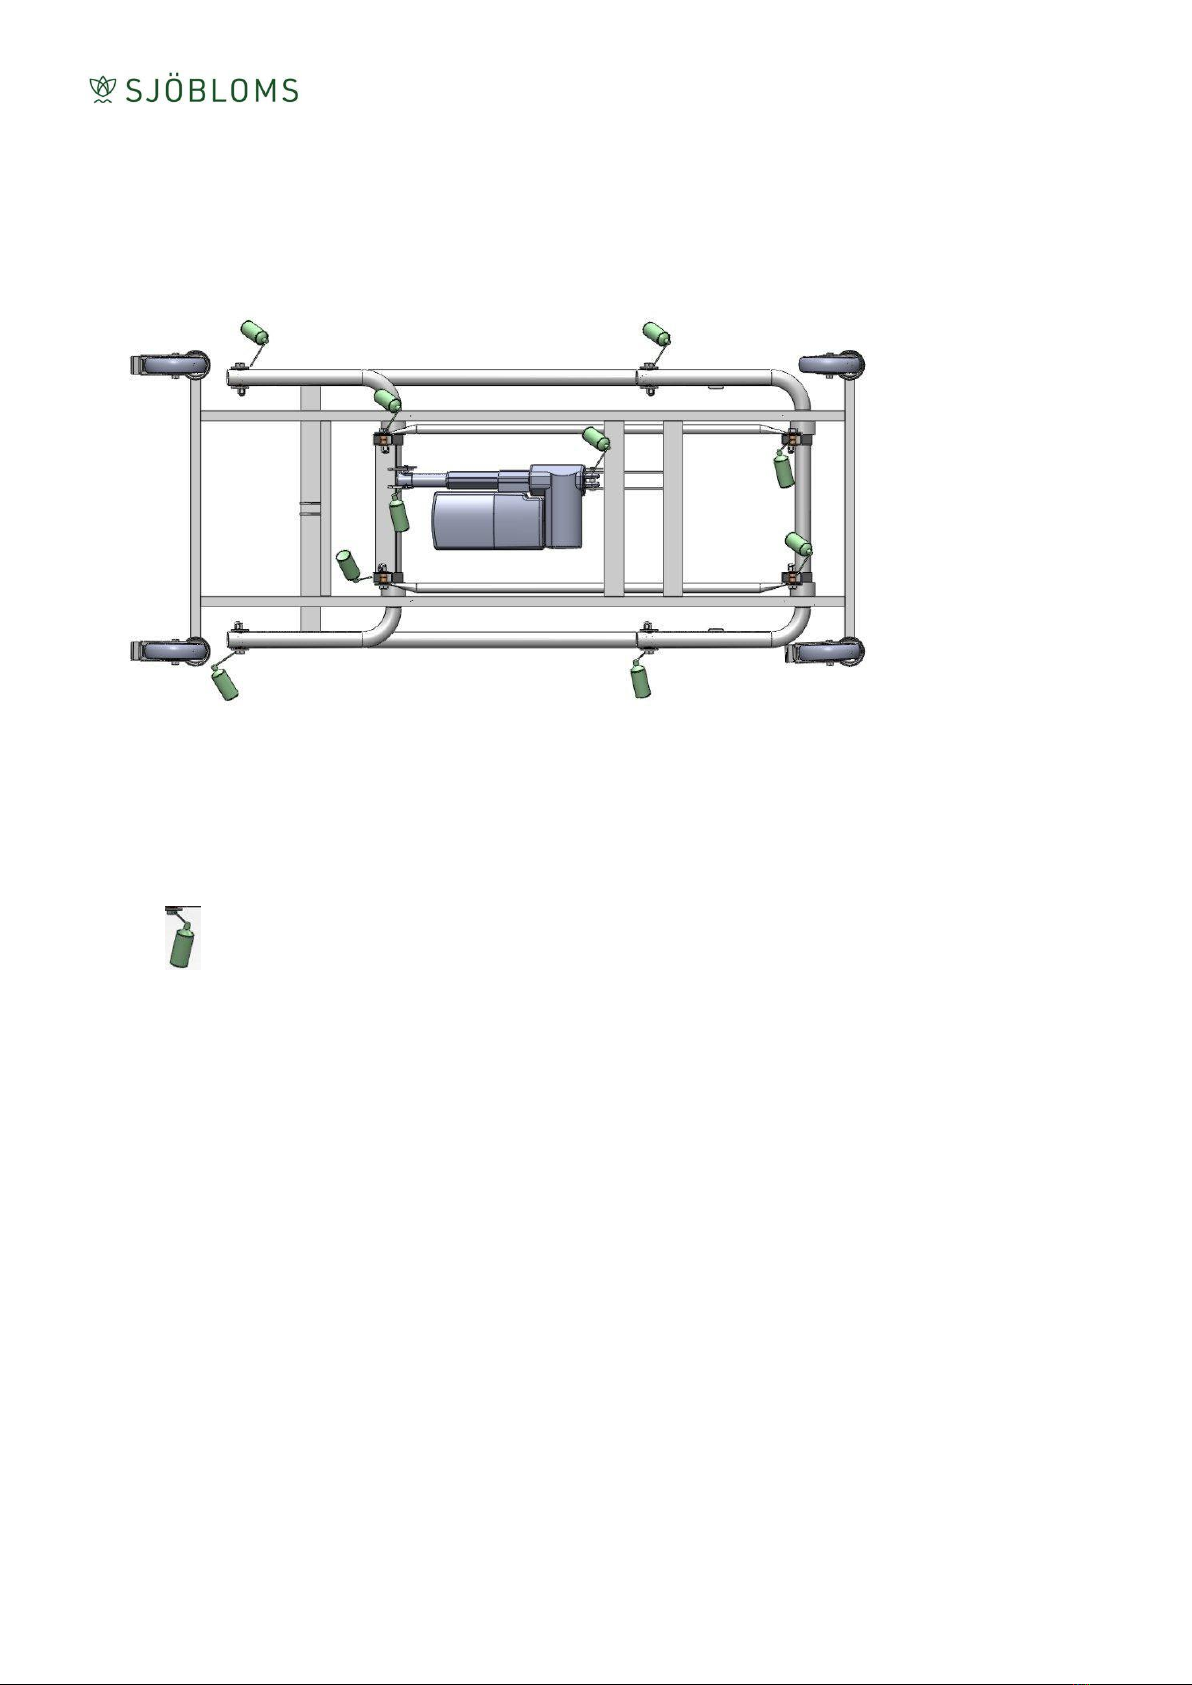
3.3 Lubrication scheme
Lubrication according to the schedule should be performed every 6 months or as needed.
1. First lock the wheels.
2. Enlist the help of another person and tip the couch on the side, in order to
lubricate the moving joints.
3. The spray can in the pictures above indicates where to lubricate.
Combi-Gyn Maintenance and cleaning
Spare-parts
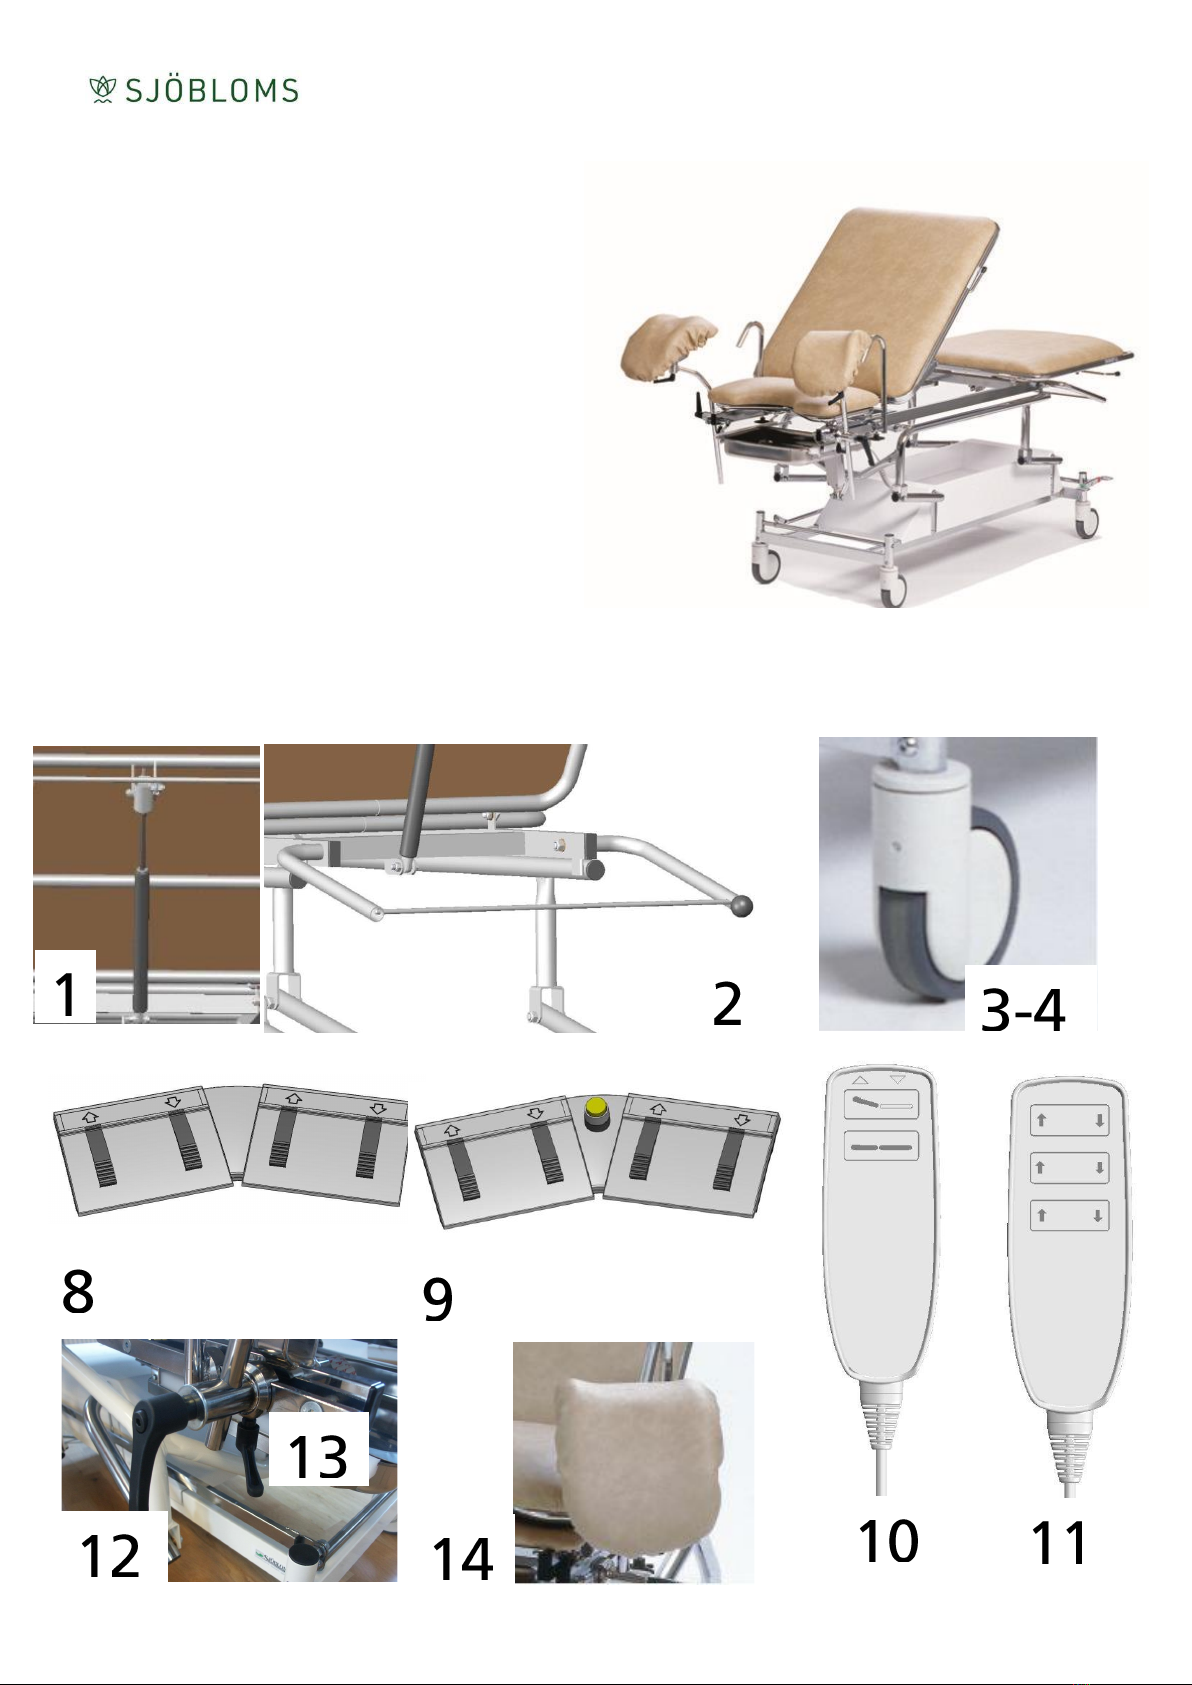
3.4 Spare-part list Combi-Gyn
No. Item no. Description
1 G0001 Gas spring for back support
2 DET015-007CR Paper-roll holder
3 125321630T2LPZ Castor standard
4 125321630T3LPZ Castor directional locking
5 343100+0015004A Lift Motor Linak
6 312100+1110004C Backrest motor Linak
7 312100+1110004C Trendelenburg motor Linak
8 FS2001 Foot control two motors, Linak
9 FS3001 Foot control three motors, Linak
10 HB824500004+11 Hand control two motors, Linak
11 HB834500003+11 Hand control three motors, Linak
12 WN55 S95-M12x25 Locking handles, large
13 WN55 S65-M8X16 Locking handles, small
14 DY-300-color Pads leg supports
Combi-Gyn Maintenance and cleaning
Accessories
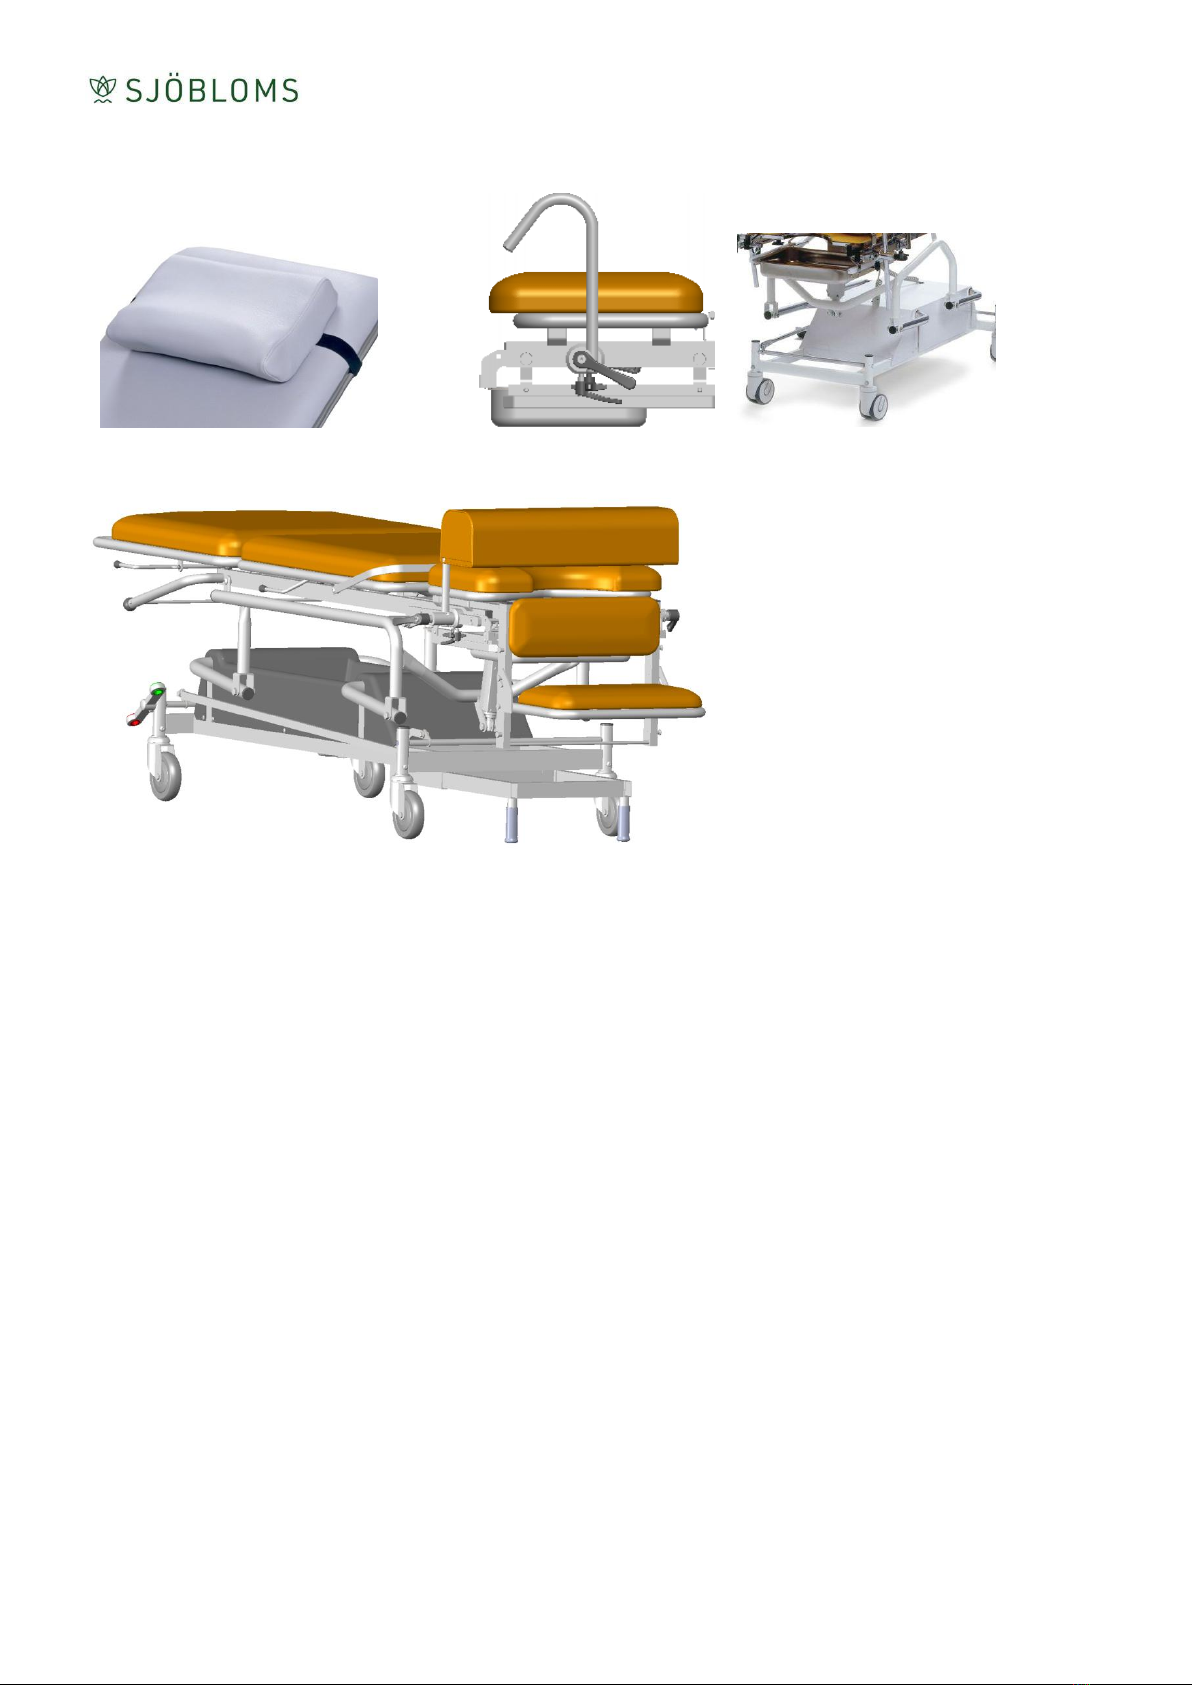
3.5 Accessories
Neck cushion Patient handles White-coated chassis
Proctology/rectoscopy attachment
This manual suits for next models
1
Table of contents
Other SJÖBLOMS Medical Equipment manuals


Popular Medical Equipment manuals by other brands


Mindray
Mindray Passport 12 Service manual

Jorvet
Jorvet Vet Pro Pump Maintenance & troubleshooting

Dentsply Maillefer
Dentsply Maillefer ProPex user manual

Shenzhen Mindray Bio-Medical Electronics Co., Ltd.
Shenzhen Mindray Bio-Medical Electronics Co., Ltd. DC-N2 Operator's manual

Custo Med
Custo Med Holter ABPM Custo Screen 400 operating manual

SOMNOmedics
SOMNOmedics NIBP PLM instruction manual


