Skil 5885 User manual

CIRCULAR SAW
5885 (F0155885..)
SKIL Europe BV - Konijnenberg 60 03/11 2610Z01916
4825 BD Breda - The Netherlands
www.skilmasters.com
ORIGINAL INSTRUCTIONS 7
NOTICE ORIGINALE 11
ORIGINALBETRIEBSANLEITUNG 16
ORIGINELE GEBRUIKSAANWIJZING 20
BRUKSANVISNING I ORIGINAL 25
ORIGINAL BRUGSANVISNING 29
ORIGINAL BRUKSANVISNING 34
ALKUPERÄISET OHJEET 38
MANUAL ORIGINAL 43
MANUAL ORIGINAL 48
ISTRUZIONI ORIGINALI 52
EREDETI HASZNÁLATI UTASÍTÁS 57
PŮVODNÍM NÁVODEM K POUŽÍVÁNÍ 62
ORİJİNAL İŞLETME TALİMATI 66
INSTRUKCJA ORYGINALNA 71
ПОДЛИННИК РУКОВОДСТВА
ПО ЭКСПЛУАТАЦИИ 76
ОРИГІНАЛЬНА ІНСТРУКЦІЯ
З ЕКСПЛУАТАЦІЇ 82
ΠΡΩΤΟΤΥΠΟ Ο∆ΗΓΙΩΝ ΧΡΗΣΗΣ 87
INSTRUCŢIUNI DE FOLOSIRE
ORIGINALE 93
ОРИГИНАЛНО РЪКОВОДСТВО
ЗА ЕКСПЛОАТАЦИЯ 97
PÔVODNÝ NÁVOD NA POUŽITIE 103
ORIGINALNE UPUTE ZA RAD 108
ORIGINALNO UPUTSTVO ZA RAD 112
IZVIRNA NAVODILA 116
ALGUPÄRANE KASUTUSJUHEND 121
ORIĢINĀLĀ LIETOŠANAS PAMĀCĪBA 125
ORIGINALI INSTRUKCIJA 131
142
139

2
E
D
A
A
HH
F
G
C
B
15885
3
2
7,9 kg
EPTA 01/2003
5000 /min
65
mm
45°
235 mm
MAX.
30 mm
230 mm
MIN.
30 mm
Watt
2000
ʿʿʽ
Ƙ
ʿˁʽ
85 mm
90°
110 V = 1700 W
RUBBER

3
K
J
L
3 mm
4
HF G
K
N
M
M
5

4
M
A D E H
P
M
A D E H
K
NOT STANDARD INCLUDED
6
Q
7

5
0
QF
G
R
S U V T
Ø 34-35 mm
98

6
X
W
Q
Q
F
G
#
$
! @
ACCESSORIES SKILNr.
2610Z00217

7
Circularsaw 5885
INTRODUCTION
• This tool is intended for lengthways and crossways
cutting of wood with straight cuts as well as angle cuts up
to 45°; with the appropriate saw blades also non-ferrous
metals, light building materials and plastics can be cut
• Read and save this instruction manual 2
TECHNICALSPECIFICATIONS1
SAFETY
GENERALSAFETYINSTRUCTIONS
WARNING!Readallsafetywarningsandall
instructions. Failure to follow the warnings and instructions
may result in electric shock, fire and/or serious injury. Saveall
warningsandinstructionsforfuturereference. The term
“power tool” in the warnings refers to your mains-operated
(corded) power tool or battery-operated (cordless) power tool.
1)WORKAREASAFETY
a) Keepworkareacleanandwelllit. Cluttered or dark
areas invite accidents.
b) Donotoperatepowertoolsinexplosive
atmospheres,suchasinthepresenceofflammable
liquids,gasesordust. Power tools create sparks which
may ignite the dust or fumes.
c) Keepchildrenandbystandersawaywhileoperating
apowertool. Distractions can cause you to lose control.
2)ELECTRICALSAFETY
a) Powertoolplugsmustmatchtheoutlet.Nevermodify
thepluginanyway.Donotuseanyadapterplugs
withearthed(grounded)powertools. Unmodied plugs
and matching outlets will reduce risk of electric shock.
b) Avoidbodycontactwithearthedorgrounded
surfacessuchaspipes,radiators,rangesand
refrigerators.There is an increased risk of electric
shock if your body is earthed or grounded.
c) Donotexposepowertoolstorainorwetconditions.
Water entering a power tool will increase the risk of
electric shock.
d) Donotabusethecord.Neverusethecordforcarrying,
pullingorunpluggingthepowertool.Keepcordaway
fromheat,oil,sharpedgesormovingparts. Damaged
or entangled cords increase the risk of electric shock.
e) Whenoperatingapowertooloutdoors,usean
extensioncordsuitableforoutdooruse. Use of a cord
suitable for outdoor use reduces the risk of electric shock.
f) Ifoperatingapowertoolinadamplocationis
unavoidable,useanearthleakagecircuitbreaker.
Use of an earth leakage circuit breaker reduces the risk
of electric shock.
3)PERSONALSAFETY
a) Stayalert,watchwhatyouaredoingandusecommon
sensewhenoperatingapowertool.Donotuseapower
toolwhileyouaretiredorundertheinfluenceofdrugs,
alcoholormedication. A moment of inattention while
operating power tools may result in serious personal injury.
b) Usepersonalprotectiveequipment.Alwaysweareye
protection. Protective equipment such as dust mask,
non-skid safety shoes, hard hat, or hearing protection used
for appropriate conditions will reduce personal injuries.
c) Preventunintentionalstarting.Ensuretheswitchisin
theoff-positionbeforeconnectingtopowersourceand/
orbatterypack,pickinguporcarryingthetool. Carrying
power tools with your nger on the switch or energising power
tools that have the switch on invites accidents.
d) Removeanyadjustingkeyorwrenchbeforeturning
thepowertoolon. A wrench or a key left attached to a
rotating part of the power tool may result in personal injury.
e) Donotoverreach.Keepproperfootingandbalance
atalltimes. This enables better control of the power tool
in unexpected situations.
f) Dressproperly.Donotwearlooseclothingor
jewellery.Keepyourhair,clothingandglovesaway
frommovingparts. Loose clothes, jewellery or long hair
can be caught in moving parts.
g) Ifdevicesareprovidedfortheconnectionofdust
extractionandcollectionfacilities,ensuretheseare
connectedandproperlyused. Use of dust collection
can reduce dust-related hazards.
4)POWERTOOLUSEANDCARE
a) Donotforcethepowertool.Usethecorrectpower
toolforyourapplication. The correct power tool will do
the job better and safer at the rate for which it was designed.
b) Donotusethepowertooliftheswitchdoesnotturn
itonandoff. Any power tool that cannot be controlled
with the switch is dangerous and must be repaired.
c) Disconnecttheplugfromthepowersourceand/or
thebatterypackfromthepowertoolbeforemaking
anyadjustments,changingaccessories,orstoring
powertools. Such preventive safety measures reduce
the risk of starting the power tool accidentally.
d) Storeidlepowertoolsoutofthereachofchildrenand
donotallowpersonsunfamiliarwiththepowertoolor
theseinstructionstooperatethepowertool. Power
tools are dangerous in the hands of untrained users.
e) Maintainpowertools.Checkformisalignmentorbinding
ofmovingparts,breakageofpartsandanyother
conditionthatmayaffectthepowertool’soperation.If
damaged,havethepowertoolrepairedbeforeuse. Many
accidents are caused by poorly maintained power tools.
f) Keepcuttingtoolssharpandclean. Properly
maintained cutting tools with sharp cutting edges are less
likely to bind and are easier to control.
g) Usethepowertool,accessoriesandtoolbitsetc.,in
accordancewiththeseinstructions,takinginto
accounttheworkingconditionsandtheworktobe
performed. Use of the power tool for operations dierent
from those intended could result in a hazardous situation.
5)SERVICE
a) Haveyourpowertoolservicedbyaqualifiedrepair
personusingonlyidenticalreplacementparts. This
will ensure that the safety of the power tool is maintained.

8
SAFETYINSTRUCTIONSFORCIRCULARSAWS
DANGER
• Keephandsawayfromcuttingareaandtheblade;
keepyoursecondhandonfronthandle(if both hands
are holding the saw, they can not be cut by the blade)
• Donotreachunderneaththeworkpiece (the guard
cannot protect you from the blade below the workpiece)
• Adjustthecuttingdepthtothethicknessofthe
workpiece(less than a full tooth of the blade teeth
should be visible below the workpiece)
• Neverholdpiecebeingcutinyourhandsoracross
yourleg(it is important to support the work properly to
minimise body exposure, blade binding, or loss of control)
• Holdtoolbyinsulatedgrippingsurfaceswhen
performinganoperationwherethecuttingtoolmay
contacthiddenwiringoritsowncord(contact with a
“live” wire will also make exposed metal parts of the tool
“live” and shock the operator)
• Whenrippingalwaysusearipfenceorstraight
edgeguide(this improves the accuracy of cut and
reduces the chance for blade binding)
• Alwaysusebladeswithcorrectsizeandshapeof
arborholes(diamondorround)(blades that do not
match the mounting hardware of the saw will run
eccentrically, causing loss of control)
• Neverusedamagedorincorrectbladewashersorbolt
(the blade washers and bolt were specially designed for
your saw, for optimum performance and safety of operation)
KICKBACK-CAUSES
• Kickback is a sudden reaction to a pinched, bound or
misaligned saw blade, causing an uncontrolled saw to lift
up and out of the workpiece toward the operator
• When the blade is pinched or bound tightly by the kerf
closing down, the blade stalls and the motor reaction
drives the unit rapidly back toward the operator
• If the blade becomes twisted or misaligned in the cut, the
teeth at the back edge of the blade can dig into the top
surface of the wood causing the blade to climb out of the
kerf and jump back towards operator
KICKBACK-OPERATORPREVENTION
Kickback is the result of tool misuse and/or incorrect
operating procedures or conditions and can be avoided
by taking proper precautions as given below
• Maintainafirmgripwithbothhandsonthesawand
positionyourarmstoresistkickbackforces;position
yourbodytoeithersideoftheblade,butnotinline
withtheblade(kickback could cause the saw to jump
backwards, but kickback forces can be controlled by the
operator, if proper precautions are taken)
• Whenbladeisbinding,orwheninterruptingacut
foranyreason,releasethetriggerandholdthesaw
motionlessinthematerialuntilthebladecomestoa
completestop;neverattempttoremovethesaw
fromtheworkorpullthesawbackwardswhilethe
bladeisinmotionorkickbackmayoccur(investigate
and take corrective actions to eliminate the cause of
blade binding; avoid cutting nails or screws)
• Whenrestartingasawintheworkpiece,centrethesaw
bladeinthekerfandcheckthatsawteetharenot
engagedintothematerial(if saw blade is binding, it may
walk up or kickback from the workpiece as the saw is restarted)
• Supportlargepanelstominimisetheriskofblade
pinchingandkickback(large panels tend to sag under
their own weight; supports must be placed under the
panel on both sides, near the line of cut and near the
edge of the panel)
• Donotuseadullordamagedblade(unsharpened or
improperly set blades produce narrow kerf causing
excessive friction, blade binding and kickback)
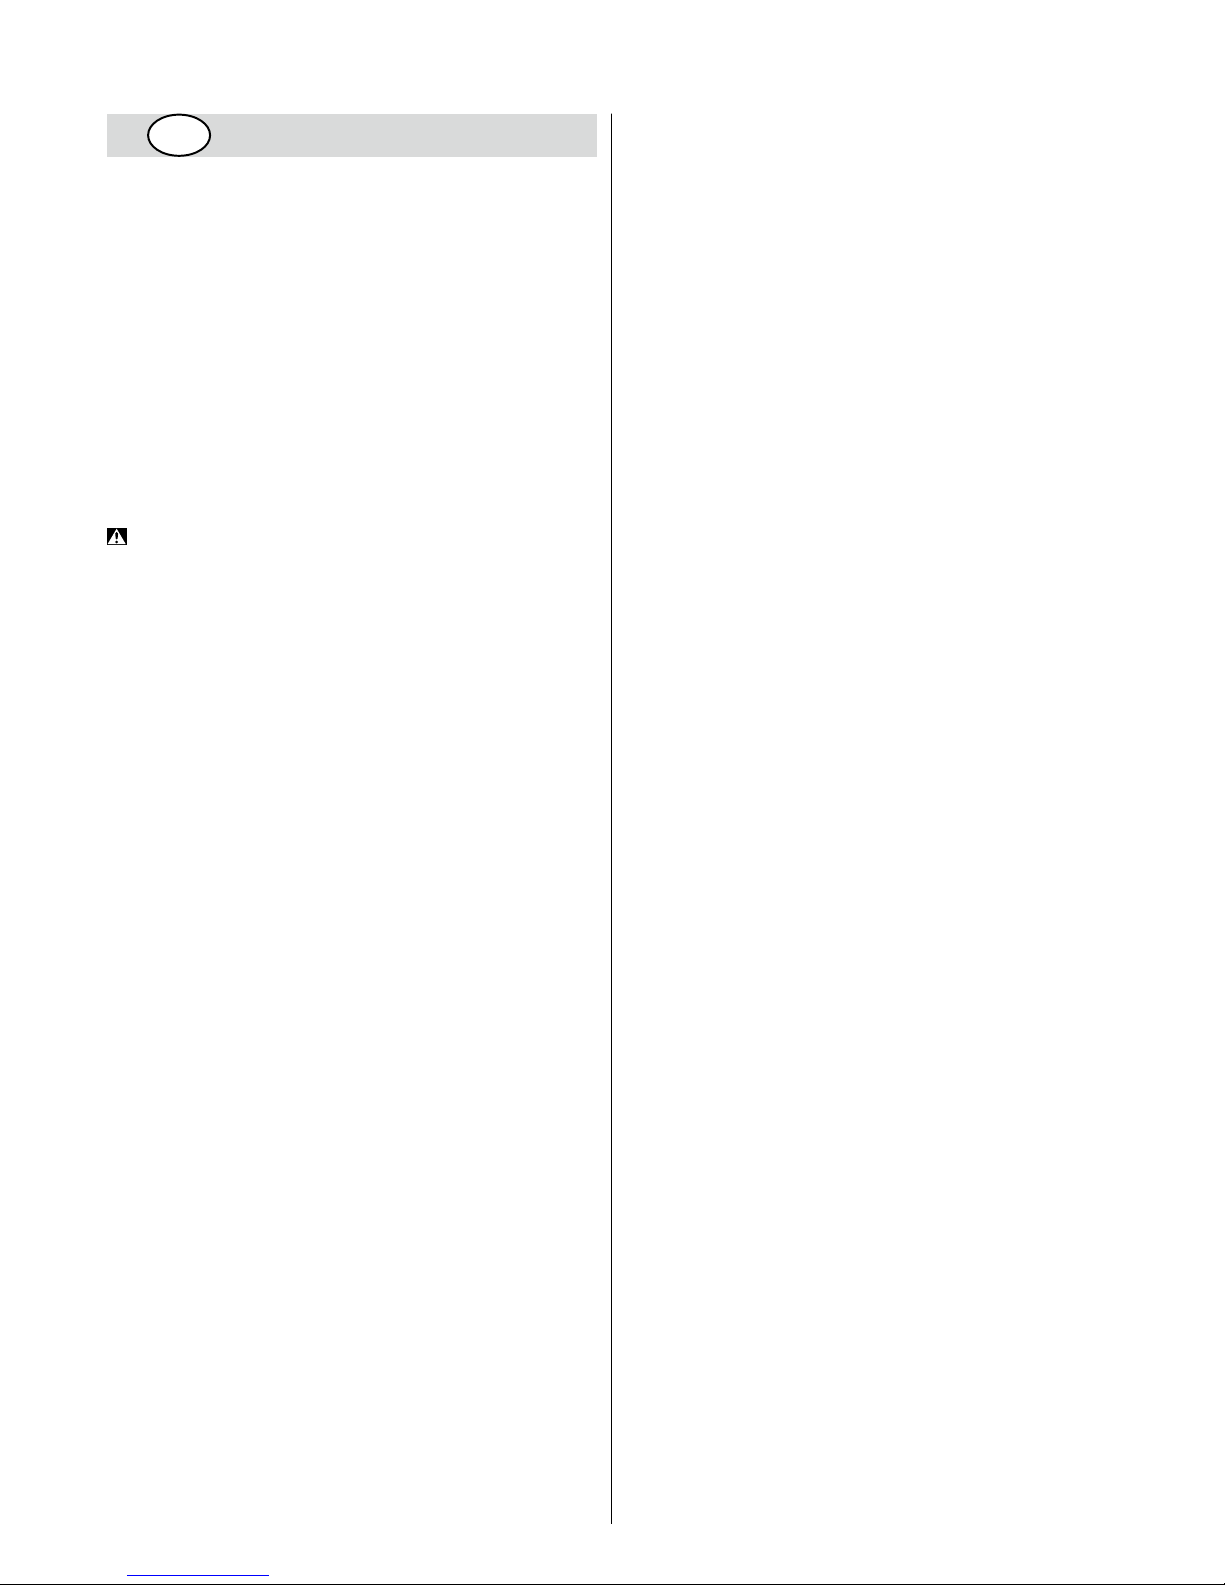
• Bladedepthandbeveladjustinglockingleversmustbe
tightandsecurebeforemakingcut(if blade adjustment
shifts while cutting, it may cause binding and kickback)
• Useextracautionwhenmakingaplungecutinto
existingwallsorotherblindareas(the protruding
blade may cut objects that can cause kickback)
WARNING
• Checklowerguardforproperclosingbeforeeachuse
• Donotoperatethesawiflowerguarddoesnot
movefreelyandcloseinstantly
• Neverclamportiethelowerguardintothe
openposition
• If saw is accidentally dropped, lower guard may be bent;
disconnect the plug, raise the lower guard with the
retracting handle and make sure it moves freely and does
not touch the blade or any other part, in all angles and
depths of cut
• Checktheoperationofthelowerguardspring;ifthe
guardandthespringarenotoperatingproperly,
theymustbeservicedbeforeuse(lower guard may
operate sluggishly due to damaged parts, gummy
deposits, or a build-up of debris)
• Lowerguardshouldberetractedmanuallyonlyfor
specialcutssuchasplungecutsandcompound
cuts;raiselowerguardbyretractinghandleandas
soonasbladeentersthematerial,thelowerguard
mustbereleased(for all other sawing, the lower guard
should operate automatically)
• Alwaysobservethatthelowerguardiscoveringthe
bladebeforeplacingsawdownonbenchorfloor
(an unprotected, coasting blade will cause the saw to
walk backwards, cutting whatever is in its path; be aware
of the time it takes for the blade to stop after switch
is released)
GENERAL
• This tool should not be used by people under the age of
16 years
• This tool is not suitable for wet cutting
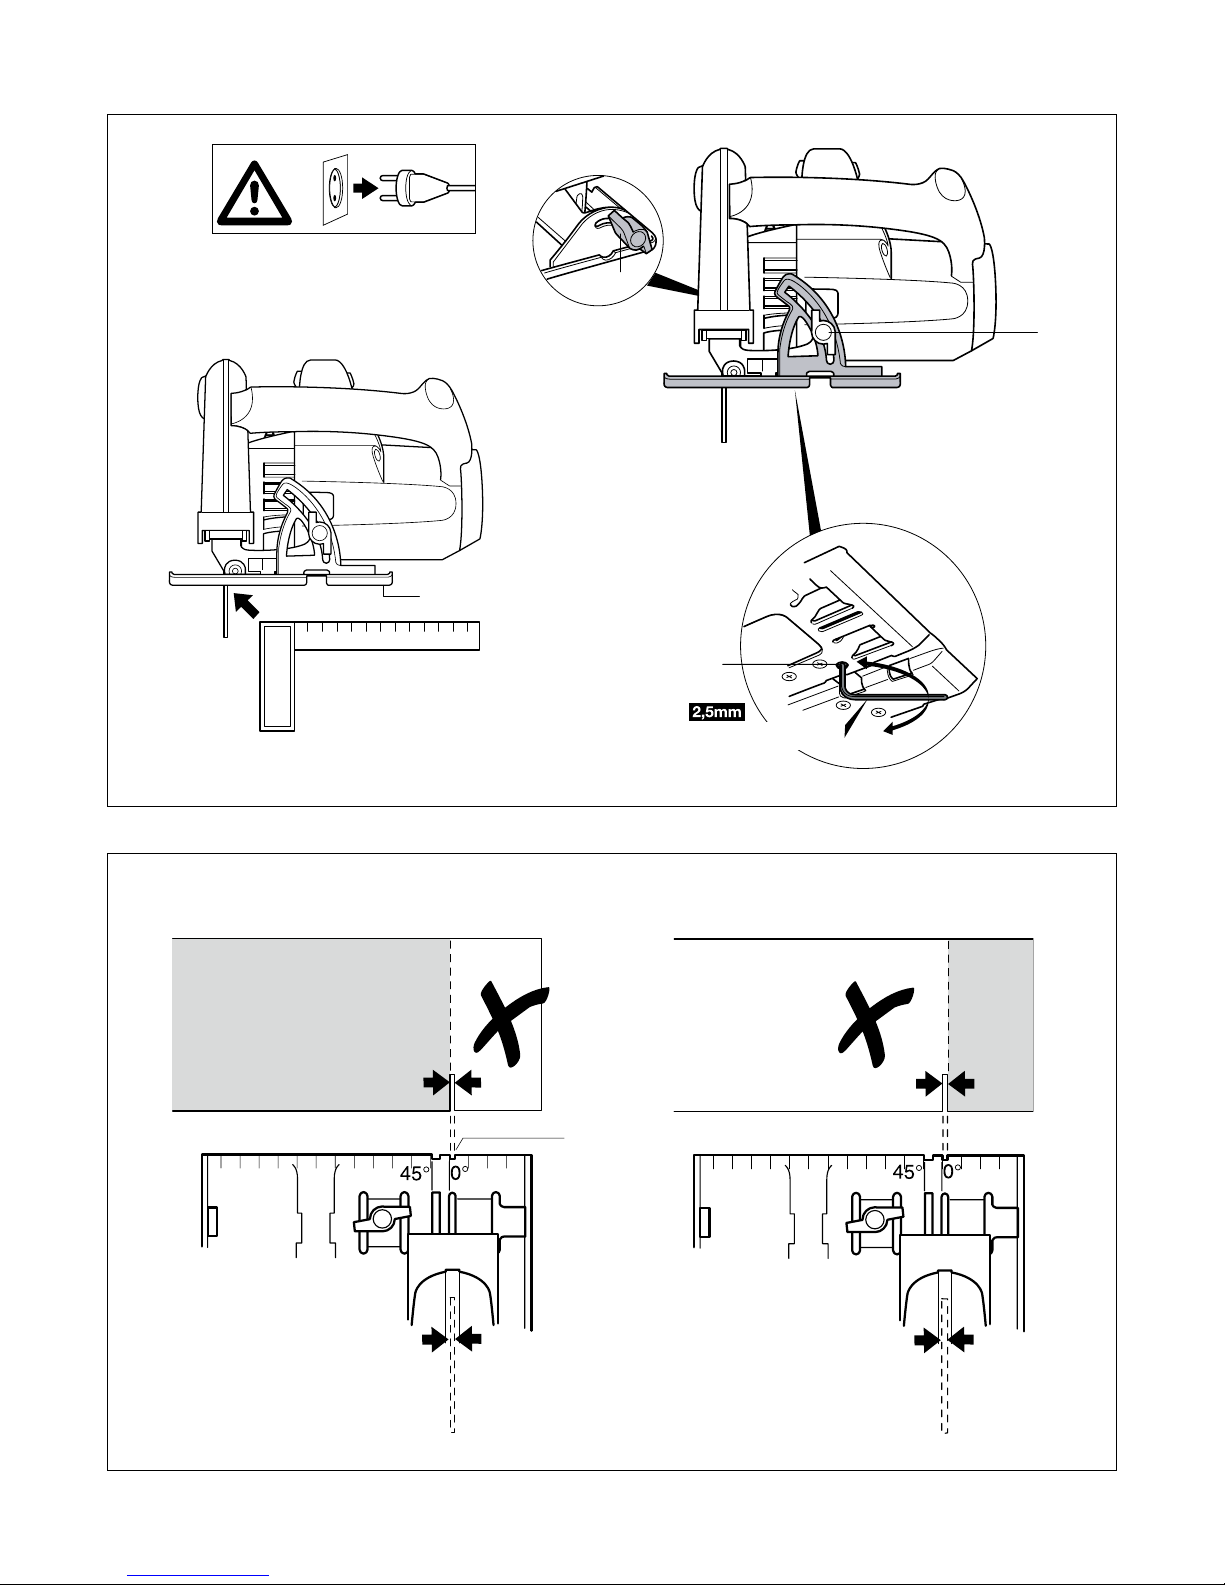
• Alwaysdisconnectplugfrompowersourcebefore
makinganyadjustmentorchanginganyaccessory
• Never use the tool when cord is damaged; have it
replaced by a qualied person
• Donotworkmaterialscontainingasbestos
(asbestos is considered carcinogenic)
• Dust from material such as paint containing lead, some
wood species, minerals and metal may be harmful
(contact with or inhalation of the dust may cause allergic
reactions and/or respiratory diseases to the operator or
bystanders); wearadustmaskandworkwithadust
extractiondevicewhenconnectable
• Certain kinds of dust are classied as carcinogenic (such
as oak and beech dust) especially in conjunction with
additives for wood conditioning; wearadustmaskand
workwithadustextractiondevicewhenconnectable

9
• Follow the dust-related national requirements for the
materials you want to work with
• Only use a saw table provided with a switch that prevents
restarting of the motor after interruption of voltage
• Only use a saw table provided with a kerf guide
ACCESSORIES
• SKIL can assure awless functioning of the tool only
when the correct accessories are used which can be
obtained from your SKIL dealer
• Use only accessories with an allowable speed matching
at least the highest no-load speed of the tool
• Never use saw blades made of high speed steel (HSS)
• Never use grinding/cutting discs with this tool
BEFOREUSE
• Always check that the supply voltage is the same as the
voltage indicated on the nameplate of the tool (tools with
a rating of 230V or 240V can also be connected to a
220V supply)
• Avoid damage that can be caused by screws, nails and
other elements in your workpiece; remove them before
you start working
• Remove all obstacles on top of as well as underneath the
cutting path before you start cutting
• Securetheworkpiece (a workpiece clamped with clamping
devices or in a vice is held more securely than by hand)
• Usesuitabledetectorstofindhiddenutilitylinesorcall
thelocalutilitycompanyforassistance (contact with
electric lines can lead to re or electrical shock; damaging a
gas line can result in an explosion; penetrating a water pipe
will cause property damage or an electrical shock)
• Use completely unrolled and safe extension cords with a
capacity of 16 Amps (U.K. 13 Amps)
DURINGUSE
• The noise level when working can exceed 85 dB(A); wear
ear protection
• Never use the tool without the original protection
guard system
• Do not attempt to cut extremely small workpieces
• Do not work overhead with the tool
• In case of jamming or electrical or mechanical malfunction,
immediately switch o the tool and disconnect the plug
• If the cord is damaged or cut through while working, do
not touch the cord, but immediately disconnect the plug
AFTERUSE
• When you put away the tool, switch o the motor and ensure
that all moving parts have come to a complete standstill
• After switching o your circular saw, never stop the rotation
of the saw blade by a lateral force applied against it
WHEN CONNECTING NEW 3-PIN PLUG (U.K. ONLY):
• Do not connect the blue (= neutral) or brown (= live) wire
in the cord of this tool to the earth terminal of the plug
• If for any reason the old plug is cut o the cord of this tool,
it must be disposed of safely and not left unattended
USE
• Mounting saw blade 3
! disconnecttheplug
- take hex key A from storage B
- push spindle-lock button C and hold it while you
remove blade bolt D with hex key
! pushspindle-lockbuttonConlywhentoolisata
standstill
- release spindle-lock button C
- remove ange E
- open lower guard F with lever G and hold it while you
mount saw blade with saw teeth and arrow printed on
saw blade pointing in same direction as arrow on
lower guard
- release lower guard F
- mount ange E
! makesurethatclampingsurfacesHofflanges
areperfectlycleanandfacetheblade
- push spindle-lock button C and hold it while you
tighten blade bolt with hex key 1/8 turn past nger tight
(ensures slippage of saw blade when it encounters
excessive resistance thus reducing motor overload
and saw kickback)
- release spindle-lock button C
• Adjusting cutting depth (0-85 mm) 4
- for an optimal quality cut the saw blade should not
extend more than 3 mm below the workpiece
- loosen lever J
- raise/lower foot K until desired cutting depth is set on
scale using indicator L
- tighten lever J
• Adjusting cutting angle (0-45°) 5
- loosen 2 knobs M
- tilt tool until desired cutting angle is set on scale using
indicator N
- tighten 2 knobs M
! whenbevelcutting,cuttingdepthdoesnot
correspondwithvalueoncuttingdepthscale
• 90° Cutting angle check 5
- adjust and tighten foot K to maximum cutting depth 4
- adjust and tighten cutting angle to 0°
- check for a 90° angle between the blade and bottom of
foot with a square
- if adjustment is needed, loosen 2 knobs M and use
adjustment screw P as illustrated
• Line-of-cut indicator Q 7
- for guiding tool along desired line of cut marked on
the workpiece
- for a straight 0° cut or a 45° bevel cut use the indicator
line concerned
- allows you to choose whether waste material is on
inner or outer side of blade
! thewidepartofthefootshouldrestonthe
supportedpartoftheworkpiece
! cuttingwidthisdeterminedbywidthofblade
teethandnotbywidthofbladebody
! alwaysmaketrialcutsfirsttoverifyactualline
ofcut
• Electronic soft-start 8
Ensures reaching the maximum speed smoothly without
a sudden impact when tool is switched on
• Dust suction
- connect vacuum cleaner to extension R 9
! neverletthevacuumcleanerhoseinterferewith
thelowerguardorthecuttingoperation
- one may also use a dust bag (SKIL
accessory 2610387402)
! donotusedustbag/vacuumcleanerwhen
cuttingmetal

10
• Operating the tool 9
- connect plug to power source
- always hold handle S rmly with one hand and handle
T rmly with the other hand
- place tool with front end of foot at on workpiece
! ensurethatthesawteetharenotengagedinto
theworkpiece
- switch on tool by rst pressing knob U (= safety switch
which cannot be locked) and then pulling trigger V
! thetoolshouldrunatfullspeedbeforetheblade
entersintotheworkpiece
- lower guard F opens automatically when saw blade
enters the workpiece (open lower guard manually by
using lever G only for special cuts such as plunge cuts)
- do not force the tool; apply light and
continuous pressure
! whileworking,alwaysholdthetoolatthe
grey-colouredgriparea(s)
- after completing the cut switch o tool by releasing
trigger V
! ensurethatthebladehascometoacomplete
standstill,beforeyouliftthetoolfrom
theworkpiece
APPLICATIONADVICE
• Always face the good side of the workpiece down to
ensure minimum splintering
• When using guide-rail (accessory 2610Z00217), the depth
of cut will be reduced with 9 mm for 90° as well as 45° cuts
• Only use sharp saw blades of the correct type 0
- quality of cut improves by the number of teeth
- carbide tipped blades stay sharp up to 30 times longer
than ordinary blades
• Rip fence W !
- for making exact cuts along a workpiece edge
- can be inserted in either side of foot
Adjusting rip fence
- loosen knob X
- adjust to desired cutting width by using rip fence scale
(use line-of-cut indicator Q as 0-reference)
- tighten knob X
• Plunge cutting @
- set desired cutting depth
- tilt tool forward with line-of-cut indicator Q lined up with
desired line of cut marked on the workpiece
- open lower guard F with lever G
- just before blade enters workpiece, switch on tool and
gradually lower back end of tool using front end of foot
as hinge-point
- gradually move tool downward as well as forward
- as soon as blade enters the material, release lever G
! thetoolshouldrunatfullspeedbeforetheblade
entersintotheworkpiece
! neverpulltoolbackwards
• Cutting large panels #
- support panel close to the cut either on oor, table
or workbench
! setcuttingdepthsothatyoucutthroughpanel
andnotthroughsupport
- in case rip fence does not allow desired width of cut,
clamp or nail straight piece of wood to workpiece as a
guide, and use the right side of the foot against this guide
MAINTENANCE/SERVICE
• Always keep tool and cord clean (especially the
ventilation slots)
! disconnecttheplugbeforecleaning
• Clean saw blade immediately after use (especially from
resin and glue)
• If the tool should fail despite the care taken in
manufacturing and testing procedures, repair should be
carried out by an after-sales service centre for SKIL
power tools
- send the tool undismantled together with proof of
purchase to your dealer or the nearest SKIL service
station (addresses as well as the service diagram of
the tool are listed on www.skilmasters.com)
ENVIRONMENT
• Donotdisposeofelectrictools,accessoriesand
packagingtogetherwithhouseholdwastematerial
(only for EU countries)
- in observance of European Directive 2002/96/EC on
waste of electric and electronic equipment and its
implementation in accordance with national law,
electric tools that have reached the end of their life
must be collected separately and returned to an
environmentally compatible recycling facility
- symbol $ will remind you of this when the need for
disposing occurs
DECLARATIONOFCONFORMITY
• We declare under our sole responsibility that this product
is in conformity with the following standards or
standardized documents: EN 60745, EN 61000,
EN 55014, in accordance with the provisions of the
directives 2006/95/EC, 2004/108/EC, 2006/42/EC
• Technicalfileat: SKIL Europe BV (PT-SEU/PJE),
4825 BD Breda, NL
ÊÆÇιƼ½ÊÄÇÇÌ
Á»½Ê½ËÁ¼½ÆÌ
ȽʹÌÁÇÆËŵÆ¿Áƽ½ÊÁÆ¿
ÍÊÇȽƓˁ˅ʿ˂ʽ¼¹Ɠ
¹ÆÊÇÅŽĽÆ
ÈÈÊÇιĹƹ¿½Ê
01.03.2011
NOISE/VIBRATION
• Measured in accordance with EN 60745 the sound
pressure level of this tool is 94 dB(A) and the sound
power level 105 dB(A) (standard deviation: 3 dB), and the
vibration 2.9 m/s² (hand-arm method; uncertainty
K = 1.5 m/s²)
• The vibration emission level has been measured in
accordance with a standardised test given in EN 60745; it
may be used to compare one tool with another and as a
preliminary assessment of exposure to vibration when
using the tool for the applications mentioned
- using the tool for dierent applications, or with dierent
or poorly maintainted accessories, may signicantly
increase the exposure level

11
- the times when the tool is switched o or when it is
running but not actually doing the job, may signicantly
reduce the exposure level
! protectyourselfagainsttheeffectsofvibration
bymaintainingthetoolanditsaccessories,
keepingyourhandswarm,andorganizingyour
workpatterns
Sciecirculaire 5885
INTRODUCTION
• Cet outil est conçu pour eectuer dans le bois des
coupes droites longitudinales et transversales ainsi que
des angles d’onglet jusqu’à 45°; muni de lames de scie
correspondantes, il est capable de scier des matériaux
non-ferroux, des matériaux de construction légers et des
matières plastiques
• Lisez et conservez ce manuel d’instruction 2
SPECIFICATIONSTECHNIQUES1
SECURITE
INSTRUCTIONSGENERALESDESECURITE
ATTENTION!Liseztouslesavertissementsde
sécuritéettouteslesinstructions. Ne pas suivre les
avertissements et instructions peut entraîner un choc
électrique, un incendie et/ou de graves blessures sur les
personnes. Conserveztouslesavertissementset
touteslesinstructionspourpouvoirs’yreporter
ultérieurement. La notion d’”outil électroportatif” dans les
avertissements se rapporte à des outils électriques
raccordés au secteur (avec câble de raccordement) et à
des outils électriques à batterie (sans câble
de raccordement).
1)SECURITEDELAZONEDETRAVAIL
a) Maintenezl’endroitdetravailpropreetbienéclairé.
Un lieu de travail en désordre ou mal éclairé augmente le
risque d’accidents.
b) N’utilisezpasl’appareildansunenvironnement
présentantdesrisquesd’explosionetoùse
trouventdesliquides,desgazoupoussières
inflammables. Les outils électroportatifs génèrent des
étincelles risquant d’enammer les poussières ou
les vapeurs.
c) Tenezlesenfantsetautrespersonneséloignés
durantl’utilisationdel’outilélectroportatif. En cas
d’inattention vous risquez de perdre le contrôle
sur l’appareil.
2)SECURITERELATIVEAUSYSTEMEELECTRIQUE
a) Lafichedesecteurdel’outilélectroportatifdoitêtre
appropriéeàlaprisedecourant.Nemodifiezen
aucuncaslafiche.N’utilisezpasdefiches
d’adaptateuravecdesappareilsavecmiseàla
terre. Les ches non modiées et les prises de courant
appropriées réduisent le risque de choc électrique.
b) Evitezlecontactphysiqueavecdessurfacesmises
àlaterretellesquetuyaux,radiateurs,fourset
réfrigérateurs. Il y a un risque élevé de choc électrique
au cas où votre corps serait relié à la terre.
c) N’exposezpasl’outilélectroportatifàlapluieouà
l’humidité. La pénétration d’eau dans un outil
électroportatif augmente le risque d’un choc électrique.
d) N’utilisezpaslecâbleàd’autresfinsquecelles
prévues,n’utilisezpaslecâblepourporterl’appareil
oupourl’accrocherouencorepourledébrancher
delaprisedecourant.Maintenezlecâbleéloigné
dessourcesdechaleur,despartiesgrasses,des
bordstranchantsoudespartiesdel’appareilen
rotation. Un câble endommagé ou torsadé augmente le
risque d’un choc électrique.
e) Aucasoùvousutiliseriezl’outilélectroportatifà
l’extérieur,utilisezunerallongeautorisée
homologuéepourlesapplicationsextérieures.
L’utilisation d’une rallonge électrique homologuée pour
les
applications extérieures réduit le risque d’un
choc électrique.
f) Sil’usaged’unoutildansunemplacementhumide
estinévitable,utilisezundisjoncteurdefuiteàla
terre. L’utilisation d’un disjoncteur de fuite à la terre réduit
le risque de choc électrique.
3)SECURITEDESPERSONNES
a) Restezvigilant,surveillezcequevousfaites.Faites
preuvedebonsensenutilisantl’outil
électroportatif.N’utilisezpasl’appareillorsquevous
êtesfatiguéouaprèsavoirconsommédel’alcool,
desdroguesouavoirprisdesmédicaments. Un
moment d’inattention lors de l’utilisation de l’appareil peut
entraîner de graves blessures sur les personnes.
b) Portezdeséquipementsdeprotection.Portez
toujoursdeslunettesdeprotection. Le fait de porter
des équipements de protection personnels tels que
masque anti-poussières, chaussures de sécurité
antidérapantes, casque de protection ou protection
acoustique suivant le travail à eectuer, réduit le risque
de blessures.
c) Eviteztoutdémarrageintempestif.S’assurezque
l’interrupteurestenpositionarrêtavantdebrancher
l’outilausecteuret/ouaublocdebatteries,dele
ramasseroudeleporter. Porter les outils en ayant le
doigt sur l’interrupteur ou brancher des outils dont
l’interrupteur est en position marche est
source d’accidents.
d) Enleveztoutoutilderéglageoutoutecléavantde
mettrel’appareilenfonctionnement. Une clé ou un
outil se trouvant sur une partie en rotation peut causer
des blessures.
e) Nesurestimezpasvoscapacités.Veillezàgarder
toujoursunepositionstableetéquilibrée. Ceci vous
permet de mieux contrôler l’appareil dans des
situations inattendues.
f) Portezdesvêtementsappropriés.Neportezpasde
vêtementsamplesnidebijoux.Maintenezcheveux,
vêtementsetgantséloignésdespartiesde
l’appareilenrotation. Des vêtements amples, des
bijoux ou des cheveux longs peuvent être happés par
des pièces en mouvement.
Other manuals for 5885
4
Table of contents
Other Skil Saw manuals

Skil
Skil MASTERS 5065 User manual

Skil
Skil 3470 User manual

Skil
Skil SKILSAW MAG77LT Assembly instructions

Skil
Skil 5680 Assembly instructions

Skil
Skil 3480 User manual

Skil
Skil 5885 User manual

Skil
Skil Skilsaw 5064 User manual

Skil
Skil 3316 Assembly instructions

Skil
Skil 1305 User manual

Skil
Skil 3400 User manual