Skoda Infotainment Radio Swing User manual

www.skoda-auto.com
Swing: Octavia
Infotainment anglicky 05.2014
S00.5614.28.20
5E0 012 720 DE
SIMPLY CLEVER
Infotainment Radio Swing
Operating instructions

Structure of this Owner's Manual (explanations)
This Owner's Manual has been systematically designed to make it easy for you
to search for and obtain the information you require.
Chapters, table of contents and subject index
The text of the Owner's Manual is divided into relatively short sections which
are combined into easy-to-read chapters. The chapter you are reading at any
particular moment is always specified on the bottom right of the page.
The Table of contents arranged according to chapter and the detailed Subject
index at the end of the Owner's Manual help you to rapidly find the information
you are looking for.
Direction indications
All direction indications such as “left”, “right”, “front”, “rear” relate to the direction
of travel of the vehicle.
Units of measurement
All values are expressed in metric units.
Explanation of symbols
Denotes a reference to a section with important information and safety
advice in a chapter.
Denotes the end of a section.
Denotes the continuation of a section on the next page.
® Denotes a registered trademark.
Examples of the information listed in the Owner's Manual
Press the button → Sound.
This information indicates that you must first press the button and then se-
lect and confirm the Sound menu.
The “→” symbol indicates the next step.
Example of the menu, the available menus, menu items or functions.
■xyz - the first menu level
■xyz - the second menu level
■xyz - the third menu level
■xyz - the first menu level
Notes
WARNING
The most important notes are marked with the heading WARNING. These
WARNING notes draw your attention to a serious risk of accident or injury.
CAUTION
A Caution note draws your attention to the possibility of damage to your vehicle
(e.g. damage to gearbox), or points out general risks of an accident.
For the sake of the environment
An Environmental note draws your attention to environmental protection as-
pects. This is where you will, for example, find tips aimed at reducing your fuel
consumption.
Note
A normal Note draws your attention to important information about the opera-
tion of your vehicle.
5E0012720DE

Preface
You have chosen a ŠKODA vehicle, which is fitted with an Infotainment Radio Swing (hereafter
called the unit) – we thank you for your confidence in us.
The new operating concept allows you to configure vehicle settings and to operate some electronic
systems centrally from the unit.
In addition to this Owner's Manual, please also carefully read the Vehicle Manual, because operation in
accordance with these instructions is a prerequisite for proper use of the vehicle.
If you have any questions about your device, please contact a ŠKODA Partner.
Your ŠKODA AUTO a.s. (hereinafter referred to as ŠKODA)

Table of Contents
Abbreviations
Introductory information
Important notes 4
Unit overview 5
Unit operation
Concerning the device screen operation 7
Operation through the MAXI DOT display 8
Unit settings
Setup menu 12
Radio
Operation 16
Radio settings 19
Media
Operation 20
Audio sources 23
Telephone
Telephone and communication equipment 27
Connect to the device to the mobile
telephone 29
Telephone functions 32
Vehicle systems
Vehicle settings 37
Index
2Table of Contents

Abbreviations
Abbreviation Definition
A2DP Advanced Audio Distribution Profile - intended for a one-way
transfer of audio data Bluetooth ® software profile
ACC Adaptive cruise control
AF Alternative frequencies - alternative frequencies of the cur-
rent radio station
AM Amplitude modulation - denomination of the radio frequency
range
TCS Traction Control of the drive wheels
AVRCP
Audio / Video Remote Control Profile - used for operating
with the data transfers via A2DP connected multi-media
functions for the prescribed Bluetooth ® software profile
AV Audio / visual source signal - typical for DVD player or TV tu-
ner
BT Bluetooth ® - wireless communication for reception and
transmission of voice and data information
DAB Digital Audio Broadcasting - digital radio reception
DRM Digital Rights Management - technical methods to monitor
or restrict the use of digital media content
DTMF Dual-tone multi-frequency - communication with the device
via touch tone dialling
ESC Electronic Stability Control
FM Frequency modulation - Identification of the radio frequency
range
HFP
Hands free profiles - Bluetooth ® software profile, which en-
ables communication between a mobile phone and the de-
vice
GSM Groupe Spécial Mobile - a global system for mobile communi-
cations
ID3 tag an additional feature of a music file, which allows for the dis-
play of artist, title, album name, etc.
KESSY keyless unlocking, starting and locking
MP3 compressed audio format
Abbreviation Definition
MTP Media Transfer Protocol - a software profile for the transfer
and synchronisation of files between two devices
NTSC
National Television System Committee - Audio-visual encod-
ing standard in North and Central America and some coun-
tries in Southeast Asia
PAL Phase Alternating Line - Audio-visual encoding standard in
most European countries
PI
Program Identification - Station identification by a single
RDS code, for example, when setting a different radio sta-
tion
PIN Personal Identification Number - personal identification
number
PTY Programme Type - type of the broadcast program
RDS Radio Data System - system for the transmission of addition-
al information for FM radio reception
SIM card Subscriber Identity Module - A card for the identification of
the mobile network operator
SSP Secure Simple Pairing - a simple secure pairing of two Blue-
tooth ® devices
TMC Traffic Message Channel - service for transmitting traffic in-
formation to the driver
TP Traffic Program identification - Program identifier for the
transmission of traffic information
USB MSC USB Mass Storage Class - a software profile for transferring
files between two devices (sometimes referred to as EMS)
VBR Variable Bit Rate - variable bit rate files with data compres-
sion
VIN Vehicle identification number
WMA Windows Media Audio - compressed audio format
3
Abbreviations

Introductory information
Important notes
Introduction
This chapter contains information on the following subjects:
Declaration of Conformity 4
4
Warning messages 4
This Owner's Manual describes all possible equipment variants without identi-
fying them as special equipment, model variants or market-dependent equip-
ment.
Consequently, this vehicle does not need to contain all of the equipment com-
ponents described in this Owner's Manual.
The level of equipment of your vehicle refers to your purchase contract of the
vehicle. More information is available from the ŠKODA Partner1) where you
bought the vehicle.
This guide is meant only as a supplement to the information contained in the
operating instructions of the vehicle. Therefore, they can be used only in con-
junction with the latest manual for this vehicle. For a detailed description of
some functions listed in these instructions, see the Vehicle Manual for your ve-
hicle.
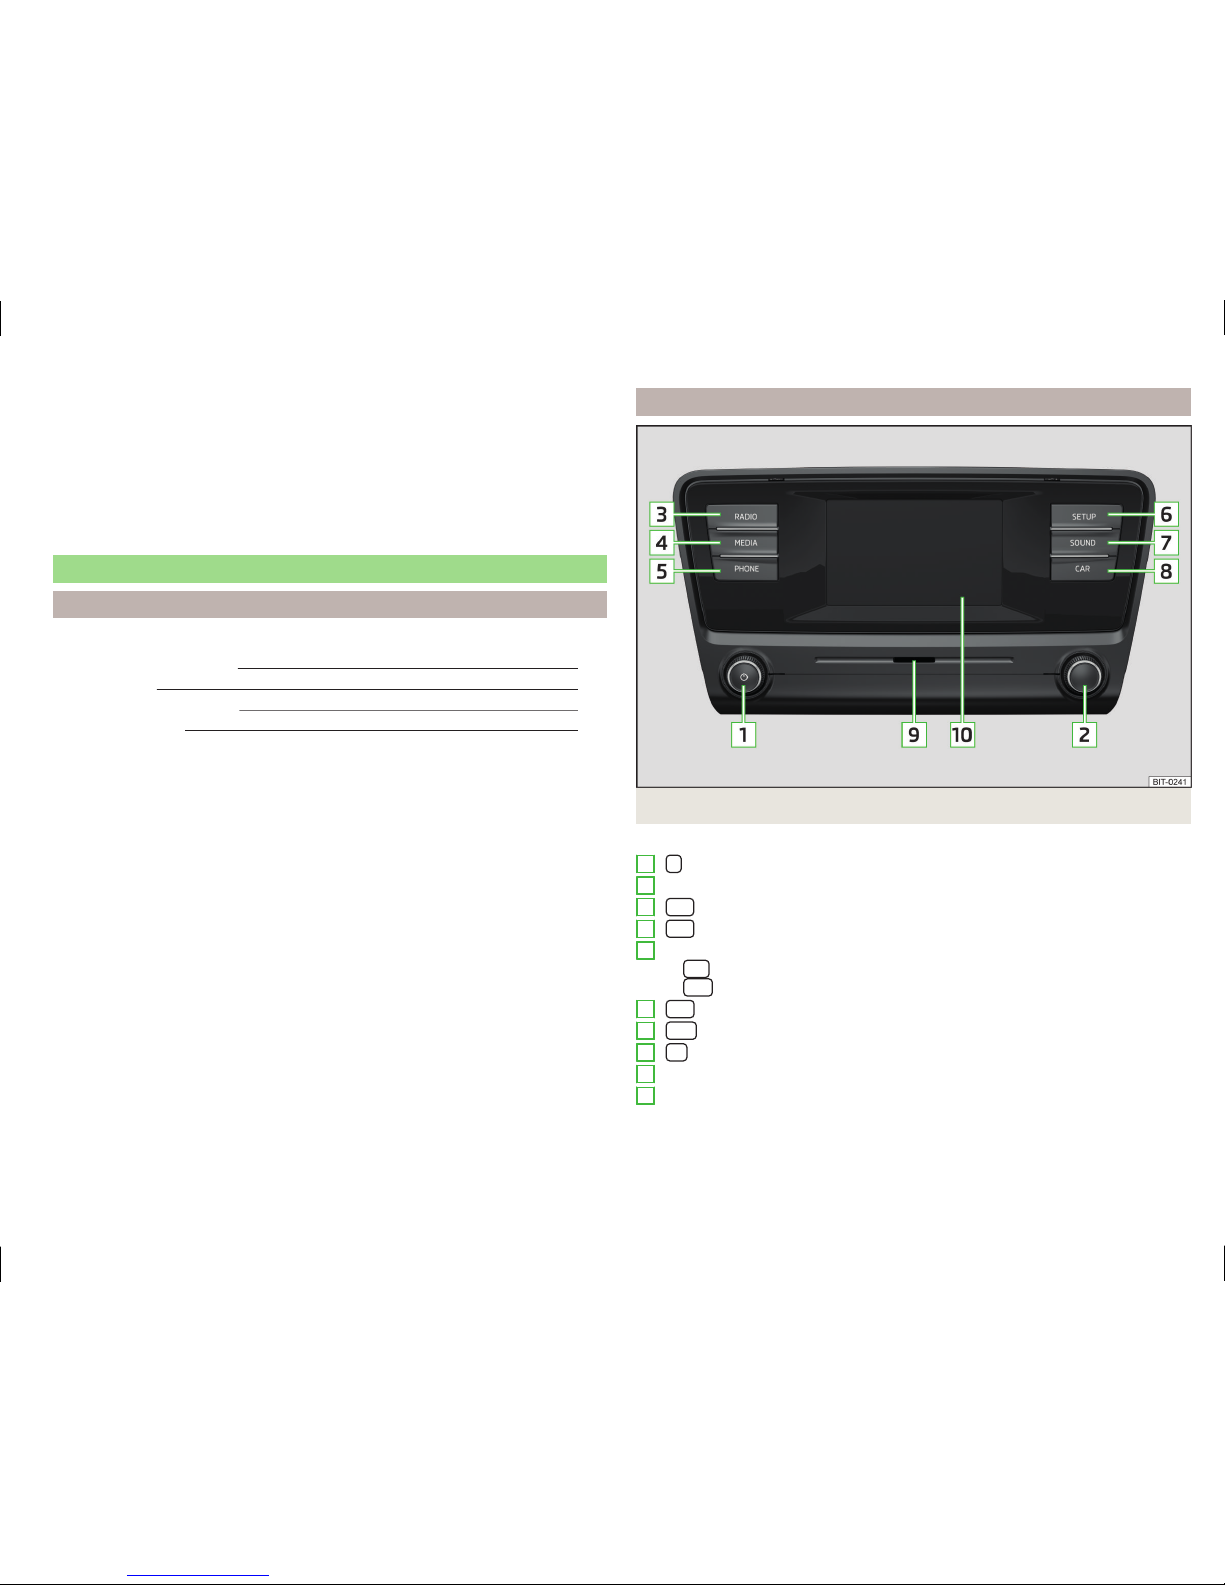
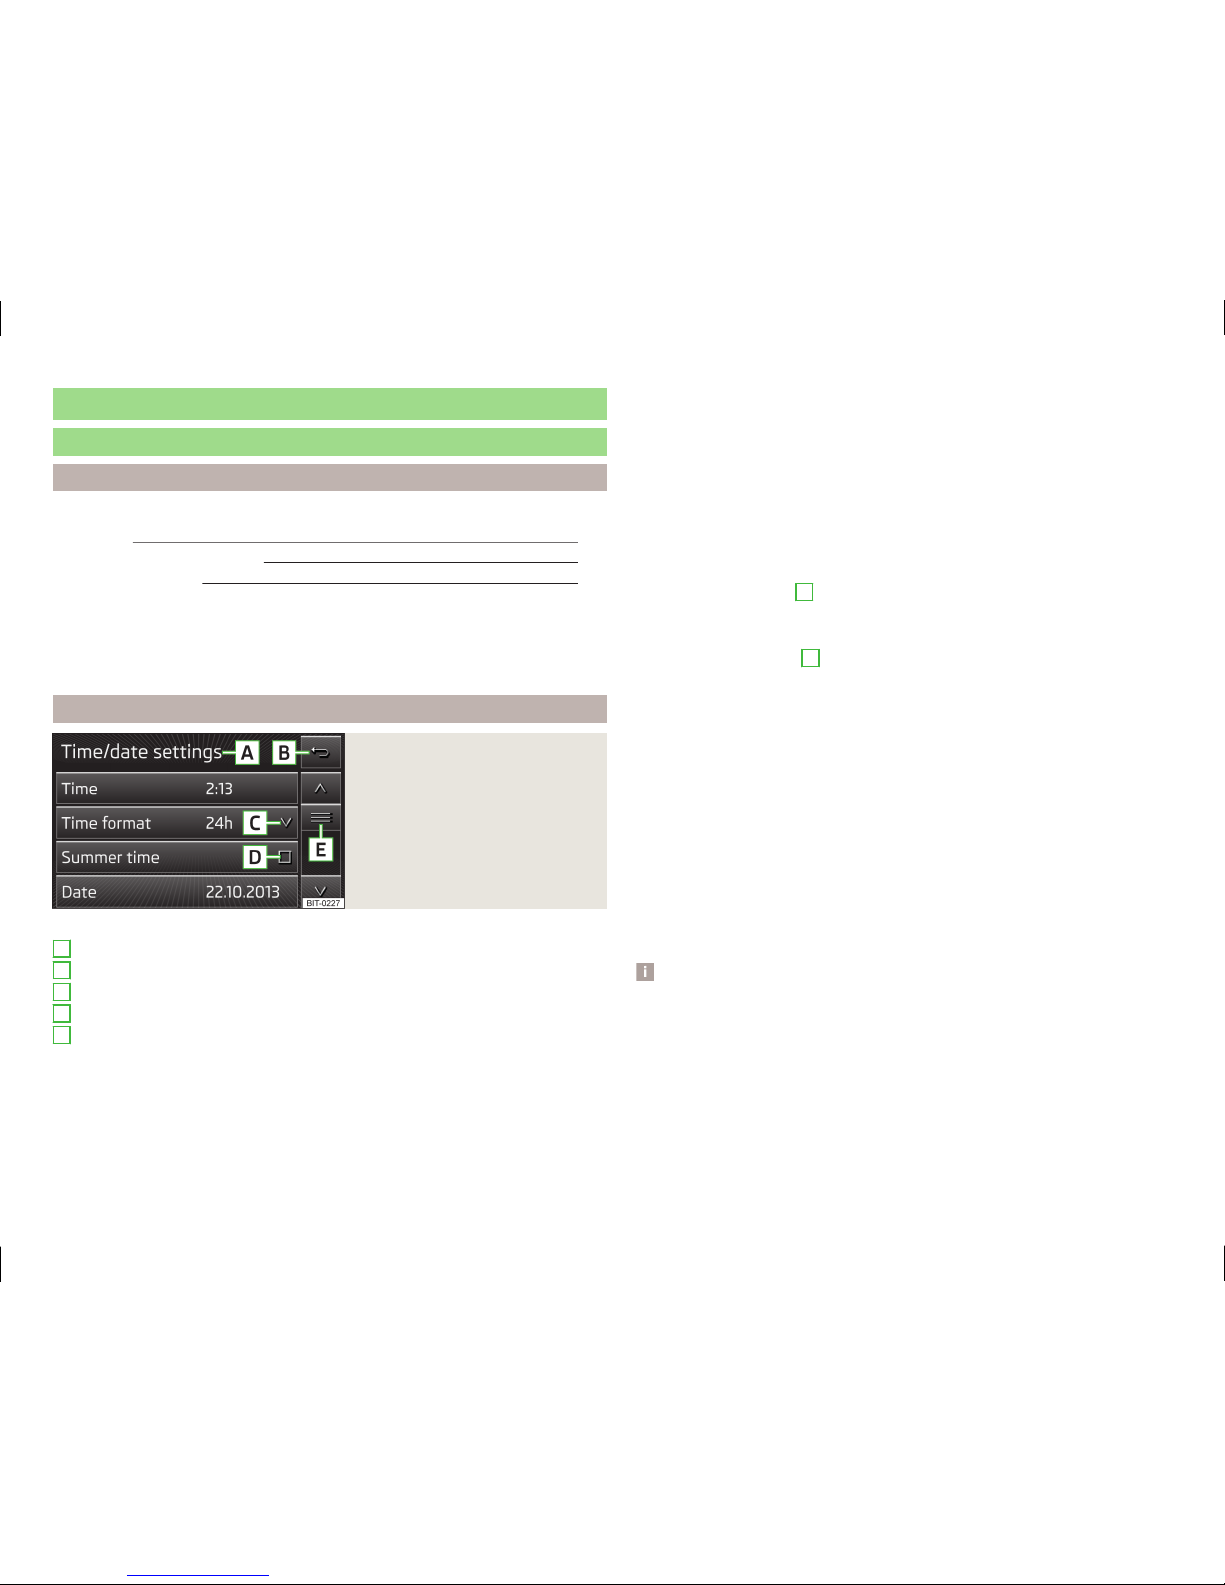
The illustrations can differ in minor details from your unit; they are only inten-
ded for general information.
WARNING
■Concentrate fully at all times on your driving! As the driver you are fully
responsible for the operation of your vehicle.
■Only use the device in a way that ensures that you are in full control of
your vehicle in every traffic situation - there is a risk of accident!
■Adjust the volume to ensure that acoustic signals from outside, e.g. sirens
from vehicles which have the right of way, such as police, ambulance and
fire brigade vehicles, can be heard at all time.
■High volumes can cause hearing damage.
Declaration of Conformity
Read and observe on page 4 first.
ŠKODA AUTO a.s. hereby declares that the ŠKODA Infotainment systems meet
the basic requirements and additional provisions of Directive 1999/5/EC.
ŠKODA AUTO a.s. hereby declares that the “connection and use of this
communications equipment is permitted by the Nigerian Communications
Read and observe on page 4 first.
Some electronic control units are factory-equipped with component protec-
tion.
Component protection serves as a protection mechanism for the following:
›for the impairment of factory- or garage-fitted control units after installation
in another vehicle (for example, after a theft);
›for the impairment of components operated outside of the vehicle.
›for the possibility of a legitimate installation or change of control units for re-
pairs at a ŠKODA1) specialist garage.
When component protection is enabled, the following message appears on the
unit display Component theft protection: the infotainment system is not fully
available at present. Please switch on the ignition.
If the component protection does not activate by switching on the ignition,
please contact a ŠKODA specialist garage.
Warning messages
Read and observe on page 4 first.
The device turns off automatically under certain circumstances. The device in-
forms you for a few seconds by means of a text message on the device screen.
1) Terms used » manual, chapter Preface.
4Introductory information
Commision.”

›Warning: battery low. Please start the engine or switch off the infotain-
ment system. - The vehicle battery is low, it is recommended to switch off
the device or to start the engine
›Battery almost empty. The Infotainment system will be switched off. - the
vehicle battery is discharged, the unit switches itself off
›Operating temperature not maintained. The Infotainment system will be
switched off. - The device temperature is too low or too high, the device
switches itself off
Unit overview
Introduction
This chapter contains information on the following subjects:
Description of the device 5
Touch screen 6
Switching the unit on/off 6
Adjusting volume 6
First and foremost, pay attention to the safety instructions » page 4, Impor-
tant notes.
This chapter deals with the unit, the unit's buttons and their functions. It also
covers switching the unit on and off, the main menus and adjusting the vol-
ume on the unit.
Description of the device
Fig. 1 Description of the device
Description of the device
- Control for switching on/off; volume adjustment
Menu button for calls and confirmations
- Menu Radio » page 16
- Menu Media » page 20
Depending on equipment fitted
› - Mute
› - Menu Telephone » page 27
- Unit settings » page 12
- Sound settings » page 13
- Vehicle systems settings » page 37
SD memory card slot » page 25
Touch screen » page 7
1
2
3
4
5
6
7
8
9
10
5
Introductory information

Touch screen
The unit is equipped with the so-called resistive (pressure / resistance) touch
screen.
The function keys on the screen can be operated by a light finger pressure to
the screen surface.
CAUTION
■The screen can only be operated by a slight touch of a finger. With too much
pressure, the screen can be damaged.
■Do not use any objects to operate the screen, which could damage the
screen surface.
■Solvent based cleaners can damage the screen surface.
■Use a soft cloth and, if necessary, methylated spirits, to remove fingerprints
from the screen. When doing so, ensure that you do not cause damage to oth-
er parts of the interior.
Note
■To protect the screen, a suitable protective film for touch screens can be
used.
■The brightness level can be set » page 13, Screen settings .
Switching the unit on/off
›The unit is switched on or off by briefly pressing the on/off knob .
When the device is switched on, the audio source and operating mode that
were active before switching off the device will be restored.
If Telephone mode was active before you switched off the unit and the igni-
tion and Bluetooth® function is not switched on, the screen displays the mes-
sage » page 28, Problems with the Telephone function. Switch on the igni-
tion or the Bluetooth® function» page 14, Bluetooth® settings.
If the vehicle key is pulled out of the ignition lock while the unit is switched on,
the unit will switch off automatically. After switching on the ignition, the unit
is turned on automatically.
If the device was switched off using the knob, then the device will not
switch on automatically after switching on the ignition.
The unit will switch off automatically after the engine is switched off and the
door is opened if the vehicle is fitted with the KESSY system. If you open the
driver's door before switching off the engine, the device will also switch off.
When the ignition is switched off, the device switches off automatically after
approx. half an hour (discharge protection of the vehicle battery).
Adjusting volume
Increase the volume
›Turn the knob to the right.
Reduce the volume
›Turn the knob to the left.
Muting
›Press the key or turn the knob to the left and set the volume to 0.
If something is being played over the media at the time of reducing the volume
with the adjustment knob to 0 then what is being played over the media is
paused.
CAUTION
■High volumes can cause sound resonance and sound distortion in the vehi-
cle.
■The car speakers may be damaged if the volume is set too loud.
Note
■The change in volume is displayed on the screen.
■The following symbol appears in the display when the sound is muted : .
■The speakers in the vehicle are matched for the power output of the device.
6Introductory information

Unit operation
Concerning the device screen operation
Introduction
This chapter contains information on the following subjects:
Operation 7
Alphanumeric with keyboard 8
Numerical keyboard 8
First and foremost, pay attention to the safety instructions » page 4, Impor-
tant notes.
This chapter covers the instrument operation and the work with the touch
screen and with various types of input keyboards.
Operation
Fig. 2
Screen display
Description of the display
News menu selected
Return to the higher-level menu
Open a submenu of the function with the “pop-up window”
Function with “checkbox”
Scroll bar - Shows the position in the menu; touch the scroll bar to navi-
gate the menu
Function keys
Screen areas which confirm a function or a menu are called “function keys”.
Function keys with a white background are active and selectable.
A
B
C
D
E
Function keys with a green background represent currently selectable func-
tions or menus.
Function keys with a grey background are inactive and therefore not selecta-
ble.
Status line
In some menus a status bar located at the top of the screen shows the time
and outdoor temperature along with other information.
Selecting menu/menu item/function
›Drag your finger over the screen in the required direction
›Turn the menu knob 2 » Fig. 1 on page 5.
Confirming menu/menu item/function
›Touch the function key with your finger
›Press the menu knob 2.
Returning to higher-level menu
›by pressing the function key .
›By pressing the relevant button next to the screen;
›By touching the screen outside of the “pop-up window” with your finger.
Open submenu of a function
›by pressing the function key opens a “pop-up window” with a function
menu.
Switching function on/off with “checkbox”
› or - Function is switched on
› or - Function is switched off
Set value
›is achieved by touching the function keys with the symbols .
›By touching or moving your finger over the scale.
Note
For some menus or menu items, the current setting is displayed, e.g. Distance:
Km ... or distance: ... mi.
7
Unit operation

Alphanumeric with keyboard
Fig. 3 ABC keyboard for searching / QWERTY keyboard for input
Description of the alphanumeric keyboard
Return to the higher-level menu
Displaying the menu with selected entries (number of corresponding en-
tries)
Confirmation of text entered into the entry line
Delete characters in the entry line
Toggle upper case to lower case and vice versa
Menu display with keys in the selected language, including diacrit-
ics » page 14
Switch to the numeric and special characters
Switch to special characters
Switch to letters
Enters a blank
The alphanumeric keyboard is used to search for entries in the device memory
(e.g. telephone contacts) or for entry (e.g. renaming the Bluetooth ® Unit).
By pressing the keyboard function key, the character required appears in the
entry line.
During the search, (for example, in the phone book), only the function keys of
usable characters are available. Do not forget to enter a space for terms made
up of more than one word, such as Lorem Ipsum. The contact to be searched
for must be entered along with the special characters (diacritics).
The search for the most relevant entries with characters already entered are
already in the character input. Therefore, it is not always necessary to enter
the entire entry name.
In the function key the number of matching selected entries will be dis-
played. A list of related items the characters entered will be opened by press-
ing this button.
The numbers 1 - 99 indicate the quantity of matching entries that were found.
If more than 99 entries are found, then instead of a number the symbols are
shown . If less than 4 entries are found, a list of the found entries is
shown automatically.
Numerical keyboard
Fig. 4
Input screen with numeric key-
pad
The numerical keyboard is mainly used for entering numbers, e.g. in the phone
menu » page 33.
Description of the numerical keyboard
- Input line
- Return to the higher-level menu
- Delete characters in the entry line
Operation through the MAXI DOT display
Introduction
This chapter contains information on the following subjects:
Operate with the control lever buttons 9
Operating the audio menu using the buttons / dials on the multifunction
steering wheel 9
operation of the telephone menu via the buttons / dials on the
multifunction steering wheel 11
First and foremost, pay attention to the safety instructions » page 4, Impor-
tant notes.
A
8Unit operation

Some of the device's features are also displayed in the MAXI DOT display1).
Depending on the equipment they can be operated with the lever or the but-
tons / dials on the multifunction steering wheel.
Note
The buttons and wheels on the multifunction steering wheel will also be lit if
the ignition and the side light are switched on.
Operate with the control lever buttons
Fig. 5
Buttons on the control lever
The separate menus and menu items displayed in the MAXI DOT display can be
operated as follows with the buttons on the control lever.
Functions of the buttons on the control lever
But-
ton
» Fig. 5
Action Function
APress and hold
button Display main menu
APress briefly switch between menu items and menus
BPress briefly Confirm menu item or menu
Operating the audio menu using the buttons / dials on the multifunction steering wheel
Fig. 6 Multifunction steering wheel - Audio menu
›In the main menu of the MAXI DOT display select the menu item Audio.
The information displayed in MAXI DOT display
■Radio
■current radio station frequency band.
■currently playing station of receivable radio stations in the given frequency
band if less than 5 are receivable.
■if more than 5 stations can be received, a list of receivable radio stations is
displayed with an option to choose one of them.
■TP traffic announcements.
■Media
■Title.
1) The display in the MAXI DOT is described in the » Manual, chapter Information system.
9
Unit operation

Buttons and wheels of the audio menu - Radio/Media
Button/
wheel » Fig. 6 Action Operation
Radio Media
1Press briefly Change source (change frequency bands and connected sources)
1Press and hold button Switch between the Radio and Media menus and open the last context status (e.g. the last radio station
or track to be played)a)
2Press briefly Switch off/on toneb) Start/stop playback
2Turn upwards Increase the volume
2Turn downwards Decrease volume
3Press briefly
To the next in the station list
or go to the station stored in the preset listc)
Stop traffic report
Skip to next tracka)
3Press and hold button Stop traffic report Fast forwarda)
4Press briefly
Go to previous in the station list
or go to the station stored in the preset list
Stop traffic report
Go to the previous track when pressed within 3 s
from the change of track,
and to the beginning of the track when pressed 3 s
after track changea)
4Press and hold button Stop traffic report Fast rewind
5Press Stop traffic report without function
5Turn upwards Display list of available stations
Scroll upwards
Go to the previous track when pressed within 3 s
from the change of track,
and to the beginning of the track when pressed 3 s
after track changea)
5Turn downwards Display list of available stations
Scroll downwards Skip to next tracka)
6Press briefly Return to a previous level on menu
6Press and hold button Return to the main menu of the MAXI DOT display
a) Does not apply for AUX.
b) The sound is turned on again by pressing wheel 2 or turning wheel 2.
c) Context-dependent selection.
10 Unit operation

operation of the telephone menu via the buttons / dials on the
multifunction steering wheel
Fig. 7 Multifunction steering wheel - Phone menu
›In the main menu of the MAXI DOT display select the menu item Tele-
phone
Buttons and wheels of the Phone menu
Button/
wheel
» Fig. 7
Action Operation
1Press briefly Switch off/on tonea)
1Turn upwards Increase the volume
1Turn downwards Decrease volume
2Press briefly Accept call, end call, entry in the main menu
Telephone, call list, call the dialled contact
2Press and hold
button Reject call, redial last call
3Turn up/down Call list, previous/next menu item
3Press briefly Confirm selected menu item
4Press briefly Return to a previous level on menu
4Press and hold
button
Return to the main menu of the MAXI DOT dis-
play
a) The sound is turned on again by pressing wheel 2 or turning wheel 2.
Telephone call function in the MAXI DOT display
Depending on the context, you can select the following functions:
Incoming call
- Accepting a call
- Rejecting a call
- Muting the ring tone
Outgoing call
- Ending the call
Current call
- Ending the conversation
- Switch off the microphone
- Switching on the microphone
- Speakerphone off (call playback by means of the telephone)
- Switch on speakerphone (voice playback means of the device)
Symbols in MAXI DOT display
Symbol Meaning
Charge status of the telephone batterya)
Signal strengtha)
A phone is connected to the unit
Missed calls (if there are several missed calls, the number
of calls is shown next to the symbol)
Roaming (before the name of the mobile network provid-
er)a)
a) This function is only supported by some telephones.
Call list
In the MAXI DOT display, only the call list can be displayed and used.
If the call list includes no entries, the following message appears in the MAXI
DOT display No entries available.
The following symbols are displayed next to each entry in the call list.
Symbol Meaning
Incoming call
Outgoing call
Missed call
Answer
Reject
Ignore
Cancel
Hang up
Mic. off
Mic. on
Private
Hands-free
11
Unit operation

Note
The buttons and wheels on the multifunction steering wheel will also be lit if
the ignition and the side light are switched on.
Unit settings
Setup menu
Introduction
This chapter contains information on the following subjects:
Main Menu 12
Sound settings 13
Screen settings 13
Time and date settings 14
Keyboard settings 14
Additional keypad language settings 14
Unit settings 14
Restore factory settings 14
Bluetooth® settings 14
System Information 15
First and foremost, pay attention to the safety instructions » page 4, Impor-
tant notes.
This chapter covers the basic settings of the device.
Additional settings are described in the individual menus
■Volume » page 6
■Radio » page 19
■Media » page 23
■Telephone » page 28
■Vehicle system settings » page 37
Main Menu
The basic parameters for the unit can be set from the Main menu.
Call up the main menu
›Press the button.
■Sound - Sound setup » page 13
■Screen - Screen settings » page 13
12 Unit settings

■Time and date - Time and date settings » page 14
■Language - Set the unit language1)
■Keypad: - Keypad display for text entry » page 14
■More keypad languages- setting of available keyboard languages in the in-
put screens » page 14
■Units - Unit settings » page 14
■Remove SD card safely - Safe removal of the SD storage card
■Remove USB safely - safe removal of USB or iPod device
■Factory settings - Restore to factory settings » page 14
■Bluetooth - Settings for the Bluetooth® function » page 14
■System information - Displays system information » page 15
■Copyright - Information on licences and copyrights are only available in Eng-
lish
Sound settings
Fig. 8 Sound settings / volume ratio
›Press the button or the button → Sound.
■Volume - Volume settings
■Max. switch-on volume - Sets the maximum volume after switching on
■Announcements - sets the volume for the traffic program alerts (TP)
■Speed-dep. vol. adjust. - Speed-dependent volume adaptation
■Lower. entertain. - Setting for the voice control volume» page 40
■Telephone - Setting for the telephone and ringer volume
■AUX volume: AUX volume - Setting for the volume of the device connected
through AUX
■Quiet - Low volume
■Medium - Medium volume
■Loud - High volume
■BT audio - Setting for the volume of the connected Bluetooth® device
■Quiet - Low volume
■Medium - Medium volume
■Loud - High volume
■iPod - Setting for the volume for the connected iPod
■Quiet - Low volume
■Medium - Medium volume
■Loud - High volume
■Balance - Fader - Sets the balance between left and right, front and
rear » Fig. 8
■Bass - Mid - Treble - Sets the bass, mid and treble » Fig. 8
■Confirmation tone - Switch on/off confirmation tone when a function key is
pressed
Screen settings
›Press the button → Screen.
■Screen off (in 10 s) - Activate/deactivate energy-saving mode for the display2)
■Brightness - Adjusts the brightness of the screen
■Brightest - brightest level
■Brighter - brighter level
■Medium - medium level
■Darker - darker level
■Darkest - darkest level
■Confirmation tone - Switch on/off confirmation tone when a function key is
pressed
■Show clock in stdby mode - Time and date displayed on the screen when the
ignition is switched on and the unit is switched off
1) The correct display of country-specific characters (e.g. ID3 tag information) can not always be guaran-
teed.
2) If after 10 seconds, the screen is not activated after touching the screen or by pressing or turning the
menu button 2 » Fig. 1 on page 5, the screen is black.
13
Unit settings

Time and date settings
›Press → Time and date.
■Time: - Time settings
■Time format: - Set the time format
■12h
■24h
■Summer time - Switches the summer time setting on/off
■Date: - Date settings
■Date format: - Set the date format
■dd.mm.yy - Day - Month - Year
■yy-mm-dd - Year - Month - Day
■mm-dd-yy - Month - Day - Year
Keyboard settings
›Press the button → Keypad:.
■ABC - keys arranged alphabetically
■QWERTY - Arrangement of the keys as per the QWERTY system (in accord-
ance with computer keyboard arrangement)
Additional keypad language settings
›Press the button → More keypad languages.
In this menu, the availability of the keyboard language for the chosen key-
board can be selected, and with this the option for fast entry of the characters
used in the selected language.
Switching between the languages chosen takes place by pressing the function
key » page 8 .
Unit settings
›Press the button → Units.
■Distance: - Distance units
■km - Kilometres
■mi - Miles
■Speed: - Speed units
■km/h - Kilometres per hour
■mph - Miles per hour
■Temperature: - Temperature units
■° - Degrees Celsius
■° - Degrees Fahrenheit
■Volume: - Volume units
■l - Litres
■gal (US) - Gallons (US)
■gal (UK) - Gallons (UK)
■Consumption: - Fuel consumption units
■l/100km - Litres per 100 kilometres
■km/l - Kilometres per litre
■mpg (US) - Miles per gallon (US)
■mpg (UK) - Miles per gallon (UK)
■CNG consump.: - CNG consumption units
■kg/100km - Kilograms per 100 km
■km/kg - Kilometres per kilogram
■m³/100km - Cubic metres per 100 kilometres
■km/m³ - Kilometres per cubic metre
■Pressure: - Pressure units for tyre pressure
■kPa - Kilopascal
■bar - bar
■psi - Pounds per square inch
Restore factory settings
›Press the button → Factory settings.
■All settings/data - menu to restore all settings
■Reset all - Reset all factory settings
■Individual settings - menu for the recovery of individual settings
■Radio - Restore default settings for radio
■Media - Restore default settings for media
■Vehicle - Restore default settings for the vehicle systems
■Sound - Restore default settings for sound
■System - Restore the system default settings
■Telephone - Restore default settings for phone
Bluetooth® settings
›Press the button → Bluetooth.
14 Unit settings

■Bluetooth - Switch on/off Bluetooth® function
■Visibility: - Switch on/off the visibility of the Bluetooth® device for other de-
vices
■Visible - Visibility is always on
■Hidden - Visibility is off
■1st name - option for renaming the Unit
■Paired devices - Display the list of paired Bluetooth® devices; connect or de-
lete a paired device; delete the list of paired devices
■ All - Delete all paired Bluetooth® devices
■ - Delete the selected paired Bluetooth® device
■Find devices - Searches for available external devices with enabled Blue-
tooth® functions and activated visibility
■BT audio (A2DP/AVRCP) - Switch on/off the connection option for Blue-
tooth® profiles A2DP and AVRCP1)
System Information
›Press the button → System information.
■Update software - the function key for the software update
■Bluetooth: ... - Version number of the Bluetooth ® software
■Device part number: ... - Part number of the unit
■Hardware: ... - Hardware used
■Software: ... - Software version
Bluetooth ®- update
For more information on device updates is available from a ŠKODA service
partner.
For smooth function and connection of the latest phone types it is recommen-
ded to update the Bluetooth ® device software regularly.
1) A2DP and AVRCP are Bluetooth® profiles that support multimedia functions.
15
Unit settings

Radio
Operation
Introduction
This chapter contains information on the following subjects:
Main menu 16
List of available stations 17
Search and select available stations 18
Save radio station 18
Search available stations (Scan) 18
Traffic programme 19
First and foremost, pay attention to the safety instructions » page 4, Impor-
tant notes.
The device allows analogue radio reception of FM and AM frequency ranges as
well as DAB digital radio reception.
Radio reception DAB allows multiple stations to be transmitted in a single fre-
quency in the form of an ensemble or group. It also allows for the transmission
of additional data and information (e.g. messages, sport, weather, warnings,
etc.).
CAUTION
■Car parks, tunnels, tall buildings or mountains can interfere with the radio
signal even causing it to fail completely.
■For vehicles with window antennas do not stick foil or metal coated stickers
to the window as this can lead to interference.
■In countries where the RDS function is not supported sufficiently, we recom-
mend turning off the AF and RDS function. Otherwise, these settings can af-
fect the functionality of the radio.
Main menu
Fig. 9
Radio: Main menu
Read and observe on page 16 first.
Main Menu - Information and function keys » Fig. 9
The selected radio station (frequency or identifier)
Station keys
Choice of radio range (FM / AM / DAB)
Choice of storage groups in the selected broadcasting ranges (e.g. FM1,
FM2 or FM3)
Changing stations either in the list of available stations or the station but-
tons depending on the settings of the menu Arrow buttons: » page 19,
Settings
Manual / semi-automatic station search » page 18
Radio Text display
Menu Settings Radio
Call up the main menu
›Press the button.
Choose broadcasting range
›Press the button repeatedly.
or
›Press the function button C » Fig. 9, and select the desired range.
A
B
C
D
16 Radio

Information symbols in the display
Symbol Importance
Traffic information station
Traffic information signals are not available or the selected sta-
tion is not a traffic information station
Signal is not available (DAB)
Note
If a continuous change of a displayed station name occurs, then it is possible
to fix the current station name by pressing on the screen for a while in the sta-
tion range A » Fig. 9.
List of available stations
Fig. 10 Example, the list of available stations: FM / DAB
Read and observe on page 16 first.
The station with sufficient signal strength are shown in the list of available
stations. The device examines these stations automatically.
Show stations list
›In the main menu Radio turn the menu knob 2 » Fig. 1 on page 5.
List of available stations - information symbols and function keys
APTY filter (FM and DAB)
Radio station, which is stored under a preset button
Currently selected radio station
Traffic information station
(e.g.) Type of program being broadcast (FM)
(e.g.) Type the regional broadcast (FM)
Signal is not available (DAB)
Update the station list (AM and DAB)
Update the list of stations
In the FM band the station list is continually updated automatically.
In AM and DAB bands update is performed manually by pressing the function
key .
PTY- filter
The station indicated in the station list FM1) and DAB2) can be filtered according
to the type of program.
›Press the function key A switch and select one of the following program
types:
All The filtering is switched off.
News News, weather, information
Culture Culture, science, education, finance, religion or children's pro-
grams
Music Music
Sport Sport
Special Travel, leisure, social programs or alarm message
Sort the stations in the station list
The FM station list can be sorted depending on the setting of the menu item
Sort stations: » page 19, Advanced Settings (FM).
The AM station list is sorted according to the frequency of the received station.
The DAB station list, can be sorted depending on the setting of the menu item
Kind of stat. list: » page 19, Settings.
1) Applies with activated RDS function » page 19, Advanced Settings (FM).
2) Applies to selected global type of the station list » page 19, Settings.
17
Radio

Search and select available stations
Read and observe on page 16 first.
Select station from the list of available stations
A radio station from the list of available stations can be selected in one of two
ways.
›Press the function key in the Radio main menu or press the top of the
screen.
or
›In the main menu Radio turn the menu knob 2 » Fig. 1 on page 5.
The list of available stations is opened » page 17.
›Select the desired station.
Manual station search
›Press the function key in the Radio main menu .
It current frequency range appears in the scale.
Set the desired station in one of the following ways.
›press the function key or press at the top of the screen (change to the
next available station).
›press the function key or press at the bottom of the screen (movement
on the scale of the frequency range).
›turn the menu button 2 » Fig. 1 on page 5 (movement on the scale of the
frequency range).
›Move the slider on the scale of the frequency range by touching with the fin-
ger.
Close the menu for manual searching by pressing the menu button 2.
Save radio station
Read and observe on page 16 first.
For each broadcasting ranges there are 12 preset buttons to store the radio
stations. These preset buttons are divided into three memory groups.
A radio station can be stored in the device memory in one of the following
ways.
Save station from the main menu Radio
›In the main menu Radio press and hold the desired station button B » Fig. 9
on page 16 until you hear an acoustic signal.
If a station was already stored in the desired position it is replaced with the
new station.
Save station from the station list
›In the list of available stations » page 17 press the function key of the desired
station longer.
A list of the station keys is shown as well as a list of the functions keys for the
storage groups.
›Select a storage group.
›Press the station button. The station is stored in the selected position.
Automatic storage of the strongest stations under preset buttons
(AutoStore)
›Press and hold the key for 10 seconds.
The unit automatically stores stations with the strongest signal in four preset
buttons the first storage group in each frequency range.
Search available stations (Scan)
Read and observe on page 16 first.
This function plays all the receivable stations in the current frequency range in
succession for a few seconds each.
Turn on search
›Press the menu knob 2 » Fig. 1 on page 5.
or
›Press the function key in the Radio main menu → Press Scan.
Turn off search
›Press the menu knob 2.
or
›press the function key .
or
›press any function key in the device screen.
18 Radio
Other manuals for Infotainment Radio Swing
2
Table of contents
Other Skoda Car Video System manuals

Skoda
Skoda Infotainment Radio Blues User manual

Skoda
Skoda 5L0 063 521 A User manual

Skoda
Skoda Infotainment Radio Swing User manual

Skoda
Skoda Infotainment Radio Bolero User manual

Skoda
Skoda Infotainment Radio Bolero User manual

Skoda
Skoda Infotainment Radio Bolero User manual

Skoda
Skoda AMUNDSEN+ User manual

Skoda
Skoda Citigo User manual
Popular Car Video System manuals by other brands

PowerAcoustik
PowerAcoustik PDN-626B Operation instructions

PowerAcoustik
PowerAcoustik PTID-4333NR owner's manual

PowerAcoustik
PowerAcoustik PTID-7001NBT operating manual

Sound Storm
Sound Storm HR8-PAKG user manual

Caraudio-Systems
Caraudio-Systems ZL-MYGIG-V2-R manual

NavLinkz
NavLinkz r.LiNK RL4-UCON8-CP manual