Introductory information
Important notes
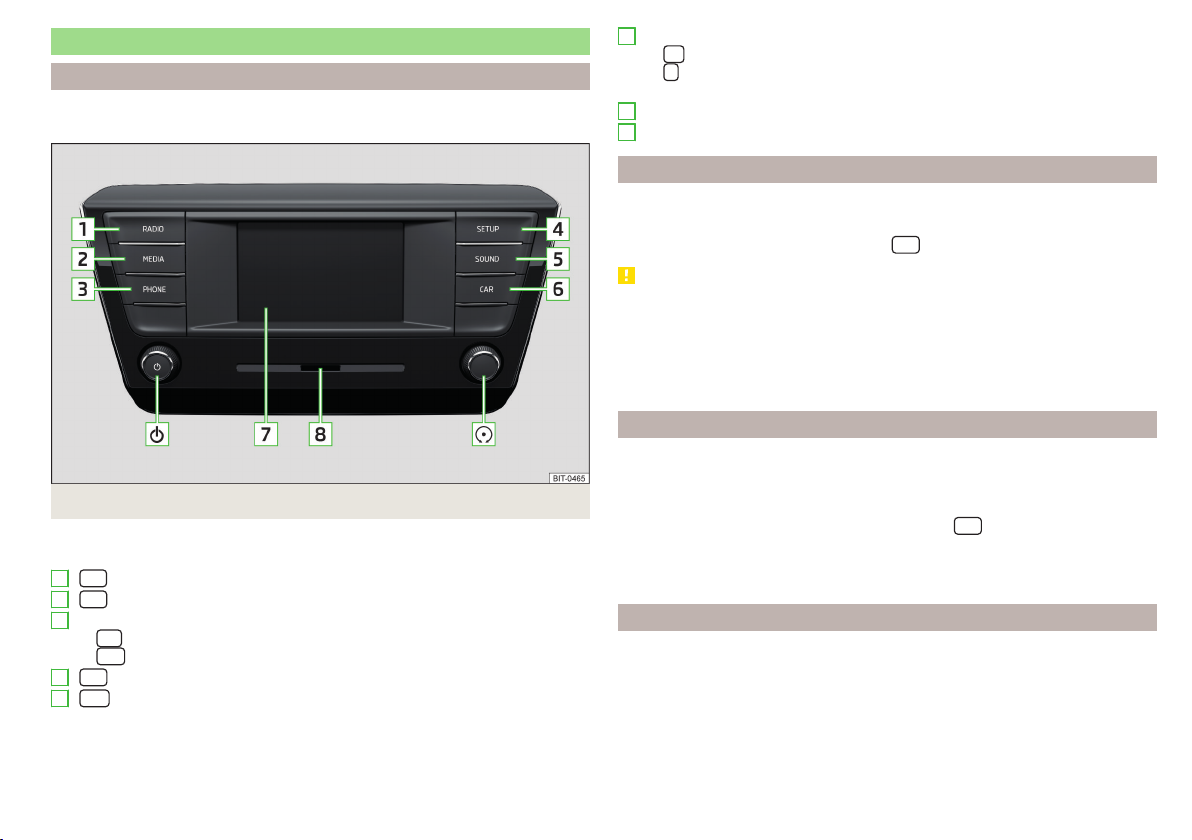
Introduction to the subject
WARNING
■Concentrate fully at all times on your driving! As the driver you are fully
responsible for the operation of your vehicle.
■Use the device only so that you have the vehicle fully under control in any
traffic situation, for example, the telephone does not couple or connect,
does not work with the contact list, etc. - risk of accident!
WARNING
■Adjust the volume to ensure that acoustic signals from outside the vehi-
cle, e.g. sirens from emergency vehicles, can be heard at all times.
■High volumes can cause hearing damage.
WARNING
■Never leave a communication device, e.g. mobile phone, audio sources, in
the deployment area of an airbag, on a seat, on the dashboard or any an-
other area, from which it can be thrown during a sudden braking manoeu-
vre, an accident or a collision - risk of injury!
■Never connect or disconnect an external device while driving - risk of ac-
cident!
■Always route the connection cable of the external device such that is
does not restrict you when driving.
CAUTION
In some countries, some unit features can no longer be selected when the ve-
hicle is running faster than a certain speed. This is not a malfunction, but com-
plies with the national legal regulations.
External devices and applications
The availability of some of the functions described in this Owner´s Manual
depends on the type of device to be connected and the applications installed
in it.
Mobile phones
On the following pages, check to see if the device is compatible with the selec-
ted mobile phones.
http://go.skoda.eu/compatibility
Due to the large number of mobile phones as well as the ongoing develop-
ment of these devices, ŠKODA AUTO cannot always ensure compatibility with
the device unconditionally. It is always recommended to physically check the
function on the associated vehicle, including the ŠKODA Partners, beforehand.
Only those versions of the selected phones will be tested and supported which
originate from the official distribution network. The same also applies to their
firmware and software.
The functions of the mobile phone to be tested may differ from the same type
of mobile phone depending on the specification for the respective country or
the specific service.
Mobile phones with the operating system and in the version available at the
time of these tests will be tested. In this regard, it could be the case that the
functions of a mobile phone may differ with a different operating system ver-
sion compared to the one used with the tested phone.
ŠKODA AUTO can accept no responsibility for the continuous changes made by
the mobile phone manufacturers and application vendors.
The function of some mobile applications may be affected by the quality of the
Internet connection at the respective location.
ŠKODA AUTO does not accept any liability for any damage to the device or ve-
hicle due to the use of incorrect or illegal applications or the improper or unau-
thorized use of mobile phones.
6Introductory information