manuals.online logo
Brands
  1. Home
  2. •
  3. Brands
  4. •
  5. SkyLink
  6. •
  7. Remote Control
  8. •
  9. SkyLink 38 User manual

SkyLink 38 User manual

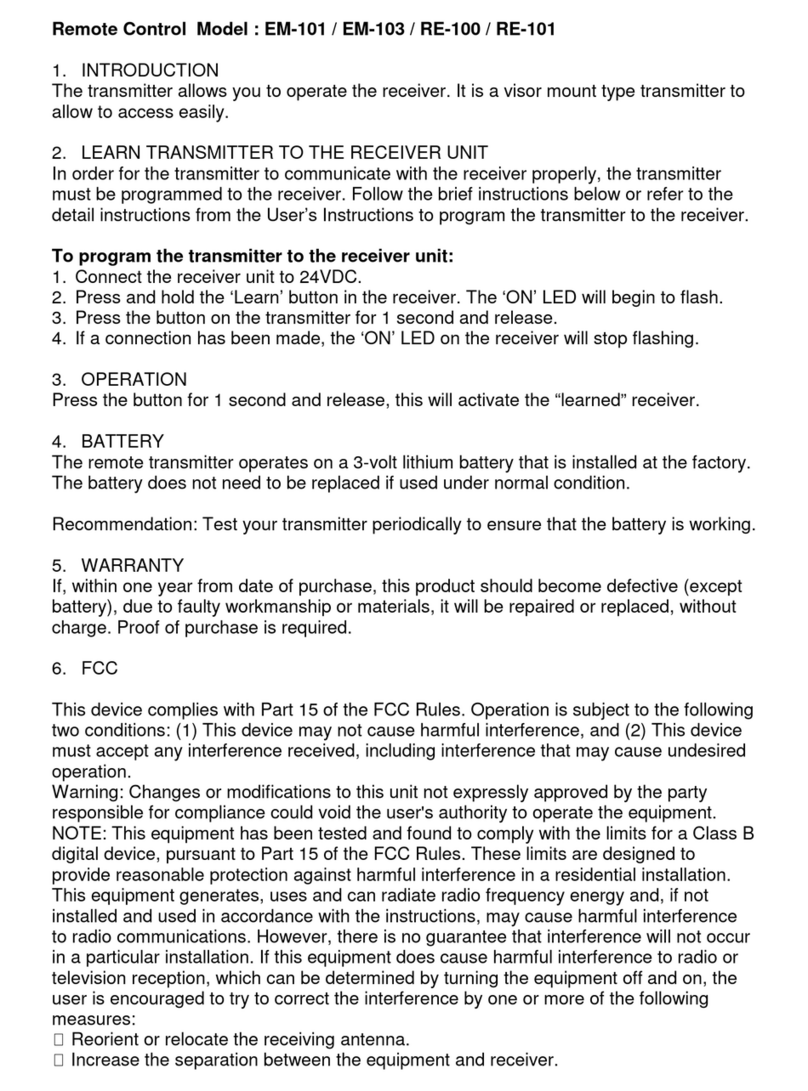
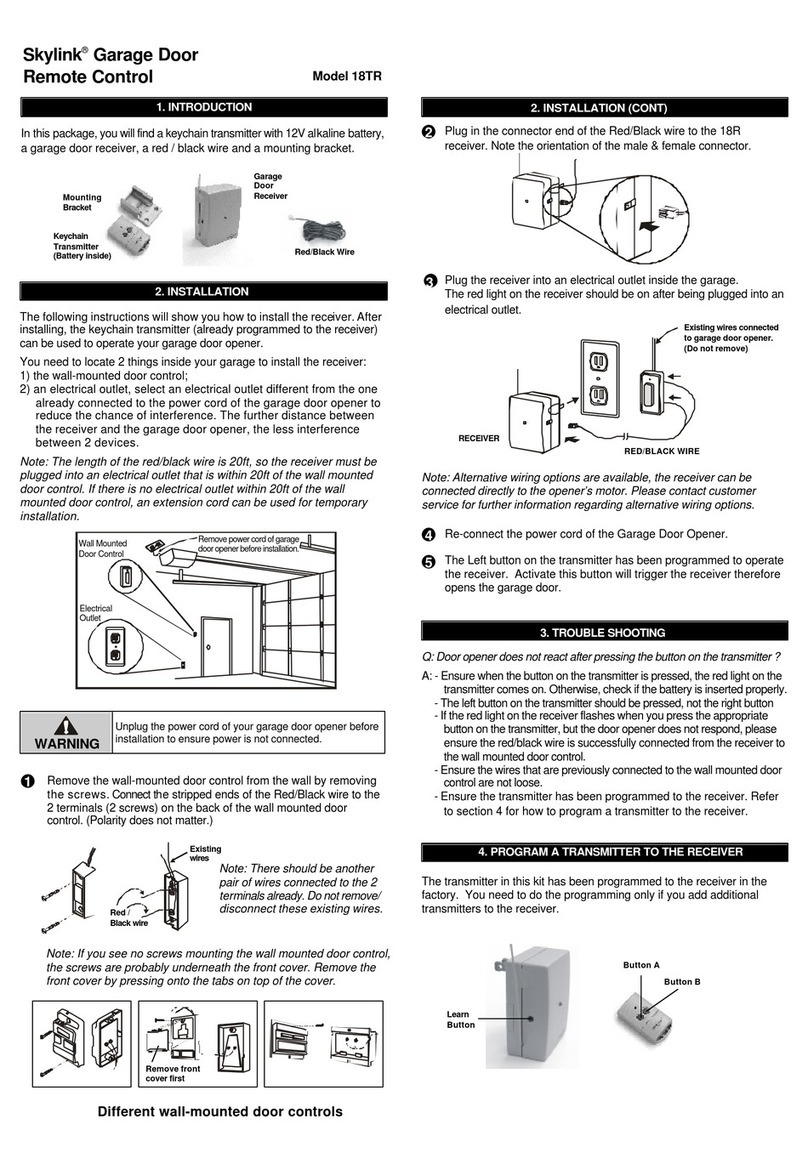
PROGRAMMING THE TRANSMITTER
1a. Locate frequency
switch on the top of
the transmitter:
(See diagram A)
2b. The model 38 transmitter
contains 8 brand jumpers
(see diagram C) and 12
code connectors. (See
diagram D).
Code connector Location
1b. Determine the brand of your garage door
opener and set the frequency switch to the
corresponding position. (See chart 1)
A B C D
12345678
2a. To program the model
38, open the case with
a coin. (See diagram B)
Brand Jumper
2c. The brand jumper has 8
columns of posts, each
column has 2 posts. (see
diagram C). The connector,
(see diagram E), must be
placed in one of the eight
columns.
3b. There are 2 ways to pro-
gram the model 38 so
that it will communicate
with your garage door
opener. Open your exist-
ing transmitter, (the unit
you currently use to open
your garage), or look at
the back of your garage
door opener. If you see a
column of small switches
go to point 3c in this
manual. If there are no
switches, go to point 3e.
Diagram A
Chart 1
Diagram B
Diagram C
3a. The code connector (see diagram D)
has 12 columns of posts, each column
has 3 posts. Each column contains
one connector (see diagram E) for a
total of 12 connectors.
Diagram E
If the connector is placed on the top and
middle posts, that column is set on “ + ”
or “ON” or “CLOSE”. If the con-nector is
placed on the middle and bottom posts,
that column is set on “ - ” or “OFF” or
“OPEN”. If the connector is removed
completely, (not placed on any posts),
it is set to “ 0 ” or the neutral position.
(see diagram F for examples of how to
set a column to the three different posi-
tions). When removing a connector to
set a column to the neutral position,
save the connector in case you change
the code at a later date.
To set the brand jumper, deter-
mine the brand of your garage
door opener and place the jum-
per connector to the corres-
ponding position. (See chart 2)
Diagram D
Linear®
M-O-M®
Stanley®
Multi-Code®
Chamberlain®
Lift-Master®
Sears®
Wayne Dalton®
Master Mechanic®
Genie®(9 positions)
Genie®(12 positions)
Master Craft®(12 positions)
Martec/Teckey®
Pulsar/Allister/Allstar®
Skylink®(SL300/SL310)
1
1
2
2
3
3
3
2/3
3
4
5
5
6
7
8
Brand of
your opener Use Jumper
Number
Chart 2
3c. To move the connectors,
slide an opened paper clip
into the side of aconnector
and lift. (see diagram G)
When repositioningcon-
nectors, place a connec-
toronthetwochosenposts,
then push down on the
connector with your finger.
Paper
Clip
Diagram G
Chamberlain®1983-1997
Lift-Master®1983-1997
Sears®1983-1997
Wayne Dalton®1983-1997
Master Mechanic®1983-1997
Genie®(9 positions) 1983-1997
Genie®(12 positions) 1983-1997
Pulsar/Allister/Allstar®1985-2002
Master Craft®1985-1997
Linear®1975-1997
M-O-M®1983-1997
Skylink®(SL310) 1993-2002
Skylink®(SL300) 1993-2002
Stanley®1976-1997
Multi-Code®1976-1997
Martec/Teckey®1992-2002
Skylink®UR-100
390
390
390
300/390
390
390
390
318
-
310
310
310
300
300
300/310
300
390
A
A
A
D/A
A
A
A
B
-
C
C
C
D
D
D/C
D
A
315/390
315/390
315/390
315/390
315/390
315/390
315/390
318
315/390
310
310
310
-
310
310
-
390
C/A
C/A
C/A
C/A
C/A
C/A
C/A
B
C/A
D
D
D
-
D
D
-
A
Brand of your opener
USA
CANADA
A
390
390
B
318
318
C
310
315
D
300
310
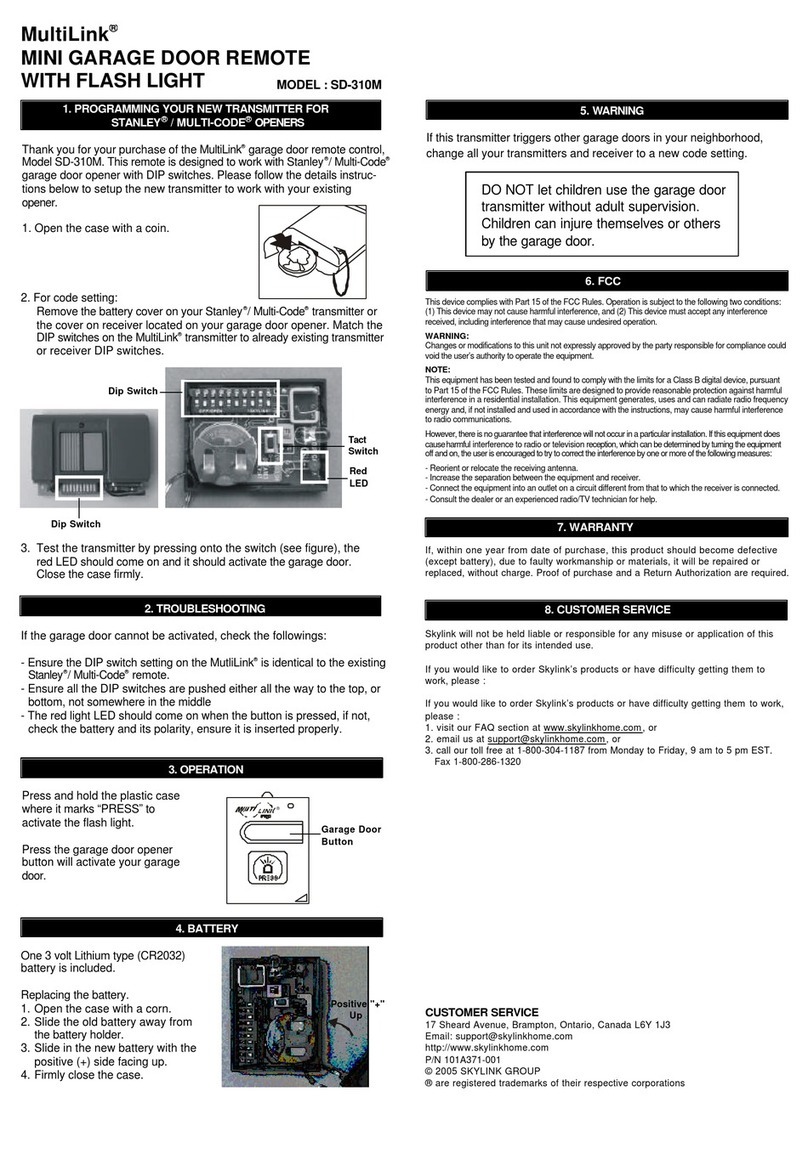
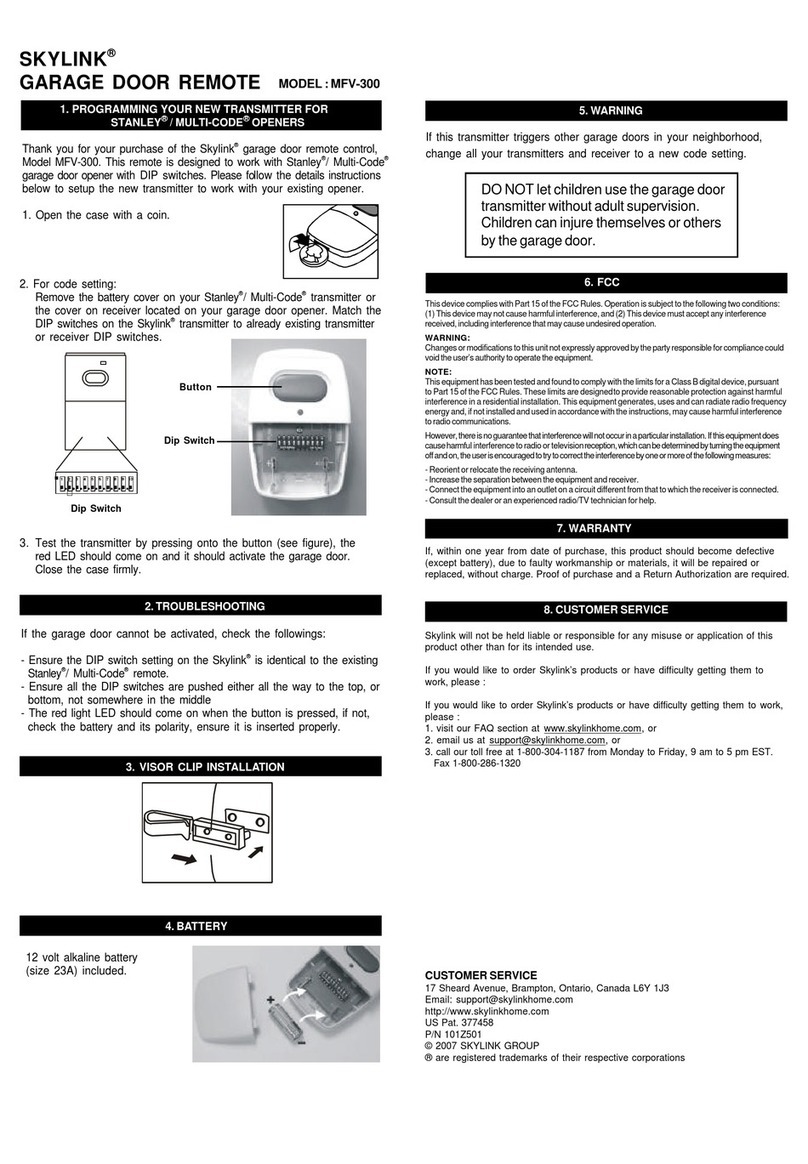
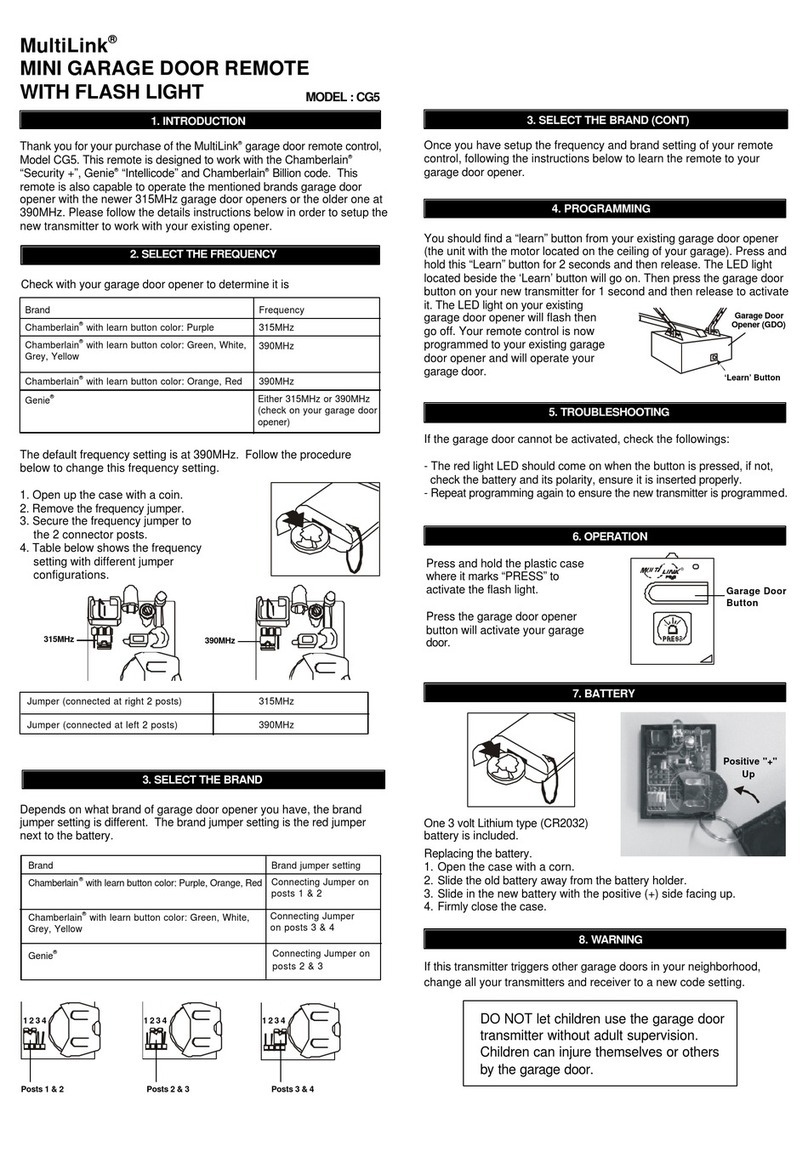
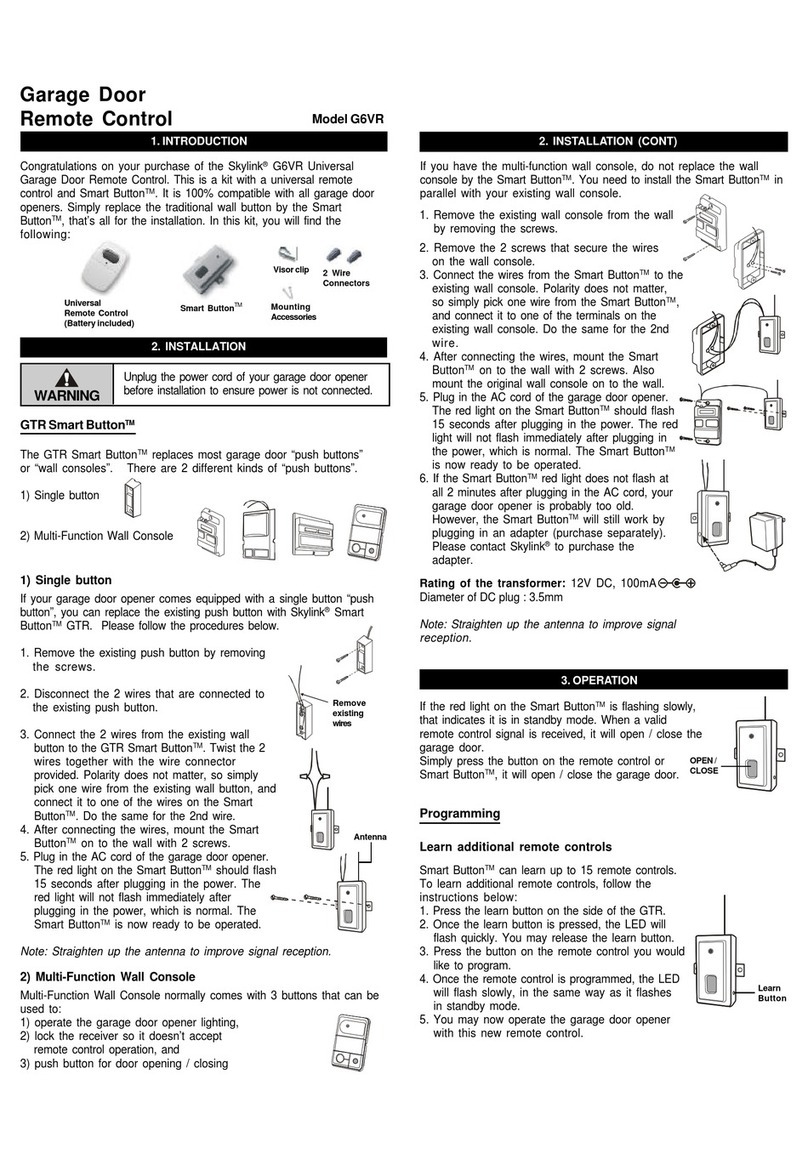
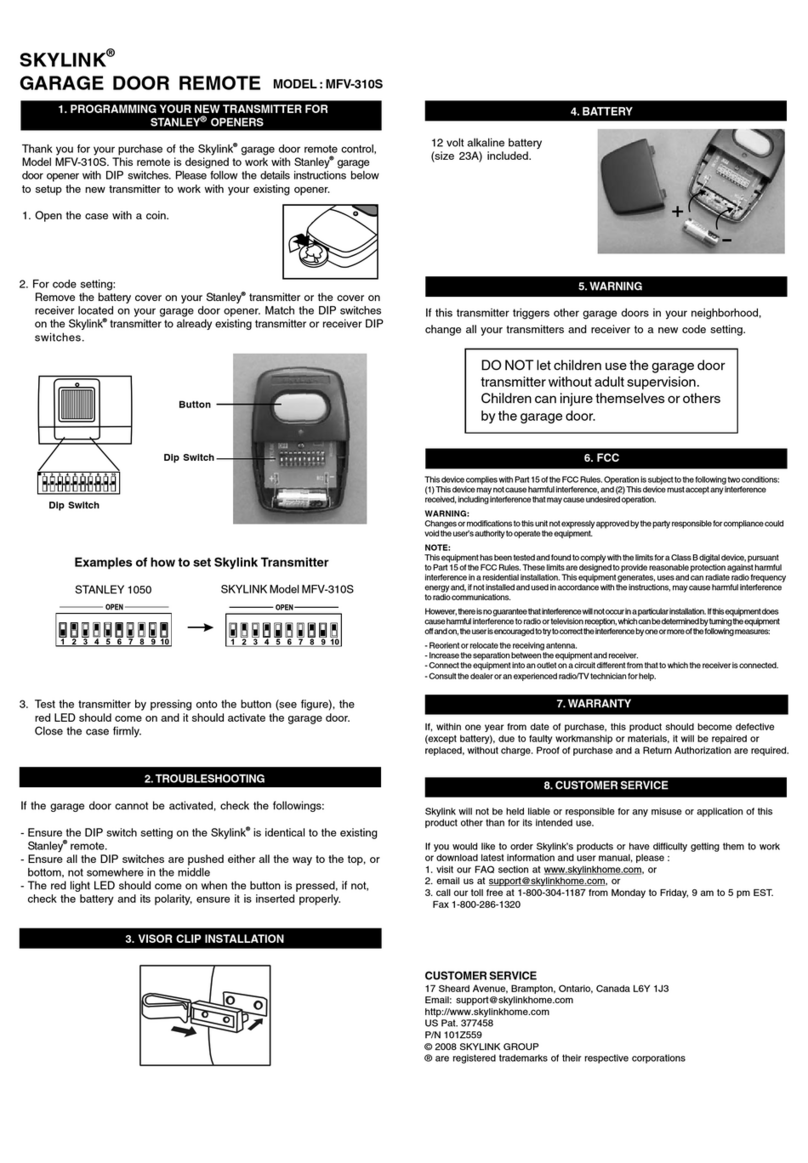
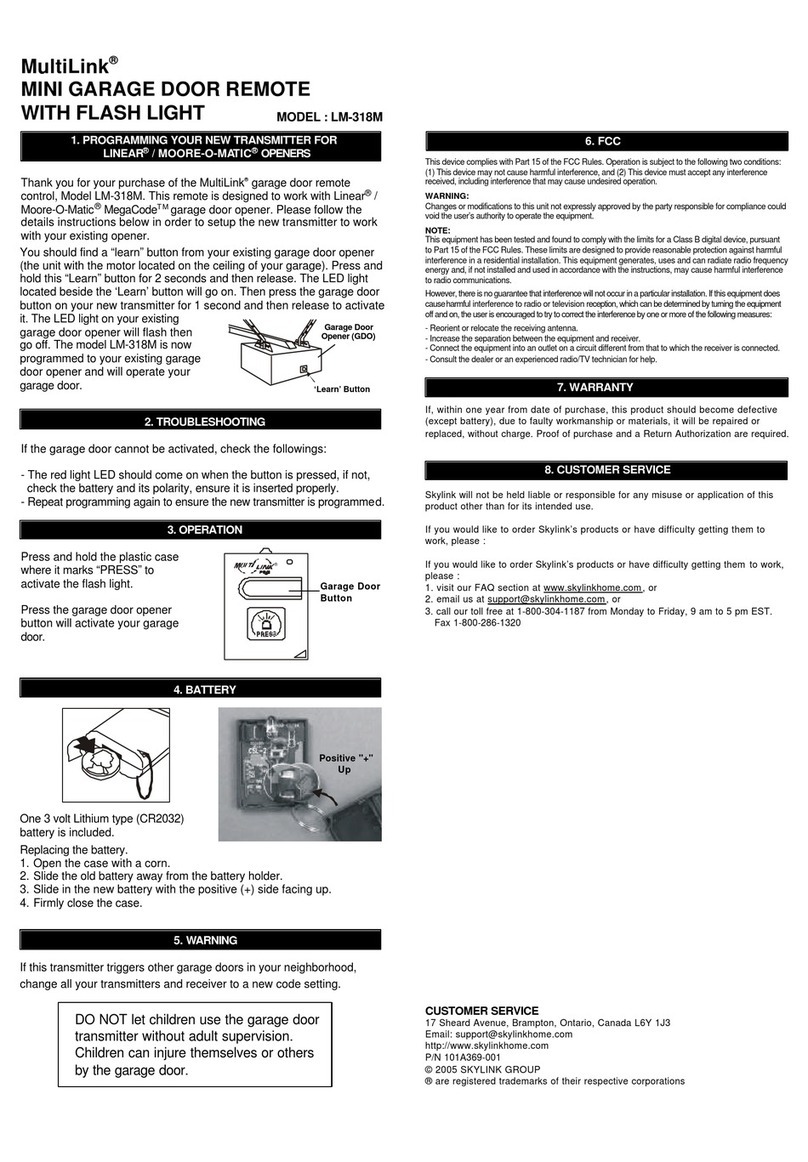
Thank you for your purchase of the Skylink garage door remote
control, Model 38. There are 3 different steps you need to setup
in order to use this universal garage doorremote control to operate
your existing garage door opener. These 3 steps are:
1) Frequency switch – select the correct frequency according to
the brand of your existing garage door opener.
2) Brand jumper – place the brand jumper at the correct position
according to the brand of your existing garage door opener.
3) Code setting – Set the jumper connectors on the Model 38 so
that they match the code setting of your existing garage door
opener.
Please follow the detailed instructions below in order to setup the
Skylink Model 38 to work with your existing opener.
After settingup theModel 38,you canactivate theremote by pressing
and holding the button for approximately 2 seconds. This is to
avoid accidentally pressing the button and activating the garage
door opener.
STEP 1- SET FREQUENCY SWITCH STEP 2- SET BRAND JUMPER
STEP 3- SET CODE CONNECTORS
Linear (1975-1997) Position 1 to 8 + OR -
M-O-M (1983-1997) Position 1 to 8 + OR -
Stanley (310) Canada (1976-1997) Position 1 to 10 + OR - 11,12 set to ‘+’ or ‘-’
Stanley (300) (1976-1997) Position 1 to 10 + OR - 11,12 set to ‘+’ or ‘-’
Multi-Code (1976-1997) Position 1 to 10 + OR - 11,12 set to ‘+’ or ‘-’
Chamberlain (1983-1997) Position 1 to 9 +, 0 (blank), OR -
Lift-Master (1983-1997) Position 1 to 9 +, 0 (blank), OR -
Sears (1983-1997) Position 1 to 9 +, 0 (blank), OR -
Wayne Dalton (1983-1997) Position 1 to 9 +, 0 (blank), OR -
Master Mechanic (1983-1997) Position 1 to 9 +, 0 (blank), OR -
Genie (9 positions) (1983-1997) Position 1 to 9 + OR -
Genie (12 positions) (1983-1997) Position 1 to 12 + OR -
Master Craft (1985-1997) Position 1 to 12 + OR -
Martec/Teckey (1992-2002) Position 1 to 10 + OR - 11,12 set to ‘+’
Pulsar/Allister/Allstar (1985-2002) Position 1 to 9 +, 0 (blank), OR -
Skylink (SL300/SL310) (1993-2002) Position 1 to 8 +, 0 (blank), OR - 1-5 set ‘+’ or ‘0’
6-8 set ‘0’ or ‘-’
9-12 must set to‘0’
Setswitch
toposition Set switch
toposition
Frequency Frequency
USA CANADA
‘+’ or ‘ON’ or CLOSE ‘0’ = BLANK
‘-’ or ‘OFF’ or ‘OPEN’
Diagram F
Code connector setting to match your opener/motor
3e. If your existing opener does not have any switches, then it can
“learn” the code needed to open your garage door. Set the con-
nectors of the model 38 to any combination of “ +, 0 , - ”. For
security reasons, do not leave the connectors at the current posi-
tion (see point 3c on how to move the connectors). Press the learn
button on the garage door opener (unit with motor located in the
ceiling of the garage, see diagram K) for approximately two
seconds. The LED light located beside the learn button will go on.
Then press the button on the model 38 transmitter and hold for
about two seconds. The LED light on the garage door opener will
flash then go off.
The model 38 is now pro-
grammed correctly and will
open your garage door.
position“ 0 “. Ifyour existing transmitter has
fewer than 12 switches, see point 3d in this
manual. Press the button on the transmitter.
Ifthe garage door does not open, reverse
all of the connectors on the model 38. The
“ + ” will be changed to the “ - ” position
and the “ - ” position will be changed tothe
“ +” position. (see diagram I)
Original Position
Reversed Position
Diagram I
GARAGEDOOR/GATE
REMOTE CONTROL
USER'SINSTRUCTIONS
(Model 38)
® are registered trademarks of their respective corporations
CUSTOMER SERVICE
2213 Dunwin Drive
Mississauga, Ontario,
L5L 1X1, CANADA
(905)608-9223
(905)608-8744 FAX
Email:[email protected]
(Reply within 24 hrs)
Customer Service : (800)304-1187
From Monday to Friday, 9am to 5pm EST
http://www.skylinkhome.com
P/N. 101A181-001 Rev.1
Patent no. D377458, 5680134,
5841390, 6005508
Patents Pending
©1995 SKYLINK GROUP
®
Skylink will not be held
liable or responsible for
any misuse or application
of this product other than
for its intended use.
FCC
The Universal Garage Door Remote Control
is approved by the FCC and it complies
with Part 15 of the FCC Rules. Its operation
issubject to the following two conditions :
1. This device may not cause harmful
interference.
2. This device must accept any interference
that may cause undesired operation.
WARNING:
Changes or modifications to this unit not
expresslyapproved bythe party
responsible of compliance could void the
user’s authority to operate the equipment.
NOTE
WARNING BATTERY
WARRANTY
If this transmitter triggers
other garage doors in
yourneighborhood,
change all your trans-
mitters and receiver to a
new code setting.
DO NOT let children use
the garage door trans-
mitter without adult
supervision. Children
can injure themselves or
others by the garage
door.
If, within one year from date
of purchase, this product
should become defective
(except battery), due to
faulty workmanship or
materials, it will be repaired
or replaced, without charge.
Proof of purchase is
required.
12 volt " cigarette lighter "
type (size 23A) battery
(included).
Diagram K
If your garage door opener is manufactured by (Chamberlain®,Sears®, Lift-Master®,Wayne
Dalton®, Pulsar®or Master Mechanic®) the switches will have 3 positions, (“ + , 0, - ”). Set
the connectors on the model 38 to match their corresponding positions. If your opener is a
Sears®, Chamberlain®or Lift-Master® and the existing transmitter has three buttons, (see
diagram J), the firstconnector in the model #38 may need to be changed to another position.
If your Chamberlain®,Sears®, Lift-Master®has 9 DIP switches, match them to the first 9
connectors on the model 38 and remove the last 3 connectors (connectors 10, 11, 12). If
there are only 8 DIP switches on your Chamberlain®,Sears®, Lift-Master®, match them to
the 2-9 position on the model 38 and remove the last 3 connectors (connectors 10, 11, 12).
Now you may have to change the positioning of the #1 connector on the model 38.
If the large button of Diagram J is used to open the garage
door, set the #1 connector to “ - ” position. If the middle
button is used, set the #1 connector to the “ 0 ” or “blank”
position. If the smaller button on the left is used, set the #1
connector to the “ + ” position.
Diagram J
OPERATION
To operate the model 38
with your GDO properly,
please press and hold the
buttonon the model 38 for
2 seconds.
NOTE: Transmission range
may be reduced with use on
a metal garage door.
3d. If your existing transmitter or receiver has fewer than 12
switches, match only the first corresponding connectors.
Leave the remaining posts blank, (remove the connectors). ‘Learn’ Button
Garage Door
Opener (GDO)
Code®, Linear®, Moore-O-
Set the connectors numbered 1 through 12 to match the
switches of your existing transmitter or receiver. If your
garage door opener is manufactured by (Stanley®, Genie®,
Multi- Matic® , Skylink ) these
switches may only have two positions, ( “+ , ON, CLOSED”
and “ - , OFF, OPEN”). (see diagram H) Set the connec-
tors on the model 38 to “ + ” if your existing switches are
either “ +, ON, CLOSE ” and set to “ - ” if your existing
switches are either “ -, OFF, OPEN”. Do not use the center
®
Examples of how to set Model 38
Diagram H
STEP 3- SET CODE CONNECTORS
If your Skylink Universal Remote Control does not
activate your Garage Door Opener, the reason
may be that your GDO age or manufacturer is not
listed on the com-patibility chart.
The solution is the Skylink UR-100 Universal
Receiver.
If you would like to order Skylink’s product or have
difficulty getting your Skylink’s remote control to
work, please :
1. visit our website FAQ at www.skylinkhome.com, or
2. email us at [email protected]
(reply within 24 hrs)
3. call our toll free at 1-800-304-1187 from Monday
to Friday, 9 am to 5 pm EST.
Model38
Existing
Transmitter
Other SkyLink Remote Control manuals

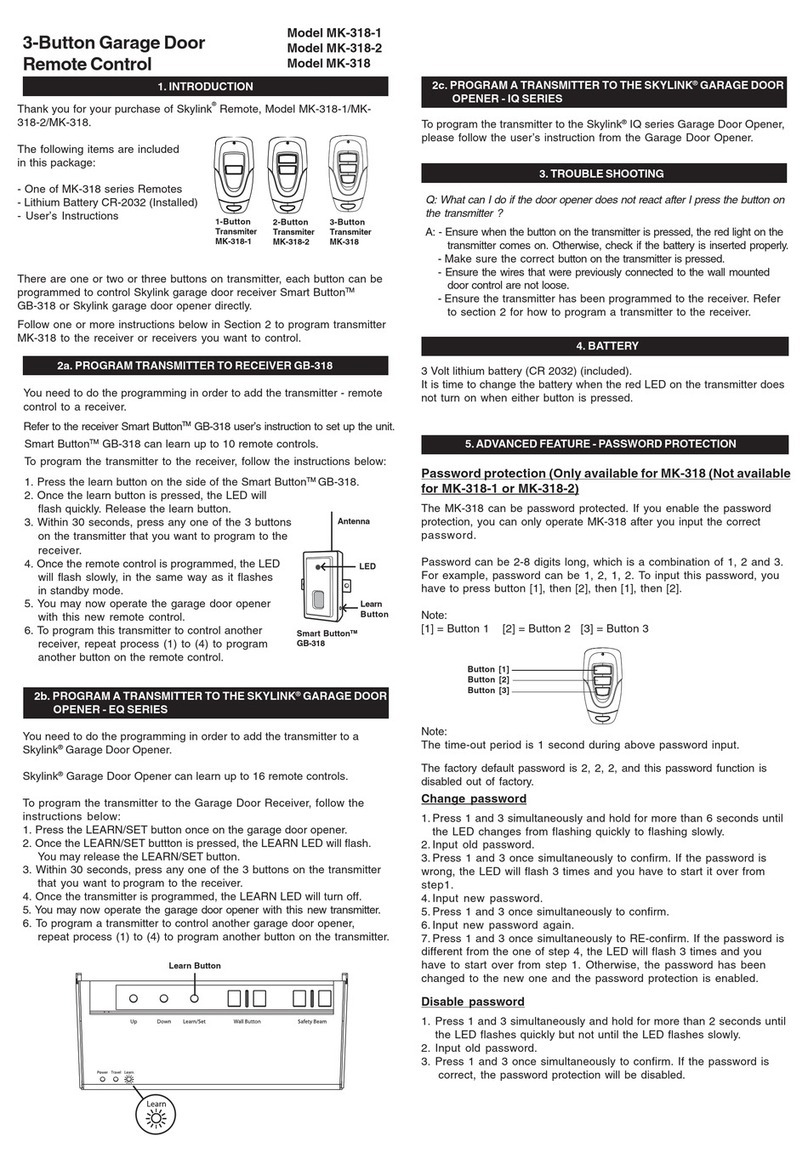
SkyLink MK-318-1 User manual

SkyLink

SkyLink MK-318-1 User manual

SkyLink WS-100 User manual

SkyLink

SkyLink WS-100 User manual

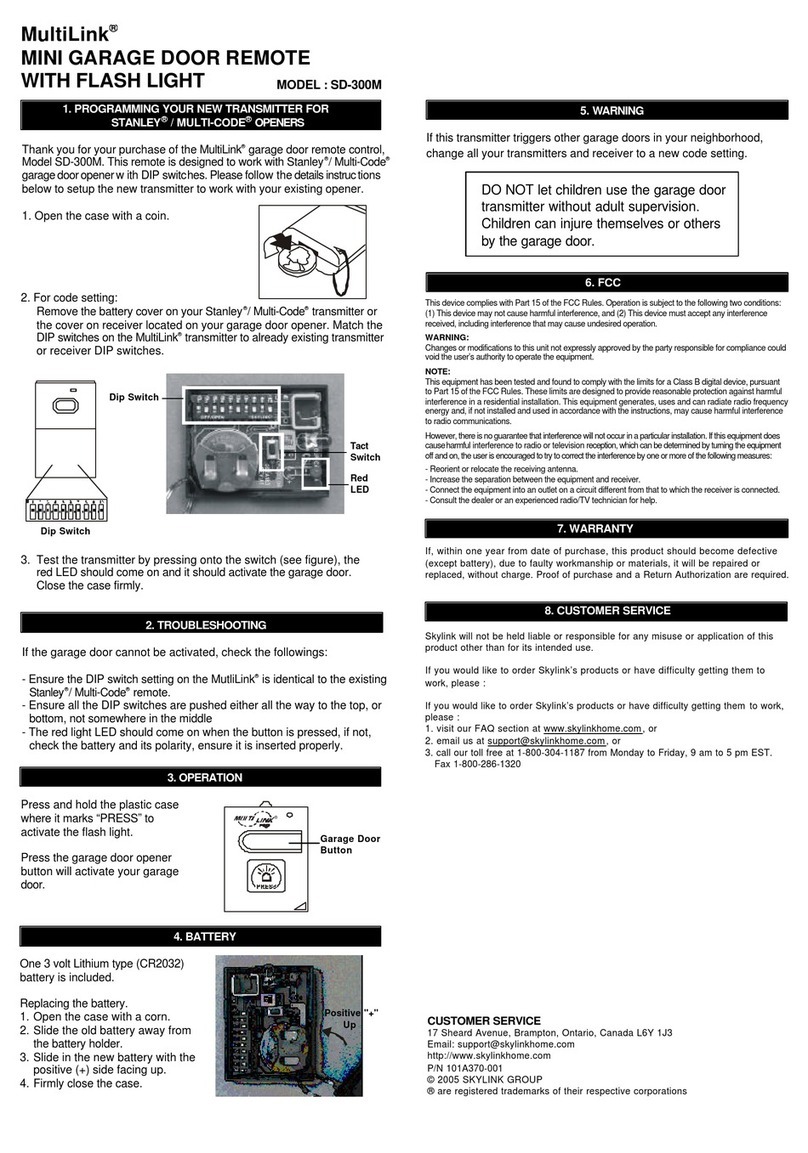
SkyLink 39 User manual

SkyLink

SkyLink 39 User manual

SkyLink MT-18 User manual

SkyLink

SkyLink MT-18 User manual

SkyLink MF-1 User manual

SkyLink

SkyLink MF-1 User manual

SkyLink GT-110 User manual

SkyLink

SkyLink GT-110 User manual

SkyLink 838A User manual

SkyLink

SkyLink 838A User manual

SkyLink MultiLink CG5 Guide User manual

SkyLink

SkyLink MultiLink CG5 Guide User manual

SkyLink 4B-101 User manual

SkyLink

SkyLink 4B-101 User manual

SkyLink EM-102 User manual

SkyLink

SkyLink EM-102 User manual

SkyLink G6MR User manual

SkyLink

SkyLink G6MR User manual

SkyLink G6K User manual

SkyLink

SkyLink G6K User manual

SkyLink GBRV Guide User manual

SkyLink

SkyLink GBRV Guide User manual

SkyLink TC-318-10 User manual

SkyLink

SkyLink TC-318-10 User manual

SkyLink 18TR User manual

SkyLink

SkyLink 18TR User manual

SkyLink Wave SoundTouch User manual

SkyLink

SkyLink Wave SoundTouch User manual

SkyLink LK-318-1 User manual

SkyLink

SkyLink LK-318-1 User manual

SkyLink MM-318-2 User manual

SkyLink

SkyLink MM-318-2 User manual

SkyLink G6T3 User manual

SkyLink

SkyLink G6T3 User manual

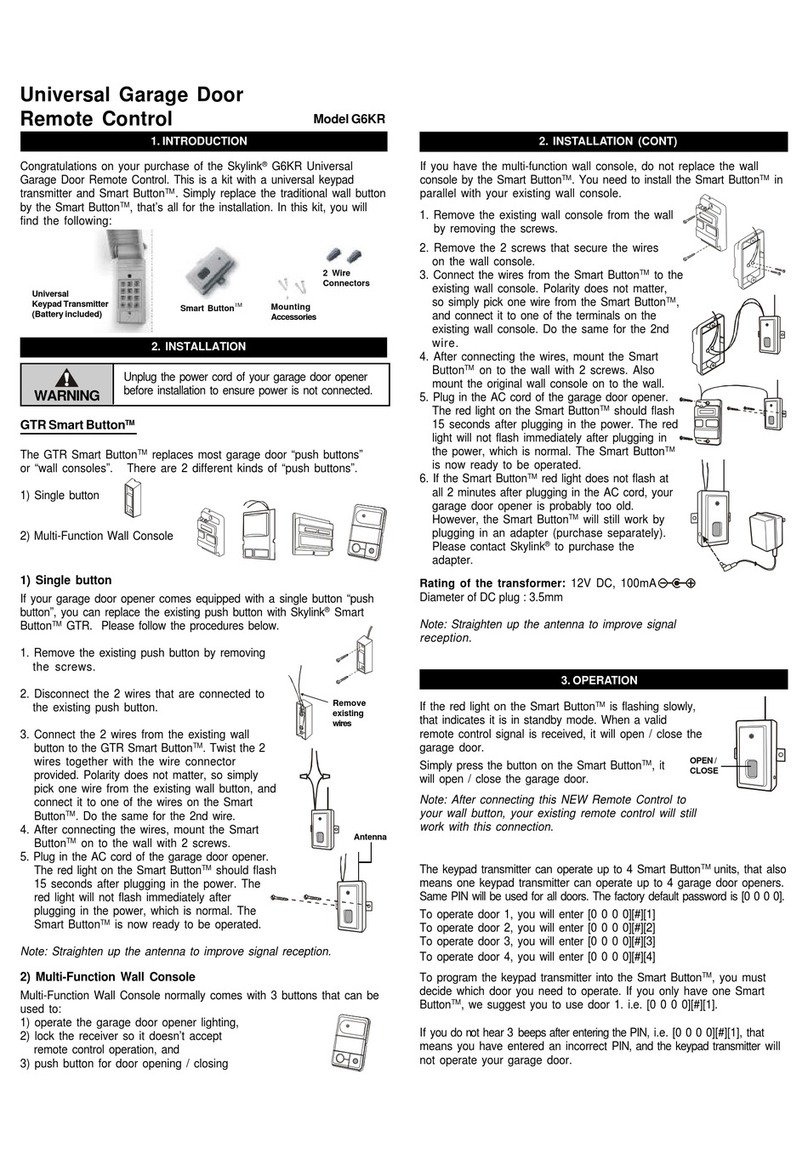
SkyLink G6KR User manual

SkyLink

SkyLink G6KR User manual

SkyLink MM-318-1 User manual

SkyLink

SkyLink MM-318-1 User manual

SkyLink MultiLink CD-390M Guide User manual

SkyLink

SkyLink MultiLink CD-390M Guide User manual

SkyLink G6KR Guide User manual

SkyLink

SkyLink G6KR Guide User manual

SkyLink TC-318-1 User manual

SkyLink

SkyLink TC-318-1 User manual

Popular Remote Control manuals by other brands

Faber GV60TT/10 user manual

Faber

Faber GV60TT/10 user manual

KVH Industries TracVision R6 DX quick start guide

KVH Industries

KVH Industries TracVision R6 DX quick start guide

RCA RCRPS04GR Guía de inicio Rápido

RCA

RCA RCRPS04GR Guía de inicio Rápido

URC MX-890 instructions

URC

URC MX-890 instructions

Sony RM-AV3000 Quick reference guide

Sony

Sony RM-AV3000 Quick reference guide

Philips SRP6207/27 user manual

Philips

Philips SRP6207/27 user manual

Huxley Skitter Guide

Huxley

Huxley Skitter Guide

GRAUPNER MX-12 - PROGRAMMATION Programming manual

GRAUPNER

GRAUPNER MX-12 - PROGRAMMATION Programming manual

Bush Remote Control quick guide

Bush

Bush Remote Control quick guide

Sony Cloud Remote instruction manual

Sony

Sony Cloud Remote instruction manual

Muller licht Tint 404022 instruction manual

Muller licht

Muller licht Tint 404022 instruction manual

JR ProPo XG6 Operation manual

JR ProPo

JR ProPo XG6 Operation manual

Cotek CR5 user manual

Cotek

Cotek CR5 user manual

Universal Remote Control Easy Clicker UR3-SR operating manual

Universal Remote Control

Universal Remote Control Easy Clicker UR3-SR operating manual

Universal Remote Control UR5U-8720L operating instructions

Universal Remote Control

Universal Remote Control UR5U-8720L operating instructions

Elko RF Pilot user manual

Elko

Elko RF Pilot user manual

LG PREMTB001 Owners and installation manual

LG

LG PREMTB001 Owners and installation manual

Dish Network Hopper with Sling Getting started

Dish Network

Dish Network Hopper with Sling Getting started

manuals.online logo
manuals.online logoBrands
  • About & Mission
  • Contact us
  • Privacy Policy
  • Terms and Conditions

Copyright 2025 Manuals.Online. All Rights Reserved.