SKYLUX Cintralux alu 25 mm User manual

BARREL VAULTS
Cintralux®alu 25 mm
Mounting instructions fixed parts for flat curb
EN
Art.N° 62822
E_MH_Mounting_instructions_Skylux_Cintralux_Alu_25mm_fixed_parts_flat_curb 01/04/2020
2/20
Safety
Take the necessary and required safety precautions, such as safety nets and lifelines when installing from the
outside, safety goggles, gloves, hard hat, etc.
Do not step on the glass.
Falling from height
• When using ladders to go on the roof:
- Ladder in good condition?
- Set up correctly at an angle of 75°?
- Secured below and on top against moving?
- Don’t take heavy material with you on the ladder (3-point contact rule)! If possible,
use a crane to lift the material.
• Do not lift material over the roof edge; use a crane to put the material on the roof.
• Roof zone: make sure the part of the roof where the skylight/barrel vault will be installed is
safe enough, e.g. secure the edge (support system in the roof gutter that supports against the
outer wall of the building, with suitable A B C categorie depending on the roof pitch) or use a
scaffold so no one can fall off the roof. If the roof is not safe enough, always use a harness with
lifeline (adapted to the fall height), attached to a suitable attachment point.
•Make sure the roof is stable and does not have dangerous openings or insufficient secure parts
(e.g. corrugated sheets, …). Take the necessary measures if this is not the case: strengthen,
use suitable safety nets below the danger zones, …
• Before making the roof opening for the skylight/barrel vault: make sure there are safety nets
conform to the current legislation. The nets must be attached firmly and sufficiently to the
building.
•When using an aerial work platform: always wear and secure your harness (mandatory)! Leaving
the cage is forbidden.
• Never walk backwards on a roof, always walk forwards.
• Make sure there’s enough light in the working zone.
Low-hanging obstacles and falling loads
• Forbidden to walk under or within a radius of 1 m of a hanging or lifted load.
• Demarcate the danger zone below the skylight/barrel vault, in the building as well as on the
outside near the outer walls (in case material slides off the roof). If the zone is demarcated,
people cannot be hit by any falling loads. It’s prohibited to enter these danger zones during
construction.
Crushing hazard
• All working tools are in good condition, provided with a valid CE label and all necessary safety
regulations. These cannot be removed.
• People who use these working tools are educated for this purpose. Protections are always
present on all working tools. They are in good condition and need to be set correctly.
Tripping/falling
•Safety is key and it begins with order and tidiness. Clean everything immediately, leave nothing
lying around.
• Trash needs to be sorted.
• Be cautious with electric cables (danger of tripping/falling). Never walk backwards!
• Make sure there’s enough light in the working zone.

01/04/2020 3/20
E_MH_Mounting_instructions_Skylux_Cintralux_Alu_25mm_fixed_parts_flat_curb
Sharp objects
• Make sure your fingers/hands are not pinched and watch out for cuts while handling skylights
or barrel vaults.
• Be careful where you put your hands during the installation.
• Wearing cut-resistant gloves is mandatory.
Ergonomics
• Always lift loads correctly: bend your knees, move your feet instead of forcing your spine, lift
as close to your body as possible.
• Parts of more than 25 kg must be lifted with at least 2 persons.
Personal protective equipment
• Work clothes, safety shoes and helmet are mandatory for everyone.
• Lifeline and harness are mandatory if the edge is not secured enough or if there are no safety nets below the
roof opening. They are also necessary when using an aerial working platform.
• Use gloves when handling skylight or barrel vault parts.
• BSafety glasses and hearing protection are mandatory when using saws / grinders.
Always perform a Last Minute Risc Analysis!
If in doubt: STOP! Do not take unnecessary risks. Ask your supervisor if needed.

E_MH_Mounting_instructions_Skylux_Cintralux_Alu_25mm_fixed_parts_flat_curb 01/04/2020
4/20
SAFETY p. 2
PRIOR INSPECTION p. 5
OVERVIEW OF PROFILES AND ACCESSORIES p. 7
OUTLINE DRAWING OF CINTRALUX ALUMINIUM
25 MM FIXED PARTS FLAT CURB p. 8
ASSEMBLY SEQUENCE OF FIXED PARTS
CINTRALUX ALUMINIUM 25 MM FLAT CURB p. 8
ASSEMBLY OF CINTRALUX ALUMINIUM 25 MM
FIXED PARTS FLAT CURB p. 9
MAINTENANCE p. 18
SNOW AND WIND LOAD p. 18
WARNINGS p. 19
SAFETY DURING ASSEMBLY p. 19
PHYSICAL PROPERTIES MULTILAYERED SHEETS p. 19
Table of contents

01/04/2020 5/20
E_MH_Mounting_instructions_Skylux_Cintralux_Alu_25mm_fixed_parts_flat_curb
Warnings and safety
See p. 17 of these instructions.
Prior inspection
a. Curb
Before the barrel vault can be mounted, the customer must provide a suciently strong curb that must retain its
shape (if necessary, reinforced with tie beams) and with roof covering. To guarantee stability, a calculation must be
made by an architect or engineering oce. The maximum roof pitch is 5°. Before getting started with mounting,
check whether the following specifications have been met:
• Material: wood / galvanized steel min. thickness of 3 mm (*)
If the curb is in concrete, a wooden batten of at least 48 x 60 mm must be firmly anchored into the
concrete with countersunk and appropriate screws in advance. The wooden batten must also be covered
with roof covering. The agreed dimensions must be strictly observed.
• Height above finished roof: min. 200 mm
• Min. finished thickness: 65 mm
• Max. finished thickness: 100 mm
• The top flange and the curb must share the same thickness. Insulation may not protrude or be thinner than
the top flange.
• The upper flanges on each of the 4 sides must be on the same plane!
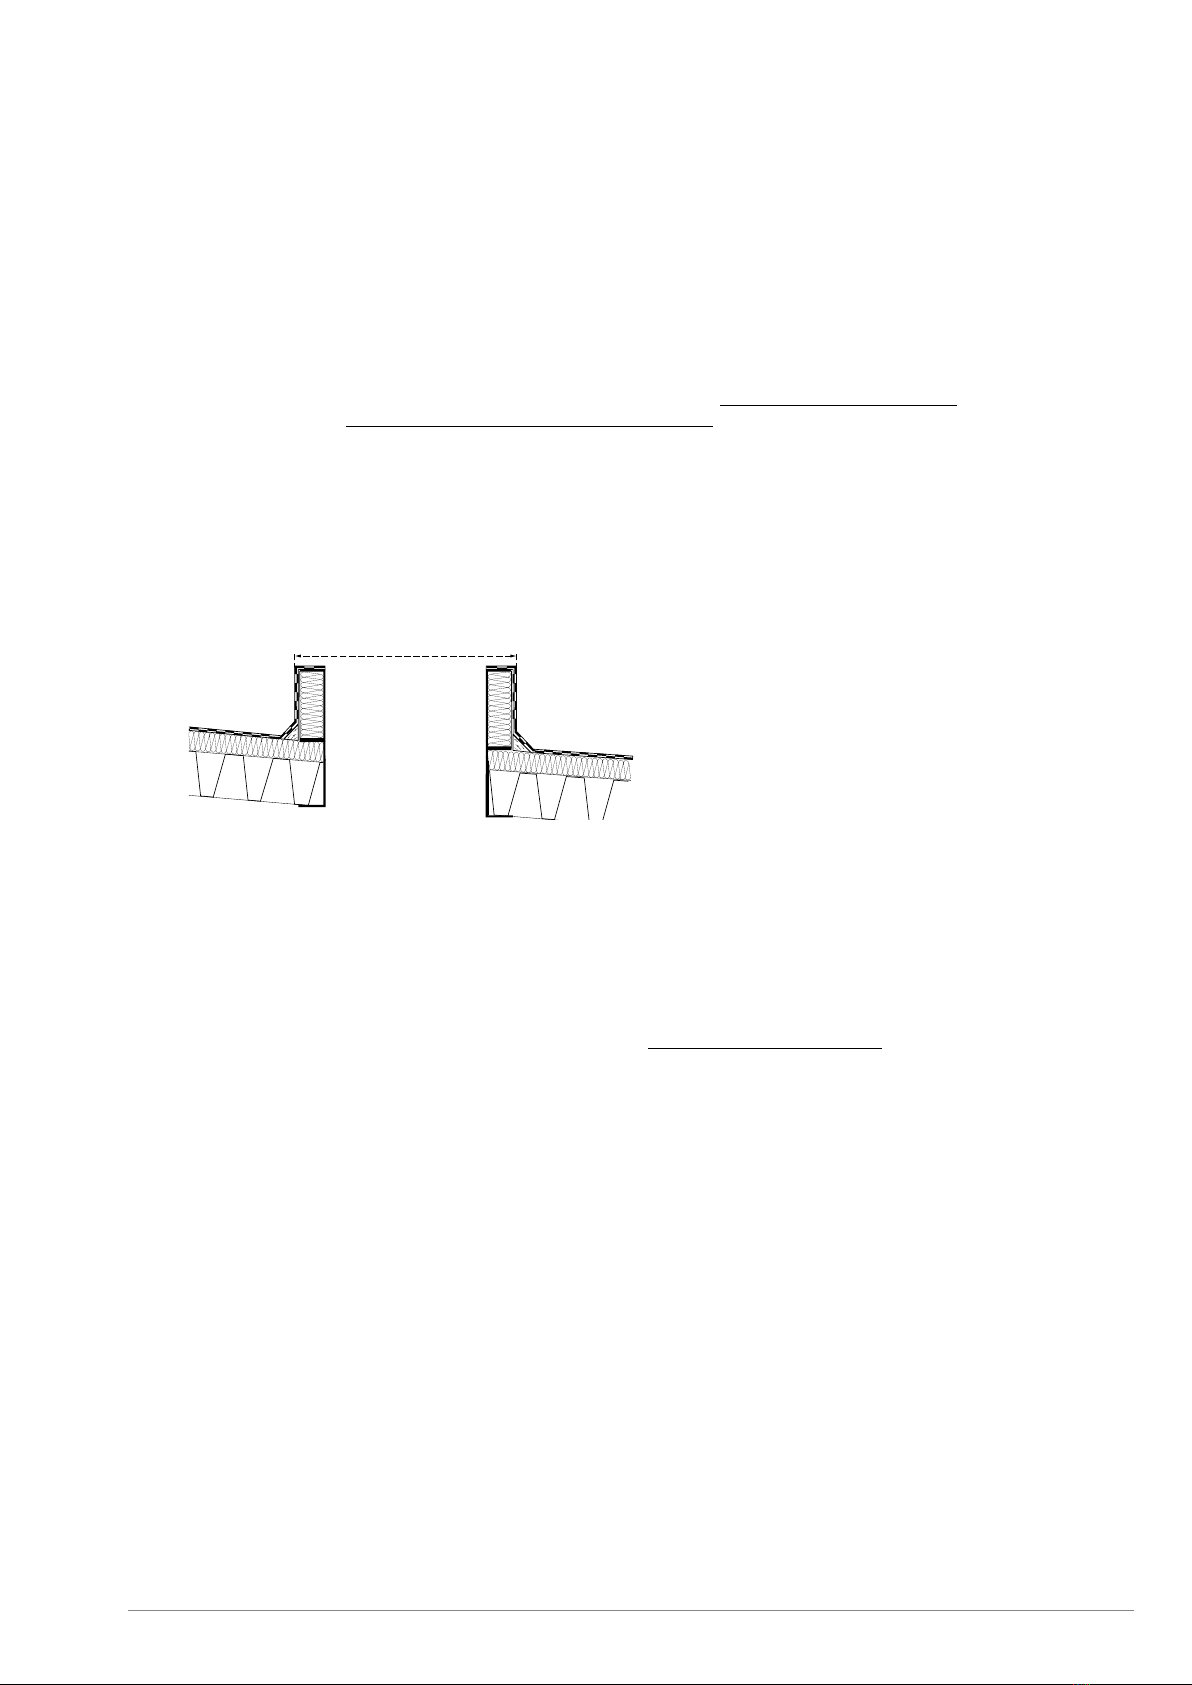
• Curb construction must be unobstructed on all sides: neither of the two curbs may go further at the
corner of the longitudinal side and on the end side of the curb.
Flat curb:
(*) to be calculated depending on the lateral forces
• Slope top flange:
- barrel vault at right angles to the roof ridge: perpendicular to the roof surface (follow roof pitch)
- barrel vault parallel to the roof ridge, 2 options:
o Horizontally: both sides must be of the same height, levelled (i.e. lower side of the curb must
protrude higher above the roof surface than the uppermost side). The top flange may protrude
slightly, up to a max. of 2°.
o It’s also possible to follow the roof pitch (up to max. 5°).
max. 5°
min. 65
max. 100
min. 3
min. 100
min. 200
(*)
E_MH_Mounting_instructions_Skylux_Cintralux_Alu_25mm_fixed_parts_flat_curb 01/04/2020
6/20
• Durability: must be able to withstand the horizontal and vertical loads. See Eurocodes and our technical
sheet to determine the maximum force on the curb. Consult your architect or engineering oce.
• Deformation: maximum 5 mm at the maximum horizontal load on the curb. Ensure that there are enough
anchors for this provided on top of the curb. Consult your architect or engineering oce.
Skylux does not guarantee curb stability as this is the responsibility of the client.
b. Dimensions
The barrel vault is made to customer specifications. It’s for this reason that the curb’s overall length and width
(roof covering included) must perfectly conform with the dimensions ordered at all points of the barrel vault. Look
for the narrowest and broadest spot* and measure the minimum and maximum overall width.
Permissible tolerances with respect to the size ordered:
Width: Min: -2 cm
Max: +1 cm
Length: ± 0,05 % (± 5 cm for a length of 100 m)
The barrel vault could possibly still be shortened in length on site, but try to avoid this.
Check the straightness* (±1 cm/5 m), parallelism* (±1 cm/5 m) and squareness (± 1°).
Check the agreed correct measurements of the curb in advance (overall sizes - including roof covering).
Also check whether the curbs run parallel in a row of two, verify the squareness and see whether the top is flat
and smooth. Clean it in advance, if necessary, and remove sawdust, irregularities, etc.
* Tighten a rope on both sides of the curb (or use lasers). Find the average position of the curb edge to tighten the rope. This rope
will also be used later to mount the lateral profiles nicely aligned with each other.
Important: should one of these specifications fail to be met, then mounting must not take place. Should you
nevertheless assemble the unit, it may have an adverse eect on several dierent parameters (stability, air and
water tightness, etc.), thus rendering any guarantee null and void.
c. Glazing and arches
- The glazing panels are only clamped to allow the expansion and contraction as a function of fluctuations in
temperature. The system is designed to render any silicone or rubber seals between the aluminium and glazing
redundant (and even strongly discouraged).
- All profiles and glazing panels (with the exception of the end piece retainer sheets) are custom-made, pre-bent,
pre-drilled and screw thread tapped.
- Be careful with the exposed UV-protected top side of the sheets (glazing).
- As a last step, do not forget to remove the protective film from the glazing sheets.
d. Sealing
Install the roof cladding according to the manufacturer’s specifications. The curb must be clad up to the daylight
size. If the barrel vault is obstructed, meaning that it is adjacent to one or more walls, the connection must
be vertical and flat. This can be done by means of a lead flashing. Before assembling: clean, remove sawdust,
irregularities, etc.
Amax + 1 cm
min - 2 cm

01/04/2020 7/20
E_MH_Mounting_instructions_Skylux_Cintralux_Alu_25mm_fixed_parts_flat_curb
Overview of profiles and accessories
Profiles
LP725 Bottom profile end piece
+ foam sealant 8 x 10 mm
LP125 Lateral profile for flat curb
+ foam sealant 15 x 15 mm
LP525 Bottom arch
LP025 Finishing profile
LP502 Top arch
LP512 Side top arch
LP726 End piece retainer profile
VPGDGL Arch stabiliser
Accessories
46577 Bracket for flat curb
36187 Screw with neoprene seal
Ø 6.5 x 50 mm
15441 Hexagon-end piece tapping bolt
M8 x 60
SPC25X6 PC 25 mm
46573
End cap
47471 End cap on end piece
46580 Lateral profile connector
47475 Corner sheet
22433 Self-tapping screw
4.2 x 16 mm
14416 BB25 tape

E_MH_Mounting_instructions_Skylux_Cintralux_Alu_25mm_fixed_parts_flat_curb 01/04/2020
8/20
Outline drawing of Cintralux aluminium 25 mm
fixed parts - flat curb
Assembly sequence of fixed parts Cintralux aluminium
25 mm - flat curb
1. Bottom profile end piece
2. Lateral profile
3. Bracket
4. Bottom arch
5. Arch stabilisers
6. Multi-walled PC panel 25 mm
Aluminium top arch PC cellular sheet 25
Aluminium bottom arch
Aluminium lateral
profile
Aluminium
end cap
Aluminium lateral profile
Roof cladding
(not supplied)
Foam
sealant Curb min. 65 mm (not supplied)
Roof opening =
daylight opening
Span (including roof cladding)
7. Top arches
8. Multi-walled PC end piece retainer sheet 25 mm
9. End piece retainer profile
10. Side top arch
11. Corner sheets
12. Checking arch tension
1
2
3
4
6
7
5
10
9
8
11

01/04/2020 9/20
E_MH_Mounting_instructions_Skylux_Cintralux_Alu_25mm_fixed_parts_flat_curb
Assembly of Cintralux aluminium 25 mm
fixed parts - flat curb
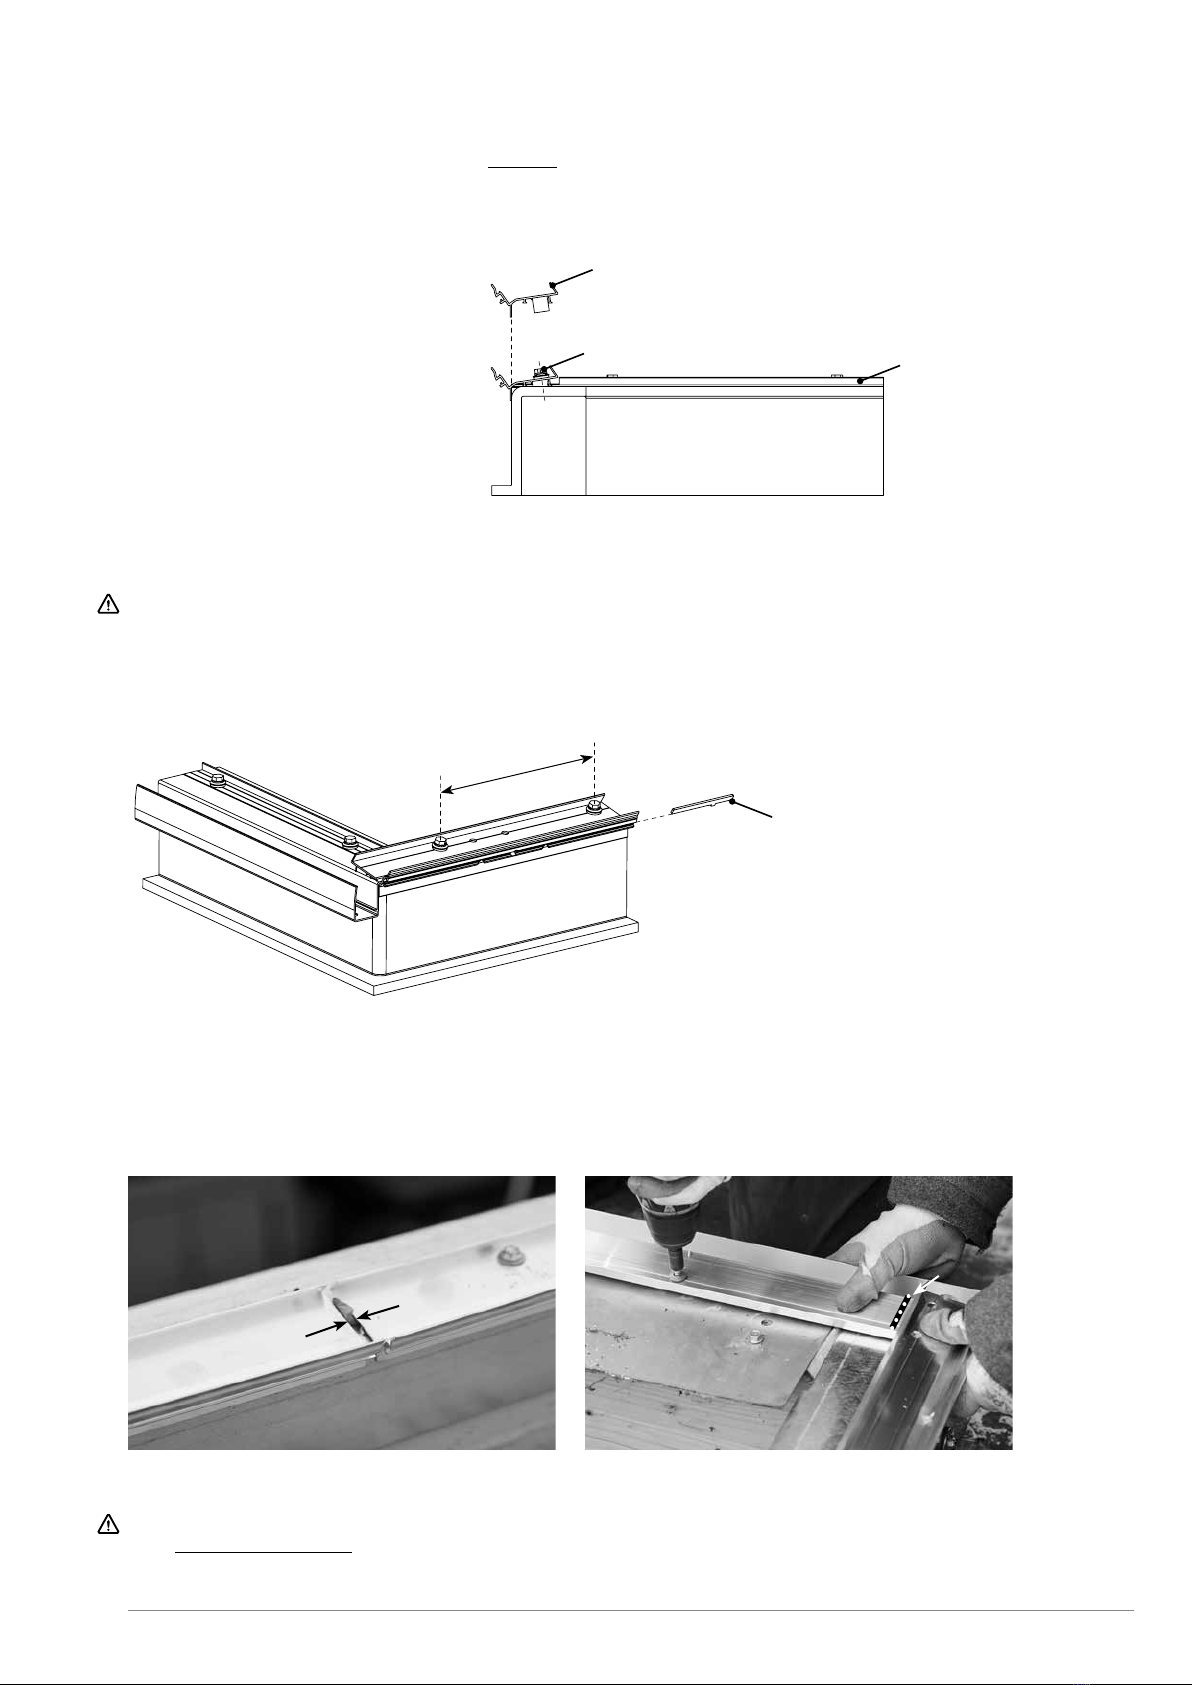
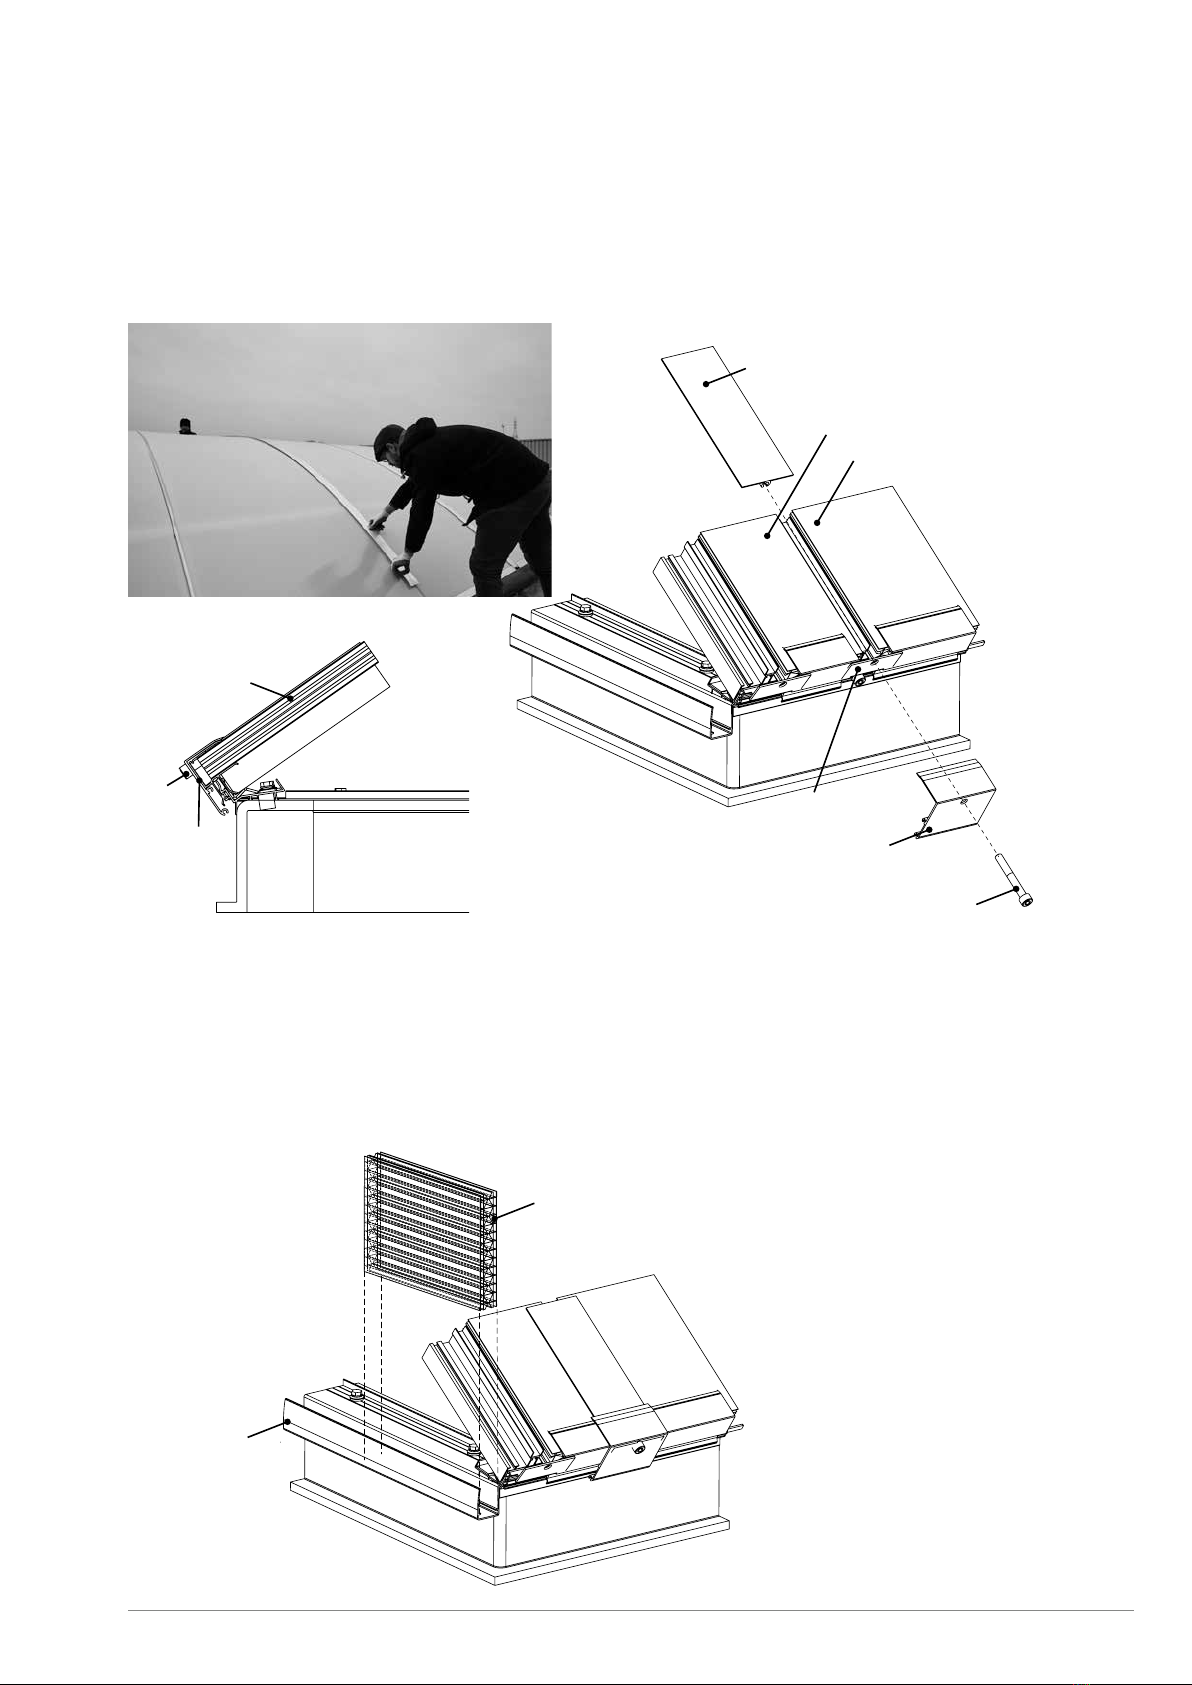
1. Bottom profile end piece
First position the two bottom profile end pieces LP725 with foam sealant 8 x 10 mm onto the ends of the barrel
vault curb and only then the first flat curb lateral profile LP125.
Align profile LP725 with rope or a laser using the long side of the finished curb.
Screw the bottom profile end piece LP725 onto the curb with the screws supplied (Ø 6,5 x 50 mm with neoprene
seal) in the holes provided, each time with two brackets and with a spacing of max. 500 mm. For this, use the
screw line provided in the bottom profile end piece LP725.
Important: always use the right screws depending on the type of curb (metal screws for a metal curb, wood screws
for wood, etc.).
Measure the curb width. If this corresponds with the ordered size, 1 cm play will be provided between the curb and
the bottom profile end piece.
Aligning:
2. Lateral profile
Position the lateral profiles for flat curb LP125 at the location of the long sides. Lay all lateral profiles in one line
on the long side (use a rope for this).
The lateral profiles for flat curb LP125 will come at the ends on top of the bottom profiles end piece LP725. (There
is a small overlap with the profiles here.)
Aligning:
Align the first lateral profile LP125 up to the
U-shape of the bottom profile end piece LP725.
Make sure that the lateral profile LP125 just
meets the PC end piece retainer sheet.
Roof cladding
Screw
LP725
Bottom profile end piece
500
Align with the ends of the finished curb
LP725
Bottom profile end piece
LP125
Lateral profile for flat curb
Align
(with play ± 1 cm)
LP125
Lateral profile for flat curb
+ foam sealant 15 x 15 mm
Screw
Ø 6,5 x 50 mm
Small profiles overlap
Screw with neoprene seal
Ø 6,5 x 50 mm
LP725
Bottom profile end piece
+ foam sealant 8 x 10 mm
Finished curb at the end of
the barrel vault
Finished curb on the long
side of the barrel vault
E_MH_Mounting_instructions_Skylux_Cintralux_Alu_25mm_fixed_parts_flat_curb 01/04/2020
10/20
Aligning:
Align the vertical edge of the lateral profile of flat curb LP125 with
the outside of the finished long side of the curb.
Screw the lateral profile for flat curb LP125 onto the curb with the screws supplied (Ø 6,5 x 50 mm with neoprene
seal), with a spacing of 500 mm, each time between two brackets. For this, use the screw line provided in the
lateral profile LP125.
Important: always use the right screws depending on the type of curb (metal screws for a metal curb, wood screws
for wood, etc.).
Several lateral profiles are linked together by means of connector 46580, which is already clamped in the lateral
profiles.
The connector also ensures a play of 5 mm (± 2 mm) between the lateral profiles.
Seal the seams between the lateral profiles LP125 so that water dripping onto the lateral profile cannot seep
inside.
Seal the corners (where lateral profile LP125 and
bottom profile end piece LP725 come together)
After that, mount the lateral profiles LP125 in the same way on the other side of the long side of the curb.
Important: ensure that the lateral profiles LP125 lie perfectly two by two in parallel and are connected to each
other at the correct distance, so that an equal daylight opening is obtained everywhere.
LP125
Lateral profile for flat curb
+ foam sealant 15 x 15 mm
Screw Ø 6.5 x 50 mm LP725
Bottom profile end piece
+ foam sealant 8 x 10 mm
46580
Front lateral profile connector
500
aitten
5 mm
01/04/2020 11/20
E_MH_Mounting_instructions_Skylux_Cintralux_Alu_25mm_fixed_parts_flat_curb
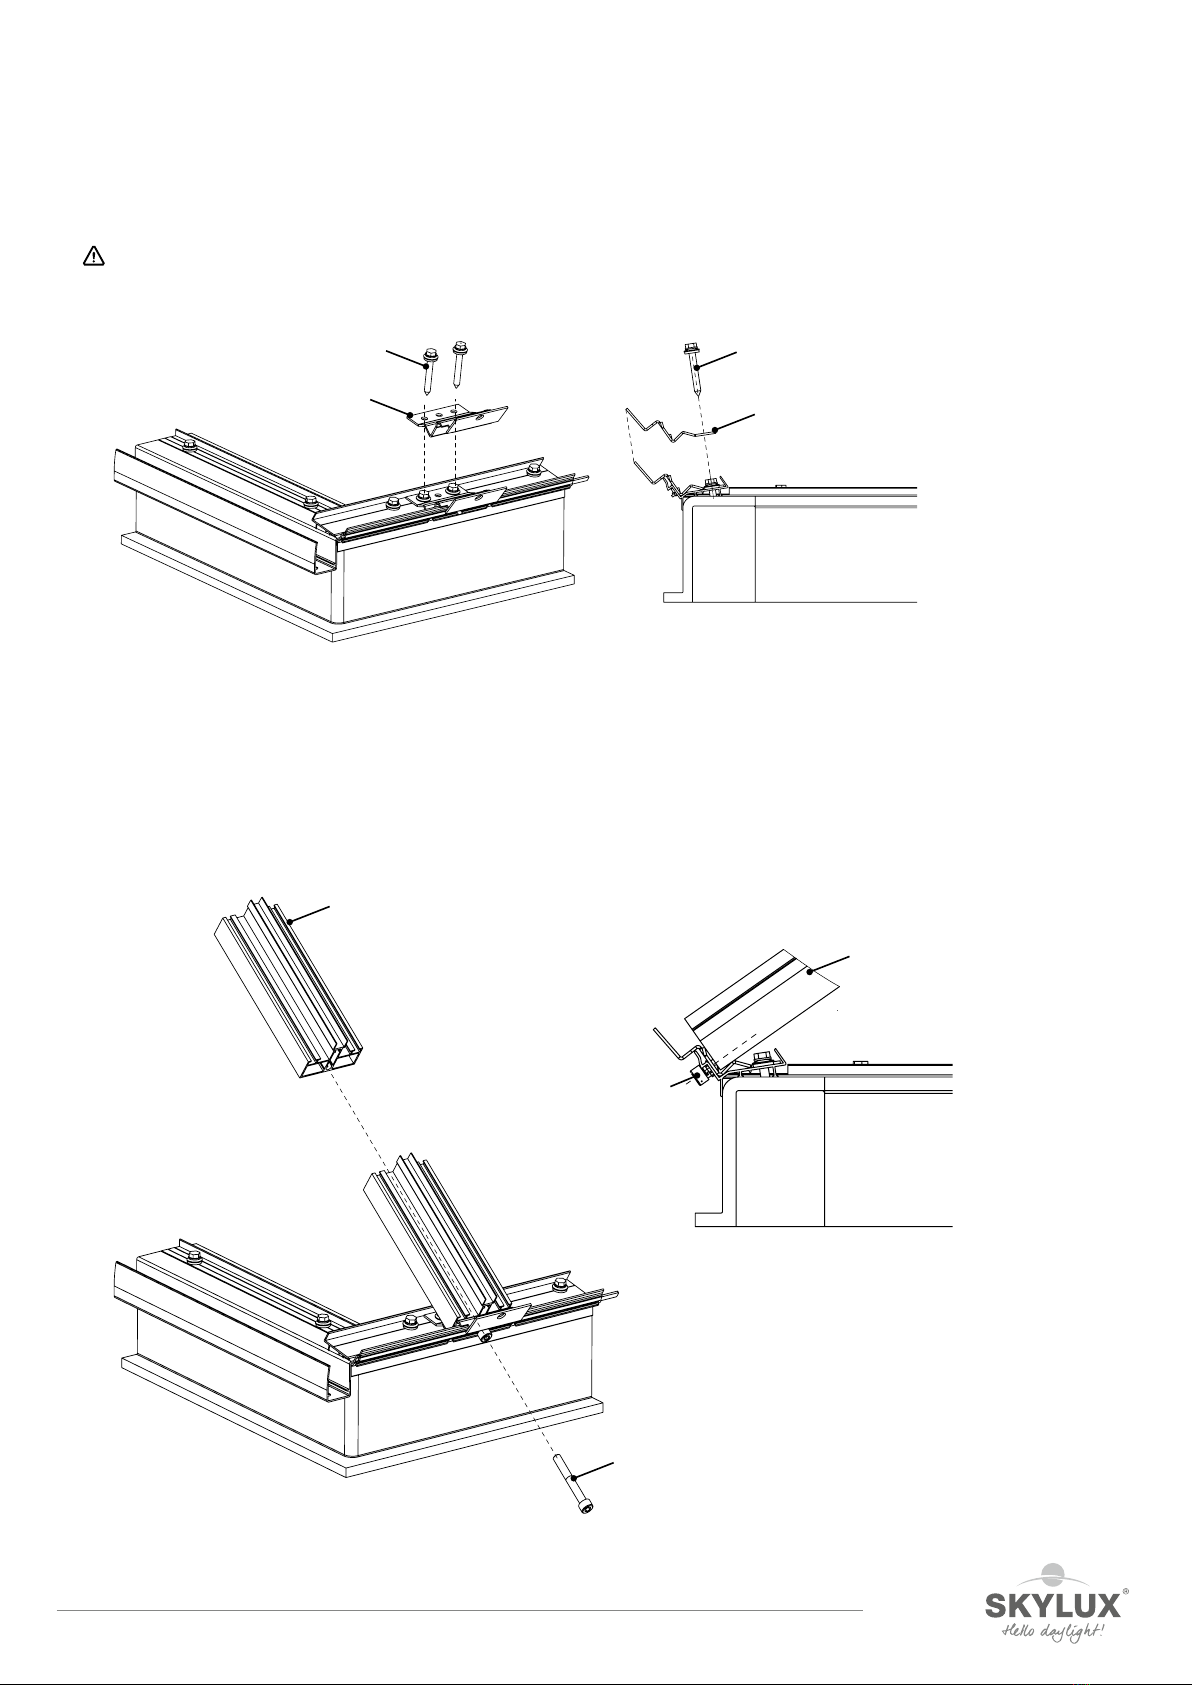
3. Bracket
Place the bracket for flat curb 46577 on lateral profile LP125 and screw it tight in the pre-drilled holes with the
two screws supplied (Ø 6.5 x 50 mm with neoprene seal 36187).
Important: at the location of the filler panels, the distance between the brackets will be less (than where full sheet
widths are to come).
4. Bottom arch
Place the pre-bent bottom arch LP525 at the location of bracket 46577 and tighten using the bolts supplied M8
x 60 mm. Each bottom arch LP525 is fixed like this to the two ends of both lateral profiles LP125 by means of
brackets 46577.
Screw
Ø 6,5 x 50 mm
46577
Bracket for flat curb
Screw
Ø 6,5 x 50 mm
46577
onderbeugel
Bracket for flat curb
LP525
Bottom arch
Bolt
M8 x 60
LP525
Bottom arch
Bolt
M8 x 60

E_MH_Mounting_instructions_Skylux_Cintralux_Alu_25mm_fixed_parts_flat_curb 01/04/2020
12/20
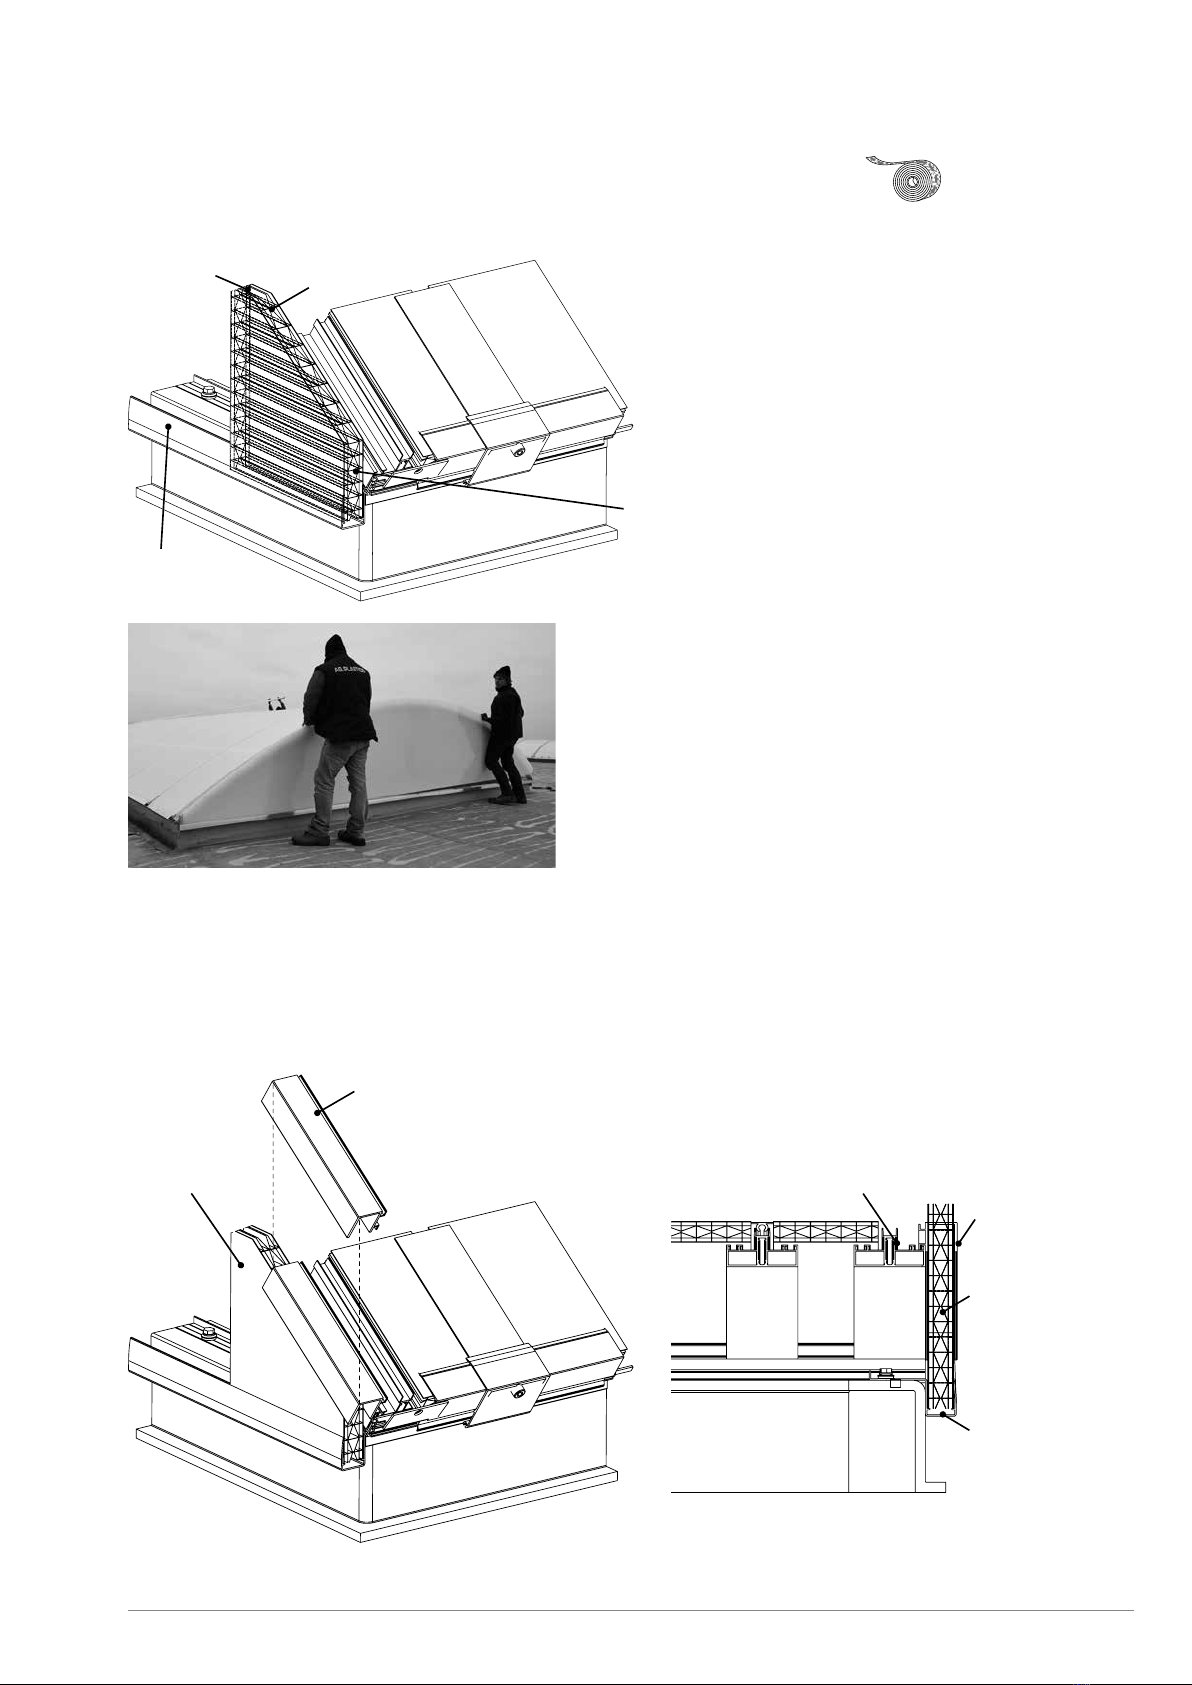
5. Arch stabiliser
Place the arch stabilisers VPGDGL between the bottom arches LP525 and hook them behind the screw.
The shortest arch stabilisers are placed at the filler panels.
For narrow barrel vaults with up to a 5 m span:
Always place an arch stabiliser VPGDGL at the location
of the first two sheets; seen from the end pieces. In this
way, the barrel vault will have a total of eight arch holders.
6. Multi-walled polycarbonate panel 25 mm
Remove the protective film from both sides of PC panel SPC25X6, just before assembly and place the multi-
walled 25 mm PC panel with the UV side facing upwards.
There are three types of PC panels 25 mm X6:
- full panel widths (1050 mm), cut to size
- narrower panel widths (< 1050 mm), cut to size filler panels)
- end piece retainer sheets, cut to size exactly and accurately (in accordance with the barrel vault arc of circle) -
see page 12 ‘End piece retainer sheet’
First push the PC panel 25 mm (with the UV side facing outwards) in the finishing profile LP025. Do this at both
ends of the panel. Centre the finishing profile with respect to the panel.
For wider barrel vaults with a span > 5 m:
Always place an arch stabiliser VPGDGL between all
bottom arches LP525; and do this on both sides of the
barrel vault.

01/04/2020 13/20
E_MH_Mounting_instructions_Skylux_Cintralux_Alu_25mm_fixed_parts_flat_curb
Take hold of this panel with the finishing profile LP025 and CLIP the feet over the lateral profile LP125, between
the bottom arches LP525. Bend the panel over the bottom arches LP525 and also clip the other side of the panel
with the finishing profile LP025 to the other lateral profile LP125.
Clips
Full panel widths (1050 mm) are always used, with the exception of the outer edges of the barrel vault towards
the end pieces; where filler panels (sawn panel widths < 1050 mm) are used.
PC 25 mm
UV side facing upwards!
LP025
Finishing profile
Filler panel
PC 25 mm
UV side facing upwards!
LP025
Finishing profile
LP125
Lateral profile for flat curb
CLIPS
PC 25 mm
LP025
Finishing profile
LP025
Finishing profile
LP125
Lateral profile
CLIPS
E_MH_Mounting_instructions_Skylux_Cintralux_Alu_25mm_fixed_parts_flat_curb 01/04/2020
14/20
7. Top arches
Place the top arches LP502 on top of the PC panels; at the location of the bottom arches. Secure the top arches
LP502 by means of the end cap 46573 and the bolts M8 x 60 mm 15441 to the brackets 46577.
Do this at both ends of top arch LP502.
Pull this top arch until the aluminium top arch fits snugly against the multi-walled polycarbonate panel.
Do not fasten too tightly!
Wait a moment with placing the side top arches LP512, which will come at the ends of the barrel vaults.
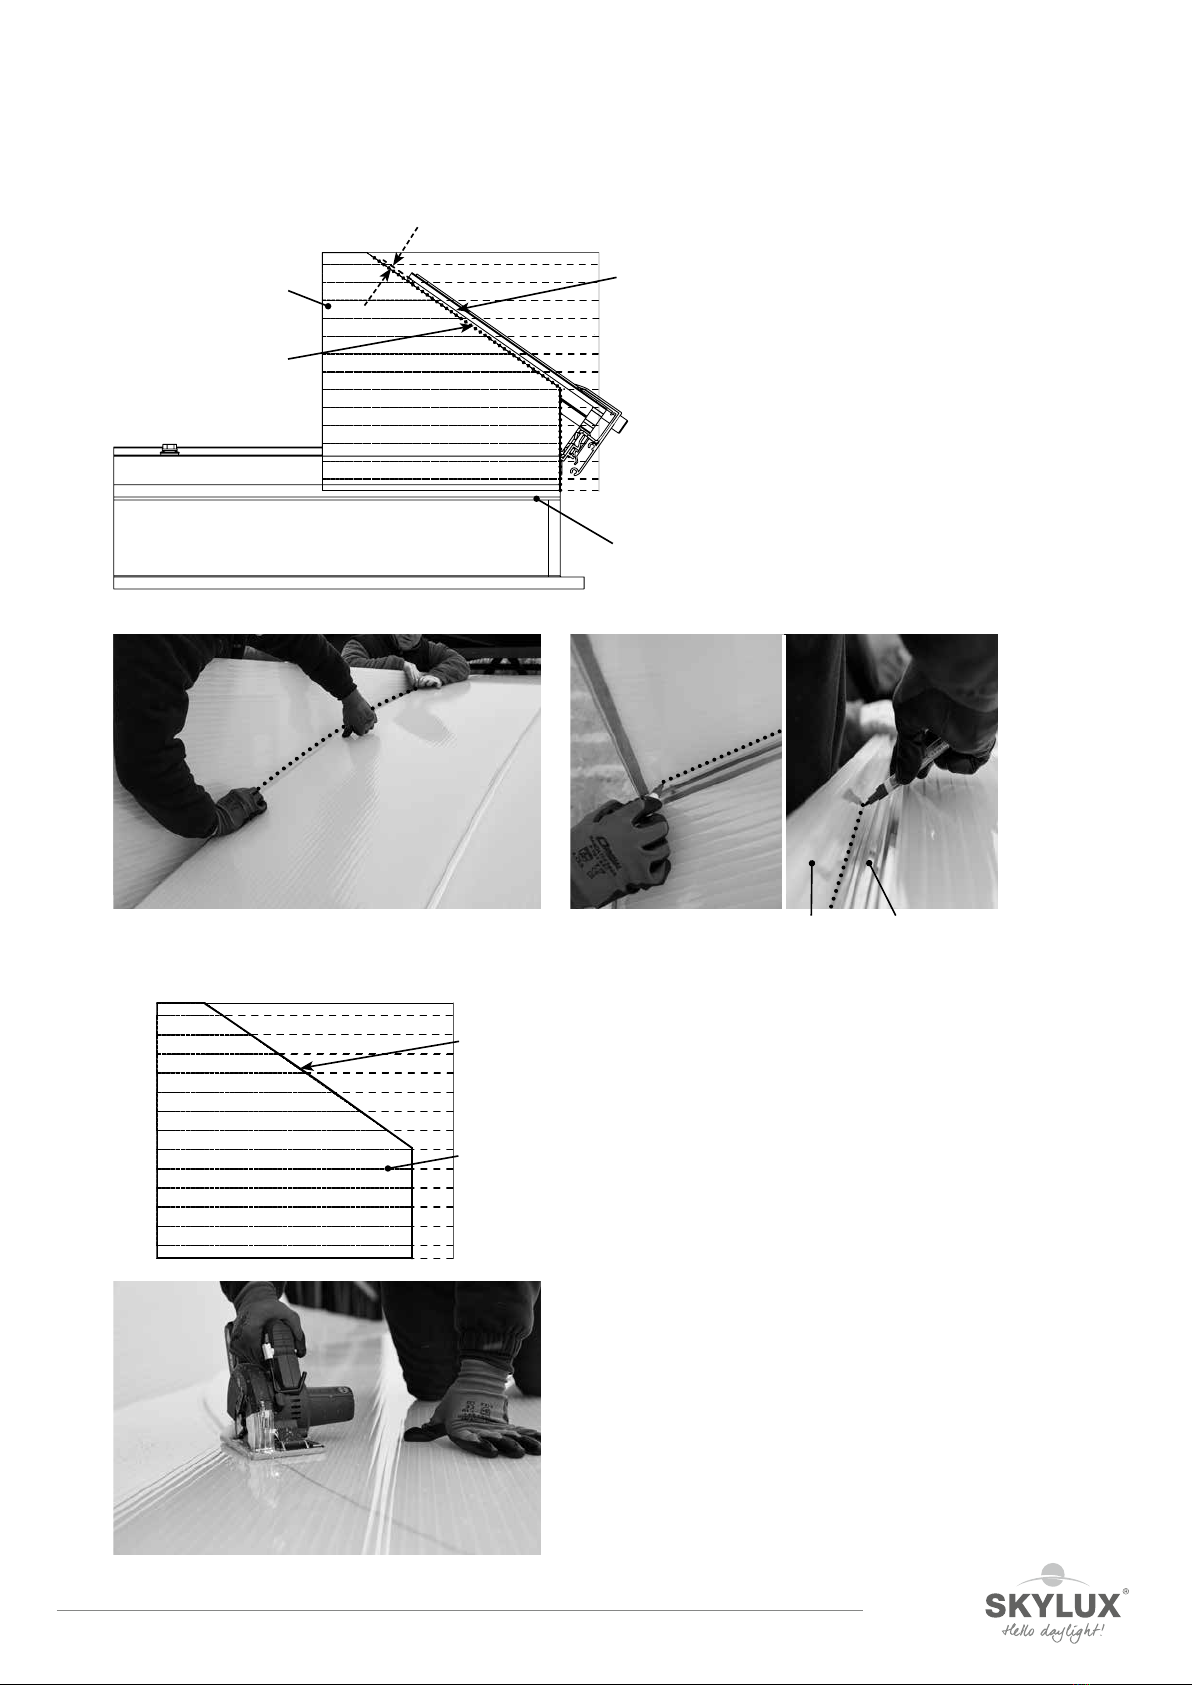
8. End piece retainer sheet
Place the multi-walled PC end piece retainer sheet 25 mm in the bottom profile end piece LP725 and make sure
that the UV side of the panel is facing the outside of the barrel vault. The end piece retainer sheet must be the
same length as the bottom profile end piece.
LP502
Bracket
Bolt
M8 x 60
46573
End cap
PC 25 mm end piece retainer
sheet with UV side facing
outwards
LP725
Bottom profile
end piece
LP502
Top arch
46573
End cap
46577
Bracket
Bolt
M8 x 60
Filler panel (< 1050 mm)
Full panel width (1050 mm)
01/04/2020 15/20
E_MH_Mounting_instructions_Skylux_Cintralux_Alu_25mm_fixed_parts_flat_curb
Mark o the saw line on the PC end piece retainer sheet 25 mm. The saw line of the rounding is 3 mm under the
top of the bottom arch LP525. Also mark o the tips of the bottom profile end piece LP725 on the 25 mm PC
end piece retainer sheet.
Remove the PC end piece retainer sheet 25 mm once more, and saw it o at the saw line.
PC 25 mm end piece retainer
sheet with UV side facing
outwards
Mark o the saw line
PC 25 mm end piece
retainer sheet
Top of bottom arch
LP525
3 mm
LP725
Bottom profile end piece
PC 25 mm
End piece
retainer sheet
Saw on the
marked line
PC end piece
retainer sheet
Bottom arch
LP525
E_MH_Mounting_instructions_Skylux_Cintralux_Alu_25mm_fixed_parts_flat_curb 01/04/2020
16/20
Remove the protective film from the PC end piece retainer sheet.
Blow the sawdust out of the grooves and tape up the sawed edges with the supplied BB25 tape.
Place the sawed panel back into the bottom profile end piece LP725.
Do this in the same way for the other end of the barrel vault.
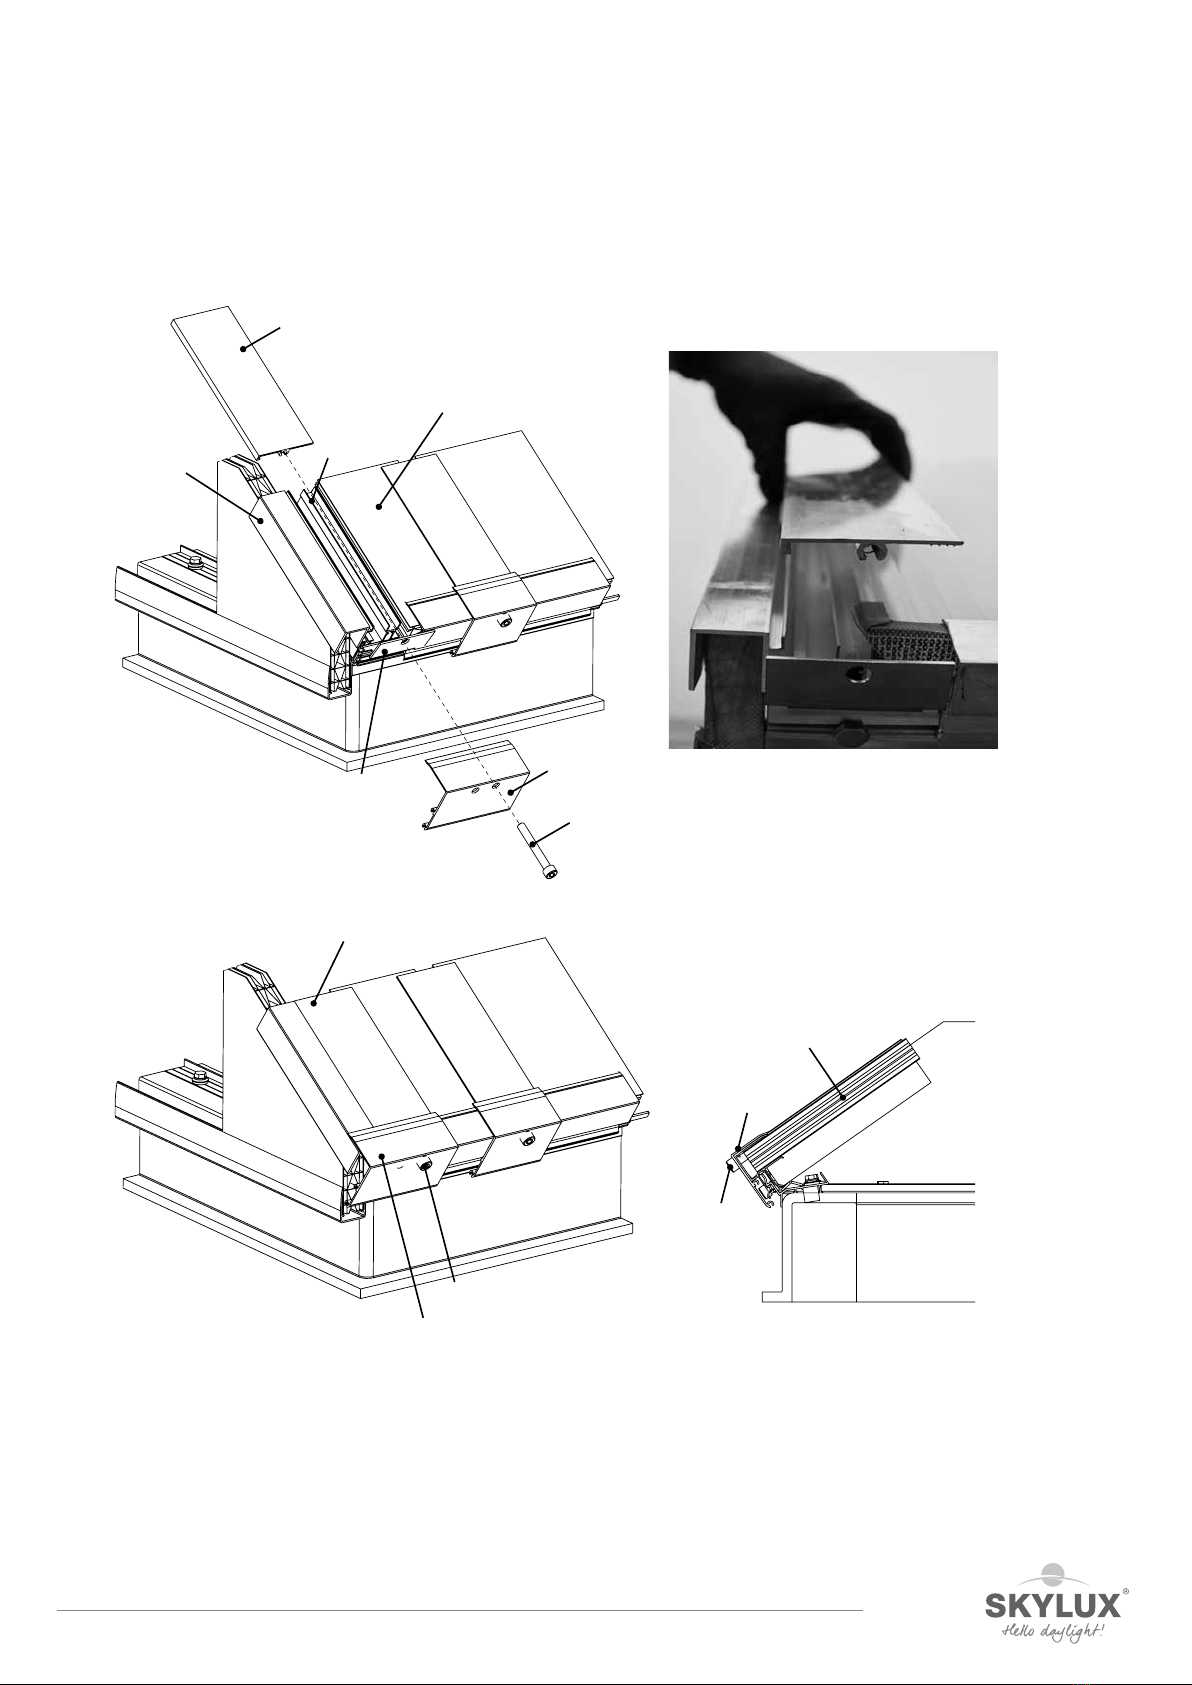
9. End piece retainer profile
Now place the end piece retainer profile LP726 on top of the sawn o PC end piece retainer sheet.
Do this in the same way for the other end of the barrel vault.
Sawn PC 25 mm end
piece retainer sheet
LP725
Bottom profile end piece
LP726
End piece retainer
profile
LP725
Bottom profile
end piece
Sawn PC 25 mm
end piece
retainer sheet
LP726
End piece
retainer profile
LP502
Bottom arch
LP725
Bottom profile
end piece
BB25 tape
BB25 tape
01/04/2020 17/20
E_MH_Mounting_instructions_Skylux_Cintralux_Alu_25mm_fixed_parts_flat_curb
10. Side top arch
Place the side top arches LP512 on top of the bottom arch LP525 at the location of the end piece. Secure the side
top arch LP512 by using the end cap of end piece 47471 LT825 on the ends of the arch and a bolt M8 x 60 mm
15441. The end cap of end piece 47471 fits over the bracket 4657. Tighten the bolts.
Do this in the same way for the other end of the barrel vault.
(Depending on the assembly on one or the other end of the barrel vault, the left or the right assembly hole in the
end cap on end piece 47471 is used.)
LP512
Side top arch
46577
Bracket for flat curb
LP525
Bottom arch
PC 25 mm
Filler panel
LP726
End piece
retainer profile
47471
End cap on
end piece
Bolt
M8 x 60 mm
LP512
Side top arch
M8 x 60 mm bolt
47471
End cap on end piece
47471
End cap on
end piece
LP512
Side top arch
Bolt
M8 x 60 mm

E_MH_Mounting_instructions_Skylux_Cintralux_Alu_25mm_fixed_parts_flat_curb 01/04/2020
18/20
11. Corner sheets
Finish the four corners of the barrel vault with the corner sheets 47475. Screw the corner sheet 47475 tight with
the three screws supplied 4.2 x 16 mm 22433.
12. Checking arch tension
Check that the top arches LP502 and side top arches LP512 are tensioned evenly at all points across the sheets.
Gently tighten the M8 x 60 mm bolts where needed.
Maintenance
The client must perform annual maintenance on the opening parts of the Cintramax and on the fixed parts of
the barrel vault. At minimum, this maintenance includes cleaning of the sheets with water and a light PH-neutral
soap. All fastenings must be checked and loose or damaged parts of the Cintramax must immediately be fixed or
replaced with original parts as described in the Cintralux ETA.
At least once a year the condensation drains (in the lateral profile, etc.) need to be cleared and the inside of the
lateral profile cleaned.
Snow and wind load
The barrel vaults are designed for normal wind and snow loads. For specific locations (seaside or very high
buildings > 12 m), this should always be specially calculated.
47475
Corner sheet
Screw
Ø 4,2 x 16 mm
47475
Corner sheet

01/04/2020 19/20
E_MH_Mounting_instructions_Skylux_Cintralux_Alu_25mm_fixed_parts_flat_curb
Warnings
Installers: installation should be performed by trained technicians with sucient knowledge of and experience in
the installation of barrel vaults.
Fixing materials: use suitable fixing material depending on the surface and the load. If in doubt, contact the screw
supplier or a specialised engineering firm. We supply fixing material that is suitable for most metal or wooden
surfaces, but this needs to be checked before starting the installation. Skylux is not responsible for the fixing
materials used.
Compatibility: only use polycarbonate-friendly materials. Avoid using silicone, polyurethane foam, detergents,
paints, varnishes, timber protectants, lubricants, insecticides, etc. A lead sheet may not come into contact with the
multi-layered sheets.
Covering: only cover the barrel vault (e.g. heat-deflecting eect) with canvas that does not contain softening
agents. It is not recommended to cover acrylic or polycarbonate with a coating or paint. In this case our guarantee
will no longer apply. It is in your interest that the manufacturer of the coating or paint provides guarantees on
compatibility with acrylic and polycarbonate.
Dust: in the event that there are still certain works to be carried out that entail the release of dust particles (such
as grinding, drilling, plaster work, etc.), then the opening under the barrel vault must be hermetically sealed, for
example with a PVC film. The dust can accumulate on, in, or between the plastic sheets. The grooves of the multi-
layered sheets are taped shut. When sawing multi-layered sheets at the project site, all grooves must be carefully
blown out and taped shut with suitable tape. Before assembly, double check that the grooves are properly taped
and correct as necessary. Ensure that the tape has not been damaged during assembly. There is no warranty for
dust inclusion.
UV side and scratches: always mount the multi-layered sheets with the UV protective side facing up. This ‘sunny
side’ is indicated on the protective film. Only remove the protective film just before installation to avoid scratches.
Point load: avoid point load on multi-layered sheets as this can cause permanent imprints. Never lean or walk on
the multi-layered sheets.
Snow accumulation: do not mount barrel vaults in places where snow can slide from a higher structure and end up
on the barrel vault.
Original parts: only use original parts and install them according to the assembly instructions.
Skylux reserves the right to modify this product or these instructions without prior notice. Changes to the
assembly instructions or to the product carry no right to compensation or exchange of parts. The most recent
version of these instructions can be consulted at any time at www.skylux.be.
Safety during assembly
Observe the necessary and required safety precautions, such as safety nets in the roof opening(s), fall protection,
protection of the roof edge, safety shoes, protective glasses, gloves, hard hat, etc.
Physical properties multi-layered sheets
Expansion and settlement sounds: acrylic and polycarbonate sheets are plastic sheets and will expand and
contract as the temperature rises and falls. The profile system allows for this. Expansion or contraction can cause
settlement noises.
Condensation: acrylic and polycarbonate sheets are barely permeable to moisture. This means that condensation
can form in the grooves. This usually happens at the start because large amounts of building moisture are
evaporating at that time. This is a physical phenomenon which will disappear after a while. This condensation does
not influence the characteristics of the plastic sheets or the guarantee.
Reflection: acrylic and polycarbonate sheets can, in some cases, depending on orientation and slope, reflect the
sunlight to the inside or outside.

E_MH_Mounting_instructions_Skylux_Cintralux_Alu_25mm_fixed_parts_flat_curb 01/04/2020
CINTRALUX IS A REGISTERED BRAND OF SKYLUX
SPINNERIJSTRAAT 100 B8530 STASEGEM
T +32 056 20 00 00 F +32 056 21 95 99
INFO@SKYLUX.BE
WWW.SKYLUX.BE
ONLY USE ORIGINAL PARTS SUPPLIED BY SKYLUX. FAILURE TO USE ORIGINAL PARTS VOIDS THE GUARANTEE.
THESE GUIDELINES ARE ONLY ADVISORY IN NATURE. THEY ONLY SERVE AS INFORMATION. INSTALLATION IS CONDUCTED UNDER THE SOLE RESPONSIBILITY
OF THE CUSTOMER.
THE DoP IS ALSO AVAILABLE ON THE WEBSITE WWW.CINTRALUX.COM
EN 14963
Table of contents
Other SKYLUX Tent manuals


Popular Tent manuals by other brands


Palram
Palram Arcadia 5000 Assembly instructions

PACIFIC PLAY TENTS
PACIFIC PLAY TENTS 29445 instructions

Alice's Garden
Alice's Garden W004COVER manual

skandika outdoor
skandika outdoor VANNA Setup Instruction

ClearSpan
ClearSpan Herculean 107846 instruction manual

toolport
toolport Wikinger Carport Assembly instructions


