SKYLUX Climacrown User manual

VERANDA / CANOPY / WINTERGARTEN
NL / FR / EN / DE
Climacrown
Montagehandleiding
Notice de pose
Mounting instructions
Montageanleitung
Art.N° 48788

E_MH_Mounting_instructions_Skylux_Climacrown 01/05/2020
2/24
Vooraleer montage of onderhoud uit te voeren, dient u alle nodige veiligheidsmaatregelen in acht te nemen. Zie pag. 16.
Avant de procéder au montage ou à l’entretien, vous devez prendre toutes les mesures de sécurité nécessaires. Voir page 18.
Before installing or maintaining, you must take into account the necessary safety precautions. See page 20.
Bevor man die Montage oder Wartung ausführt, müssen alle Sicherheitsmaßnahmen berücksichtigt werden. Siehe Seite 22.
Climacrown is een kroonlijst die geplaatst wordt op een Climalux-dak. De montage van Climacrown dient te
gebeuren tijdens de montage van het Climalux-dak en vooraleer de beglazing in het dak geplaatst wordt. Bij
montage van Climacrown op een bestaand Climalux-dak, moeten de platen of de beglazing tijdelijk gedemonteerd
worden.
Climacrown est un bandeau horizontal destiné à être monté sur une toiture Climalux. L’installation de la
Climacrown doit être eectuée durant l’installation de la toiture Climalux et avant que le vitrage ne soit placé sur
le toit. Lors de montage d’une Climacrown sur une toiture Climalux existante, il faut démonter temporairement les
panneaux ou le vitrage.
Climacrown is a cornice that is mounted on a Climalux roof. The assembly of the Climacrown must be carried out
during the assembly of the Climalux roof and before the glazing is installed in the roof. If the Climacrown is to be
assembled on an existing Climalux roof, the sheets or glazing must be demounted temporarily.
Climacrown ist eine Attika, die auf ein Climalux-Dach montiert wird. Die Montage der Climacrown muss
gleichzeitig mit der Montage vom Climalux-Dach ausgeführt werden und vor die Verglasung ins Dach installiert
wird. Bei der Montage einer Climacrown auf ein bestehendes Climalux-Dach müssen die Platten oder die
Verglasung zeitweilig demontiert werden.
B: Breedte Climalux-dak = lengte goot (zonder sluitstukken)
Largeur de la toiture Climalux = longueur de la gouttière (hors embouts)
Width Climalux roof = length gutter (without end fittings)
Breite Climalux Dach = Länge Dachrinne (ohne Abschlussstücke)
D: Diepte Climalux-dak = horizontale afstand muur tot paal
Profondeur de la toiture Climalux = distance horizontale entre le mur et le poteau
Depth Climalux roof = horizontal distance from wall to post
Tiefe Climalux Dach = horizontaler Abstand von der Wand bis zum Pfosten
H: Hoogteverschil onderzijde muurprofiel tot onderzijde gootprofiel
Diérence de hauteur entre la face inférieure du profil mural et la face inférieure du profil de gouttière
Height dierence between bottom side wall profile to bottom side gutter profile
Höhenunterschied zwischen Unterseite Mauerprofil und Unterseite Rinnenprofil
160
115
h = 144
H
D
B
H
D

01/05/2020 3/24
E_MH_Mounting_instructions_Skylux_Climacrown
BCC = B - 15 mm | BU = BCC - 40 mm
BTOT = B + 55 mm
DCC = D + 146 mm | DU = D + 130 mm
DTOT = D + 185 mm
BCC = B - 7,5 mm | BU = B - 27,5 mm
BTOT = B + 27,5 mm
DCC = D + 146 mm | DU = D + 130 mm
DTOT = D + 185 mm
BCC = B | BU = B + 10 mm
BTOT = B + 10 mm
BCC = B - 15 mm | BU = BCC - 40 mm
BTOT = B + 55 mm
DCC = D + 258 mm | DU = D + 218 mm
DTOT = D + 328 mm
DCC DCC
BTOT
BCC
DTOT
DCC
BTOT
BCC
DTOT
BTOT
BCC
BTOT
BCC
DCC
DTOT
DCC
BCC

E_MH_Mounting_instructions_Skylux_Climacrown 01/05/2020
4/24
CC150
Stapelprofiel 150 mm
Profil empilable 150 mm
Stack profile 150 mm
Stapelprofil 150 mm
CC225
Stapelprofiel 225 mm
Profil empilable 225 mm
Stack profile 225 mm
Stapelprofil 225 mm
CCL
Hoekprofiel
Profil d’angle
Corner profile
Eckprofil
CCU
U-profiel
Profil U
U-profile
U-Profil
CCBEUG
Beugel voor goot GX
Étrier pour gouttière GX
Bracket for gutter GX
Bügel für Dachrinne GX
CCHAAK
Haak Climacrown
Crochet Climacrown
Hook Climacrown
Haken Climacrown
CCLAS
Sluitplaat hoekprofiel
Embout pour profil
d’angle
End piece corner profile
Abschlussstück für
Eckprofil
ZSB
ZSG
Zelorende schroef
5,5 x 32 mm TX 25
Vis autoperceuse
5,5 x 32 mm TX 25
Self-drilling screw
5,5 x 32 mm TX 25
Selbstbohrende Schraube
5,5 x 32 mm TX 25
PST
Parkerschroef
4,8 x 13 mm TX 25
Vis Parker
4,8 x 13 mm TX 25
Parker screw
4,8 x 13 mm TX 25
Parker-Schraube
4,8 x 13 mm TX 25
BOUTM5
Bout M5 x 20 RVS
Boulon M5 x 20 inox
Bolt M5 x 20 RVS
Bolzen M5 x 20 RVS
RONDM5
Rondsel M5 x 16 RVS
Rondelle M5 x 16 inox
Ring M5 x 16 RVS
Scheibe M5 x 16 RVS
MOERM5
Borgmoer M5 RVS
Écrou de sécurité M5 inox
Lock nut M5 RVS
Sicherungsmutter M5 RVS
NP
Nagelplug Ø 8 mm
Cheville à clou Ø 8 mm
Nail plug Ø 8 mm
Nageldübel Ø 8 mm
LED
LEDstripe IP67
Bandeau LED IP67
LED stripe IP67
LEDStreifen IP67
TRANSFO
Transfo 30W 12V
Transfo 30W 12V
Transformer 30W 12V
Transformator 30W 12V
KAB
Verlengkabel 6m
voor LED
Rallonge 6m
pour LED
Extension cord 6m
for LED
Verlängerungskabel 6m
für LED
LEDCO
LED-cover
Cover LED
LED cover
LED-Abdeckung

01/05/2020 5/24
E_MH_Mounting_instructions_Skylux_Climacrown
VOORBEREIDING
PREPARATION
PREPARATION
VORBEREITUNG
ZSB
CCBEUG
GX
AX
CCBEUG ZSB
= = = =
CCBEUG + ZSB CCBEUG + ZSB

E_MH_Mounting_instructions_Skylux_Climacrown 01/05/2020
6/24
l
LEFT CLLX-profile RIGHT CLLX-profile
Ø 5 mm
CCHAAK BOUT
ROND MOER
M5 M5 x 20
CCHAAK
cutting line
49
100
CLL CLL

01/05/2020 7/24
E_MH_Mounting_instructions_Skylux_Climacrown
De gelakte schroeven ZSG worden gebruikt om de sluitplaatjes op het hoekprofiel te monteren.
Les vis laquées ZSG sont utilisées pour fixer les embouts sur le profil d’angle.
The lacquered screws ZSG are used to mount the end pieces on the corner profile.
Die lackierten Schrauben ZSG werden verwendet, um die Abschlussstücke aufs Eckprofil zu befestigen.
CCHAAK ZSG/ZSB
ZSG
ZSG
CCHAAK
ZSB
ZSB

E_MH_Mounting_instructions_Skylux_Climacrown 01/05/2020
8/24
Aanpassen haak links en rechts (doorgang LED-kabel).
Adaptez les crochets à gauche et à droit (pour le passage du câble LED).
Adjust hook on the left and right (passage LED cable).
Anpassen Haken links und rechts (Durchgang LED-Kabel).
Ø 16
72
166,70
Ø 16
10
LED
drill hole Ø 12
41
7
drill hole Ø 12
41
7

01/05/2020 9/24
E_MH_Mounting_instructions_Skylux_Climacrown
LED-strook van binnen naar buiten doorsteken tussen zijdrager en gootprofiel
Insérez le bandeau LED de l’intérieur vers l’extérieur entre les supports latéraux et le profil de gouttière
Push the LED stripe from the inside to the outside between side rafter and gutter profile
LED-Streifen von innen nach außen zwischen Seitenträger und Rinnenprofil durchstecken
Zwarte zone 8 mm diep weghalen (aan de onderkant)
Enlevez la zone noire de 8 mm (face inférieure)
Remove black zone 8 mm (on the bottom side)
Schwarze Zone 8 mm tief entfernen (an der Unterseite)
TRANSFO
230V AC
8 mm
8 mm
8 mm

E_MH_Mounting_instructions_Skylux_Climacrown 01/05/2020
10/24
MONTAGE KROONLIJST ZIJKANT(EN)
MONTAGE DU BANDEAUX AUX COTES LATERAUX
ASSEMBLY CORNICE ON THE LATERAL SIDE(S)
MONTAGE DER ATTIKA AN DER SEITE(N)
Voorboren met Ø 4 mm en schroeven met PST
Préforez à la mèche Ø 4 mm puis vissez avec les vis PST
Pre-drill with Ø 4 mm and screws with PST
Vorbohren mit Ø 4 mm und Schrauben mit PST
optie LED: schuif de LED-stroken in de profielen
option LED: glissez les bandeaux LED à l’intérieur des profils
option LED: slide the LED stripes in the profiles
Zusatz LED: Schieben Sie die LED-Streifen in die Profile
+
CC150CC225 CCL
+
PST
/
CCBEUG
LED
10
20
CCL
CCL
5
2 x
CC150/CC225
PST
CCL

01/05/2020 11/24
E_MH_Mounting_instructions_Skylux_Climacrown
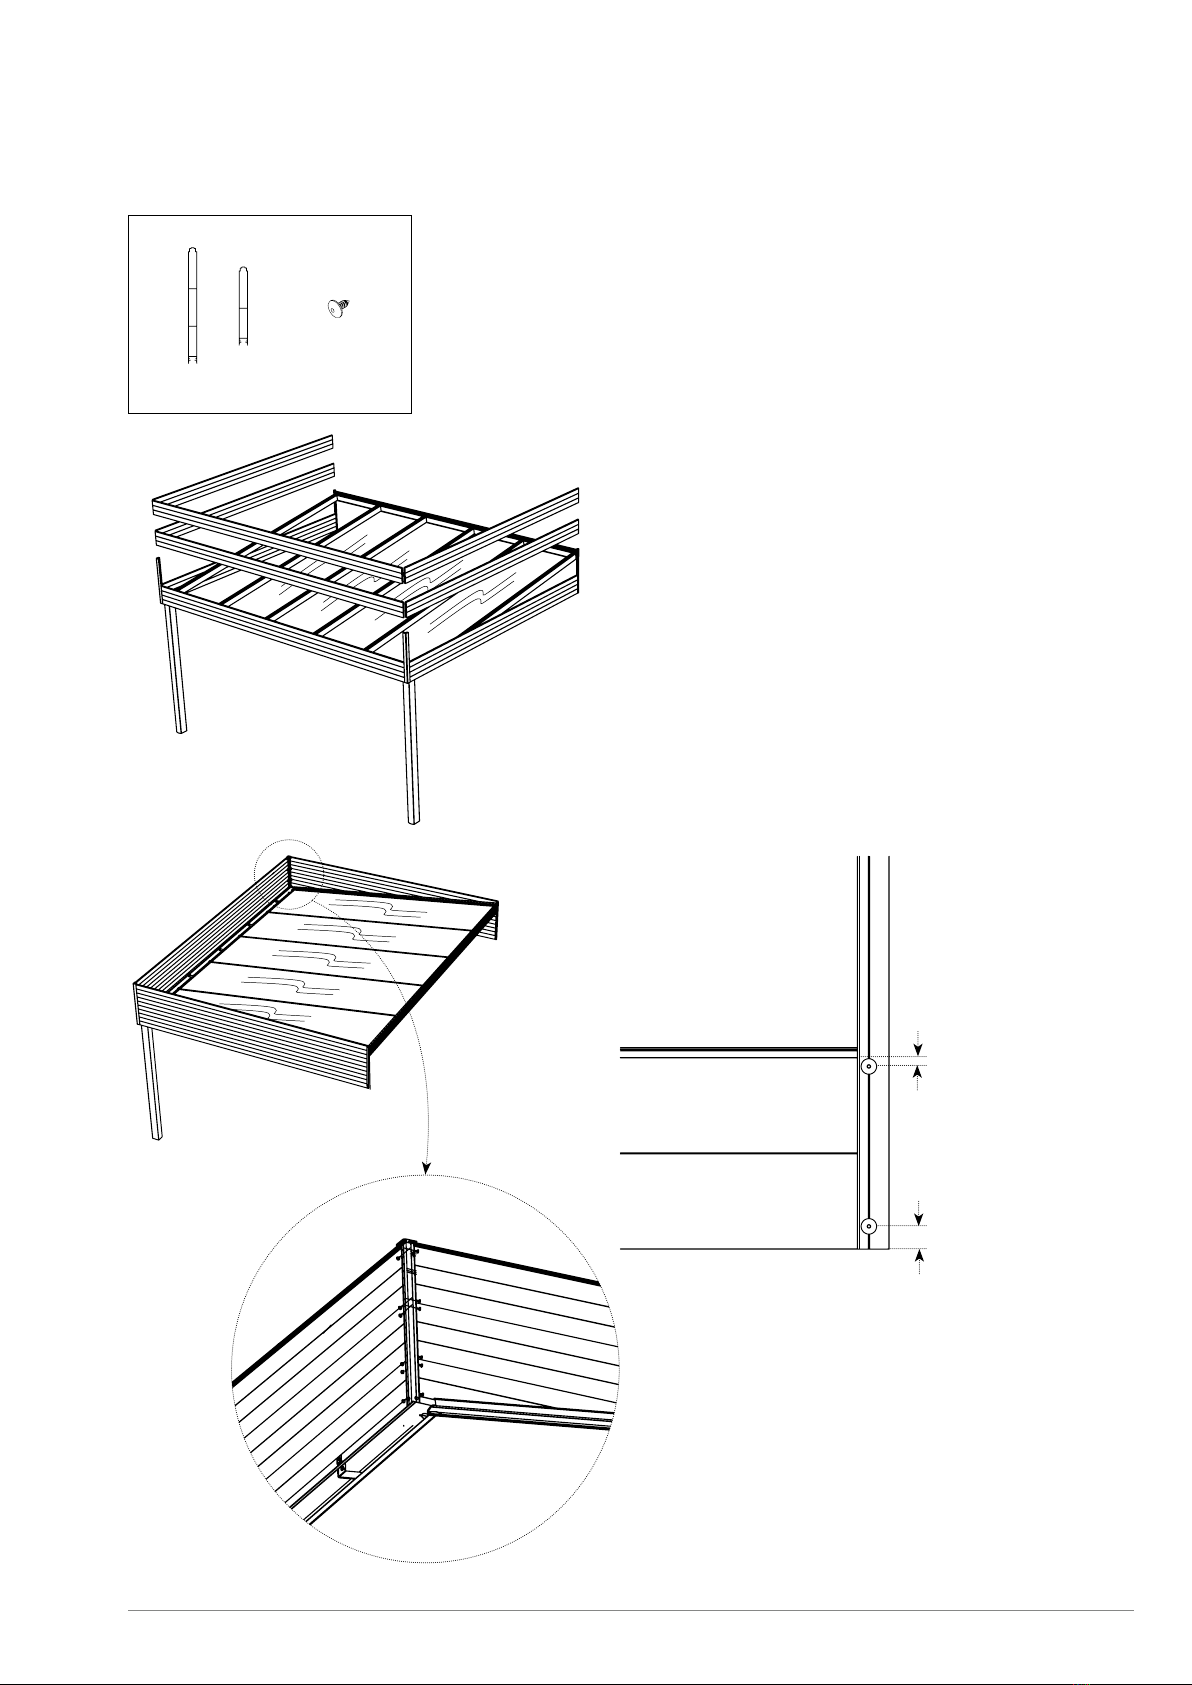
De schroef op 70 mm van de onderkant niet volledig indraaien zodat het profiel hierop rust.
Ne vissez pas complètement la vis à 70 mm de la face inférieure afin que le profil repose sur celle-ci.
Do not completely screw in the screw 70 mm from the bottom side so the profile can rest on it.
Die Schraube auf 70 mm der Unterseite nicht komplett eindrehen, damit das Profil darauf liegen kann.
CCU NP
CCHAAK
Hg- 10 mm
CCU
CC150/CC225
30
Ø 8
max.
300
max.
300
70
Ø 8
30 HG - 10 mm
CCU
NP
NP
70

E_MH_Mounting_instructions_Skylux_Climacrown 01/05/2020
12/24
Herhaal bovenstaande richtlijnen voor de andere zijkant.
Faites la même chose pour l’autre côté.
Repeat the above mentioned guidelines for the other side.
Wiederholen Sie die oben genannten Richtlinien für die andere Seite.
3 mm
1
2
20
10
CCU

01/05/2020 13/24
E_MH_Mounting_instructions_Skylux_Climacrown
MONTAGE KROONLIJST VOORZIJDE
MONTAGE DU BANDEAU SUR LA FACE AVANT
ASSEMBLY CORNICE ON THE FRONT SIDE
MONTAGE DER ATTIKA AN DER VORDERSEITE
optie LED: schuif de LED-stroken in de profielen
option LED: glissez les bandeaux LED à l’intérieur des profils
option LED: slide the LED stripes in the profiles
Zusatz LED: Schieben Sie die LED-Streifen in die Profile
Na deze handeling worden de platen of de beglazing (terug) op het Climalux-dak geplaatst.
Werk het Climalux-dak nu volledig af en monteer vervolgens de Climacrown verder.
Une fois cette opération terminée, il faut (re)monter les panneaux ou le vitrage dans la toiture Climalux.
Finissez à présent la toiture Climalux et poursuivez le montage de la Climacrown.
After this, the sheets or glazing are (re)mounted on the Climalux roof.
Finish the Climalux roof and continue to mount the Climacrown.
Nach diesem Schritt werden die Platten oder die Verglasung (wieder) ins Climalux-Dach montiert.
Stellen Sie das Climalux-Dach komplett fertig und montieren Sie anschließend die Climacrown weiter.
+
PSTCC150CC225
/
E_MH_Mounting_instructions_Skylux_Climacrown 01/05/2020
14/24
OPBOUW CLIMACROWN
STRUCTURE CLIMACROWN
CONSTRUCTION CLIMACROWN
AUFBAU CLIMACROWN
+
PSTCC150CC225
/
20
10

01/05/2020 15/24
E_MH_Mounting_instructions_Skylux_Climacrown
Breng de LED-cover op maat en klik deze tussen de haken in het profiel.
Découpez le cover LED sur mesure et clipsez-le entre les crochets du profil.
Adjust the LED cover and click it in between the hooks in the profile.
Passen Sie die LED-Abdeckung an und klicken Sie diese zwischen den Haken ins Profil.
Monteer de sluitplaatjes CCLAS op de hoekprofielen met de gelakte schroeven ZSG.
Montez les embouts CCLAS sur les profils d’angle à l’aide des vis laquées ZSG.
Mount the end pieces CCLAS onto the corner profiles with the lacquered screws ZSG.
Montieren Sie die Abschlussstücke CCLAS auf die Eckprofile mit den lackierten Schrauben ZSG.
CCU PST
LEDCO LED
“click”
CCU
CCLAS ZSG
CCLAS
CCLAS
ZSG
ZSG

E_MH_Mounting_instructions_Skylux_Climacrown 01/05/2020
16/24
Veiligheid
Neem de nodige en vereiste veiligheidsmaatregelen in acht, zoals bij plaatsing langs de buitenzijde via het dak is
het gebruik van valbescherming verplicht (lifeline), veiligheidsbril, handschoenen , helm, enz.
Verboden op het glas te treden.
Vallen van hoogte
• Bij gebruik van ladders voor het betreden van het dak:
- Ladder in goede staat?
- Correct opgesteld onder 75°?
- Vastgelegd onderaan en bovenaan tegen verschuiven?
- Geen zwaar/groot materiaal meenemen op de ladder! (3 contactpunten-regel.) Indien
mogelijk met kraanlift naar boven brengen.
• Indien men het dak moet betreden moet men zorgen voor een voldoende breed loopvlak dat
gesteund is op de draagbalken van de onderstructuur.
• Bij gebruik van een hoogwerker/schaarlift: harnas altijd dragen (verplicht) en aangelijnd! Het
verlaten van de kooi is verboden.
• Loop nooit achterwaarts op een dak, maar altijd voorwaarts.
• Zorg dat de werkzone voldoende verlicht is.
Laaghangende obstakels en vallende lasten
• Verboden onder of in een omstrek van 1 m van een hangende last te komen.
• Gevarenzone afbakenen onder de plaats waar valgevaar is van materiaal tijdens de opbouw van
de veranda.
• Het is niet toegelaten tijdens de werkzaamheden deze afgebakende gevarenzone te betreden
of eronder door te lopen.
Gegrepen worden
• Alle gebruikte arbeidsmiddelen hebben een geldig CE-label, zijn goed onderhouden en
voorzien van alle noodzakelijke veiligheidsvoorzieningen. Deze mogen nooit weggenomen
worden.
• De personen die de arbeidsmiddelen bedienen zijn hiervoor opgeleid. Afschermkappen zijn
steeds voorzien op alle arbeidsmiddelen. Deze zijn in goede staat en correct ingesteld.
Struikelen/vallen
• Orde en netheid zijn het begin van veiligheid. Ruim onmiddellijk alles op, laat niets
rondslingeren.
• Afval dient gesorteerd te worden.
• Bijzondere aandacht vereist voor elektrische kabels (struikelgevaar). Loop nooit achterwaarts!
• Zorg dat de werkzone goed verlicht is.

01/05/2020 17/24
E_MH_Mounting_instructions_Skylux_Climacrown
Scherpe onderdelen
• Opgelet voor knellen van vingers en snijwonden bij het manipuleren van de onderdelen van de
veranda.
• Kijk altijd waar je je handen plaatst tijdens het monteren van de onderdelen.
• Het dragen van snijbestendige handschoenen is verplicht.
Ergonomie
• Tillen van lasten: ga steeds op de correcte manier te werk: door de knieën gaan; voeten
verplaatsen i.p.v. ruggegraat te torsen; last zo dicht mogelijk bij het lichaam houden.
• Stukken boven de 25 kg steeds met minstens 2 personen tillen.
Persoonlijke beschermingsmiddelen
• Werkkledij, veiligheidsschoenen en helm zijn altijd voor iedereen verplicht.
• Het gebruik van een gekeurd harnas en vanglijn is verplicht bij ontbreken van collectieve randbeveiliging of
netten onder de dakopening, alsook bij het gebruik van een hoogwerker/schaarlift.
• Draag steeds handschoenen bij het manipuleren van de onderdelen.
• Bij gebruik van afkortzagen/slijpmachines is het dragen van een veiligheidsbril en gehoorbescherming verplicht.
Voer steeds uw Last Minute Risico Analyse uit!
Bij twijfel: STOP! Neem geen onnodige risico’s. Raadpleeg jouw leidinggevende.

E_MH_Mounting_instructions_Skylux_Climacrown 01/05/2020
18/24
Sécurité
Prenez les mesures de sécurité nécessaires et requises ; par exemple, en cas de montage depuis l’extérieur, sur
le toit, il est obligatoire d’utiliser une protection antichute (ligne de vie), des lunettes de sécurité, des gants, un
casque, etc. Interdiction de marcher sur le verre.
Chutes de hauteur
• En cas d’utilisation d’échelles pour l’accès toiture :
- L’échelle est-elle en bon état ?
- Est-elle correctement inclinée (à 75°) ?
- Est-elle immobilisée en bas et en haut pour éviter qu’elle ne glisse ?
- Il est interdit d’escalader l’échelle avec du matériel lourd/volumineux (règle de 3 points
d’appui) ! Levez le matériel avec une grue si possible.
• Si on doit monter sur le toit, il faut prévoir une surface de marche supportée par les porteurs
de la sous-structure.
• En cas d’utilisation d’une nacelle élévatrice/d’un élévateur à pantographe : utilisez et sécurisez
toujours le harnais (obligatoire) ! Il est interdit de quitter la cage.
• Ne progressez jamais en marche arrière sur un toit, mais toujours en marche avant.
• Veillez à ce que la zone de travail soit suffisamment éclairée.
Obstacles à faible hauteur et chutes de charges
• Il est interdit de se trouver sous ou aux alentours d’une charge suspendue (dans un périmètre
de 1 m).
• Délimitez la zone de danger sous l’endroit où le matériau peut tomber durant le montage de la
véranda.
• Il est interdit d’entrer les zones dangereuses pendant les travaux.
Accrochage
• Tous les équipements de travail utilisés doivent porter un label CE valable, être bien entretenus
et être dotés de tous les dispositifs de sécurité nécessaires. Ils ne peuvent jamais être enlevés.
• Les personnes qui utilisent les équipements de travail sont formées à cet effet. Des capots
de protection sont toujours prévus sur tous les équipements de travail. Ils sont en bon état et
correctement réglés.
Trébuchement/chute
• La sécurité commence par le maintien de l’ordre et de la propreté. Rangez tout
immédiatement, ne laissez rien traîner.
• Les déchets doivent être triés.
• Une attention particulière est requise pour les câbles électriques (risque de trébuchement).
Ne circulez jamais en marche arrière !
• Veillez à ce que la zone de travail soit bien éclairée.

01/05/2020 19/24
E_MH_Mounting_instructions_Skylux_Climacrown
Pièces tranchantes
• Attention à ne pas vous coincer ou couper les doigts lors de la manipulation des éléments de la
véranda.
• Regardez toujours où vous placez les mains pendant le montage des pièces.
• Le port de gants anti-coupures est obligatoire.
Ergonomie
• Levage de charges : procédez toujours de la manière correcte : utilisez les genoux ; déplacez
les pieds au lieu de tordre le torse ; maintenez la charge le plus près possible du corps.
• Les pièces de plus de 25 kg doivent être soulevées par 2 personnes minimum.
Équipements de protection individuelle
• Les vêtements de travail, les chaussures de sécurité et le casque sont obligatoires en toutes circonstances pour
tout le monde.
• L’utilisation d’un harnais et d’une longe de retenue agréés est obligatoire en l’absence de protection collective
périphérique ou de filets sous l’ouverture de la fenêtre de toit, ainsi qu’en cas d’utilisation d’une nacelle
élévatrice/d’un élévateur à pantographe.
• Portez toujours des gants lorsque vous manipulez les pièces de la fenêtre de toit.
• En cas d’utilisation de tronçonneuses/meuleuses, le port de lunettes de sécurité et de protections auditives est
obligatoire.
Faites toujours une Analyse des Risques Last Minute !
En cas de doute : ARRÊTEZ ! Ne prenez pas de risques inutiles. Consultez votre dirigeant.

E_MH_Mounting_instructions_Skylux_Climacrown 01/05/2020
20/24
Safety
Take the necessary and required safety precautions, such as safety nets and lifelines when installing from the
outside, safety goggles, gloves, hard hat, etc.
Do not step on the glass.
Falling from height
• When using ladders to go on the roof:
- Ladder in good condition?
- Set up correctly at an angle of 75°?
- Secured below and on top against moving?
- Don’t take heavy material with you on the ladder (3-point contact rule)! If possible,
use a crane to lift the material.
• If you are going on the roof, make sure there is a walking surface that is wide enough and that
supports on the beams of the lower structure.
•When using an aerial work platform: always wear and secure your harness (mandatory)! Leaving
the cage is forbidden.
• Never walk backwards on a roof, always walk forwards.
• Make sure there’s enough light in the working zone.
Low-hanging obstacles and falling loads
• Forbidden to walk under or within a radius of 1 m of a hanging or lifted load.
• Demarcate the danger zone below the zone where there is a risk of material falling down
during the installation of the veranda.
• It’s prohibited to enter these danger zones during construction.
Crushing hazard
• All working tools are in good condition, provided with a valid CE label and all necessary safety
regulations. These cannot be removed.
• People who use these working tools are educated for this purpose. Protections are always
present on all working tools. They are in good condition and need to be set correctly.
Tripping/falling
•Safety is key and it begins with order and tidiness. Clean everything immediately, leave nothing
lying around.
• Trash needs to be sorted.
• Be cautious with electric cables (danger of tripping/falling). Never walk backwards!
• Make sure there’s enough light in the working zone.
This manual suits for next models
1
Table of contents
Other SKYLUX Tent manuals


