SMARCYCLE S User manual


Precautions
Battery and charging:
Charging is only allowed at 0°C~45°C, and discharging is only allowed at
-20°C~60°C. The battery must be kept dry. It is strictly prohibited to put the
battery in acidic or alkaline liquid. Rain must be avoided, and it shall be kept
away from fire, heat and high temperature environment. It is strictly prohibited to
reverse the battery's positive and negative poles or damage them, plug in the
battery or let it suffer from short circuit. Please use the original special charger
when charging. The charging must not last more than 6 hours, and the charging
current does not exceed 2A. When not in use for a long time, please keep the
battery in a cool and dry place, and charge it for five hours every month. Users
must follow the instructions when charging, otherwise they will be at their own
risk. Attention shall be paid to the type of battery to which the charger is
compatible and the applicable voltage, and mixing is strictly prohibited. When
charging, it shall be placed in a ventilated environment. It is strictly prohibited to
charge in a residential building and in an enclosed space or in a hot
environment. When charging, insert the battery first, and then supply the mains
power; when fully charged, cut off the mains power first, and then unplug the
battery connector. When the green light is on, the power shall be cut off in time.
It is forbidden to connect the charger to the AC power supply without load for a
long time without charging. During the charging process, if the indicator light is
abnormal, a peculiar smell occurs, or the charger case is overheating, stop
charging immediately and repair or replace the charger. During the use and
storage of the charger, be careful not to let foreign matter enter, especially avoid
inflow of water or other liquids, so as to avoid short circuit inside the charger.
The charger should not be carried with the vehicle. If it is necessary to carry it, it
shall be placed in the tool box after shock absorption treatment. Do not
disassemble or replace the accessories in the charger by yourself.
Riding:
Do not use until you have read the instructions carefully to understand the
performance of the product; do not lend it to anyone who does not manipulate
the product. Before riding, check if the brakes are working. When braking,
please apply the rear brake first, and then apply the front brake. Pay attention to
the tightness of the brakes. When you find that the brakes are too loose, you
can use a internal hexagonal wrench to tighten it. Note that the braking distance
shall be increased when you are riding in rain or snow. Applicable age: 16 to 65
years old.
Be sure to wear a safety helmet while riding it, follow the traffic rules, and do not
drive on motorized lanes and roads with many pedestrians. Please check the tire
pressure before riding. The recommended tire pressure is 35 PSI.
The speed at downhill and non-brick pavement does not exceed 15km/h.
Be careful not to bump the motor vigorously when it is used, and keep the
EN 01

spindle lubricated.
Do not ride at more than the maximum load of the bike (maximum load: 120kg)
After use, the car cannot be parked in the building's entrance hall, evacuation
stairs, or emergency exit. It must be properly parked in accordance with safety
regulations.
No one-handed riding!
Do not exceed the maximum seat post height limit, otherwise the frame might
be damaged.
Disclaimer:
After riding, please place the bike in a place free from sunlight and rain, not in a
residential building;
Check the motor and brake frequently;
Check the screws of the vehicle and the places to be tightened regularly, and
tighten them regularly.
Recommended torque: (unit: kgf.cm) handlebar screws 60-80, stem screws
175-200, seat screws 175-200, and wheel screws 320-450;
The front and rear wheels of the vehicle shall be located in the center of the fork
or frame;
Check the spell frequently for any scars, cracks, or excessive wear. The inner
tube and the air nozzle shall be perpendicular to the hub. The cover tyre that is
damaged or excessively worn needs to be replaced immediately, please ask a
professional technician to replace your tyre. If your cover tyre accidentally
punctures and leaks, please contact a professional technician to repair or
replace it.
Maintenance and care:
For the product model, specifications or related information mentioned in this
Operation Manual, the company reserves the right of modification and final
interpretation; the functions of the specific model mentioned in this Operation
Manual are only applicable to that specific model;
The product models, specifications, or related information mentioned in the
Operation Manual may be changed without notice; without prior written
permission of the company, the Operation Manual may not be copied, modified,
reproduced, transmitted, or published in any form. Please read the Manual
carefully before using the product, and operate in accordance with the Manual,
otherwise the company will not be liable for product damage or personal or
property damage caused by improper use or error.
EN 02
EN 03
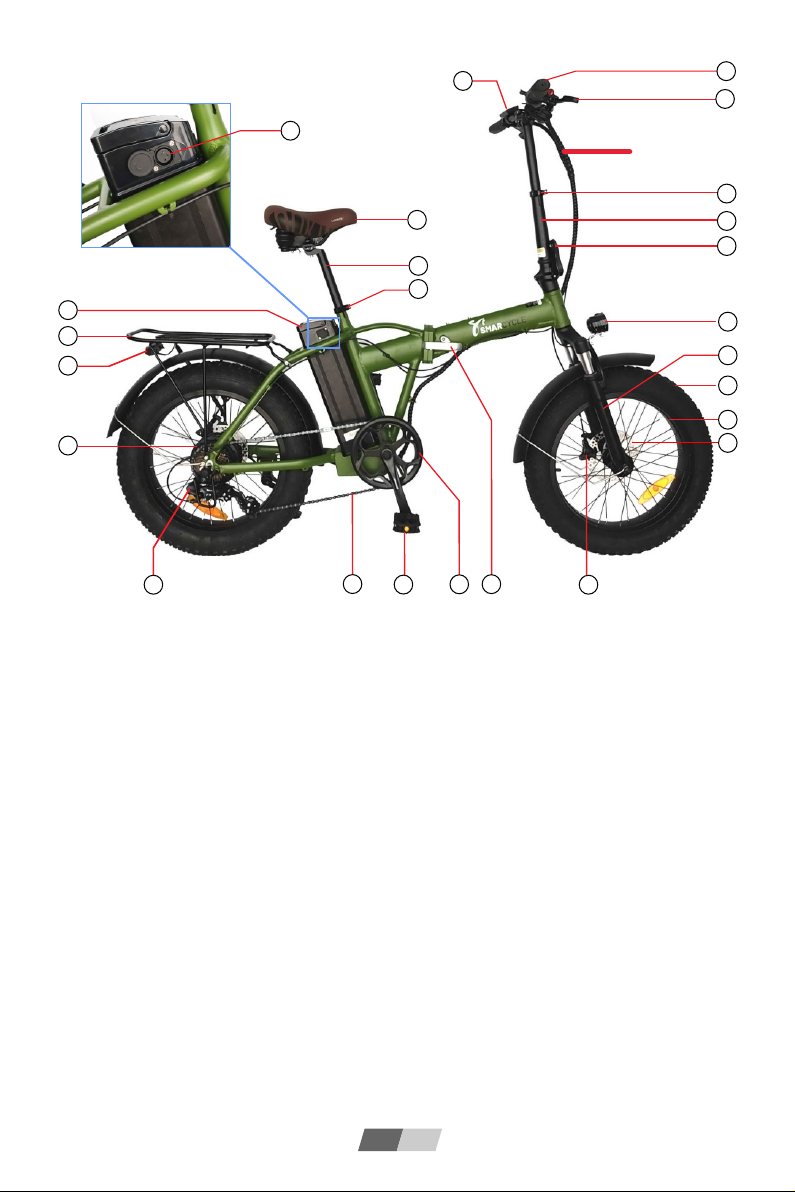
①
②
③
④
⑤
⑥
⑦
⑧
⑨
⑩
⑪
⑫
⑬
Handle
Brake lever
Dash board
Quick release of standpipe
Standpipe
Standpipe folding quick release
Headlight
Front fork
Tyre
Hub
Disc brake block
Front disc brake
Frame folding quick release
⑭
⑮
⑯
⑰
⑱
⑲
⑳
㉑
㉒
㉓
㉔
㉕
Sprocket
Folding pedal
Chain
Rear derailleur
Drive motor
Rear light
Rear hanger
Lithium battery.
Battery charging hole
Seat tube adjustment quick release
Seat tube
Saddle
31
2
4
5
6
7
8
9
10
11
12
13
14
15
16
17
19
20
21
18
23
24
25
Figure 1 (Whole Vehicle Diagram)
22
Optional Thumb Throttle Plug-in
location for off-road used only
(intersection of the black cable
bundle), remove the lid on the
socket and then plug in the
throttle.
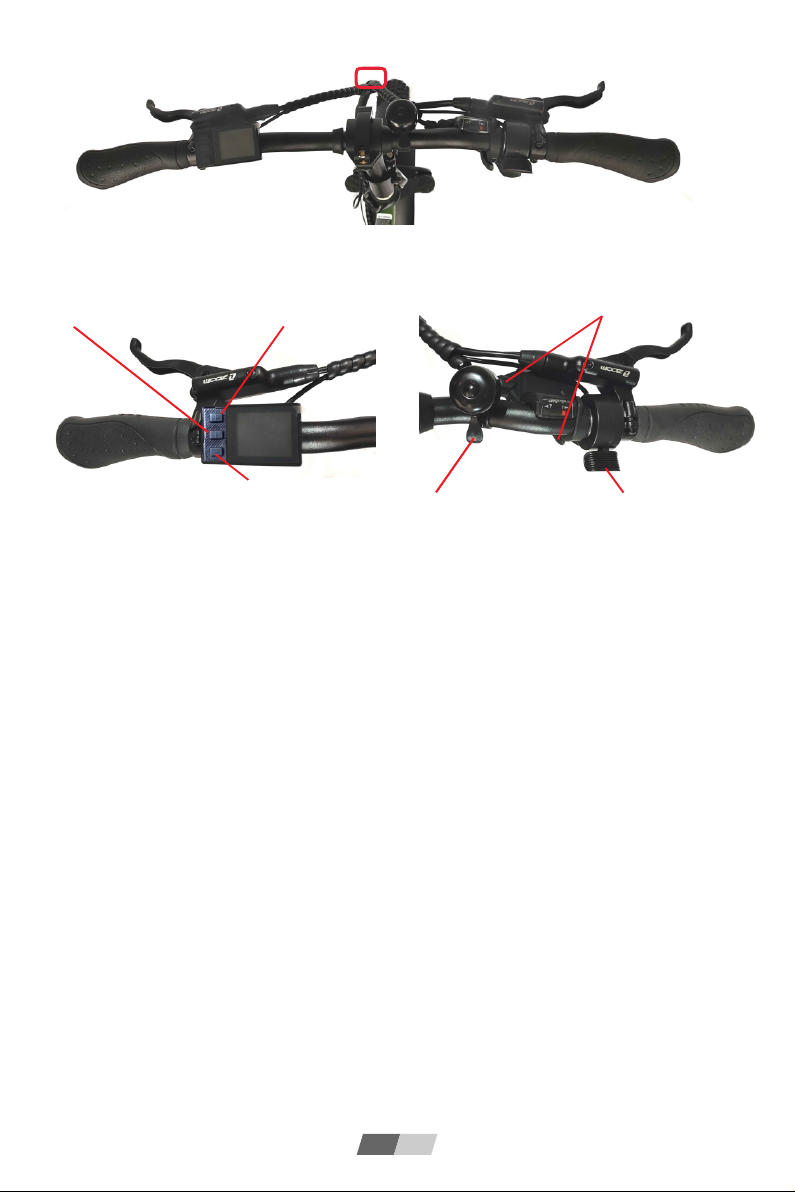
Long press the " i" button
to turn on/off the power
"+" is the speed shift button;
long press it to turn on the
front light
"-" is the speed downshift button; long
Press it to push the bicycle with power
Rear gear shift lever
Mechanical bell Thumb throttle
Function introduction:
1. Charging: Refer to item 22 of Figure 1, the charging hole can be seen on the right
side of the battery in the frame, and it can be charged by connecting the charger.
When the battery is full and the charger indicator turns from red to yellow-green, it
means it is fully charged.
2. Turn on/off: refer to Figure 3 and press and hold the " i " button to turn on/off
the power of the display.
3. Display: The display screen lights up after power on, displaying information such
as power, speed, motor speed, mileage, etc. The power speed is initially 0. Press the
"+" and "-" buttons to increase and decrease the power speed of electric drive mode.
4. Front light: Refer to Figure 3, long press the "+" button to turn on/off the front light.
5. Power-assisted mode: power-assisted riding, step on the pedals of the bicycle, and
automatically start electric power after a certain speed. If you don't need assistance,
you can turn off the power of the display.
6. Speed transmission: Refer to Figures 3 and 4, when the bicycle is running, you can
change the mechanical speed by flipping the shift levers.
7. Electric mode: Refer to Figure 4, press the thumb throttle, and the bicycle can
accelerate forward. The greater the pressing range, the faster the bicycle will run. For
safety reason, please press the thumb throttle lightly and accelerate slowly.
EN 04
Figure 2 (Handlebar)
Figure 3 (Left Handlebar) Figure 4 (Right Handlebar)
(Thumb throttle can be
installed and plugged
into socket hidden in
the intersection of the
upper part of the black
cable bundle at the
front)
(Optional to be installed)
Thumb Throttle Installation Socket location
EN 05
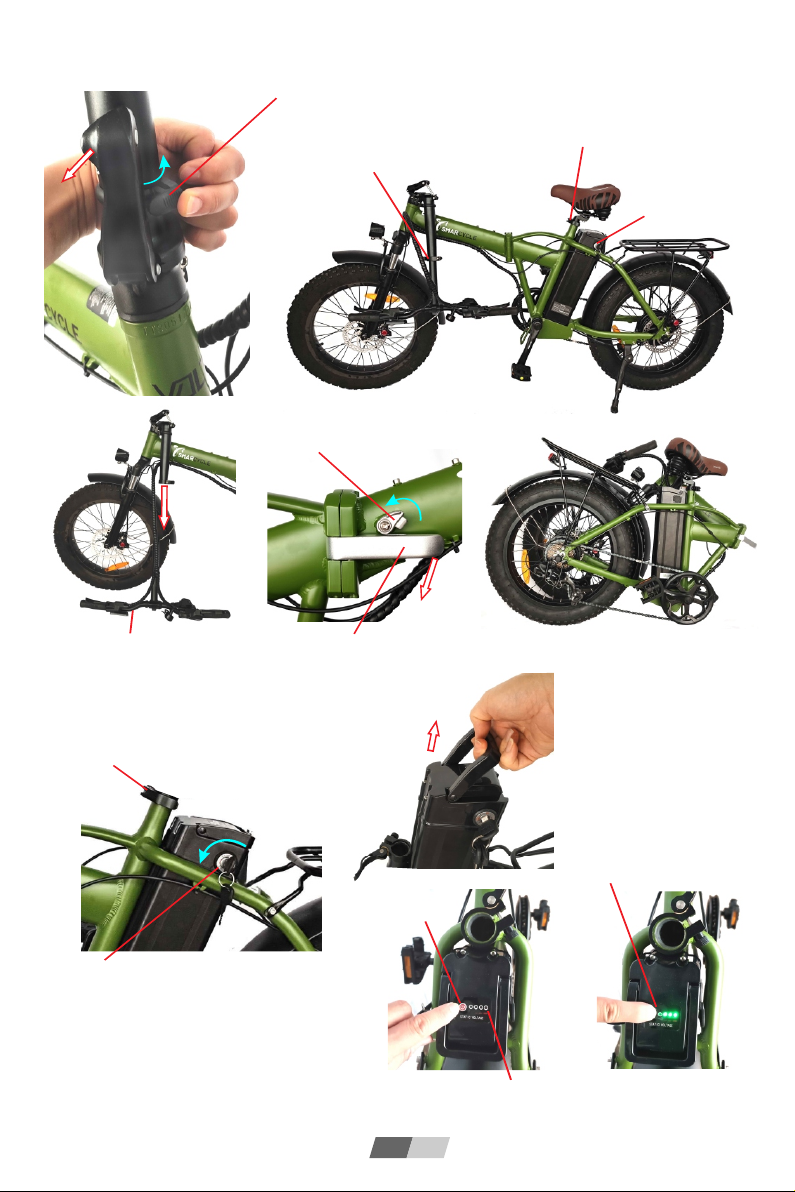
Folding Operation Illustration
1: Unscrew the plastic safety buckle on the
standpipe quick release, and then release the
quick release, and the riser can be folded to
the left
2: The standpipe upper and lower adjustable
quick releases can adjust the height of the
standpipe.
4: For easy folding,the handlebars
can be pulled out completely
Battery lockhole
3: Release the upper and lower
adjustable quick releases of
the seat tube to adjust the seat
tube to the lowest position.
Pull out
5: Rotate the folding safety buckle up first
6: Then pull the folding shackle out to
fold the frame State of Frame After Folding
Pull out
Pull out
completely
1. First loosen the seat tube with quick release to pull
the whole seat tube out, as shown in the figure;
Remove the battery
2. Insert the key into the battery lockhole, press
the key to the bottom and then rotate it to the
left to unlock it, and then pull the battery out.
Pull out
Battery capacity
button
Power display lamp
Press this button on the battery
box to display the battery
capacity after the green light is
lightened. More green lights
lightened shows more battery
capacity.
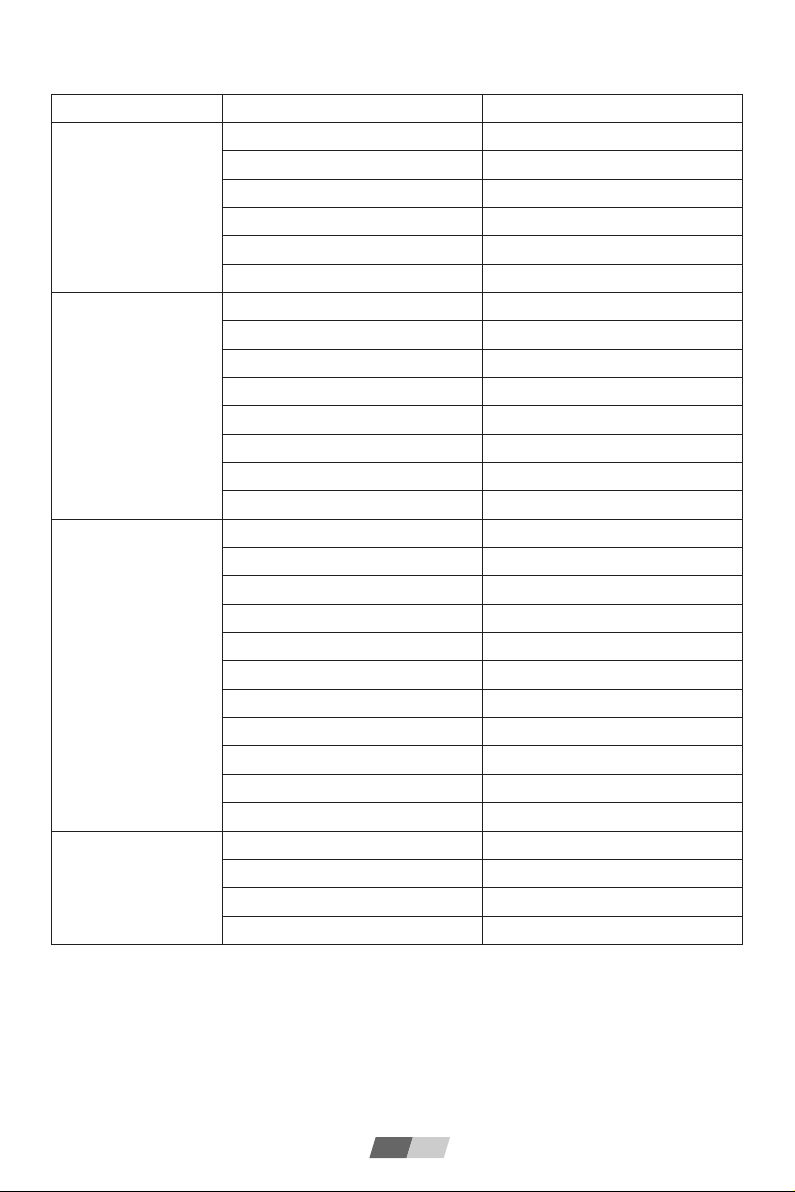
Product Parameters
Parameters
Bike frame material
Folded dimensions
Developed dimensions
Distance from pedal to ground
Tyre dimensions
Package dimensions
Bike weight
Maximum load
Best riding speed
Maximum speed
Range
Maximum climbing angle
Operating temperature
Waterproofing grade
Type of battery
Battery capacity
Battery rated voltage
Motor line type
Motor rated voltage
Motor rated power
Charging voltage
Input voltage
Undervoltage protection value
Overcurrent protection value
Charging time
Instrument display
Front lighting
Braking method
Tyre style
Standard Edition
Aluminum alloy
1000*610*660mm
1700*610*1260mm
100mm
20 inches
98*52*76cm
27kg
120kg
20km / h
25km / h
50~55km
30 degrees
-10~45°C
IP 54
18650 lithium-ion power battery
12.8AH
48V
Power
48V
250W standard / 350W off road
DC54.6V / 2A
AC220V
42V
1.5A
4-5 hours
Coloured LCD screen
Yes
hydraulic disc brakes
Pneumatic tyre
Remarks: electric quantity, load, tyre pressure, pavement environment, chain and axle lubrication
degree, etc. will affect the maximum speed; the endurance mileage is measured at a load of 60kg
and a speed of 15~25km/h on flat and hardened road under continuous testing from 100% power
capacity to 0% power capacity; driving habits, temperature, load, tyre pressure, pavement
environment and other factors will affect the endurance mileage.
Dimensions
Performance
parameters
Electrical
specifications
Product Features
EN 06
Product Description and Characteristics
• Part description
• Technical Parameters
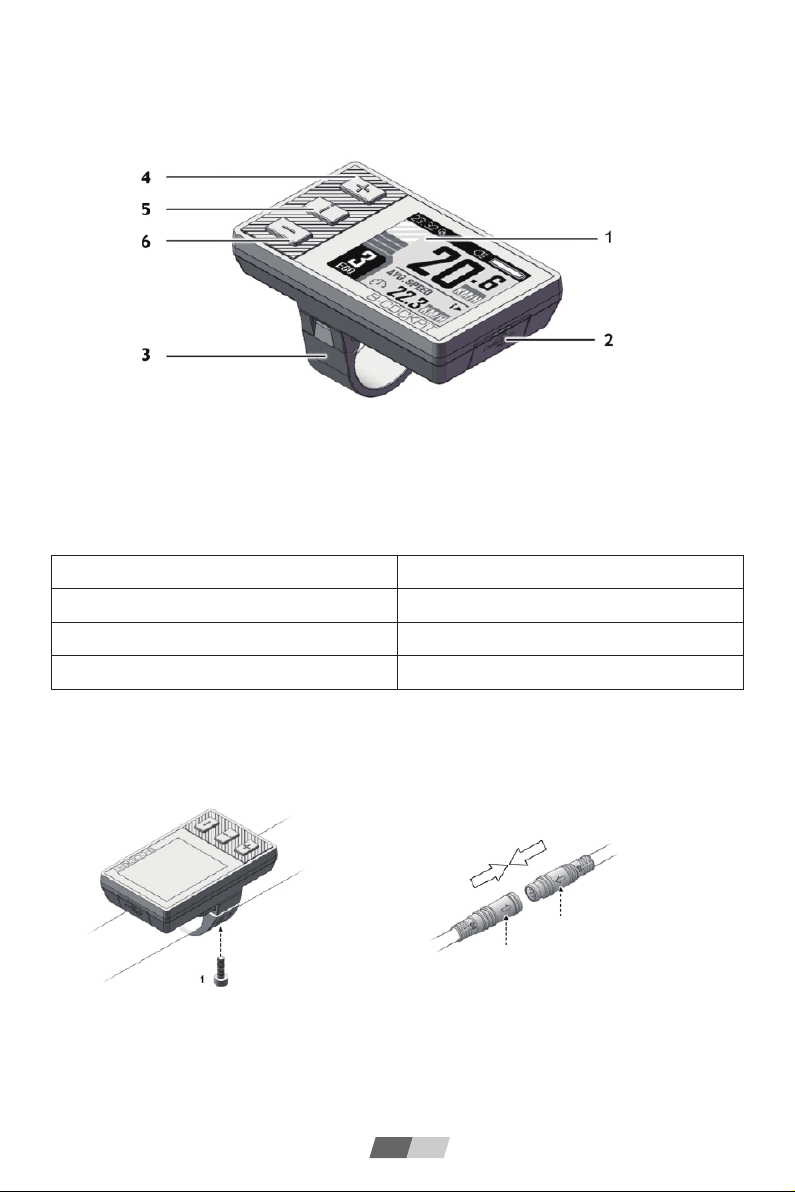
Installation Instructions
• Installation of BC-18 device
1. Use M3 hex socket key, tighten screw 1, and fix the instrument to the left side of the handlebar.
Tightening torque: 0.2N.m. Do not over-tighten it, otherwise the surface of the instrument may be
damaged.
2. Align the two arrow marks and firmly connect the cable on the instrument with the cable on the
electric bicycle controller.
1. 1.77'' inch, 160x128 color TFT LCD screen
2. USB port with protective cover
3. Mounting bracket
4. "+" button
5. "i" display function button
6. "-" button
Rated operating voltage
USB port output
Operating temperature
Storage temperature
24V /3 6V /48 V DC
5V,500mA
-10°C ~+45°C
-20°C -+60°C
Arrow mark
Arrow mark
EN 07

Instrument interface
• Instrument interface is the default interface on the instrument
• Key function
1. "+" key:
2. "-" key:
Status Bar
Motor output energy
Speed stage
Headlight status
Time
Data indicator
Riding speed
Lithium battery capacity
Information
display area
Instrument functions
Menu interface
Short press once
Increased power
Cursor up/increase
Long press for 3 seconds
Headlight on/off
----
Press and hold for a long time
----
----
Instrument functions
Menu interface
Short press once
Decreased power
Cursor
down/decrease
Long press for 3 seconds
----
Cancel and return
Press and hold for a long time
6 km/h mode
----
EN 08
Instrument functions
Menu interface
Short press once
----
----
Long press for 3 seconds
Enter the menu interface
Save changes and exit
Press and hold for a long time
----
----
Instrument functions
Menu interface
Short press once
Change information
display
OK/Confirm
Long press for 3 seconds
Instrument system
----
Press and hold for a long time
On/Off
----
3. "i" key:
4. & Press both keys simultaneously:
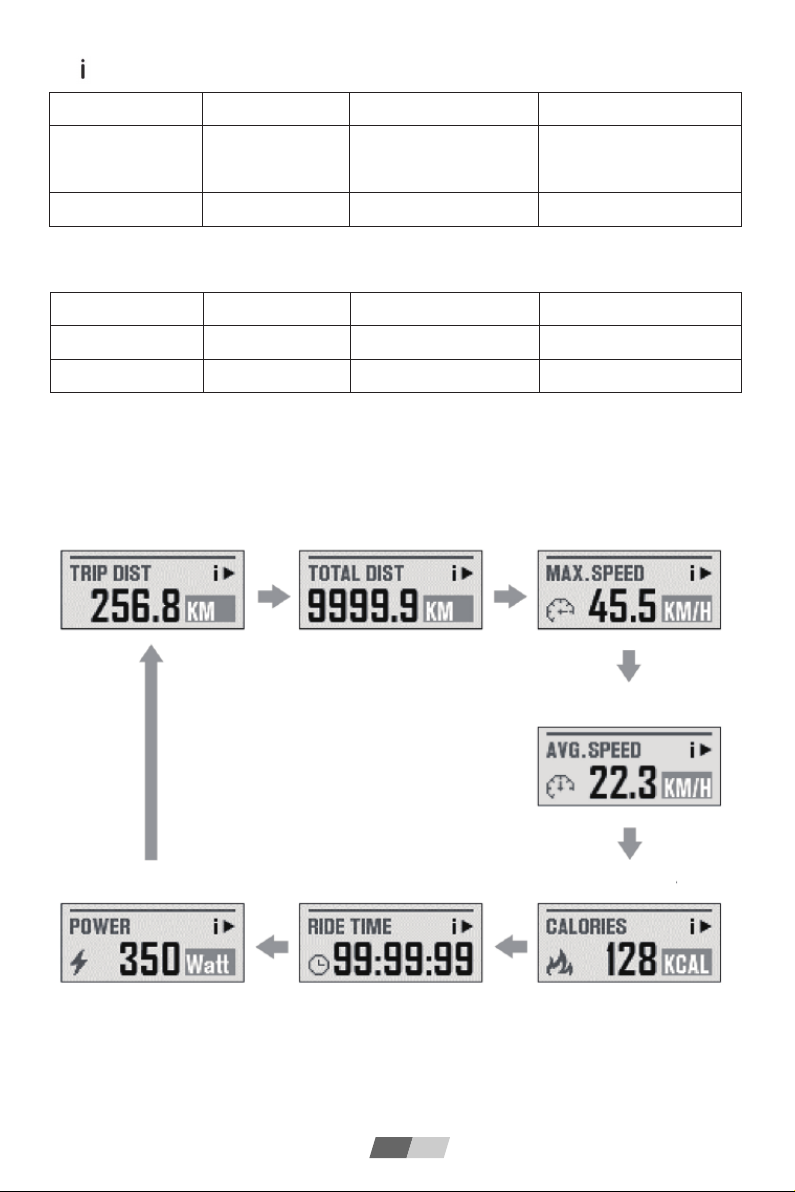
Information Display Area
In the instrument interface, short press the "i" key for circulation browsing of the
information of various riding and electric bicycles.
* If the electric bicycle is not ridden, the riding time statistics will be suspended
and reset to zero at 00:00 every day.
* Calories and riding time statistics are reset to zero at 00:00 every day.
Mileage Total mileage Maximum driving speed
Average speed
Today's calories burnedReal-time motor output power Today's riding time
EN 09

System configuration precautions
Changing the parameters in the "System Configuration" without knowledge may cause the
electric bicycle to have malfunction.
It may even make driving unsafe.
Before making any modifications yourself, consult the manufacturer.
System Operation
• Initial operation
Set the system time
1. Press the "+" and "-" two keys simultaneously and hold for 2 seconds to enter the main menu
page of the system
2. Press the "+" key and select the "Display Setting" field, and then press "i" to confirm
3. Use the same method to select "Set Date & Time" and other items below
4. On each page, you can adjust the parameters by pressing the "+" and "-".
5. The parameter being adjusted is displayed as a flashing number.
6. After the adjustment is completed, press "i" to confirm and continue to the next parameter setting
until all parameters are set.
Other Interfaces
• Error code notification
EN 10

System Operation
• Initial operation
Set the system time
1. Press the "+" and "-" two keys simultaneously and hold for 2 seconds to enter the main menu
page of the system
2. Press the "+" key and select the "Display Setting" field, and then press "i" to confirm
3. Use the same method to select "Set Date & Time" and other items below
4. On each page, you can adjust the parameters by pressing the "+" and "-".
5. The parameter being adjusted is displayed as a flashing number.
6. After the adjustment is completed, press "i" to confirm and continue to the next parameter setting
until all parameters are set.
Other Interfaces
• Error code notification
List of error codes (example only, depending on customer)
Error code
21
22
23
24
25
30
Corresponding error conditions
Controller protection
Accelerator error
Motor phase error
Speed sensor error
Brake error
Communication error
Solutions to corresponding errors
Check if the three-phase power line is connected
properly
Check accelerator conductor connections and
replace motor if necessary
Check motor conductor connections and replace
motor if necessary
Check the speed sensor conductor connections
and replace the sensor if necessary
Check the brake system conductor connections
and replace the brake system if necessary
Check joints and contacts between parts
EN 11
Table of contents
Other SMARCYCLE Bicycle manuals


