Wisper 806 Classic 2013 User manual

1
Owner’s Manual
Wisper 806Classic 2013 Model
January 2013 1st edition
We strongly recommend that you read this entire manual before using your Wisper bike

2
Contents
1Introduction......................................................................................................................................3
2Part 1 - Caring for your Wisper bike and pre use checks .................................................................4
2.1 Before you set off for the first time ..........................................................................................4
2.2 Before each use.........................................................................................................................5
2.3 Battery care ...............................................................................................................................6
2.4 Recharging your battery............................................................................................................6
2.5 Water.........................................................................................................................................7
2.6 Maintenance and adjustments .................................................................................................7
2.7 Technical specifications & performance ...................................................................................8
2.8 Simple Trouble shooting..........................................................................................................11
3Part 2 Controls and Equipment ......................................................................................................13
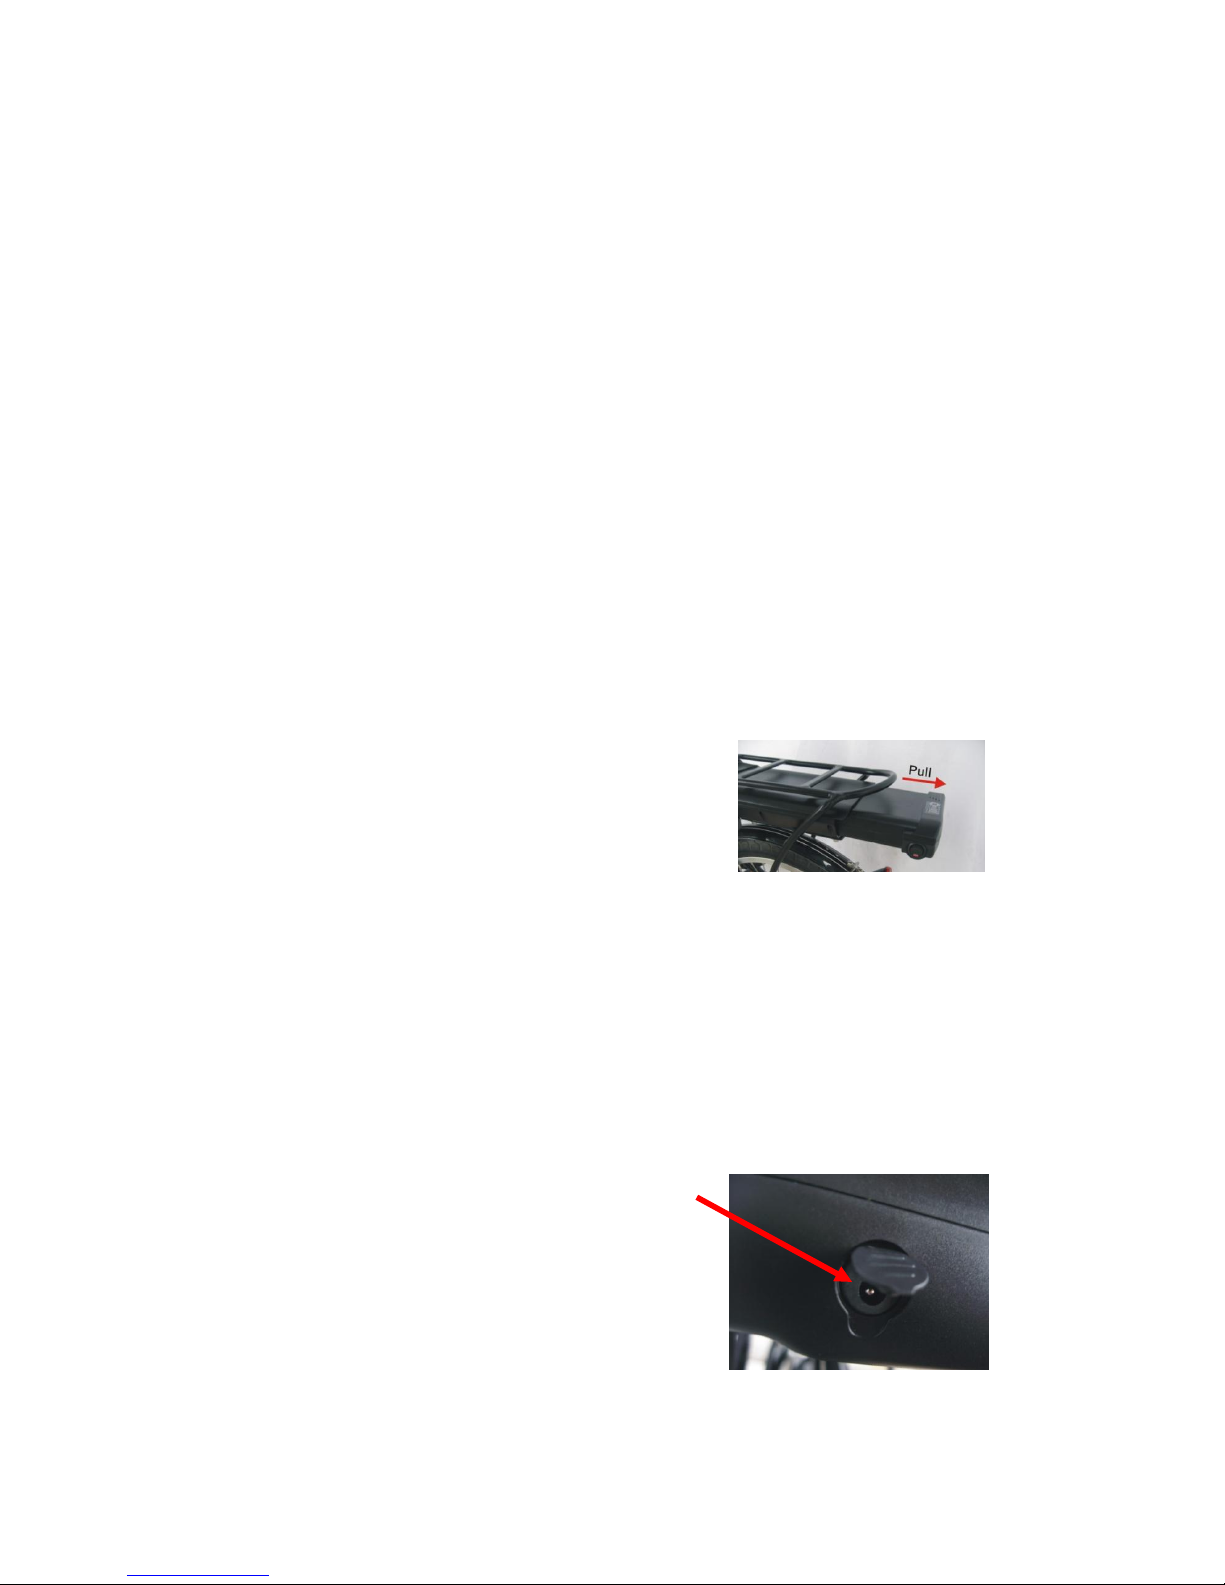
3.1 Battery on off and battery lock ...............................................................................................13
3.2 LCD function description .........................................................................................................13
3.3 The LIGHTS ..............................................................................................................................15
3.4 Pedelec mode and ASSIST mode.............................................................................................16
3.5 Throttle Mode .........................................................................................................................17
3.6 Battery capacity meter, riding style and affect on range........................................................17
3.7 Gear shifter..............................................................................................................................19
3.8 Brakes......................................................................................................................................20
3.9 The front connection box (manifold) ......................................................................................21
3.10 Quick release saddle height, handlebar adjustment and folding mechanism......................22
3.11 Saddle post suspension.........................................................................................................25
3.12 Rims and spokes....................................................................................................................25
3.13 Drive wheel removal .............................................................................................................26
3.14 Chain adjustment ..................................................................................................................27
4Warranty ........................................................................................................................................28
4.1 Battery maintenance and user responsibilities.......................................................................29
5Service ............................................................................................................................................30
6Appendix 1 Pre Delivery inspection and 300 mile service check list..............................................31

3
1Introduction
Thank you for choosing a Wisper electric bicycle.
Before you use your Wisper electric bike it is important that you read this manual carefully. If there
is anything you do not understand completely please contact us.
Please observe traffic regulations, and do not lend your bicycle to anyone who is unfamiliar with it.
The bicycle can only legally be used on the road by a person aged 14 years or older.
We strongly advise you to always wear an approved cycle helmet when using your bicycle and if you
are unfamiliar with cycling to attend a cycle proficiency course prior to using it on the public
highway.
When using any bicycle it is important that you stay within safe limits, if you feel as if you are
travelling too quickly you probably are.
Test your brakes prior to using the bike every time you use it and remember the bike will not stop as
quickly in the wet as it would in the dry.
Before you use the bike for the first time please make absolutely certain that it has been correctly
assembled. You can do this by either taking it to your nearest cycle engineer or if you are proficient
in cycle mechanics inspecting it yourself. In particular you must make sure that the pedals, saddle,
handle bars and any self assembled items have been correctly fitted.
Avoid consuming alcohol before you ride your electric bike. The use of alcohol greatly reduces
reflexes and limits your ability to ride safely
If you need to replace your battery please either dispose of it properly or preferably send it back to
us or our distributors and we will make sure it is properly recycled.
Above all enjoy your Wisper bike, happy cycling!
Wisper Ltd

4
2Part 1 - Caring for your Wisper bike and pre use checks
Your Wisper bike has been thoroughly tested at the factory prior to delivery, and undergone a pre
delivery inspection as detailed in the table in appendix 1 of this manual. Please ensure the table has
been completed by your Wisper dealer.
It is very important that you check the bike thoroughly before its first use. Equally important are
frequent and regular spot checks, they will protect you and your Wisper bike. The bike must be
returned to the supplying dealer after approximately 300 miles/500km have been completed for a
second safety inspection as detailed in appendix 1.
Please read this manual carefully. Only on full understanding of all the functions of this electric
bicycle should you attempt to use it.
2.1 Before you set off for the first time
2.1.1 Check the handle bars and handle bar stem are properly tightened
2.1.2 Check all other nuts and bolts and fixings are properly tightened, pay particular attention to
the motor fixings, side kick stand, yoke and steering head bearings
2.1.3 Check brakes and brake isolators are functioning properly
2.1.4 Check tyre pressures are correct and tyres are not damaged
2.1.5 Check reflectors and lights if fitted are functioning properly
2.1.6 Make sure battery is fully charged
2.1.7 Load the battery into your bicycle’s rear carrier and turn on the power ON/OFF button on
the battery. Lock the battery into the rear carrier to ensure the battery’s output connection
is always connected properly. Remove the key.

5
2.1.8 Press the on/off switch (labeled with O’ symbol) on the LCD display located on the left hand
side of the handlebars to check the battery capacity and the power assistance level selected.
2.1.9 To avoid dangerous unplanned acceleration, always make sure that the electrical system is
turned off and the power indicator lamps are not illuminated when mounting, dismounting or
leaving the bike unattended. For your safety, please turn off the power switch on the battery when
stopped or walking the bike
2.1.10 Remember to validate your warranty by visiting www.wisperbikes.com/mywarranty and
filling in your details.
2.2 Before each use
It is important you perform a check of your bike every time you use it, checks should include the
following, if you find any damage or problems do not use the bike until the problem has been solved
or you have had the faulty item checked by a bike mechanic or your retailer.
2.2.1 Check tyres for any visible damage
2.2.2 Check tyre pressures
2.2.3 Check for any loose nuts bolts or fixings
2.2.4 Check brake functions
2.2.5 Check electronic functions
2.2.6 Check reflectors are in place and lights are working
2.2.7 Check your battery for any visible signs of damage

6
2.3 Battery care
2.3.1 Before you use the battery for the first time it is essential to condition the battery. To fully
condition your new battery give it a complete deep charge, and discharge cycle. This is achieved by
charging your battery for 12 hours until the charger LED turns green, then use the bike until the
battery almost drained and recharge as above. After this “conditioning” process you can then charge
and discharge the battery as and when you require to best suit your usage and journey profiles.
Always recharge your battery after use apart from keeping the battery in good condition, this will
ensure your bike is always ready to go.
NEVER leave your bike for more than 24 hours with a completely drained battery.
2.3.2 If you are going to leave your battery uncharged for more than four weeks it is best left
about 60% charged. You must then re charge it every 6 to 8 weeks for two hours to prevent the
voltage from declining below safe levels which can cause irrepairable damage to the battery cells
2.3.3 Before setting off on any journey it is always better to have a fully charged battery
2.3.4 Do not expose the bicycle or battery pack to fire, heat sources, acid or alkaline substances
2.3.5 When leaving your bicycle during hot weather always leave in a shaded well ventilated area
2.3.6 For best results always recharge the battery at room
temperature
2.3.7 Before unloading the battery make sure it is turned off at
the switch and unlocked, then pull the battery box from the rear
carrier housing. Please refer to the picture.
2.3.8 If your battery is damaged or appears to be overheating for any reason immediately return it
to your retailer for advice and a safety check
2.3.9 Further information on user responsibilities and battery maintenance are included in the
warranty section of this manual
2.4 Recharging your battery
4.1 Make sure the charger is turned off and connect the
charger to your battery then connect to a suitable mains
socket. Then turn on the charger. Red and yellow lamps on
the charger indicate the battery is charging, when the yellow
light turns green the battery is fully charged. Always turn off
the charger and disconnect from the mains after charging.
Always disconnect the charger from the mains before
disconnecting the charger from the battery. It is possible that
the battery will take up to 12 hours to charge on the first charge.

7
2.4.2 Always charge the battery in a well ventilated area.
2.4.3 Do not leave the charger connected to the mains when not in use.
2.5 Water
2.5.1 Your electric bicycle is rain and splash proof and can be used in all weathers.
2.5.2 The electrical components of the vehicle, such as motor, battery, and controller, must not be
submerged in water.
2.6 Maintenance and adjustments
2.6.1 IMPORTANT! Do not attempt to open the casings of the battery, motor or controller it
could be dangerous and all warrantees will become void. If you experience a problem contact our
service department or your retailer.
2.6.2 Wheel spokes should be adjusted after 300 miles riding. The saddle post should never be
raised beyond the maximum indicated by a safety line around the tubes. The recommended torque
on the nuts is as follows:
Front axle nuts. 70 N.m
Back axle nuts. 50 N.M
Handlebar stem clamp bolt. 12 N.m
Seat pillar clamp nut/bolt. 5-8 N.m
Brake cable anchor bolt. 5 N.m
Brake centre bolt. 11 N.m
Seat clamp nuts. 24 N.m
Crank Allen bolts. 30 N.m
Gear shifter nuts. 4N.m
V brake caliper nuts. 10N.m
Rear carrier nuts. 8N.m
Mudguard bracket nuts. 8N.m
Other nuts/bolts torque depends on their size. M4:2.5-4.0N.m, M5:4.0-6.0N.m, M6:6.0-7.5N.m

8
2.6.3 Ensure the correct tension is maintained on your chain. Further details on how to adjust this
are included later in this manual. However if the chain becomes loose or frequently comes off the
chain wheel please seek advice from your dealer.
2.6.4 The brake levers should lock the wheels when compressed half way between their open
position and touching the handle bars. When they need adjusting please do so according to the
instructions included in this manual.
IMPORTANT braking distances increase on wet or icy roads.
2.6.5 Warning: Handlebar hand grips or tube end plugs should be replaced if damaged, as bare
tube ends can cause injury.
2.6.7 Lubrication:
2.6.7.1. Lubricate on a regular basis all pivot points on the derailleur, and chain with light oil or
chain lube and the brake pivot bushes (not the brake shoes or disc) with a little grease.
2. 6.7.2 Once a year, have your dealer re-grease the headset bearings, wheel bearings and pedal
bearings.
2.6.8 Recommended tools for proper maintenance:
Torque spanner with Nm gradations
Allen keys sizes 2, 4, 5, 6, 8 mm
9, 10, 15 mm open-end spanners
Socket spanners with 14, 15, and 19 mm socket
No. 1 Phillips head screwdriver bicycle inner tube repair kit, tyre pump
2.7 Technical specifications & performance
Motor High efficiency brushless front wheel drive by Dapu Japan
250W (200W available for Australia and Japan)
Battery Lithium Ion with advanced battery management system (BMS)
36V 9Ah 324Wh Capacity Weight 2.5kg
Controller 36V 14A developed specifically for Wisper for optimum performance
Mains charger Lithium 120V or 240V input, Intelligent charge system communicates with
BMS, auto stop when fully charged
36V 2Ah. Charge time 2 –4.5 hours

9
Car/boat charger Lithium 12V input (Optional at extra cost)
Connections All electronic components and motor wheel have individual connectors for
ease of servicing
Assisted range Average 30miles/50 kilometers*
Assistance modes 1. Throttle only: to 15.5mph/25kph available in UK (4mph/6kph in EC)
2. Throttle assist: complete throttle use when pedaling forward
3. Pedelec: with 6 levels of assistance power; safe mode/0%, 1/40% 2/50%,
3/60%, 4/80%, 5/90%, 6/100% power
Maximum speed 15.5mph/25kph with powered assistance, this does not affect top speed
when pedaling
Controls LCD display panel
Battery power available
Bike on/off switch
Instant Power consumption
Front and rear light on/off switch
Power assistance controls, six levels and safe mode
E-system diagnostics
Bicycle weight 19.5kg without battery
22kg Including battery and all accessories
Load capacity 100kg/220lb/15st 10lb
Frame Hand welded 6061 Alloy T4 and T6 tempered
Frame size 20” 32.8cm
Finish Graphite Silk powder coated and lacquered, oven hardened
Forks Hi-tensile steel
Seat post Alloy with adjustable suspension
Saddle Rio Plus by SelleRoyal Italy
Handlebars Black anodised alloy with ergo support grips
Stem Alloy, telescope adjustable and folding
Kick stand Black anodised alloy
Gears Shimano NEXUS no maintenance 7 speed hub. Gear changer 7 speed twist
grip
Chain ring 170mm 48 tooth
Chain KMC Z8RB rust resistant

10
Cranks Annodised black alloy
Pedals Alloy folding, sealed bearings
Brakes Rear: Tektro V
Front: Tektro V
Levers: Tektro comfort
Rims Alloy double walled 20” x 1.5” Büchel Germany
Spokes 13g stainless steel Büchel Germany
Tyres 20” x 1.75” Schwalbe Energizer Plus with 3mm Green Guard puncture
protection and hi-visibility reflective walls
Mudguards Polycarbonate shatterproof
Lighting Front: 36V 15W LED super bright power from e-system
Rear: 36V light power from bike e-system
Reflectors: front white, rear red, wheels orange
Extra equipment 25kg rack and luggage cords, bell, tool kit
Metal fixings A4 grade Stainless steel or alloy
*Bike ranges depend on many factors. Depending on rider weight and fitness, road and weather
conditions ranges will vary from 15 to 60 miles. See our web pages for more information.

11
2.8 Simple Trouble shooting
Problem
Possible reasons
Solution
Top speed too
slow
1. Low battery voltage
2. Handle bar control
problem
3. Damage to motor
driveline
1. Recharge battery fully
2. Call service
3. Call service
Power on but
motor not
working
1. Battery not connected
2. Battery fused
3. Motor connection
damaged
4. Handle bar control
problem
1. Re install battery
2. Replace fuse
3. Call service
4. Call service
Low range after
recharging the
battery
1. Tyre pressures too low
2. Undercharge or charger
fault
3. Battery capacity loss or
damage
4. Hill climbing, frequent
stops, strong head winds,
over loading.
1. Check pressures
2. Recharge completely
or have charger
inspected
3. Replace battery
4. Use pedal assist mode
and try to avoid using
throttle excessively
Also see section on
Wisper website
regarding range issues

12
The bicycle is equipped with built in diagnostics. Should a fault be detected during use then the LCD
display will display a fault code as shown below to indicate the fault.
Fault code
Description
Possible Solution
LCD
diagnostics
Code 02
Motor current is too high.
Check for motor cable damage.
Code 03
Motor cable connection may be
loose or excessive use of the throttle
from rest.
Check connections. Use pedal
assist where possible.
Code 04
Battery voltage is too low.
Re charge the battery or use
less power assistance.
Code 05
Brake lever cut out function
problem.
Isolate each brake switch in
turn by unplugging at the
manifold. Replace defective
brake switch.
Code 07
The throttle is faulty.
Fit replacement throttle.
Code 08
Controller faulty
Check wiring connections at
controller and manifold. Fit
replacement controller if
required.
Code 09
Battery output voltage is too high.
Contact service department
Code LO
Battery voltage is too low.
Re charge the battery or use
less power assistance.

13
3Part 2 Controls and Equipment
In this section the functions and any specific maintenance needed on all the main controls and
ancillary equipment are described.
3.1 Battery on off and battery lock
3.9.1 Your Wisper bike is supplied with 3 identical keys. The
key is only used for locking the battery into the bike. Please
keep a careful note of the key number as we cannot replace it
without this number should it become mislaid.
3.9.2 The battery is connected to the electrical system on
the bike automatically when you push the battery into the rear
carrier housing. To turn on the bike’s electrical system, switch
the on/off button on the battery to on. To turn off the bikes electrical system, switch the on/off
button to off. (Please refer to the picture)
3.9.3 After the battery has been turned on the bike is ready for use. There is a battery capacity
indicator on the battery and on the LCD handle bar LCD display. Press and hold the battery indicator
button on the battery to check the capacity LEDs. All lights should be displayed on a fully charged
battery.
2.9.4 To lock the battery into the bike frame turn the key clockwise so the locking bolt secures the
battery in position. To unlock turn the key anti clockwise. Please remove the key when riding. Please
read the sections in the manual for battery care and advice on charging at the beginning of this
manual.
2.9.5 The battery can be charged either on or off the bike.
2.9.6 To remove the battery first turn off the power by switching the on/off button to off. Unlock
the battery and pull out from the rear carrier housing.
3.2 LCD function description
3.2.1 The LCD display has the following functions (Refer to the picture below but note the set and
on/off function are combined into one large blue button which is activated by pressing left and right
sides respectively).
A: Power ON/OFF button. Push and hold for 3 seconds to turn on.
B: Up (increase) adjustment button. For increasing the level of pedal assistance.

14
C: Down (decrease) adjustment button. For decreasing the level of assistance.
D: Set. When pressed, you can switch the bike lights on and off and set the single trip distance. If you
press it together with C button, you can set the bike’s tyre size.
E: This shows the instantaneous power consumption. A longer bar means the motor’s power output
is higher.
F: Battery capacity. The bars indicate the charge capacity (level) of the battery. Each bar
approximates to 25% capacity remaining.
G: Instantaneous speed figures.
H: Pedelec assistance strength levels.
I: Total riding distance since last reset.
3.2.2 When the ON/OFF button is pushed and held for 3 seconds and the capacity indicator goes
out you have turned the bike “off”. When the bike is “off” you will not get any assistance from the
battery and motor and the bike is effectively simply an unpowered push bike. To turn the power
back on so the pedelec and throttle work again simply press the ON/OFF button once, the capacity
indicator will illuminate showing the power is on.
3.2.3 How to adjust functions:
3.2.3.1 To adjust the pedal assistance. Refer to paragraphs 3.4 below.
3.2.3.2 To turn on the bike front and rear light press the “set”button once. You will see a light
symbol added under the battery capacity indicator, then press the “up arrow”to turn the
lights on and the down arrow to turn the lights off. This also turns the display backlight on and off.
3.2.3.3 To read the single trip distance press the “set”button twice; you will see a symbol in
the left side of the screen. Press the down arrow to clear the value.

15
3.2.3.4 To read the single trip riding time press the “set”button three times; you will see a clock
symbol in the left side of the screen. This display does not provide the time of day –simply
elapsed riding time since last reset. Press the down arrow to clear the value.
3.2.3.5 How to change display units from Km to miles: Press the up arrow and down arrow together
for 6 seconds. This will change distance and speed readouts to miles and mph. If this operation is
repeated the units will change back to Km and Km/h.
3.2.3.6 How to calibrate the display for wheel size: It is important to calibrate the display to take
account of the wheel size fitted to the bike. If this is not done the readouts will be inaccurate. To do
this press the set button for six seconds until you see the symbol. Use the up or down button to
change the wheel diameter (inches) and the corresponding tyre circumference (mm). Wait 5 seconds
for the system to reset.
3.2.3.7 If a problem is suspected with the bike press the set button and down arrow simultaneously
to display any error code. Refer to section 2.8 for the error code descriptions. Contact your Wisper
dealer for advice should this occur.
3.3 The LIGHTS
11.1 The front and rear light is powered by the main battery and is switched on following the
procedure above. Always ensure you observe the correct polarity of the connecting wires if they are
removed for any reason.
11.2 Due to the low power consumption use of the lights will not reduce the range of the bike.

16
3.4 Pedelec mode and ASSIST mode
3.4.1 When you first ride your 806Classic you will notice that after half to one turn of the pedals
the motor will start working assisting you ride the bike by adding power to the front wheel. This is
the standard or pedelec mode. To continue using the pedelec mode you must keep turning the
pedals, if you stop pedaling the motor will stop and the bike will slow to a halt. If you start pedaling
again after half to one turn the motor will start again.
3.4.2 You will find the ASSIST level shows on the LCD display. You can adjust the assistance
strength by pressing the up or down arrow.
There are 6 levels of assistance. 40%/50%/60%/80%/90%/100% and zero assistance. The image
below shows level 6 selected.
3.4.3 80%, 90% and 100% mode are generally used when you need a greater amount of assistance
from the motor. 60% mode is used when you do not need the instant power of 90% or 100%. 40%
and 50% are used in high traffic situations or poor conditions such as ice and snow when 80%, 90%
and 100% power immediately could be dangerous.
3.4.4 Power consumption. When you increase the assistance, you will find the battery range is
reduced. Further details on this are included later in this manual in Appendix 2.
3.4.5 Zero assistance mode: In this mode there will be no assistance from the motor but the
speed, distance and time displays on the LCD display will continue to operate as normal as will the
lights.

17
3.5 Throttle Mode
3.5.1 The throttle is located on the left hand handlebar and can be used independently to the
pedelec mode to provide full power irrespective of assist level selected (providing at least level 1 is
selected) but the operation will vary depending on the country where the bike is supplied. Bikes are
set up to be legal in the region in which they are supplied and will either provide full power (100%)
or power up to 4 mph (6kph) (walkalong mode) independently of the pedelec.
3.5.2 The independent use of the throttle, when available, will enable you to use the throttle
without pedaling. However to achieve optimum performance and life from the motor it is
recommended that opening the throttle full from standing still be avoided and that where possible
pedal assistance should be used when starting the bike from rest.
3.5.3 The use of the throttle in pedelec mode is legal in most countries. Throttle in pedelec mode
enables you to turn up the power to the motor as long as you are pedaling the bike, if you stop
pedaling the motor will stop too. If you have the pedelec mode set too Low, you can increase the
assistance from the motor from 40% to 100% of available power simply by turning the throttle
towards you.
IMPORTANT Make sure your throttle grip and the grip on the left hand side of your handle bars
are always intact and in good condition. Uncovered handlebar tubes can be very dangerous in case
of a collision. Ensure the spacer fitted between the throttle and the fixed grip is properly installed.
Warning: The electric motor on your bike is very powerful and if you set of in high assist mode you
may cause the front wheel to spin. This is the same on any motorized vehicle. We therefore highly
recommend that you always start off with the bike set to the lowest level of assistance and only
use a small amount of throttle until you are moving forwards at walking pace.
3.6 Battery capacity meter, riding style and affect on range
The range of the bike (distance covered between recharging of the battery) is greatly influenced by
the level of assist selected, the amount of pedal assistance provided by the rider and the use of the
throttle. If a high level of assist is selected then the range of the bike will be reduced compared to

18
using a lower level of assist. Similarly if the rider does not pedal at all and relies totally on the
throttle the range will be very significantly reduced.
The Wisper pedelec system simply detects that the pedal cranks are turning and any continued
forward motion of the cranks will result in the bicycle electronics proving the full level of assistance
selected on the handlebar display regardless of rider input effort. Hence in certain situations where
little rider effort is being provided, the range can be reduced.
The optimum range is achieved when rider pedal effort is maximized and an ideal situation is for the
rider to aim to match the power being provided by the bike on an equal basis.
Assist level 1 is set relatively high at 40% power. Hence even using what appears to be a relatively
low level of assistance, the bicycle electronics are actually providing almost ½ of the rated power
output of the bicycle. For many riders assist level 1 will provide more than adequate assistance and
it is recommended the lowest level of assistance possible is selected if maximum range is important.
The battery capacity indicator is provided to give an approximation of battery capacity remaining.
Each bar (LED) approximates to a ¼ of the capacity. However this indicator relies on sensing battery
voltage which will rise and fall depending on the amount of power being demanded at any given
time, ambient temperatures etc. Hence the meter should only be used for indication purposes.
The battery capacity indicator built into the top of the battery (4 LEDs) provides a similar indication
and operates on the same principle.
Under heavy power situations (full throttle or high levels of assist) the battery voltage will
temporarily dip resulting in the capacity meter showing a lower level of charge. When that heavy
power is reduced the capacity meter may rise again as the battery naturally recovers its voltage.
During the discharge period of the battery the voltage will drop from an initial voltage of nearly 42
volts to a minimum of 31.5 volts. The bulk of the discharge period will be in the range of 38 to 36
volts which provides the optimum performance for the bicycle. Hence due to this wide range in
voltage the performance of the bike will vary depending on the state of charge of the battery. To
achieve the best possible performance it is better to start a journey with a fully charged battery and
to recharge it if possible as soon as the capacity indicates less than ½ capacity remaining.
When the output of the battery reaches 31.5 volts the bicycle electronics will cut power to the
motor to protect the system. A “LO” code or “03” code may also be displayed on the LCD display.
This is quite normal and a safety feature built into the system. Also as the battery discharges,
particularly when only the final 25% capacity is remaining (1 bar displayed on the capacity meter), it
is likely that heavy use of the throttle or use of high assist levels in pedelec mode will cause the
battery voltage to temporarily dip resulting in the above error codes being displayed and a
temporary cut out of power. If this occurs it is recommended that the minimum level of assist is
used, and the use of the throttle is minimized, until the battery is recharged.

19
3.7 Gear shifter
3.6.1 The 806 Classic is fitted with a 7 speed Shimano Nexus gear unit contained within the rear
hub.
3.6.2 The twist grip gear shifter is located on the right hand side of the handlebars. Turning the
twist grip away or towards you as shown by the arrows on the grip you will change gear which will
be indicated by a corresponding gear number in the twist grip housing. It is not necessary to pedal
while changing gear and gear changes can be made with the bike stationary. No maintenance is
required under normal operation apart from occasional adjustment of the cable and chain tension.

20
3.8 Brakes
3.7.1 Front and rear V brakes are fitted to the bicycle.
3.7.2 The brake levers are fitted with cut outs which are required by law. This means that when
you pull on either the back or front brake lever the motor immediately stops working.
3.7.3 Inspect brake pads for wear on a regular basis. If the grooves in the braking surface are less
than 2 mm deep, replace the pads as follows. (illustrations are shown for front brakes)
3.7.4 Squeeze both brake arms together and unhook the curved tubular cable guide end from the
left hand brake arm (as viewed from the front of the bike in the above image). This will allow the
brake arms to spring clear of the wheel rim. Use a 5mm Allen key to loosen the bolts holding the
brake pads to the arms (right & left), then take the spacers and washers out.
3.7.5 Install new brake pads taking note of the spacer positions, then with both pads pressed
against the wheel rim by squeezing the arms together, tighten the brake pad bolts, making sure they
are aligned correctly on the rim, and there is a gap of 1mm between the top of the rim and the top
of the pad. Finally tighten to 6-8N.m.
This manual suits for next models
1
Table of contents
Other Wisper Bicycle manuals

Wisper
Wisper 705se User manual

Wisper
Wisper 806 Alpino Troubleshooting guide

Wisper
Wisper 805FE User manual

Wisper
Wisper 705se User manual

Wisper
Wisper 705 Classic 2013 User manual

Wisper
Wisper 905se City User manual

Wisper
Wisper TAILWIND User manual

Wisper
Wisper 805FE User manual

Wisper
Wisper 806 Alpino User manual

Wisper
Wisper 906Alpino User manual