SMART CFF1000 Quick guide

Exclusively Distributed by:
SMART Worldwide
(an SMA Worldwide Ltd. Company)
SMA House, Langley Waters, Home Park
Kings Langley, Herordshire, WD4 8LZ
SMART Worldwide Ltd 2016 ©
www.smartworldwidefun.com
Model: CFF1000
SMART (an SMA Worldwide Ltd. Company) have a policy of continuous improvement
and we reserve the right to change specications and colours without notice.
SMART is a registered trademark of SMA Worldwide Ltd, London, England.
www.smartworldwidefun.com
© SMA Worldwide Ltd. 2016

SMART Modern Cascading Chocolate Fountain
Instructions & Recipes
CFF1000

ENGLISH
2
SAFETY
Appliance Specications:
220-240 V, 50-60 Hz
170 Watts,
Your safety and the safety of others is very important.
We have provided many important safety messages in this
manual and on your appliance. Always read and obey all safety
messages.
This is the safety alert symbol.
This symbol alerts you to potential hazards that can
kill or hurt you and others.
All safety messages will follow the safety alert symbol.
All safety messages will tell you what the potential hazard is, tell
you how to reduce the chance of injury, and tell you what can
Make every day a party!
Visit www.smartworldwidefun.com for more fun products.
CONTENTS
IMPORTANT PRECAUTIONS . . . . . . . . . . . . . . . . . . . . . . . . . . . . . . . .3
IMPORTANT SAFEGUARDS . . . . . . . . . . . . . . . . . . . . . . . . . . . . . . . .3
INTRODUCTION . . . . . . . . . . . . . . . . . . . . . . . . . . . . . . . . . . . . . . . 4
PARTS & ASSEMBLY . . . . . . . . . . . . . . . . . . . . . . . . . . . . . . . . . . . . .5
HOW TO OPERATE. . . . . . . . . . . . . . . . . . . . . . . . . . . . . . . . . . . . . .6
HELPFUL TIPS . . . . . . . . . . . . . . . . . . . . . . . . . . . . . . . . . . . . . . . .6
CLEANING & MAINTENANCE . . . . . . . . . . . . . . . . . . . . . . . . . . . . . . . 7
RECIPES . . . . . . . . . . . . . . . . . . . . . . . . . . . . . . . . . . . . . . . . . . . .8
RETURNS & WARRANTY . . . . . . . . . . . . . . . . . . . . . . . . . . . . . . . . . . 9

ENGLISH
3
IMPORTANT PRECAUTIONS
1. NEVER use a scouring pad on the unit.
2. NEVER leave unit unattended while in use.
3. NEVER place anything other than the intended ingredients in the base bowl.
4. NEVER use near water.
5. NEVER touch tower with ngers while machine is on, nor while it is still hot.
6. Unplug unit from outlet when not in use and when cleaning.
7. DO NOT operate this appliance with a damaged cord or plug or in the event the
appliance ever malfunctions.
8. DO NOT put Base in dishwasher.
9. Keep out of reach of children.
10. This appliance is NOT A TOY.
11. This appliance is not intended for use by unsupervised young children or cogni-
tively challenged individuals.
12. Young children should be supervised while product is in use to ensure that they
do not play with the appliance.
IMPORTANT SAFEGUARDS
When using electrical appliances, basic safety precautions should always be followed, including:
1. Read all instructions before operating this appliance.
2. DO NOT TOUCH moving parts.
3. To protect against electrical shock do not immerse cord, plug or any part of the Base in
water or other liquids.
4. Close supervision is necessary when any appliance is used by or near children.
5. Unplug from outlet when not in use and before removing parts for cleaning.
6. DO NOT operate any appliance with a damaged cord or plug or if the appliance has been
damaged in any manner. Return the appliance to the nearest repair shop for examination or
repair.
7. The manufacturer does not recommend the use of accessory attachments. Use of attach-
ments may cause injuries.
8. DO NOT use outdoors.
9. DO NOT let the cord touch hot surfaces.
10. DO NOT place on or near a hot gas or electric burner, or in a heated oven.
11. Extreme caution must be used when moving this appliance.
12. This unit must be on a level surface to operate properly.
13. DO NOT use this appliance for other than its intended use.
14. DO NOT leave unit unattended while in use or when plugged in to an outlet.

ENGLISH
4
1. DO NOT assemble the Auger or Tower while the motor is running. Make sure unit is un-
plugged before assembling.
2. DO NOT heat chocolate over 110oF as warping of the towers may occur.
3. Heating Element will get hot. Avoid contact until fully cooled.
4. A short power supply cord is provided to reduce the risk resulting from becoming
entangled or tripping over a long cord.
5. Extension cord can be used if care is exercised in use.
6. The marked electrical rating of an extension cord should be at least as great as the
electrical rating of the appliance.
7. This appliance has a polarized plug (one blade is wider than the other). To reduce the risk
of electrical shock, this plug is intended to t into a polarized outlet only one way.
8. Keep hands and foreign objects out of the fountain while it is running. Regularly check the
Bowl to make sure that it is clear of chunks of fruit, etc. as they will clog the base of the Tower and
the chocolate will not ow properly.
INTRODUCTION
Thank you for purchasing The SMART Cascading Chocolate Fountain! This chocolate
fountain creates a cascade of sweetness that will add mouth-watering fun to any
occasion. Friends and family will enjoy snacks, appetizers and desserts with the SMART
Cascading Chocolate Fountain. Use as a beautiful addition to any dining table or create
an impressive display at special events. Try a variety of chocolates and sauces to create
the avor you desire.
Try the following:
• Milk Chocolate
• Dark Semi-Sweet Chocolate
• White Chocolate
• Butterscotch
• Liqueuers
Dip strawberries, marshmallows, apple wedges, pretzels, cookies, ice cream balls, pea-
nut butter balls – use your imagination!

ENGLISH
5
PARTS & ASSEMBLY
Your SMART Cascading Chocolate Fountain requires little assembly. Prior to use, wipe
out Bowl with a damp cloth and dry. Wash Auger, Tiers, and Tower Cylinders in warm
soapy water, rinse, then dry.
After cleaning, return Auger to Base. Make sure Auger is securely in place by aligning
the opening on the bottom of the Auger with the Base Pin. Do not attempt to place
Auger, Tiers, or Tower Cylinders on Base or remove from Base while the motor is run-
ning. Make sure the Tower Cylinders are tted on the posts in the Base properly.
SWITCH POSITIONS
Left: Heat Motor / Top: OFF / Right: Heat

6
HOW TO OPERATE
• First, nd a stable surface near an electrical outlet before starting. Unit must be
level to operate properly and to create the desired owing eect. Make sure your cord
is away from any water source. If needed, it is acceptable to use an extension cord.
• Turn the switch on the right to start the heater on the SMART Cascading Choc-
olate Fountain. Let the unit warm up for at least 3 – 5 minutes before adding melted
chocolate.
• While the machine is warming up, get a microwaveable bowl. Fill bowl with two
pounds of chocolate chips (32 ounces) and ¾ of a cup of oil. You may need to add
more oil to ensure proper ow. If you are using Belgian Chocolate, you do not need to
add oil.
• Place in microwave for 2½ minutes. When done, stir choolate. If necessary,
continue to warm chocolate in microwave until melting is complete (another 2 to 2½
minutes). DO NOT heat chocolate over 110oF as warping of the towers may occur.
• Never add cool or cold liquids to the melted chocolate in the fountain as this will
stop the ow.
• Chocolate needs to be completely melted and of thin consistency to allow proper
ow. Use a large spoon to test the consistency of the chocolate. If the chocolate drips
too thickly from the spoon, add more oil to the mixture.
• Once the chocolate is completely melted and of proper consistency, turn the mo-
tor switch on the SMART Cascading Chocolate Fountain to the HEAT MOTOR position,
so the motor and the heater are running at the same time.
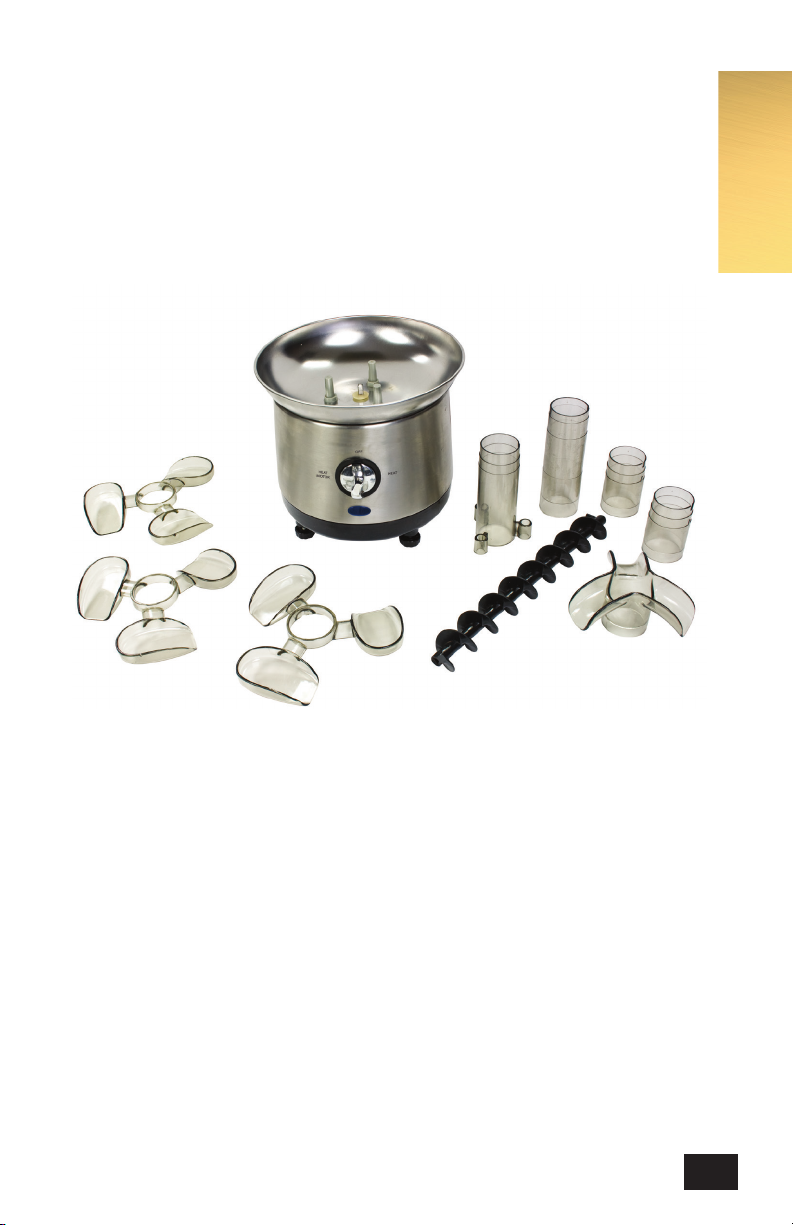
• Carefully pour the melted chocolate into the Bowl at the base of the Tower. The
melted chocolate should be drawn under the Tower Cylinders and carried up the Tow-
er by the Auger. Chocolate should then begin to ow from the top of the Tower and
cascade evenly down each tier.
• The SMART Cascading Chocolate Fountain must be level to ensure proper sheet-
ing of the chocolate. Be careful not to drop pieces of food into the Bowl which clogs
the ow of chocolate.
HELPFUL TIPS
• If chocolate begins to drip instead of ow down the Tower, the chocolate is too
thick. Thin the chocolate by adding vegetable oil. Also, make sure that the unit is level.
• If the chocolate is owing unevenly, the unit is not level. Make sure that the unit is
on a level surface so that the chocolate is evenly distributed.
• If the ow is intermittent, interrupted or not owing properly, check to see if there
are chunks of food in the Bowl of the Base that may be clogging the chocolate ow.
• Never add cool or cold liquid to the SMART Cascading Chocolate Fountain as this
will stop the ow of the fountain.
• DO NOT heat chocolate over 110oF as warping of the towers may occur.
ENGLISH

7
CLEANING & MAINTENANCE
To prolong the life of your SMART Cascading Chocolate Fountain be sure to follow
cleaning instructions after every use. Never use anything abrasive on the base to main-
tain the original nish.
1. Make sure unit is unplugged before cleaning. Allow parts to COOL to the touch.
Tower, Auger, and Base can get VERY HOT!
2. Before rst use and continuing after each use, be sure to wash the Tower and
Auger thoroughly. AVOID washing parts in the dishwasher.
3. To make cleaning of the SMART Cascading Chocolate Fountain easier, carefully
remove the Tower and Auger (after cooling) and wipe o remaining chocolate with
paper towels. Wash in warm, soapy water, rinse and dry.
4. Carefully pour out as much remaining chocolate from the Bowl as possible. Use
non-abrasive, damp sponge or cloth to wipe clean the rest of the unit. Then, wipe with
a non-abrasive towel to dry.
DO NOT POUR OUT EXCESS OR LEFTOVER CHOCOLATE DOWN ANY DRAIN. POUR
INTO A PLASTIC BAG OR DISPOSABLE CONTAINER THEN PUT INTO THE GARBAGE.
SMART CONVERSION TABLE
1 cup our = 125g our
1 cup butter = 225g butter
1 cup brown sugar = 170g brown sugar
1 cup granulated sugar = 170g granulated sugar
1 cup icing sugar = 100g icing sugar
1 cup uncooked rice = 170g rice
1 cup chopped nuts = 100g chopped nuts
1 cup fresh breadcrumbs = 150g fresh breadcrumbs
1 cup sultanas = 140g sultanas
1 shot = 11/2 ounces (45 ml)
1 cup = 5.33 shots (239 ml)
10 ounces = 0.625 pounds
ENGLISH

8
RECIPES
For best results, chocolate should contain 60% cocoa. Any higher percentage
of cocoa will require the addition of vegetable oil to thin out the mixture. DO
NOT ADD ANY COLD LIQUIDS TO FOUNTAIN DURING OPERATION.This will
cause your mixture to thicken and not ow properly.
Enhance the avor of your chocolate using liqueurs. Try these delectable
chocolate creations:
Orange Chocolate:
Orange Liqueur or Orange Concentrate
Chocolate Hazelnut:
Hazelnut Liqueur
Coee Chocolate:
Amaretto
Mint Chocolate:
Crème de Menthe
Chocolate Macaroon:
Crème de Coconut
Chocolate Liqueur:
Any Brand of Chocolate Liqueur
Try the SMART Luxury Belgian Chocolate! It is specically designed for
our Chocolate Fountains!
To burn the alcohol o of the liqueur:
• Prior to mixing the liqueur with the chocolate, measure ¼ cup of liqueur
(more or less depending on taste) and pour into a small cooking pot.
• Cook the liqueur on the stove top and bringing to a boil.
• Mix the liqueur with choice of chocolate before adding to the SMART
Cascading Chocolate Fountain
You can also melt cheese to create a cheese fondue fountain. Dip grapes,
apples, breads, shrimp, crackers, and pretzels – use your imagination! In
order to use cheese, just prepare the cheese as you would for a regular
fondue pot by diluting it with white wine or cream to keep it liquid, enabling
it to ow through the tower. Powdered cheese may be used as well.
Barbeque sauces may also be used. Try your favorite barbeque sauce and dip
cooked chicken cubes, beef/steak cubes, pork cubes or shrimp. Just keep in
mind the consistency of the sauce needs to be thin! Use wine, liquor or other
liquids to thin the sauce.
ENGLISH

9
RETURNS & WARRANTY
SMART Cascading Chocolate Fountain
Should you have any questions, please contact the seller.
Exclusively Distributed by:
SMART Worldwide
(an SMA Worldwide Ltd. Company)
SMA House
Langley Waters, Home Park
Kings Langley, WD4 8LZ
Hertfordshire
United Kingdom
Phone: Please see website for details
Web: www.smartworldwidefun.com
Email: [email protected]
Customer Service Inquiry
To submit a Customer Service inquiry, go to www.smartworldwidefun.com
and ll out the Customer Service Inquiry form and click the Submit button.
This appliance is designed and built to provide many years of satisfactory per-
formance under normal household use. The distributor pledges to the original
owner that should there be any defects in material or workmanship during
the rst 90 days of purchase, we will repair or replace the unit at our option.
Our pledge does not apply to damages caused by shipping, mishandling or
unit being dropped. A product deemed defective either from manufacturing
or being mishandled is up to the distributor’s discretion. In order to obtain
service under this warranty, please contact the seller as the rst port of call.
This warranty does not apply to re-manufactured merchandise.
Please read these instructions carefully. Failure to comply with these instruc-
tions, damages caused by improper replacement parts, abuse or misuse will
void this pledge to you and is being made in place of all other expressed
warranties.
For more information, visit us online at www.smartworldwidefun.com
Like us on Facebook at www.facebook.com/SMARTWorldwide
Follow us on Twitter at @SMARTWorldwide1
View us on YouTube at www.youtube.com/user/SmartWorldwideFun
To activate
your warranty
please visit
our website
w
w
w
.
s
m
a
r
t
w
o
r
l
d
w
i
d
e
f
u
n
.
c
o
m
w
w
w
.
s
m
a
r
t
w
o
r
l
d
w
i
d
e
f
u
n
.
c
o
m
ENGLISH
Table of contents
Other SMART Kitchen Appliance manuals

SMART
SMART SMART Breakfast Master SBM2000 User manual

SMART
SMART MDM600KIT Quick guide

SMART
SMART GCM600SMART Quick guide

SMART
SMART RKP530 Quick guide

SMART
SMART HSB590 User manual

SMART
SMART PW01 User manual

SMART
SMART SBM10 User manual

SMART
SMART SPC810 Technical specifications

SMART
SMART SSM24 Technical specifications

SMART
SMART RSM950 Quick guide