SmarTrike Xtend Bike Guide
Xtend Bike
Warning and Maintenance
1
20832621303
Australia
Usa
ENGLISH
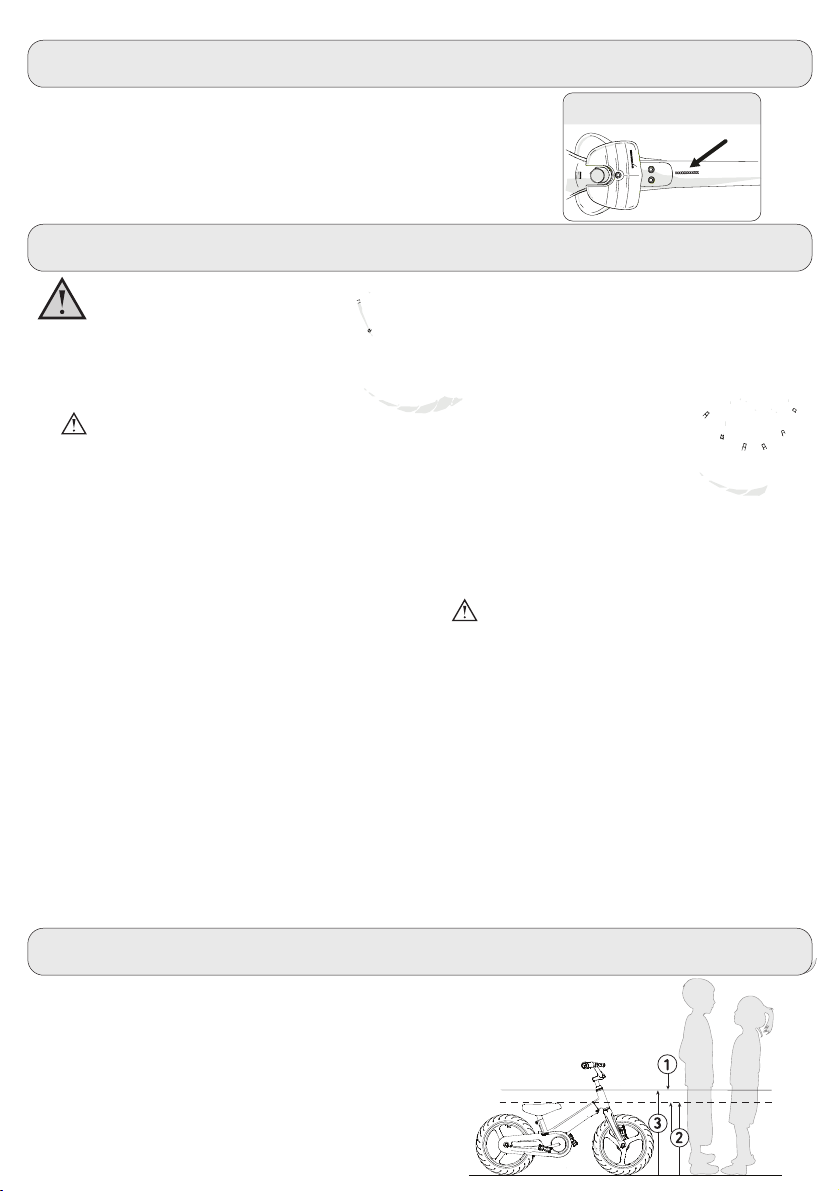
NOTE: This information is available only on the bicycle.
As shown in the image, our bicycle has the production date
code stamped into its body (model / STR / month /year).
X
X
XX
X
X
X
X
X
X
X
XX
Under the body tube
Rider must have at least 2.5cm (1) between their crotch
and the seat when standing
with feet shoulder-width apart and flat on the ground
(2). Make necessary
adjustments to the bike so the rider’s leg-length is at
least 2.5cm higher than the bike's seat (3).
Meanings of Warnings:
This symbol is highly crucial. Carefully see the word “CAUTION” or “WARNING” which follows
it. The word “CAUTION” is provided before mechanical instructions. In case you do not obey these
instructions carefully, mechanical damage or failure of a part of the bicycle can take place.
The word “WARNING” is given before personal safety instructions. If you do not obey these
sensitive instructions, injury to the person riding or to others can take place.
1. WARNING! This bike has been designed as children bicycle which should be used on smooth,
non-motorized vehicle lane or pavement. Please avoid riding on slope or bumpy terrain as this
might cause tumbling over.
2.Children should always wear a helmet when riding this product.
3.Parents or carers must read the Assembly Instructions and instruct children how to use the child’s
bike, particularly the safe use of the braking system. Make sure child is aware of potential hazards
and properly understands how to use the brakes before cycling. Please keep the instruction manual
for future reference.
4.The rider should conduct regular checks on brakes, tires, steering, rims, and caution concerning
possible increased braking distances in wet weather. WARNING! To avoid personal injury,
strictly forbid children to touch the chain, chainwheel, freewheel and other rotating components.
5.The rider shall follow the local legal requirements, specially national regulations as lighting and
reflectors, when the bicycle is to be ridden on public roads. Parents or carers should ensure that
the child understands and knows the local legal requirements.
6.The rider should avoid riding under harsh environment and during night.
7.The rider should select only original accessories. If the front fork needs to be replaced, the
set-back and inner diameter of the new one should be consistent to the original one.
8.The replacement of the handlebar hand grip or tube end plugs must be done if they are
damaged. This is necessary as bare tubes could cause injury. All the products with capped
handlebar ends need to be regularly checked to ensure that there is ample protection for the ends
of the handlebars
9.The maximum load weight (rider together with the belongings) of this product is 100lbs (45kg).
Maximum loading weight of rider, belongings and bike is 100lbs (45kg).
10.This bicycle cannot fit a carrier or child seat.
2
Rider maximum weight should be no more than
100lbs (45kg)
.
Owner’s Bicycle Identification Record
Warning and Safety Information
Fitting the Rider to the Bicycle

Before You Ride
Stem Adjustment
WARNING! Before every ride, it is important to carry out the following safety instructions,
1.If the bicycle was unassembled when purchased, before first ride, ensure the bike has been
assembled and adjusted exactly as written in assembly guide.
2.Ensure the handlebar and seat height are appropriate to the rider.
3.Ensure all components are assembled in place and screwed tightly,especially the pedals
and the stem. If any component gets loose, please screw tightly before use,according to torque table.
4.Ensure the front and rear brakes work properly.
5.Ensure both ends of the handlebar are properly protected.
6.Ensure tires are inflated in compliance with the pressure indicated on the tire sidewall.
7.Check that the tires show no signs of excessive wear or flat spots, and that there are no cuts or
other damage. Excessively worn or damaged tires should be replaced.
8.Ensure the chain works properly. The chain needs to be adjusted if it gets loose, in case of falling
9.Check the reflectors: Do not ride the bicycle in case the reflectors are not installed correctly,
damaged, or missing. Ensure the visibility of the reflectors is not blocked by clothing or other articles.
Clean the reflectors as necessary with soap and a damp cloth because dirty reflectors do
not work well.
10.Ensure all accessories are assembled firmly and work properly.
11.Ensure that none of the bike parts are deformed.
WARNING! Stop riding the bike if any bike part is deformed.
The deformed part should be replaced immediately.
WARNING: To prevent steering system damage and
possible loss of control, the “MIN-IN” (minimum
insertion) mark , on the stem must be below the top
of the locknut B .
NOTE:
Remove plastic cap C from the end of
the stem D .
A
STEPS:
1. Insert the stem D into the fork ( fig A ).
2. Point the stem towards the front section of
the bike.
3. Streamline the stem with the front fork and
tighten the stem bolt securely.
4. Tighten the stem bolt E just enough to hold it
in place.
fig A
D
E
C
A
B
6mm /0.23”
3

Handlebar Adjustment
WARNING: If the handlebar clamp in not tight enough, the handlebar can slip in the stem.
This can cause damage to the handlebar or stem, and can cause loss of control.
If necessary, loosen the handlebar clamp nut/screw F and rotate handlebar into
a comfortable riding position (fig A, B).
NOTE: Do not over tighten. See torque table for recommended torque.
fig B fig A
2
F
13
6mm / 0.23‘’
Seat Bolt Mount
Use a 5mm Allen key for adjusting the height of the
seat as per the drawing on page number 3.
Pull the seat out as per the required height.
Use the 5mm Allen key for locking the mechanism
back.
After assembling the seat,
press down on the seat to
make sure it is well
reinforced.
C.
B.
A.
A
B
C
Seat Adjustment
WARNING: In order to
prevent the seat from
becoming loose and a
possible loss of control, the
“MIN-IN” (minimum
insertion) mark A on the
seat post is placed below
the top of the seat tube B .
According to European standards,
do not insert the seat further than
the top mark (Illustration mark C ).
5mm
4

Testing Stem and Handlebar Tightness
To test the tightness of the stem:
Straddle the front wheel of the bike between your legs.
Turn the handlebar in order to try and turn the front wheel.
If the stem and handlebar turn without turning the front wheel, readjust the stem with the
wheel and secure the stem bolt(s) tighter than before (about 1/2 turn only at a time).
Carry out this test again, until the stem and handlebar do not turn without turning the
front wheel.
To test the tightness of the handlebar clamp:
Hold the bicycle in a stable way and try to move the ends
of the handlebar back and forth or up and down.
WARNING: Make sure not to exceed 100 lbs (45 kg) force.
If the handlebar moves, loosen the
bolt(s) of the handlebar clamp loosen.
Place the handlebar in the proper
position and tighten the bolt(s) of the
handlebar clamp tighter than before.
Carry out this test again, until the
handlebar does not move in the handlbar clamp.
Testing The Seat - Post Clamp Tightness
To test the tightness of the seat-post clamp:
Try turning the seat side-to-side.
If the Seat Post moves in the seat tube:
Tighten the Allen screw which is on the seat-post clamp.
Repeat this test again, until the seat post does not move in the seat tube.
Using and Adjusting the Brake
1.To stop the bike, parents should teach children to use their fingers to pull and squeeze the brake
WARNING! Brake levers with excess travel may lead to non-functional brakes. In this case,
brakes should be checked and adjusted immediately by the purchase bike shop.
levers. Rider should avoid sudden brakes, as rider might fall.
2.The front wheel can be stopped by pulling and squeezing the right brake lever. The Rear wheel can be
stopped by pulling and squeezing the left brake lever.
3.If the brake system wears out, it is recommended to visit a professional bike shop to replace the
brake pads or brake system.
It is recommended to change brake block and cables after riding 2,000 km.
Front brake
Rear brake
Japan
Front brake
Back brake
Front brake
Front brake
a
b
A. To install the brakes, pull back the silver bolt
to expose the brake line, and insert the end of
the brake line into the designated hole located
on the brake lever.
Left grip activates front brakeRight grip activates front brake
Australia
Australia
Usa
Usa
Test the brakes to make sure they are functioning.
Turn pedals backwards to activate back brake.
B
B
B
Back brake
%
5

Regularly check the tire inflation pressure as all tires lose air gradually with the passage of
Be careful not to use unregulated air hoses to inflate the tires/tubes on both sides of the bicycle.
An unregulated hose could abruptly over-inflate the tires and cause them to burst.
Replace the tires that are worn out.
New wheel noises will disappearafter 2 weeks of riding.
1. Bike’s Wear Parts: tires (incl. inner tubes), wheels, brakecable, brake block linings,chain,
sprockets,handlebar grips,pedal system. All maintenance work requires expertknowledge,
so please consult with yourlocal bike shop. Pleaseuse genuine spare parts only.
2. Take your bike formaintenance check at the store of purchase within two months after
the startof use.
3. Take your bike annually for maintenancecheck at the store of purchase, or any time an
abnormality has been found.
WARNING: In case a tire is under-inflated do not sit on the product as it can damage the tires,
rim and inner tube.
Inflating the Tire:
To inflate the tires of the bicycle, use a hand or a foot pump.
Service station meter-regulated air hoses can also be used.
The tire sidewall showcases the maximum inflation pressure.
Prior to adding air On both sides of the tire.of the bicycle, ensure that the edge of the tire
(the bead) is the same distance from the rim, all around the rim, and on both sides of the tire.
does not seem to be seated properly, release air from the inner tube until you
can push the tire’s bead into the rim where needed. Add air gradually and stop regularly for
checking the tire seating as well as the pressure, until you reach the proper inflation pressure.
Maintenance:
In case the tire
Maintenance and Service - Tire
6
WARNING:
Be careful not to over lubricate. In case oil gets on the wheel rims or the brakes,
it will minimize the brake performance and thus a longer break distance will be necessary
to stop the bicycle.
Use light machine oil (20W) for lubricating the bicycle as per the following table:
Lubrication & Maintenance
Put the bicycle on its left side and slowly turn the rear
wheel in a clockwise direction. Apply four drops of oil
in the crack between the rear sprockets (which are
stationary) and the freewheel body
(which turns clockwise).
Put four drops of oil into both ends of each cable.
On the pivot point of each cantilever brake, put one drop
of oil.
On the pivot point of each brake lever put one drop of oil.
Put one drop of oil on each roller of the chain. Make sure
Put four drops of oil where the axles go into the pedals.
What
Pedals
Chain
Brake Lever
Wheel Brakes
Brake and cable
Crank every six months
every six months
every six months
every six months
every six months
every six months
When Where

LIMITED WARRANTY:
Your new bicycle is built using global high-quality standards and is designed
only for recreational use. It is not intended for commercial use or extreme riding.
Subject to the highlighted limitations, this smarTrike bicycle is warranted
to the original purchaser to be free from any kind of defects in materials
and workmanship for a certain period from the date of purchase:
R
Mind to check if all bolts and nuts in the bike are firmly tightened on a regular basis.
You are suggested to tighten the bolts and nuts on relevant positions by torque
wrench according to the torque data in the following table.
Recommended Torque Table
WARNINGS: The chain must stay on the sprockets. In case it
Slack chains may lead to dislodgement of the
chains. In such occurrence, urgently adjust the chain by
the store of purchase.
pedal.
WARNINGS:
WARNINGS:
Do not try to repair chain on your own. If any
problem arises with the chain, go to a bicycle
service shop immediately to get the repair work done.
Correct Chain Tension and Adjustment
Adjustment:
When the chain C is at the correct tightness, the rider can rotate the crank freely and pull it no more
than one-half inch A away from a straightedge B as shown in the image. You need to adjust the
tightness of the chain by following these guidelines:
The axle nuts of the rear wheel must be loosened.
Shift the rear wheel forwards or backwards as required.
NOTE: Ensure the rear wheel is in the
center of the bicycle frame.
Maintain the wheel in this position and
tighten securely.
When not in use, the bicycle should be covered. Keep away from rain, wipe down
if becomes wet, etc. When disposing your bicycle, please follow the rules of your
local municipality. Do not just leave it where it is.
7
Bike illustration for reference only
*
Our goods come with guarantees that cannot be excluded under the Australian Consumer
Law. You are entitled to a replacement or refund for a major failure and for compensation
for any other reasonably foreseeable loss or damage. You are also entitled to have the
goods repaired or replaced if the goods fail to be of acceptable quality and the failure
does not amount to a major failure.
A
B
C
9-14 N•m15-19 N•m10-14 N•m 7 N•m 8 N•m 15-19 N•m 7-19 N•m 22-27 N•m
24-29 N•m
Back Wheel
Front Wheel
7-11 N•m

FOR SERVICE ASSISTANCE
CALL (+61)1800951184
Congratulations on the purchas of your new bike!
With proper assembly and maintenance it will oer you years of enjoyable riding!
IMPORTANT:
Carefully read and follow this manual ( and any other materials included with this bike) before riding.
Please retain this manual for future use. If this bike was purchased for child, it is the responsibility of the
purchaser to verify the bike has been properly assembled, and that the user has been properly trained and
instructed in use of the bike.
This manual is provided to assist you and is not intended to be comprehensive manual covering all aspects of
maintaining and repairing your bicycle. The bicycle you have purchased is a complex piece of equipment that
must be properly assembled and maintanied in order to be ridden safely.
If you have any doubts about the assembly or your abillity to properly assemble and maintain the bicycle. You
must have it assembled and maintaind by professional bicycle mechanic.
DANGER! : Failure to properly assemble and maintain your bicycle
could result an serious injury or death to the rider.
WARNING!
ALWAYS WEAR A HELMET
MAKE SURE STEM AND PEDALS ARE TIGHT
CHECK YOUR BRAKES
DO NOT RIDE AT NIGHT
READ OWNERS MANUAL
FOR A FREE OWNER’S MANUAL OR QUESTIONS
CALL (+61)1800951184
MADE IN CHINA
CHECK AND READ THIS DECAL
ON YOUR BICYCLE BEFORE EACH RIDE:
CAUTION!
ALWAYS WEAR A PROPERLY FITTED HELMET WHEN YOU RIDE YOUR BICYCLE.
DO NOT RIDE AT NIGHT.
AVOID RIDING IN WET CONDITIONS.
8
IMPORTANT:
Reading and following the information and instructions in this manual are assential to your ability to ride
safely.
1. It is the responsibility of the owner or in the case of a younger rider the parents of the rider to be certain all
assembly instructions have been followed, even if the bike has been assembled by the seller or a professional
assembly company.
2. Brakes are essential to safety. Be sure they are checked and working properly before each use. Remember
that any mechanical system changes condition during use and must be maintained and checked before each
use.
3. Rules for bicycle use (bicycle laws) vary from location to location so be certain the rider knows and
understands the rules that apply to sense as rider safety precautions at all times.
to properly and safely use the bike as well.
5. There are many dierent types of bicycles and often these types are designed for dierent uses. Make sure
you know what type unit you, including size of the unit that is proper for the rider to insure good control during
use. Do not overload a unit with a rider that is too heavy or too large, and do not attempt to carry extra
passengers, packages or loads on the bicycle. Do not attempt to use street bikes for o road riding.
NOTE. Carefully read this manual and follow instructions. Your bicycle may come with additional instruction
sheets that cover features unique to your bike. Please ensure that you read and become familiar with their
contents. Always wear a CPSC approved helmet when riding your laws. Keep all materials which come with the
bike for future reference.
Any major service or adjustments on your bike should be carried out by a competent adult or professional bike
mechanic. If you wish to make adjustments yourself, this manual contains important tips on how to do it.
CAUTION: Any adjustments you make are entirely at your own risk. Do NOT use your bike for freestyle and
stunt riding, jumping or competitive events. Even if you are riding a mountain bike, you should know that
o-road use or any similar activities can be dangerous, and you are warned that you assume the risk for
personal injury, damages or losses incurred from such use. Do not ride your bike when any part is damaged or
not working properly. If you are unsure how to carry out repairs or maintenance on your bike, it is vital that you
consult a local bike mechanic for professional assistance and support.
WARNING: As with all mechanical components, the bicycle is subjected to wear and high stresses.
Dierent materials and components may react to wear or stress fatigue in dierent ways. If the design life of
a component has been exceeded, it may suddenly fail, possibly causing injuries to the rider. Any form of
crack, scratches or change of coloring in highly stressed areas indicate that the life of the component has
been reached and should be replaced.
Children’s Bikes: (Max. weight of rider+luggage+bike=105lbs/47.6kg). These bikes are intended for use by
children in safe areas with riding surfaces that are in good condition and free of trac. Children must
always ride within their abilies under perental supervision and should wear a safety helmet and use other
safety equipment at all times. A parent should check the bike regularly and do required maintenance.
Condition 1—This is a set of conditions for the
operation of a bicycle on a regular paved surface or smooth
unpaved surface where the tires may unintentionally lose
ground contact.
RESPONSIBILITY OF THE OWNER
ALWAYS WEAR A HELMET
IT COULD SAVE YOUR LIFE!
A properly fitting, CPSC approver, bicycle helmet
should be worn at all times when riding your bicycle.
In addition, if you are carrying a passenger (only use
an approved child safety seat), and remember, the
passenger must also be wearing a helmet
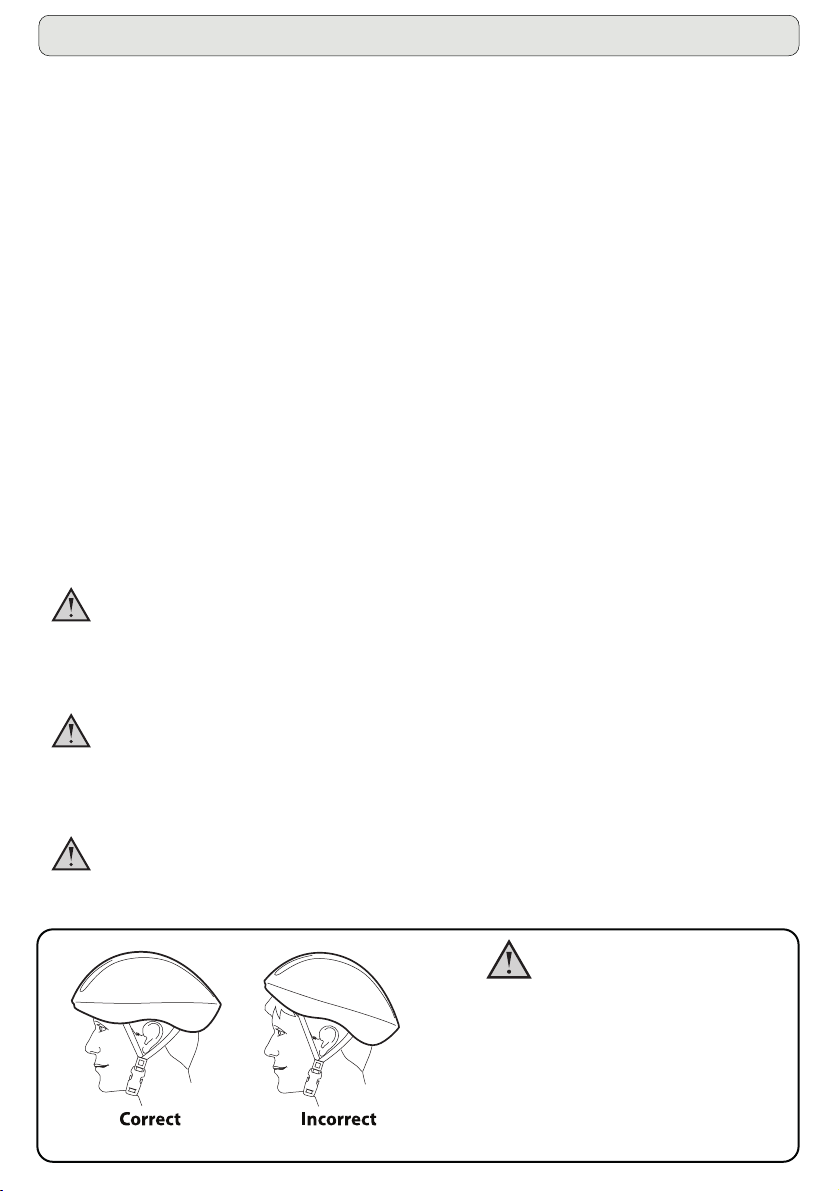
The correct helmet should:
- be comfortable
- be lightweight
- have good ventilation
- fit correctly
- cover the forehead
- be securely fastened on the rider
Forehead covered Forehead exposed
9

Your new bicycle is built using global high-quality standards and is designed
only for recreational use. It is not intended for commercial use or extreme riding.
Subject to the highlighted limitations, this smarTrike bicycle is warranted
to the original purchaser to be free from any kind of defects in materials
and workmanship for a certain period from the date of purchase:
R
Our goods come with guarantees that cannot be excluded under the Australian Consumer
Law. You are entitled to a replacement or refund for a major failure and for compensation
for any other reasonably foreseeable loss or damage. You are also entitled to have the
goods repaired or replaced if the goods fail to be of acceptable quality and the failure
does not amount to a major failure.
4 years for the frame and fork, 12 months for all Other bicycle
component parts. No other express or implied warranty given.
smarTrike® will make sure to replace without charge the bicycle frame, fork or those
component parts which are ascertained by smarTrike® to be defective in materials
or manufacture under normal use and service during the applicable warranty period.
It will be the responsibility of the original purchaser to bear any and all labor charges
that are connected with the repair or replacement of the frame, fork, and/or parts.
The component parts subject to wear and tear in use such as tires,
tubes, seats, grips, and brakes have not been covered under this.
warranty.
BEWARE THERE ARE LIMITATIONS ON WHAT WE WARRANTY:
This limited warranty is not applicable to normal wear and tear, nor is it applicable to claimed
defects, malfunctions, or failures that result from abuse, neglect, improper assembly, improper
maintenance, alteration, collision, crash, misuse, or any damage caused while taking part in
any organized competition or commercial activity. The bicycle frame, fork, and component parts
have been manufactured and designed for use by average riders, and these bicycles are not
meant for stunt riding, ramp riding, jumping, aggressive riding or any similar extreme activities,
such uses might damage the bicycle frame, fork and/or component parts and will void this
warranty. smarTrike® bicycles are designed for the average rider to use the bicycles on
approved trails and for noncompetition riding which is safe and within the rider’s limits and
experience. Even in such conditions bicycle riding can be naturally dangerous as bodily injury
or death can take place, especially if the rider does not ensure that the safety and maintenance
checks recommended in this manual are followed, if the rider does not wear a helmet,
aggressive stunts or extreme terrain riding. All riders will presume their own risk of injury
while biking, and smarTrike will not take any responsibility unless the accident and injury
R
arise out of smarTrike’s. sole negligence and such negligence has to be definitely proven.
R
THE PURCHASE OF THIS smarTrike BICYCLE WILL CONFIRM THE
BUYER’S AGREEMENT THAT smarTrike LIABILITY UNDER THIS
WARRANTY SHALL BE NO GREATER THAN THE AMOUNT OF THE
ORIGINAL PURCHASE PRICE AND IN NO EVENT SHALL smarTrike
BE LIABLE FOR INCIDENTAL OR CONSEQUENTIAL DAMAGES.
R
R
R
This Limited Warranty will be void in case the product is ever:
Used in a manner other than for recreation or transportation purpose
Altered or modified in any way. Used for rental purposes.
smarTrike does not provide an extended warranty. in case you have
bought an extended warranty, it has to be honored by the store from
which you bought the bicycle or the appropriate party.
For your personal records, retain your original sales receipt with this manual.
LIMITED WARRANTY
10

11
This Warranty is given by:
Smartrike Marketing Ltd. (“smarTrike®”)
12 Leshem St., Kiryat Gat 8258412, Israel
Local Representative:
The Brand Exchange PTY LTD
401 Riversdale Road, Hawthorn East,
Melbourne, Australia 3123
Customer Service Number: (+61) 1800951184
Customer Service Email:
Our goods come with guarantees that cannot be excluded under the Australian Consumer Law. You are entitled to a
replacement or refund for a major failure and for compensation for any other reasonably foreseeable loss or damage. You
are also entitled to have the goods repaired or replaced if the goods fail to be of acceptable quality and the failure does not
amount to a major failure.
smarTrike® Products:
Our Warranty: In addition to any other guarantee or warranty implied by law, The Brand Exchange PTY LTD warrants that
smarTrike® Products will be free from manufacturing defects for a period of 12 months from the date of
purchase (“Warranty”).
Exceptions: This Warranty does not cover normal wear and tear, or any damage, failure or loss caused by
improper use, assembly, maintenance or storage (including airline travel) of the smarTrike® Products.
How to claim: To make a claim under this Warranty, simply follow these steps:
Step 1: Find your receipt which proves the date on which you purchased the smarTrike® product. If the date of
purchase cannot be verified, the claim is void.
explain the problem. An assessment will be made on the product based on the Warranty cover. In follow up, smarTrike® will
also advise in writing whether you are required to return the purchased smarTrike product along with a copy of the receipt
for inspection and how to do so. smarTrike® will cover the cost of the return delivery.
Step 3: Wait for us to contact you. smarTrike® will inform you of our assessment of your claim within 14 days.
When we contact you, we will firstly let you know whether you have a valid claim under this Warranty, and
if so, we will inform you whether your smarTrike® product will be replaced or repaired, together with the
number of days you can expect to wait to receive your replaced or repaired smarTrike® product.
Questions? If you have any questions about smarTrike® products and this Warranty, please contact us on:
smartrike.com.au/pages/contact-us or [email protected].
Tel.: (+61)1800951184 (Monday to Friday 09:00-17:00).
www.smarTrike.com.au
Warranty against Defects
Contact us on smartrike.com.au/pages/contact-us

20832621303
12
Other manuals for Xtend Bike
1
Table of contents
Other SmarTrike Bicycle manuals

SmarTrike
SmarTrike 820 User manual

SmarTrike
SmarTrike Zoom 319 User manual

SmarTrike
SmarTrike 680 User manual

SmarTrike
SmarTrike 502 User manual

SmarTrike
SmarTrike Delight User manual

SmarTrike
SmarTrike Vanilla Plus 665 User manual

SmarTrike
SmarTrike 630 User manual

SmarTrike
SmarTrike 400 User manual

SmarTrike
SmarTrike Breeze 605 User manual

SmarTrike
SmarTrike 650 User manual


