Smeg KDD90CNE User manual

KDD90CNE
IT
LIBRETTO DI USO
EN
USER MANUAL
FR
MANUEL D’UTILISATION
DE
BEDIENUNGSANLEITUNG
NL
GEBRUIKSAANWIJZING
ES
MANUAL DE USO
PT
LIVRO DE INSTRUÇÕES PARA UTILIZAÇÃO
RU
РУКОВОДСТВО ПО ЭКСПЛУАТАЦИИ
SV
BRUKSANVISNING
DA
BRUGSVEJLEDNING
PL
INSTRUKCJA UŻYTKOWANIA
NO
BRUKSVEILEDNING
FI
KÄYTTÖOHJEET
AR

IT
.................................................................................................................. 3
EN
.................................................................................................................. 7
FR
.................................................................................................................11
DE
................................................................................................................ 15
NL
................................................................................................................ 19
ES
................................................................................................................ 23
PT
................................................................................................................ 27
RU
................................................................................................................ 31
SV
................................................................................................................ 36
DA
................................................................................................................ 40
PL
................................................................................................................ 44
NO
................................................................................................................ 48
FI
................................................................................................................ 52
AR
................................................................................................................ 56

3
1. INFORMAZIONI SULLA
SICUREZZA
Per la propria sicurezza e per
il corretto funzionamento
dell’apparecchio, si prega di
leggere attentamente questo
manuale prima dell’installazione
e della messa in funzione.
Tenere queste istruzioni sempre
insieme all’apparecchio, anche
in caso di cessione o
trasferimento a terzi. È
importante che gli utilizzatori
conoscano tutte le
caratteristiche di funzionamento
e sicurezza dell’apparecchio.
Il collegamento dei cavi
deve essere eettuato da
un tecnico competente.
• Il fabbricante non potrà
ritenersi responsabile per
eventuali danni risultanti da
un’installazione o utilizzazione
impropria.
• Se le istruzioni di installazione
del piano cottura a gas
specicano una distanza
maggiore di quella sopra
indicata, è necessario tenerne
conto.
• Controllare che la tensione
di rete corrisponda a quella
indicata sulla targa dati
applicata all’interno della
cappa.
• I dispositivi di sezionamento
devono essere installati
nell’impianto sso in
conformità alle normative sui
sistemi di cablaggio.
• Per gli apparecchi di Classe
I, controllare che la rete di
alimentazione domestica
disponga di un adeguato
collegamento a massa.
• Collegare la cappa alla
canna fumaria con un tubo di
diametro minimo di 120 mm. Il
percorso dei fumi deve essere
il più corto possibile.
• Devono essere rispettate tutte
le normative riguardanti lo
scarico dell’aria.
• Non collegare la cappa
aspirante ai condotti fumari
che trasportano fumi di
combustione (per es. di
caldaie, camini ecc.).
• Se la cappa è utilizzata
in combinazione con
apparecchi non elettrici (per
es. apparecchi a gas), deve
essere garantito un suciente
grado di aerazione nel locale
per impedire il ritorno di usso
dei gas di scarico. Quando la
cappa per cucina è utilizzata in
combinazione con apparecchi
non alimentati dalla corrente
elettrica, la pressione negativa
nel locale non deve superare
0,04 mbar per evitare che i
fumi vengano riaspirati nel
locale dalla cappa.
• L’aria non deve essere
evacuata attraverso un
condotto utilizzato per lo
IT
LIBRETTO DI USO

4
scarico dei fumi da apparecchi
di combustione alimentati a
gas o altri combustibili.
• Il cavo di alimentazione, se
danneggiato, deve essere
sostituito dal fabbricante o
da un tecnico del servizio
assistenza.
• Collegare la spina ad una
presa di tipo conforme
alle normative vigenti e in
posizione accessibile.
• Relativamente alle misure
tecniche e di sicurezza
da adottare per lo scarico
dei fumi è importante
attenersi scrupolosamente
ai regolamenti stabiliti dalle
autorità locali.
AVVERTENZA: prima di
installare la cappa,
rimuovere le pellicole di
protezione.
• Usare solo viti e minuteria di
tipo idoneo per la cappa.
AVVERTENZA: la mancata
installazione delle viti o dei
dispositivi di ssaggio in
conformità alle presenti
istruzioni può comportare
rischi di scosse elettriche.
• Non osservare direttamente
con strumenti ottici (binocolo,
lente d’ingrandimento….).
• Non cuocere al ambé sotto la
cappa: si potrebbe sviluppare
un incendio.
• Questo apparecchio può
essere utilizzato da bambini di
età non inferiore a 8 anni e da
persone con ridotte capacità
psico-sico-sensoriali o con
esperienza e conoscenze
insucienti, purché
attentamente sorvegliati e
istruiti su come utilizzare in
modo sicuro l’apparecchio e
sui pericoli che ciò comporta.
Assicurarsi che i bambini non
giochino con l’apparecchio.
Pulizia e manutenzione da
parte dell’utente non devono
essere eettuate da bambini,
a meno che non siano
sorvegliati.
• Sorvegliare i bambini,
assicurandosi che non
giochino con l’apparecchio.
• L’apparecchio non deve
essere utilizzato da persone
(bambini compresi) con
ridotte capacità psico-sico-
sensoriali o con esperienza
e conoscenze insucienti,
a meno che non siano
attentamente sorvegliate e
istruite.
Le parti accessibili possono
diventare molto calde
durante l’uso degli
apparecchi di cottura.
• Pulire e/o sostituire i
ltri dopo il periodo di tempo
specicato (pericolo di
incendio). Vedere il paragrafo
Manutenzione e pulizia.
• Deve essere presente
un’adeguata ventilazione
nel locale quando

5
la cappa è utilizzata
contemporaneamente ad
apparecchi che utilizzano
gas o altri combustibili (non
applicabile ad apparecchi che
scaricano unicamente l’aria nel
locale).
• Il simbolo sul prodotto o
sulla sua confezione indica
che il prodotto non può
essere smaltito come un
normale riuto domestico.
Il prodotto da smaltire deve
essere conferito presso
un apposito centro di
raccolta per il riciclaggio
dei componenti elettrici ed
elettronici. Assicurandosi che
questo prodotto sia smaltito
correttamente, si contribuirà
a prevenire potenziali
conseguenze negative per
l’ambiente e per la salute
che potrebbero altrimenti
derivare dal suo smaltimento
inadeguato. Per informazioni
più dettagliate sul riciclaggio
di questo prodotto, contattare
il Comune, il servizio locale
di smaltimento riuti oppure
il negozio dove è stato
acquistato il prodotto.
• Questa Cappa aspirante
può essere utilizzata in
combinazione con un piano
cottura a Gas dotato delle
seguenti caratteristiche:
• Potenza massima totale
12,4kW.
• 5 fuochi come in gura.
2,6 kW
1 kW
5 kW
1,9 kW
1,9 kW
Salita/discesa
dell’apparecchio
Pericolo di lesioni!
Pericolo di schiacciamento
durante la salita e la
discesa dell’apparecchio.
Durante la salita e la
discesa dell’apparecchio,
non sostare mai nell’area
di movimento dello stesso.
Tenere i bambini a
distanza di sicurezza.
2. USO
• La cappa aspirante è progettata
esclusivamente per l’uso domestico
allo scopo di eliminare gli odori dalla
cucina.
• Non usare mai la cappa per scopi
diversi da quelli per cui è stata
progettata.
• Non lasciare mai amme alte sotto la
cappa quando è in funzione.
• Regolare l’intensità della amma in
modo da dirigerla esclusivamente
verso il fondo del recipiente di cottura,
assicurandosi che non ne avvolga i
lati.
• Le friggitrici devono essere
costantemente controllate durante
l’uso: l’olio surriscaldato potrebbe
incendiarsi.

6
3. PULIZIA E
MANUTENZIONE
- La parte spugnosa del ltro può
essere lavata in lavastoviglie almeno
ogni 4 mesi o più frequentemente,
per un uso particolarmente intenso,
garantendo il funzionamento no ad
un massimo di 5 lavaggi prima della
sostituzione (W).
- I ltri antigrasso devono essere puliti
ogni 2 mesi di funzionamento o più
frequentemente in caso di utilizzo
molto intenso e possono essere lavati
in lavastoviglie (Z).
• Pulire la cappa utilizzando un panno
umido e un detergente liquido neutro.

7
4. COMANDI
Tasto Funzione Tasto Led
A
Il tasto Funziona solo ad Anta Aperta.
Spegne / Accende il Motore alla prima velocità -
Tenendo il tasto premuto per circa 5 secondi, quando tutti i carichi sono
spenti (Motore + Luce), si Attiva / Disattiva il Telecomando.
IR+Punto (2Lampeggi) – Telecomando Attivo.
IR+Punto (1Lampeggio) – Telecomando Disattivo.
BPressione Breve = Accende/Spegne le Luci alla massima intensità. -
Pressione di 2 Secondi = Accende/Spegne le Luci di Cortesia. -
C
Il tasto Funziona solo ad Anta Aperta.
Attiva / Disattiva la funziona 24h che accende il Motore alla prima velocità per
10 minuti ogni ora per 24 ore. Al termine la cappa torna in Off
Visualizza un’animazione.
D
Funziona solo ad Anta Aperta = decrementa la velocità di esercizio.
Le velocità P1 – P2 sono le 2 velocità intensive così impostate:
P1 = 5 minuti e P2 = 7 minuti
Al termine il motore torna alla seconda velocità.
Visualizza la velocità impostata:
P2 – P1 – 3 – 2 – 1
E
Funziona solo ad Anta Aperta = incrementa la velocità di esercizio.
Le velocità P1 – P2 sono le 2 velocità intensive così impostate:
P1 = 5 minuti e P2 = 7 minuti
Al termine il motore torna alla seconda velocità.
Visualizza la velocità impostata:
1 – 2 – 3 – P1 – P2
Funziona sia ad Anta Chiusa che Aperta.
Pressione di 2 Secondi = Abilita/Disabilita l’ Allarme Filtri al Carbone
Attivo con Motore Spento e senza Allarmi Filtri in corso.
2 Lampeggi C = Allarme Filtri C.A. Attivato
1 Lampeggio C = Allarme Filtri C.A. Disattivato
F
Funziona solo ad Anta Aperta.
Attiva/DisattivailDelay,lospegnimentoautomaticoritardatodi15’,delMotore.
Quandoviene attivatatalefunzione ilmotoreviene pilotatoalla prima velocità.
Se le funzione viene disattivata prima del tempo previsto, il motore rimane
alla prima velocità.
Visualizza L
G
Funziona sia ad Anta Chiusa che Aperta.
Pressione di 2 Secondi = Con l’allarme ltri in corso si effettua il Reset dell’
Allarme Filtri. Tali segnalazioni sono visibili solo a motore spento.
Visualizza Segnala la necessità di lavare i ltri
antigrasso metallici. L’allarme entra in funzione dopo 100
ore di lavoro effettivo della Cappa.
Visualizza Segnala la necessità di sostituire
i ltri al carbone attivo e devono anche essere lavati i ltri
antigrasso metallici. L’allarme entra in funzione dopo 200
ore di lavoro effettivo della Cappa.
H
Anta Chiusa
Apre l’ Anta + Motore e Luci = On.
-
Anta Aperta
Chiude l’ Anta + Motore e Luci = Off
-
5. TELECOMANDO
(OPZIONALE) 6. ILLUMINAZIONE
• Per la sostituzione contattare
l’Assistenza Tecnica (“Per l’acquisto
rivolgersi all’assistenza tecnica”).

8
1. SAFETY
INFORMATION
For your safety and correct
operation of the appliance,
read this manual carefully before
installation and use. Always
keep these instructions with the
appliance even if you move or
sell it. Users must fully know
the operation and safety features
of the appliance.
The wire connection has to
be done by specialized
technician.
• The manufacturer will not be
held liable for any damages
resulting from incorrect or
improper installation.
• If theinstructions forinstallation
of the gas hob specify a
greater distance, this must be
respected.
• Check that the mains voltage
corresponds to that indicated
on the rating plate xed to the
inside of the hood.
• Means for disconnection must
be incorporated in the xed
wiring in accordance with the
wiring rules.
• For Class I appliances, check
that the domestic power supply
guaranteesadequateearthing.
• Connect the extractor to the
exhaust ue through a pipe of
minimum diameter 120 mm.
The route of the ue must be
as short as possible.
• Regulations concerning the
discharge of air have to be
fullled.
• Do not connect the extractor
hood to exhaust ducts carrying
combustion fumes (boilers,
replaces, etc.).
• If the extractor is used in
conjunction with non-electrical
appliances (e.g. gas burning
appliances), a sucient degree
of aerationmust beguaranteed
in the room in order to prevent
the backow of exhaust gas.
When the cooker hood is used
in conjunction with appliances
supplied withenergy other than
electric, the negative pressure
in the room must not exceed
0,04 mbar to prevent fumes
being drawnback intotheroom
by the cooker hood.
• The air must not be discharged
into a ue that is used for
exhausting fumes from
appliances burning gas or
other fuels.
• If the supply cord is damaged,
it must be replaced from the
manufacturer or its service
agent.
• Connect the plug to a socket
complying with current
regulations, located in an
accessible place.
• With regards to the technical
and safety measures to be
adopted for fume discharging
it is important to closely follow
the regulations provided by the
local authorities.
EN
USER MANUAL

9
WARNING:Before installing
the Hood, remove the
protective lms.
• Useonlyscrews andsmall parts
supplied with the hood.
WARNING:Failure toinstall
the screws or xing device
in accordance with these
instructions may result in
electrical hazards.
• Do not look directly at the
light through optical devices
(binoculars, magnifying
glasses…).
• Do not ambè under the range
hood; risk of re.
• This appliance can be used by
children aged from 8 years and
aboveandpersonswithreduced
physical, sensory or mental
capabilities or lack of experience
and knowledge if they have
been given supervision or
instruction concerning use of
the appliance in a safe way
and understand the hazards
involved.Childrenshallnotplay
with the appliance. Cleaning
and usermaintenance shallnot
be made by children without
supervision.
• Children should be supervised
to ensure that they do not play
with the appliance.
• The appliance is not to be used
by persons (including children)
with reduced physical, sensory
or mental capabilities, or lack
of experience and knowledge,
unless they have been given
supervision or instruction.
Accessible parts may
become hot when used with
cooking appliances.
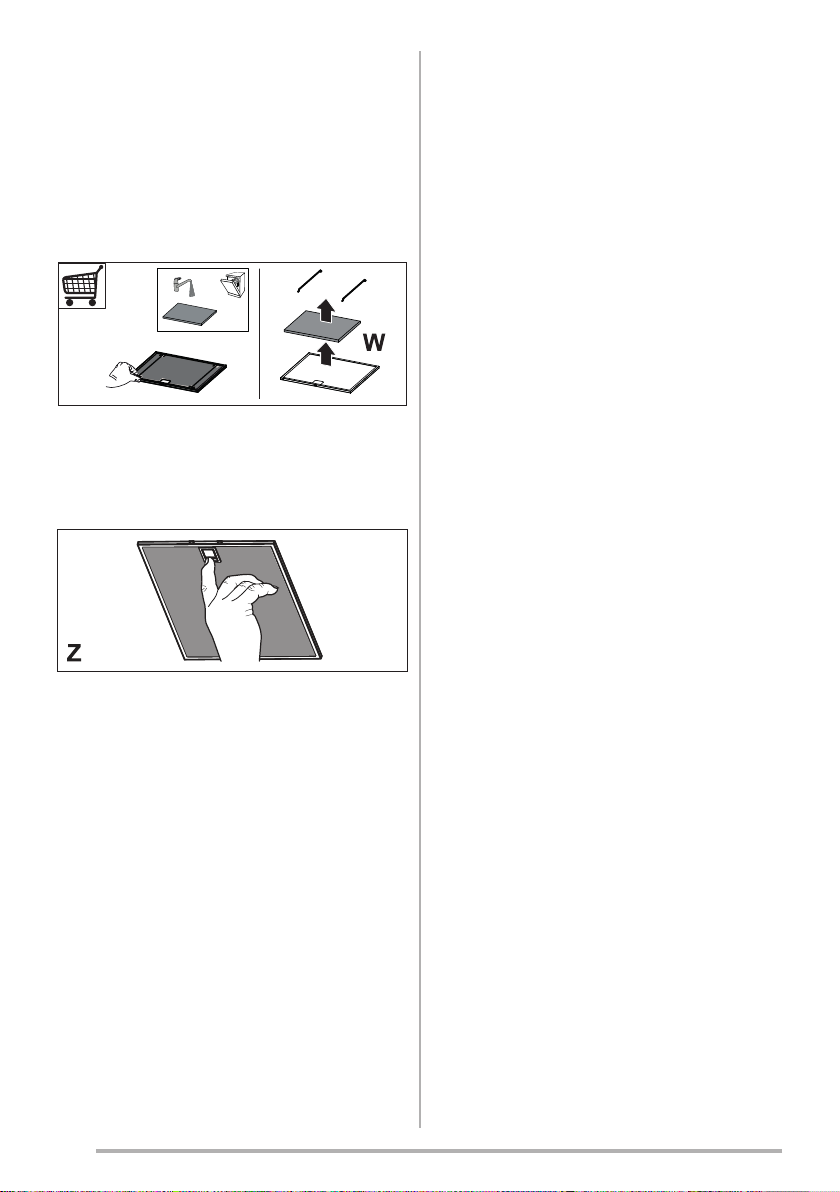
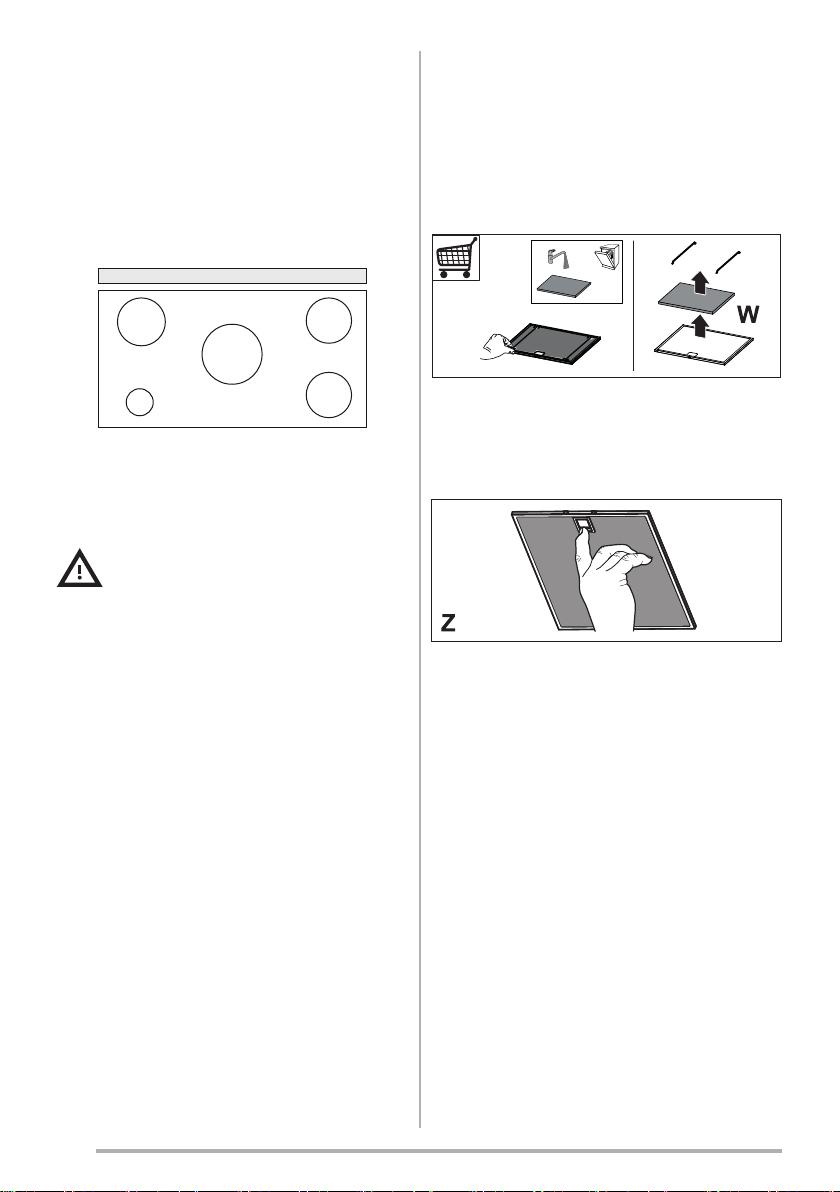
• Clean and/orreplace theFilters
after the specied time period
(Fire hazard). See paragraph
Care and Cleaning.
• There shall be adequate
ventilationoftheroomwhenthe
range hood is used at the same
time as appliances burning gas
or other fuels (not applicable to
appliances that only discharge
the air back into the room).
• The symbol on the product
or on its packaging indicates
that this product may not be
treated as household waste.
Instead it shall be handed over
to the applicable collection point
for the recycling of electrical
and electronic equipment.
By ensuring this product is
disposed of correctly, you
will help prevent potential
negative consequences for
the environment and human
health, which could otherwise
be caused by inappropriate
waste handling of this product.
For more detailed information
about recycling of this product,
please contact your local city
oce, your household waste
disposal service or the shop
where you purchased the

10
product.
• This suction Hood can be
used in combination with a
Gas hob with the following
characteristics:
• Total maximum power 12.4kW.
• 5 burners as shown in the gure.
2,6 kW
1 kW
5 kW
1,9 kW
1,9 kW
Extending/retracting the
appliance
Risk of injury!
Risk of jamming when
retracting and extending the
appliance. Never reachinto
the moving area of the
appliance while it is being
retracted or extended. Keep
children at a safe distance.
2. USE
• The extractor hood has been designed
exclusively for domestic use to
eliminate kitchen smells.
• Never use the hood for purposes
other than those for which it has been
designed.
• Never leave high naked ames under
the hood when it is in operation.
• Adjust the ame intensity to direct it
onto the bottom of the pan only, making
sure that it does not engulf the sides.
• Deep fat fryers must be continuously
monitored during use: overheated oil
can burst into ames.
3. CARE AND CLEANING
- The sponge-like part of the lter can be
washed inthe dishwasher atleastonce
every 4 months, or more frequently if
use is particularly intense. Operation
is guaranteed for up to a maximum
of 5 washes, after which it must be
replaced (W).
- The Grease lters must be cleaned
every 2 months of operation, or
more frequently for particularly heavy
usage, and can be washed in a
dishwasher (Z).
• Clean the hood using a damp cloth
and a neutral liquid detergent.

11
4. CONTROLS
Button Function LED button
A
The button only works when the door is open.
Turns the motor On/Off at speed one. -
Press and hold the button for approximately 5 seconds, with all the
loads turned off (Motor and Lights), to turn the Remote control On/Off.
IR+Dot (Flashes twice)-Remote control On.
IR+Dot (Flashes once)–Remote control Off.
BPress Briey = Turns the Lights On/Off at maximum intensity. -
Press and hold for 2 Seconds = Turns the Courtesy Lights On/Off. -
C
The button only works when the door is open.
Activates / Deactivates the 24h function which turns the motor on at
speed one for 10 minutes every hour, for 24 hours.
At the end of this time the hood turns Off.
Visualizza un’animazione.
D
Only works with the Door Open = decreases the operating speed.
Speeds P1 - P2 are the 2 intensive speeds, which are set to:
P1 = 5 minutes and P2 = 7 minutes
At the end of this time the motor returns to speed two.
Displays the set speed:
P2 – P1 – 3 – 2 – 1
E
Only works with the Door Open = increases the operating speed.
Speeds P1 - P2 are the 2 intensive speeds, which are set to:
P1 = 5 minutes and P2 = 7 minutes
At the end of this time the motor returns to speed two.
Displays the set speed:
1 – 2 – 3 – P1 – P2
Works both with the Door Closed and Open.
Pressandholdfor2Seconds=Enables/DisablestheActivatedCharcoal
Filter Alarm with the Motor turned off and no Filter Alarm triggered.
C ashes twice = A.C. Filter Alarm Activated
C ashes once = A.C. Filter Alarm Deactivated
F
Only works with the Door Open.
Activates/Deactivates the Delay, automatic switch-off of the motor
with a 15’ delay.
When this function is activated the motor is set to speed one. If
the function is deactivated before the time foreseen, the motor will
remain at speed one.
Displays L
G
Works both with the Door Closed and Open.
Press and hold for 2 Seconds = With the lter alarm triggered the
Filter Alarm is Reset. These indications are only visible when the
motor is turned off.
Displays Indicatestheneedtowashthemetal
grease lters. The alarm is triggered after the Hood has
been in operation for 100 working hours.
Displays Indicates the need to change the
activated charcoal lters, and also to wash the metal
grease lters. The alarm is triggered after the Hood has
been in operation for 200 working hours.
H
Door Closed
Opens the door and Motor + Lights = On.
-
Door Open
Closes the door and Motor + Lights = Off
-
5. REMOTE CONTROL
(OPTIONAL)
6. LIGHTING
• For replacement contact technical
support (“To purchase contact technical
support”).

12
1. CONSIGNES DE
SÉCURITÉ
Pour votre sécurité et pour
garantir le fonctionnement
correct de l’appareil, veuillez lire
attentivement ce manuel avant
d’installer et de mettre en
fonction l’appareil. Toujours
conserver ces instructions avec
l’appareil, même en cas de
cession ou de transfert à une
autre personne. Il est important
que les utilisateurs connaissent
toutes les caractéristiques de
fonctionnement et de sécurité
de l’appareil.
La connexion des câbles
doit être eectuée par un
technicien compétent.
• En aucun cas le fabricant ne
peutêtretenu pourresponsable
d’éventuels dommages dus
à une installation ou à une
utilisation impropre.
• Si les instructions d’installation
du plan de cuisson à gaz
spécifient une distance
supérieure à celle indiquée ci-
dessus, veuillez impérativement
en tenir compte.
• Assurez-vous que la tension
du secteur correspond à celle
indiquée sur la plaque des
caractéristiques apposée à
l’intérieur de la hotte.
• Lesdispositifsdesectionnement
doivent être montés dans
l’installation xe conformément
aux normes sur les systèmes
de câblage.
• Pour les appareils de Classe
I, s’assurer que l’installation
électrique de votre intérieur
dispose d’une mise à la terre
adéquate.
• Reliezl’aspirateurdu conduitde
cheminée avec un tube ayant
un diamètre minimum de 120
mm. Le parcours des fumées
doit être le plus court possible.
• Respecter toutes les normes
concernant l’évacuation de l’air.
• Ne reliez pas la hotte aspirante
aux conduits de cheminée
qui acheminent les fumées
de combustion (par ex. de
chaudières, de cheminées,
etc.).
• Si vous utilisez l’aspirateur
en même temps que des
appareils non électriques
(par ex. fonctionnant au gaz),
veillez à ce que la pièce soit
adéquatement ventilée, an
d’empêcher le retour du ux
des gaz d’évacuation. Si vous
utilisez la hotte de cuisine en
mêmetempsquedesappareils
non alimentés à l’électricité, la
pression négative dans la pièce
ne doit pas dépasser 0,04 mbar,
an d’éviter que les fumées
soient réaspirées dans la pièce
où se trouve la hotte.
• Ne pas évacuer l’air à travers
une conduite utilisée pour
l’évacuation des fumées des
appareils de combustion
alimentés au gaz ou avec
FR
MANUEL D’UTILISATION

13
d’autres combustibles.
• Si le cordon d’alimentation
est endommagé, faites-le
remplacer par le fabricant ou
par un technicien d’un service
après-vente agréé.
• Branchez la che à une prise
conforme aux normes en
vigueur et dans une position
accessible.
• En ce qui concerne les
dimensions techniques et
de sécurité à adopter pour
l’évacuation des fumées,
veuillez vous conformer
scrupuleusement aux
règlements établis par les
autorités locales.
AVERTISSEMENT : Avant
d’installer la hotte, retirer les
lms de protection.
• Utilisez exclusivement des vis
et des petites fournitures du
type adapté pour la hotte.
AVERTISSEMENT : toute
installation de vis et de
dispositifs de xation non
conformesàces instructions
peut entraîner des risques
de décharges électriques.
• Ne pas observer directement
avec des instruments
optiques (jumelles, lentilles
grossissantes...).
• Ne flambez pas des mets
sous la hotte : sous risque de
développer un incendie.
• Cet appareil peut être
utilisé par des enfants de
plus de 8 ans et par des
personnes dont les capacités
physiques, sensorielles ou
mentales sont diminuées ou
ayant une expérience et des
connaissances insusantes,
pourvu que ce soit sous la
surveillance attentive d’une
personne responsableet après
avoir reçu des instructions sur
lamanièred’utilisercetappareil
en toute sécurité et sur les
dangers que cela comporte.
Assurez-vous que les enfants
ne jouentpas aveccetappareil.
Le nettoyage et l’entretien de la
part de l’utilisateur ne doivent
pas être effectués par des
enfants,àmoinsqu’ilsnesoient
surveillés.
• Surveillezlesenfants.S’assurer
qu’ils ne jouent pas avec
l’appareil.
• Cet appareil n’est pas
destiné à être utilisé par
des personnes (enfants
compris) dont les capacités
physiques, sensorielles ou
mentales sont diminuées ou
ayant une expérience et des
connaissances insusantes,
à moins que celles-ci ne soient
attentivement surveillées et
instruites.
Les parties accessibles
peuvent devenir très
chaudes durant l’utilisation
des appareils de cuisson.

14
• Nettoyer et/ou remplacer les
ltres après le délai indiqué
(danger d’incendie). Voir le
paragraphe Nettoyage et
Entretien.
• Veillez à ce que la pièce
bénéficie d’une ventilation
adéquate lorsque la hotte
fonctionne en même temps
que des appareils utilisant du
gaz ou d’autres combustibles
(non applicable aux appareils
qui évacuent l’air uniquement
dans la pièce).
• Le symbole marqué sur le
produit ou sur son emballage
indique que ce produit ne
peut pas être éliminé comme
déchet ménager normal.
Lorsque ce produit doit être
éliminé, veuillez le remettre
à un centre de collecte
prévu pour le recyclage
du matériel électrique et
électronique. En vous assurant
que cet appareil est éliminé
correctement, vous participez
à prévenir des conséquences
potentiellement négatives pour
l’environnement et pour la
santé, qui risqueraient de se
présenter en cas d’élimination
inappropriée. Pour toute
information supplémentaire
sur le recyclage de ce produit,
contactez votre municipalité,
votre déchetterie locale ou le
magasin où vous avez acheté
ce produit.
• Cette hotte aspirante peut être
utilisée en association avec un
plan de cuisson à gaz ayant
les caractéristiques suivantes:
• Puissance maximum totale
12,4 kW.
• 5 feux, comme illustré dans
la gure.
2,6 kW
1 kW
5 kW
1,9 kW
1,9 kW
Introduction/retrait de
l’appareil
Danger de blessures !
Danger d’écrasement
durant l’introduction et le
retrait de l’appareil. Lors
de l’introduction ou du
retrait de l’appareil, ne
jamais s’arrêter dans la
zone de mouvement de
celui-ci. Gardez les
enfants à distance de
sécurité.
2. UTILISATION
• Cette hotte aspirante a été conçue
exclusivement pour un usage
domestique, dans le but d’éliminer
les odeurs de cuisine.
• Ne jamais utiliser la hotte pour des
objectifs différents de ceux pour
lesquels elle a été conçue.
• Ne jamais laisser un feu vif allumé sous

15
la hotte lorsque celle-ci est en fonction.
• Régler l’intensité du feu de manière à
l’orienter exclusivemetnt vers le fond
de la casserole, en vous assurant qu’il
ne déborde pas sur les côtés.
• Contrôler constamment les friteuses
durant leur utilisation : l’huile surchauée
risque de s’incendier.
3. NETTOYAGE ET
ENTRETIEN
- La partie spongieuse du ltre peut être
lavée au lave-vaisselle au moins tous
les 4 mois ou plus fréquemment en cas
d’utilisation particulièrement intense,en
garantissant ainsi le fonctionnement
jusqu’à un maximum de 5 lavages avant
son remplacement
(W).
- Nettoyer les ltres à graisse tous les 2
moisdefonctionnement ouplussouvent
en cas d’utilisation particulièrement
intense. Ces ltres peuvent être lavés
au lave-vaisselle (Z).
• Nettoyer la hotte avec un chion
humide et un détergent liquide neutre.

16
4. COMMANDES
Touche Fonction Touche led
A
La touche fonctionne seulement avec la porte ouverte.
Coupe / Démarre le moteur en première vitesse. -
Garder la touche appuyée pendant environ 5 secondes, lorsque toutes
les charges sont éteintes (Moteur+ Éclairage), pour brancher/ débrancher
la télécommande.
IR+Point (2 clignotements)
– Télécommande activée
IR+Point (1 Clignotement)–
Télécommande désactivée
BAppui bref = Allume/Éteint l’éclairage à l’intensité maximum. -
Appui de 2 secondes = Allume/Éteint les lumières de courtoisie. -
C
La touche fonctionne seulement avec la porte ouverte.
Active / Désactive la fonction 24h qui démarre le moteur en première vitesse
pendant 10 minutes par heure pour 24 heures. À la n, la hotte se replace sur Off
Afchage d’une animation.
D
Fonctionne seulement avec la porte ouverte = diminue la vitesse
d’exercice. Les vitesses P1 – P2 sont les 2 vitesses intensives paramétrées
comme ci-dessous :
P1 = 5 minutes et P2 = 7 minutes
À la n, le moteur retourne en deuxième vitesse
Afche la vitesse paramétrée :
P2 – P1 – 3 – 2 – 1
E
Fonctionne seulement avec la porte ouverte = augmente la vitesse
d’exercice. Les vitesses P1 – P2 sont les 2 vitesses intensives paramétrées
comme ci-dessous :
P1 = 5 minutes et P2 = 7 minutes
À la n, le moteur retourne en deuxième vitesse
Afche la vitesse paramétrée :
1 – 2 – 3 – P1 – P2
Fonctionne aussi bien avec la porte fermée qu’ouverte.
Appui de 2 secondes = Valide/Invalide l’alarme ltres à charbon actif avec le
moteur coupé et sans alarmes ltres en cours.
2 Clignotements C = Alarme ltres à charbon
actif Activée
1 Clignotement C = Alarme ltres à charbon actif Désactivée
F
Fonctionne seulement avec la porte ouverte.
Active/DésactiveleDelay,l’extinctionautomatiqueretardée de 15’dumoteur.
Lorsqu’on active cette fonction, le moteur est piloté à la première vitesse.
Si la fonction est désactivée avant le temps prévu, le moteur reste en
première vitesse.
Afche L
G
Fonctionne aussi bien avec la porte fermée qu’ouverte.
Appui de 2 secondes = L’alarme ltres étant en cours, effectuer le Reset
de l’alarme ltres. Ces signalisations sont visibles seulement lorsque le
moteur est coupé.
Afche Signale la nécessité de laver les
ltres à graisse métalliques. L’alarme entre en fonction
après 100 heures de fonctionnement effectif de la hotte.
Afche Signalela nécessitéderemplacer les
ltres à charbon actif. Laver également les ltres à graisse
métalliques. L’alarme se déclenche après 200 heures de
fonctionnement effectif de la hotte.
H
Porte fermée
Ferme la porte + Moteur et Éclairage = On
-
Porte ouverte
Ferme la porte + Moteur et Éclairage = Off
-
5. TÉLÉCOMMANDE
(FOURNIE SUR
DEMANDE)
6. ÉCLAIRAGE
• Pour le remplacement, contacter le
Service après-vente (« Pour l’achat,
s’adresser au service après-vente »).

17
1. SICHERHEITSINFORMA-
TIONEN
Zu Ihrer eigenen Sicherheit
und für die korrekte Funkti-
on des Gerätes lesen Sie bitte
diese Betriebsanleitung auf-
merksam durch, bevor Sie das
Gerät installieren und benutzen.
Verwahren Sie die Bedienungs-
anleitung stets zusammen mit
dem Gerät, auch wenn Sie
dieses an Dritte weitergeben
oder übertragen. Es ist wichtig,
dass der Benutzer alle Betriebs-
und Sicherheitsmerkmale des
Gerätes kennt.
Die Kabel müssen von ei-
nem zuständigen Fach-
mann angeschlossen wer-
den.
• Der Hersteller haftet nicht für
etwaige Schäden, die durch
eine fehlerhafte Installation
oder einen ungeeigneten Ge-
brauch entstehen könnten.
• Sollten die Installationsanwei-
sungen des gasbetriebenen
Kochfelds einen größeren
Abstand als oben angegeben
vorsehen, ist dies zu berück-
sichtigen.
• Sicherstellen, dass die Netz-
spannung der auf dem Typen-
schild angegebenen Span-
nung entspricht. Das Typen-
schild ist imInneren derHaube
angebracht.
• Trennvorrichtungen müssen
in der festen Anlage gemäß
NormenüberVerkabelungssy-
steme installiert werden.
• Für Geräte der Klasse I sicher-
stellen,dassdasVersorgungs-
netz des Gebäudes korrekt
geerdet ist.
• Die Abzugshaube an den
Schornstein miteinem Rohrmit
Mindestdurchmesser von 120
mm anschließen. Der Verlauf
des Rauchabzugs muss so
kurz wie möglich sein.
• Alle gesetzlichen Vorschriften
im Bereich Abluft einhalten.
• DieAbzugshaube darf nicht an
einen Schacht angeschlossen
werden, in den Rauchgase
abgeleitet werden (z. B. von
Heizkesseln, Kaminen, usw.).
• Falls die Abzugshaube mit
Geräten verwendet wird, die
nicht elektrisch betrieben sind
(z.B. Gasgeräte), muss im
Raum für eine ausreichende
Belüftung gesorgt werden,
damit der Rückuss der Ab-
gase verhindert wird. Wird die
Abzugshaube zusammen mit
nicht elektrisch betriebenen
Geräten eingesetzt, darf der
UnterdruckimRaum0,04mbar
nicht überschreiten, damit die
Abgase nicht wieder ange-
saugt werden.
• Die Luft darf nicht durch einen
Kanal abgelassen werden, der
als Rauchabzugfür Gasgeräte
oder Geräte verwendet wird,
GEBRAUCHSANLEITUNG
DE

18
die mit anderen Brennstoen
betrieben werden.
• Wenn das Gerätekabel be-
schädigt ist, muss es vom
Hersteller oder von einem
Kundendiensttechniker ersetzt
werden.
• Den Stecker in eine den
einschlägigen Vorschriften
entsprechende zugängliche
Steckdose stecken.
• Was die technischen und
sicherheitsrelevanten Maß-
nahmen für den Rauchabzug
betrit, sind die Vorgaben der
örtlichen Behörden streng
einzuhalten.
WARNUNG: Bevor die
Haube installiert wird, die
Schutzfolien abziehen.
• Nur für die Abzugshaube ge-
eignete Schrauben und Klein-
teile verwenden.
WARNUNG: Die mangeln-
deVerwendungvonSchrau-
ben und Befestigungsele-
menten gemäß der vorlie-
genden Anleitung kann zu
Stromschlaggefahr führen.
• Nicht direkt mit optischen In-
strumenten (Fernglas, Lupe,
usw.) in das Licht schauen.
• Auf keinen Fall unter der Hau-
be ambieren: Dabei könnte
ein Brand entstehen.
• Dieses Gerät darf von Kin-
dern ab 8 Jahren und von
Personen mit beschränkten
geistigen, physischen oder
sensorischen Fähigkeiten
oder mangels Erfahrung und/
oder mangels Wissen benutzt
werden, vorausgesetzt, sie
werden aufmerksam beauf-
sichtigt oderüber den sicheren
Gebrauch des Geräts und die
damit verbundenen Gefahren
eingewiesen. Sicherstellen,
dass Kinder nicht mit dem
Gerät spielen. Vom Benutzer
auszuführende Reinigungs-
und Wartungsarbeiten dürfen
nicht von Kindern ausgeführt
werden, sofern sie nicht dabei
beaufsichtigt werden.
• Kinder müssen beaufsichtigt
werden, damit sichergestellt
wird, dass sie nicht am Gerät
spielen.
• Dieses Gerät darf nicht von
Personen (einschließlich
Kindern) mit beschränkten
geistigen, physischen oder
sensorischen Fähigkeiten
oder mangels Erfahrung und/
oder mangels Wissen benutzt
werden, außer sie werden
aufmerksam beaufsichtigt und
eingewiesen.
Die frei zugänglichen Teile
können während des Ko-
chens mit Kochgeräten
sehr heiß werden.
• Die Filter sind nach den
angegebenen Intervallen zu
reinigen und/oder zu ersetzen
(Brandgefahr). Siehe Absatz

19
Wartung und Reinigung.
• Wenn dieAbzugshaube gleich-
zeitig mit Geräten verwendet
wird, die Gas oder andere
Brennstoe benutzen, muss
im Raum eine ausreichende
Belüftung vorhanden sein (gilt
nicht für Geräte, die nur Luft
in den Raum ablassen).
• Schutzschild bei Rissbildung
ersetzen. Das Symbol am
Produkt oder auf der Verpak-
kung weist darauf hin, dass
das Gerät nicht als normaler
Hausmüll entsorgt werden
darf. Das ausrangierte Ge-
rät muss vielmehr bei einer
speziellen Sammelstelle für
elektrische und elektronische
Geräte abgegeben werden.
Mit der vorschriftsmäßigen
Entsorgung des Gerätes
trägt der Benutzer dazu bei,
schädliche Auswirkungen auf
Umwelt und Gesundheit zu
vermeiden. Weitere Informa-
tionen zum Recycling dieses
Produktes können bei der
zuständigen Behörde, der
örtlichen Abfallbeseitigung
oder bei dem Händler, der das
Gerät verkauft hat, eingeholt
werden.
• Diese Abzugshaube kann in
Kombination mit einer gasbe-
triebenen Kochstelle mit den
folgenden Merkmalen einge-
setzt werden:
• Max. Leistung 12,4 kW
• 5 Flammen, wie abgebildet.
2,6 kW
1 kW
5 kW
1,9 kW
1,9 kW
Montage/Demontage des
Geräts
Verletzungsgefahr!
Quetschgefahr bei
Montage und Demontage
des Geräts. Bei der
Montage oder Demontage
des Geräts darf sich
niemand im
Handhabungsbereich
aufhalten. Kinder in einem
Sicherheitsabstand
halten.
2. GEBRAUCH
• Die Abzugshaube wurde ausschließlich
für den häuslichen Gebrauch entwickelt,
um Kochdünste zu beseitigen.
• Die Haube darf nur für die ihr
zugedachten Zwecke benutzt werden.
• Unter der eingeschalteten Haube keine
oenen Flammen benutzen.
• Die Flamme so regulieren, dass
sie nicht über den Boden des
Kochgeschirrs hinausreicht.
• Fritteusen müssen während des
Gebrauchs ständig überwacht werden:
überhitztes Öl könnte sich entzünden.

20
3. REINIGUNG
UND WARTUNG
- Der poröse Teil des Filters kann min-
destens alle 4 Monate oder bei sehr
intensivem Gebrauch auch öfter in der
Spülmaschine gewaschen werden, und
zwarbis zu5Mal, bevorerausgewechselt
werden muss (W).
- Die Fettlter sind alle 2 Monate oder
beiintensiverNutzungöfterzureinigen
und können in der Spülmaschine
gespült werden (Z).
• Die Haube mit einem feuchten Lappen
und einem neutralen Reinigungsmittel
abwischen.
Table of contents
Languages:
Other Smeg Ventilation Hood manuals