Smeg KSET900X Technical manual

DE Montage- und Gebrauchsanweisung
EN Instruction on mounting and use
FR Prescriptions de montage et mode d’emploi
NL Montagevoorschriften en gebruiksaanwijzingen
SV Monterings- och bruksanvisningar
IT Istruzioni di montaggio e d'uso
ES Montaje y modo de empleo
PT Instruções para montagem e utilização
RU Инструкции по монтажу иэксплуатации
TR Montaj ve kullanõm talimatlarõ


7
EN - Instruction on mounting and use
Closely follow the instructions set out in this manual. All
responsibility, for any eventual inconveniences, damages or
fires caused by not complying with the instructions in this
manual, is declined.
The extractor hood has been designed exclusively for
domestic use.
Caution
WARNING! Do not connect the appliance to the mains until
the installation is fully complete.
Before any cleaning or maintenance operation, disconnect
hood from the mains by removing the plug or disconnecting
the mains electrical supply.
Always wear work gloves for all installation and maintenance
operations.
The appliance is not intended for use by children or persons
with impaired physical, sensorial or mental faculties, or if
lacking in experience or knowledge, unless they are under
supervision or have been trained in the use of the appliance
by a person responsible for their safety.
This appliance is designed to be operated by adults, children
should be monitored to ensure that they do not play with the
appliance.
This appliance is designed to be operated by adults. Children
should not be allowed to tamper with the controls or play with
the appliance.
Never use the hood without effectively mounted grating!
The hood must NEVER be used as a support surface unless
specifically indicated.
The premises where the appliance is installed must be
sufficiently ventilated, when the kitchen hood is used together
with other gas combustion devices or other fuels.
The ducting system for this appliance must not be connected
to any existing ventilation system which is being used for any
other purpose such as discharging exhaust fumes from
appliances burning gas or other fuels.
The flaming of foods beneath the hood itself is severely
prohibited.
The use of exposed flames is detrimental to the filters and
may cause a fire risk, and must therefore be avoided in all
circumstances.
Any frying must be done with care in order to make sure that
the oil does not overheat and ignite.
Accessible parts of the hood may became hot when used with
cooking applicance.
With regards to the technical and safety measures to be
adopted for fume discharging it is important to closely follow
the regulations provided by the authorised authorities.
The hood must be regularly cleaned on both the inside and
outside (AT LEAST ONCE A MONTH).
This must be completed in accordance with the maintenance
instructions provided in this manual). Failure to follow the
instructions provided in this user guide regarding the cleaning
of the hood and filters will lead to the risk of fires.
Do not use or leave the hood without the lamp correctly
mounted due to the possible risk of electric shocks.
We will not accept any responsibility for any faults, damage or
fires caused to the appliance as a result of the non-
observance of the instructions included in this manual.
This appliance is marked according to the European directive
2002/96/EC on Waste Electrical and Electronic Equipment
(WEEE). By ensuring this product is disposed of correctly, you
will help prevent potential negative consequences for the
environment and human health, which could otherwise be
caused by inappropriate waste handling of this product.
The symbol on the product, or on the documents
accompanying the product, indicates that this appliance may
not be treated as household waste. Instead it should be taken
to the appropriate collection point for the recycling of electrical
and electronic equipment. Disposal must be carried out in
accordance with local environmental regulations for waste
disposal.
Use
The hood is designed to be used either for exhausting or filter
version.
Ducting version
The hood is equipped with a top air outlet Bfor discharge of
fumes to the outside (exhaust pipe and pipe fixing clamps not
provided). Fig. 5
Attention! If the hood is supplied with carbon filter, then it
must be removed.
Filter version
When there is no exhaust duct for venting outdoors, you can
use a carbon filter.
The air is depurated by the filter and put again in the
surrounding.
Attention! If the hood is not supplied with carbon filter,
then it must be ordered and mounted.
The filtered air is returned from atop the cabinet through a
duct that passes through the cabinet itself.The diameter of the
duct must be the same as that of flange H.
The deflector Jcan be fixed to the outlet hole using the two
screws provided. Fig. 4-5
Installation
The minimum distance between the supporting surface for the
cooking equipment on the hob and the lowest part of the
range hood must be not less than 43cm from electric cookers
and 65cm from gas or mixed cookers.
If the instructions for installation for the gas hob specify a
greater distance, this must be adhered to.
Electrical connection
The mains power supply must correspond to the rating
indicated on the plate situated inside the hood. If provided with
a plug connect the hood to a socket in compliance with current
regulations and positioned in an accessible area, after

8
installation. If it not fitted with a plug (direct mains connection)
or if the plug is not located in an accessible area, after
installation, apply a double pole switch in accordance with
standards which assures the complete disconnection of the
mains under conditions relating to over-current category III, in
accordance with installation instructions.
Warning! Before re-connecting the hood circuit to the mains
supply and checking the efficient function, always check that
the mains cable is correctly assembled.
Mounting
Expansion wall plugs are provided to secure the hood to most
types of walls/ceilings. However, a qualified technician must
verify suitability of the materials in accordance with the type of
wall/ceiling. The wall/ceiling must be strong enough to take
the weight of the hood. Do not tile, grout or silicone this
appliance to the wall. Surface mounting only.
This hood is designed for fitting in a cabinet or on some other
support.
The diameter of the ventilation duct must be the same as the
that of the flange mounted on the ventilation hole on the hood.
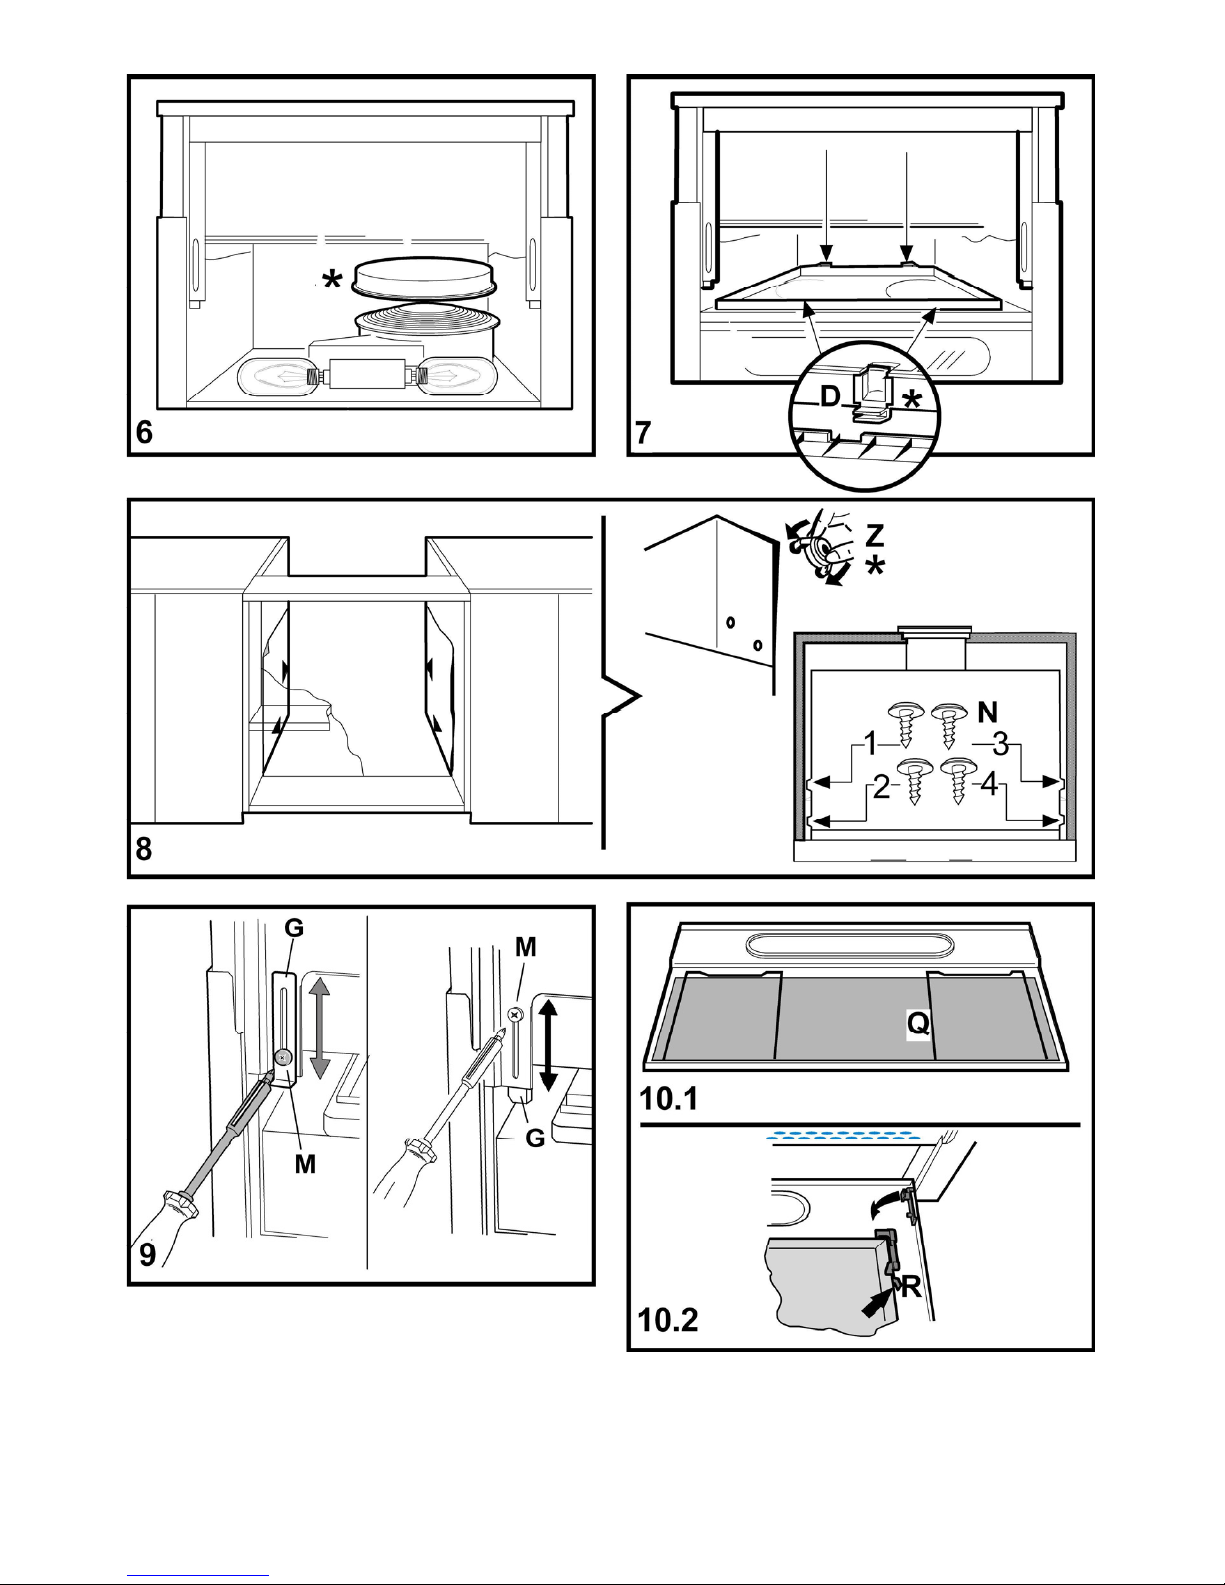
To mount the hood proceed as follows:
- Position the drilling template inside the left cupboard on
the right hand side with the arrow point towards the back
on the cupboard.
- Drill the holes marked on the template.
- Repeat the procedure for the right hand cupboard
- If the sides of the cupboards are 18 mm thick, insert 4
spacers Zon the sides of the hood.
- Fix the hood to the cupboard using four screws N.
Fig. 8
Additional instructions for the montage
Box adjustement
The hood can be installed in cabinets with different depths,
the front of the box must always be in line with the cabinet.
For alignment adjust the back stops of the box. For box
adjustment, loosen screws “M” and slide square plates “G” as
necessary and tighten screws “M”. Fig. 9
Description of the hood
Fig. 1.1
1. Light Switch
2. Motor Speed Switch
3. Illumination of the cooking surface
4. Grease Filters/grease filter support grate
5. Light Cover Supports
6. Pull-Out Drawer
Model with Grease Filter Support Grate
Opening the Grease Filter Support Grates - Fig. 2.1
a. Remove the pull-out drawer completely.
b. Push the Aknobs inwards toward each other (in the
“Open” direction as indicated on the plastic knob itself).
c. To remove the grates completely, use the Bspring
fasteners, which act as pins to hold the grate in place
(Fig. 3).
Model with Self-supporting Metal Filters
Removing the Grease Filters - Fig. 2.2
a. Remove the pull-out drawer completely.
b. Press the side handles C(some models are supplied with
handles Z - Fig. 2.3) towards the opposite side and
remove the filters.
Putting the Filters Back in Place
a. Remove the pull-out drawer completely and mount the
grease filter so that it covers the drawer.
b. Close the drawer and install the remaining grease filter.
Opening the Light Cover Support
a. Remove the pull-out drawer completely.
b. According to model in possession:
Lamp Dwith hook locks type A- Fig.2.2
Move the bracket hook locks towards each other (in
direction “Open” as printed on the plastic part of the lock).
Lamp Fwith hook locks type S- Fig. 1.2
Move the hook locks as indicated by the arrows and
completely remove the lamp from the housing (Fig. 1.3).
Operation
The hood is fitted with a control panel with aspiration speed
selection control and a light switch to control cooking area
lights.
Use the high suction speed in cases of concentrated kitchen
vapours. It is recommended that the cooker hood suction is
switched on for 5 minutes prior to cooking and to leave in
operation during cooking and for another 15 minutes
approximately after terminating cooking.
Maintenance
ATTENTION! Before performing any maintenance operation,
isolate the hood from the electrical supply by switching off at
the connector and removing the connector fuse.
Or if the appliance has been connected through a plug and
socket, then the plug must be removed from the socket.
Cleaning
The cooker hood should be cleaned regularly (at least with the
same frequency with which you carry out maintenance of the
fat filters) internally and externally. Clean using the cloth
dampened with neutral liquid detergent. Do not use abrasive
products. DO NOT USE ALCOHOL!
WARNING: Failure to carry out the basic cleaning
recommendations of the cooker hood and replacement of the
filters may cause fire risks.
Therefore, we recommend oserving these instructions.
The manufacturer declines all responsibility for any damage to
the motor or any fire damage linked to inappropriate
maintenance or failure to observe the above safety
recommendations.
Grease filter
Traps cooking grease particles.
If situated inside the support grill, it may be one of the
following types:
Paper filter must be replaced once a month or if colouring
appears on upper side, in such cases the colouring is evident
through the grill openings.

9
Sponge filter should be washed with hot soapy water once a
month and replaced every 5 to 6 washes.
Metallic filter must be cleaned once a month, with non
abrasive detergents, by hand or in dishwasher on low
temperature and short cycle.
When washed in a dishwasher, the grease filter may discolour
slightly, but this does not affect its filtering capacity.
Removing the Grease Filters (for models wtih grease filter
support grates)
To remove the dirty grease filter, proceed as follows:
a. Remove the pull-out drawer completely and open the
ventilation grates that support the grease filters.
b. Remove the Qfasteners for the grease filter and remove
it (Fig. 10.1). If special metal filters have been installed,
press on the plastic springs Rto unhook them (Fig.
10.2).
c. When washing or replacing the grease filter, wash the
grate as well with warm soapy water.
d. Remount the new filter or the old one after it has dried
thoroughly.
Charcoal filter (filter version only)
It absorbs unpleasant odours caused by cooking.
The saturation of the activated charcoal occurs after more or
less prolonged use, depending on the type of cooking and the
regularity of cleaning of the grease filter.
In any case it is necessary to replace the cartridge at least
every four mounths (or when the filter saturation indication
system – if envisaged on the model in possession – indicates
this necessity).
To fit or replace a carbon filter:
a. Request a charcoal filter from the retailer, specifying the
model and type of hood.
Caution! Some charcoal filters come covered with a plastic
film to protect their filtering properties. If this is the case,
remove the film before installing the filter.
b. Remove the pull-out drawer completely.
c. Remove the grease filters or the grates.
d. Place the activated carbon filter in position:
1) Version with one motor: insert the filter in its housing
over the plastic grill and rotate it until it locks in
position (Fig. 6).
2) Version with two motors: to assemble the filter,
insert it in its seating and fix it in position using the
clips L(Fig. 7)
e. Remove the grease filters or grills
To remove the carbon filter, follow the procedure described in
item 1) or 2), depending on the version) in the reverse order.
Replacing lamps
Disconnect the hood from the electricity.
Warning! Prior to touching the light bulbs ensure they are
cooled down.
a. Remove the pull-out drawer.
b. Open the light cover support or the back grease filter
support grate.
c. Always replace burnt-out lamps, according to what is
provided for your appliance, with olive-shaped max. 40
Watt (E 14) bulbs, or neon-lamp 14 Watt max., or PL
lamp 11 Watt (one PL lamp appliance) or PL 9 Watt (two
PL lamp appliance).
d. Close the light cover support or the back grease filter
support grate.
If the lights do not work, make sure that the lamps are fitted
properly into their housings before you call for technical
assistance.
Table of contents
Other Smeg Ventilation Hood manuals
Popular Ventilation Hood manuals by other brands

Zephyr
Zephyr ZVE-E30DS Use, care and installation guide

GE
GE 36" CUSTOM HOOD INSERT ZVC36LSS Dimensions and installation information

Schweigen
Schweigen WM3150S installation guide

ELICA
ELICA OPEN SUITE SUPERIOR Instruction on mounting and use

Boffi
Boffi FLAT-KAP Assembly instructions

ELICA
ELICA ECR627SS Use, care and installation guide