Snell QBx Surround User manual

Owner’s Manual
QBx
Surround

2
SPECIFICATIONS
Frequency Response (±3dB) 98Hz–20kHz, -6dB @ 85Hz
Recommended Amplifier Power 15–150 watts (above 80Hz)
Nominal Impedance 6 ohms
Sensitivity (2.83v at 1m) 88dB SPL (in half-space, wall mounted)
Tweeter (video-shielded) 1-inch (25mm) black-anodized aluminum dome
with neodymium magnet structure and multi-
finned aluminum heatsink
Bass Unit (video-shielded) 51/4-inch (130mm) polymer chassis, HDA cone and
rubber surround
Cabinet Construction 3/4-inch MDF walls
Composite Baffle Construction Two layers of 5/8-inch high density fiberboard,
joined by specialty adhesive
Grille Black or white cloth
Dimensions (HxWxD) 113/4x 71/2x 6 inches
29.8 x 19.1 x 15.3cm
Weight/pair 24 lbs (11 kg)
Finish Black or white painted MDF
Hand-Tuned
Crossover
51/4" Video-Shielded
Bass Unit
"Butterfly"
Grille Cutout
Elliptical
Baffle Edges
1" Neodymium
Magnet Tweeter
High Loss
Sandwich Baffle

3
PRODUCT DESCRIPTION
The QBx (“Quiet Box”) Surround is the ideal choice for today’s surround applications. It is a
two-way design that incorporates all the QBx technology features. The result is exceptional
performance with minimal space requirements. While the QBx Surround is diminutive in size,
it has the full complement of QBx cabinet, driver and crossover technology.
The QBx Surround system consists of the following:
2 Model QBx Surround speakers with premounted hanging brackets
2 Mounting templates
2 Interlocking wall hangers
4 1” felt dot bumpers
8 Wall fasteners with screws for drywall mounting
8 Self-tapping screws (#6 x 2” phillips flat-head) for solid surface mounting
QBx Technology
In an ideal speaker, the speaker cabinet is inert and resonance free. It should have smooth
contours without projections that cause reflections which degrade high frequency response.
In short, the cabinet should not negatively affect the sound of the loudspeaker. QBx (Quiet
Box) refers to a number of techniques that reduce the detrimental effects that typically
come from the resonances and reflections of ordinary cabinets.
“Butterfly” grille cutout
The cutout area around the tweeter is given a highly irregular contour to prevent the
irregular high frequency response that would otherwise occur. The contour expands and
contracts around the perimeter of the tweeter, creating a “butterfly” shape.
Elliptical baffle edges
The grille is mounted flush into the baffle. The baffle edges have large elliptical radiuses. This
smooths the cabinet termination, greatly reducing the edge reflections. High frequency
smoothness is preserved.
High-Loss Sandwich Baffle
The unique high-loss baffle is constructed from multiple layers of wood and a high tech
adhesive. The “lossy” adhesive that laminates the two layers of speaker baffle greatly reduces
cabinet resonances, resulting in purer midrange and clean, crisp bass.
Hand-Tuned Crossover
The crossover networks were designed using sophisticated computer simulation. Final system
balance is determined by exhaustive listening tests. These networks adhere to an “in-phase”
or Linkwitz-Reilly design: time alignment and coherency are maintained through the driver-
to-driver transition region. For optimum use as a surround speaker, the QBx Surround has
been designed for best response on a downward tilting (30°, ±15°) axis. In production, each
crossover is individually tuned by technicians to within ±0.5dB of the Master Reference,
ensuring predictable performance in your home.
Drive Units
This two-way monitor uses a 1-inch black-anodized aluminum dome tweeter with a
multifinned aluminum heatsink and a 51/4-inch bass unit with a High Definition Aerogel
cone. The video-shielded driver complement provides unlimited placement options.
4
HOW TO PLACE YOUR QBx SURROUNDS
Determining Room Placement
Whether you prefer a more direct surround effect, or the enveloping sense of a diffusion-
oriented surround speaker, proper placement of your QBx Surrounds will enable you to
achieve it. In either case, a few ground rules should suffice for maximum enjoyment of either
surround placement. Take a few minutes to place your speaker systems correctly to ensure
they sound their best.
Height
The QBx Surround speaker produces optimum response along an axis that tilts downward 30°
(±15°). Place the Surround speakers at least 5 feet (1.5m) from a floor, yet 12 inches (30cm)
from the ceiling. A fairly high mounting location will aid in sound diffusion and reduce the
chance you will be able to audibly locate the speakers. Increased height will also help to even
out the sound levels across the listening area.
Boundaries
Keep the Surrounds at least 12 inches (30cm) away from an adjacent wall or large obstacle.
Coverage Area
For large areas, multiple Surrounds can be used to ensure even coverage. Use one pair of
Surrounds for every three rows of seats (approximately 10 feet between Surround speakers).
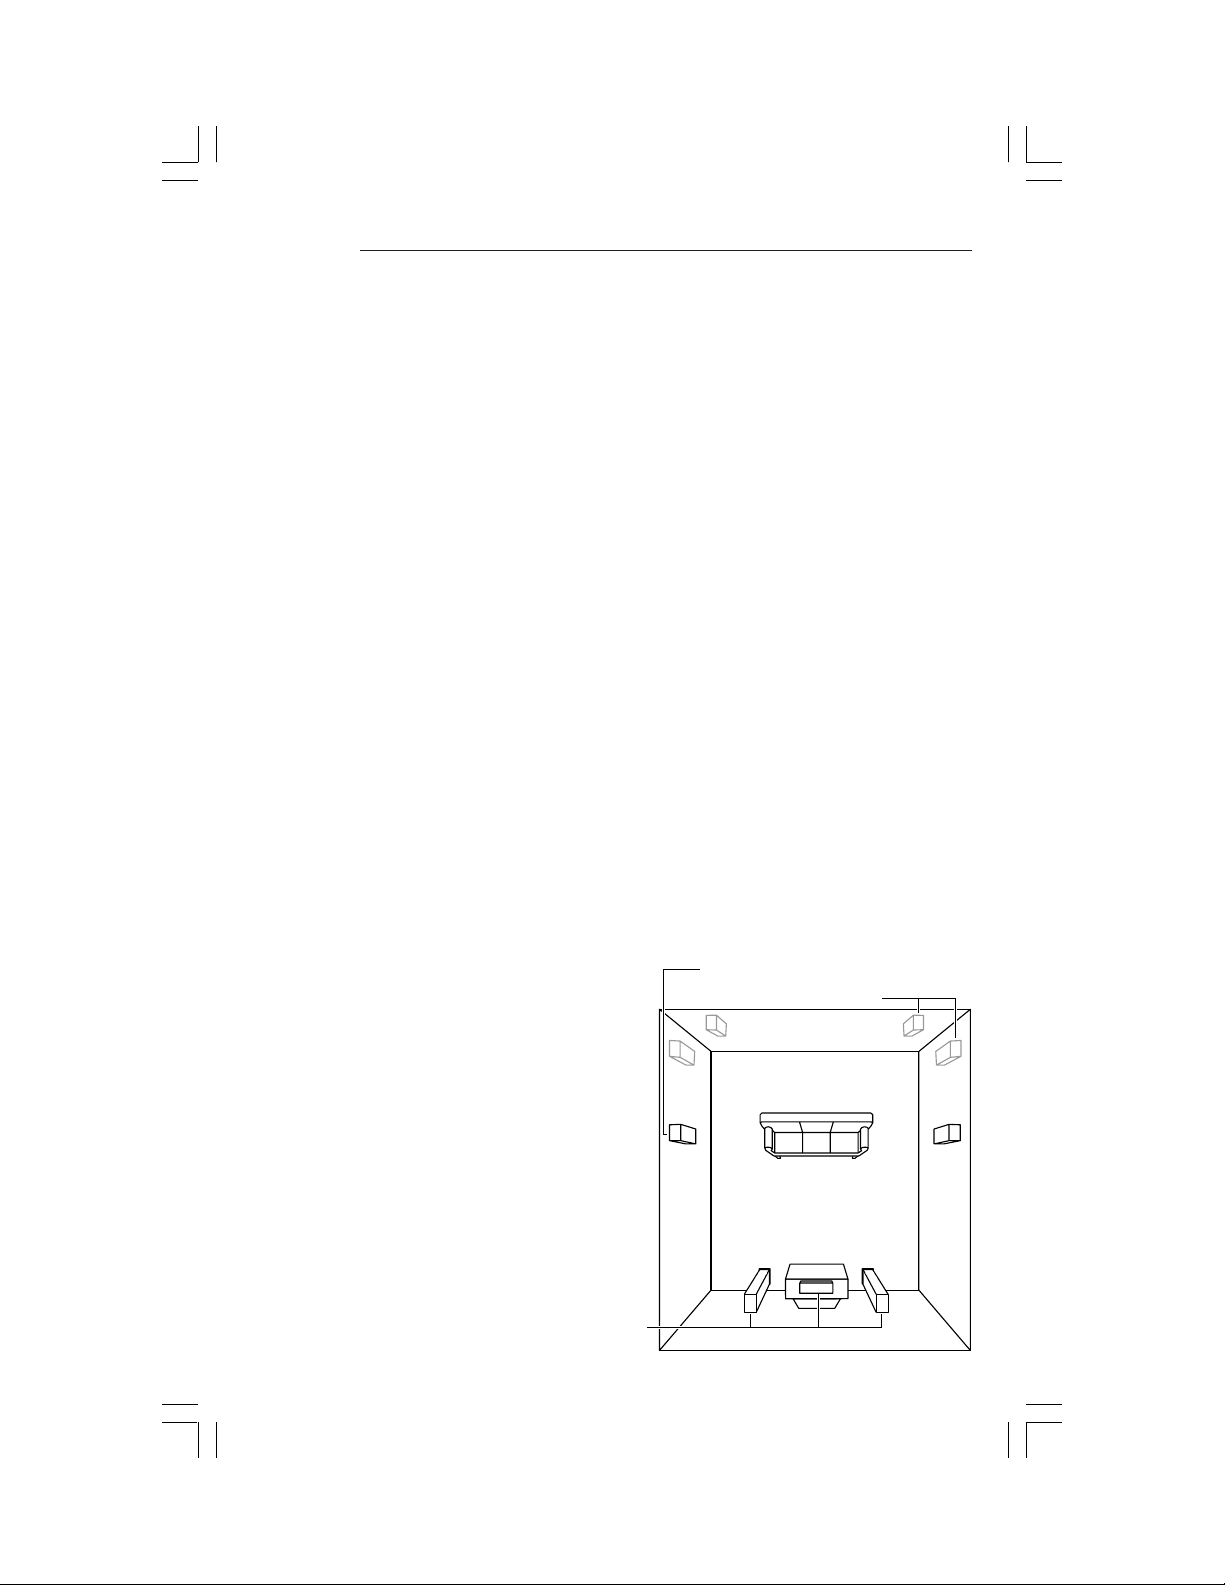
Placement
Please consult the placement diagram. To achieve the greatest sense of sound envelopment,
place the QBx Surrounds to the side of the listening area. If the listening area is against a
wall (for example, if your couch is placed against a back wall), place the QBx Surrounds to
the side of the couch, leaving at least 12 inches (30cm) between the QBx Surrounds and the
back wall.
Back Wall Placement
When placing the QBx Surrounds behind your listening area, keep them as close to the side
walls as possible — but no closer than 12 inches (30cm).
Aiming Your Speakers
For a diffuse sound effect, aim your QBx
Surrounds away from the listening area.
You should not be able to audibly locate
the speakers. Alternatively, aiming your
speakers toward the listening area will
create more focused, directional sound
energy, creating exciting effects in the
surround channels.
Alternative Surround Locations
Typical Surround Placement
Front and Center
Channel Speakers

5
MOUNTING THE QBx SURROUNDS
Mounting the speaker on hollow surfaces (drywall, etc.):
1. Using the supplied mounting template, drill four holes. If the speaker wires are run
behind the wall, make a hole for them as well.
2. Insert the supplied wall fasteners through the bracket and into the wall.
3. Level the bracket and tighten the screws.
4. Remove the adhesive backing cover from the felt bumpers and press them into place on
the lower corners of the Surround cabinet as shown below. Connect the wires. If you are
running the wires along the wall, use the wire groove channel on the speaker rear panel
to ensure a neat installation.
5. Place the QBx Surround on the wall so the bracket on the back of the speaker is above
the bracket on the wall. Lower the speaker until the two brackets interlock.
Felt Bumpers
Mounting the speakers on solid surfaces:
If you are mounting the speakers on wood
or some other solid material, use the
mounting template to drill four 3/32” holes.
Insert the 2” flat head (#6) self tapping
screws through the bracket into the holes.
Follow instructions 3 through 6 above to
complete the installation.
Aftermarket Mounts
As an added feature, we have provided pre-drilled holes to use with several popular
aftermarket speaker mounts. Two such systems are the Omnimount 50 Series (or equivalent)
or the Vogel SAT 5 (or equivalent).

6
CONNECTING THE SPEAKERS
Warning! To prevent electrical shock, always switch off the amplifier or receiver when
making connections to the speaker system.
We recommend 16 gauge cable or thicker for runs up to 25 feet (8m) and 14 gauge wire or
thicker for longer runs.
Connecting with bare wire:
Insert bare wire into holes and tighten.
Connecting with banana plugs, pins or spade lugs:
When using connectors, be sure that they are small enough
to allow the speaker to hang flat on the wall. The gold-plated
binding posts accept standard banana plugs and pins, and
can accommodate spade lugs to 5/16-inch.
When making connections, be sure to connect + to + (red) and – to – (black).
Using With a Multichannel Surround Processor
When using a subwoofer:
Select the SMALL setting on your receiver or processor for your Surround channels. This
routes all bass information (typically below 100Hz) to your subwoofer.
When not using a subwoofer:
Select the LARGE setting on your receiver or processor for your Surrounds. This routes all
bass information (typically below 100Hz) to your Surrounds. Otherwise, bass information
will be lost.
Matching the sound levels of each speaker:
The output level of the Surround speakers can be set using the noise signal generator
built into some AV electronic components or, often just as effectively, by ear. If your AV
electronic components include a “circulating noise source” (a test noise that switches
from channel to channel) use it to balance the output of the channels. If you do not
have a circulating noise test signal, select several movie scenes that have significant
surround sound content. Adjust the levels by ear so that the surround effects, when
present, seem similar in level to the front channels. Surround effects are most realistic
when the levels are set to be subtle, not overwhelming.
QBx Surround
amplifier or receiver

7
HOW TO CARE FOR YOUR SPEAKERS
Use a soft terry cloth towel slightly dampened with water, glass cleaner, or a diluted
mild detergent. The towel should be just damp enough to wipe the surface clean without
leaving a trail of moisture.
Do not use abrasive cleaners or any cleaner containing chemicals harsher than those
found in glass cleaner.
LISTENING LEVELS AND POWER HANDLING
The power recommendation for the system assumes you will operate the amplifier in a
way that will not produce distortion. All speakers can be damaged by even a modest
amplifier if it is producing distortion. If you hear a gritty noise or other signs of strain,
turn down the volume. Prolonged or repeated operation of your speakers with a
distorted signal can cause damage that is not covered by the warranty. It is especially
important that you do not overdrive the bass capability of smaller speakers. Watch for
noises, such as pops, caused by the music’s bass line. Use of the loudness control and/or
full bass boost at louder volumes is likely to overdrive the woofer. Use such controls
sparingly.
LIMITED WARRANTY
For five years from the date of purchase, Snell Acoustics will repair for the original owner
any defect in materials or workmanship that occurs in normal use of the speaker system,
without charge for parts and labor.
Your responsibilities are to use the product according to the instructions supplied, to provide
safe and secure transportation to an authorized Snell Acoustics service representative, and to
present proof of purchase from an authorized Snell dealer in the form of your sales slip when
requesting service.
Excluded from this warranty is damage that results from abuse, misuse, accidents, shipping,
repairs, or modifications by anyone other than an authorized Snell Acoustics service
representative. This warranty is void if the serial number has been removed or defaced.
This warranty gives you specific legal rights, and you may also have other rights that vary
from state to state.
If Service Seems Necessary
Contact the dealer from whom you purchased the speaker system. If that is not possible, call
us at 978-373-6114, or write to: Snell Acoustics
143 Essex Street
Haverhill, MA 01832
We will promptly advise you of what action to take. If it is necessary to return your speaker
system to the factory, please ship it prepaid in the original factory packaging. Please note
that Snell Acoustics will not be held liable for shipping damage due to improper packaging.
After it has been repaired, we will return it freight-prepaid in the U.S. or Canada.

©2000 Snell Acoustics. All Rights Reserved.
Specifications are subject to change without notice.
Covered by patents issued and/or pending.
Part #542-1014
143 Essex Street
Haverhill, MA 01832
phone: 978-373-6114
fax: 978-373-6172
email: [email protected]
www.snellacoustics.com
Table of contents
Other Snell Speakers manuals


