Snell PS.10 User manual

PS.10
PS.10 Powered Subwoofer
Owner‘s Manual

2
SAFETY INSTRUCTIONS
Warning: To reduce
the risk of fire or
electric shock, do
not expose this appliance to rain or moisture.
The lightning flash with arrowhead symbol,
within an equilateral triangle, is intended
to alert the user to the presence of uninsulated
”dangerous voltage“ within the product’s enclosure
that may be of sufficient magnitude to constitute
a risk of electric shock to persons.
The exclamation point within an equilateral
triangle is intended to alert you to the
presence of important operating and maintenance
(servicing) instructions in the literature accompa-
nying the appliance.
Read Instructions: All the safety and operating
instructions should be read before the appliance is
operated.
Retain Instructions: The safety and operating
instructions should be retained for future refer-
ence.
Heed Warnings: All warnings on the appliance
and in the operating instructions should be
adhered to.
Follow Instructions: All operation and other
instructions should be followed.
Water and Moisture: The appliance should not
be used near water—for example, near a bathtub,
washbowl, kitchen sink, laundry tub, in a wet base-
ment, or near a swimming pool, etc.
Carts and Stands: The appliance should be used
only with a cart or stand that is recommended by
the manufacturer.
Wall or Ceiling Mounting: The appliance should
not be mounted to a wall or ceiling.
Ventilation: The appliance should be situated so
that its location or position does not interfere with
its proper functioning. For example, the appliance
should not be situated on a bed, sofa, rug, or simi-
lar surface that may obstruct the heat sink sur-
faces; or placed in a built-in installation, such as a
bookcase or cabinet that may impede the flow of
air near the heat sink surfaces.
Heat: The appliance should be situated away from
heat sources, such as radiators, stoves, or other
appliances that produce heat.
Power Sources: The appliance should be connect-
ed to a power supply only of the type described in
the operation instructions or as marked on the
appliance.
Power Cord Protection: Supplies should be rout-
ed so that they are not likely to be walked on or
pinched by items placed upon or against them. Pay
particular attention to cords and plugs, conve-
nience receptacles, and the point where they exit
from the appliance.
Cleaning: The appliance should only be cleaned as
recommended by the manufacturer.
Non-Use Periods: The power supply cord should
be unplugged from the outlet when left unused for
long periods of time.
Object and Liquid Entry: Care should be taken
so that objects do not fall into and liquids are not
spilled into the inside of the appliance.
Damage Requiring Service: The appliance should
be serviced if any of the following events occur:
fiThe power supply or plug has been damaged.
fiObjects have fallen, or liquid has been spilled
into the appliance.
fiThe appliance has been exposed to rain.
fi The appliance does not appear to operate nor-
mally or exhibits a marked change in perfor-
mance.
fi The appliance has been dropped, or the enclo-
sure is damaged.
Servicing: The user should not attempt to service
the appliance beyond what is described in the
operating instructions. For all other servicing, con-
sult your dealer or contact Snell Acoustics.
SAFETY INSTRUCTIONS

3
Specification PS.10 Powered Subwoofer
Frequency Response (±3dB) 32-125Hz
27Hz at -6dB
Amplifier Power 300 watts
Crossover Low Pass for Subwoofer Variable from 50 to 125Hz
Crossover High Pass for Line Out Fixed at 80Hz, 12dB/octave
Bass Unit 10-inch (250mm) custom-built bass unit with dual
spiders, top-mounted heat sink, and die-cast
aluminum chassis. With coated paper cone and butyl
surround. Video-shielded.
Cabinet Construction Hardwood veneer on 3¼4-inch MDF.
Internal Double-H bracing.
Grille Guillotine-style black cloth covered grille
Controls fiPhase Switch
fiAuto On-Off switch with instant On, and
one-minute Off delay
fiVolume control
Dimensions (HxWxD) 161¼8x 153¼4x 161¼8"
41cm x 40cm x 41cm
Weight 57 lbs (26kg)
Finish Hand-sanded, hand-painted
Black on American Oak veneer
INTRODUCTION
We designed the PS.10 for maximum output in an
incredibly compact enclosure. With bass extension
to 27Hz (-6dB) and output over 105dB at a typical
listening position in a 3,000 cubic-foot room, the
PS.10 meets the demands of digital 5.1 formats.
Yet, the PS.10 is so compact, it easily fits within a
typical AV cabinet.
Tuned for Flexibility
We tuned the PS.10 to match the speed and sonic
presentation of the Snell E.5 Tower and K.5
Monitor. We included a system-specific electronic
crossover that automatically adjusts the output of
your front speakers, so you are assured of a seam-
less blend between the PS.10 and your E.5 or K.5
speaker systems.
Plus, we incorporated a number of user-definable
settings, giving you the flexibility to fine-tune the
PS.10 to match your existing system.
Easy to Hide
The PS.10 cabinet is small enough to tuck behind
furniture or place in a closet. Because the bass unit
and ports are on the front of the cabinet, you can
place the PS.10 directly inside a typical AV cabinet
system without performance degradation.
INTRODUCTION
SPECIFICATIONS
4
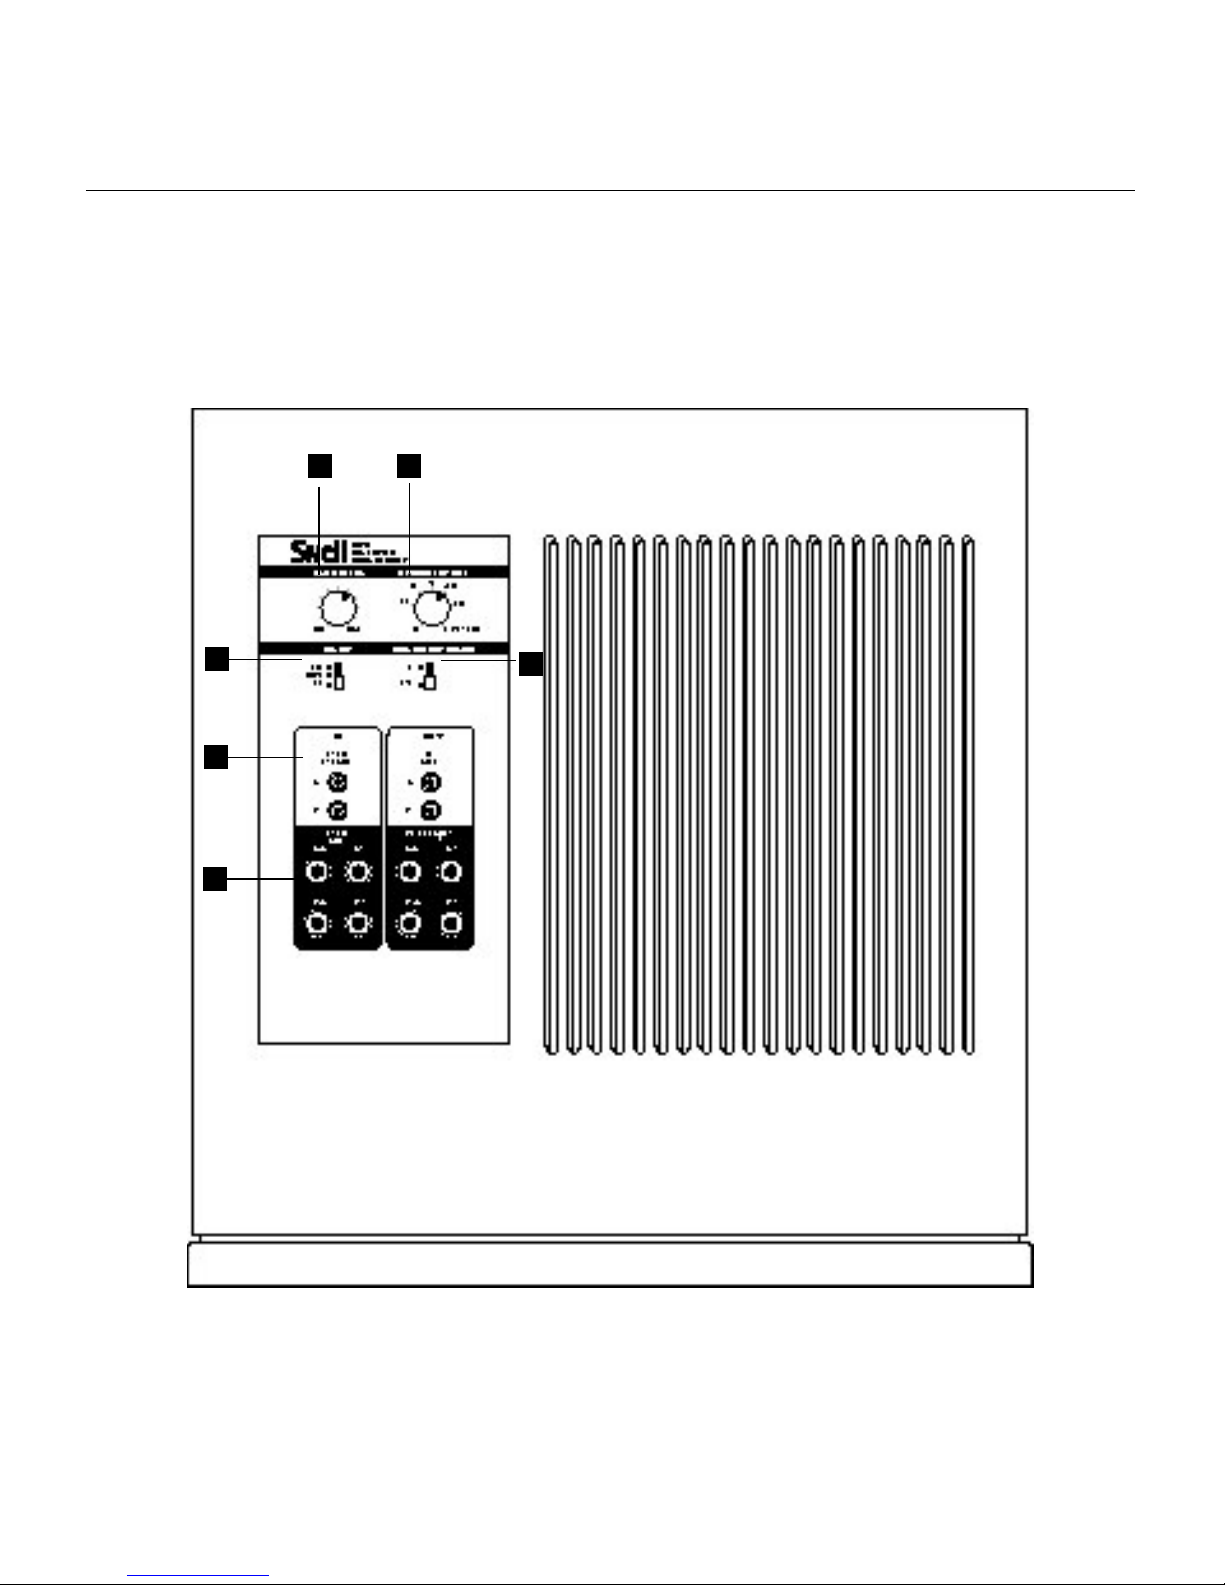
FEATURES
1
5
2
43
6
5
Low-Pass Filter/Crossover
This control sets the frequency of the low-pass
filter, and is fully adjustable from 50 to 125Hz.
The “EXTERNAL” setting effectively removes the
filter from the network, allowing you to use
the subwoofer filter from your electronics.
Level Control/Volume
The Bass Level control adjusts the sound level
output of the PS.10.
Phase Switch
Determines whether the subwoofer adds or
cancels in the crossover region. The proper set-
ting changes based upon the current location
of the speaker.
Power (Off/Auto/On)
Set to ”AUTO,“ the amplifier will turn on auto-
matically when a signal is presented to the
subwoofer. The amplifier will turn off after 10
to 15 minutes of no signal. Set to ”ON,“ the
amplifier will stay on all the time. NOTE: Power
will be continuously supplied to the PS.10
while set in the ”AUTO“ position.
1
2
3
4
5
6
7
8
9
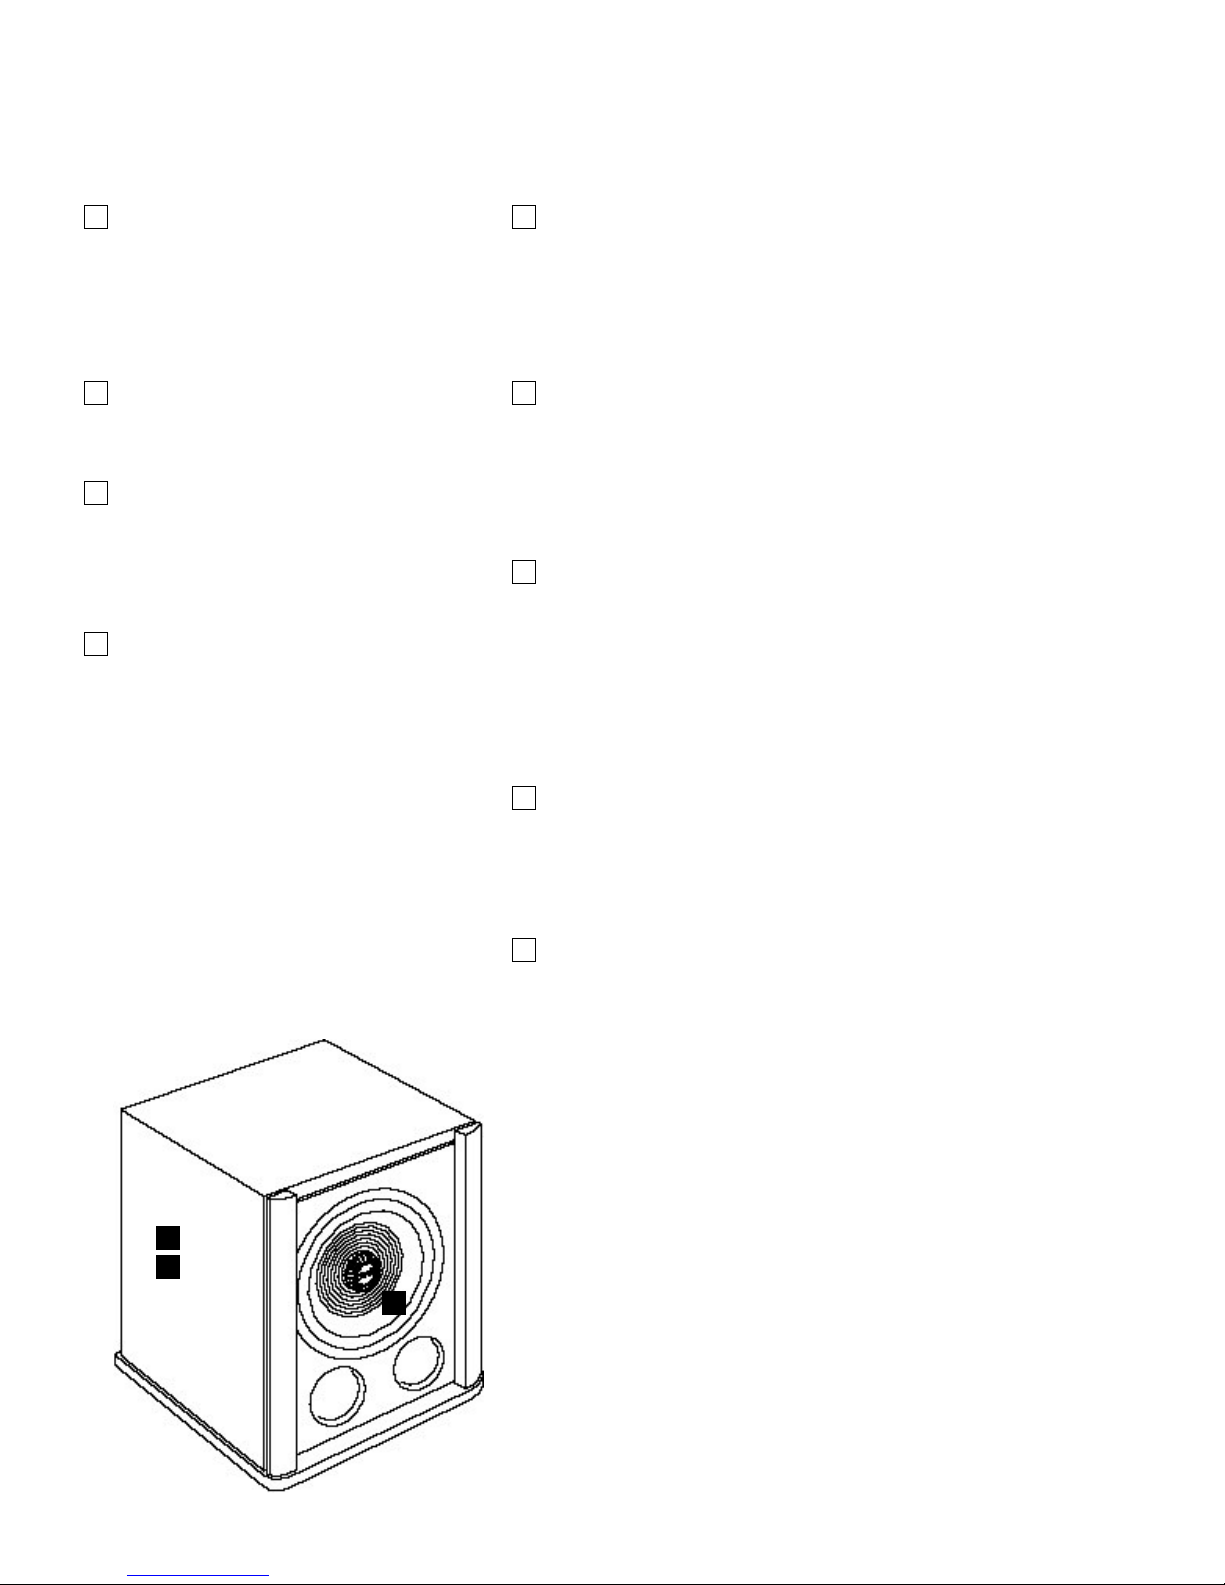
Line-Level Inputs
The line-level inputs incorporate a fixed 80Hz
high-pass filter. When used in conjunction with
the line level outputs, these inputs will redirect
all bass information below 80Hz from your
main speakers to the PS.10.
Speaker-Level Inputs
The PS.10 utilizes high-level inputs. The 5-way
gold-plated terminals accept spade lugs to
5/16 inch, pins, banana plugs, and up to 12-
gauge bare wire. These inputs bypass the inter-
nal high-pass filter.
Bass Driver
The PS.10 uses a 10-inch (250 mm) custom-
built bass unit with dual spiders, a coated
paper cone with butyl surround, and a die-cast
aluminum chassis. The drive unit includes a
front-mounted heat sink that draws heat away
from the voice coil, yielding better power han-
dling capabilities.
Handmade Cabinets
Our cabinet department hand assembles each
unit, and then hand sands each several times.
The result is a cabinet of exceptional workman-
ship, with sharp corners and smooth sides.
Veneers
We use premium, book-matched veneers in our
oiled cabinets, chosen for grain consistency
and aesthetics. A pair of speakers uses wood
veneer from the same tree, so grain patterns
are consistent. Our cabinet shop sequences the
veneer, maintaining a match for the top,
right/right, and left/left sides of each pair of
speakers. We even go so far as to veneer the
inside of the cabinet. This way, as the cabinet
experiences changes in humidity in your home,
it won’t warp or come apart at the edges.
9
8
7

6
CONNECTIONS
Line-Level Input: Line level is the preferred choice in systems using a separate amp and preamp or in receivers that
have a line level or preamp out. These inputs include a built-in fixed high-pass filter at 80Hz. You should use this
input for ”SUBWOOFER OUT“ connections.
Speaker-Level Input: Use these inputs if your receiver does not allow access to the preamp.
GENERAL GUIDELINES ON WIRING
Warning: To reduce the risk of electric shock, always switch off the subwoofer and the amplifier and or
receiver when making connections to the subwoofer and speakers.
When to use line connections in conjunction with the internal crossover:
As a general rule, the best results come from using the line-level connections, where sound is passed from
the preamplifier‘s outputs to the subwoofer and on to the amplifier. Many receivers and integrated ampli-
fiers include a ”PREAMP OUT“ and ”AMPLIFIER IN“ on the back panel. If this is the case with your electron-
ics, or if you are using separates, use this input.
When using these inputs, the signal returned to your amplifier has everything below 80Hz filtered out.
This is a fixed high-pass filter and does not preempt the variable low-pass filter built into the subwoofer.
When to use the line connection without the internal crossover:
Most surround sound receivers and preamps now offer a ”SUBWOOFER OUT“ feature.
When using this option, the subwoofer filter will most likely be set within the electronics. The signal being
sent to your main speakers will be full range. You should then set the PS.10‘s internal crossover for
”EXTERNAL.“
When to use the speaker-level connections:
If your receiver does not offer a ”SUBWOOFER“ or ”PREAMP OUT“ option, or if you wish to run your main
speakers full range, you should use the speaker-level connection.

7
LINE LEVEL WIRING
When using the speaker-level inputs, the main speakers will be receiving the full frequency range.
Using the Subwoofer out connection
1. Connect a single RCA Cable from the “SUBWOOFER OUT” on your processor to either the Left or Right
input on the PS.10.
fiIf you want to use the crossover point determined by your surround electronics, set the PS.10 crossover
to ”EXTERNAL“.
fiIf you want the PS.10 to cross over lower than determined by your surround electronics, select a lower
setting on the PS.10 crossover.
Using the PS.10‘s internal high-pass filter
1. Use the line-level RCA inputs, connecting to ”PREAMP OUT“ on your receiver.
2. From the PS.10 line-level out, connect to ”AMPLIFIER IN“ on your receiver.
3. Choose a setting for the PS.10 crossover that allows the subwoofer to blend seamlessly with the main
speakers.
The high-pass filter is fixed at 80Hz for the main speakers and has a 12/dB rolloff.
8
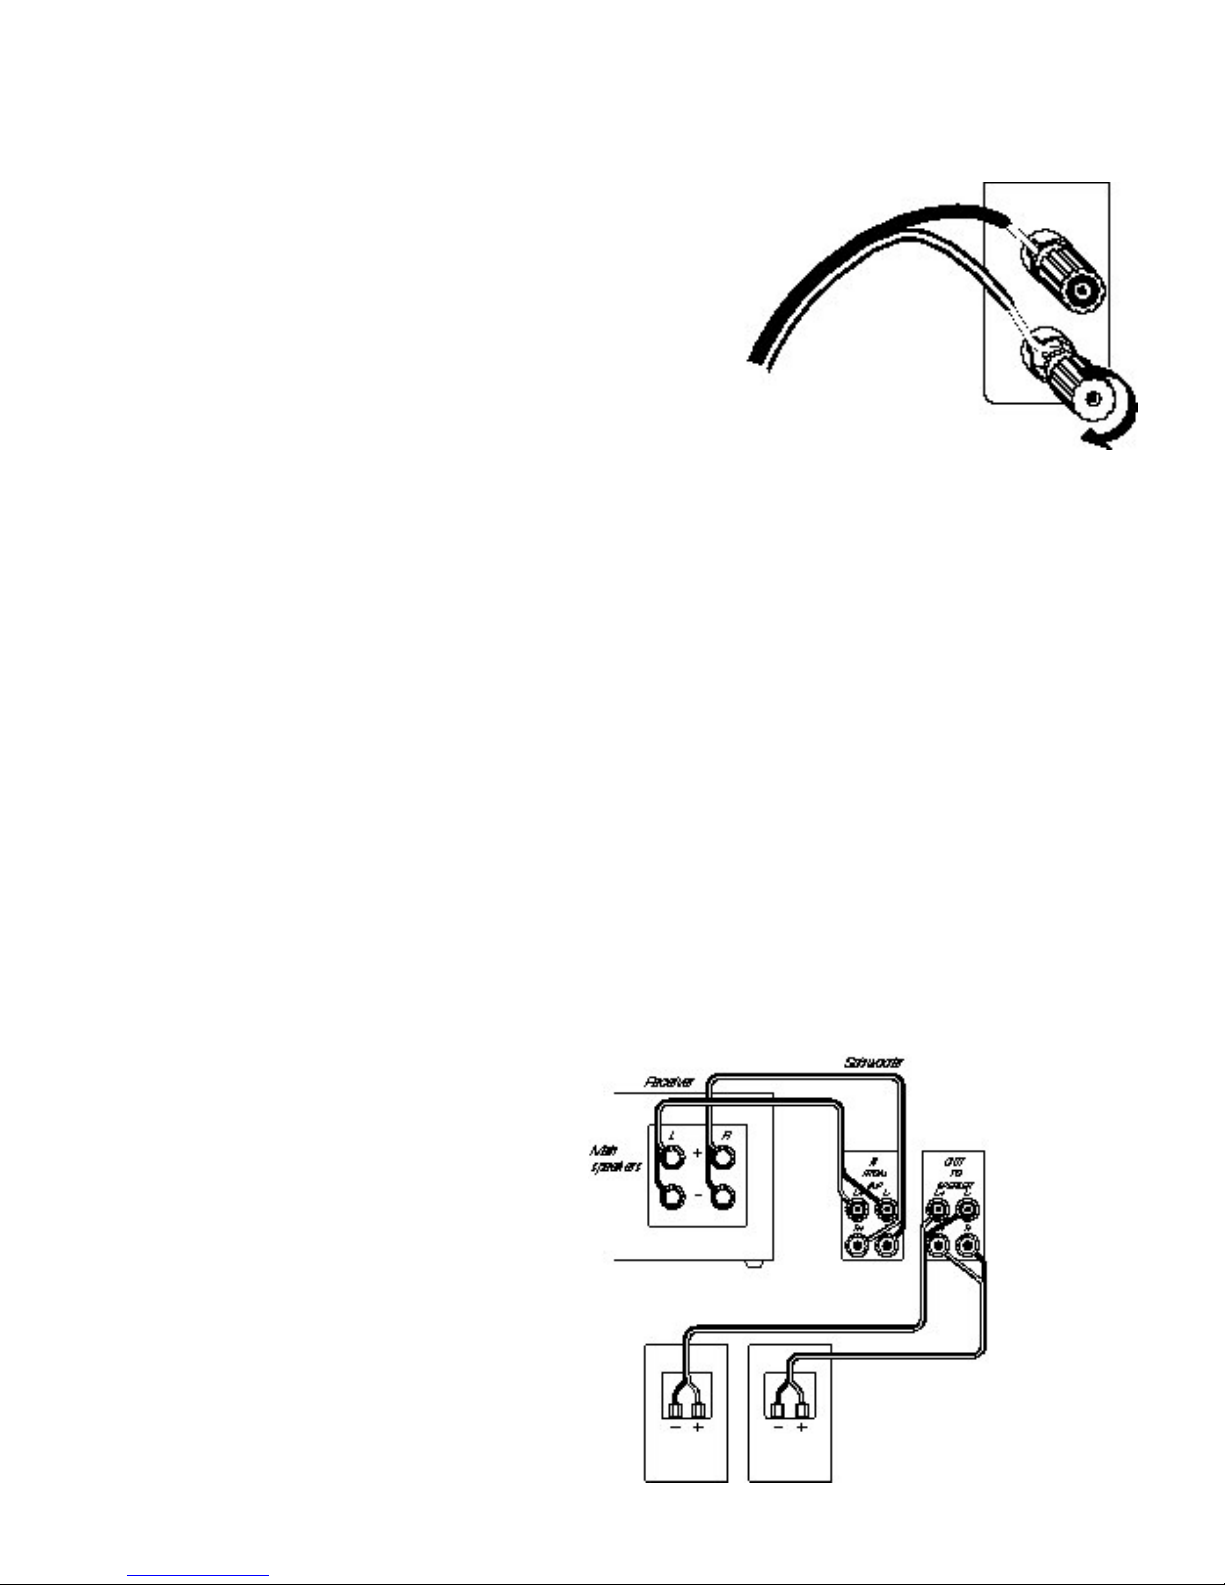
WIRING FOR 2-CHANNEL AUDIO
Using speaker-level wiring
Option 1
Connect from the main speaker out on the receiver
to the PS.10. Connect the main speakers to the
output of the subwoofer.
Speaker-Level Wiring
The simplest way to wire the subwoofer is via the
speaker connections. This does not present any
additional load to your amplifier. The PS.10 is not
sensitive to wire length, therefore you may want to
use long wires at first to allow for experimentation
with placement. There are three options for wiring
using speaker-level inputs. Which option you select
will probably be influenced by the placement of the
speakers in relation to each other and the electron-
ics. The resulting sound will be the same.
NOTE: Be sure to maintain a consistency of +to +
(positive) to (positive) and -to -(negative) to
(negative).
The 5-way binding posts permit easy connection to
banana plugs, spade lugs, and bare wire.
9
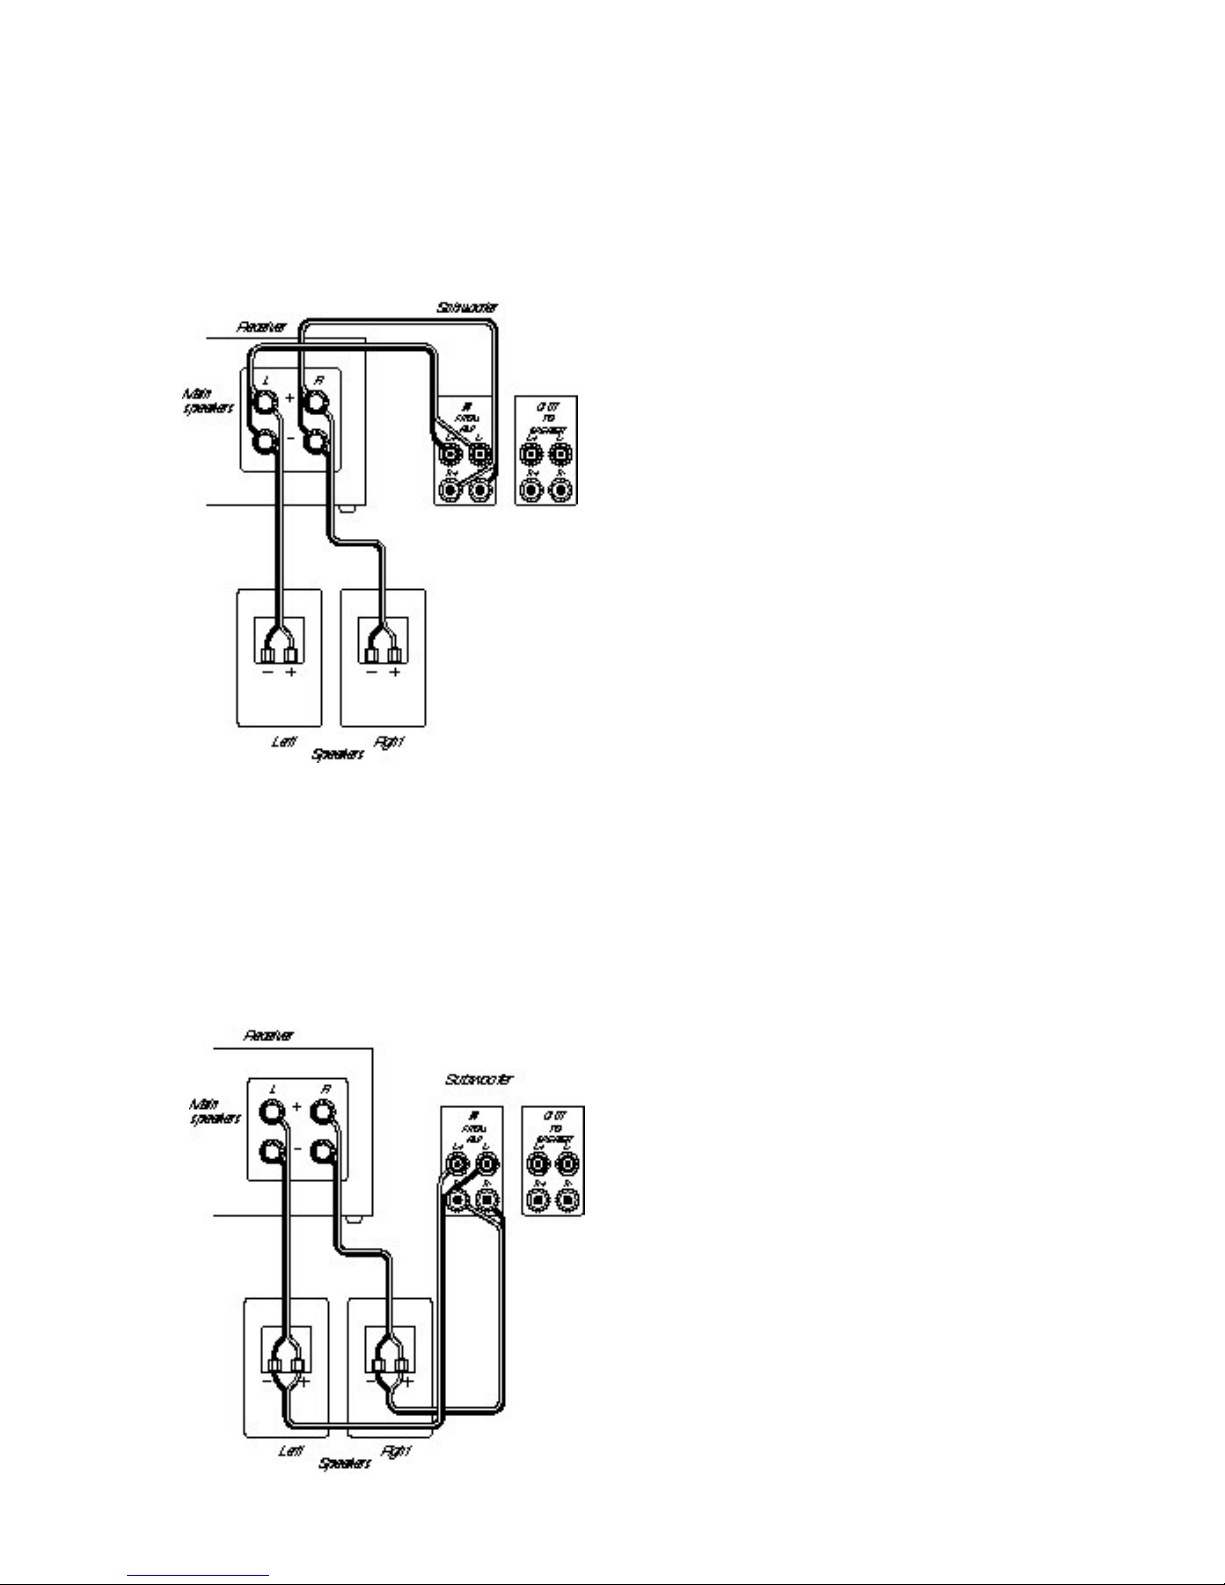
Option 2
Connect both the subwoofer and the main speakers
to the back of the receiver.
Option 3
Connect the amplifier to the main speaker system
and the main speaker system to the subwoofer in.
10
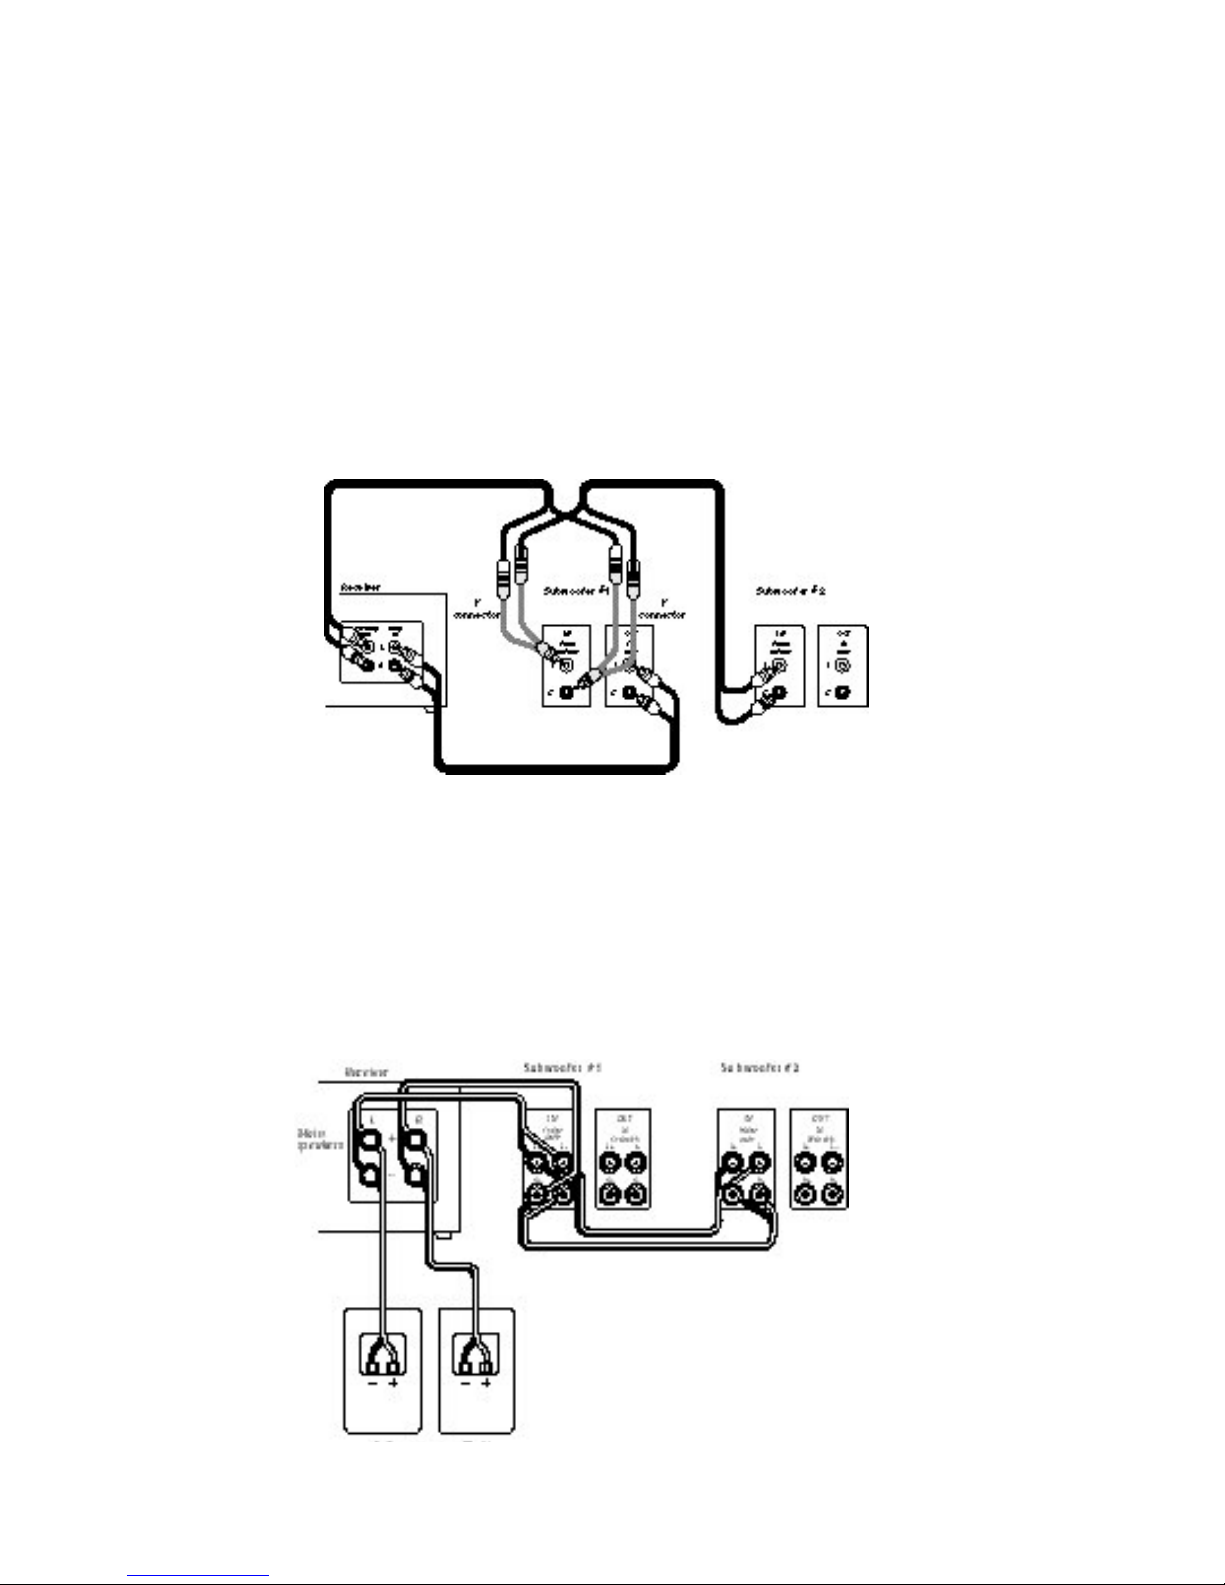
CONNECTING TWO PS.10’s
You may wish to use two PS.10’s, particularly if you are in a large room.
fiDouble subwoofers may be wired with either speaker-level or line-level connections.
fiBe sure the Phase Switch is set the same on both units.
Wiring two PS.10’s using speaker-level inputs
Use the ”OUT TO“ binding posts on one subwoofer to daisy chain to the second PS.10.
Wiring two PS.10’s using line-level inputs
Use "Y" connectors to daisy chain the ”PREAMP OUT“ signal to the input of a second PS.10.
Other Snell Subwoofer manuals

Snell
Snell AMS Sub 10 User manual

Snell
Snell PS.10mk2 User manual

Snell
Snell ICS Sub 24 mk3 User manual

Snell
Snell Basis 150 User manual

Snell
Snell Premier Basis 150 User manual

Snell
Snell Premier Basis 300 User manual

Snell
Snell QBx Sub User manual

Snell
Snell Powered Subwoofer ICS Sub 24 User manual

Snell
Snell Premier Basis 300 User manual

Snell
Snell IC-Basis 300 User manual


