SoftBank 940SC User manual

1
Getting Started
Parts & Functions .......................................................................... 1-2
Handset .............................................................................................. 1-2
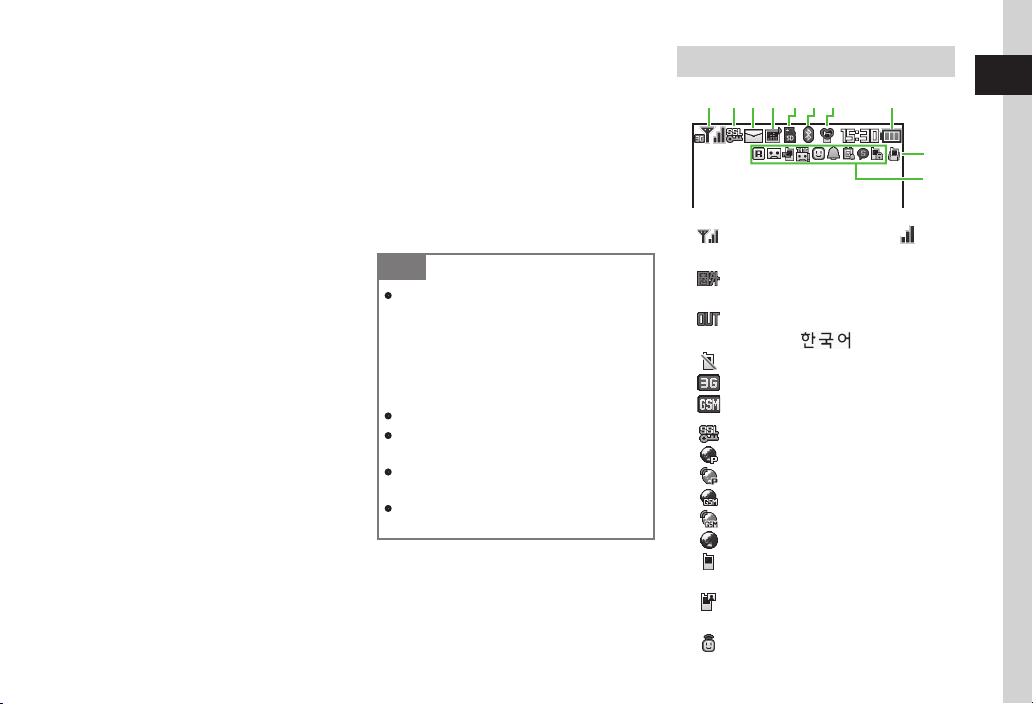
Display Indicators ................................................................................ 1-3
Touch Panel ................................................................................... 1-5
Tap ..................................................................................................... 1-5
Scroll................................................................................................... 1-5
Hold.................................................................................................... 1-5
Drag & Drop........................................................................................ 1-5
Swipe.................................................................................................. 1-5
Touch Panel Operations....................................................................... 1-6
Motion Control .............................................................................. 1-7
USIM Card...................................................................................... 1-7
Before Using USIM Card ...................................................................... 1-7
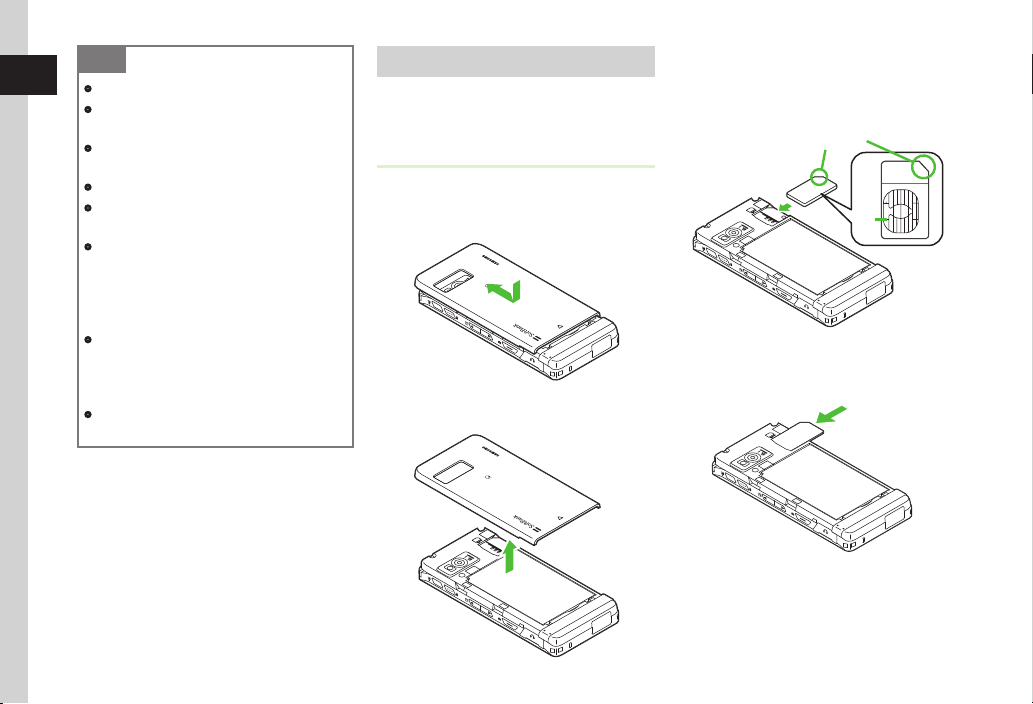
Inserting & Removing USIM Card......................................................... 1-8
Battery & Charger ......................................................................... 1-9
Before Using Battery/Charger............................................................... 1-9
Inserting & Removing Battery............................................................. 1-10
Charge Battery .................................................................................. 1-11
Power On/Off............................................................................... 1-13
Power On.......................................................................................... 1-13
Power Off.......................................................................................... 1-13
Account Details ........................................................................... 1-13
Viewing Account Details.................................................................... 1-13
Editing Account Details...................................................................... 1-14
Handling Precautions (Touch Panel & Key Lock)......................... 1-14
Standby Display........................................................................... 1-15
Minding Mobile Manners ............................................................ 1-15
Offline Mode ..................................................................................... 1-15
Manner Mode ................................................................................... 1-16
Changing Mode Settings ................................................................... 1-16
Default Mode Settings ....................................................................... 1-17
Security Codes............................................................................. 1-20
Phone Password................................................................................ 1-20
Center Access Code........................................................................... 1-20
Network Password ............................................................................ 1-20
PIN Code........................................................................................... 1-20
Password for USIM Lock .................................................................... 1-21
Advanced Settings....................................................................... 1-21
Account Details ................................................................................. 1-21

Getting Started
1
1-2
a
Earpiece/Speaker
bOptical Sensor
Measures ambient light for Display brightness;
in-call object proximity.
cDisplay
dtStart Key
Place and receive Voice Call.
ecClear/Back Key
Return to previous operation step.
fSub Camera
Use for Facial Recognition or Video Call.
gExternal Light
Flashes for missed call or incoming call/
message; illuminates red while charging.
hyPower/End Key
Turn power on/off or end operations.
iMicrophone
jStrap Eyelet
kEarphone Microphone Port
Connect optional Earphone Conversion Cable
here.
lExternal Antenna
Use for Digital TV reception.
mmManner Key
Long press to activate or cancel Manner
mode.
Parts & Functions
Handset

Getting Started
1
1-3
nlHold Key
Lock or unlock Touch Panel and buttons
of handset.
onSide Key/TV Key
Raise ringer, Media Player, or TV volume.
Long press to activate TV.
pbSide Key
Lower ringer, Media Player, or TV volume.
Long press to activate Dummy Call.
qkCamera Key
Long press to activate Camera.
Press this shutter to capture images.
rMobile Light
Turn this on when capturing images.
sExternal Camera
Capture images or send video during
Video Call.
tBattery Cover
Remove to access Battery or USIM.
uCharger/External Device Port
Connect Charger, PC, etc. here.
vInternal Antenna
wInfrared Port
Use for infrared transmissions.
xFeliCa
Place this part over reader/writer for IC
transmission/Osaifu-Keitai®.
yMemory Card Port
microSD™ Memory Card connect port.
zBuilt-in stand
Open Built-in stand to automatically
activate preset function (Digital TV,
Photo Album, etc.).
Note
・
Handset transmits/receives signals via Internal
Antenna. There is no External Antenna. Voice
quality may vary depending upon where/how
handset is used.
Do not cover or place stickers, etc. over the area
containing Internal Antenna or Optical Sensor;
may affect sensitiveness.
・
Do not cover Optical Sensor; may darken Display.
・
Keep Optical Sensor clear of obstructions; may
cause malfunctions.
・
Ifusingprotectivelm,keepOpticalSensorarea
free of obstructions; may cause malfunction.
・
DisplaybrightnesschangesorDisplayickers
depending on surroundings.
Display Indicators
a b cd ef g h
i
j
a Signal strength (more bars
indicates stronger signal)
Out-of-range (Language set to
Japanese)
Out-of-range (Language set to
English or )
OfineMode
3G Network connected
GSM Network connected
bSSL connected
3G Network connected (ready)
3G Network connected (in use)
GSM Network connected (ready)
GSM Network connected (in use)
Packet Communication unavailable
VoiceCallinprogress(asheswhen
placing or receiving calls)
VideoCallinprogress(asheswhen
placing or receiving calls)
My status online

Getting Started
1
1-4
cNew mail
Sending mail
Receiving mail
Delivery Report active
Memory full (S! Mail/SMS)
Downloading Content Key
dMusic playing
Music paused
Recording TV program
Reservation set
S! Appli
S! Appli paused
S! Appli Activation Request
eMemory Card inserted
Read from/write on Memory Card
Software Update required
PC Site Browser connected
Unread S! Quick News
Unread S! Information Channels
All Keys locked
RSS-compatible website
fBluetooth®active
Bluetooth®transmission in progress
Bluetooth®
Web connection engaged
Bluetooth®Headset connected
USB connected
(yellow) USB in use
(gray) Infrared activated
(red) Infrared transmission in progress
Data synchronized
GPS in use
IC Card locked
IC Card in use
gManner mode
Drive mode
Meeting mode
Activity mode
Good Night Timer set
hBattery strong
Battery moderate
Battery low
Battery weak (charge now)
(ashinginred)Batteryempty
i
Ringer and Vibration activated for calls
Ringer active for calls
Vibration active for calls
Ringer & Vibration disabled for calls
jRoaming active
Answering Machine active
Unheard Answering Machine message
Voicemail/Call Forwarding (No reply)
activated
Activate Voicemail
Unheard Voicemail
S! Friend's Status Request
UnreadS!Friend'sStatusnotication
Alarm set
Schedule set
Schedule with Alarm set
Tasks set
Tasks with Alarm set
Secret Mode
Password Lock activated

Getting Started
1
1-5
Touch Panel
Use Stylus to tap or scroll handset Touch Panel items. Some functions support rotating handset vertically or horizontally to change Display orientation.
See below for Touch Panel conventions used in this guide.
Tap
Lightly touch target item on Display. Select items to
open or execute functions.
・
In this guide, some tap operation procedures are
abbreviated with arrows (fP.ii).
Scroll
Gently slide Stylus across Touch Panel to scroll menus
or Internet pages.
・
In this guide, this operation appears as "scroll".
Hold
Touch and hold a Display item to activate/execute
that item.
・
In this guide, this operation appears as "touch and
hold".
Drag & Drop
Touch and hold a Display item, move it to the target
location (drag) and release it (drop).
・
In this guide, this operation appears as "drag" and "drop".
Swipe
Place Stylus on Touch Panel and swipe it in the
direction you want to move.
Quickly open next/previous window/page.
・
In this guide, this operation appears as "swipe".
Note
・
Use bundled Stylus with Touch Panel.
Finger use leaves ngerprints. Pens may
affect Panel sensitivity. Do not apply force
to Touch Panel; press gently and carefully.
・
Tapping multiple functions simultaneously
may cancel operations.
・
Touch sensor may not function properly in
high humidity or if handset is wet.
・
Using protective lm, etc. on Touch Panel
may inhibit Sensor function.

Getting Started
1
1-6
Touch Panel Operations
Use Touch Panel to perform these basic operations.
・
Tap / to move to the previous or next item
or image.
・
Scroll down for more menu items, tabs or page
area out of view in Mail, PC Site Browser, or
File Viewer. Alternatively, when entering text or
viewing messages or Internet pages, press
n / bto scroll.
Content Beyond
Display View
・
Tap pulldown menu ( ) for menu items.
Pulldown
Menu
・
Tap Mark all to mark all items. Tap Unmark all
to unmark all items.
The functions below support Display rotation. In this
guide, instructions are for Portrait view operations.
・
Image Viewer (fP.12-4).
・
PC Site Browser (fP.5-4).
・
Digital TV (fP.6-1).
・
Camera & Imaging (fP.7-1).
・
Media Player (fP.8-4).
・
File Viewer (fP.10-16).
Advanced
s
●Set Auto Lock (rP.14-3)
●Set Touch Panel Tone Volume Level & Vibration
Level for Operating Touch Panel (rP.14-3)
●Calibrate Touch Panel (rP.14-3)

Getting Started
1
1-7
Motion Control
Shakeortilthandsettoperformspecicfunctions.
Shake
Shake handset right and left.
・
Use to play Dice (fP.9-4).
Tilt
Tilt handset right and left.
・
Use to scroll Photo Album images (fP.7-15).
USIM Card
Before Using USIM Card
Universal Subscriber Identity Module (USIM) Card is
an IC card containing customer and authentication
information, including handset number and limited
storage for Phone Book entries and SMS. Install
USIM Card to use handset; power off handset to
insert/remove USIM Card.
IC
USIM Card
Insert USIM Card into another compatible handset
to access SMS and Phone Book entries saved
on USIM Card. Note the following precautions
regarding USIM Card usage and care (see USIM
Card User Guide for details):
・
Avoid using excessive force when inserting/
removing USIM Card.
・
SoftBank Mobile is not liable for damage resulting
from inserting USIM Card into IC card readers or
other third party devices.
・
Always keep USIM Card IC chip clean.
・
Clean USIM Card IC chip with a soft, dry cloth.
・
Do not attach labels to USIM Card; malfunction
may result.

Getting Started
1
1-8
Note
・
USIM Card is the property of SoftBank Mobile.
・
If USIM Card is lost or damaged, you will be
charged for its reissue.
・
Return USIM Card to SoftBank Mobile upon
termination of subscription.
・
Returned USIM Cards are recycled.
・
USIM Card specications may change
without prior notice.
・
If USIM Card or handset with USIM Card
inserted is lost or stolen in Japan or abroad,
immediately contact SoftBank Mobile
Customer Center, General Information
(fP.15-27) to suspend service.
・
Handset/USIM Card repairs, replacement,
or upgrades may deactivate Chaku-Uta®,
Chaku-Uta Full® or video les on handset/
Memory Card.
・
Back-up USIM Card les. SoftBank Mobile is
not liable for lost les.
Inserting & Removing USIM Card
Always turn power off before opening handset to
remove battery, or insert/remove USIM Card.
Inserting
aPress and slide Battery Cover
as shown
bRemove Battery Cover
cWith IC chip down, insert
USIM Card into card slot as
shown in the illustration
Notch
IC
dPush in USIM Card until it
stops and locks

Getting Started
1
1-9
Removing
a Remove battery (fP.1-8
Inserting ato b)
bPress down on USIM Card and
gently slide it out
Note
・
Inserting USIM Card with excessive force may
damage it or handset.
・
Do not misplace a removed USIM Card.
・
To prevent damaging it, avoid touching IC
chip when inserting or removing USIM Card.
Do not touch battery contacts.
・
Do not remove USIM card while handset is
powered on; handset may restart.
Battery & Charger
Before Using Battery/Charger
Chargebatterybeforerstuseofhandsetorafter
long periods of disuse.
Battery
・
Long periods of disuse may affect battery's
ability to hold a full charge. Charge battery at
least once every six months while not in use.
Otherwise, battery may become unusable.
・
Depending on usage, bulges may appear near
end of battery life; this does not affect safety.
・
Handset uses a lithium-ion battery; charge
battery anytime without damaging its ability to
hold a charge.
・
Do not charge battery under the following conditions:
- In ambient temperatures beyond 5°C - 40°C
- In high levels of humidity, vibration or dust (may
cause malfunction)
- Near a radio receiver (may cause feedback)
・
Handset or Charger may warm while charging.
This is normal, however, should they become
very hot to touch, stop charging and contact
SoftBank Mobile Customer Center, General
Information (fP.15-27).
・
Battery is a consumable; replace it if operating
time shortens noticeably.
Note
・
Use specied Charger only.
・
Battery must be inside handset to charge.
・
When not in use, unplug Charger from outlet.
Battery Life
Battery time/life may be reduced by any of the following:
・
Environmental Factors
- Storing/using handset beyond 5°C - 40°C
- Using handset in poor signal conditions
- Debris on handset, battery or Charger Port
・
Operational Factors
- Camera use
- Media Player use
- Heavy use (e.g., for using messaging)
- Bluetooth®transmissions
- Digital TV use
・
Settings
- Using Slide show
- Increasing Brightness or Duration
- Using Media Player with Backlight set to
Always On

Getting Started
1
1-10
Battery Disposal
Do not dispose of exhausted batteries with ordinary
refuse. Tape over battery terminals before disposal
or take to a SoftBank Shop. Follow any and all local
regulations regarding battery disposal.
Lithium-ion batteries are recyclable.
When Battery Runs Out
When battery is weak, a warning appears and
handset beeps. Charge or replace battery; otherwise
handset will automatically turn off.
Inserting & Removing Battery
Inserting
a Remove battery (fP.1-8
Inserting ato b)s
b
Fit battery into handset as shown
Tabs
cReplace Battery Cover
Note
・
Gently insert battery to avoid damaging
handset tabs.
・
Without cover, battery may fall out. Attach
Battery Cover before use.
・
Strong impacts may damage Battery Cover.
Removing
Always turn handset off before removing battery.
Never remove battery while Charger is connected.
a Remove battery (fP.1-8
Inserting ato b)s
bLift battery up and remove as
shown

Getting Started
1
1-11
Charge Battery
・
If handset is on while Charger is connected,
battery indicator shows charge level, charging
as follows: →→. ashes
when battery is fully charged. If handset is
off, Charging... appears while charging and
when battery is charged, Battery full appears.
External Light illuminates in red while charging.
・
An empty battery requires approximately 250
minutes to be charged with power off. Charging
time may vary depending upon the ambient
temperature.
AC Charger
a
Open Port Cover; with label down,
insert Charger Connector into
External Device Port
Note
・Make sure Charger Connector is label side
down before inserting it.
Label Side
AC100V
Outlet
Port Cover
External Device Port
Charger Connector
Charger
b
Plug AC Charger into an AC 100V
outlet
cWhen battery is charged,
disconnect handset, close Port
Cover, and unplug AC Charger
USB Charge
Connect handset to PC via USB Cable to charge
battery.
a
Open Port Cover; with label down,
insert USB Cable Connector
into External Device Port
Note
・Make sure Charger Connector is label side
down before inserting it.
b
Insert USB Plug into PC USB port
cWhen battery is charged,
disconnect handset, close Port
Cover, and remove USB Plug
・
USB charging takes longer; charging time
varies according to the PC. A weak battery
may not charge via USB.

Getting Started
1
1-12
In-Car Charger (Optional)
a
Open Port Cover; with label
down, insert Charger Connector
into External Device Port
Note
・Make sure Charger Connector is label side
down before inserting it.
Label Side
Port Cover
External Device Port
Charger Connector
bPlug In-Car Charger into a Car
Cigarette Socket
In-Car Charger
Plug
Car Cigarette
Socket
cStart engine
d
When battery is charged,
disconnect handset, close Port
Cover, and unplug In-Car Charger
Port Cover
External Device Port
Charger
Connector
・
See In-Car Charger user guide (Japanese) for
operations. Use In-Car Holder (optional).
Note
・
Avoid charging handset in extreme heat
(inside vehicles, etc.).
・
In-Car Charger only for vehicles with
negative ground (12V/24V vehicles).

Getting Started
1
1-13
Power On/Off
Power On
a
Press yuntil Display
illuminates
Standby Display
・
Toconrmhandsetphonenumber,tapPhone→
Account details. Your phone number appears in
Account Details. Edit or use contents (fP.1-13).
・
When handset is left open and idle, Display
automatically shuts down to conserve power
(fP.14-4).
Default: Key Lock activates automatically, when
Display shuts down (fP.1-14).
・
ThersttimeMessaging,Yahoo!,etc.istapped
or a function requiring a network connection is
activated,RetrieveNWinfoconrmationappears.
Choose Yes and follow onscreen instructions.
-RetrieveNWinfoconrmationappearsafter
replacing USIM Card or executing All reset.
-Retrieving Network Info sets date and time.
Network Services (SMS, S! Mail, Yahoo! Keitai,
and S! Friend's Status etc.) are available.
-Retrieve Network Info manually (fP.14-25).
-This guide describes operations with date and
time set unless noted otherwise.
Power Off
aPress yuntil Display goes
dark
・
SoftBank logo appears and handset powers
off.
Note
・
For proper shut down, press yuntil
Display goes dark.
Account Details
Save your name, mail address, blood type, and
other information as Account Details.
Viewing Account Details
aTap Menu →Phone func. →
Account details
・
Default: Only handset phone number appears.
・
Alternatively, in Standby, tap Phone →Account
details.

Getting Started
1
1-14
Editing Account Details
Example: Save name, phone number, mail address
・
See "Adding Information to Phone Book Entry"
(fP.2-20) to save other information.
aTap Menu →Phone func. →
Account details →Tap Edit
b Tap Name eld
c
Enter last name/rst name →
Conrm reading →Tap OK
・
In Name screen, tap Reading:Last name/
Reading:First name
→ Enter reading →Tap
OK to edit reading.
d Tap Phone number 2 eld
→Enter number →Type →
Private
/
Business
/
Home
/Work/
FAX
/Video call/
Others
→
Tap
OK
e
Tap E-mail address eld →
Enter mail address →Type →
Private/Home/Work/Internet →
Tap OK
fTap Save
・
See Text Entry (fP.2-8) to enter text.
・
Default: Handset phone number appears.
Advanced
brP.1-21
●Editing Account Details
●Sending Account Details as vFile
●Resetting Account Details
●Creating vFile and Save in Data Folder
●Printing with Bluetooth®-Compatible Printer
Handling Precautions
(Touch Panel & Key Lock)
Note these precautions when handling handset.
・
Activate Key Lock before putting handset in a
pocket.
・
When carrying AC Charger, retract plug
blades. Do not pull/twist power cord; doing so
may damage it.
Activate to prevent accidental operation when
carrying handset in a bag or pocket, etc.
al
・
Key Lock activates.
・
Activate Key Lock during most operations. While
in use, some functions may not allow Key Lock
activation.
・
Key Lock activates during calls. To use handset
during a call, cancel Key Lock.
・
Default: If handset is left idle, Display shuts down
and Key Lock automatically activates.
To cancel automatic Key Lock activation, set Auto
lock to Off (fP.11-4).
・
To cancel Key Lock, press lfor Key Lock
guidance, then press l.

Getting Started
1
1-15
Standby Display
Access handset applications via Shortcut Keys,
Widgets or Toolbar (fP.2-2). Set images saved in
Data Folder as Wallpaper.
Minding Mobile Manners
Please take care not to disturb others when using
handset.
・
Turn your handset off in theaters, museums,
and other places where silence is the norm.
・
Keep your handset off aboard airplanes*,
inside hospitals, or in other places where
handset use is prohibited.
*If handset use is permitted, follow airline
instructions for proper use.
・
Refrain from using your handset in quiet places
such as restaurants, hotel lobbies, or elevators.
・
Observe announcements or posted instructions
regarding handset use aboard trains, etc.
・
Refrain from handset use that interrupts the
owofpedestrianorvehicletrafc.
Handset offers two manner-related modes.
・
OfineMode
Temporarily suspends all handset transmissions.
Other functions may be used.
・
Manner Mode
Mutes handset sounds and activates Vibration
for all alerts, tones, and Alarms. Use Manner
Key to activate or cancel Manner mode.
In addition to Manner, handset features Normal,
Drive, Meeting and Outdoor as the set Ringtone
or operation sound.
・
ActivatingOfineModeorMannermodemutesringer.
Alternatively, set ringtone volume or Vibration (fP.14-3).
Ofine Mode
a
Tap Menu →Settings →Call
settings →Under Ofine mode,
On or Off
・
PoweroffhandsetinOfineMode,conrmation
appears. Choose Yes to power on handset in
OfineMode.

Getting Started
1
1-16
Manner Mode
Cancel settings for Manner mode from current setting
mode.
am (1 + seconds)
・
When Manner mode is active, appears.
・
Even if Manner mode is active, shutter click sounds
for Camera.
・
Press mfor 1+ seconds to cancel Manner
mode. Canceling Manner mode, returns handset to
mode set before Manner was activated.
Changing Mode Settings
Handsetfeaturesvemodes,includingManner.
am
b
Normal, Manner, Drive, Meeting,
or Outdoor
Select mode by usage; edit Normal mode or Manner
mode settings as required (fP.1-17).
Mode Description
Normal Mode* All Sounds & Alerts settings apply
Manner Mode Mutes handset system sounds
Drive Mode
Mutes ringer; plays Driving Message
and activates Answering Machine
for calls
Meeting Mode Mutes ringtones & system sound
Outdoor Mode Maximizes tone volume
*Normal mode indicator does not appear in Standby.

Getting Started
1
1-17
Default Mode Settings
Default Volume and Ringtone settings vary by mode. Change incoming transmission response by mode. Available items vary by mode. See defaults below (fP.14-5).
Mode
Item Normal Manner Drive Meeting Outdoor
Volume
Voice call Level 3 N/A N/A Level 0 Level 5
Video call Level 3 N/A N/A Level 0 Level 5
Message Level 3 N/A N/A Level 0 Level 5
S! Friend's Status Level 3 N/A N/A Level 0 Level 5
Missed call notif. Level 3 N/A N/A Level 0 Level 5
S! Quick News Level 0 N/A N/A Level 0 Level 0
Delivery report Level 3 N/A N/A Level 0 Level 5
System sounds Level 3 N/A N/A Level 0 Level 5
Ringtone (Upper: Ringtone, Lower: Duration)
Voice call Young hopefuls N/A N/A Young hopefuls Young hopefuls
Video call Samsung Tune N/A N/A Samsung Tune Samsung Tune
Message A Toy Box
5 seconds N/A N/A A Toy Box
5 seconds
A Toy Box
5 seconds
S! Friend's Status A Toy Box
5 seconds N/A N/A A Toy Box
5 seconds
A Toy Box
5 seconds
Missed call notif. A Toy Box
5 seconds N/A N/A A Toy Box
5 seconds
A Toy Box
5 seconds
S! Quick News A Toy Box
5 seconds N/A N/A A Toy Box
5 seconds
A Toy Box
5 seconds
Delivery report A Toy Box
5 seconds N/A N/A A Toy Box
5 seconds
A Toy Box
5 seconds

Getting Started
1
1-18
Mode
Item Normal Manner Drive Meeting Outdoor
Vibration
Voice call Off Pattern 1 N/A Off Off
Video call Off Pattern 1 N/A Off Off
Message Off Pattern 1 N/A Off Off
S! Friend's Status Off Pattern 1 N/A Off Off
Missed call notif. Off Pattern 1 N/A Off Off
S! Quick News Off Off N/A Off Off
Delivery report Off Pattern 1 N/A Off Off
System sounds Popup box alerts/Call
end tone/Alerts on call Alerts on call N/A Alerts on call Popup box alerts/Call
end tone/Alerts on call
Incoming light
Voice call Green Green Green Green Green
Video call Green Green Green Green Green
Message Green Green Green Green Green
S! Friend's Status Green Green Green Green Green
Missed call notif. Green Green Green Green Green
S! Quick News Off Off Off Off Off
Alarms Green Green Green Green Green
Delivery report Green Green Green Green Green

Getting Started
1
1-19
Mode
Item Normal Manner Drive Meeting Outdoor
Noticationlight
Missed call Blue Blue Blue Blue Blue
Message Green Green Green Green Green
Answering machine White White White White White
S! Friend's Status Light Blue Light Blue Light Blue Light Blue Light Blue
Missed call notif. Blue Blue Blue Blue Blue
Missed alarm Pink Pink Pink Pink Pink
Delivery report Green Green Green Green Green
Answering machine Off On N/A* Off Off
*Answering machine activates automatically in Drive mode and cannot be disabled.

Getting Started
1
1-20
Security Codes
Phone Password, Center Access Code and
Network Password are required to use handset.
Phone Password
The four-digit number (Default: 9999) is required to
operate/change some handset functions.
・
Entered Phone Password digits are represented
with *.
・
If incorrect, an error message appears. Try again.
・
Phone Password can be changed on handset
(fP.11-3).
Center Access Code
Four-digitnumberspeciedatsubscription;required
to change service subscriptions or optional services
to operate handset from landlines.
Network Password
Four-digitnumberspeciedatsubscription,required
to restrict handset services. Entering incorrect
Network Password three consecutive times locks
Call Barring settings. To resolve, Network Password
and Center Access Code must be changed. For
details, contact SoftBank Mobile Customer Center,
General Information (fP.15-27).
・
Network Password can be changed on handset
(fP.3-20).
Note
・
Write down Phone Password, Center
Access Code, and Network Password. If
you lose a code, contact Customer Service
(fP.15-27).
・
Do not reveal Phone Password, Center
Access Code, or Network Password to others.
SoftBank Mobile is not liable for damage
caused by misuse of these codes by others.
PIN Code
USIM Card features two security codes: PIN and
PIN2.
PIN Code
Use PIN (four- to eight-digit) to prevent
unauthorized use of handset by others.
・
Modify PIN (fP.11-3).
・
When PIN Lock is activated, PIN entry is required
each time handset is turned on or whenever
USIM Card is re-inserted (fP.11-4).
PIN2 Code
PIN2 (four- to eight-digit) is required for resetting
Call time & cost or editing Set max cost limit,
etc.
・
Modify PIN2 (fP.11-3).
Other manuals for 940SC
3
Table of contents
Other SoftBank Cell Phone manuals

SoftBank
SoftBank 930SH User manual

SoftBank
SoftBank 910SH User manual

SoftBank
SoftBank 940N User manual

SoftBank
SoftBank 102SH User manual

SoftBank
SoftBank 805SC User manual

SoftBank
SoftBank 831P User manual

SoftBank
SoftBank 940SC User manual

SoftBank
SoftBank 831SH User manual

SoftBank
SoftBank 820SC User manual

SoftBank
SoftBank 005SH User manual

SoftBank
SoftBank 840P User manual

SoftBank
SoftBank 003Z User guide

SoftBank
SoftBank 921T User manual

SoftBank
SoftBank 830SC User manual

SoftBank
SoftBank 831P User manual

SoftBank
SoftBank 709SC User manual

SoftBank
SoftBank 932SH Safety guide

SoftBank
SoftBank 831SH User manual

SoftBank
SoftBank 823T User manual

SoftBank
SoftBank 821P User manual