Solar Stik Li Expander Pak 2400 User manual
Solar Stik®
Technical Bulletin 2
Effective Date 20150831
800.793.4364
www.solarstik.com
© 2019 Solar Stik Inc.
All Rights Reserved. Solar Stik is a registered trademark of Solar Stik Inc. SS20190717
Protocols for the Proper Storage and Maintenance
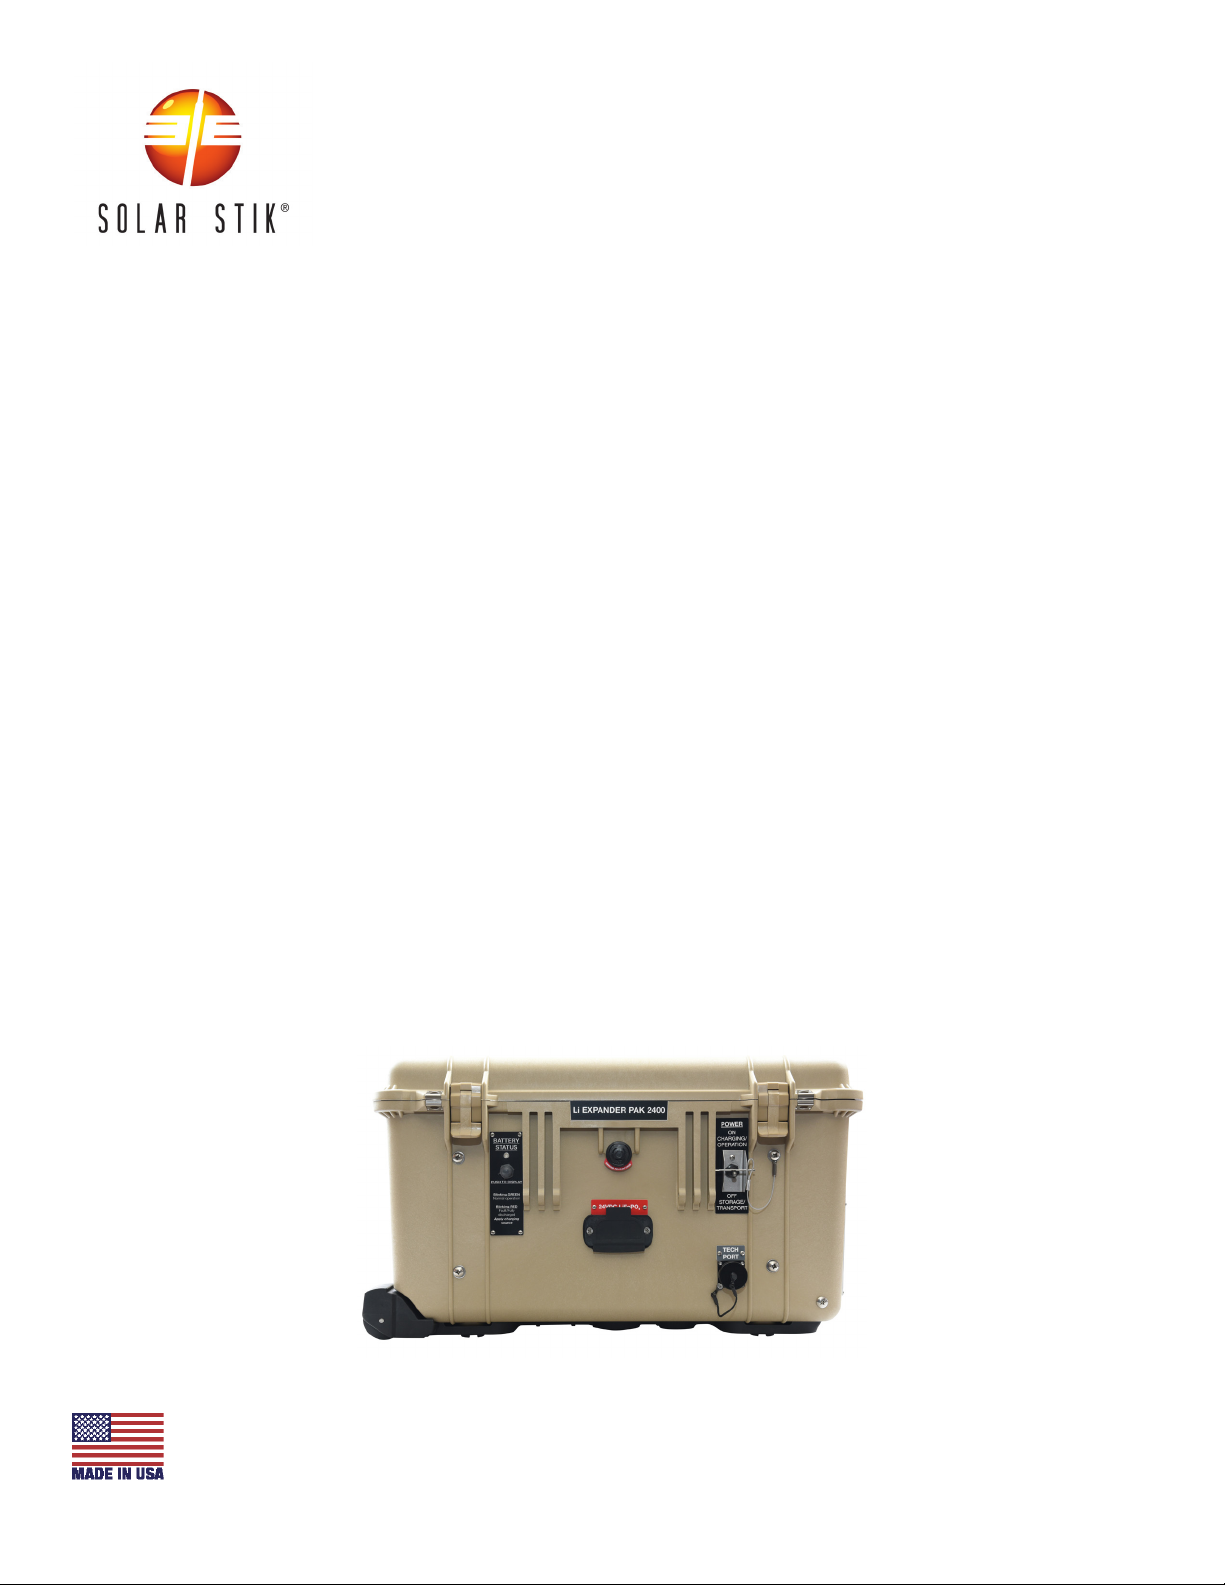
Li Expander Pak 2400
The Li Expander Pak 2400 has a low self-discharge rate at 77 ºF (25 ºC) and can be stored for up to
6 months before it needs to be recharged (if it was charged fully when placed in storage). However,
the self-discharge rate increases as the storage temperature increases. The increased self-discharge
rate at high temperatures is a phenomenon common to all rechargeable batteries.
This Technical Bulletin provides easy instructions to ensure that the Li Expander Pak 2400s function
optimally in all environments. Conversely, failure to follow these instructions will result in irreversible
damage to the Li Expander Pak 2400s within a short period of time.
This Technical Bulletin provides protocols for:
1. Li Expander Pak 2400 storage and charging maintenance in climate-controlled
environments (page 2)
2. Li Expander Pak 2400 storage and charging maintenance in high temperature environments
(page 6)
3. Solutions (by reference to other Technical Bulletins) if one or more Li Expander Pak 2400s
displays a flashing RED Battery Status LED (page 6)
4. A Preventive Maintenance Checks and Services Table for two storage-temperature
scenarios (page 7).
Page 1 of 8
Solar Stik®
Technical Bulletin 2
Effective Date 20150831
800.793.4364
www.solarstik.com
© 2019 Solar Stik Inc.
All Rights Reserved. Solar Stik is a registered trademark of Solar Stik Inc. SS20190717
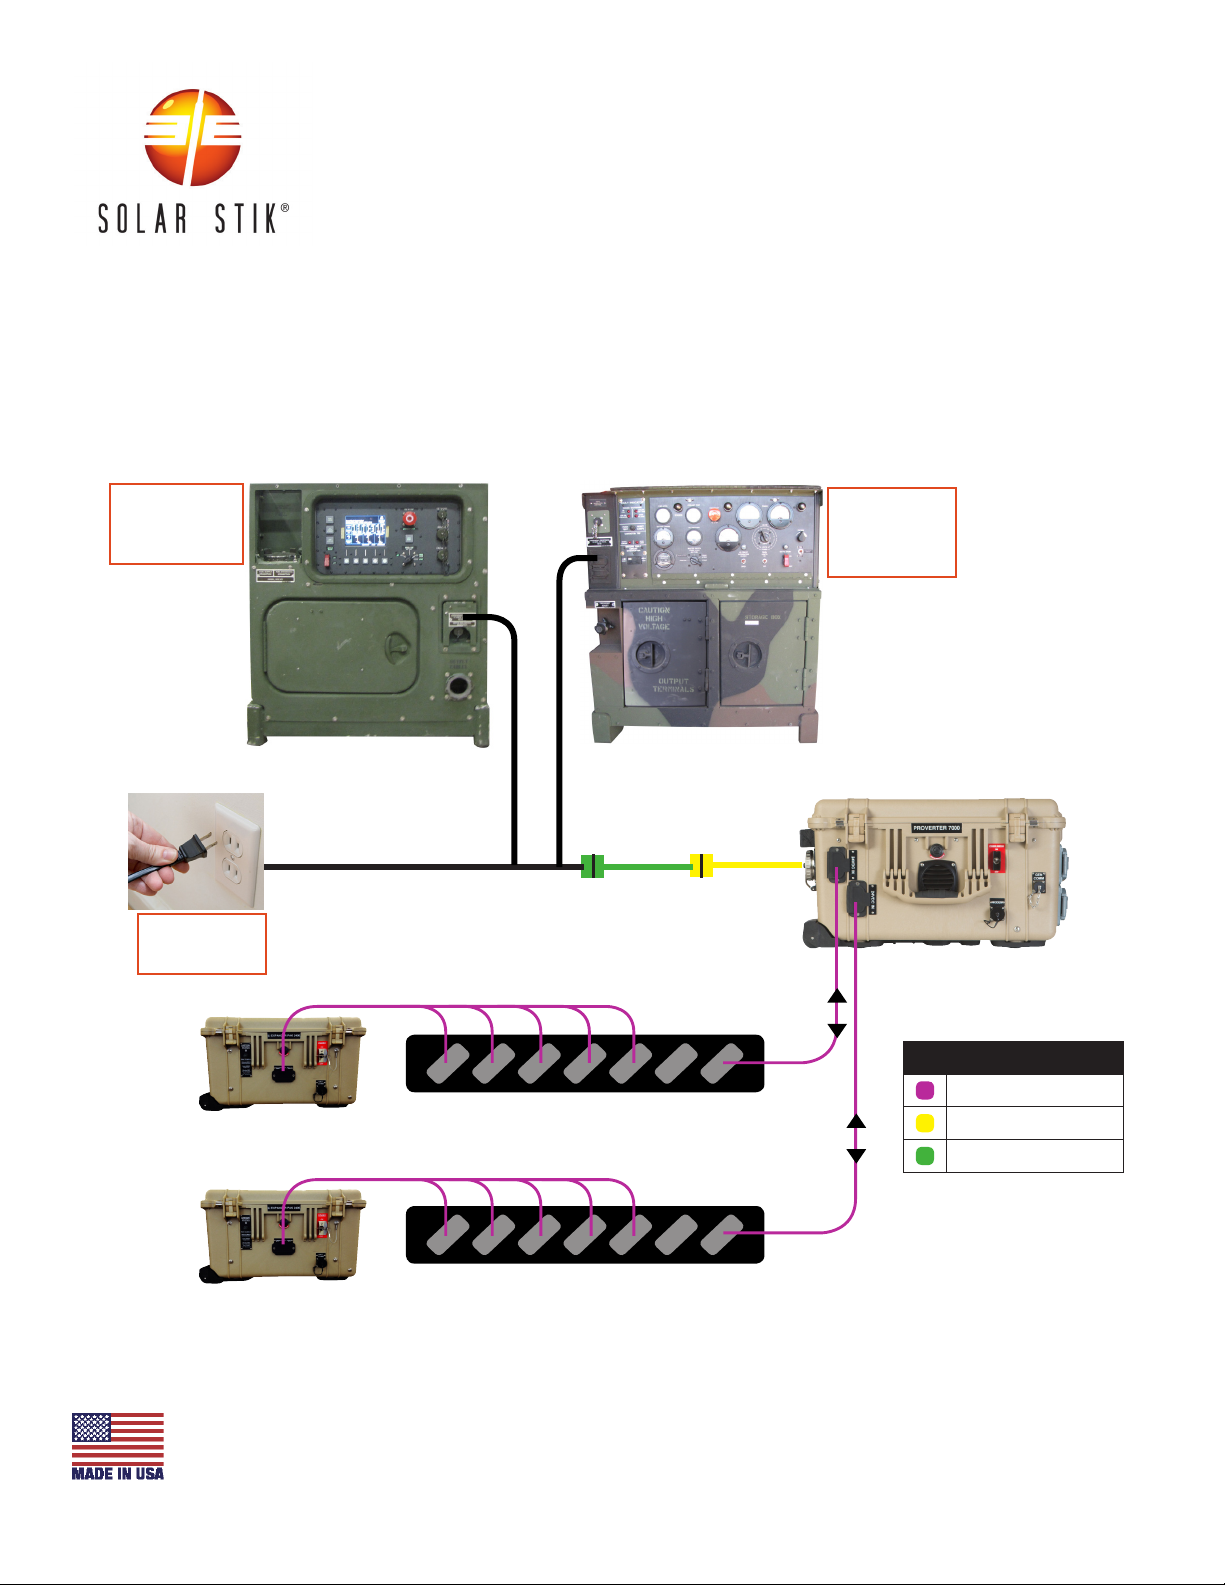
Figure 1 - Wiring Diagram for In-storage Charging
1. Protocol for Li Expander Pak 2400 storage and charging maintenance in climate-controlled
environments
The following protocol shows a sequence of steps that will allow simultaneous charging of all ten
(10) batteries of a single system using shore power or generators as the charging source. The basic,
system-charging connection scheme is shown in the diagram below.
120 VAC 15 A
convenience
receptacle
Legend
Inter-Connect
50 A to 30 A Adaptor
30 A to 15 A Adaptor
PRO-Verter
7000-120 AGS
Inter-Connect Strip
Li Expander Pak 2400 (x5)
Li Expander Pak 2400 (x5)
30 A to 50 A
Two (2) Adaptor Cables*
15 A to 30 A
Page 2 of 8
*Adaptor Cables sold separately
MEP-802A
120 VAC 15 A
convenience
receptacle
AMMPS
120 VAC 15 A
convenience
receptacle
Inter-Connect Strip

Solar Stik®
Technical Bulletin 2
Effective Date 20150831
800.793.4364
www.solarstik.com
© 2019 Solar Stik Inc.
All Rights Reserved. Solar Stik is a registered trademark of Solar Stik Inc. SS20190717
Input
120 VAC
50 A
PSS-G AES Cable Set case
2. The Adapter Cables are sold
separately* (gures 3 and 4) and can
be stored with the AES in the Cable
Case (gure 2).
1. Slide the stack of PAM Solar Array Cases on the left, to the
left (red arrow; gure 2) to expose the 120 VAC L5-50 Port
on the PRO-Verter 7000.
Figure 2 - PAM cases moved/50 A Port accessible
Figure 3 - 50 A to 30 A Adapter Cable Figure 4 - 30 A to 15 A Adapter Cable
Figure 5 - Adaptor Cables attached to the AC
input connection on the PRO-Verter 7000
3. Connect the 30 A and/or 15 A adaptor
to the PRO-Verter 7000 50 A port
(Figure 5).
The AES components should be arranged so that the necessary ports are accessible. Two adaptor
cables (gures 3 and 4) allow connection of a 120 VAC 15 A power cord into the 120 VAC 50 A Port
on the left-hand side of the PRO-Verter 7000. The method described here will work no matter how
the individual components are arranged as long as they are close enough for the cables to reach
between the ports.
Page 3 of 8
*50A to 30A Adapter Cable Item # 07-1001182
*30A to 15A Adapter Cable Item # 07-1001181

Solar Stik®
Technical Bulletin 2
Effective Date 20150831
800.793.4364
www.solarstik.com
© 2019 Solar Stik Inc.
All Rights Reserved. Solar Stik is a registered trademark of Solar Stik Inc. SS20190717
4. Connect ve (5) Li Expander Paks to one (1) Inter-Connect Strip and ve (5) Li Expander PAK
2400s to the other Inter-Connect Strip using a 5’ Inter-Connect Cable for each as shown in the
diagram above.
5. Connect the two (2) Inter-Connect Strips to the 24VDC IN ports on the front left side of the PRO-
Verter 7000 using two (2) 5’ Inter-Connect cables as shown in the diagram above.
Page 4 of 8
120VAC 15A
convenience
receptacle
Legend
Interconnect
50A to 30A Adaptor
30A to 15A Adaptor
PRO-Verter
7000-120 AGS
Inter-Connect Strip
Li Expander Pak 2400 (x5)
Li Expander Pak 2400 (x5)
30A to 50A
Two (2) Adaptor Cables*
15A to 30A
4
5
Inter-Connect Strip
MEP-802A
120 VAC
10 A
convenience
receptacle
AMMPS
120 VAC
15 A
convenience
receptacle
Solar Stik®
Technical Bulletin 2
Effective Date 20150831
800.793.4364
www.solarstik.com
© 2019 Solar Stik Inc.
All Rights Reserved. Solar Stik is a registered trademark of Solar Stik Inc. SS20190717
10. Turn off Li Expander Pak and reinsert cotter pins.
Page 5 of 8
6. Remove the cotter pin from the Power Switch of all Expander Paks and PRO-Verter 7000-120
and toggle the switches to “ON”.
7. Determine the Battery Status by pushing the button for the Battery Status LED report. Each one
should be GREEN or AMBER.
8. Adjust the input amperage
on the PRO-Verter 7000. See
diagram to the right. The diagram
provides setting values for charging using
shore power) and fuel-powered generators.
9. The PRO-Verter LCD user interface will display zero (0) charging amps when the batteries are charged fully and the
LED Status indicator will be GREEN.
NOTICE
*Extending the charge times beyond the minimum will not result in damage to the Li
Expander Pak 2400s. However, they should not be left to charge indefinitely.
Minimum charge times based on AC input amperage
5 amps AC (600 watts of charging power) ~40 hours charge time if the batteries were fully discharged*
10 amps AC (1200 watts of charging power) ~20 hours charge time if the batteries were fully discharged*
15 amps AC (1800 watts of charging power) ~13 hours charge time if the batteries were fully discharged*
30 amps AC (3600 watts of charging power) ~6.7 hours charge time if the batteries were fully discharged*
NOTICE
Failure to properly set “AC Input” may overload the AC power source.
F3 AC Input
Amps = 15A
FAVS 3
Press
Top line shows current
FAVS menu and position in FAVS menu
Bottom line shows AC current setting
Push Select to edit current setting
Press to save
Rotate to
desired
amperage:
F3 AC Input
Amps = 30A
F3 AC Input
Amps = 15A
Shore Power
F3 AC Input
Amps = 5A 1 kW GenSet
2 kW GenSet

Solar Stik®
Technical Bulletin 2
Effective Date 20150831
SS20190717
800.793.4364
www.solarstik.com
© 2019 Solar Stik Inc.
All Rights Reserved. Solar Stik is a registered trademark of Solar Stik Inc.
* If the Expander Paks are stored at temperatures above 90 ºF (32 ºC), then the time between
maintenance checks and/or charges must be reduced to one (1) month.
The importance of reducing the time between maintenance charges (i.e., charging more frequently)
and maintaining the Expander Paks in a fully charged state increases as the storage temperature
increases. The higher the storage temperature, the faster the Li Expander Pak 2400s will self-
discharge.
It is absolutely imperative to follow these instructions. Failure to maintain a full charge prior to
and during storage can result in permanent damage to the Li Expander Pak 2400s.
3. If one or more Li Expander Paks displays a Blinking RED Battery Status LED, please refer
to Technical Bulletin 1B.
2. Protocol for Li Expander Pak 2400 storage and charging maintenance in high-temperature
environments
Page 6 of 8
Failure to follow these instructions may result in permanent equipment failure and/or personal injury.
Required Tools
• Multimeter
• LiFePO4battery maintenance charger or a Solar Stik PRO-Verter
Optional Tool
MKM BMS Reader
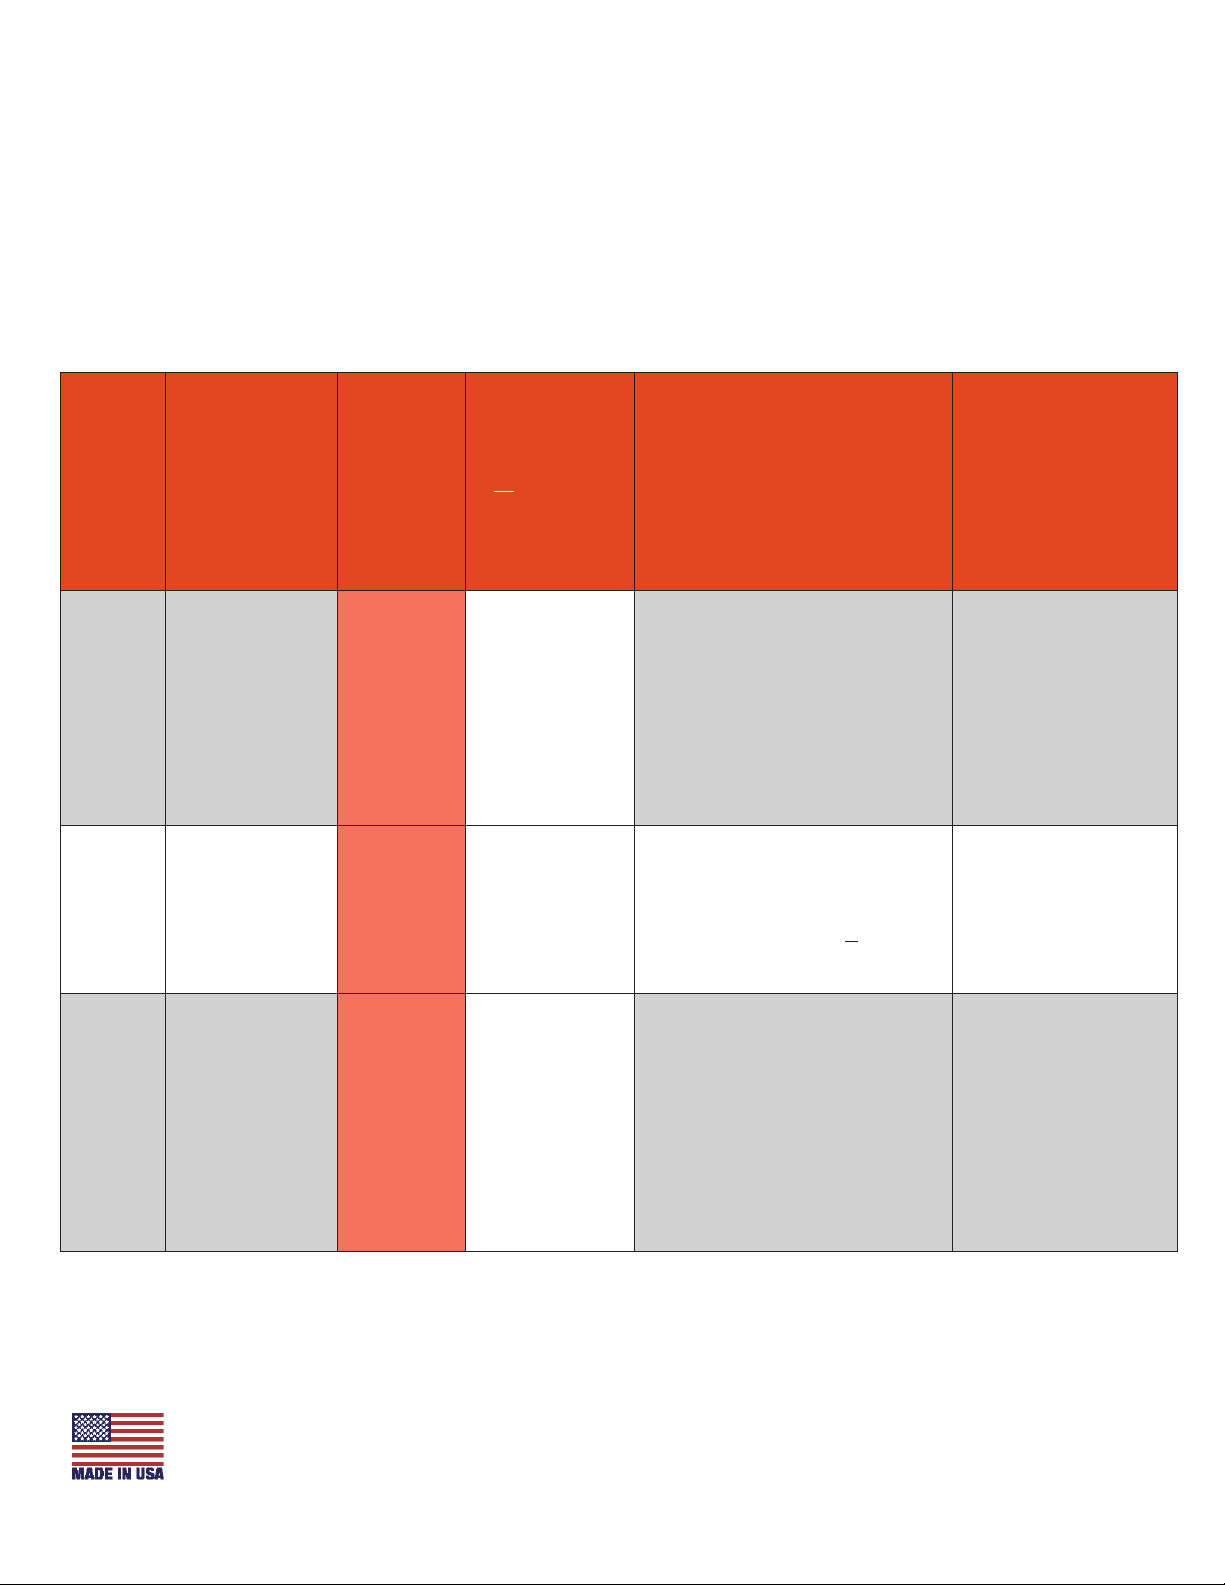
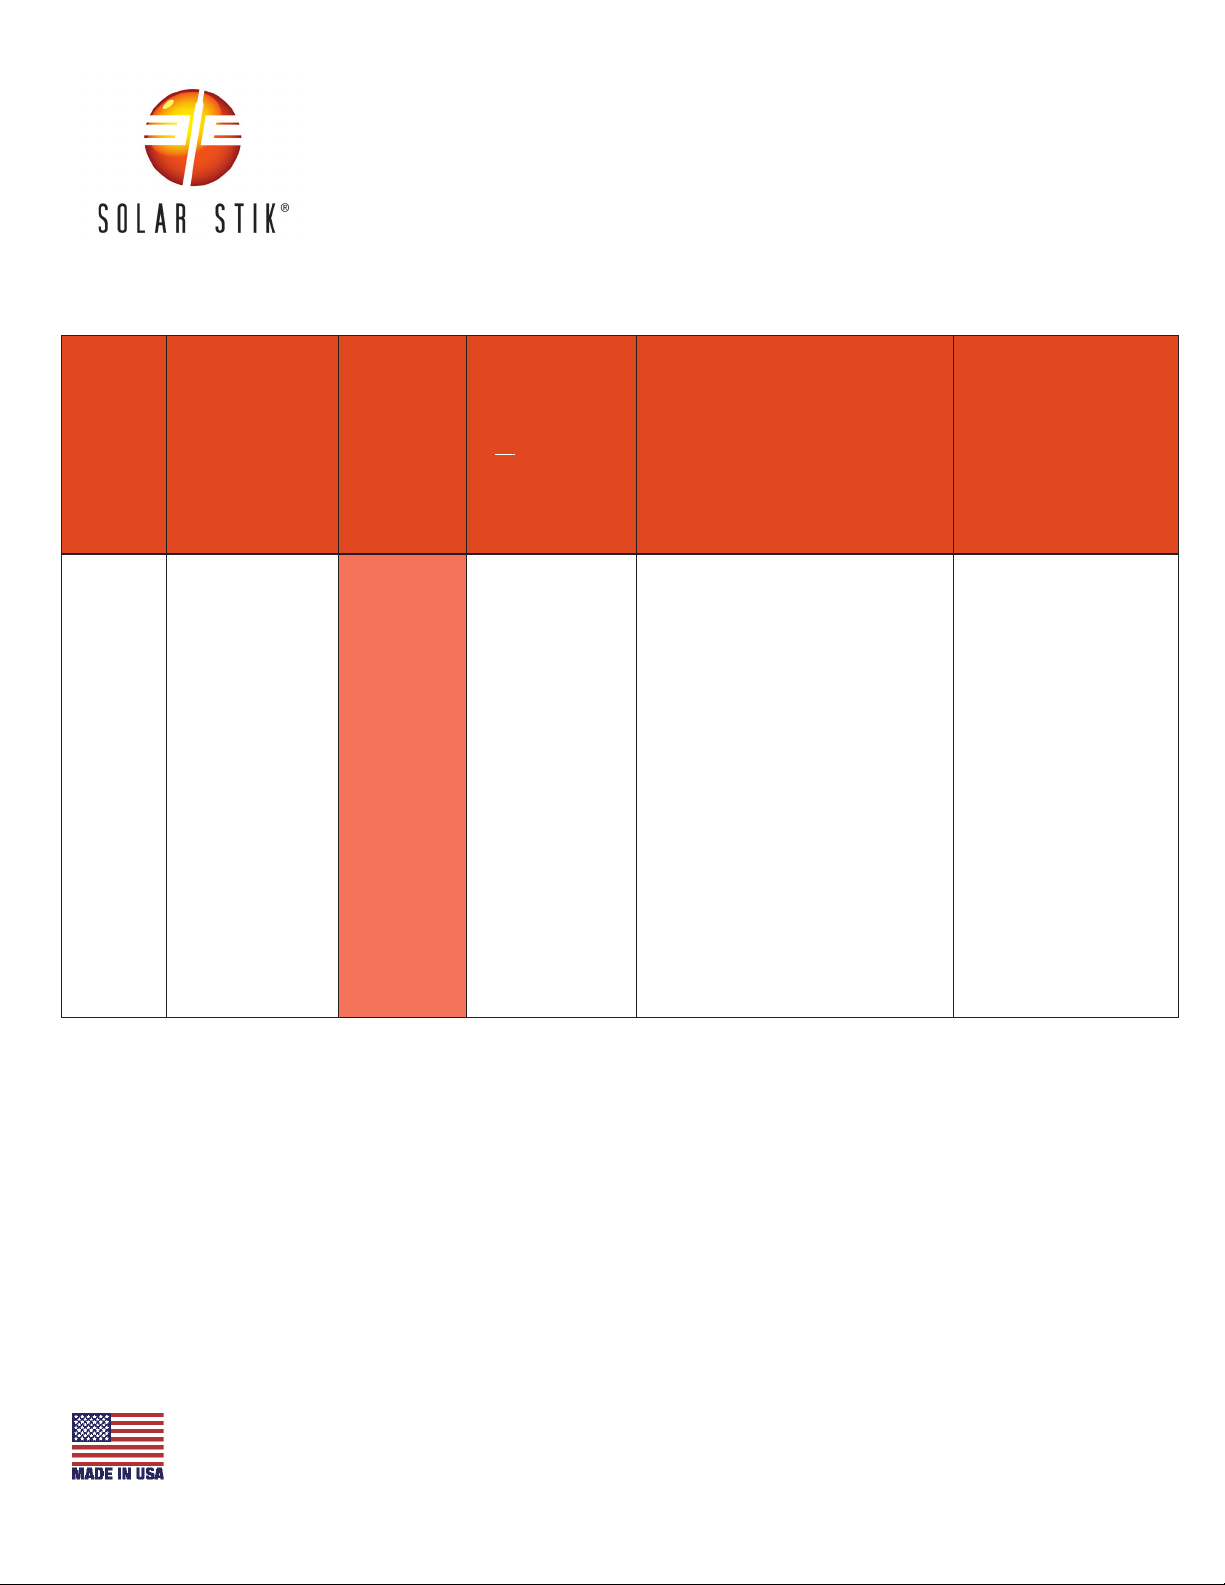
4. In-storage Preventive Maintenance Checks and Services
1Monthly (M)—every month; 2Quarterly (Q)—every three months; 3Semiannually (S) – every 6 months
4The BMS Reader (Item # 20-0001004) is an optional tool available from Solar Stik. Contact Solar Stik
for information.
Item # Item to be
Inspected
Interval
at
91-140
ºF
(33-60
ºC)
Storage
Temp
Interval at
77-90 ºF
(< 25-32 ºC)
Storage
Temp
Procedures Non-mission
Capable
1
Visual
inspection
of 24VDC Li
Expander Pak
2400
M1Q21. Inspect case for visible
damage and missing
items.
2. Clean excessive dust or
dirt accumulation from the
exterior and ports.
3. Close all unused port
covers.
~If the case is
broken or split or if
ports are damaged,
contact Solar Stik
Technical Support
for advice on how to
proceed.
2
Expander Pak
State of Charge
(SOC) 4
M Q
Measure the Expander Pak
SOC using the MKM BMS
Reader 4. (See Operator Manual
for the MKM BMS Reader for
details.) If the SOC is < 50%
Skip to and perform Item #4 of
this chart.
If Expander Pak SOC
= zero (0)%, contact
Solar Stik Technical
Support or FSR.
3
Battery Status
LED color
M Q 1. Push and hold the Battery
Status LED button.
2. Record the color of the
Battery Status LED in the
maintenance/service log
3. If the Battery Status LED
is ashing red on any Li
Expander Pak, proceed to
Item #3.
~If the Battery Status
LED emits no light,
contact Solar Stik
Technical Support or
FSR.
Page 7 of 8
Continued on next page page
800.793.4364
www.solarstik.com
© 2019 Solar Stik Inc.
All Rights Reserved. Solar Stik is a registered trademark of Solar Stik Inc.
Solar Stik®
Technical Bulletin 2
Effective Date 20150831
800.793.4364
www.solarstik.com
© 2019 Solar Stik Inc.
All Rights Reserved. Solar Stik is a registered trademark of Solar Stik Inc. SS20190717
Item # Item to be
Inspected
Interval
at
91-140
ºF
(33-60
ºC)
Storage
Temp
Interval at
77-90 ºF
(< 25-32 ºC)
Storage
Temp
Procedures Non-mission
Capable
4
In-storage
maintenance
charging
Q S31. Charge Li Expander Paks
for 24 hours at 29.0 V.
Follow the instructions for
the lithium battery charger
used.
2. Charge until the Battery
Status LED on all Li
Expander Paks is ashing
green (if ashing red to
begin with).
3. If the Battery Status LED
ashes red on any Li
Expander Pak after 24
hours, continue charging
all Li Expander Paks for
another 24 hours.
~If any Li Expander
Pak has a red-ash
Battery Status LED
after 48 hours of
charging OR if the
LED emits no light
after charging,
contact Solar Stik
Technical Support.
Continued from previous page
Page 8 of 8
Other Solar Stik Batteries Pack manuals

Solar Stik
Solar Stik BOS 2000-120-5199 User manual

Solar Stik
Solar Stik 24VDC Li ESM 2000 Installation instructions

Solar Stik
Solar Stik 50-000335 User manual

Solar Stik
Solar Stik 24VDC POWER HUB 2400 Installation instructions

Solar Stik
Solar Stik PRO-VERTER Installation instructions

Solar Stik
Solar Stik 24VDC LI EXPANDER PAK 1300 Installation instructions

Solar Stik
Solar Stik 24VDC LI BOS 500-120 User manual


