manuals.online logo
Brands
  1. Home
  2. •
  3. Brands
  4. •
  5. Soleus Air
  6. •
  7. Electric Heater
  8. •
  9. Soleus Air HGW-203 User manual

Soleus Air HGW-203 User manual

BASEBOARD
MICATHERMIC
HEATER
USER MANUAL
Model # HGW-203
PLEASE SAVE THESE INSTRUCTIONS
BASEBOARD MICATHERMIC HEATER
Micathermic is a new method of heating that utilizes technology from both convection
and reflective heat. The heater releases 80% reflective and 20% convection heat,
distributing heat consistently and more evenly throughout the room. The heater releases
healthy infrared heat, directly warming surrounding objects. As the surrounding objects
absorb heat, the air temperature rises.
Special Features
¾Safe and healthy
¾Heats instantly and silently
¾Adjustable thermostat
¾Power and temperature control light indicator
¾Anti-freeze setting
¾Overheat safety protection
¾Energy efficient
¾Lightweight
¾Quiet
¾Non-flammable surface
¾No dehumidifying
Specifications
Voltage Rating 115 V, 60Hz
Power Consumption 1500W
Unit Size 29.5“(L)x 9”(H)x 7“(W)
Unit Weight 8 lbs
INTRODUCTION
Heater Diagram
Remove Packaging
PLEASE READ ALL INSTRUCTIONS BEFORE OPERATING HEATER!
1. Remove the heater from the
box.
2. Remove the poly foam from
both ends and remove the
poly bag.
3. Remove the two foot bases
and two bolts from the
polyfoam.
4. Save the packaging for storing
the heater while it is not in use
or during summer months.
1. Power and Temperature
Control Knob
2. Anti-Freeze Setting
3. Temperature Control
Light Indicator
4. Metal Grille
Assembly Operation
PLEASE READ ALL INSTRUCTIONS BEFORE OPERATING HEATER!
Required tools:
phillips screwdriver
(not included)
Align the foot bases with the
bottom of the unit. Use the
included bolts to attach the foot
bases to the heater body as
shown in the diagram.
1. Ensure that the Temperature
Control Knob is at “OFF”
position. [Fig 1]
2. Plug the power cord into a
suitable electrical outlet.
[Rated not less than 115 volt]
3. Turn the Temperature Control
Knob clockwise until the Light
Indicator turns on [Fig 2]. At this
moment, the Temperature
Control will start working.
Note: The Light Indicator will
turn off when the room reaches
the desired temperature. After a
while, as the room temperature
falls, the heater will turn on
again and release heat until the
room temperature rises to the
desired temperature. Desired
room temperature is maintained
automatically by this procedure.
You can adjust the temperature
control knob to increase or
decrease the room temperature as
desired by turning in a clockwise
or counter-clockwise direction as
shown in the figure.
Important Safeguards
PLEASE READ ALL INSTRUCTIONS BEFORE OPERATING HEATER!
4. To obtain a desirable
temperature, there is an area
indicated on the Temperature
Control Knob known as the
“Comfortable Zone.” You
can adjust the knob to select a
temperature within this range.
5. Anti-Freeze Setting
This setting keeps the
temperature of the
surrounding area above
freezing to prevent pipes
from breaking. To do this,
simply plug in the heater and
turn the Temperature Control
Knob to the “Snowflake”
position. The heater will
automatically turn on when
the ambient temperature
drops below 41°F.
6. Overheat Safety Protection
The heater comes equipped
with overheat safety
protection, so it can detect if
it is overheating and will
automatically shut off. When
the unit temperature falls
again, power will be resumed.
To avoid overheating and
potential risk of fire, DO
NOT cover the heater.
¾The heater is hot when in use. To avoid burns, do not let bare skin touch hot
surface. Use handles when moving this heater.
Keep combustible materials, such as drapery and other furnishings, at least 3
feet [0.9m] from the front of the heater and away from the sides and rear.
¾Extreme caution is necessary when any heater is used by or near children or
invalids, or when the heater is left operating or unattended.
¾Do not use outdoor. Never locate heater where it may fall into a bathtub or
other water container.
¾This heater has hot and arcing or sparking parts inside. Do not use in areas
where gasoline, paint or flammable liquids are used or stored.
¾Do not insert or allow foreign objects to enter any ventilation or exhaust
opening as this may cause an electric shock or fire, or damage the heater.
¾To prevent a possible fire, do not block air intakes or exhaust in any manner.
Do not operate this appliance on soft surfaces because the inlet openings can be
blocked.
¾Always unplug heater when not in use. To disconnect heater, turn controls to
off, then remove plug from outlet.
¾Avoid using an extension cord because the extension cord may overheat and
cause a risk of fire.
¾Do not run cord under carpet and do not cover cord with throw rugs, runners,
or the like. Place the cord away from traffic area and where it will not be
tripped over.
¾The heater must not be located immediately below an outlet.
¾Do not operate any heater with a damaged cord or plug, after the heater
malfunctions, or has been dropped or damaged in any manner. If the heater is
damaged, it must be serviced by the manufacturer or a similarly qualified
service agent in order to ensure safety.
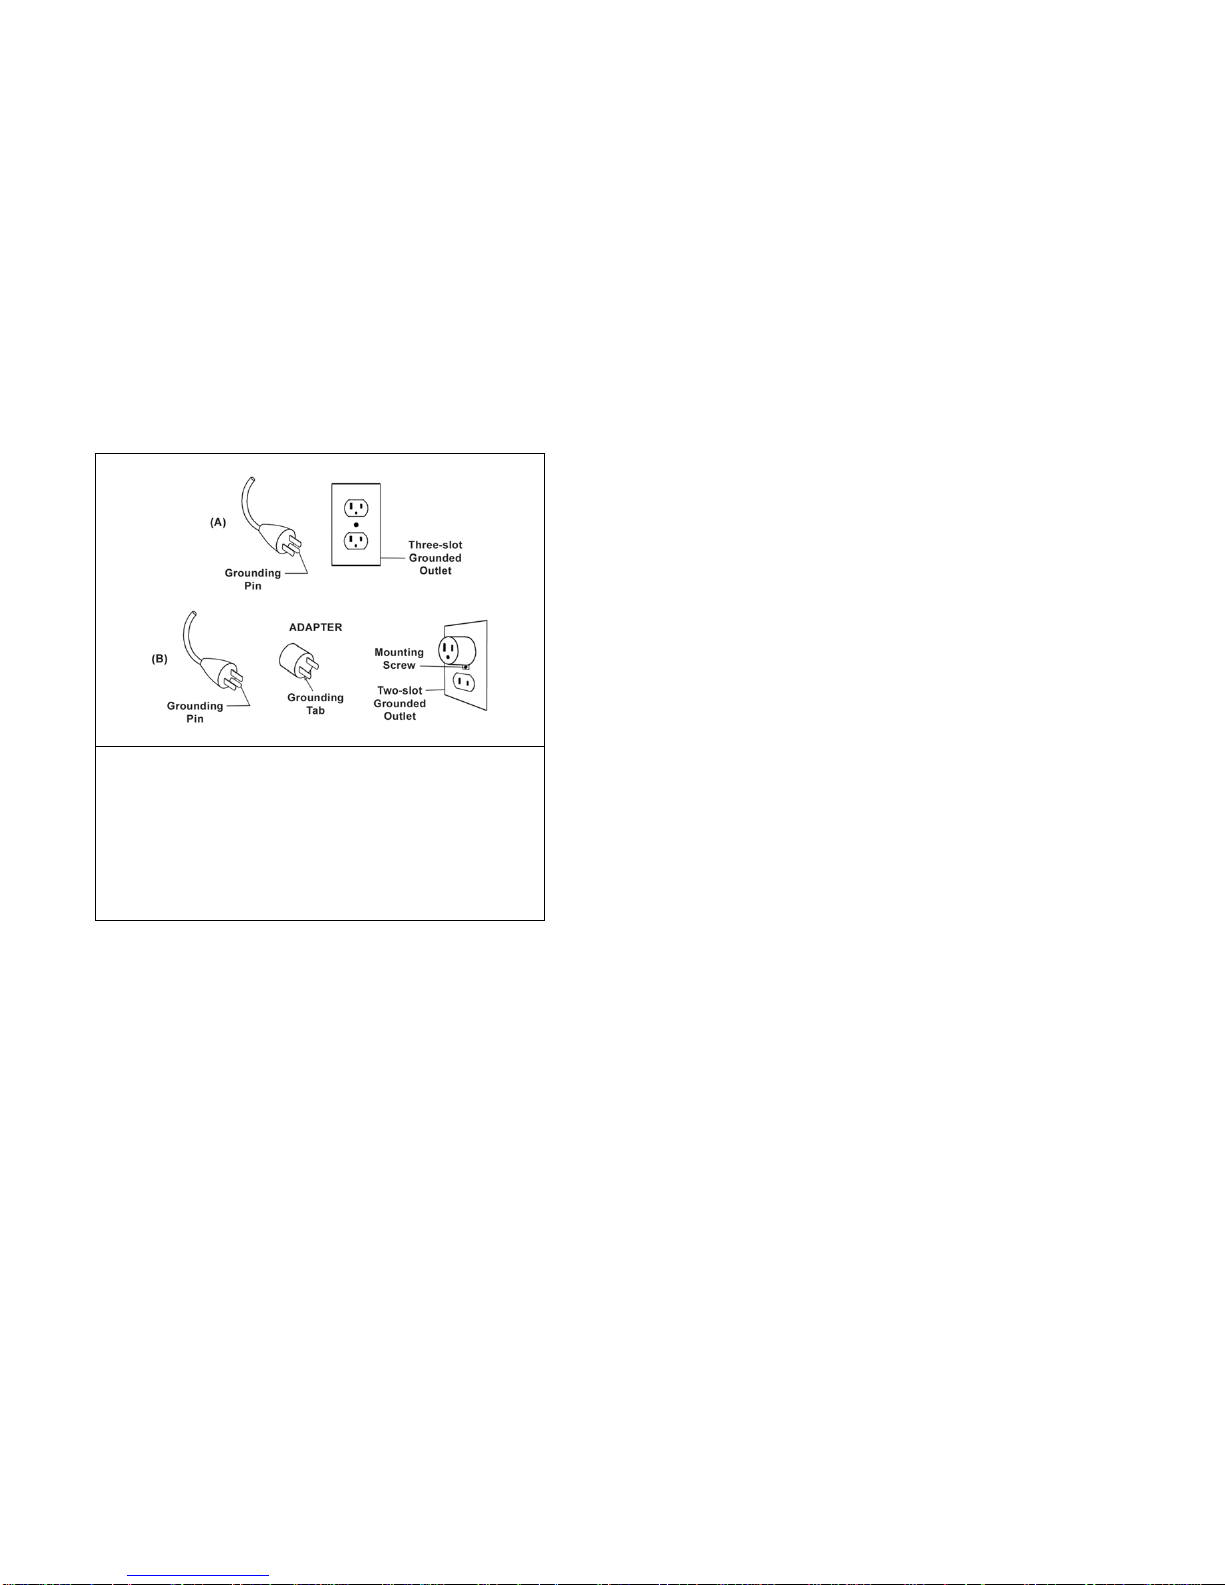
¾Connect the heater to properly grounded outlets only.
¾Use this heater only as described in this manual. Any other use not
recommended by the manufacturer may cause fire, electric shock, or injury to
persons.
¾Do not use this heater with a programmer, timer or any other device that
switches the heater on automatically, since a fire risk exists if the heater is
covered or positioned incorrectly.
WARNING: This heater has a grounded three pronged plug intended to fit
into a three slot outlet. (A) An adapter is available for connecting three
pronged plugs into two slot outlets. (B) When doing so, the green grounding
tab extending from the adapter must be fastened under the wall plate’s
mounting screw. The adapter should not be used if a three-slot outlet is
available.
DO NOT DEFEAT THE SAFETY PURPOSE OF THE GROUNDED
PLUG.
Cleaning
¾Before cleaning, turn off the heater, unplug the power cord and allow the
heater to cool.
¾Do not immerse power cord and plug or heater in water or other liquid or pour
water or other liquid over the heater.
¾Use a vacuum cleaner to remove dust and lint from the metal grille of the
heater.
¾Wipe the heater with a dry cloth to remove dust and a damp cloth [not wet] to
clean off stains.
¾Do not use detergents, abrasive cleaning powder or polish of any kind on the
body of the heater, as these can damage the finish.
Storage
¾Store the heater in a cool dry location. Preferably, to prevent dust and dirt build
up, use the old packaging to repack the unit.
Troubleshooting
HEATER WILL NOT HEAT
1. Check if the heater is plugged in and turned on.
2. Check if the Temperature Control Knob is in the right position.
3. Check if any objects are covering the unit.
HEATER WILL NOT TURN ON
1. Check if the power cord is plugged into an electrical outlet.
2. Check if electricity or the main fuse is working.
3. Check if the heater is on the Thermostat Control condition [ensure the Light
Indicator is on].
WARRANTY
One Year Limited Warranty
Soleus International Inc. warrants the accompanying Soleus Air HGW-203 to be free of
defects in material and workmanship for the applications specified in its operation
instruction for a period of ONE (1) year from the date of original retail purchase in the
United States or Canada.
If the heater exhibits a defect in normal use, Soleus International Inc. will, at its option,
either repair or replace it, free of charge within a reasonable time after the heater is
returned during the warranty period.
As a condition to any warranty service obligation, the consumer must present this
Warranty Certificate along with a copy of the original purchase invoice.
THIS WARRANTY DOES NOT COVER:
1) Damage, accidental or otherwise, to the heater while in the possession of a
consumer not caused by a defect in material or workmanship.
2) Damage caused by consumer misuse, tampering, or failure to follow the care and
special handling provisions in the instructions.
3) Damage to the finish of the case, or other appearance parts caused by wear.
4) Damage caused by repairs or alterations of the heater by anyone other than those
authorized by Soleus International Inc.
5) Freight and Insurance cost for the warranty service.
ALL WARRANTIES, INCLUDING ANY IMPLIED WARRANTY OF MERCHANT
ABILITY ARE LIMITED TO ONE-YEAR DURATION OF THIS EXPRESS
LIMITED WARRANTY. SOLEUS INTERNATIONAL INC. DISCLAIMS ANY
LIABILITY FOR CONSEQUENTIAL OR INCIDENTAL DAMAGES AND IN NO
EVENT SHALL SOLEUS INTERNATIONAL INC’S LIABILITY EXCEED THE
RETAIL VALUE OF THE HEATER FOR BREACH OF ANY WRITTEN OR
IMPLIED WARRANTY WITH RESPECT TO THIS HEATER.
As some states do not allow the limitation or exclusion of incidental or consequential
damages, or do not allow limitation on implied warranties, the above limitations and
exclusions may not apply to you. This warranty gives you specific legal rights, and you
may also have other rights that vary from state to state.
For Warranty, Technical Support, Customer Service, Missing or Defective Parts
Please Call (888) 876-5387
Or Write To:
Soleus International Inc.
9451 Telstar Ave.
El Monte, CA 91731 USA
www.soleusair.com

Other Soleus Air Electric Heater manuals

Soleus Air HM5-15R-32 User manual

Soleus Air

Soleus Air HM5-15R-32 User manual

Soleus Air MS-11 User manual

Soleus Air

Soleus Air MS-11 User manual

Soleus Air HGW-308 User manual

Soleus Air

Soleus Air HGW-308 User manual

Soleus Air 3077997 User manual

Soleus Air

Soleus Air 3077997 User manual

Soleus Air HM5-15R-32 User manual

Soleus Air

Soleus Air HM5-15R-32 User manual

Soleus Air HB15R-M2-32 User manual

Soleus Air

Soleus Air HB15R-M2-32 User manual

Soleus Air HM4-15E-01 User manual

Soleus Air

Soleus Air HM4-15E-01 User manual

Soleus Air HM1-10R-32 Installation instructions manual

Soleus Air

Soleus Air HM1-10R-32 Installation instructions manual

Soleus Air HM4-15R-01 User manual

Soleus Air

Soleus Air HM4-15R-01 User manual

Soleus Air HC7-15-01 User manual

Soleus Air

Soleus Air HC7-15-01 User manual

Soleus Air HM1-10-01 User manual

Soleus Air

Soleus Air HM1-10-01 User manual

Soleus Air MS-09 User manual

Soleus Air

Soleus Air MS-09 User manual

Soleus Air HGW-308R User manual

Soleus Air

Soleus Air HGW-308R User manual

Soleus Air 3092402 User manual

Soleus Air

Soleus Air 3092402 User manual

Soleus Air HC1-15-12 User manual

Soleus Air

Soleus Air HC1-15-12 User manual

Popular Electric Heater manuals by other brands

Rointe Venice VWI010DHWD4 instruction & installation guide

Rointe

Rointe Venice VWI010DHWD4 instruction & installation guide

Daikin EEH01A6 installation manual

Daikin

Daikin EEH01A6 installation manual

Bionaire BCH9208 Instruction leaflet

Bionaire

Bionaire BCH9208 Instruction leaflet

Anslut 411034 User instructions

Anslut

Anslut 411034 User instructions

Orbegozo REW 500 instruction manual

Orbegozo

Orbegozo REW 500 instruction manual

Burda TERM2000 Instructions for use

Burda

Burda TERM2000 Instructions for use

Ansult 024207 operating instructions

Ansult

Ansult 024207 operating instructions

Garland HO IN 1500 quick guide

Garland

Garland HO IN 1500 quick guide

EUROM Mon Soleil Wi-Fi 350 user manual

EUROM

EUROM Mon Soleil Wi-Fi 350 user manual

Timberk TEC.PF10 LE 1000 IN instruction manual

Timberk

Timberk TEC.PF10 LE 1000 IN instruction manual

Sunbeam Electric Heater user manual

Sunbeam

Sunbeam Electric Heater user manual

Honeywell #HZ-7000 - Sure-set Digital Heater Fan owner's manual

Honeywell

Honeywell #HZ-7000 - Sure-set Digital Heater Fan owner's manual

DeLonghi 634R Safety instruction

DeLonghi

DeLonghi 634R Safety instruction

Dyson AM04 operating manual

Dyson

Dyson AM04 operating manual

Trotec IR 2550 S operating manual

Trotec

Trotec IR 2550 S operating manual

EWT PC230TLGT manual

EWT

EWT PC230TLGT manual

DeLonghi EW0507 user guide

DeLonghi

DeLonghi EW0507 user guide

RW Flame RFI-3601LA Service manual

RW Flame

RW Flame RFI-3601LA Service manual

manuals.online logo
manuals.online logoBrands
  • About & Mission
  • Contact us
  • Privacy Policy
  • Terms and Conditions

Copyright 2025 Manuals.Online. All Rights Reserved.