Solight RNZN01 User manual
➀
➁
➂
➃
➆
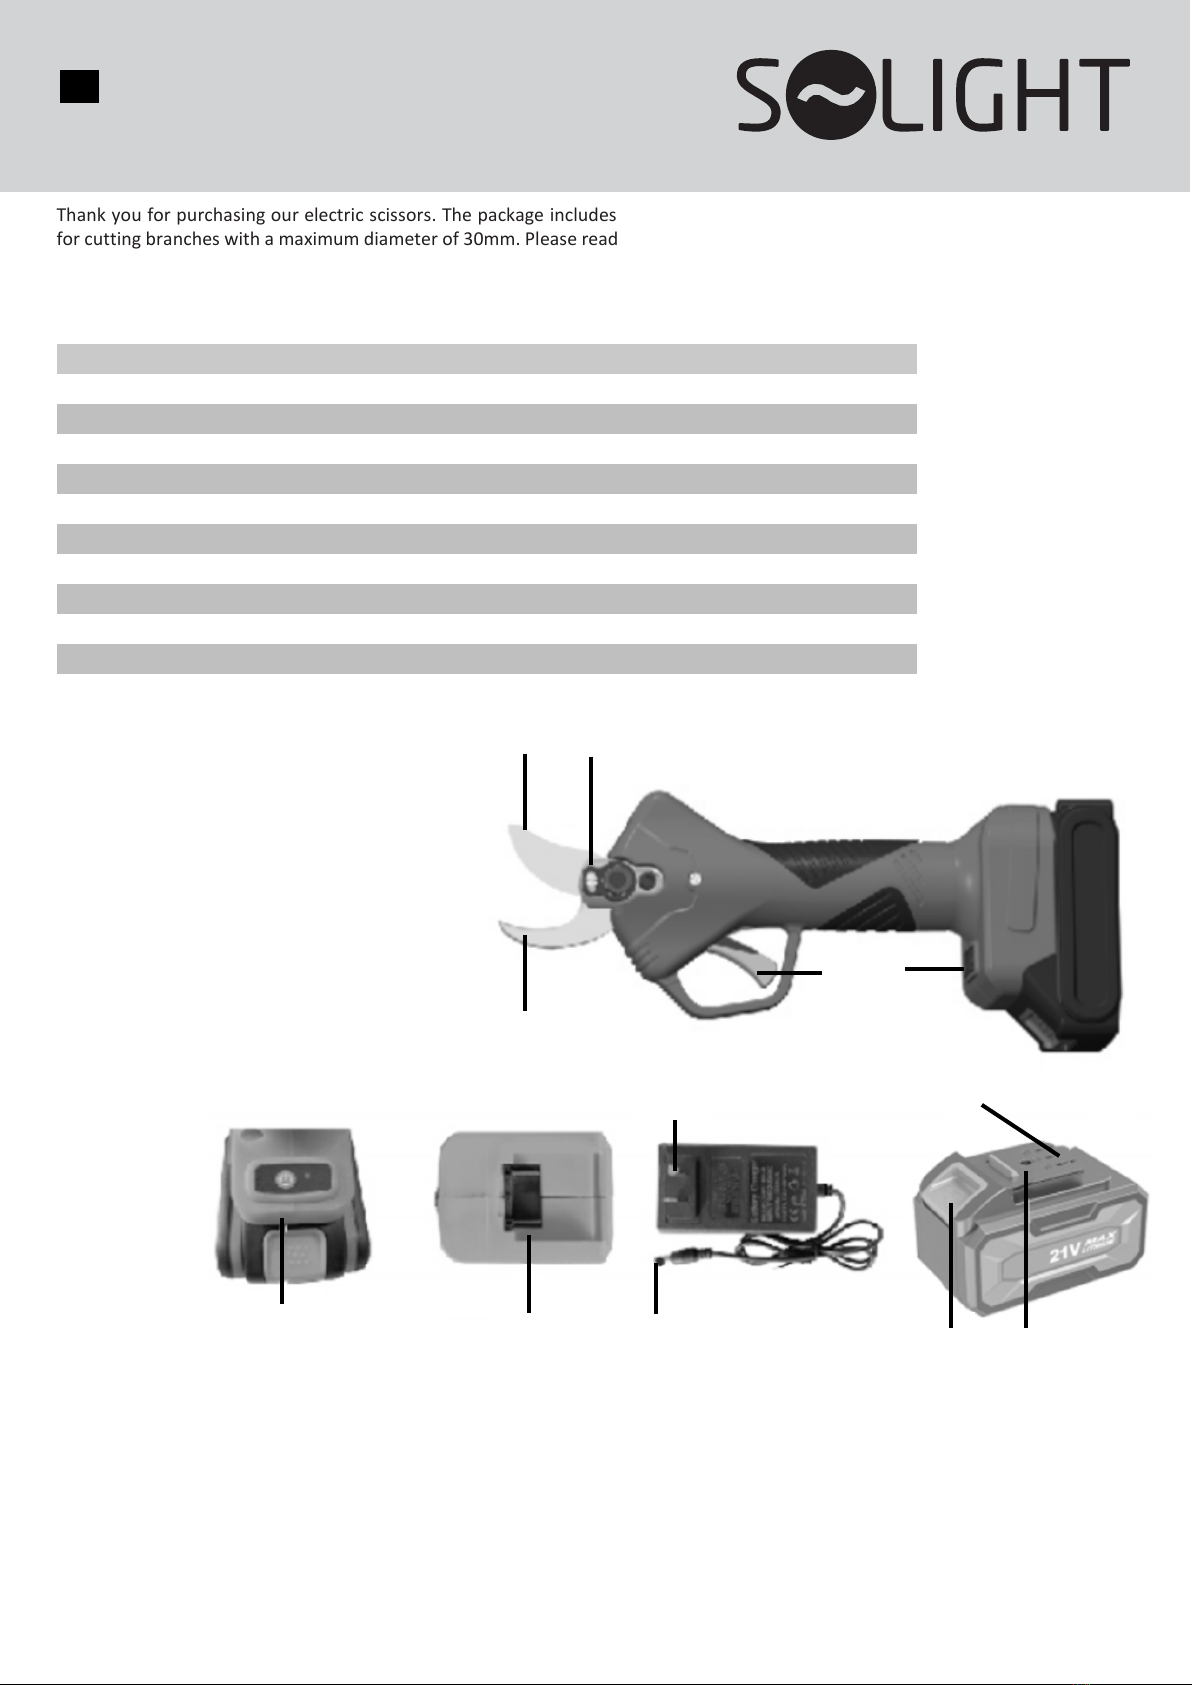
1. Movable blade
2.
Non-movable blade
3.
Blade release screws
4.
Trigger
5.
Correctly connected battery
6.
Battery holder
7.
Blade opening setting switch
8.
Battery charging plug
9.
Plug 230 V/50 Hz
10.
Button to remove the battery
11.
Battery charging port
12.
Battery lock
➄
➅
➇
➈
⑩
⑪
⑫
Thank you for purchasing our electric scissors. The package includes the scissors, battery, charger and accessories. Use the scissors
for cutting branches with a maximum diameter of 30mm. Please read these instructions carefully before use and pay attention to the
safety warnings.
TECHNICAL PARAMETERS
Model
RNZN01
The power of the cut
180 N
Rated voltage
300W
Blade opening modes
4
Standby current
< 9 uA
Number of cuts per charge
approx. 500
Power
Li-Ion battery 21V 2Ah
Operating humidity
≤ 95% RH (non-condensing)
Charging time per battery
approx. 150 min
Dimensions with battery
30 x 12 x 8 cm
Weight with battery
1,2 kg
DESCRIPTION OF EQUIPMENT
EN RNZN01
Electric secateurs

Fig. 1
Fig. 2
Fig. 3
SAFETY NOTICE
Read all safety warnings and instructions carefully. Failure to follow the appropriate warnings and instructions may result in electric
shock, fire and severe burns.
•Keep the device and its components out of the reach of children.
•Never charge the device outdoors or expose it to water.
•If the device overheats, it automatically shuts down.
•Never use the scissors on objects that are live.
•When you are not using the scissors, make sure the battery is disconnected.
•Check the strength and tightness of the blades before use.
•Disconnect the battery during any maintenance/manipulation of the device.
•Do not use the device on non-plant materials and do not exceed the maximum diameter allowed.
•Keep the equipment clean.
•Wear safety goggles and appropriate clothing when working.
BATTERY POWER SUPPLY
The battery of the newly purchased product is not charged. Plug the charger plug into the battery socket. Finally, plug the charger into
an electrical outlet. The charger indicator light is red. This indicates that the charger is charging. After 1.5-2.5 hours, the charger light
will turn green. Charging is complete. You can use the battery.
•When charging, the charger and battery get slightly hot.
•If the battery is not used for an extended period of time, it should be recharged every 3 months to prolong its life.
•A new battery or a battery that has not been used for a long time needs approximately 5 charge and discharge cycles to reach its
maximum capacity.
•Do not charge the battery after only a few minutes of operation, this could reduce the operating time and performance of the
battery.
•Do not store the battery in a humid environment.
•Use only the original charger from the manufacturer.
•Keep the battery away from small metal objects.
•Do not disassemble or modify the battery in any way.
•Keep the battery away from heat sources.
•Do not charge the battery outdoors.
JAW OPENING ADJUSTMENT
The jaws can be opened to several preset positions. On the switch above the battery, you can choose from four positions depending on
how thick you want to cut.
EQUIPMENT MAINTENANCE
Always disconnect the battery before performing any maintenance. Apply oil after every approximately 5 hours of work. To apply oil,
follow the steps below.
1. Unscrew the nut and remove the cotton wool (Fig. 1)
2. Drip oil into the hole and plug it with cotton wool (Fig. 2)
3. Cut several times with the scissors on empty to disperse the oil (Fig. 3).
BLADE SETTING
A blade with proper tightening will not swing from side to side. If the blade setting is normal, the shears will cut with less effort. Always
disconnect the battery and follow the steps below before checking/adjusting.
1. Loosen the top screw and remove the nut lock.
2. Tighten/loosen the nut until the appropriate condition is reached.
3. Put the bracket back on and screw in the screw.
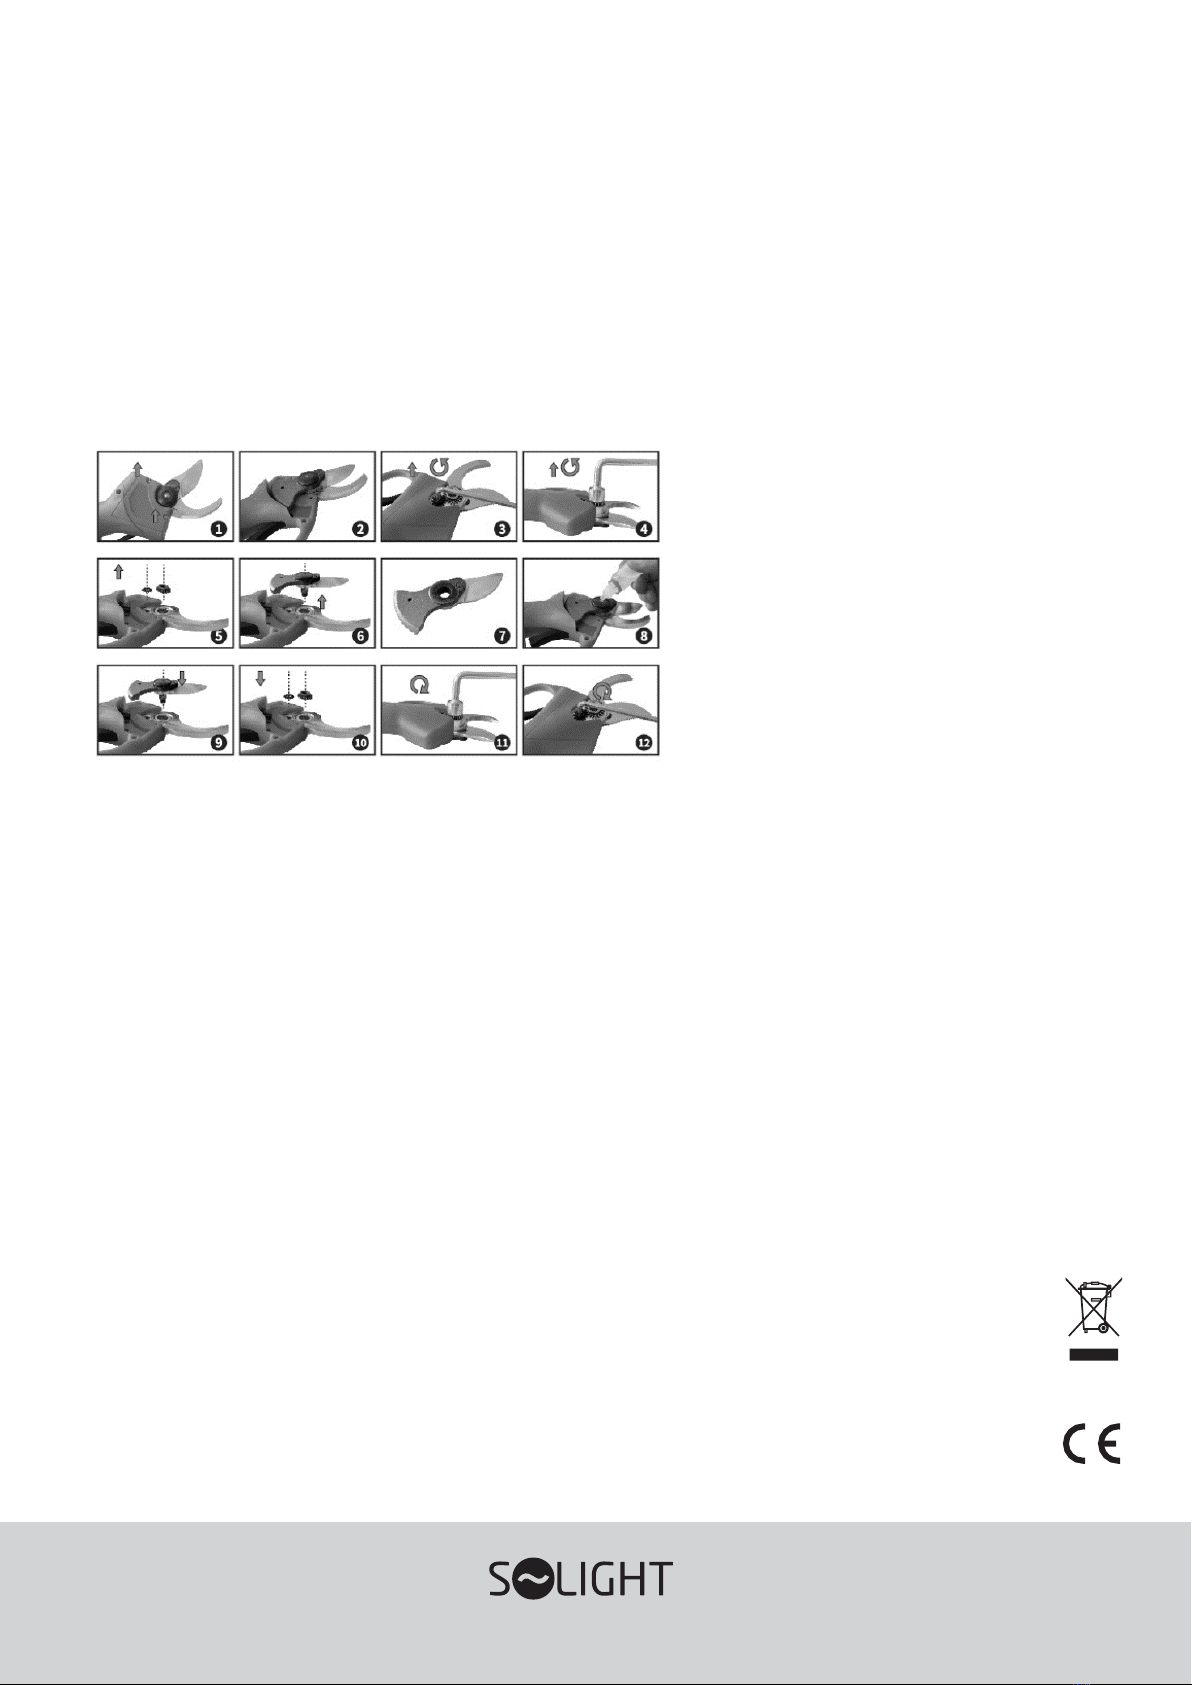
CHANGING THE HAT
Always disconnect the battery before replacing it.
1. Using a Phillips screwdriver, loosen the two screws on the top cover and remove the cover as shown in figure (2).
2. Loosen the two screws and the anti-release lock (3) using the tool.
3. Use a tool to loosen the lock nut and remove the stop seal (5).
4. Remove the old knife and replace it with a new knife.
5. If necessary, clean the gears (warning: do not use chemicals).
6. Attach the blade and gearbox (7) to the shears.
7. Fit the stop washer and secure the lock nut.
8. Secure the upper locking screw and seal against loosening.
9. If necessary, oil the gearbox and the blade (8).
10. Attach the top cover.
STORAGE OF EQUIPMENT
Hold down the cut button until the device beeps once and the blades engage. Once the blades are clamped, disconnect the battery,
clean the shears and store them in the case.
PROBLEM SOLVING
1. If you accidentally insert something into the scissors that cannot be cut, release the trigger immediately and the movable blade will
automatically return to the open position.
2. If the branches to be cut are too hard, the trigger must be released in time and the movable blade automatically returns to the
open position.
3. If the battery cannot be charged, first check that the charger is properly connected to the product.
4. In the event of an electrical or mechanical fault, switch off the switch immediately.
5. If the battery is not used in accordance with the operating instructions, fluid may be released from the battery. Do not touch the
liquid and wash it off immediately with water in case of accidental contact. Liquid from the battery may cause irritation or burns.
This symbol on the product or in the accompanying documentation indicates that the product must not be disposed of with
mixed household waste. This product is intended for environmentally friendly disposal, so take it to the designated
collection point. For further information on the environmentally sound disposal of the product, please contact your local
authority, your household waste collection and disposal provider or your dealer. By disposing of your product in an
environmentally friendly manner, you are helping to protect the environment.
This product complies with all the essential requirements of the EU Directives that apply to it.
The product has been issued with a CE declaration of conformity in accordance with the applicable
regulations. On request from the manufacturer: info@solight.cz, or download www.solight.cz
Solight Holding, s.r.o., Na Brně 1972, Hradec Králové 500 06, Czech Republic.
Table of contents


