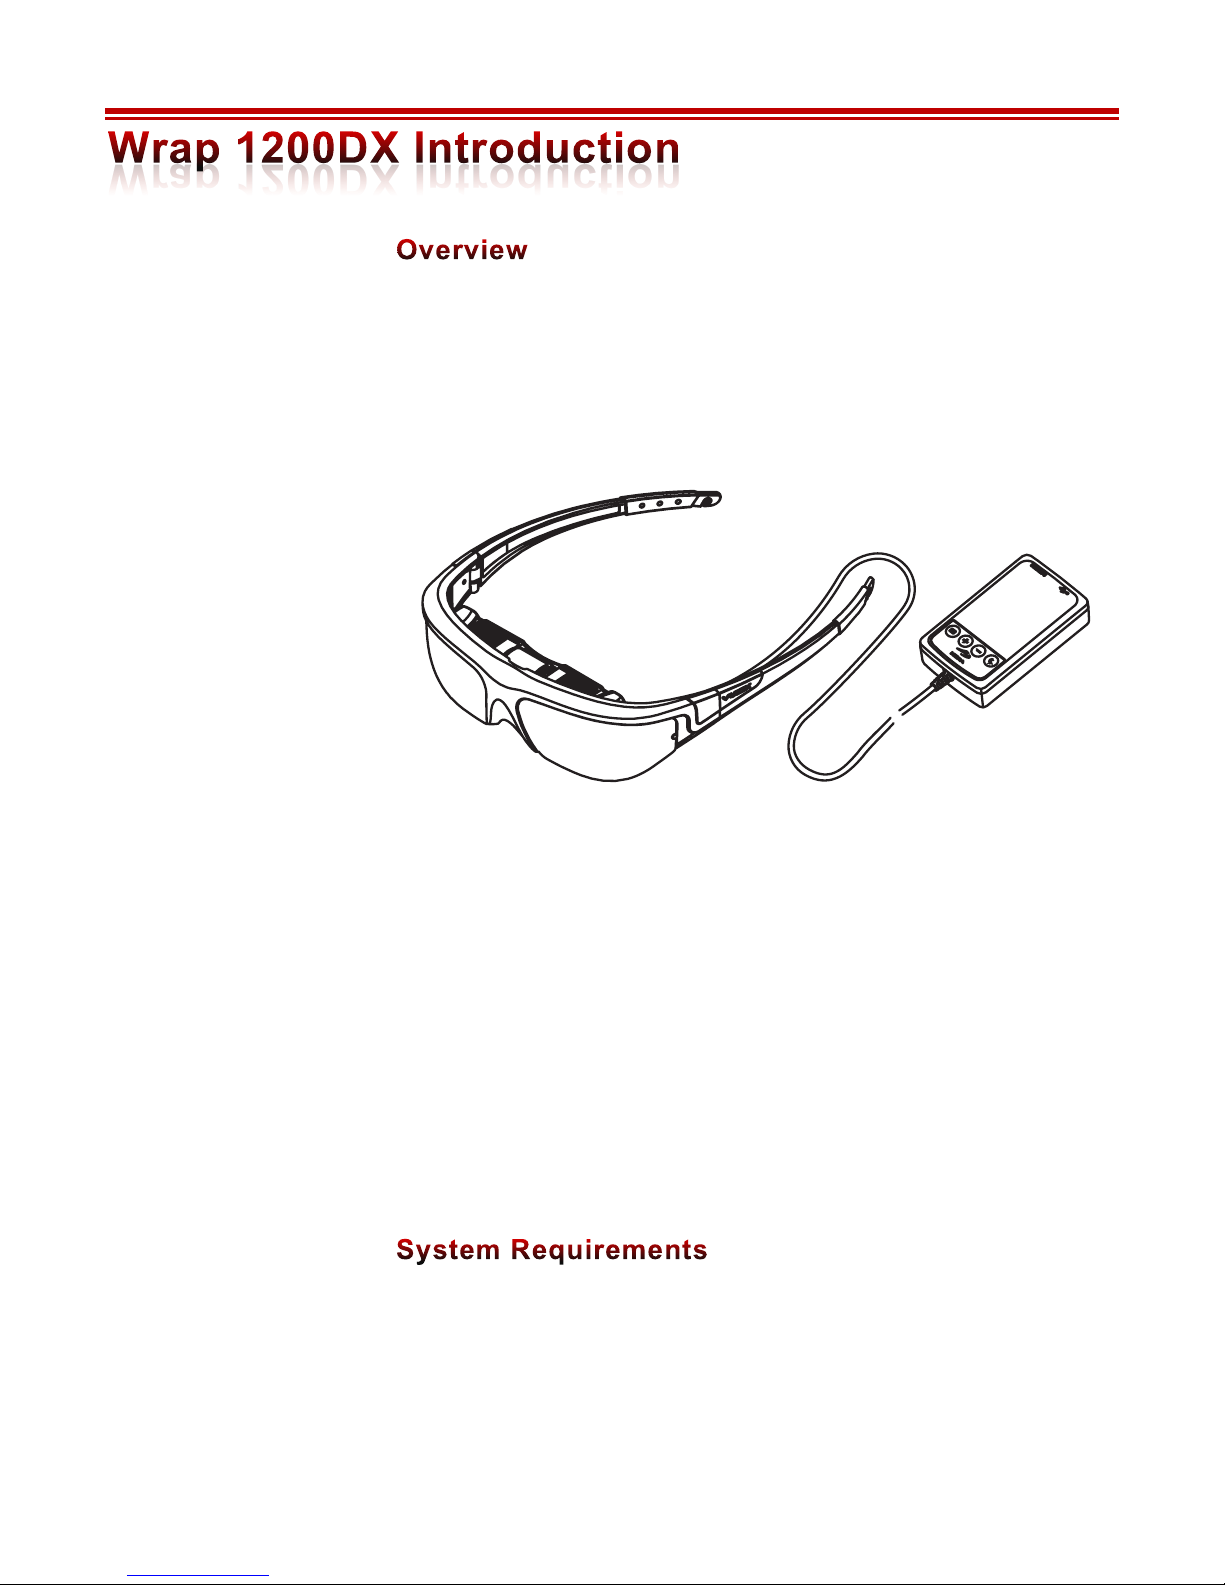
Vuzix Wrap 1200DX User manual

Wrap 1200DX
User Guide
English Edition
®

2
WRAP 1200DX INTRODUCTION 5!
Overview 5!
System Requirements 5!
Requirement and Compatibility Notations 6!
Downloads & Updates 6!
INSTALLATION & SETUP 7!
Step 1: Charging the Controller 7!
Charging 7!
Step 2: Connecting Accessories 8!
Earphones 8!
Step 3: Connecting To A Host Device 8!
Step 4: Adjustment & Configuration 9!
Power On/Off 9!
Video Display 9!
Audio 10!
Focal Adjustment 10!
Eye Separation Adjustment 10!
Accutilt®Display Angle Adjustment 11!
Nose Bridge 11!
Tether Strap 11!
CONTROLLER & OSD 12!
Controller Buttons 12!
OSD Display Controls 12!
Display Mode 13!
Brightness 13!
Contrast 13!
EYEWEAR REFERENCE 14!
Video Display 14!
3D Video 14!
Battery 14!
Nose Bridge 15!
Eye-separation Adjustment 15!
Accutilt Adjustment 16!
Wrap Noise-Isolating Earphones 16!
Windows - Lost Audio 17!
Tether Strap 17!

3
OPTIONAL ACCESSORIES AND ADD-ONS 18!
Wrap Tracker 18!
Wrap Lightshield 18!
Lens Cover Replacement 19!
Lens Cover Removal 19!
Lens Cover Installation 19!
MHL Adapter – Micro USB to HDMI®20!
Connecting a MHL Adapter 21!
Travel & Carry Cases 23!
CLEANING 24!
SUPPORT SERVICES 25!
WASTE ELECTRICAL & ELECTRONIC EQUIPMENT 26!
FCC COMPLIANCE 26!

4
Read the Safety and Warranty information before proceeding.

5
The WRAP 1200DX is a unique video eyewear product offering an all-digital
solution for optimum video quality and compatibility with a wide range of
audio/video sources. An HMDI® interface provides compatibility with virtually
any HDMI equipped video source, including 3D Blu-ray DVD players.
The WRAP 1200DX provides a 16:9 WVGA display, capable of displaying 2D or
3D video, removable stereo earphones and a Controller with a rechargeable battery
and HDMI (with 3D) connectivity. Its all-digital format enables the best possible
image quality to be displayed on a 75-inch virtual screen, as seen from 10 feet (~3m)
including HDCP (High-bandwidth Digital Content Protection) protected content
to be viewed in 3D.
An HDMI interface enables the eyewear to connect to virtually any device with
HDMI output including HDMI equipped mobiles phones, tablets, personal
computers, set top entertainment and gaming systems, Blu-ray disc players and
more.
•Host device with HDMI output
•USB power source: 0.5A or greater

6
Requirement and Compatibility Notations
•A “host device” is the device used to process and/or serve audio/video content to
the eyewear. Typical examples include a personal computer or mobile device
such as a smartphone or tablet.
•The Wrap 1200DX has been demonstrated to work with a broad array of
devices that incorporate HDMI technology. Compatibility with all devices,
cables and content cannot be guaranteed.
•Only High Speed HDMI® Cables should be used with this product. Ethernet
compatibility is not required.
•A USB power source providing 0.5 Amps or greater is required. A 1.0 Amp
power source is recommended.
•Some mobile devices enable connection to HDMI displays through an MHL
(Mobile High-Definition Link) port using an MHL Adapter. The WRAP
1200DX supports audio and video display with MHL Adapter equipped
devices. Due to the power requirements of some MHL Adapters, a continuous
connection to a power source may be required.
•Vuzix provides online access to WRAP 1200DX software, documentation and
updates.
!To download the complete set of software and documentation, go
to: www.vuzix.com/DD
!To download individual files and/or updates, go to:
www.vuzix.com/downloads

7
This section of the guide leads you through the installation and connection of your
WRAP 1200DX eyewear to a variety of host devices. Some adaptation may be
required for some devices.
•The Wrap 1200DX is powered by a rechargeable lithium-ion battery in the
Controller. The eyewear’s runtime varies dependent upon the power demands
of the video, screen brightness and other factors including the charge level of the
Controller’s battery.
Prior to First Use
•Prior to using the Wrap 1200DX its battery must charged for a minimum of
four (4) hours, using a USB power supply providing a minimum of 0.5 Amps
(charger not included).
Charging
•The Wrap 1200DX’s Controller can be charged using a USB charger plugged
into an electrical outlet or another USB power source, such as a USB port on a
computer, as long as it provides 0.5 Amps or greater.
The USB cable provided with your eyewear has two different connectors, a small
Mini-B connector (left) and a standard Type A (right) as illustrated below.
!Plug the Mini-B connector into the USB port on the Controller and the Type A
connector into the USB power source.
Some HDMI
connections require
significant power. For
continuous use of the
eyewear over extended
periods, you may have
to maintain a
connection to the USB
charger.
A USB power supply
providing 1.0 Amps or
greater is
recommended.

8
!Allow the Controller to charge for a minimum of 4 hours prior to its first use.
Earphones
Be sure to adjust the volume to a safe and comfortable level before inserting the
earphones into your ears. The volume is controlled through the “+” (plus) and
“–” (minus) buttons on the Controller.
!Plug the stereo earphones into the jacks above each of the eyewear displays.
The noise-isolating earphones are not required for the proper operation of the
eyewear. Unplug the earphones if you prefer to use an alternate speaker system.
•The Controller provides a HDMI and a USB port plus four control buttons and
an indicator light.
!Use the HDMI cable provided, or an alternate High Speed HDMI®Cable, to
connect the eyewear’s Controller an HDMI equipped host device.
HDMI
USB
Windows based PCs
automatically detect
new speaker
connections and
reconfigure the audio
output to be played
through them. If you
wish to use an
alternate speaker
system, select the
desired speakers
through the Windows
Control panel.
Additional adapters or
cables may be required
for your installation.
Cables not certified as
High Speed HDMI®
Cables and may not
provide the same level
of performance and/or
compatibility.

9
Power On/Off
!Press the “Power & Menu” button to turn the eyewear on.
!Press and hold the “Power & Menu” button to turn the eyewear off.
!Press the “Power & Menu” button again to display the OSD (On Screen Display)
If no video signal is detected for a period exceeding 30 seconds, the eyewear display
will turn off to conserve power.
Video Display
The WRAP 1200DX does not require any configuration for displaying 2D video
from most devices providing HDMI technology.
Computer connections may require additional configuration to enable the eyewear
to function as an external monitor, displaying a duplicate image to that shown on
the primary computer monitor.
If your computer does not automatically configure itself to display its video on both
its primary monitor and the eyewear, adjust its video display settings as follows:
•Multiple Displays: Duplicate or mirrored display
•Resolution: One of the following resolutions
1152 x 648
1280 x 720 (720p)
1600 x 900
1920 x 1080 (1080p)
Power
& Menu
Other resolutions may
be available on your
computer system but
may not display in the
proper aspect ratio.
For best results, use one

10
Audio
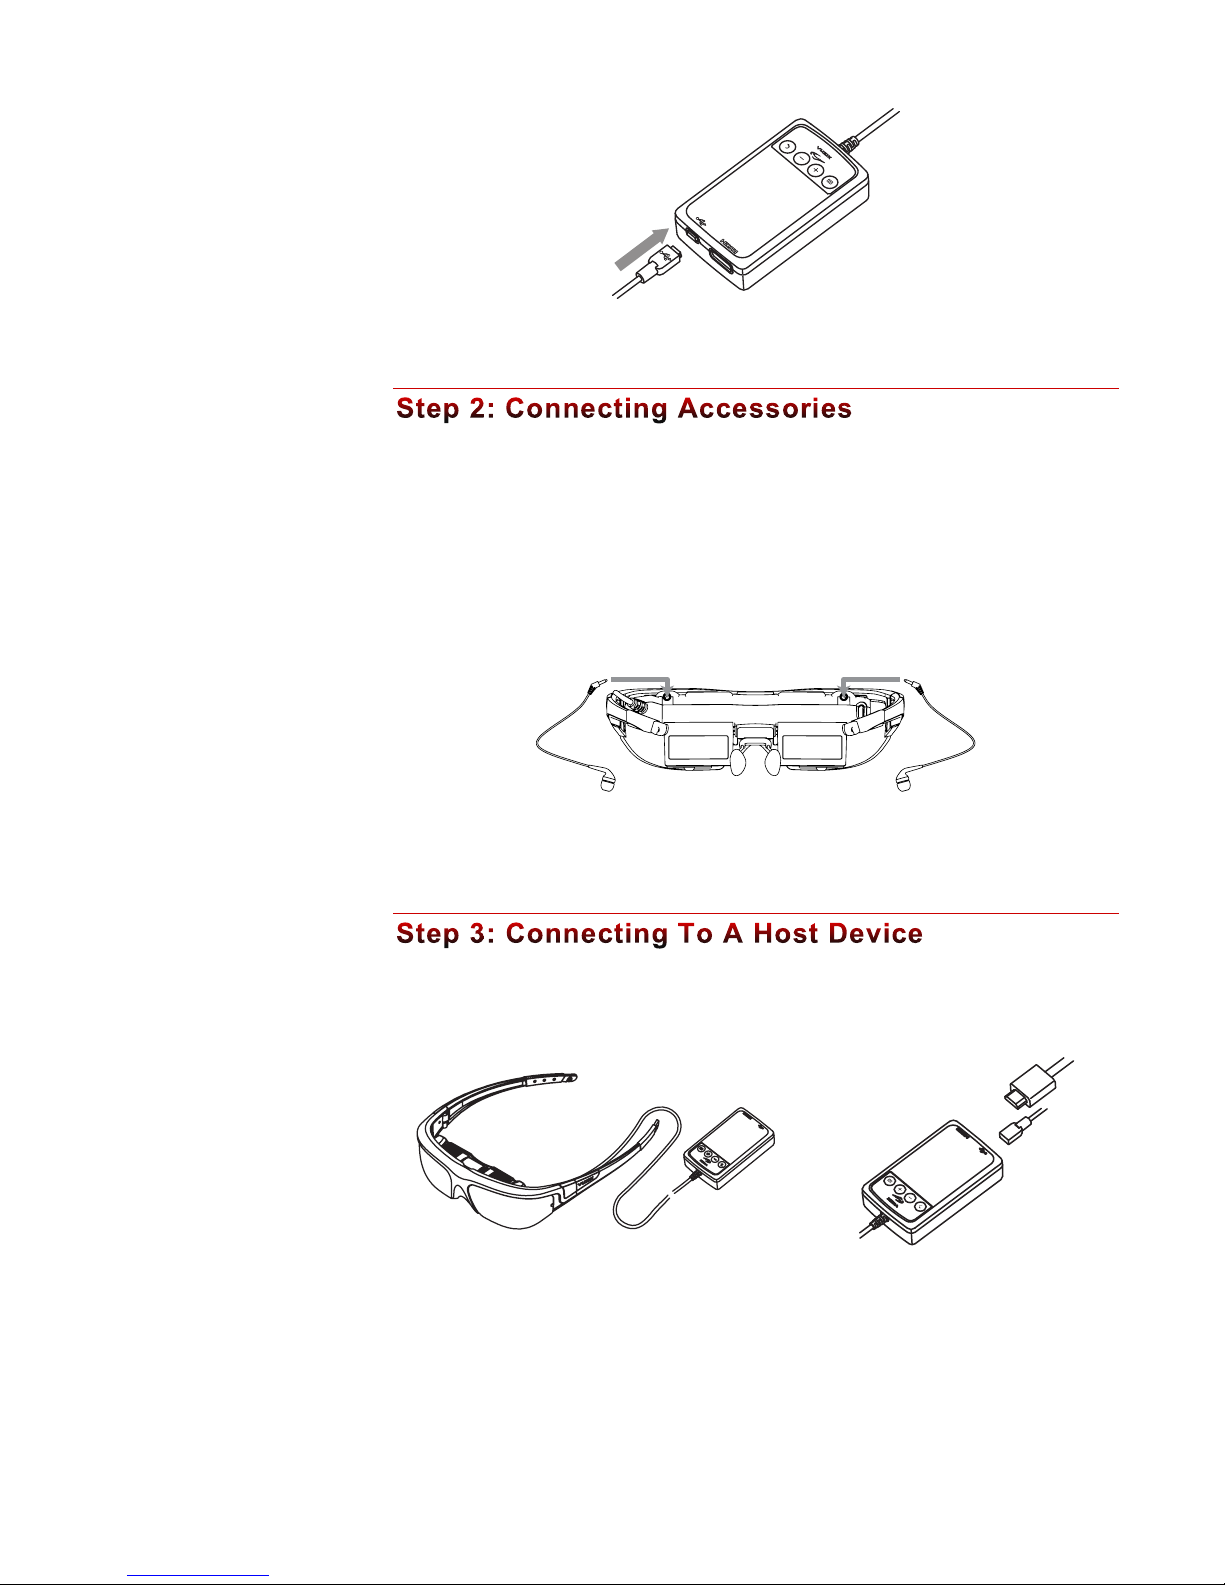
The WRAP 1200DX is equipped with removable stereo earphones. Small, medium
and large noise-isolation rings are included.
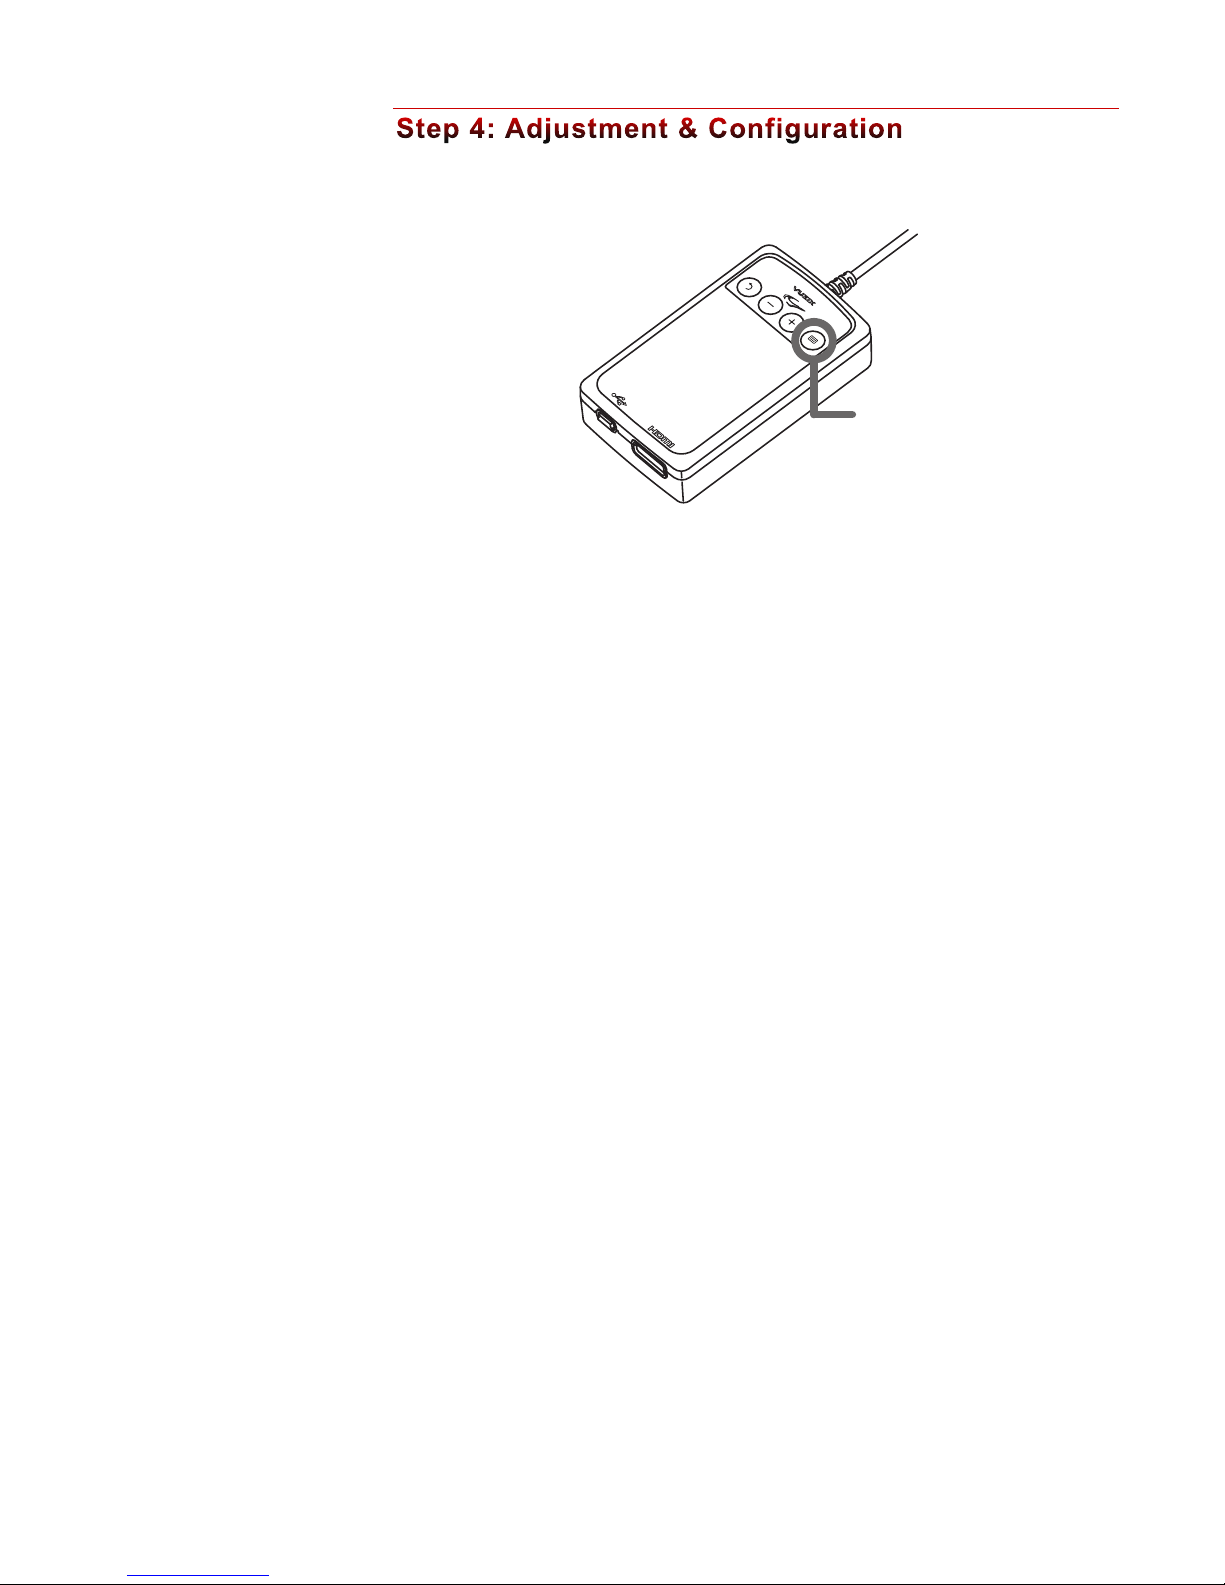
!Press the plus (+) or minus (-) button on the Controller to adjust the volume.
Do not put the earphones into your ears until the audio volume has been set to
a moderate and safe level.
Focal Adjustment
The focus of each eye’s display can be adjusted independently from approximately
+2 to -4 diopters. If this adjustment is insufficient, the eyewear can be worn over
many styles of prescription eyeglasses.
!Close one eye and slide the adjuster above your open eye to achieve the
sharpest focus.
!Repeat the process, closing the opposite eye.
Eye Separation Adjustment
This distance between your eyes, InterPupillary Distance (IPD), varies from one
person to the next. If your eyes are not correctly aligned with the displays, the image
may appear dark or disappear entirely. An IPD adjustment enables you to align
each display with its respective eye.
Each display adjusts independently by sliding it left or right.
!Close one eye and slide the display box for the other eye left or right to provide
the clearest and brightest image.
!Repeat the process to adjust the other display.
If an alternate audio
system is used, volume
controlled through that
system’s controls.

11
Accutilt®Display Angle Adjustment
The angle of your displays can also impact their clarity. Vuzix eyewear is equipped
with a patented Accutilt system that enables the display to be to be tilted up or
down by up to 15 degrees.
!Adjust the display angle, by rotating the up/down tilt of display module, to
achieve the best quality image.
Nose Bridge
The nose bridge assembly is adjustable both in length and the angle/width of its
pads.
!Slide the nose pad assembly in or out to adjust the display height of your
eyewear. The eyewear displays should be aligned to the same level as your
eyes.
!Bend the nose pad wires to adjust the pad separation and angle.
Just as is the case with prescription eyeglasses, the wire arms of the nose pads are
designed for adjustment for a single user. Excessive and/or frequent adjustment or
sharp bends in the wire arms may weaken and break them. Replacement nose pads
are available from Vuzix.
Tether Strap
For active applications a tether strap can be used to provide a more secure fit.
!Attached each end of the tether strap to the eyelets on the eyewear stems.
!Adjust the strap synch for a comfortable and secure fit.
If the stem pulls
completely out, simply
slip it back into its slot
taking care that the
serrated strip faces
toward you – away
from the eyewear
display assembly.

12
The WRAP 1200DX Controller provides access to audio controls as well as the
OSD, a menu system for controlling the eyewear’s On-Screen Display (OSD)
options. Volume and the OSD options are managed through the four buttons on
the Controller.
Power & Menu
Powers up the video eyewear and enable its on-screen display menu (OSD).
Press the “Power & Menu” button again, once the device is powered on, to
display the OSD
Plus Selector
Increases adjustment settings of current OSD selection.
Increases volume if the OSD is inactive.
Minus Selector
Decreases adjustment settings of current OSD selection.
Decreases volume if the OSD is inactive.
Return – Go Back
Press it once to turn off the OSD, if it is displayed.
Double-press it to toggle between 2D and the last 3D setting, if the OSD is
not displayed.
With the device on, press the Power & Menu button to display the OSD.

13
The above image displays a Windows desktop in the background. The image shown in
your eyewear will vary depending the host device used and the current menu selection.
The display resolution is displayed in the top left corner, along with the current
display mode. The battery level is displayed in the top right corner.
Display Mode
The display mode menu options, titled “3D”, are shown in above the brightness and
contrast setting controls.
You have three display modes to choose from:
•“2D” for standard 2 dimensional content,
•“SxS” for side-by-side formatted 3D content, and
•“T/B” for top/bottom formatted 3D content.
!Adjust the strap synch for a comfortable and secure fit
This can only be done when the HDMI technology does not detect 3D content.
Brightness
!Use the + and – buttons to adjust the screen brightness.
Contrast
!Use the + and – buttons to adjust the contrast of the screen.
3D 2D SxS T/B
2D
720P
Toggle between the
current and prior
display mode by
double-pressing the
Go Back button.

14
Most HDMI devices do not require display configuration adjustment when
connected to the Wrap 1200DX. Some computer systems may require adjustments
to their display settings to enable the Wrap 1200DX as second or external display.
The computer must be configured to support the Wrap 1200DX as an external
monitor, duplication its desktop or laptop monitor. Depending upon your
operating system this configuration may be referred to as duplicate, mirrored, or
clone display mode.
If the display settings do not automatically adjust to a resolution commonly
supported by the desktop and eyewear monitors, it must be manually set to one of
the following resolutions:
1152 x 648
1280 x 720 (720p)
1600 x 900
1920 x 1080 (1080p)
2D and 3D video is supported on all known makes and models of Windows
compatible graphics cards. No additional 3D drivers are required.
3D Video
By default the eyewear supports standard 2D video. Stereoscopic 3D video support
is provided for side-by-side, top/bottom and frame packed content. A compliant
HDMI 3D capable source will automatically configure the eyewear for the correct
3D mode and enable 3D display. You will not be able to change the 3D settings of
the eyewear when it is automatically configured in this manner.
Battery
The Controller contains a rechargeable lithium ion battery, recharged by connecting
it to a USB charger (wall outlet or computer port) with an output of 1 amp or
greater.
Recharging a fully depleted battery can take up to 8 hours.
The Vuzix icon on the Controller will illuminate red while the device is plugged
into the charger.If the device is plugged in and turned on, the red illumination will
Content must be
displayed “full screen”
on a PC to be viewed
in 3D.
Other resolutions may
be available on your
computer system but
may not display in the
proper aspect ratio.
For best results, use one

15
remain on and the blue illumination will flash indicating that the device is on and
charging.
The WRAP 1200DX’s nose bridge and pads are adjustable. For the best viewing
experience your displays should be centered in front of your eyes. By sliding the nose
bridge assembly’s stem in or out of the display module you can adjust the resting
height of the displays. By bending the wire nose pad arms you can address the angle
and spread of the pad to achieve optimum comfort.
To adjust the nose bridge:
!Slide the nose bridge assembly in and out to adjust its reach to position the
eyewear displays directly in your line of sight.
If you pull the nose bridge assembly too far out it will come completely out of the
display module. Don't worry if this happens as it can be easily slid back in and
enables you to replace the nose bridge assembly should it be broken.
!Gently bend the wire arms of the nose pad to achieve a comfortable fit with the
pad’s face resting on the bridge of your nose – in the same manner that you
would adjust the nose pads on standard eyeglasses.
Gentle persuasion with a pair of needle nose pliers works best to bend the wire nose
pad arms. This places the least amount of strain on the assembly and adjacent parts.
The wire nose pad arms are not designed for frequent bending or sharp angles as this
may weaken and break them. Replacement nose pad assemblies are available for
purchase from Vuzix (www.vuzix.com).
IPD (InterPupillary Distance) is the distance separating your eyes - sometimes
referred to simplify as “eye-separation”. IPD varies from one person to the next and
when yours does not match close enough to the eyewear displays, the image in one
eye or the other may darken or disappear entirely.

16
Each display adjusts independently by sliding it left or right.
To adjust the IPD:
!Close one eye and slide the display box for the other eye left or right to provide
the clearest and brightest image.
!Repeat the process to adjust the other display.
Your WRAP 1200DX is equipped with a patented view angle adjustment called
“Accutilt”. The mechanism allows you to rotate and tilt the display module up and
down approximately 15° to achieve the best quality display.
To adjust the viewing angle:
!Pivot the display assembly to achieve the best quality display.
The noise isolating earphones provided with the WRAP 1200DX are removable and
the eyewear can be used with or without them attached. The earphones are
interchangeable and can be used on either the left or right side.
Three sizes of noise-isolators are provided, allowing you to adjust for a secure and
comfortable fit. Simply slide one noise isolator off the speaker stem and slide
another on.

17
Volume adjustment for the earphones is controlled using the Adjustment Buttons
on the Controller. Take care that the volume is set to a low level before inserting the
earphones into your ears.
Adjustment Buttons
If you are using an alternate audio system, use that audio system’s controls to adjust
volume.
Windows - Lost Audio
When a Windows equipped computers detect a new speaker system they assume you
want to use these new speakers and automatically configures them as the enabled
speaker system. If you had been listening for audio through another sound system, it
may appear that you’ve lost audio. The audio is still playing but Windows has
redirected it to play through the eyewear’s earphones. Use the speaker settings in the
Windows Control Panel to select another speaker system.
A tether strap or lanyard is provided for those unaccustomed to wearing glasses or
who are moving around while wearing the WRAP 1200DX. The tether will help
secure (but not prevent) it from falling off and possible damaged.
The ends of the tether strap loop over the hooks at the end of each eyewear stem.

18
The following items are not included with the Wrap 1200DX but may be
purchased separately from Vuzix or other retailers.
The optional Vuzix Wrap Tracker (P/N: 301T00011) adds see-where-you-look
capabilities to supported virtual reality games and simulation programs running on a
Windows PC. This 3-DOF head tracker with compass plugs into the back of the
eyewear’s display module and connects to a Windows based computer through the
Controller’s USB cable.
The Wrap Tracker is supported by a large number of games and simulation
programs. A “creator” feature in its VR Manager software also allows you to enable
many additional games with head tracker support.
Head-tracking support enables a game or simulator to be aware of your current head
position direction of view for increased spacial awareness and realism. An example of
head tracking in a flight simulation is its ability to alter your viewing perspective to
display content in the direction of your current view and change that angle and
direction as you swivel your head for see-where-you-look realism.
The Wrap tracker plugs into a small port on the Wrap 1200DX and connects to a
Windows based PC through the Wrap Controller’s Mini-USB port and cable. Vuzix
VR Manager software is included to enable tracker calibration and add VR support
in a broad number of Windows based applications.
Go to the Vuzix website for more information on the Wrap Tracker.
The optional Wrap Lightshield slips easily on and off the Wrap eyewear to enable
total immersion for virtual reality applications or simply to block out light and
visual distractions for viewing a movie.
Upgrade your Wrap
1200DX to VR
(virtual reality)
eyewear for added
realism and immersion
in games, flight
simulators and more.
A Wrap Tracker
enables see-where-you-
look head tracking for
supported Windows
based applications and
the Wrap Lightshield
enhances immersion,
bringing you into the
game.

19
Go to the Vuzix website for more information on the Wrap Lightshield.
Your WRAP 1200DX includes a tinted pair of lens covers. Optional replacement
colored lens covers (Shades) are available for purchase from the Vuzix website.
Lens Cover Removal
!With the eyewear upside down, grasp the frame in both hands with your thumbs
pointing toward each other along the bottom of the frame, at position “A” and
your forefingers at position “B”.
!Using your thumbs as a pressure point, apply pressure with your forefingers at
position “B” to gently bend the frame at position “A”, causing the cover and
frame to separate along the seam behind position “C”.
!Slowly apply increasing pressure until tab “3” pops free of the frame. Now the
lens can be easily lifted out of the frame.
Lens Cover Installation
!Insert tabs “1” and “2” into their slots in the frame.
A
B
B
C
1
23
4

20
!Insert tab “3” into its slot.
!Press the front of the cover inwards to pop tab “4” into its slot.
!Examine the fit of the cover in comparison to the other lens. Press more firmly to
seat tab “4” if the lens is not completely locked into the frame.
!Remount the camera, as shown above.
Remount the camera and wipe away any fingerprints with a clean microfiber cloth
and you’re ready to go.
Go to the Vuzix website for more information on Vuzix Wrap Lens Covers.
MHL (Mobile High-Definition Link) is a standard used primarily by tablets and
smartphones to provide HDMI connectivity through a smaller micro USB port. It
sends the audio and video signals through the micro USB connector and converts it
to a HDMI signal for use on supported devices, such Vuzix eyewear equipped with
an HDMI compatible Controller. The signal remains in digital format throughout
the conversion process, avoiding quality is lost.
A Micro USB to HDMI MHL Adapter enables MHL device, such as an HTC EVO
3D or Samsung Galaxy S3, to connect to HDMI enabled eyewear models for audio
and all of the HDMI supported video resolutions. It also supports 3D video and
HDCP media protection when used with HDMI enabled Vuzix eyewear models.
Most MHL devices require an external power source from their internal batteries, to
drive the adapter and to power the eyewear. In many cases this power requirement
exceeded the output of typical USB ports on a computer. Though connecting to a
computers USB will charge the eyewear Controller’s battery if the eyewear is not in
use, it may not provide sufficient power for indefinite use. For the shortest charge
time and to enable indefinite use of an MHL connected eyewear session, supply
power to the MHL Adapter from the power adapter provided with your eyewear,
with no other USB devices connected.
The following is a partial listing of MHL mobile devices from three popular
manufacturers:
Some MHL devices
may require an
additional 5-pin to
11-pin Micro USB
Adapter for MHL
Adapter.
Table of contents
Other Vuzix Smart Glasses manuals

Vuzix
Vuzix M300 User manual

Vuzix
Vuzix Blade User manual

Vuzix
Vuzix M400 User manual

Vuzix
Vuzix Star 1200 User manual

Vuzix
Vuzix SHIELD 492 User manual

Vuzix
Vuzix M400C User manual

Vuzix
Vuzix Blade User manual

Vuzix
Vuzix M400 Installation instructions manual

Vuzix
Vuzix Blade 494 User manual

Vuzix
Vuzix CamAR User manual

Vuzix
Vuzix STAR 1200XLD User manual

Vuzix
Vuzix M100 User manual

Vuzix
Vuzix M300XL User manual

Vuzix
Vuzix M4000 User manual

Vuzix
Vuzix Smart Swim SS-147B User manual

Vuzix
Vuzix BLADE 2 User manual

Vuzix
Vuzix Blade User manual

Vuzix
Vuzix M300 User manual

Vuzix
Vuzix M300 User manual

Vuzix
Vuzix Smart Swim User manual