SOMFY YSLO FLEX RTS 2P User manual

YSLO FLEX RTS 2P
Ref. 5116414B
ÍS0IÈ4ArÎ
EN Installation guide (2 panels)
www.somfy.com

Caution! Note
Insatallation guide (2 panels) page 3
EN

Copyright © 2013 - 2014 Somfy SAS. All rights reserved.
Yslo Flex RTS 2P
3

Copyright © 2013 - 2014 Somfy SAS. All rights reserved.
Yslo Flex RTS 2P
4
TRANSLATED INSTRUCTIONS
These instructions apply to all YSLO FLEX RTS 2P drive, the different versions of which are available
in the current catalogue.
Field of application
MVA drive are designed to drive all types of swinging shutters.
The installer, who must be a motorisation and home automation professional, must ensure that the
motorised product is installed in accordance with the standards in force in the country in which it is
installed such as EN 13659 relating to roller shutters.
Liability
Please read these instructions carefully before installing and using the drive. In addition to following
the instructions given in this guide, the instructions detailed in the attached Safety instructions
document must also be observed.
The drive must be installed by a motorisation and home automation professional, according to
instructions from Somfy and the regulations applicable in the country in which it is commissioned.
It is prohibited to use the drive outside the eld of application described above. Such use, and any
failure to comply with the instructions given in this guide and in the attached Safety instructions
document, absolves Somfy of any liability and invalidates the warranty.
The installer must inform its customers of the operating and maintenance conditions for the drive
and must provide them with the instructions for use and maintenance, and the attached Safety
instructions document, after installing the drive. Any After-Sales Service operation on the drive must
be performed by a motorisation and home automation professional.
If in doubt when installing the drive, or to obtain additional information, contact a Somfy adviser or go
to the website www.somfy.com.
Specic safety instructions
Cables which pass through a metal wall must be protected and isolated using a sheath or
sleeve.
Attach cables to prevent any contact with moving parts.
If the drive is used outdoors, and if the power supply cable is a type H05-VVF cable, the cable
should be installed in a UV-resistant duct, e.g. under a gland.
Leave the drive power supply cable accessible: it must be possible to replace it easily.
Always make a loop in the power supply cable to prevent water entering the drive.
For tubular motors 50/60 mm in diameter:
The drive wheel must be locked in place to prevent it moving along the roller tube:
- Either by securing the roller tube onto the drive wheel using 4 screws or 4 pop rivets positioned
between 5 mm and 15 mm from the outer edge of the drive wheel, suitable for all types of roller
tube. The screws or pop rivets must only be attached to the drive wheel and not to the drive.
- Or by using a drive wheel stop, suitable for tubes which are not smooth.
Somfy SAS, F-74300 CLUSES as manufacturer hereby declares that the drive covered by these instructions
when marked for input voltage 230V~50Hz and used as intended according to these instructions, is in
compliance with the essential requirements of the applicable European Directives and in particular of the
Machinery Directive 2006/42/EC, and the Radio Directive 2014/53/EU.
The full text of the EU declaration of conformity is available at www.somfy.com/ce.
Antoine Creze, Approval manager, acting on behalf of Activity director, Cluses, 05/2016.

GENERAL INFORMATION 5
I. Introduction 5
II. Contents 6
III. Safety 8
III.I. Safety and liability 8
III.II. Specic safety instructions 8
IV. Yslo Flex RTS 2P in detail 8
INSTALLING YSLO FLEX RTS 2P 9
5. Preparing the shutter 9
5.1. Tools required 9
5.2. Installation position 9
5.3. Removing opening and closing systems 9
6. Positioning Yslo Flex RTS 2P 10
7. Drilling the bracket mounting holes 10
8. Choosing the cable exit 11
9. Fixing Yslo Flex RTS 2P 12
10. Wiring 14
11. Checking the wiring 15
12. Commissioning and saving the RTS
control point 15
13. Checking and adjusting the rotation
direction 16
14. Installing stoppers 16
14.1. Details 16
14.2. Fixing the stoppers on the side 17
15. Clipping on the housings 17
16. Fixing the arms and sliders 18
16.1. Cutting the sliders. 18
16.2. Installing the arms 19
16.3. Installing the sliders on the panels 19
17. Checking and resetting the panels 20
18. Reversing panel priority 20
19. Adjusting the closing force 20
20. Additional settings 21
20.1. (My) favourite position 21
20.2. Adding/Deleting RTS control points 21
20.3. Adding/Deleting RTS solar sensors 21
20.4. Signalling movement 21
21. Use 21
21.1. (My) favourite position 21
21.2. Opening and Closing 21
21.3. STOP function 21
21.4. Obstacle detection 22
21.5. Frost protection 22
22. Tips and recommendations 22
22.1. Do you have a question about
Yslo Flex RTS 2P? 22
22.2. Maintenance operation requiring the housing
to be unclipped 23
23. Technical data 23
Copyright © 2013 - 2014 Somfy SAS. All rights reserved.
Yslo Flex RTS 2P
5
Contents
GENERAL INFORMATION
I. Introduction
This guide describes how to install, commission and set up this product.
Yslo Flex RTS 2P motor is designed to motorise all types of swing shutters.
Yslo Flex RTS 2P is equipped with a battery that allows it to function autonomously in the event
of a power outage (20 operations or 5 days). In this case, Yslo Flex RTS 2P beeps during the
movements for your information.
Yslo Flex RTS 2P is equipped with Radio Technology Somfy (RTS).
Yslo Flex RTS 2P is used with a RTS control point.
Yslo Flex RTS 2P is equipped with:
- obstacle protection.
- frost protection.
Copyright © 2013 - 2014 Somfy SAS. All rights reserved.
Yslo Flex RTS 2P
6
II. Contents
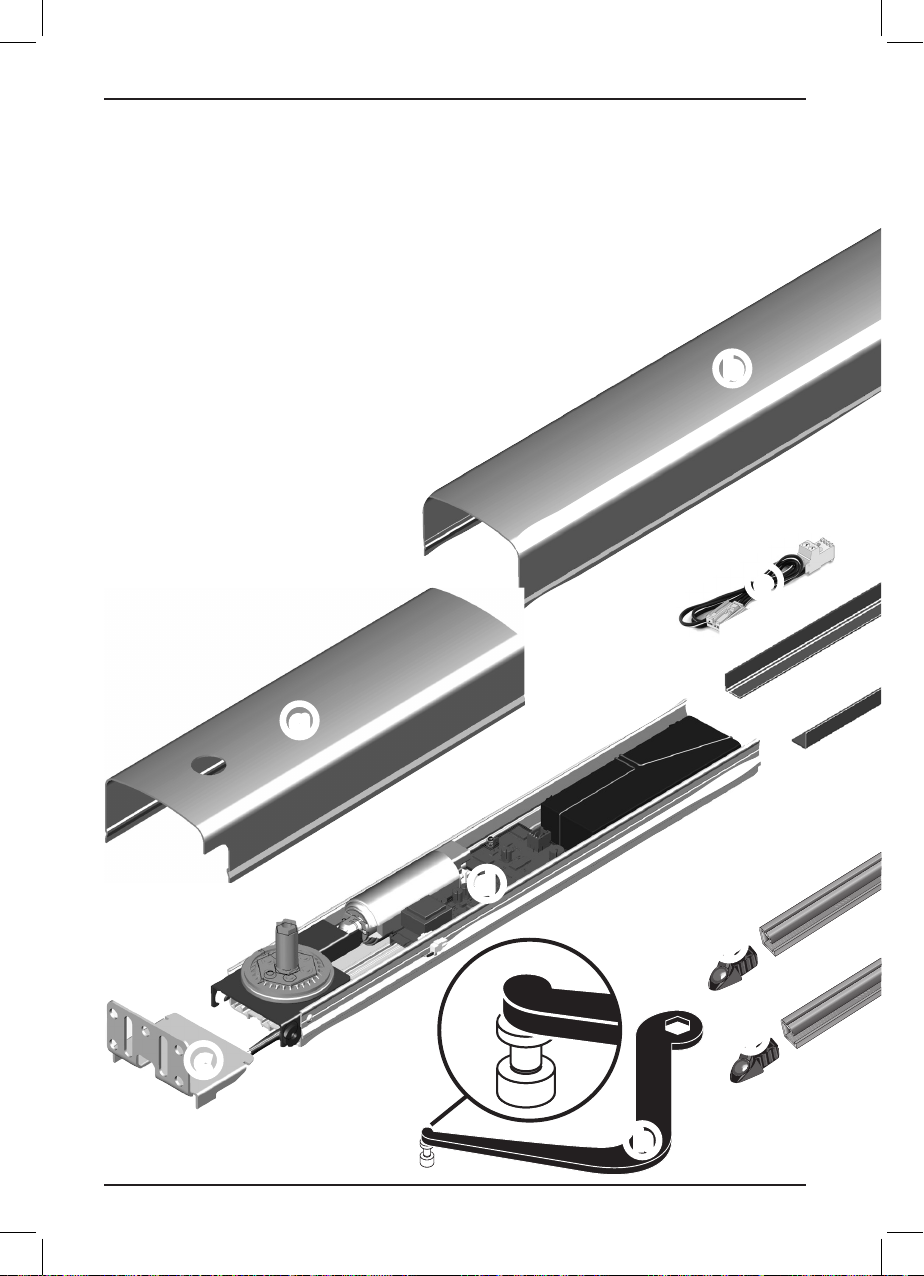
a Left housing x 1 and Right housing x 1
b Trim housing x 1
c Brackets x 2
d Electromechanical module x 1
e Motor cable x 1
f Alignment rails x 2
g Mechanical module x 1
h Left arm x 1
i Right arm x 1
j End pieces x 4
k Sliders x 2
l Smoove O/C RTS control point x 1 + faceplate x 1
m Pop rivets x 4, for PVC or Aluminium shutters
n Stoppers x 2
o M10 screws x 2 + Screw covers x 2 + Washers x 2
a
b
h
j
j
d
e
c

Copyright © 2013 - 2014 Somfy SAS. All rights reserved.
Yslo Flex RTS 2P
7
a
f
g
c
k
kll
i
j
j
m n o
Copyright © 2013 - 2014 Somfy SAS. All rights reserved.
Yslo Flex RTS 2P
8
III. Safety
III.I. Safety and liability
Please read the installation guide carefully before installing and using the product.
This Somfy product must be installed by a professional motorisation and home automation installer
for whom this guide is intended.
Moreover, the installer must comply with standards and legislation in the country in which the
product is being installed, and inform his customers of the operating and maintenance conditions for
the product.
Any use outside the sphere of application dened by Somfy is prohibited. This will invalidate the
warranty and release Somfy from all liability, as will any failure to comply with the instructions given
herein.
Never begin installing before checking the compatibility of this product with the associated devices
and accessories.
III.II. Specic safety instructions
In addition to the safety instructions given in this guide,
please also comply with the usage rules and instructions
set out in the enclosed document "Safety instructions to be
followed and kept for future reference".
Switch off the mains power supply to the swing shutter
before undertaking any maintenance operation on or near
it.
Motor movement must be carried out only when the
window is closed.
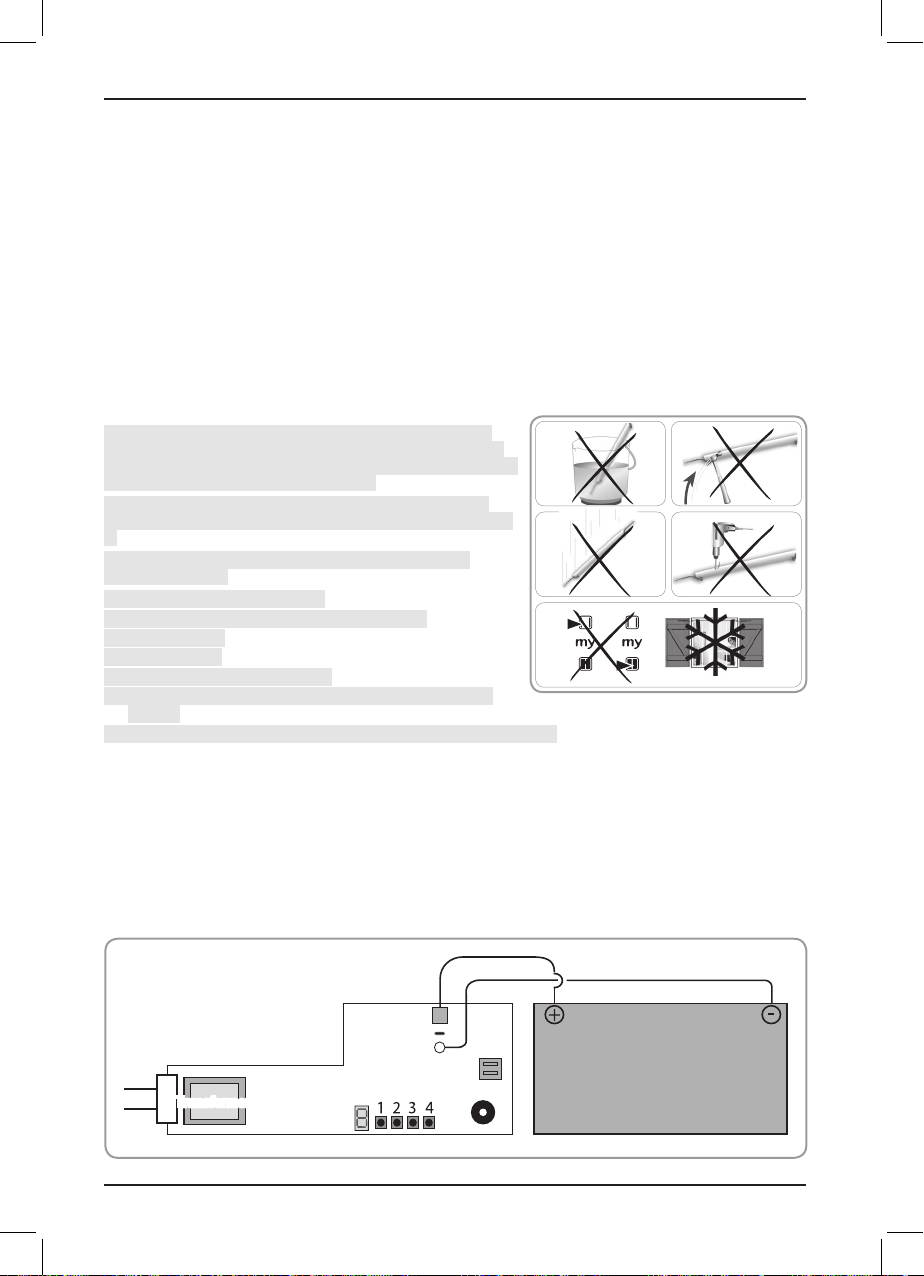
To avoid damaging the product:
1) Do not immerse Yslo Flex RTS 2P in water!
2) Avoid impacts!
3) Do not drop it!
4) Do not drill Yslo Flex RTS 2P!
5) Avoid operating it when ice has formed on the swing
shutter.
6) Do not use abrasive products or solvents to clean the product.
IV. Yslo Flex RTS 2P in detail
Button 1: Open, stop, open, etc.
Button 2: Close, stop, close, etc.
Button 3: Change the rotation direction and Sequential; movement, stop, reverse movement,
stop, etc.
Button 4: PROG
Black
Transformer
BATTERY
1
3
5
2
4

Copyright © 2013 - 2014 Somfy SAS. All rights reserved.
Yslo Flex RTS 2P
9
INSTALLING YSLO FLEX RTS 2P
You can watch the installation video on the website at www.somfypro.fr.
1. Preparing the shutter
Yslo Flex RTS 2P must be installed in a location that is
sheltered from inclement weather.
Yslo Flex RTS 2P is designed only for lintel installation.
1.1. Tools required
• Saw, pencil, screwdriver, ratchet wrench, drill, sprit level, screws, measuring tape.
1.2. Installation position
• Before installing, check whether the measurements are suitable for the following installation positions.
Standard installation position
Installation with battens
Min: 20 mm
Max: 40 mm
Min: 20 mm
Max: 40 mm
Min: 145 mm
Min: 145 mm
Min: 0 mm
Max: 90 mm
Min: 0 mm
Max: 50 mm
Min: 40 mm
Max: 90 mm
Min: 40 mm
Max: 90 mm
Min: 90 mm
Min: 130 mm
1.3. Removing opening and closing systems
• Remove all the systems used for opening and closing the shutter.
90 mm
Copyright © 2013 - 2014 Somfy SAS. All rights reserved.
Yslo Flex RTS 2P
10
Before installing Yslo Flex RTS 2P, the swing shutter must be capable of being opened or
closed without difculty and the lintel must be level in width and depth.
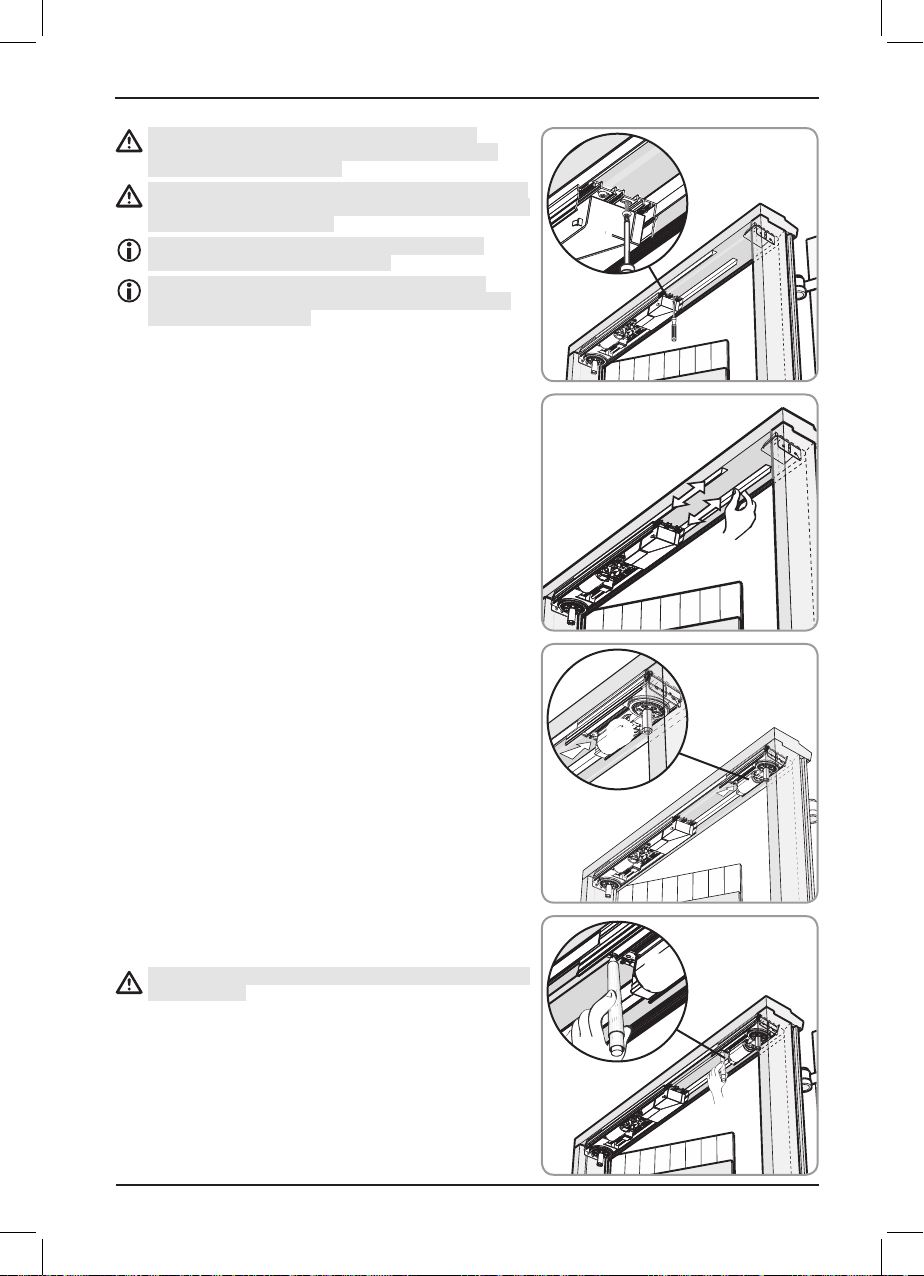
2. Positioning Yslo Flex RTS 2P
1) Close the shutter
2) Draw a pencil line along the lintel following the inside of
the closed shutter
3) Place the rst bracket cagainst the lintel 10 mm away
from the pencil line towards the inside and mark the
holes
4) In the same way, position the second bracket on the
opposite end and mark holes.
3. Drilling the bracket mounting holes
The anchors used must be able to withstand forces of at least 40 kg. The brackets must be
xed in at least two points.
Somfy recommends that you use screws with a diameter of at least six millimetres.
The choice of the xing method depends on the nature of the support, and therefore, it will be
under your sole responsibility.
• Drill the holes and x the rst bracket.
• In the same way, drill the holes and x the second bracket on the opposite end.
c
10 mm
Copyright © 2013 - 2014 Somfy SAS. All rights reserved.
Yslo Flex RTS 2P
11
After opening the kit, separate the housings from the modules.
4. Choosing the cable exit
The electromechanical module dmust be installed on the power inlet side.
The product’s supply cable must exit the product on the window side.
Cable exit
Cable exit
d
d
- Place the cable guide so that the cable can go through the sheet on the desired side.
The cable guide xmust be used to guarantee the electrical safety and integrity of the cable.
The power cable must not be cut between the red label and Yslo Flex RTS 2P.
x

Copyright © 2013 - 2014 Somfy SAS. All rights reserved.
Yslo Flex RTS 2P
12
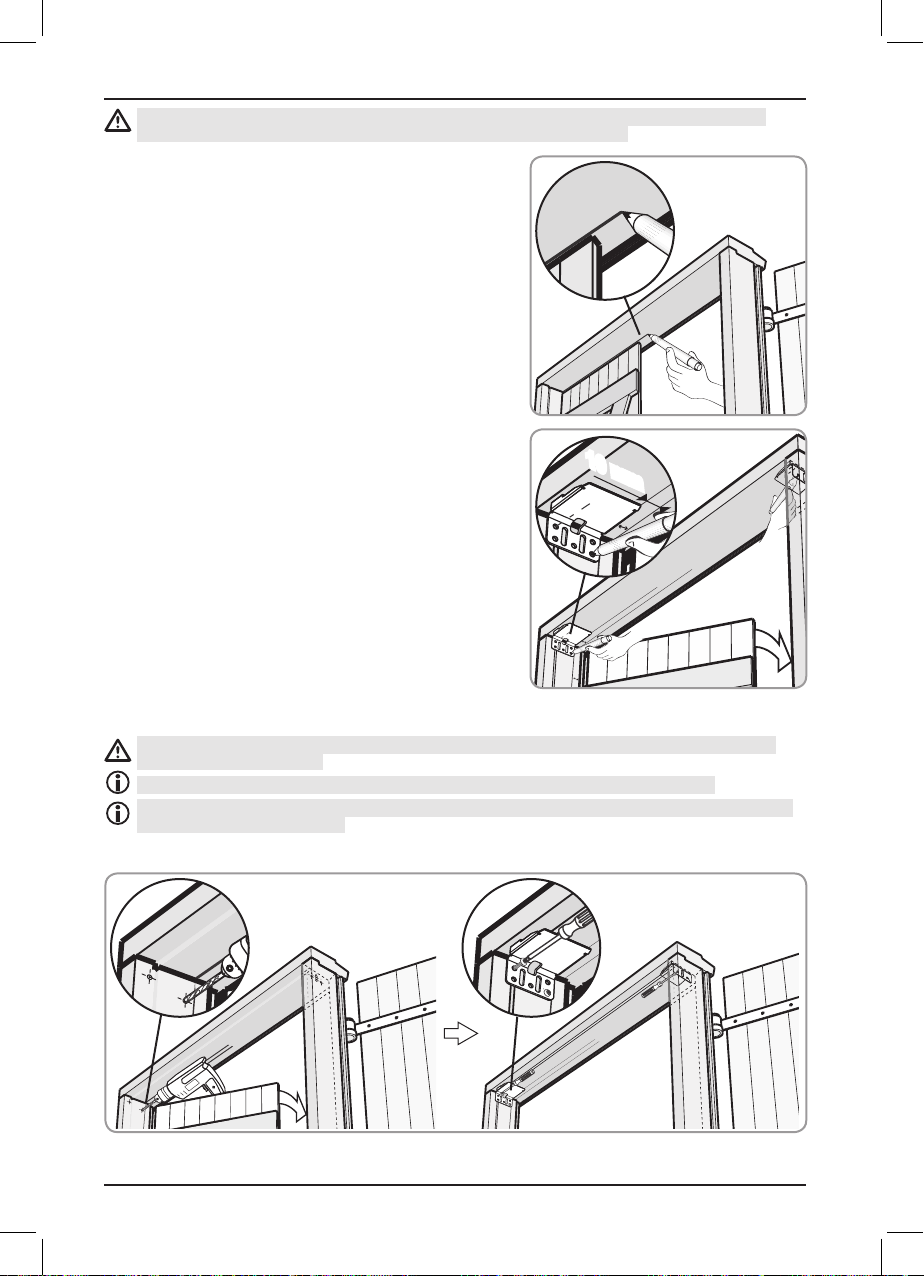
5. Fixing Yslo Flex RTS 2P
Do not pinch the mains wire when xing
Yslo Flex RTS 2P.
1) Fit the electromechanical module d on the rst bracket c
(on the side where the power supply is located).
2) Mark holes on the battery side.
Keep it as parallel as possible to the pencil line before
making holes.
3) Remove the electromechanical module d and drill
the holes.
4) Slide the alignment rails fon the back of the
electromechanical module dwhile engaging them in
the angle brackets of the module.
f
f
d
f
d
c
Copyright © 2013 - 2014 Somfy SAS. All rights reserved.
Yslo Flex RTS 2P
13
5) Position the electromechanical module dagain on the bracket, aligned with the mounting holes.
Pre-x the rails and electromechanical module
assembly. Do not lock the screws so that you can
adjust the rails if necessary.
The anchors used must be able to withstand forces of
at least 40 kg. The electromechanical module must be
xed in at least two points.
Somfy recommends that you use screws with a
diameter of at least six millimetres.
The choice of the xing method depends on the
nature of the support, and therefore, it will be under
your sole responsibility.
6) Pull the rails out as far as possible while keeping at least
50 mm of the rails engaged inside the electromechanical
module.
7) Fit the mechanical module gon the second bracket while
covering the alignment rails.
8) Mark holes for the mechanical module gon the motor
side.
Keep it as parallel as possible to the pencil line before
making holes.
d
g
g
Copyright © 2013 - 2014 Somfy SAS. All rights reserved.
Yslo Flex RTS 2P
14
9) Remove the mechanical module gand drill holes.
10) Position the mechanical module gagain on the bracket,
aligned with the mounting holes. Fix and tighten the two
modules with suitable screws. (make sure they are as
parallel as possible to the pencil line).
The anchors used must be able to withstand forces of
at least 40 kg. The mechanical module must be xed
in at least two points.
Somfy recommends that you use screws with a
diameter of at least six millimetres.
The choice of the xing method depends on the
nature of the support, and therefore, it will be under
your sole responsibility.
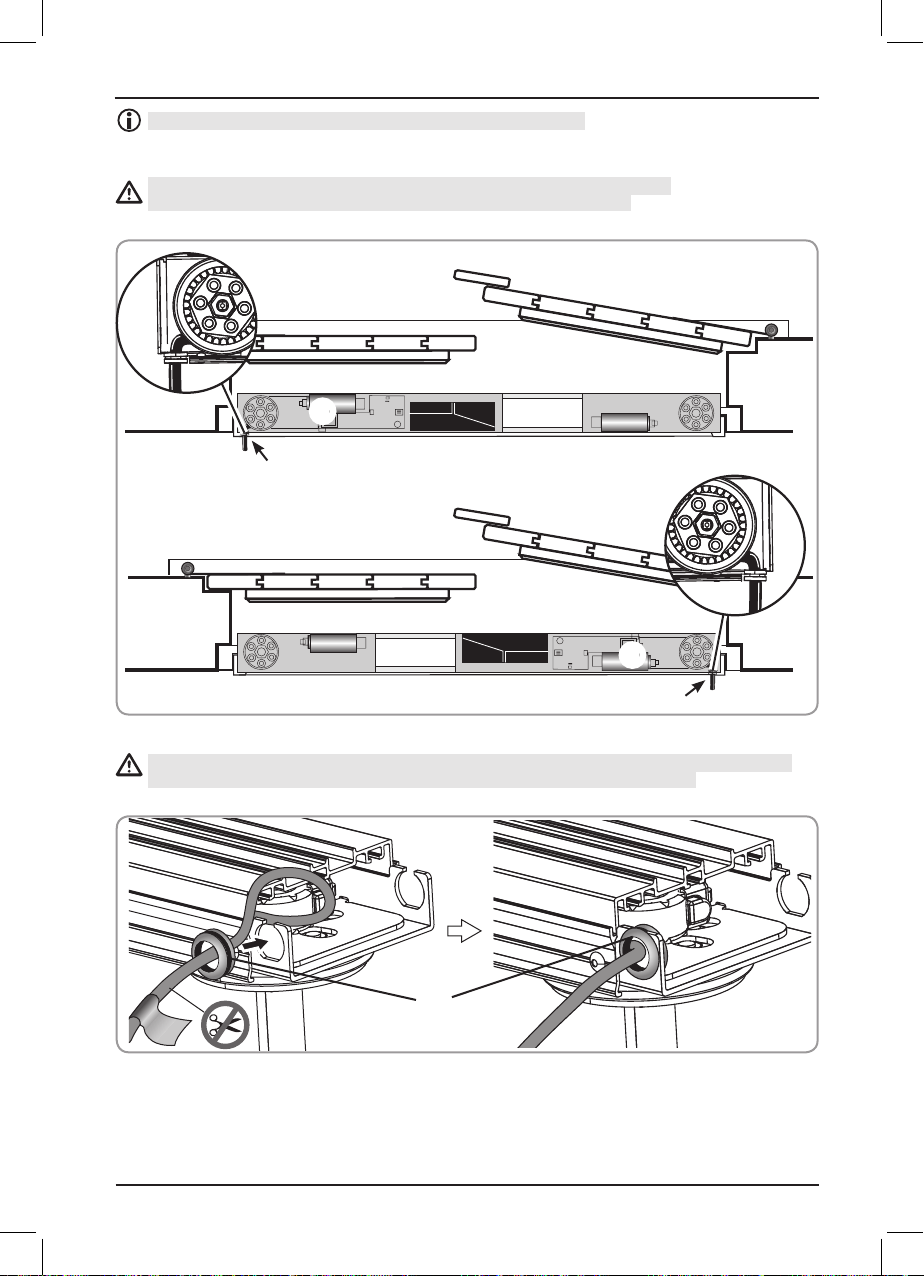
6. Wiring
The power cable must be protected from the movement of the swing shutter.
To avoid damaging the antenna and reducing the radio range:
- Do not modify the cable routing within the product.
- Do not cut the cable inside the product.
1) Switch the power supply off.
2) Connect the red wire of the battery to the (+) terminal of the battery on the control board
3) Connect the black wire of the PCB to the (-) terminal of the battery: Yslo Flex RTS 2P will begin
to beep.
4) Connect the motor cable eto the connector of the electromechanical module d.
5) Connect the motor cable eto the connector of the mechanical module g.
Use ties yto maintain the cables in place.
1OFF 2 3 4 5
Batterie
g
d
e
y
g
Copyright © 2013 - 2014 Somfy SAS. All rights reserved.
Yslo Flex RTS 2P
15
- Connect the motor to 230 V 50 Hz based on the information below:
d g
230 V 50 Hz
Neutral
Blue
Phase
Brown
7. Checking the wiring
Mechanical module connectorBuzzer
Battery (+) terminal
Red
Black
Transformer
BATTERY
230 V power cable with antenna system.
8. Commissioning and saving the RTS control point
Battery operation is not possible for the rst 20 operations.
You must switch on the mains supply before any operation.
Upon power-up, if Yslo Flex RTS beeps, check the battery connection.
ON
1) Press and hold the button no. 4 on the Yslo Flex RTS board
until it beeps.
The shaft of the overlapping panel makes a rotation.
2) Take the RTS control point
3) Briey press the (PROG) button on the RTS control
point:
The shaft of the overlapping panel makes a rotation
and Yslo Flex RTS beeps twice and the control point is
saved in Yslo Flex RTS.
4) Press the ON/OFF button to turn on or turn off the control
point.
Do not press the sensitive side of the control point
against your hand to avoid triggering accidental
orders.
1
BIP
BIP... BIP
3
4
2
2 s
BIP
BIP... BIP
Copyright © 2013 - 2014 Somfy SAS. All rights reserved.
Yslo Flex RTS 2P
16
9. Checking and adjusting the rotation direction
- Press the button on the RTS control point until the two
output shafts rotate:
a)If the output shafts rotate in the opening direction, the
rotation direction is correct. Go to Section "Installing
stoppers".
b)If the output shafts rotate in the closing direction, the
rotation direction is not correct.
1) Press and hold the button no. 3 on the Yslo Flex RTS 2P
board:
- An output shaft moves back and forth with a beep: the
rotation direction has been modied.
2) Press the button on the RTS control point to check the
rotation direction.
10. Installing stoppers
10.1. Details
35 mm
40 mm
23 mm
30 mm
Stop Composite
breakable stop
Buffer
• To avoid damaging the shutters in open position, position stoppers on the same level as the arms of
the motor behind the two shutter panels.
High position
a
b
2
1
OK
≈ 5 s
BIP
BIP... BIP

Copyright © 2013 - 2014 Somfy SAS. All rights reserved.
Yslo Flex RTS 2P
17
Yslo Flex RTS 2P is equipped with obstacle detection and stops against the stoppers.
10.2. Fixing the stoppers on the side
• Fix the breakable stoppers on the wall or on the panel and then insert the buffer.
150 mm
The choice of the xing method depends on the nature of the support, and therefore, it will be
under your sole responsibility.
11. Clipping on the housings
Position the recess of the housing on the power cable side (on window side).
Make sure you do not damage the power cable while clipping.
1) Clip on the left housing a.
2) Clip on the right housing a.
a
d
a
g

Copyright © 2013 - 2014 Somfy SAS. All rights reserved.
Yslo Flex RTS 2P
18
3) Clip on the trim housing bby centring it.
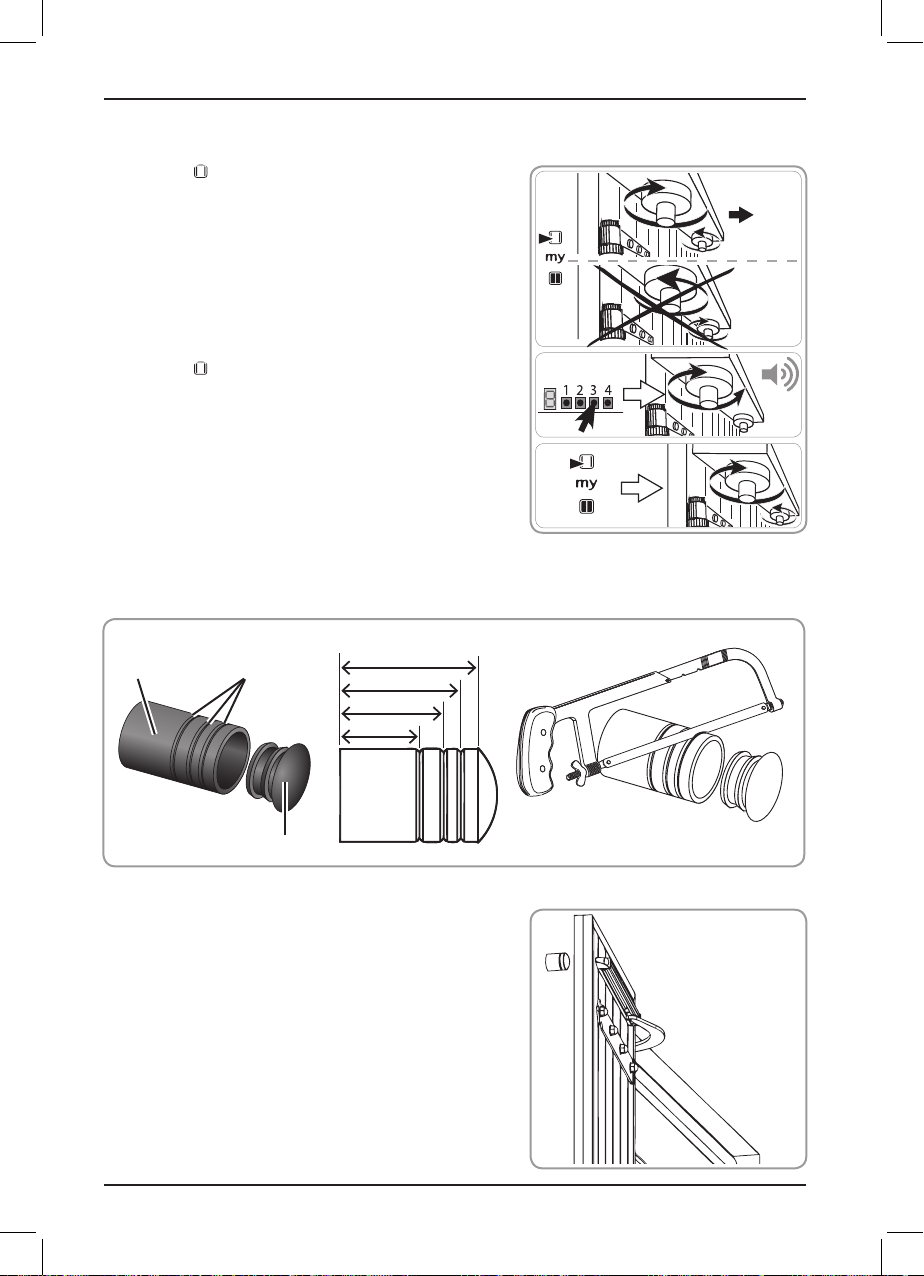
12. Fixing the arms and sliders
12.1. Cutting the sliders.
1) Close the shutters manually
2) Measure the width (l)of the internal panels with shutters
closed
3) Cut the sliders to the width of the panels (l) minus 55 mm.
b
Internal
l
l
- 55 mm

Copyright © 2013 - 2014 Somfy SAS. All rights reserved.
Yslo Flex RTS 2P
19
12.2. Installing the arms
1) Install the rollers at the end of the arms and tighten rollers
slightly with two 8 mm wrenches.
According to the roller’s installation, the arm becomes
the left arm or right arm.
2) Position the hexagonal hole of the arm opposite the
motor output shaft.
To observe the direction of installation of the arm, the
roller must face upwards.
3) Tighten the assembly with the screw and the washer o
to drive in the arm.
It is necessary to use the washer.
4) Place the covers a on the screw heads (supplied).
5) Place the arms in half-open position using the RTS
control point.
12.3. Installing the sliders on the panels
1) Slide the sliders kover the arm rollers.
In order to observe the direction of installation, the
sliders must be positioned with the channel facing
downwards.
2) Push the end pieces jinto the ends of the sliders.
3) Using a spirit level, you must centre the sliders horizontally
on the width of the panels.
Installation with batten: using a spirit level, you must
position the sliders horizontally such that they touches
the outer edge (the one opposite the hinges) of each
panel. The end pieces of the sliders jmust not
protrude beyond the panel.
4) Fix the sliders on the panels through the holes of the end pieces using pop rivets mfor PVC and
Aluminium shutters or using wood screws (not supplied) in other cases.
The pop rivets supplied with the slider end pieces should be used only for PVC or aluminium
swing shutters.
In the case of wooden swing shutters, to avoid the risk of the sliders being pulled out, the choice
of screws is under the sole responsibility of the installer.
o
o
k
j j
m
m

Copyright © 2013 - 2014 Somfy SAS. All rights reserved.
Yslo Flex RTS 2P
20
13. Checking and resetting the panels
• Check that the product is switched on.
• Briey press the button on the RTS control point: the
swing shutter opens until it stops automatically on the
stoppers.
• Allow the swing shutter to open completely.
• Briey press the button on the RTS control point: the
swing shutter closes completely.
The Yslo Flex RTS 2P motor does not require any end
limit setting.
14. Reversing panel priority
This step is necessary if the time delay applies to the
wrong panel.
The priority panel is the overlapping panel or the one
that opens rst.
1) Place the panels in half-open position.
2) Press and hold the and buttons until the priority
panel moves back and forth aupon opening,
Yslo Flex RTS 2P beeps and immediately press and
hold the button until the panel bthat gets priority
moves back and forth and Yslo Flex RTS 2P beeps
twice.
15. Adjusting the closing force
Recommended values depending on usage:
USAGE PVC shutter Aluminium shutter Wooden shutter Resin shutter
Max level 1 2 3 4
Yslo Flex RTS 2P is factory set to level 2. To modify it, follow the steps below:
1) Place the panels in half-open position.
2) Briey press the and buttons on the RTS control
point at the same time and immediately press the
and buttons on the RTS control point simultaneously
until the priority panel moves back and forth.
Yslo Flex RTS 2P beeps: the motor is in programming
mode for 10 seconds.
3) Adjust the closing force using the or buttons.
- To increase the closing force, press the button.
- To decrease the closing force, press the button.
1 x beep
beep Level 1 (min)
BEEP-BEEP [_____] BEEP-BEEP [_____] BEEP-
BEEP [_____] BEEP-BEEP [_____] BEEP-BEEP, etc.
2 x beep
beep Level 2
BEEP-BEEP [] BEEP-BEEP [_____] BEEP-BEEP [] BEEP-
BEEP [_____] BEEP-BEEP [] BEEP-BEEP [___etc.
3 x beep
beep Level 3
BEEP-BEEP [] BEEP-BEEP [] BEEP-BEEP [_____] BEEP-
BEEP [] BEEP-BEEP [] BEEP-BEEP [_____] BEEP etc.
4 x beep
beep Level 4 (max)
BEEP-BEEP [] BEEP-BEEP [] BEEP-BEEP [] BEEP-BEEP
[_____] BEEP-BEEP [] BEEP-BEEP [] BEEP-BEEP [], etc.
4) Press the button until the priority panel moves back and forth: the new closing force is saved and
Yslo Flex RTS 2P beeps twice.
1
2
BIP
BIP... BIP
5 s
2 s
b
a
a
BIP
BIP... BIP
b
0.5 s 2 s
BIP
BIP... BIP
Table of contents
Other SOMFY Door Opening System manuals


Popular Door Opening System manuals by other brands

Real Carriage Door & Sliding Hardware
Real Carriage Door & Sliding Hardware Franklin Autoswing installation manual

Siemens
Siemens SIRIUS 3RV19 6 2 Series operating instructions

Parking Facilities
Parking Facilities PFGOGSM manual

eku
eku COMBINO 60 H Vorfront Mounting instructions

Assa Abloy
Assa Abloy NORTON RIXSON 6200 Series installation instructions

Briton
Briton 121 Installation

Assa Abloy
Assa Abloy DC130 installation instructions

ALL WEATHER
ALL WEATHER 8100 Series installation instructions

GEZE
GEZE Boxer Series installation instructions

Taurean
Taurean B Series installation instructions

Dormakaba
Dormakaba RTS Series installation instructions

Tormax
Tormax 1102 Instructions for use


