SOMFY Oximo WireFree Solar Panel User manual

www.somfy.com
FRDEENITNLES
www.somfy.com
Ref. 5060625A
Oximo WireFree™
Solar Panel

Copyright © 2009 Somfy SAS. All rights reserved.
Par la présente, Somfy déclare que l’appareil est conforme aux exigences essentielles et aux autres dispositions
pertinentes de la directive 1999/5/CE. Une déclaration de conformité est mise à disposition à l’adresse internet
www.somfy.com/ce. Utilisable en UE, CH et NO.
Notice d’installation page 1
FR
Hiermit erklärt Somfy, dass das Gerät alle grundlegenden Bestimmungen und Vorschriften der Richtlinie 1999/5/EG
erfüllt. Die Konformitätserklärung ist unter der Internetadresse www.somfy.com/ce verfügbar. Verwendbar in der EU,
der Schweiz und Norwegen.
Gebrauchsanleitung Seite 7
DE
Por la presente, Somfy declara que el producto cumple con los requisitos básicos y demás disposiciones de la directiva
1999/5/CE. Puede consultar la declaración de conformidad en la siguiente dirección de Internet: www.somfy.com/ce.
Utilizable en UE, CH y NO.
Guía de instalación página 31
ES
Somfy hereby declares that this product conforms to the essential requirements and other relevant provisions of Direc-
tive 1999/5/CE. A Declaration of conformity is available at www.somfy.com/ce. Usable in EU, CH and NO.
Installation guide page 13
EN
Somfy dichiara che il dispositivo è conforme ai requisiti essenziali e alle altre disposizioni pertinenti della direttiva
1999/5/CE. Una dichiarazione di conformità è disponibile all’indirizzo Internet www.somfy.com/ce. Utilizzabile in UE,
CH e NO.
Guida all’installazione pagina 19
IT
Bij deze verklaart Somfy dat het product voldoet aan de essentiële eisen en aan de andere bepalingen van richtlijn
1999/5/CE. Een conformiteitsverklaring staat ter beschikking op de website www.somfy.com/ce.. Te gebruiken in de
Europese Unie, Zwitserland en Noorwegen.
Installatiegids bladzijde 25
NL

Copyright © 2009 Somfy SAS. All rights reserved.
Oximo WireFree™ Solar Panel
1
FR
1. Introduction 1
2. Sécurité 1
2.1 Sécurité et responsabilité 1
2.2 Consignes spécifiques de sécurité 1
3. Installation 1
3.1 Emplacement du (des) panneau(x)
solaire(s) 1
3.2 Fixation du (des) panneau(x) solaire(s) 2
4. Câblage 4
4.1 Cas avec 1 panneau solaire 4
4.2 Cas avec 2 panneaux solaires 4
5. Utilisation et mode de fonctionnement 5
6. Nettoyage 5
7. Astuces et conseils 5
7.1 Un problème avec l’Oximo
WireFree™ Solar Panel ? 5
7.2 Remplacement d’un panneau solaire 5
7.3 Ajout d’un panneau solaire 6
8. Données techniques 6
Sommaire
1. Introduction
L’Oximo WireFree™ Solar Panel est un panneau solaire qui capte le rayonnement du soleil et trans-
forme cette énergie en énergie électrique pour charger la batterie Oximo WireFree™ Battery.
Cette batterie à plage de tension étendue va ainsi alimenter le moteur basse consommation Oximo
40 DC RTS.
Ces 3 éléments composent le kit de motorisation pour volets roulants Oximo 40 WireFree™ RTS.
Certainesinstallations nécessitent deux panneauxsolaires,uncâbleenYOximoWireFree™YCable
permet le câblage des deux panneaux solaires à la batterie.
L’Oximo WireFree™ Solar Panel est aussi appelé «panneau solaire» dans cette notice.
2. Sécurité
2.1 Sécurité et responsabilité
Avant d’installer et d’utiliser le produit, lire attentivement la notice d’installation.
Ce produit Somfy doit être installé par un professionnel de la motorisation et de l’automatisation de
l’habitat auquel cette notice est destinée.
L’installateur doit par ailleurs, se conformer aux normes et à la législation en vigueur dans le pays
d’installation, et informer ses clients des conditions d’utilisation et de maintenance du produit.
Toute utilisation hors du domaine d’application défini par Somfy est non conforme. Elle entraînerait,
comme tout irrespect des instructions figurant dans cette notice, l’exclusion de la responsabilité et
de la garantie Somfy.
Avant toute installation, vérifier la compatibilité de ce produit avec les équipements et accessoires
associés.
2.2 Consignes spécifiques de sécurité
Ne jamais percer le panneau solaire ni son support.1)Ne jamais rien poser sur le panneau solaire (risque de rayure ou de casse), en particulier lors de2)
l’installation.
Ne jamais apposer de produit pouvant filtrer les rayons du soleil (par exemple de la peinture) sur3)
les cellules photovoltaïques du panneau solaire.
3. Installation
3.1 Emplacement du (des) panneau(x) solaire(s)
Le(s)panneau(x)solaire(s) doi(ven)t toujours êtreinstallé(s)àl’extérieur,surlecoffreduvoletroulant,
de manière à recevoir le maximum de lumière naturelle.

Copyright © 2009 Somfy SAS. All rights reserved.
Oximo WireFree™ Solar Panel
2
FR
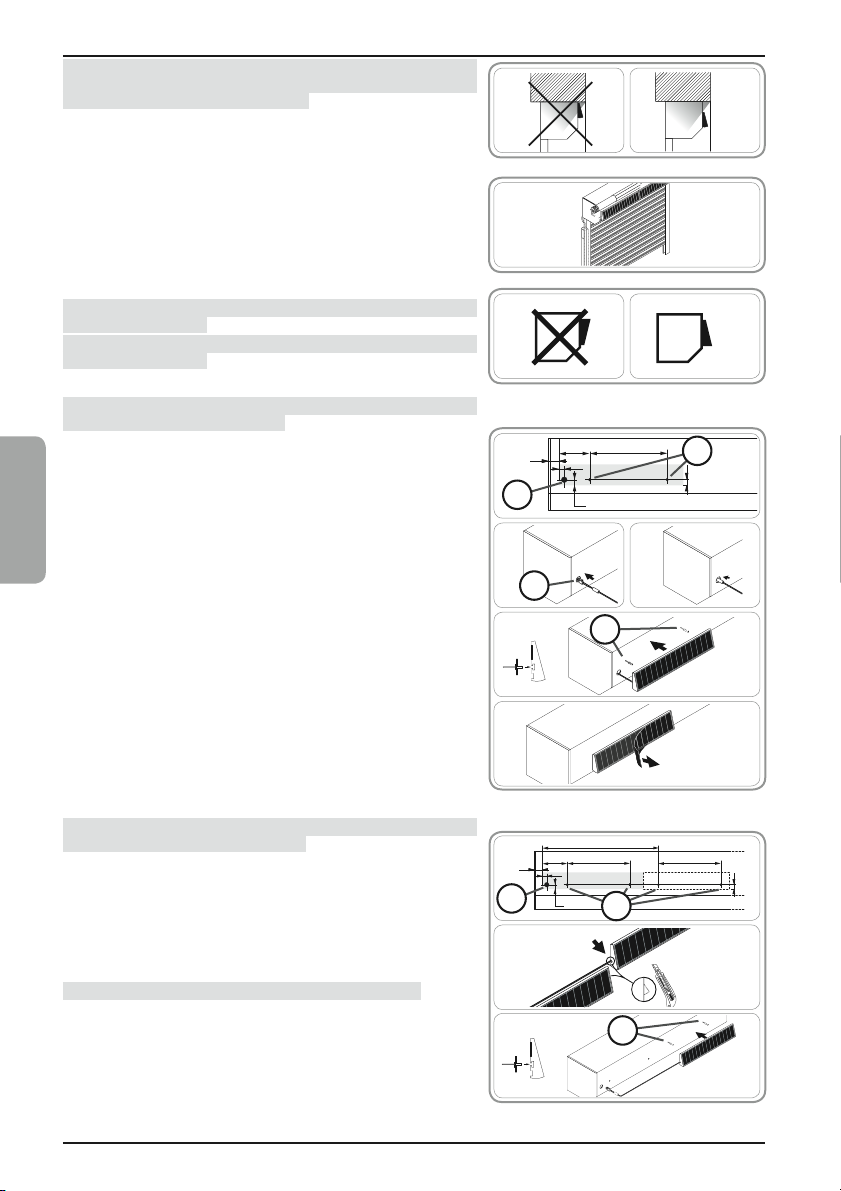
Attention ! Ne jamais installer le(s) panneau(x) solaire(s)
derrière une vitre, ni à l’ombre. Toujours laisser les cellules
photovoltaïques dégagées, ne jamais rien placer devant.
Les trois éléments qui composent le kit Oximo 40
WireFree™ RTS doivent être installés du même côté du
volant roulant.
Somfy recommande d’installer systématiquement les
éléments à gauche du volet roulant, même pour un
montage avec un panneau solaire. En effet, si l’ajout d’un
second panneau solaire s’avère nécessaire, cela ne sera
plus possible si les éléments sont installés à droite du volet
roulant.
3.2 Fixation du (des) panneau(x) solaire(s)
Attention ! Ne pas abîmer les câbles lors de l’installation.
Ébavurer tous les perçages.
Attention ! Respecter le sens de pose du panneau solaire
qui doit être incliné vers le haut.
3.2.1 Fixation par rivetage
Somfy recommande la fixation du (des) panneau(x)
solaire(s) par rivetage pour garantir une bonne tenue dans
le temps.
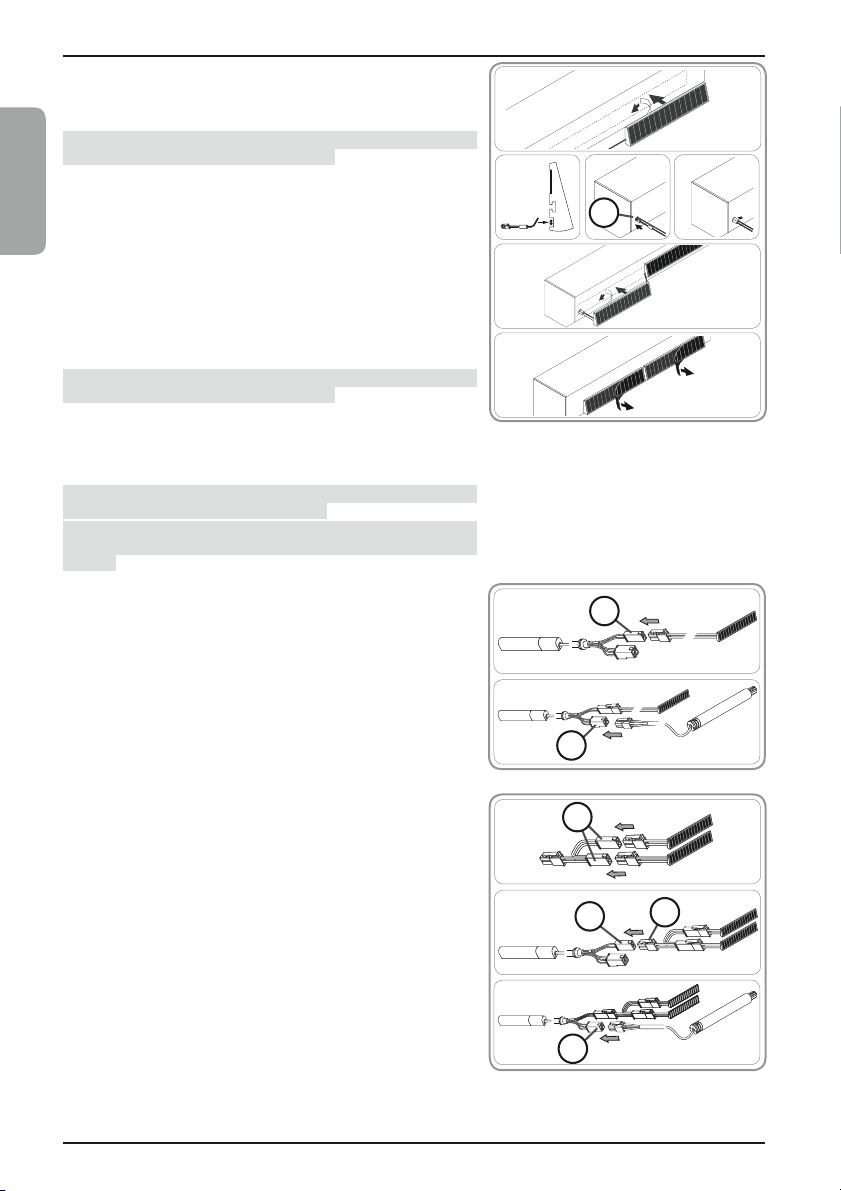
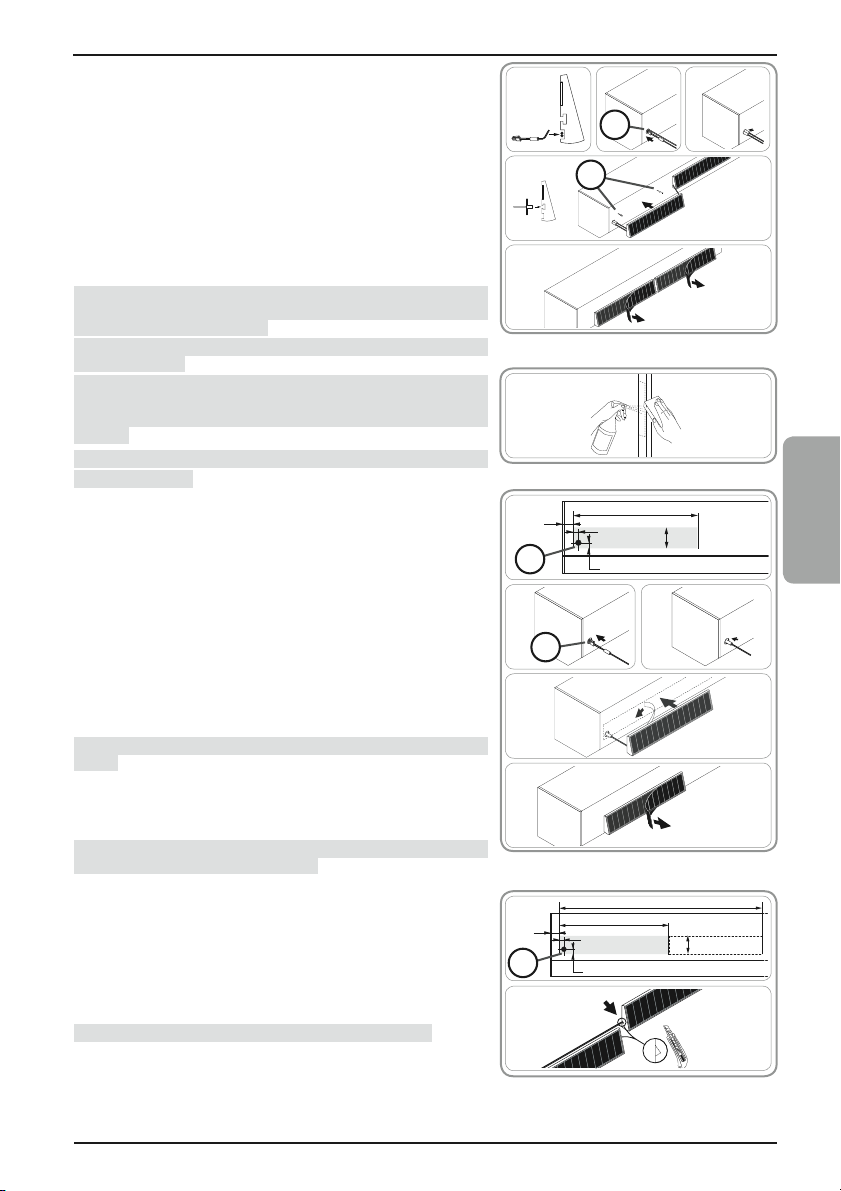
3.2.1.1 Cas avec 1 panneau solaire
Percer 1 trou de diamètre 15 mm (A) et 2 trous de diamè-1)tre 4,2 mm (B) sur l’avant du coffre selon le schéma
ci-joint.
Passer le fil du panneau solaire à l’intérieur du coffre2)grâce au trou percé (A).
Protégerlefildesbordsdutrouenpositionnantlamousse3)de protection à cet endroit-là.
Fixer le panneau solaire à l’aide de rivets POP aluminium4)de diamètre 4 mm et de longueur 6 mm maxi, dans les
deux trous percés (B).
Enlever le film de protection des cellules5)photovoltaïques.
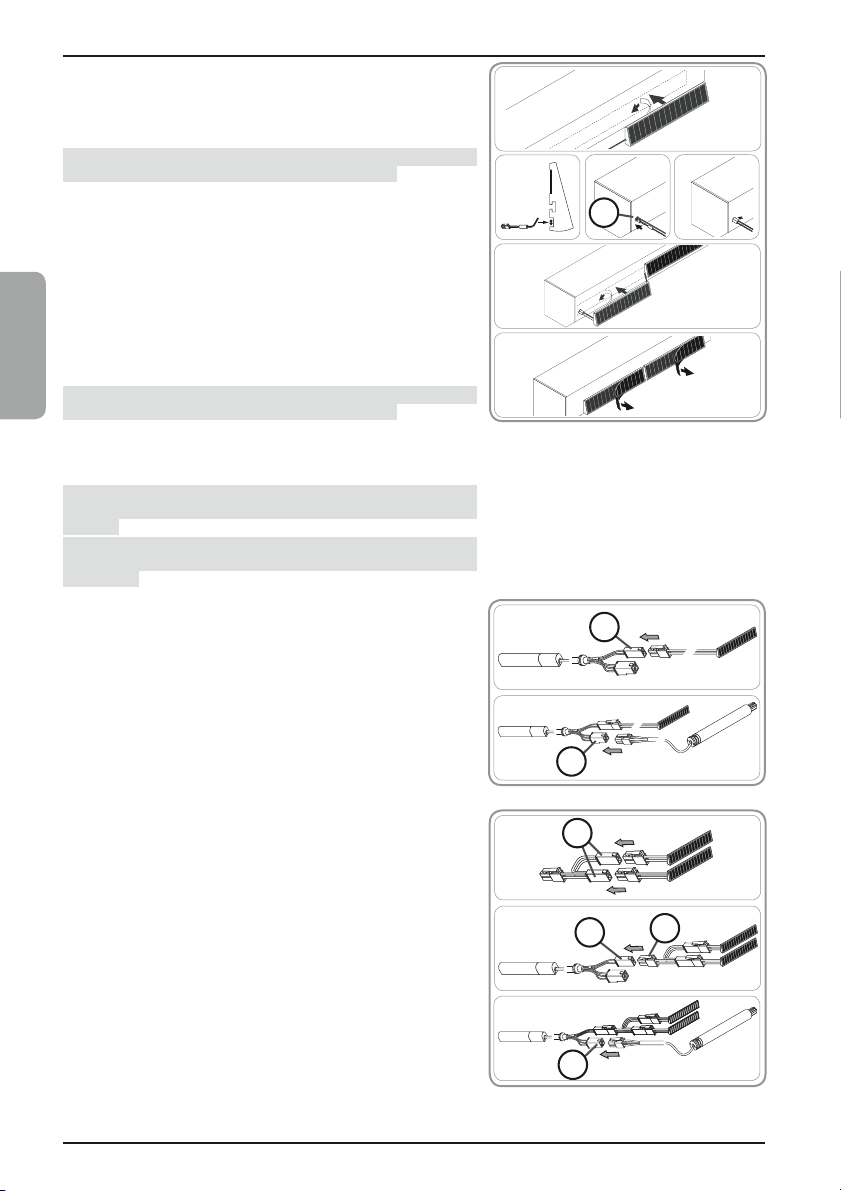
3.2.1.2 Cas avec 2 panneaux solaires
Toujours placer les deux panneaux solaires l’un à côté de
l’autre et non pas l’un au-dessus de l’autre.
Percer 1 trou de diamètre 15 mm (C) et 4 trous de diamè-1)tre 4,2 mm (D) sur l’avant du coffre selon le schéma
ci-joint.
Découper l’encoche située à côté de la sortie de câble2)sur le panneau solaire de droite.
Découper l’encoche située du côté opposé à la sortie de3)câble sur le panneau solaire de gauche.
Attention ! Ne pas rayer ni endommager le panneau
solaire.
Passer le fil du panneau solaire de droite dans l’encoche4)réalisée.
Fixer le panneau solaire de droite à l’aide de rivets POP5)aluminium de diamètre 4 mm et de longueur 6 mm maxi,
dans les 2 trous (D) percés à droite.
OK
OK
23
5
4
1
15 mm 20 mm
15 mm
70 mm 360 mm
14 mm
A
B
A
B
2-3-4
5
1
15 mm 20 mm
15 mm
70 mm 360 mm 14 mm
C
360 mm
D
570 mm
D

Copyright © 2009 Somfy SAS. All rights reserved.
Oximo WireFree™ Solar Panel
3
FR
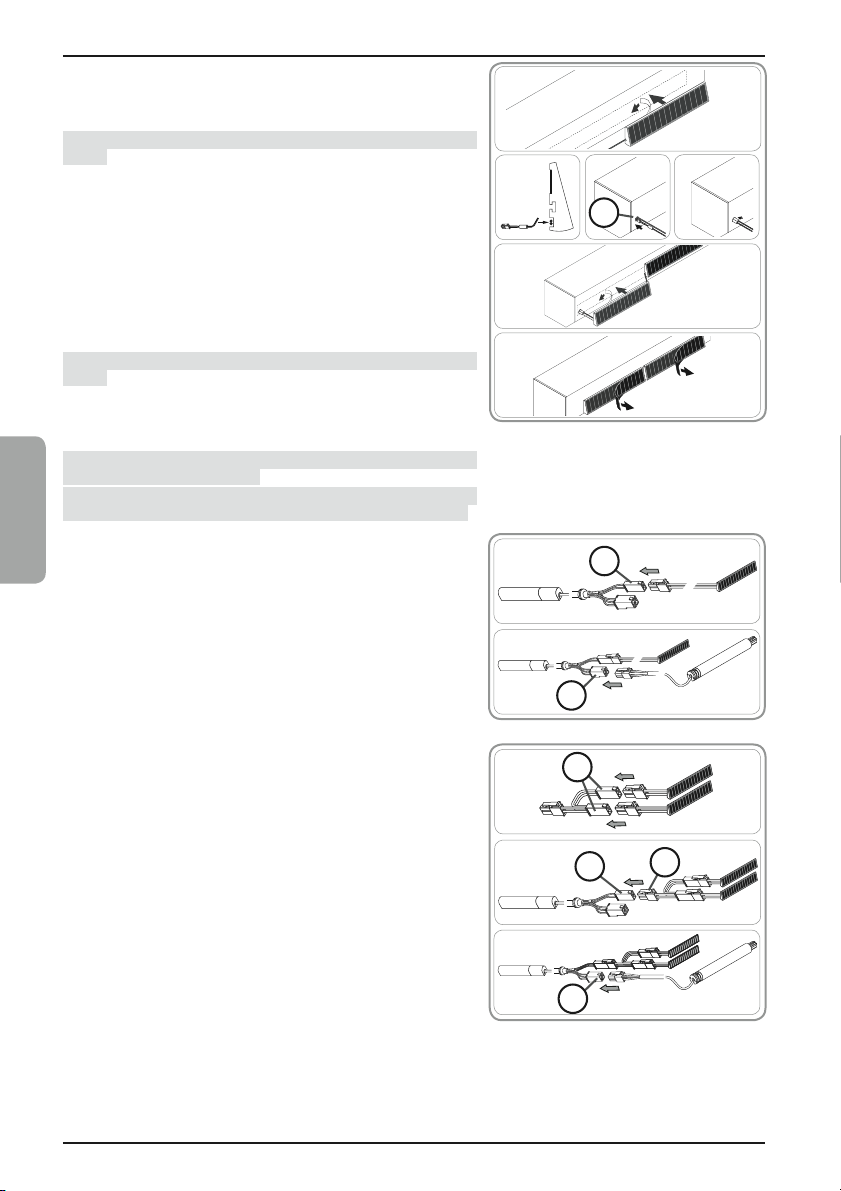
6)Glisser le fil du panneau solaire de droite à l’intérieur de
la rainure située au dos du panneau solaire de gauche.
Passer les fils des panneaux solaires à l’intérieur du7)coffre grâce au trou percé (C).
Protéger les fils des bords du trou en positionnant les8)mousses de protection à cet endroit-là.
Fixer le panneau solaire de gauche à l’aide de rivets POP9)aluminium de diamètre 4 mm et de longueur 6 mm maxi,
dans les 2 autres trous percés (D).
Enlever les films de protection des cellules10)
photovoltaïques.
3.2.2 Fixation par collage
Somfydéconseillela fixationdupanneausolaireparcollage,
en particulier sur des surfaces non lisses et poreuses telles
que crépi, béton, bois..
La température ambiante lors du collage doit être comprise
entre 20°C et 38°C.
Attention ! Bien nettoyer les emplacements de fixation sur le
coffre du volet roulant avec un solvant à base de mélange
d’alcool isopropylique et d’eau (50/50) ou avec un solvant
à base d’heptane.
Respecter les consignes de sécurité relatives à l’utilisation
des solvants lors des phases de nettoyage.
3.2.2.1 Cas avec 1 panneau solaire
Repérer l’emplacement de fixation sur l’avant du coffre1)selon le schéma ci-joint.
Percer 1 trou de diamètre 15 mm (E) sur l’avant du coffre2)selon le schéma ci-joint.
Passer le fil du panneau solaire à l’intérieur du coffre3)grâce au trou percé (E).
Protégerlefildesbordsdutrouenpositionnantlamousse4)de protection à cet endroit-là.
Enlever le papier de protection de l’adhésif situé au dos5)du panneau solaire.
Appliquer le panneau solaire sur le coffre avec une pres-6)sion uniforme sur le cadre du panneau solaire.
Attention ! Ne jamais exercer de pression sur les cellules
photovoltaïques, risque de destruction.
Enlever le film de protection des cellules7)photovoltaïques.
3.2.2.2 Cas avec 2 panneaux solaires
Toujours placer les deux panneaux solaires l’un à côté de
l’autre et non pas l’un au-dessus de l’autre.
Repérer les deux emplacements de fixation sur l’avant du1)coffre selon le schéma ci-joint.
Percer 1 trou de diamètre 15 mm (F) sur l’avant du coffre2)selon le schéma ci-joint.
Découper l’encoche située à côté de la sortie de câble3)sur le panneau solaire de droite.
Découper l’encoche située du côté opposé à la sortie de4)câble sur le panneau solaire de gauche.
Attention ! Ne pas rayer ni endommager le panneau
solaire.
Passer le fil du panneau solaire de droite dans l’encoche5)réalisée.
10
9
687
C
D
34
7
5-6
1-2
20 mm
15 mm
E
E
15 mm 500 mm
55 mm
1-2
20 mm
15 mm
F
15 mm
1000 mm
55 mm
500 mm
3-4-5
Copyright © 2009 Somfy SAS. All rights reserved.
Oximo WireFree™ Solar Panel
4
FR
6)Enlever le papier de protection de l’adhésif situé au dos
du panneau solaire de droite.
Appliquer le panneau solaire de droite sur le coffre avec7)une pression uniforme sur le cadre du panneau solaire.
Attention ! Ne jamais exercer de pression sur les cellules
photovoltaïques, risque de destruction.
Glisser le fil du panneau solaire de droite à l’intérieur de8)la rainure située au dos du panneau solaire de gauche.
Passer les fils des panneaux solaires à l’intérieur du9)coffre grâce au trou percé (F).
Protéger les fils des bords du trou en positionnant les10)
mousses de protection à cet endroit-là.
Enlever le papier de protection de l’adhésif situé au dos11)
du panneau solaire de gauche.
Appliquer le panneau solaire de gauche sur le coffre12)
avec une pression uniforme sur le cadre du panneau
solaire.
Attention ! Ne jamais exercer de pression sur les cellules
photovoltaïques, risque de destruction.
Enlever les films de protection des cellules13)
photovoltaïques.
4. Câblage
Attention ! Les câbles et les connecteurs doivent être proté-
gés de l’enroulement du volet roulant.
Somfy recommande de placer les connecteurs derrière la
joue et de fixer les câbles à l’intérieur du coffre du volet
roulant.
4.1 Cas avec 1 panneau solaire
Câbler le connecteur 2 broches du panneau solaire à1)celui de la batterie (G).
Câbler le connecteur 4 broches du moteur Oximo 402)DC RTS à celui de la batterie (H).
Voir notice Oximo 40 WireFree™ RTS.
4.2 Cas avec 2 panneaux solaires
Câbler chaque panneau solaire à un connecteur (I) du1)câble en Y (Oximo Wirefree™ Y Cable, non fourni).
Câbler le connecteur 2 broches du câble en Y (J) à celui2)de la batterie (G).
Câbler le connecteur 4 broches du moteur Oximo 403)DC RTS à celui de la batterie (H).
Voir notice Oximo 40 WireFree™ RTS.
6-7
13
11-12
8109
F
H
G
1
2
1
2
H
3
J
G
I

Copyright © 2009 Somfy SAS. All rights reserved.
Oximo WireFree™ Solar Panel
5
FR
7.2 Remplacement d’un panneau solaire
Le remplacement d’un panneau solaire, par un modèle iden-
tique uniquement, doit être effectué par un professionnel.
Ne jamais jeter le panneau solaire avec les ordures
ménagères. Veiller à déposer le panneau solaire
dans un point de collecte ou dans un centre agréé
afin de garantir son recyclage.
Désactiver le moteur à l’aide du bouton PROG de la batte-- rie, voir notice Oximo Wirefree™ Battery.
Déconnecter le panneau solaire de la batterie.- Retirer le câble du coffre du volet roulant.- Si le panneau solaire est riveté sur le support :- Démonter les rivets par l’intérieur du coffre du voleta)roulant.
Retirer le panneau solaire.b)
Si le panneau solaire est collé sur le support :- Glisser une lame fine entre le cadre du panneau solairea)et le coffre du volet roulant pour détacher le panneau
solaire au niveau de l’adhésif.
Décoller le panneau solaire en tirant sur son cadre.b)Enlever les résidus d’adhésif du support.c)
Pour mettre en place le nouveau panneau solaire, repren-- dre l’installation complète à partir du chapitre 3.
7. Astuces et conseils
7.1 Un problème avec l’Oximo WireFree™ Solar Panel ?
Problèmes Causes possibles Solutions
Le volet roulant ne fonctionne pas.
Le câblage est incorrect. Contrôler le câblage et le modifier si
besoin.
Un des composants (moteur, batterie,
point de commande, ...) ne fonctionne
pas. Voir les notices correspondantes.
La batterie est rechargée plusieurs
fois dans l’année à l’aide du char-
geur de batterie externe.
Un panneau solaire ne suffit pas pour
charger la batterie. Vérifier le nombre de panneau solaire
nécessaire selon la configuration, et
ajouter un panneau solaire si besoin.
Le ou les panneau(x) solaire(s) est
(sont) défectueux ou endommagé(s). Remplacer le ou les panneau(x)
solaire(s).
La durée de vie de la batterie arrive à
son terme. Remplacer la batterie, voir notice
Oximo WireFree™ Battery.
5. Utilisation et mode de fonctionnement
Après l’installation et la mise en service du kit Oximo 40
Wirefree™ RTS, la batterie se charge en énergie électrique
grâce au(x) panneau(x) solaire(s) :
L’énergie électrique transmise par le(s) panneau(x)- solaire(s) est stockée par la batterie pour alimenter le
moteur Oximo 40 DC RTS.
6. Nettoyage
Veiller à ne jamais laisser s’accumuler de la neige sur le
panneau solaire et s’assurer que ses cellules photovoltaï-
ques ne sont pas cachées par de la neige, des feuilles, etc.
Maintenir les cellules photovoltaïques propres en les
nettoyant à l’eau claire, à l’aide d’un chiffon doux afin de ne
pas les rayer.

Copyright © 2009 Somfy SAS. All rights reserved.
Oximo WireFree™ Solar Panel
6
FR
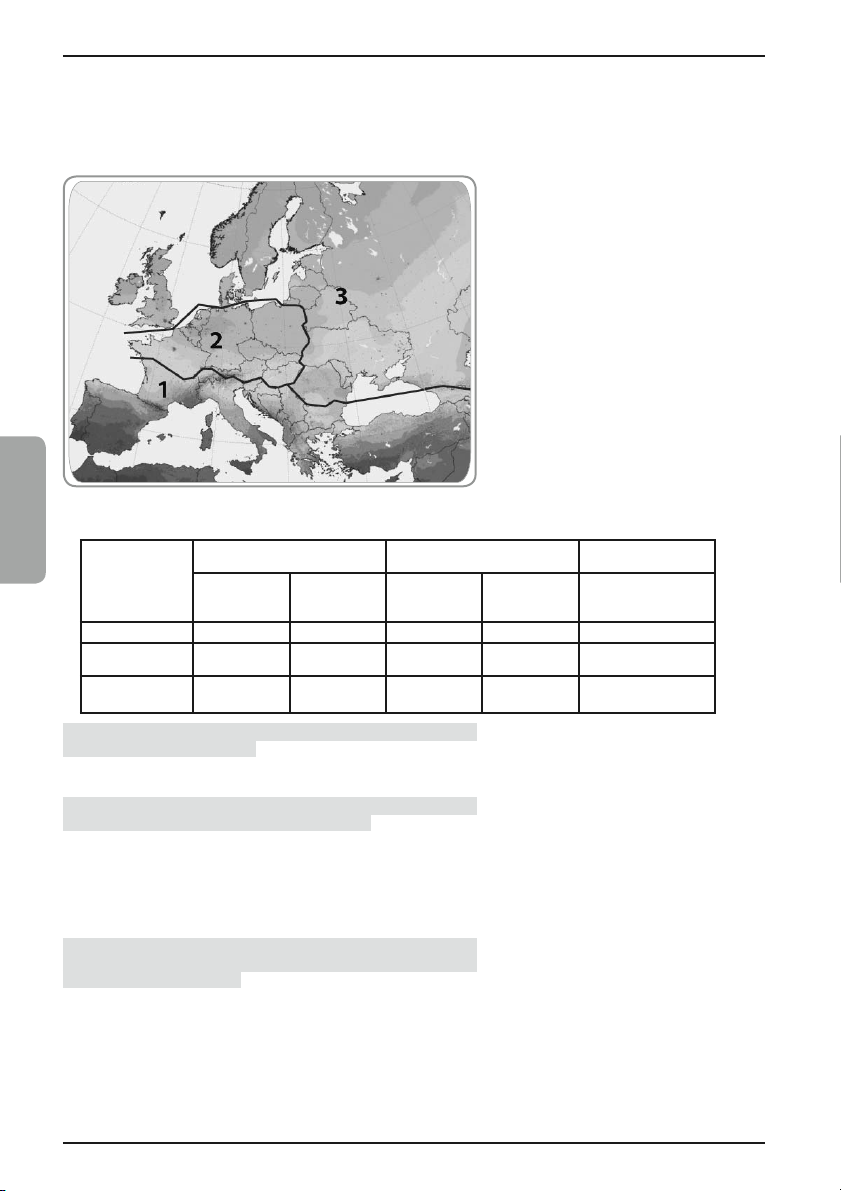
7.3 Ajout d’un panneau solaire
7.3.1 Estimation du nombre de panneaux solaires
Pour estimer le nombre de panneaux solaires nécessaires à
un fonctionnement optimal du kit Oximo 40 Wirefree™ RTS :
Situer la zone de l’installation sur la carte :-
Analyser l’orientation du volet roulant.- Vérifier dans le tableau le nombre de panneaux solaires- indiqué :
Couple du
moteur
Zone 1 Zone 2 Zone 3
Orientation
Est/Sud/Ouest Orientation
Nord Orientation
Est/Sud/Ouest Orientation
Nord Orientation Est/Sud/
Ouest/Nord
3 Nm 1 1 1 1 Non recommandée
6Nm1212Non recommandée
10 Nm 1 2 2 Non
recommandée Non recommandée
Conseil : Si le panneau solaire ne reçoit pas un ensoleille-
ment direct, utiliser 2 panneaux solaires.
7.3.2 Ajout d’un panneau solaire
Attention ! Un panneau solaire maximum peut être ajouté
au kit de motorisation pour volets roulants Oximo 40
WireFree™ RTS.
Désactiver le moteur à l’aide du bouton PROG de la batte-- rie, voir notice Oximo Wirefree™ Battery.
Déconnecter le premier panneau solaire de la batterie.- Pour mettre en place le nouveau panneau solaire, repren-- dre l’installation décrite pour 2 panneaux solaires, à partir
du chapitre 3.2.1 ou 3.2.2.
Remarque : Pour passer le fil du second panneau solaire à
l’intérieur du coffre du volet roulant, percer un nouveau trou
de diamètre 15 mm à l’avant du coffre.
8. Données techniques
Alimentation :Cellules solaires
Indice de protection : IPX4
(dont cellules photovoltaïques : IP67).

Copyright © 2009 Somfy SAS. All rights reserved.
Oximo WireFree™ Solar Panel
7
DE
1. Einleitung 7
2. Sicherheitshinweise 7
2.1 Sicherheit und Gewährleistung 7
2.2 Spezifische Sicherheitshinweise 7
3. Montage 7
3.1 Anordnung des/der Solarpanele 7
3.2 Befestigung des/der Solarpanele 8
4. Verkabelung 10
4.1 Situation mit 1 Solarpanel 10
4.2 Situation mit 2 Solarpanelen 10
5. Bedienung und Betriebsarten 11
6. Reinigung 11
7. Tipps und Hinweise 11
7.1 Ein Problem mit dem Oximo
WireFree™ Solar Panel? 11
7.2 Austausch eines Solarpanels 11
7.3 Hinzufügen eines Solarpanels 12
8. Technische Daten 12
Inhalt
1. Einleitung
Das Oximo WireFree™ Solar Panel ist ein Solarpanel, das die Sonnenstrahlung einfängt, diese in
elektrische Energie umwandelt und damit die Oximo WireFree™ Battery lädt.
Diese Batterie mit erweitertem Spannungsbereich versorgt dann den stromsparendenAntrieb Oximo
40 DC RTS mit Strom.
Diese 3 Komponente bilden das Antriebskit für Rollläden Oximo 40 WireFree™ RTS.
Wenn in bestimmten Situationen zwei Solarpanele benötigt werden, können diese mit dem Y-Kabel
Oximo WireFree™ Y Cable an der Batterie angeschlossen werden.
Das Oximo WireFree™ Solar Panel wird in dieser Anleitung auch verkürzt als „Solarpanel“ bezeichnet.
2. Sicherheitshinweise
2.1 Sicherheit und Gewährleistung
Lesen Sie bitte vor der Installation und Verwendung dieses Produktes diese Gebrauchsanleitung sorgfältig durch.
Dieses Somfy-Produkt muss von einer fachlich qualifizierten Person installiert werden, für die diese
Anleitung bestimmt ist.
Die fachlich qualifizierte Person muss außerdem alle im Installationsland geltenden Normen und Gesetze
befolgen, und ihre Kunden über die Bedienungs- und Wartungsbedingungen des Produkts informieren.
Jede Verwendung, die nicht dem von Somfy bestimmten Anwendungsbereich entspricht, gilt als nicht
bestimmungsgemäß. Im Falle einer nicht bestimmungsgemäßen Verwendung, wie auch bei Nicht-
Befolgung der Hinweise in dieser Anleitung, entfällt die Haftung und Gewährleistungspflicht von Somfy.
Vor der Montage muss die Kompatibilität dieses Produkts mit den dazugehörigen Ausrüstungs- und
Zubehörteilen geprüft werden.
2.2 Spezifische Sicherheitshinweise
Das panel und seine Halterung dürfen keinesfalls durchbohrt werden.1)Auf dem Solarpanel nie etwas ablegen (Gefahr des Verkratzens oder Bruchs), insbesondere bei2)
der Installation.
Nie Stoffe auf die Photovoltaikzellen der Solarpanele bringen, die die Sonnenstrahlung filtern3)
können (z.B. Farbe).
3. Montage
3.1 Anordnung des/der Solarpanele
Das/die Solarpanele müssen außen, am Rollladenkasten, montiert werden, um möglichst viel
direktes Sonnenlicht zu empfangen.

Copyright © 2009 Somfy SAS. All rights reserved.
Oximo WireFree™ Solar Panel
8
DE
Achtung! Solarpanele nie hinter Glas oder im Schatten
montieren.DiePhotovoltaikzellenimmerschattenfreihalten,
nichts davor stellen oder anbringen.
Die 3 Elemente des Kits Oximo 40 WireFree™ RTS müssen
auf derselben Seite des Rollladens montiert werden.
Somfy empfiehlt, die Elemente grundsätzlich auf der
linken Seite des Rollladenkastens zu montieren, auch bei
Montage mit nur einem Solarpanel. Sollte zu einem späte-
ren Zeitpunkt ein zweites Solarpanel montiert werden, ist
dies nicht möglich, wenn die Elemente auf der rechten Seite
des Rollladens montiert sind.
3.2 Befestigung des/der Solarpanele
Achtung! Die Kabel bei der Installation nicht beschädigen.
Alle Bohrungen entgraten.
Achtung!Die Montagerichtung des Solarpanels beachten,
es muss nach oben geneigt sein.
3.2.1 Geschraubte Befestigung
Somfy empfiehlt, das/die Solarpanele für dauerhaften Halt
mit Schrauben zu befestigen.
3.2.1.1 Situation mit 1 Solarpanel
Bohren Sie entsprechend dem beiliegenden Schema1)auf der Vorderseite des Kastens ein Loch mit 15 mm
Durchmesser (A) und 2 Löcher mit 4,2 mm Durchmesser
(B).
Führen Sie das Kabel des Solarpanels durch das Loch2)(A) in den Kasten ein.
Schützen Sie das Kabel im Bereich des Lochs mit3)Schaumstoff vor Beschädigungen.
BefestigenSiedasSolarpanelmitAluminium-Blindnieten,4)Durchmesser 4 mm, Länge 6 mm, in den beiden Löchern
(B).
Entfernen Sie die Schutzfolie von den5)Photovoltaikzellen.
3.2.1.2 Situation mit 2 Solarpanelen
Die beiden Solarpanele immer nebeneinander, nie
übereinander anordnen.
BohrenSieentsprechenddembeiliegendenSchemaaufder1) Vorderseite des Kastens ein Loch mit 15 mm Durchmesser
(C) und 4 Löcher mit 4,2 mm Durchmesser (D).
Stellen Sie am rechten Solarpanel auf der Seite des2)Kabelausgangs einen Kabelauslass her.
Stellen Sie am linken Solarpanel auf der dem3)Kabelausgang gegenüberliegenden Seite einen
Kabeleinlass her.
Achtung! Das Solarpanel nicht verkratzen oder
beschädigen.
Führen Sie das Kabel des rechten Solarpanels durch den4)Kabelauslass.
Befestigen Sie das rechte Solarpanel mit Aluminium-5)Blindnieten, Durchmesser 4 mm, Länge 6 mm, in den
beiden rechten Löchern (D).
OK
OK
23
5
4
1
15 mm 20 mm
15 mm
70 mm 360 mm
14 mm
A
B
A
B
2-3-4
5
1
15 mm 20 mm
15 mm
70 mm 360 mm 14 mm
C
360 mm
D
570 mm
D

Copyright © 2009 Somfy SAS. All rights reserved.
Oximo WireFree™ Solar Panel
9
DE
6)Schieben Sie das Kabel des rechten Panels durch den
Kabeleinlass auf der Rückseite des linken Solarpanels.
Führen Sie die Kabel der Solarpanele durch das Loch (C)7)in den Kasten ein.
Schützen Sie die Kabel im Bereich des Lochs mit8)Schaumstoff vor Beschädigungen.
Befestigen Sie das linke Solarpanel mit Aluminium-9)Blindnieten, Durchmesser 4 mm, Länge 6 mm, in den
beiden anderen Löchern (D).
Entfernen Sie die Schutzfolien von den Photovoltaikzellen.10)
3.2.2 Geklebte Befestigung
Somfyrät davon ab,dieSolarpanele durch Kleben zubefes-
tigen, besonders bei Oberflächen wie Putz, Beton, Holz ...,
die nicht rau und porös sind.
Während des Klebens sollte die Temperatur zwischen 20°C
und 38°C liegen.
Achtung! Die Klebeflächen auf dem Rollladenkasten
mit einem Lösungsmittelgemisch aus Isopropylalkohol
und Wasser (50/50) oder mit einem Lösungsmittel auf
Heptanbasis gründlich reinigen.
Bei der Reinigung die Sicherheitshinweise bezüglich der
Verwendung von Lösungsmitteln beachten.
3.2.2.1 Situation mit 1 Solarpanel
Markieren Sie den Befestigungsbereich entsprechend1)dem beigefügten Schema auf dem Kasten.
Bohren Sie entsprechend dem beigefügten Schema2)auf der Vorderseite des Kastens 1 Loch mit 15 mm
Durchmesser (E).
Führen Sie das Kabel des Solarpanels durch das Loch3)(E) in den Kasten ein.
Schützen Sie das Kabel im Bereich des Lochs mit4)Schaumstoff vor Beschädigungen.
Entfernen Sie das Schutzpapier auf der Rückseite des5)Solarpanels.
KlebenSiedasSolarpaneldurchgleichmäßigenDruckauf6)den Rahmen des Solarpanels auf den Rollladenkasten.
Achtung! Unter keinen Umständen Druck auf die
Photovoltaikzellen ausüben, Zerstörungsgefahr.
Entfernen Sie die Schutzfolie von den Photovoltaikzellen.7)
3.2.2.2 Situation mit 2 Solarpanelen
Die beiden Solarpanele immer nebeneinander, nie
übereinander anordnen.
Markieren Sie die Befestigungsbereiche entsprechend1)dem beigefügten Schema auf dem Kasten.
Bohren Sie entsprechend dem beigefügten Schema2)auf der Vorderseite des Kastens 1 Loch mit 15 mm
Durchmesser (F).
Stellen Sie am rechten Solarpanel auf der Seite des3)Kabelausgangs einen Kabelauslass her.
Stellen Sie am linken Solarpanel auf der dem4)Kabelausgang gegenüberliegenden Seite einen
Kabeleinlass her.
Achtung! Das Solarpanel nicht verkratzen oder beschädigen.
Führen Sie das Kabel des rechten Solarpanels durch den5)Kabelauslass.
10
9
687
C
D
34
7
5-6
1-2
20 mm
15 mm
E
E
15 mm 500 mm
55 mm
1-2
20 mm
15 mm
F
15 mm
1000 mm
55 mm
500 mm
3-4-5
Copyright © 2009 Somfy SAS. All rights reserved.
Oximo WireFree™ Solar Panel
10
DE
6)Entfernen Sie das Schutzpapier auf der Rückseite des
rechten Solarpanels.
Kleben Sie das rechte Solarpanel durch gleichmäßi-7)gen Druck auf den Rahmen des Solarpanels auf den
Rollladenkasten.
Achtung! Unter keinen Umständen Druck auf die
Photovoltaikzellen ausüben, Zerstörungsgefahr.
Schieben Sie das Kabel des rechten Panels durch den8)Kabeleinlass auf der Rückseite des linken Solarpanels.
Führen Sie die Kabel der Solarpanele durch das Loch (F)9)in den Kasten ein.
Schützen Sie die Kabel im Bereich des Lochs mit10)
Schaumstoff vor Beschädigungen.
Entfernen Sie das Schutzpapier auf der Rückseite des11)
linken Solarpanels.
Kleben Sie das linke Solarpanel durch gleichmäßi-12)
gen Druck auf den Rahmen des Solarpanels auf den
Rollladenkasten.
Achtung! Unter keinen Umständen Druck auf die
Photovoltaikzellen ausüben, Zerstörungsgefahr.
Entfernen Sie die Schutzfolie von den Photovoltaikzellen.13)
4. Verkabelung
Achtung! Die Kabel und Steckverbinder müssen davor
geschützt werden, vom Rollladen mit aufgewickelt zu
werden.
Somfy empfiehlt, die Steckverbinder hinter die Lagerplatte
zu schieben und die Kabel im inneren des Rollladenkastens
zu fixieren.
4.1 Situation mit 1 Solarpanel
Verbinden Sie den 2-poligen Steckverbinder des1)Solarpanels mit dem der Batterie (G).
Verbinden Sie den 4-poligen Steckverbinder des Oximo2)40 DC RTS-Antriebs mit dem der Batterie (H).
Siehe Anleitung Oximo 40 WireFree™ RTS.
4.2 Situation mit 2 Solarpanelen
Verbinden Sie jedes Solarpaneel mit einem der1)Steckverbinder (I) des Y-Kabels (Oximo Wirefree™ Y
Cable, nicht im Lieferumfang enthalten).
Verbinden Sie den 2-poligen Steckverbinder des2)Y-Kabels (J) mit dem der Batterie (G).
Verbinden Sie den 4-poligen Steckverbinder des Oximo3)40 DC RTS-Antriebs mit dem der Batterie (H).
Siehe Anleitung Oximo 40 WireFree™ RTS.
6-7
13
11-12
8109
F
H
G
1
2
1
2
H
3
J
G
I
Copyright © 2009 Somfy SAS. All rights reserved.
Oximo WireFree™ Solar Panel
11
DE
7.2 Austausch eines Solarpanels
Das Solarpanel muss von einem Fachmann durch ein
identisches Modell ersetzt werden.
Das Solarpanel unter keinen Umständen zum
Hausmüll geben. Entsorgen Sie das Solarpanel über
eine Sammelstelle oder eine entsprechend zugelas-
sene Stelle, damit es ordnungsgemäß recycelt wird.
Deaktivieren Sie den Antrieb mit Hilfe der PROG-- Taste der Batterie, siehe Anleitung Oximo Wirefree™ Battery.
Trennen Sie die Kabelverbindung zwischen Solarpanel und Batterie.-
Ziehen Sie das Kabel aus dem Rollladenkasten.- Wenn das Solarpanel auf den Untergrund genietet ist:- Entfernen Sie die Nieten von der Innenseite desa)Rollladenkastens aus.
Nehmen Sie das Solarpanel ab.b)
Bei Klebebefestigung des Solarpanels:- Fahren Sie mit einer dünnen Klinge zwischen dena)Rahmen des Solarpanels und den Rollladenkasten,
um die Klebeverbindung des Solarpanels zu lösen.
Lösen Sie das Solarpanel ab, indem sie an seinemb)Rahmen ziehen.
Entfernen Sie eventuelle Kleberreste vom Untergrund.c)
Wiederholen Sie zur Montage des neuen Solarpanels alle- in Kapitel 3 beschriebenen Installationsschritte.
7. Tipps und Hinweise
7.1 Ein Problem mit dem Oximo WireFree™ Solar Panel?
Störungen Mögliche Ursachen Lösungen
Der Rollladen funktioniert nicht.
Die Verkabelung ist fehlerhaft. Die Verkabelung überprüfen und ggf.
ändern.
Eine der Komponenten (Antrieb,
Batterie, Funkhandsender, ...)
funktioniert nicht. Siehe die entsprechenden
Anleitungen.
Die Batterie muss im Laufe eines
Jahres mehrere Male mit dem exter-
nen Batterieladegerät nachgeladen
werden.
Ein Solarpanel reicht nicht, um die
Batterie zu laden.
Überprüfen Sie die entsprechend
Ihrer Konfiguration benötigteAnzahl
von Solarpanelen und installieren
Sie, wenn nötig, ein zusätzliches
Solarpanel.
Das oder die Solarpanele sind
schadhaft oder beschädigt. Ersetzen Sie das/die Solarpanele.
Die Lebensdauer der Batterie ist
erschöpft. Ersetzen Sie die Batterie, siehe
Anleitung Oximo WireFree™ Battery.
5. Bedienung und Betriebsarten
Nach der Installation und der Inbetriebnahme des Oximo 40
Wirefree™ RTS-Kits lädt sich die Batterie mit Hilfe des/der
Solarpanele auf,
Die von dem/den Solarpanelen übertragene Energie wird- von der Batterie gespeichert, welche den Oximo 40 DC
RTS-Antrieb mit Spannung versorgt.
6. Reinigung
AchtenSiedarauf,dasssichaufdemSolarpanelkeinSchnee
absetzt und stellen Sie sicher, dass die Photovoltaikzellen
nicht durch Schnee, Blätter usw. beschattet werden.
Reinigen Sie die Photovoltaikzellen mit klarem Wasser und
einem weichen Lappen, um sie nicht zu verkratzen.

Copyright © 2009 Somfy SAS. All rights reserved.
Oximo WireFree™ Solar Panel
12
DE
7.3 Hinzufügen eines Solarpanels
7.3.1 Abschätzung des Bedarfs an Solarpanelen
Um für einen optimalen Betrieb des Oximo 40 Wirefree™
RTS-Kits notwendigeAnzahl von Solarpanelen zu ermitteln:
Lokalisieren Sie den Installationsort auf der Karte:-
Bestimmen Sie die Orientierung des Rollladens.- Stellen Sie anhand der Tabelle die Anzahl der benötigten- Solarpanele fest:
Drehmoment
des Antriebs
Zone 1 Zone 2 Zone 3
Orientierung
Ost/Süd/West Orientierung
Nord Orientierung
Ost/Süd/West Orientierung
Nord Orientierung Ost/
Süd/West/Nord
3Nm1111Nichtempfohlen
6Nm1212Nichtempfohlen
10 Nm 1 2 2 Nicht
empfohlen Nicht empfohlen
Empfehlung:WenndasSolarpanelkeindirektesSonnenlicht
empfängt, 2 Solarpanele verwenden.
7.3.2 Hinzufügen eines Solarpanels
Achtung! ProAntriebskit für Rollläden Oximo 40 WireFree™
RTS kann maximal 1 Solarpanel hinzugefügt werden.
Deaktivieren Sie den Antrieb mit Hilfe der PROG-Taste- der Batterie, sieheAnleitung Oximo Wirefree™ Battery.
Trennen Sie die Kabelverbindung zwischen dem ersten- Solarpanel und der Batterie.
Wiederholen Sie zur Montage des neuen Solarpanels- alle ab Abschnitt 3.2.1 oder 3.2.2 für die Montage von 2
Solarpanelen beschriebenen Installationsschritte.
Hinweis:BohrenSie,umdas Kabel des zweiten Solarpanels
in den Rollladenkasten einführen zu können, ggf. ein
weiteres Loch mit 15 mm in die Vorderseite des Kastens.
8. Technische Daten
Stromversorgung: Solarzellen
Schutzart: IPX4
(Photovoltaikzellen: IP67).

Copyright © 2009 Somfy SAS. All rights reserved.
Oximo WireFree™ Solar Panel
13
EN
1. Introduction 13
2. Safety 13
2.1 Safety and responsibility 13
2.2 Specific safety advice 13
3. Installation 13
3.1 Location of solar panel(s) 13
3.2 Mounting the solar panel(s) 14
4. Wiring 16
4.1 Scenario with 1 solar panel 16
4.2 Scenario with 2 solar panels 16
5. Use and operating mode 17
6. Cleaning 17
7. Tips and recommendations 17
7.1 Problem with the Oximo
WireFree™ Solar Panel? 17
7.2 Replacing a solar panel 17
7.3 Adding a solar panel 18
8. Technical data 18
Contents
1. Introduction
The Oximo WireFree™ Solar Panel is a solar panel that captures the sun's rays, converting this
energy into electrical energy to charge the Oximo WireFree™ Battery.
This will be used by the extended voltage range battery to power the Oximo 40 DC RTS low consumption motor.
These 3 components form the Oximo 40 WireFree™ RTS roller shutters motor kit.
Certain installations require two solar panels: an Oximo WireFree™ Y Cable is used for wiring the
two solar panels to the battery.
The Oximo WireFree™ Solar Panel is also referred to as "the solar panel" in this guide.
2. Safety
2.1 Safety and responsibility
Before installing and using the product, please read the installation guide carefully.
This Somfy product must be installed by a professional motorisation and home automation installer,
for whom these instructions are intended.
Moreover, the installer must comply with current standards and legislation in the country in which the
product is being installed, and inform his customers of the operating and maintenance conditions for
the product.
Any usage outside of applications defined by Somfy constitutes non-compliance, and is therefore not
covered by the guarantee. In this event, as for all usage not consistent with the instructions given
herein, Somfy accepts no responsibility for harm or damage.
Never begin installing without first checking the compatibility of this product with the associated
equipment and accessories.
2.2 Specific safety advice
Never pierce the solar panel or its bracket.1)Never put anything onto the solar panel (risk of scratching or breakage), especially during2)
installation.
Never apply any product that might filter the sun's rays (such as paint) to the solar panel's3)
photovoltaic cells.
3. Installation
3.1 Location of solar panel(s)
The solar panel(s) must always be installed outside, on the roller shutter casing, so as to receive as
much natural light as possible.
Copyright © 2009 Somfy SAS. All rights reserved.
Oximo WireFree™ Solar Panel
14
EN
Caution! Never install the solar panel(s) behind glass, or in
the shade.Always leave the photovoltaic cells unobstructed,
do not put anything in front of them.
The three components that make up the Oximo 40
WireFree™ RTS kit must be installed on the same side as
the roller shutter.
Somfy recommends that all components be fitted
systematically to the left of the roller shutter, even when
fitting a solar panel. If it proves necessary to fit a second
solar panel, it would no longer be possible if the components
are fitted on the right hand side of the roller shutter.
3.2 Mounting the solar panel(s)
Caution! Do not damage the cables during installation.
Deburr all drill holes.
Caution! Mount the solar panel the right way round, it must
be inclined upwards.
3.2.1 Rivet mounting
Somfy recommends rivet mounting the solar panel(s), to
ensure a secure hold over time.
3.2.1.1 Scenario with 1 solar panel
Drill 1 hole with diameter 15 mm (A) and 2 holes with1)diameter 4.2 mm (B) on the front of the casing, as per the
diagram opposite.
Feed through the solar panel wire inside the casing via2)the drilled hole (A).
Protect the wire from the hole edges by positioning the3)protective foam at that point.
Mount the solar panel in the two drilled holes (B), using4)aluminium pop rivets with diameter 4 mm and max length
6 mm.
Remove the protective film from the photovoltaic cells.5)
3.2.1.2 Scenario with 2 solar panels
Always place the two solar panels one beside the other,
rather than one on top of the other.
Drill 1 hole with diameter 15 mm (C) and 4 holes with1)diameter 4.2 mm (D) on the front of the casing, as per the
diagram opposite.
Cut the notch situated beside the cable output on the2)right-hand solar panel.
Cut the notch situated on the opposite site from the cable3)output on the left-hand solar panel.
Caution! Do not scratch or damage the solar panel.
Feed the wire from the right-hand solar panel into the4)notch made.
Mount the right-hand solar panel in the 2 drilled holes on5)the right (D), using aluminium pop rivets with diameter 4
mm and max length 6 mm.
OK
OK
23
5
4
1
15 mm 20 mm
15 mm
70 mm 360 mm
14 mm
A
B
A
B
2-3-4
5
1
15 mm 20 mm
15 mm
70 mm 360 mm 14 mm
C
360 mm
D
570 mm
D
Copyright © 2009 Somfy SAS. All rights reserved.
Oximo WireFree™ Solar Panel
15
EN
6)Slide the wire from the right-hand solar panel inside the
groove on the back of the left-hand solar panel.
Feed through the solar panel wires inside the casing via7)the drilled hole (C).
Protect the wires from the hole edges by positioning the8)protective foam pads at that point.
Mount the left-hand solar panel in the 2 other drilled holes9)(D), using aluminium pop rivets with diameter 4 mm and
max length 6 mm.
Remove the protective films from the photovoltaic cells.10)
3.2.2 Glue mounting
Somfy does not recommend glue mounting the solar panel,
especially on non-smooth or porous surfaces such as
plastering, concrete, wood.
The ambient temperature during gluing must be between
20°C and 38°C.
Caution! Thoroughly clean the mounting locations on the
roller shutter casing with an isopropyl alcohol and water
mixture (50/50) based solvent or with a heptane based
solvent.
Observe the safety instructions for solvent use during the
cleaning phases.
3.2.2.1 Scenario with 1 solar panel
Mark the mounting location on the front of the casing as1)per the diagram opposite.
Drill 1 hole with diameter 15 mm (E) on the front of the2)casing as per the diagram opposite.
Feed through the solar panel wire inside the casing via3)the drilled hole (E).
Protect the wire from the hole edges by positioning the4)protective foam at that point.
Remove the protective paper from the adhesive on the5)back of the solar panel.
Press the solar panel frame uniformly against the casing6)to mount the solar panel.
Caution! Never press on the photovoltaic cells: they could
break.
Remove the protective film from the photovoltaic cells.7)
3.2.2.2 Scenario with 2 solar panels
Always place the two solar panels one beside the other,
rather than one on top of the other.
Mark the two mounting locations on the front of the casing1)as per the diagram opposite.
Drill 1 hole with diameter 15 mm (F) on the front of the2)casing as per the diagram opposite.
Cut the notch situated beside the cable output on the3)right-hand solar panel.
Cut the notch situated on the opposite site from the cable4)output on the left-hand solar panel.
Caution! Do not scratch or damage the solar panel.
Feed the wire from the right-hand solar panel into the5)notch made.
10
9
687
C
D
34
7
5-6
1-2
20 mm
15 mm
E
E
15 mm 500 mm
55 mm
1-2
20 mm
15 mm
F
15 mm
1000 mm
55 mm
500 mm
3-4-5
Copyright © 2009 Somfy SAS. All rights reserved.
Oximo WireFree™ Solar Panel
16
EN
6)Remove the protective paper from the adhesive on the
back of the right-hand solar panel.
Press the solar panel frame uniformly against the casing7)to mount the right-hand solar panel.
Caution! Never press on the photovoltaic cells: they could
break.
Slide the wire from the right-hand solar panel inside the8)groove on the back of the left-hand solar panel.
Feed through the solar panel wires inside the casing via9)the drilled hole (F).
Protect the wires from the hole edges by positioning the10)
protective foam pads at that point.
Remove the protective paper from the adhesive on the11)
back of the left-hand solar panel.
Pressthe solar panelframeuniformly against thecasing12)
to mount the left-hand solar panel.
Caution! Never press on the photovoltaic cells: they could
break.
Remove the protective films from the photovoltaic cells.13)
4. Wiring
Caution! The cables and connectors must be protected from
the roller shutter movement.
Somfy recommends placing the connectors behind the end
piece and fixing the cables inside the roller shutter casing.
4.1 Scenario with 1 solar panel
Wire the solar panel 2-pin connector to the battery1)connector (G).
Wire the Oximo 40 DC RTS motor 4-pin connector to the2)battery connector (H).
See the Oximo 40 WireFree™ RTS guide.
4.2 Scenario with 2 solar panels
Wire each solar panel to a Y cable connector (I) (Oximo1)Wirefree™ Y Cable, not supplied).
Wire the Y cable 2-pin connector (J) to the battery2)connector (G).
Wire the Oximo 40 DC RTS motor 4-pin connector to the3)battery connector (H).
See the Oximo 40 WireFree™ RTS guide.
6-7
13
11-12
8109
F
H
G
1
2
1
2
H
3
J
G
I
Copyright © 2009 Somfy SAS. All rights reserved.
Oximo WireFree™ Solar Panel
17
EN
7.2 Replacing a solar panel
A solar panel must be replaced by a professional, and only
with an identical model.
Never throw out the solar panel with domestic
waste. Please take the solar panel to a collection
point or an approved centre to ensure that it is
recycled.
Deactivate the motor using the battery PROG button, see- Oximo Wirefree™ Battery guide.
Disconnect the solar panel from the battery.- Remove the cable from the roller shutter casing.- If the solar panel is riveted on the bracket:- Remove the rivets via the inside of the roller shuttera)casing.
Remove the solar panel.b)
If the solar panel is glued on the bracket:- Slide a thin blade between the solar panel frame anda)the roller shutter casing to detach the solar panel from
the adhesive.
Unstick the solar panel by pulling on its frame.b)Remove the adhesive residue from the bracket.c)
To fit the new solar panel, perform complete reinstallation- from section 3.
7. Tips and recommendations
7.1 Problem with the Oximo WireFree™ Solar Panel?
Problems Possible causes Solutions
The roller shutter is not operational.
The wiring is incorrect. Check the wiring and modify it if
necessary.
One of the components (motor,
battery, control point, etc.) is not
working. See the corresponding guides.
The battery is recharged several
times in a year using the external
battery charger.
One solar panel is not sufficient to
charge the battery.
Check the number of solar panels
required according to the configuration,
and add a solar panel if need be.
The solar panel(s) is (are) faulty or
damaged. Replace the solar panel(s).
The battery has reached the end of its
service life. Replace the battery, see Oximo
WireFree™ Battery guide.
5. Use and operating mode
After the Oximo 40 Wirefree™ RTS kit has been installed
and commissioned, the battery is charged with electrical
energy by the solar panel(s):
The electrical energy transmitted by the solar panel(s)- is stored by the battery to power the Oximo 40 DC RTS
motor.
6. Cleaning
Make sure never to let snow accumulate on the solar panel,
and that its photovoltaic cells are not covered by snow,
leaves, etc.
Keepthe photovoltaic cells cleanbycleaningthem with clean
water, using a soft cloth to avoid scratching them.
Copyright © 2009 Somfy SAS. All rights reserved.
Oximo WireFree™ Solar Panel
18
EN
7.3 Adding a solar panel
7.3.1 Estimating the number of solar panels
To estimate the number of solar panels required for optimum
operation of the Oximo 40 Wirefree™ RTS kit:
Locate the installation zone on the map:-
Analyse the orientation of the roller shutter.- Check the number of solar panels indicated in the table:-
Motor torque
Zone 1 Zone 2 Zone 3
East/South/
West
orientation North
orientation East/South/
West
orientation North
orientation East/South/West/
North orientation
3Nm1111Notrecommended
6Nm1212Notrecommended
10 Nm 1 2 2 Not
recommended Not recommended
Recommended: If the solar panel is not directly exposed to
the sun, use 2 solar panels.
7.3.2 Adding a solar panel
Caution!One solar panel atmost canbeaddedto the Oximo
40 WireFree™ RTS roller shutters motor kit.
Deactivate the motor using the battery PROG button, see- Oximo Wirefree™ Battery guide.
Disconnect the first solar panel from the battery.- To fit the new solar panel, repeat the installation procedure- described for 2 solar panels from section 3.2.1 or 3.2.2.
Note: To feed through the second solar panel wire inside the
roller shutter casing, drill another hole with diameter 15 mm
on the front of the casing.
8. Technical data
Power supply: solar cells
Protection rating: IPX4
(of which photovoltaic cells: IP67).
Table of contents
Languages:
Other SOMFY Solar Panel manuals


Popular Solar Panel manuals by other brands


ELECAENTA
ELECAENTA LSFC-120 user manual

Link Energy
Link Energy Pilot Series installation guide

Phaesun
Phaesun Mare Flex Series manual

Znshine Solar
Znshine Solar ZXP6-TD60-270/P installation manual

Aquatec Equipment
Aquatec Equipment AQUAPRO 02AS510 instruction manual

Eterbright
Eterbright CIGS-3000A1 Series Installation and safety manual


