Sony Gigavault RHCU2 User manual

ES
2-556-312-01(1)
2003 Sony Corporation
USB Interface
Adaptor for Portable
HardDisk Media
RHCU2/RHK40U2/RHK80U2
FR
DE
GB
Operating Instructions
Mode d’emploi
Bedienungsanleitung
Guía de instrucciones
Appendix

2
English
For Customers in the U.S.A. and
Canada
WARNING
Keep away from children. If
swallowed, promptly see a doctor.
To prevent fire or shock hazard,
do not expose the unit to rain or
moisture.
To avoid electrical shock, do not
open the cabinet. Refer servicing
to qualified personnel only.
Note
Data is safe in the following environments:
In X-ray security systems at airports.
Owner’s Record
The model number and serial number are located on
the back of the product. Record the serial number in
the space provided here. Refer to the model and serial
number when you call the Sony Customer
Information Center.
Model No. RHCU2, RHK40U2, RHK80U2
Serial No. ________________________________
Regulatory Information
Declaration of Conformity
Trade Name: SONY
Model No.: RHCU2, RHM40, RHM80
Responsible Party: Sony Electronics Inc.
Address: 680 Kinderkamack Road,
Oradell, NJ 07649 U.S.A.
Telephone No.: 201-930-6972
This device complies with Part 15 of the FCC
Rules. Operation is subject to the following two
conditions: (1) This device may not cause harmful
interference, and (2) this device must accept any
interference received, including interference that
may cause undesired operation.
Caution
You are cautioned that any changes or modifications
not expressly approved in this manual could void
your authority to operate this equipment.
Note
This equipment has been tested and found to comply
with the limits for a Class B digital device, pursuant
to Part 15 of the FCC Rules. These limits are
designed to provide reasonable protection against
harmful interference in a residential installation. This
equipment generates, uses, and can radiate radio
frequency energy and, if not installed and used in
accordance with the instructions, may cause harmful
interference to radio communications. However, there
is no guarantee that interference will not occur in a
particular installation. If this equipment does cause
harmful interference to radio or television reception,
which can be determined by turning the equipment
off and on, the user is encouraged to try to correct the
interference by one or more of the following
measures:
– Reorient or relocate the receiving antenna.
– Increase the separation between the equipment and
receiver.
– Connect the equipment into an outlet on a circuit
differentfromthattowhichthereceiverisconnected.
– Consult the dealer or an experienced radio/TV
technician for help.
The supplied interface cable must be used with the
equipment in order to comply with the limits for a
digital device pursuant to Subpart B of Part 15 of the
FCC Rules.

3
GB
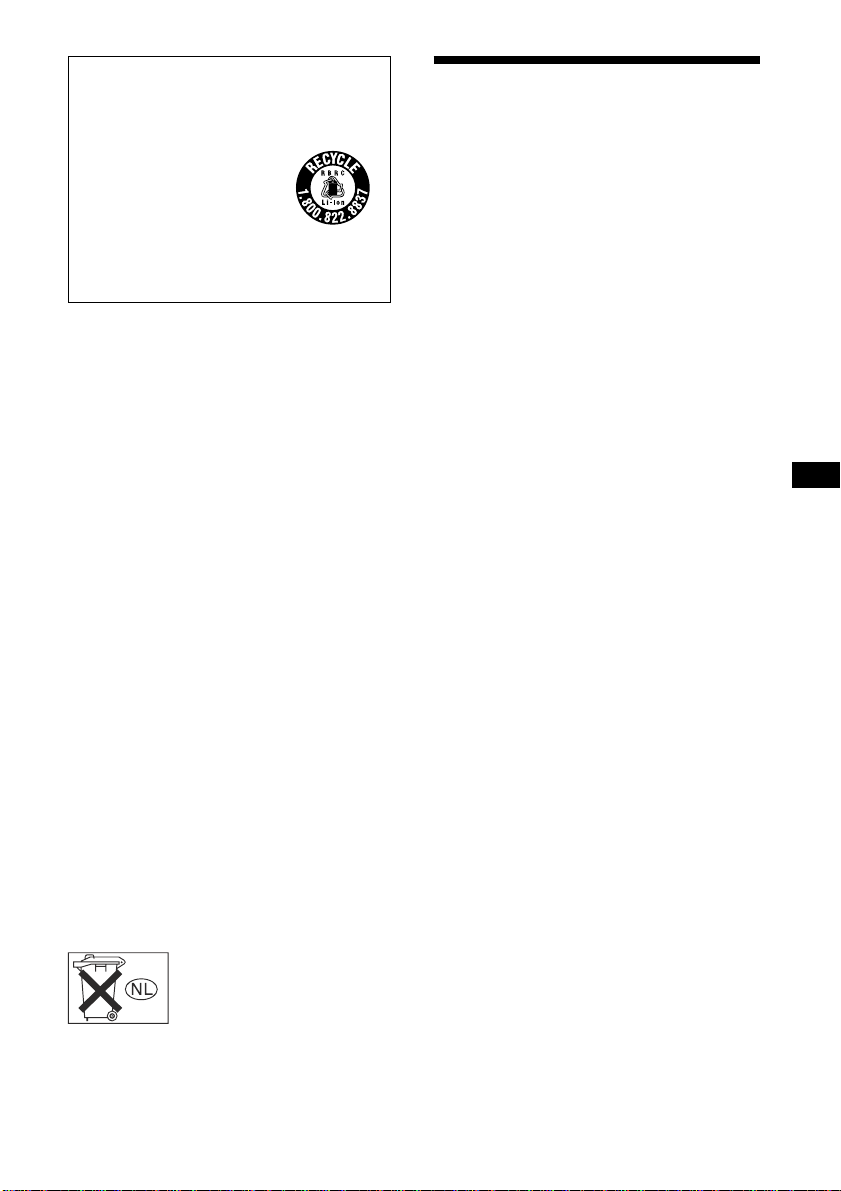
Recycling Lithium-ion Batteries
Lithium-ion batteries are recyclable.
You can help preserve our environment by
returning your used rechargeable batteries to the
collection and recycling
location nearest you.
For more information regarding
recycling of rechargeable
batteries, call toll free
1-800-822-8837, or visit http://
www.rbrc.org/
Caution: Do not handle damaged or leaking
Lithium-ion batteries.
Please contact your nearest Sony Dealer if you have
problems with this product.
The battery used in RHCU2 must be replaced at Sony
Customer Information Center only.
(a) “Caution: The battery used in this product may
present a fire or chemical burn hazard if mistreated.
Do not disassemble, heat above 100˚C (212˚F) or
incinerate.”
(b) “Dispose of used batteries according to your local
waste and recycling regulations. Keep away from
children.”
For Customers in the U.S.A.
For technical support, please visit
http://www.sony.net/Products/gigavault/index2.html,
or call 1-866-654-SONY (7669). The number in the
declaration of conformity on the previous page is for
FCC-related matters only.
For Customers in Canada
This Class B digital apparatus complies with
Canadian ICES-003.
For Customers in Europe
This equipment has been tested and found to comply
with the limits set out in the EMC Directives using a
connection cable shorter than 3 meters.
This equipment complies with EN55022 Class B and
EN55024 for use in the following areas: residential,
commercial, and light-industrial.
This equipment conforms with the following
European Directives: 89/336/EEC, 92/31/EEC (EMC
directive).
Voor de klaten in Nederland
Gooi de batterij niet weg maar
lever deze in als klein chemisch
afval (KCA).
Table of Contents
Features................................................... 4
Package Contents.................................... 4
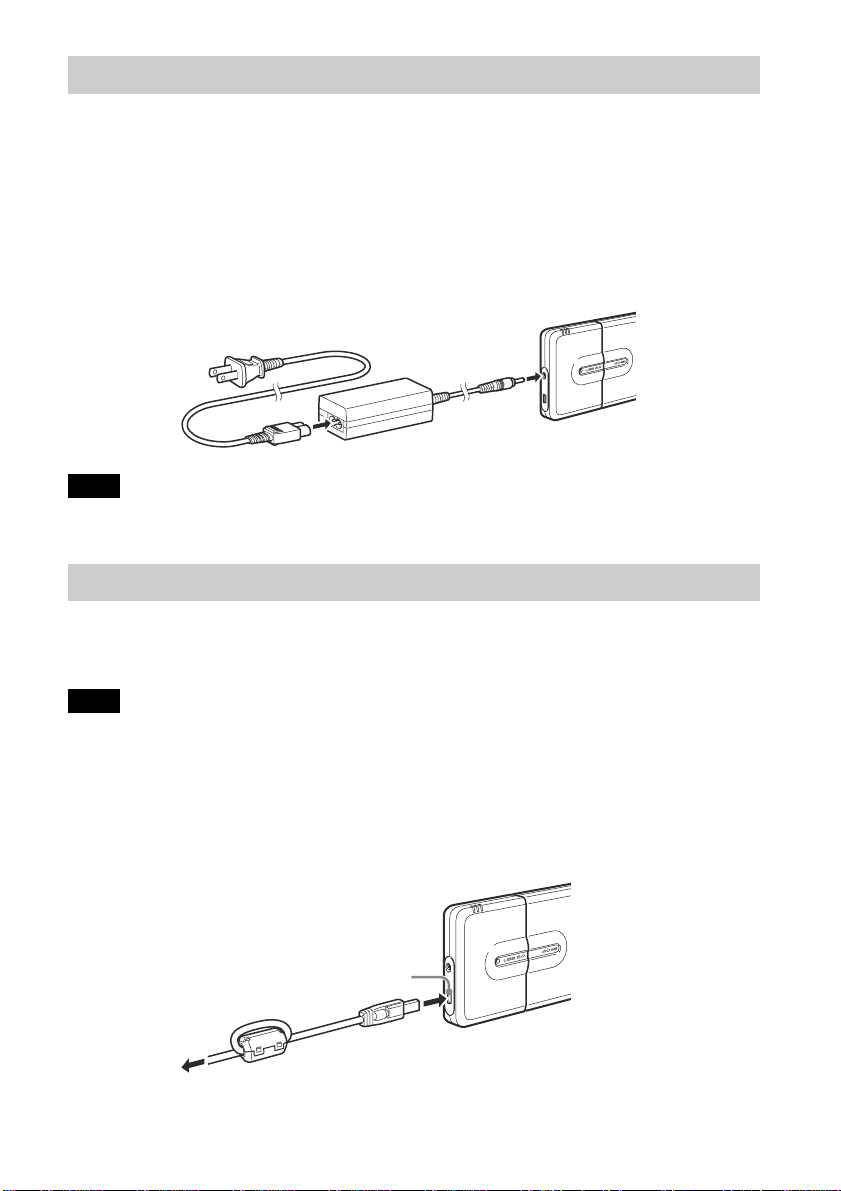
Connection.............................................. 4
Connecting the Portable HardDisk
Media ............................................ 4
Connecting the Unit to the Power
Outlet............................................. 5
Connecting the Unit to your
Computer....................................... 5
Using the Internal Battery ...................... 6
Installing the Device Driver ................... 8
Windows XP Installation
Procedure ...................................... 8
Windows 2000, Windows Me, and
Windows 98 SE Installation
Procedure ...................................... 9
Using the Unit....................................... 10
Disconnecting the Unit from your
Computer .......................................... 10
About the Included Software................ 10
Troubleshooting.................................... 11
Usage Notes.......................................... 12
Specifications ....................................... 47

4
Features
The RHCU2 (hereafter “the unit”) is a USB 2.0 interface adaptor for the Portable
HardDisk Media. By connecting the unit, you can easily use the Portable HardDisk Media
as an external storage device. Because the unit is a USB device, you can connect and
disconnect it from your computer with ease. Further, connecting the unit to a USB 2.0-
compliant computer greatly improves the data transfer speed.
Package Contents
When you open the package, make sure that it contains the following. If any of the items
listed below are missing or damaged, call the Sony Customer Information Center.
•USB Interface Adaptor
•Portable HardDisk Media (included
only with the RHK40U2/RHK80U2.
Sold separately and necessary to use the
RHCU2)
•USB cable
•Stand (included only with the
RHK40U2/RHK80U2)
•AC adaptor
•Power cord
•CD-ROM
•Operating instructions (this document)
•Label (included only with the
RHK40U2/RHK80U2)
Connection
Connecting the Portable HardDisk Media
Before connecting the Portable HardDisk Media,
remove the protective cover from the Portable
HardDisk Media connector.
Align the unit and Portable HardDisk Media so that
the connectors mate correctly. Connect the Portable
HardDisk Media to the unit, then secure with the screw
at the back of the unit.

5
Connecting the Unit to the Power Outlet
When you use the unit for the first time, it is necessary to connect it to the power outlet
using the AC adaptor and power cord.
Connect the power cord to the AC adaptor. Next, connect the DC cable of the AC adaptor
to the DC connector of the unit. Finally, connect the power cord to the power outlet. When
you do so, the unit automatically begins charging its internal battery.
Make sure that the power outlet is close to the unit and readily accessible.
Note
Theshapeofthepowercordvariesdependingonthecountryorregionofpurchase.
Connecting the Unit to your Computer
Connect the USB cable to the unit. Then, connect the cable to a USB port of your
computer.
Note
Supplieddriversoftware isrequiredforWindows98SEandhighlyrecommendedforWindowsMe/2000/
XPusers.
•WithWindows2000,WindowsMe,Windows98SE, installthedevicedriverbeforeconnectingtheunit
toyourcomputer.
•WithWindowsXP,installthedevicedriverafterconnectingtheunittoyourcomputer.
Fordetailsabouthowtoinstallthedevicedriver,see“InstallingtheDeviceDriver”.
AC adaptor
DC connector
To AC outlet
To your
computer
USB cable
USB port

6
Using the Internal Battery
Every time that you connect the AC adaptor to the unit, the internal battery recharges. This
way, you can use the unit without the need of always connecting it to the AC adaptor. This
section contains information about the unit’s internal battery.
Internal Battery
To maintain a stable power input, the unit is equipped with an internal battery. When you
use the unit for the first time or when the internal battery charge is low, it is necessary to
recharge the internal battery. When the internal battery is recharged, you do not need to
connect the unit to the power outlet to use it.
The battery indicators show the status of the internal battery.
•When using the unit at low temperatures (50˚F (10˚C) or less),
connect it to the AC adaptor as the battery life tends to shorten.
•Do not let the battery run out when reading or writing data, as this
may damage data and/or the hard disk.
•If the unit is not connected to the power outlet and it fails to start
even though the internal battery is not depleted, recharge the
internal battery or use the AC adaptor. Depending on the
operating conditions, starting the unit may demand more energy
than usual from the internal battery.
Status Indicator Meaning
During operation •Indicates the remaining charge as shown below when Giga Vault is used only
with the battery:
3 Lit Green: Full charge
2 Lit Green: Charge low (approx. 10 to 60% remains)
If you connect the unit to your computer when the internal
battery is at this level, it may not have enough remaining charge
to power the unit. If this is the case, connect the AC adaptor.
Blinking Red: Charge extremely low (less than 10%)
•When the AC adaptor is connected and used as the power source, the three
green indicators light only when the battery is fully charged.
Recharging The status of the battery charge is indicated as:
3 Lit Orange: Full charge
2 Lit Orange: Charge low (approx. 10 to 60%)
1 Lit Orange: Charge extremely low (less than 10%)
You can recharge the internal battery either when it is connected to or disconnected from
the Portable HardDisk Media.
Battery indicators

7
When the unit is not connected to your computer, the internal battery is recharged in
approximately five hours at normal ambient temperature. Depending on the status of the
computer, the recharge time can be over five hours if it is performed when the unit is
connected to your computer.
When the unit is connected to your computer and in use, an icon appears on the Windows
taskbar allowing you to monitor the remaining charge of the internal battery.
The remaining charge of the internal battery is high. (Two to three indicators on
the unit are lit.)
The remaining charge of the internal battery is low. (One indicator on the unit is
blinking red.)
Note
ThisicondoesnotappearifthedevicedriverontheCD-ROMsuppliedwiththeunitisnotinstalled.
Internal Battery Status Messages
The following messages appear on your computer screen depending on the status of the
internal battery. Follow the indications of the messages when they appear.
Note
ThemessagesbelowdonotappearifthedevicedriverontheCD-ROMsuppliedwiththeunitisnot
installed.
❑When the battery charge is low
•Remaining charge approximately 20 minutes (this value varies depending on the
conditions of use).
“The battery power is low. Please use your AC adaptor for further usage.”
•Remaining charge extremely low
“The battery power is depleted. Please shut down all applications stored on the Giga
Vault.”
•No remaining charge
“Giga Vault is now inactive.”
(Giga Vault is automatically turned off approximately 10 seconds later.)
❑When the ambient temperature is low (approx. 50˚F (10˚C) or less)
“Please use your AC adaptor for further usage.”
If this message appears, connect the AC adaptor to the unit.

8
Installing the Device Driver
Supplied driver software is required for Windows 98 SE and highly recommended for
Windows Me/2000/XP users. The installation procedure varies according to your
operating system.
Windows XP Installation Procedure
After connecting Giga Vault to the computer, do the procedure below with the provided
CD-ROM to install the device driver.
Note
ItispossibletousetheunitwiththedefaultWindowsXPdriverbutwestronglyrecommendthatyou
installthedevicedriverontheCD-ROMsuppliedwiththeunit.Failuretodosomaycausetheunitto
malfunction.
1Insert the supplied CD-ROM into the CD-ROM drive of your computer.
Note
IfyouareusinganexternalCD-ROMdriveconnectedtotheUSBportofyourcomputerandthisis
theonlyavailableUSBport,copythecontentsoftheCD-ROMtotheC:\Gigavaultfolderonthehard
diskofyourcomputer,removetheCD-ROMfromthedrive,andthendisconnecttheCD-ROMdrive.
(YoumustcreatetheC:\Gigavaultfolderbeforehand.)
2Using the USB cable, connect the unit to your computer.
Your operating system detects the unit and installs the default device driver. Wait
until the system informs you that the installation is complete.
Windows XP opens a selection dialog box at this point. Click [Cancel] to close it.
Note
ConnecttheunitdirectlytoaUSBportofyourcomputerwhenyouinstallthedevicedriver.Avoid
connectingtheunittoUSBhubsorwithextensioncables.
3Access the CD-ROM with Windows Explorer or other such application,
and then double-click Setup.exe. (If you copied the contents of the CD-
ROM to the C:\Gigavault folder on the hard disk of your computer as
indicated in step 1, double-click Setup.exe found there.)
An installation wizard starts.

9
4Follow the instructions on the screen to complete the installation of the
device driver.
If a message appears indicating that the provided driver has not passed Windows
Logo testing, click [Continue Anyway] to continue.
Note
Adevicedriverisnecessaryforeachdifferentunitthatyouconnecttoacomputer. Followtheprocedure
outlinedabovetoinstalldevicedriversforthesecondunitonward.
Windows 2000, Windows Me, and Windows 98 SE
Installation Procedure
Perform the following procedure before connecting the unit to your computer.
Notes
•WithWindows98SE,ifyouconnecttheunittoyourcomputerbeforeinstallingthedevicedriver,the
AddNewHardwarewizardstartsautomatically.Click[Cancel]andperformtheprocedurebelow.
•WithWindows2000andWindowsMe,iftheunitisconnectedtoyour computerbeforeinstallingthe
devicedriver,disconnecttheunit.
1Insert the supplied CD-ROM into the CD-ROM drive of your computer.
2Access the CD-ROM with Windows Explorer or other such application,
and then double-click Setup.exe.
An installation wizard starts.
3Follow the instructions on the screen to complete the installation of the
device driver.
zHint
Onlyonedevicedriverisnecessaryforeachdifferentunitthatyouconnecttoacomputerrunning
Windows2000,Windows Me,orWindows98SE.Inotherwords,youmustonlyperformtheprocedure
outlinedabovethefirsttimethatyouconnectaunittoacomputer.Everynewunitthatyouconnecttoyour
computerusesthesamedevicedriver.

10
Using the Unit
When you connect the unit to your computer with the USB cable, the Portable HardDisk
Media appears as “GIGA VAULT (D:)”(where “D”is the letter of the drive. This letter
may vary depending on your computer). The Portable HardDisk Media is recognized as an
external mass storage device, therefore you can use it as you would any other hard disk to
save files and/or folders.
The access indicator on the Portable HardDisk Media allows you to
verify its status when you access it.
Indicator Status
Green, lit Portable HardDisk Media is on standby.
Orange, flashing Data transfer in progress. (Never disconnect the
unit or cable when the Portable HardDisk Media
is in this state.)
Disconnecting the Unit from your
Computer
With Windows XP
Click on the Windows taskbar. Click the appropriate command on the shortcut menu.
When your computer prompts you, disconnect the unit.
With Windows Me and Windows 2000
Click on the Windows taskbar. Click the appropriate command on the shortcut menu.
When your computer prompts you, click [OK] and disconnect the unit.
With Windows 98 SE
Click on the Windows taskbar. Click the command on the shortcut menu. When your
computer prompts you, click [OK] and disconnect the unit.
About the Included Software
Detailed information about the included software is available on the Web sites of the
software manufacturers and software distributors. (Accessible from the links in each
software.)
Access indicator

11
Troubleshooting
Symptom Cause/Remedy
The computer does not detect the unit.
The unit does not function properly when
connected to a USB hub.
The unit does not function properly when
using it at the same time as other USB
devices.
You cannot disconnect the unit, because
a message indicating that the storage
device is in use appears.
The unit does not reach High Speed.
The internal battery takes an unusual
amount of time to recharge.
The unit rattles when it is shaken.
Windows does not start when you turn
on your computer.
cMake sure that you are using an operating system that
supports the unit. You cannot use the unit with operating
systems that do not support it.
cDepending on the status of your computer, it is possible
that it may not detect the unit. In this situation, visit the
unit's troubleshooting Web page at
http://www.sony.net/gigavault/ (English only).
cIf you connect the unit to a USB hub, the unit may not
function properly, depending on your hub. We recommend
that you connect the unit directly to your computer.
cWhen using the unit at the same time as other USB
devices, the unit may respond more slowly than usual.
cOne or several programs using the unit may still be
running. Quit any program using the unit before
attempting to disconnect it.
cMake sure that your computer supports this transfer rate.
However, some USB 2.0 boards and cards may prevent
the unit from reaching this transfer rate. For details,
consult the maker of your USB board or card.
cIf you are attempting to charge the internal battery while
the unit is connected to your computer and the Portable
HardDisk Media is in use, it is possible for the unit's
internal temperature to exceed 113°F (45°C). If this is the
case, charging is interrupted. Disconnect the unit from the
computer. Once the internal temperature of the unit
reaches normal levels, charging resumes automatically.
(Note that even if charging is interrupted because of the
above, you can still continue using the unit normally.)
cThis is not indicative of damage.
cDepending on your computer, turning it on while the unit
is still connected may prevent Windows from starting. If
so, press CTRL+ALT+DELETE to restart your computer.
If your computer encounters this problem, make sure that
you disconnect the unit before turning on your computer.

12
Usage Notes
•Affix the label accompanying the unit on the label area as
illustrated.
•Starting or shutting down your computer, or awakening it from
sleep mode while the unit is connected may cause it to function
erratically. Always disconnect the unit from your computer before
performing these operations.
•Never disconnect the USB cable and/or AC adaptor from your
computer or unit while the unit is in use.
•To avoid an accidental disconnection during use, make sure that the unit and Portable
HardDisk Media are firmly connected and secured with the screw at the back of the unit.
•Do not store the unit or Portable HardDisk Media in direct sunlight, humid locations,
hot locations, or locations subjected to strong vibrations.
•Avoid moving the unit and Portable HardDisk Media during use as this may cause them
to malfunction.
•Avoid sudden temperature changes. If you move the unit and Portable HardDisk Media
from a cold to a warm environment or the ambient temperature rises suddenly, do not
use them immediately as condensation may have formed inside them. If this occurs
while you are using the unit and Portable HardDisk Media, suspend use for an hour or
more, then deactivate them.
•In the unlikely event of a malfunction or defect, or if a foreign object penetrates the unit
or Portable HardDisk Media, disconnect the AC adaptor and/or USB cable. Then,
contact the Sony Customer Information Center.
Please Record Responsibly
Before copying anything onto the Portable HardDisk Media, please make sure that you are
not violating copyright laws. Most software companies allow you to make a backup or
archive copy of software. Check your software’s license agreement for details.
Label area
•Giga Vault is a trademark of Sony Corporation.
•Microsoft and Windows are registered trademarks of Microsoft Corporation in the
United States and other countries.
•Other system names and product names that appear in this manual are registered
trademarks or trademarks of their respective owners. Note that the ™and ®symbols are
not used in this manual.

13
Français
RECYCLAGE DES ACCUMULATEURS
AUX IONS DE LITHIUM
Les accumulateurs aux ions de lithium sont
recyclables.
Vous pouvez contribuer à
préserver l’environnement en
rapportant les piles usées dans
un point de collection et
recyclage le plus proche.
Pour plus d’informations sur le recyclage des
accumulateurs, téléphonez le numéro gratuit
1-800-822-8837 (Etats-Units et Canada
uniquement), ou visitez http://www.rbrc.org/
Avertissement: Ne pas utiliser des
accumulateurs aux ions de
lithium qui sont endommagées
ou qui fuient.
Pour les utilisateurs au Canada
Cet appareil numérique de la classe B est conforme à
la norme NMB-003 du Canada.
Pour la clientèle en Europe:
Cet appareil a été testé et jugé conforme aux limites
établies par les directives CEM visant l’utilisation de
câbles de raccordement d’une longueur inférieure à
trois mètres.
Ce produit est conforme aux normes de classification
EN55022 Classe B et EN55024 pour une utilisation
dans les environnements suivants : zones
résidentielles, commerciales et d’industrie légère.
Cet appareil est conforme aux directives européennes
suivantes : 89/336/CEE et 92/31/CEE (directive CEM).
Table des matières
Caractéristiques .................................... 14
Contenu de l’emballage ........................ 14
Raccordement ....................................... 14
Raccordement du support de disque
dur portable ................................. 14
Utilisation de la batterie interne .... 15
Raccordement de l’appareil à votre
ordinateur .................................... 15
Utilisation de la batterie interne ........... 16
Installation du pilote de périphériques . 19
Procédure d’installation sous
Windows XP ............................... 19
Procédure d’installation sous
Windows 2000, Windows Me et
Windows 98 SE........................... 20
Utilisation de l’appareil ........................ 21
Déconnexion de l’appareil de votre
ordinateur .......................................... 22
A propos du logiciel fourni................... 22
Dépannage ............................................ 23
Remarques sur l’utilisation................... 24
FR
• Giga Vault est une marque de
commerce de Sony Corporation.
• Microsoft et Windows sont des marques
déposées de Microsoft Corporation aux
Etats-Unis et dans d’autres pays.
• Les autres noms de systèmes et de
produits apparaissant dans le présent
mode d’emploi sont des marques de
commerce ou des marques déposées de
leurs détenteurs respectifs. Les
symboles ™ et ® ont été omis
volontairement dans ce mode d’emploi.

14
Caractéristiques
Le RHCU2 (ci-après appelé«l’appareil ») est un adaptateur d’interface USB 2.0 pour le
support de disque dur portable. Le raccordement de l’appareil permet d’utiliser facilement
le support de disque dur portable en tant que support externe d’enregistrement de données.
Etant donnéque l’appareil est un appareil USB, vous pouvez le connecter et le
déconnecter de votre ordinateur facilement. De plus, le raccordement de l’appareil àun
ordinateur compatible USB 2.0 permet d’améliorer de façon significative la vitesse de
transfert des données.
Contenu de l’emballage
En déballant l’appareil, vérifiez que les accessoires énumérés ci-dessous sont tous
présents. Si un accessoire est manquant ou endommagé, contactez votre revendeur.
•Adaptateur d’interface USB
•Support de disque dur portable (inclus
uniquement avec le RHK40U2/
RHK80U2. Vendu séparément et
nécessaire àl’utilisation du RHCU2)
•Câble USB
•Support de bureau (inclus uniquement
avec le RHK40U2/RHK80U2)
•Adaptateur secteur
•Cordon d’alimentation
•CD-ROM
•Mode d’emploi (ce document)
•Etiquette (inclus uniquement avec le
RHK40U2/RHK80U2)
Raccordement
Raccordement du support de disque dur portable
Avant de raccorder le support de disque dur portable,
retirez le capuchon protecteur du connecteur de
support de disque dur portable.
Alignez l’appareil et le support de disque dur portable
de manière àce que les connecteurs s’assemblent
correctement. Raccordez le support de disque dur
portable àl’appareil, puis assurez le raccordement
avec la vis àl’arrière de l’appareil.

15
Utilisation de la batterie interne
Lors de la première utilisation de l’appareil, il est nécessaire de le raccorder àla prise
secteur àl’aide de l’adaptateur secteur et du cordon d’alimentation.
Raccordez le cordon d’alimentation àl’adaptateur secteur. Raccordez ensuite le câble CC
de l’adaptateur secteur au connecteur CC de l’appareil. Raccordez finalement le cordon
d’alimentation àla prise de courant. Une fois ce branchement effectué, l’appareil entame
automatiquement la charge de sa batterie interne.
Assurez-vous que la prise de courant est proche de l’appareil et facile d’accès.
Remarque
L’aspect du cordon d’alimentation varie selon le pays ou la région d’achat.
Raccordement de l’appareil àvotre ordinateur
Raccordez le câble USB àl’appareil. Raccordez ensuite le câble àun port USB de votre
ordinateur.
Remarque
Le logiciel pilote fourni est requis pour Windows 98 SE et fortement recommandépour les
utilisateurs de Windows Me/2000/XP.
•Avec Windows 2000, Windows Me, Windows 98 SE, installez le pilote de périphériques avant de
raccorder l’appareil àvotre ordinateur.
•Avec Windows XP, installez le pilote de périphériques après avoir raccordél’appareil àvotre ordinateur.
Pour de plus amples informations concernant l’installation du pilote de périphériques, reportez-vous àla
section «Installation du pilote de périphériques ».
Adaptateur secteur
Connecteur CC
Vers la prise secteur
Vers votre ordinateur
Câble USB
Port USB

16
Utilisation de la batterie interne
A chaque raccordement de l’adaptateur secteur àl’appareil, la batterie interne se recharge.
De cette manière, vous pouvez utiliser l’appareil sans avoir àle raccorder sans cesse à
l’adaptateur secteur. Cette section contient des informations relatives àla batterie interne
de l’appareil.
Batterie interne
Afin d’être alimentéen permanence, l’appareil est équipéd’une batterie interne. Lors de la
première utilisation de l’appareil ou lorsque la batterie interne est presque déchargée, il est
nécessaire de recharger la batterie interne. Lorsque la batterie interne est rechargée, vous
n’avez pas besoin de raccorder l’appareil àla prise de courant pour l’utiliser.
Les indicateurs de batterie indiquent le niveau de charge de la batterie interne.
•Lors de l’utilisation de l’appareil àbasses températures (10 °C ou
moins), raccordez-le àl’adaptateur secteur car l’autonomie de la
batterie a tendance àdiminuer.
•Ne laissez pas la batterie se décharger complètement pendant la
lecture ou l’écriture de données car cela pourrait endommager les
données et/ou le disque dur.
•Si vous utilisez l’appareil sur alimentation interne, rechargez la
batterie interne avant de raccorder l’appareil àvotre ordinateur.
Etant donnéque l’appareil consomme une grande quantité
d’électricitélorsqu’il est raccordéàvotre ordinateur, il se peut
qu’il ne fonctionne pas correctement si le niveau d’autonomie de
la batterie est trop bas.
Indicateurs de
batterie

17
suite
Statut Signification du voyant
Pendant l’opération •Indique le niveau d’autonomie restant tel qu’indiquéci-dessous, lorsque le
Giga Vault est utiliséuniquement avec la batterie :
3 Alluméen vert : Charge complète
2 Alluméen vert : Autonomie moyenne (entre 10 et 60 % d’autonomie
restante)
Si vous raccordez l’appareil àvotre ordinateur lorsque la
batterie interne a atteint ce niveau d’autonomie, il est
possible que l’autonomie restante ne soit pas suffisante
pour alimenter l’appareil. Dans ce cas, raccordez
l’adaptateur secteur.
Clignote en rouge : Autonomie réduite (inférieure à10 %)
•Lorsque l’adaptateur secteur est raccordéet utiliséen tant que source
d’alimentation, les trois voyants verts s’allument uniquement lorsque la batterie
est entièrement rechargée.
En charge Le statut de charge de la batterie est indiquécomme suit :
3 Alluméen orange : Charge complète
2 Alluméen orange : Autonomie moyenne (entre 10 et 60 %)
1 Alluméen orange : Autonomie réduite (inférieure à10 %)
Vous pouvez recharger la batterie interne soit lorsqu’elle est connectée ou déconnectée du
support de disque dur portable.
Lorsque l’appareil n’est pas raccordéàvotre ordinateur, la batterie interne est rechargée
totalement en environ cinq heures àune température ambiante normale. En fonction du
statut de l’ordinateur, le temps de charge peut être supérieur àcinq heures si la charge est
effectuée pendant que l’appareil est raccordéàvotre ordinateur.
Lorsque l’appareil est raccordéàvotre ordinateur et que vous l’utilisez, une icône
s’affiche dans la barre des tâches de Windows pour vous permettre de contrôler
l’autonomie de la batterie interne.
L’autonomie restante de la batterie interne est élevée (deux ou trois voyants de
l’appareil sont allumés).
L’autonomie restante de la batterie interne est basse (un voyant de l’appareil
clignote en rouge).
Remarque
Cette icône ne s’affiche pas si le pilote de périphériques du CD-ROM fourni avec l’appareil n’est pas
installé.

18
Messages relatifs au statut de la batterie interne
Les messages suivants s’affichent àl’écran de votre ordinateur, en fonction du statut de la
batterie interne. Suivez les indications des messages qui s’affichent.
Remarque
Les messages ci-dessous ne s’affichent pas si le pilote de périphériques du CD-ROM fourni avec l’appareil
n’est pas installé.
❑Lorsque l’autonomie de la batterie est basse
•Environ 20 minutes d’autonomie restante (cette valeur varie en fonction des
conditions d’utilisation).
«La batterie est faiblement chargée. Veuillez utiliser votre adaptateur secteur pour
continuer àutiliser l’appareil. »
•Autonomie réduite
«La batterie est déchargée. Veuillez quitter toutes les applications ouvertes dans
GIGA VAULT. »
•Charge totalement épuisée
«GIGA VAULT est maintenant désactivé. »
(Le Giga Vault se met automatiquement hors tension environ dix secondes plus tard.)
❑
Lorsque la température ambiante est basse (égale ou inférieure à10 °C)
«Veuillez utiliser votre adaptateur secteur pour continuer àutiliser l’appareil. »
Si ce message s’affiche, raccordez l’adaptateur secteur àl’appareil.

19
suite
Installation du pilote de périphériques
Le logiciel pilote fourni est requis pour Windows 98 SE et fortement recommandépour les
utilisateurs de Windows Me/2000/XP. La procédure d’installation varie en fonction du
système d’exploitation utilisé.
Procédure d’installation sous Windows XP
Après avoir raccordéle Giga Vault àl’ordinateur, suivez la procédure ci-dessous avec le
CD-ROM fourni pour installer le pilote de périphériques.
Remarque
Il est possible d’utiliser l’appareil avec le pilote par défaut de Windows XP, mais il est fortement
recommandéd’installer le pilote de périphérique sur le CD-ROM fourni avec l’appareil. Si ce périphérique
n’est pas installé, il est possible que l’appareil ne fonctionne pas correctement.
1Insérez le CD-ROM fourni dans le lecteur de CD-ROM de votre
ordinateur.
Remarque
Si vous utilisez un lecteur de CD-ROM raccordéau port USB de votre ordinateur et que c’est le seul
port USB disponible, copiez le contenu du CD-ROM dans le dossier C:\Gigavault du disque dur de
votre ordinateur, retirez le CD-ROM du lecteur, puis déconnectez le lecteur de CD-ROM (vous devez
créer le dossier C:\Gigavault àl’avance).
2A l’aide du câble USB, raccordez l’appareil à votre ordinateur.
Votre système d’exploitation détecte l’appareil et installe le pilote de périphériques
par défaut. Veuillez patienter jusqu’à ce que le système vous informe que
l’installation est terminée.
Windows XP ouvre une boîte de dialogue de sélection àce moment là. Cliquez sur
[Annuler] pour refermer la boîte de dialogue.
Remarque
Raccordez l’appareil directement àun port USB de votre ordinateur lorsque vous installez le pilote de
périphériques. Evitez de raccorder l’appareil àdes multiprises USB ou àdes rallonges.

20
3Accédez au CD-ROM à l’aide de Windows Explorer ou d’une autre
application similaire, puis double-cliquez sur Setup.exe (si vous avez
copié le contenu du CD-ROM dans le dossier C:\Gigavault du disque dur
de votre ordinateur, comme indiqué à l’étape 1, double-cliquez sur le
ficher Setup.exe que vous y trouverez).
Un assistant d’installation démarre.
4Suivez les instructions à l’écran pour terminer l’installation du pilote de
périphériques.
Si un message s’affiche indiquant que le pilote fourni n’a pas passéavec succès le test
Windows Logo, cliquez sur [Continuer] pour continuer la procédure d’installation.
Remarque
Un pilote de périphérique est nécessaire pour chaque appareil que vous raccordez àun
ordinateur. Procédez comme indiquéci-dessus pour installer les pilotes de périphériques pour le
deuxième appareil et les suivants.
Procédure d’installation sous Windows 2000, Windows Me
et Windows 98 SE
Effectuez la procédure suivante avant de raccorder l’appareil àvotre ordinateur.
Remarques
•Avec Windows 98 SE, si vous raccordez l’appareil àvotre ordinateur avant d’installer le pilote de
périphérique, l’Assistant Ajout de nouveau matériel démarre automatiquement. Cliquez sur [Annuler] et
effectuez la procédure ci-dessous.
•Sous Windows 2000 et Windows Me, si l’appareil est raccordéàvotre ordinateur avant l’installation du
pilote de périphérique, déconnectez l’appareil.
1Insérez le CD-ROM fourni dans le lecteur de CD-ROM de votre
ordinateur.
2Accédez au CD-ROM à l’aide de l’Explorateur de Windows ou d’une autre
application similaire, puis double-cliquez sur Setup.exe.
Un assistant d’installation démarre.
This manual suits for next models
2
Table of contents
Languages:
Other Sony Adapter manuals

Sony
Sony AC V16 User manual

Sony
Sony AC-S5220E User manual

Sony
Sony MSACEX1 - Adaptateur Memory Stick Duo Express... User manual

Sony
Sony VAIO PCGA-UPR5 User manual

Sony
Sony CNA-1 User manual

Sony
Sony BKM-21D User manual

Sony
Sony AC-E30HG Quick guide

Sony
Sony RHCIL User manual

Sony
Sony PCG-ABA1 Series User manual

Sony
Sony AA-V33EK User manual
Popular Adapter manuals by other brands

Delkin Devices
Delkin Devices MultiMedia Card to Floppy Disk Adapter user manual

Mitsubishi Electric
Mitsubishi Electric PAC-SC36NA-E installation manual

NETGEAR
NETGEAR MA 101 installation guide

Philips
Philips CPWNA100/00 quick start guide

StarTech.com
StarTech.com USB32HD2 quick start guide

GRAVITY
GRAVITY GSF36M10F manual