Français
Des informations relatives à l’utilisation de chaque objectif sont
disponibles dans ce manuel. La section « Précautions avant toute
utilisation », qui fait l’objet d’un document séparé, contient des
précautions relatives aux objectifs, telles que des remarques sur leur
utilisation. Veuillez lire attentivement ces deux documents avant
d’utiliser l’objectif.
Cet objectif est conçu pour les montures A, à utiliser sur les appareils photo
Sony α(modèles équipés d’un capteur d’image au format APS-C). Vous ne
pouvez pas l’utiliser avec des appareils photos au format 35 mm.
Cet objectif a été développé en collaboration par Carl Zeiss et Sony
Corporation et est conçu pour les appareils photo à monture Sony A.
Cet objectif a été conçu conformément aux normes strictes et au système
d’assurance qualité de Carl Zeiss.
Remarques sur l’utilisation
Lorsque cet objectif est utilisé avec un appareil photo à monture E, rattachez
un adaptateur pour monture d’objectif vendu séparément. Ne rattachez pas
directement l’objectif à l’appareil photo à monture E sinon l’objectif et l’appareil
pourraient être endommagés.
Tenez fermement à la fois l’appareil photo et l’objectif lorsque vous transportez
l’appareil photo avec l’objectif fixé.
Ne tenez pas l’appareil par une partie saillante de l’objectif lors d’une opération
de zoom.
Précautions concernant l’utilisation du flash
Lorsque vous utilisez un flash intégré, veillez à retirer le pare-soleil et à prendre
la photo à une distance d’au moins 1 m (3,3 pieds) du sujet. Dans le cas de
certaines combinaisons objectif/flash, l’objectif peut partiellement bloquer la
lumière du flash, ce qui génère une ombre en bas de l’image.
Lors de l’utilisation d’un flash intégré, les coins de l’écran peuvent apparaître
plus sombres en position grand angle. Vérifiez la longueur focale selon le flash
intégré de votre appareil photo.
Vignetage
Lorsque vous utilisez l’objectif, les coins de l’écran peuvent s’assombrir par
rapport au centre. Pour réduire ce phénomène (appelé vignetage), l’ouverture
doit être réglée à une valeur comprise entre 1 et 2 par rapport à la position de
fermeture complète.
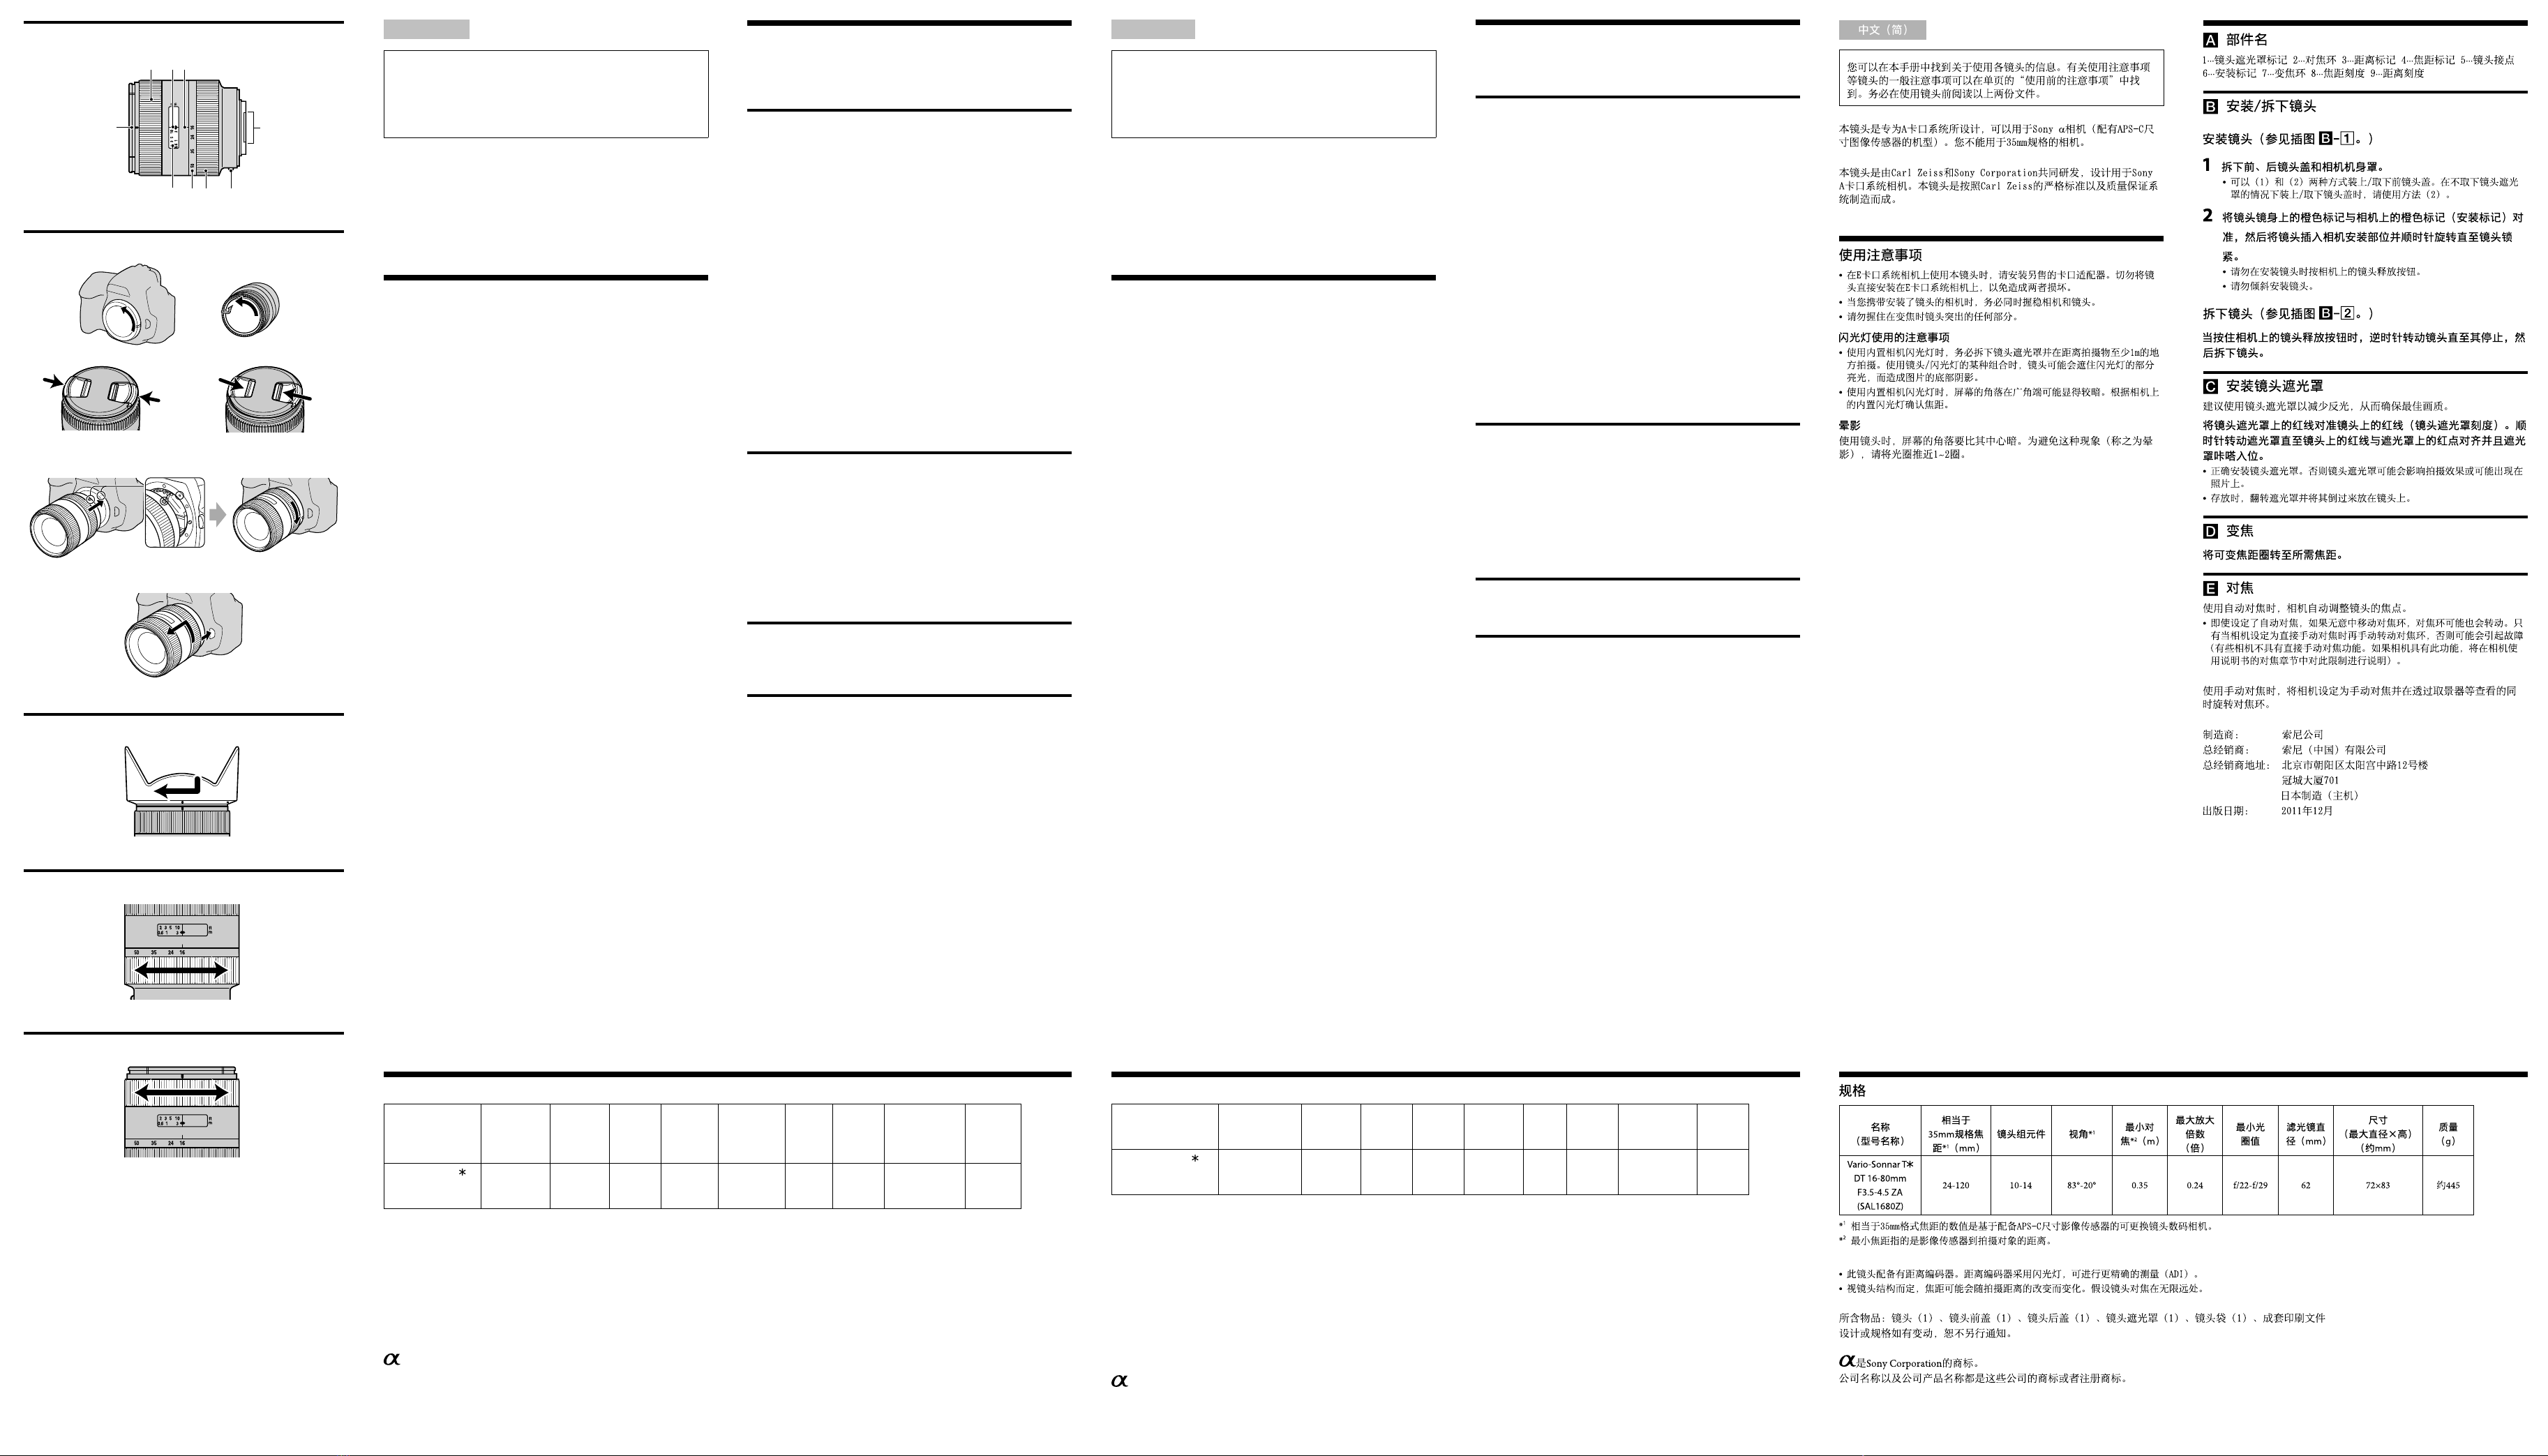
Noms des pièces
1···Repère du pare-soleil 2···Bague de mise au point 3···Index de distance
4···Repère de la longueur focale 5···Contacts de l’objectif 6···Repère de
montage 7···Bague du zoom 8···Echelle de longueur focale 9···Echelle de mise
au point
Fixation/retrait de l’objectif
Fixation de l’objectif (Voir l’illustration –.)
1Retirez les capuchons d’objectif situés à l’avant et l’arrière, ainsi
que le capuchon de l’appareil photo.
Vous pouvez fixer/détacher le capuchon avant de l’objectif de deux façons,
(1) et (2). Lorsque vous fixez/détachez le capuchon d’objectif alors que le
pare-soleil est en place, utilisez la méthode (2).
2Alignez le repère orange situé sur la monture de l’objectif sur le
repère orange de l’appareil (repère de montage), puis insérez l’
objectif dans la monture de l’appareil et tournez-le dans le sens
horaire jusqu’à ce qu’il se bloque.
N’appuyez pas sur le bouton de déblocage de l’objectif de l’appareil lorsque
vous fixez l’objectif.
Ne fixez pas l’objectif de travers.
Retrait de l’objectif (Voir l’illustration –.)
Tout en appuyant et en maintenant enfoncé le bouton de déblocage
de l’objectif sur l’appareil, tournez l’objectif dans le sens anti-horaire
jusqu’à la butée, puis détachez l’objectif.
Fixation du pare-soleil
Il est recommandé d’utiliser un pare-soleil afin de réduire la lumière parasite
et d’assurer une qualité d’image maximale.
Alignez la ligne rouge du pare-soleil sur la ligne rouge de l’objectif
(index du pare-soleil). Tournez le pare-soleil dans le sens horaire
jusqu’à ce que la ligne rouge de l’objectif se trouve sur le point rouge
du pare-soleil et que celui-ci émette un déclic de mise en place.
Fixez correctement le pare-soleil. Sinon, le pare-soleil risque de perturber l’effet
souhaité ou d’apparaître sur les images.
Lorsque vous le rangez, retournez le pare-soleil et placez-le sur l’objectif à l’arrière.
Utilisation du zoom
Tournez la bague du zoom pour obtenir la longueur focale de votre
choix.
Mise au point
Lorsque vous utilisez la mise au point automatique, l’appareil photo fait la
mise au point automatiquement au niveau de l’objectif.
Même lorsque le mode de mise au point automatique est sélectionné, la bague
de mise au point peut tourner si vous la déplacez par inadvertance. Ne tournez
la bague de mise au point manuellement que lorsque l’appareil photo est en
mode de mise au point manuelle sous peine de provoquer un problème de
fonctionnement. (Certains appareils photos ne sont pas équipés de la fonction de
mise au point manuelle directe. Si votre appareil photo est doté de cette fonction,
cette restriction est décrite dans la section relative à la mise au point du mode
d’emploi de l’appareil photo.)
Pour effectuer une mise au point manuelle, réglez votre appareil en mode
de mise au point manuelle et tournez la bague de mise au point tout en
regardant dans le viseur, etc.
Español
En este manual encontrará información sobre la utilización de cada
objetivo. Las precauciones comunes que se aplican a los objetivos,
como por ejemplo las notas sobre la utilización, se encuentran en una
hoja separada con el título “Precauciones previas a la utilización del
producto”. Asegúrese de leer ambos documentos antes de utilizar el
objetivo.
Este objetivo está diseñado para las monturas A que se pueden utilizar en
las cámaras Sony α(modelos equipados con sensor de imágenes de tamaño
APS-C). No se puede utilizar en cámaras de formato de 35 mm.
Este objetivo se ha desarrollado conjuntamente por Carl Zeiss y Sony
Corporation, y está diseñado para las cámaras de montura A de Sony. Este
objetivo se ha fabricado de acuerdo con las estrictas normas y el sistema de
garantía de calidad de Carl Zeiss.
Notas sobre el uso
Cuando utilice este objetivo en una cámara con montura E, fíjele un adaptador
de montura de objetivo a la venta por separado. No fije el objetivo directamente
al la cámara con montura E o podría dañar ambos.
Cuando transporte la cámara con el objetivo colocado, sujete firmemente tanto
la cámara como el objetivo.
No sujete ninguna parte sobresaliente del objetivo al utilizar el zoom.
Precauciones en el uso del flash
Al usar una cámara con flash incorporado, asegúrese de extraer el parasol
y tomar fotografías desde como mínimo 1 m de distancia desde el motivo.
Con algunas combinaciones de objetivo y flash, el objetivo puede bloquear
parcialmente la luz del flash, lo que podría provocar una sombra en la parte
inferior de la imagen.
Cuando utilice una cámara con flash incorporado, es posible que las esquinas
de la pantalla se vean más oscuras en la posición gran angular. Compruebe la
distancia focal según el flash incorporado a la cámara.
Viñeteado
Si utiliza el objetivo, las esquinas de la pantalla se vuelven más oscuras que el
centro. Para reducir este fenómeno (llamado viñeteado), cierre la abertura de
1 a 2 puntos.
Nombres de las piezas
1···Índice de cubierta del objetivo 2···Anillo de enfoque 3···Índice de distancia
4···Índice de distancia focal 5···Contactos del objetivo 6···Índice de montaje
7···Anillo de zoom 8···Escala de distancia focal 9···Escala de distancia
Colocación/extracción del objetivo
Para colocar el objetivo (consulte la ilustración
–
.)
1Extraiga las tapas frontal y posterior del objetivo y la tapa del
cuerpo de la cámara.
Puede colocar o extraer la tapa frontal del objetivo de dos modos, (1) y (2).
Cuando coloque o extraiga la tapa del objetivo con el parasol colocado,
utilice el método (2).
2Alinee el índice naranja del tambor del objetivo con el índice
naranja de la cámara (índice de montaje) y, a continuación,
inserte el objetivo en la montura de la cámara y gírelo hacia la
derecha hasta que quede encajado.
No pulse el botón de liberación del objetivo de la cámara cuando monte el
objetivo.
No monte el objetivo inclinado.
Para extraer el objetivo (consulte la ilustración –.)
Gire el objetivo hacia la izquierda hasta que se detenga mientras mantiene el
botón de liberación del objetivo pulsado y, a continuación, extráigalo.
Colocación del parasol
Es recomendable utilizar un parasol para reducir los reflejos y garantizar la
máxima calidad de imagen.
Alinee la línea roja del parasol con la línea roja del objetivo (Índice del
parasol). Gire la cubierta hacia la derecha hasta que la línea roja del
objetivo se ajuste en el punto rojo de la cubierta.
Fije el parasol correctamente. Si no, es posible que la cubierta impida el efecto
deseado o puede que aparezca en las fotografías.
Cuando la guarde, gire el parasol y colóquelo al revés en el objetivo.
Utilización del zoom
Gire el anillo de zoom hasta la distancia focal que desee.
Enfoque
Cuando utilice el enfoque automático, la cámara enfocará el objetivo
automáticamente.
Incluso cuando esté activado el enfoque automático, es posible que el anillo
de enfoque gire si lo mueve accidentalmente. Gire manualmente el anillo de
enfoque únicamente cuando la cámara esté ajustada en el modo de enfoque
manual directo. De lo contrario, podría provocar un fallo de funcionamiento
(algunas cámaras no disponen de la función de enfoque manual directo. Si su
cámara presenta esta función, encontrará la explicación sobre esta restricción en
la sección acerca del enfoque del manual de instrucciones de la cámara).
Cuando enfoque manualmente, ajuste la cámara en el modo de enfoque
manual y gire el anillo de enfoque mientras mira a través del visor, etc.
Spécifications
Nom (Désignation du
modèle)
Longueur focale
équivalente au
format 35 mm
*1
(mm)
Elément en
groupes de
l’objectif
Angle de
vue *1
Mise au
point
minimale*2
(m (pieds))
Agrandissement
maximum (X)
Valeur f
minimale
Diamètre
du filtre
(mm)
Dimensions
(diamètre maximum
× hauteur) (mm (po))
Poids
(g (on.))
Vario-Sonnar T
DT 16-80mm F3.5-4.5
ZA (SAL1680Z)
24-120 10-14 83°-20° 0,35 (1,2) 0,24 f/22-29 62 Environ 72×83
(2 7/8×3 3/8)
Environ
445 (15 3/4)
*1Les valeurs pour une longueur focale et un angle de vue équivalents au format 35 mm sont basées sur des appareils photos numériques à objectifs interchangeables équipés
d’un capteur d’image au format APS-C.
*2La mise au point minimale est la distance entre le capteur d’image et le sujet.
Cet objectif dispose d’un encodeur de distance. L’encodeur de distance permet d’effectuer des mesures plus précises (ADI) à l’aide d’un flash.
Selon le mécanisme d’objectif, la longueur focale peut varier en fonction de la distance de prise de vue. La longueur focale suppose que l’objectif est réglé sur l’infini.
Articles inclus: Objectif (1), Capuchon d’objectif avant (1), Capuchon d’objectif arrière (1), Pare-soleil (1), Étui pour objectif (1), Jeu de documents imprimés
La conception et les spécifications peuvent être modifiées sans préavis.
est une marque commerciale de Sony Corporation.
Les noms des compagnies et les noms des produits sont des marques de fabrique ou des marques déposées de ces compagnies.
Especificaciones
Nombre (Nombre del
modelo)
Distancia focal
*1
(mm) equivalente al
formato de 35 mm
Elementos y
grupos del
objetivo
Ángulo de
visión *1
Enfoque
mínimo*2
(m)
Ampliación
máxima (X)
F-stop
mínimo
Diámetro
del filtro
(mm)
Dimensiones
(diámetro máximo ×
altura) (mm)
Peso (g)
Vario-Sonnar T
DT 16-80mm
F3.5-4.5 ZA (SAL1680Z)
24-120 10-14 83°-20° 0,35 0,24 f/22-29 62 Aprox. 72×83 Aprox. 445
*1Los valores de la distancia focal equivalente al formato de 35 mm y al ángulo de visión se basan en cámaras digitales de objetivo intercambiable equipadas con un sensor de
imágenes de tamaño APS-C.
*2El enfoque mínimo es la distancia desde el sensor de imágenes hasta el motivo.
Este objetivo está equipado con un codificador de distancia. El codificador de distancia permite una medición más exacta (ADI) mediante el uso de un flash para la
realización del proceso.
En función del mecanismo del objetivo, es posible que la distancia focal varíe si la distancia de toma de imagen también lo hace. La distancia focal asume que el objetivo está
enfocado al infinito.
Elementos incluidos: Objetivo (1), Tapa frontal del objetivo (1), Tapa posterior del objetivo (1), Parasol (1), Estuche para objetivo (1), Juego de documentación
impresa
El diseño y las especificaciones están sujetos a cambio sin previo aviso.
es una marca comercial de Sony Corporation.
Los nombres de compañías y los nombres de productos de compañías son marcas comerciales o marcas comerciales registradas de esas compañías.
–1
(1) (2)
–2


