스테레오 미니 플러그
Stereo mini plug
A
B
D
E
1
F
2
C
3G
연장 코드(부속품)
Extension cord (supplied)
한국어
스테레오 헤드폰
특징
•부드럽고 유연한 나선형 목덜미 밴드를 채택한 가볍고 활동적인 헤드폰.
•이어버드 방식의 헤드폰으로 깊은 저음과 풍부한 사운드 제공.
•방수 기능.*1
*1약간의 빗물이나 물방울에 노출되어도 제품의 기능에는 영향을 주지 않습니다.
주요 제원
종류: 폐쇄형, 다이내믹 / 드라이버 장치: 9 mm, 돔 형식(CCAW 채택) /
전원 용량: 100 mW(IEC*2) / 임피던스: 1 kHz에서 16 Ω / 감도:
100 dB/mW / 주파수 응답: 9 - 23,000 Hz / 코드: 약 0.6 m, OFC
Litz 코드 / 플러그: 금도금 스테레오 미니 플러그 / 무게: 약 13 g(코드
제외) / 부속품: 휴대용 케이스(1), 연장 코드(약 0.6 m)(1), 이어버드
(S × 2, M × 2, L × 2), 클립(1)
*2 IEC = International Electrotechnical Commission
디자인 및 주요 제원은 사전 통보 없이 변경될 수 있습니다.
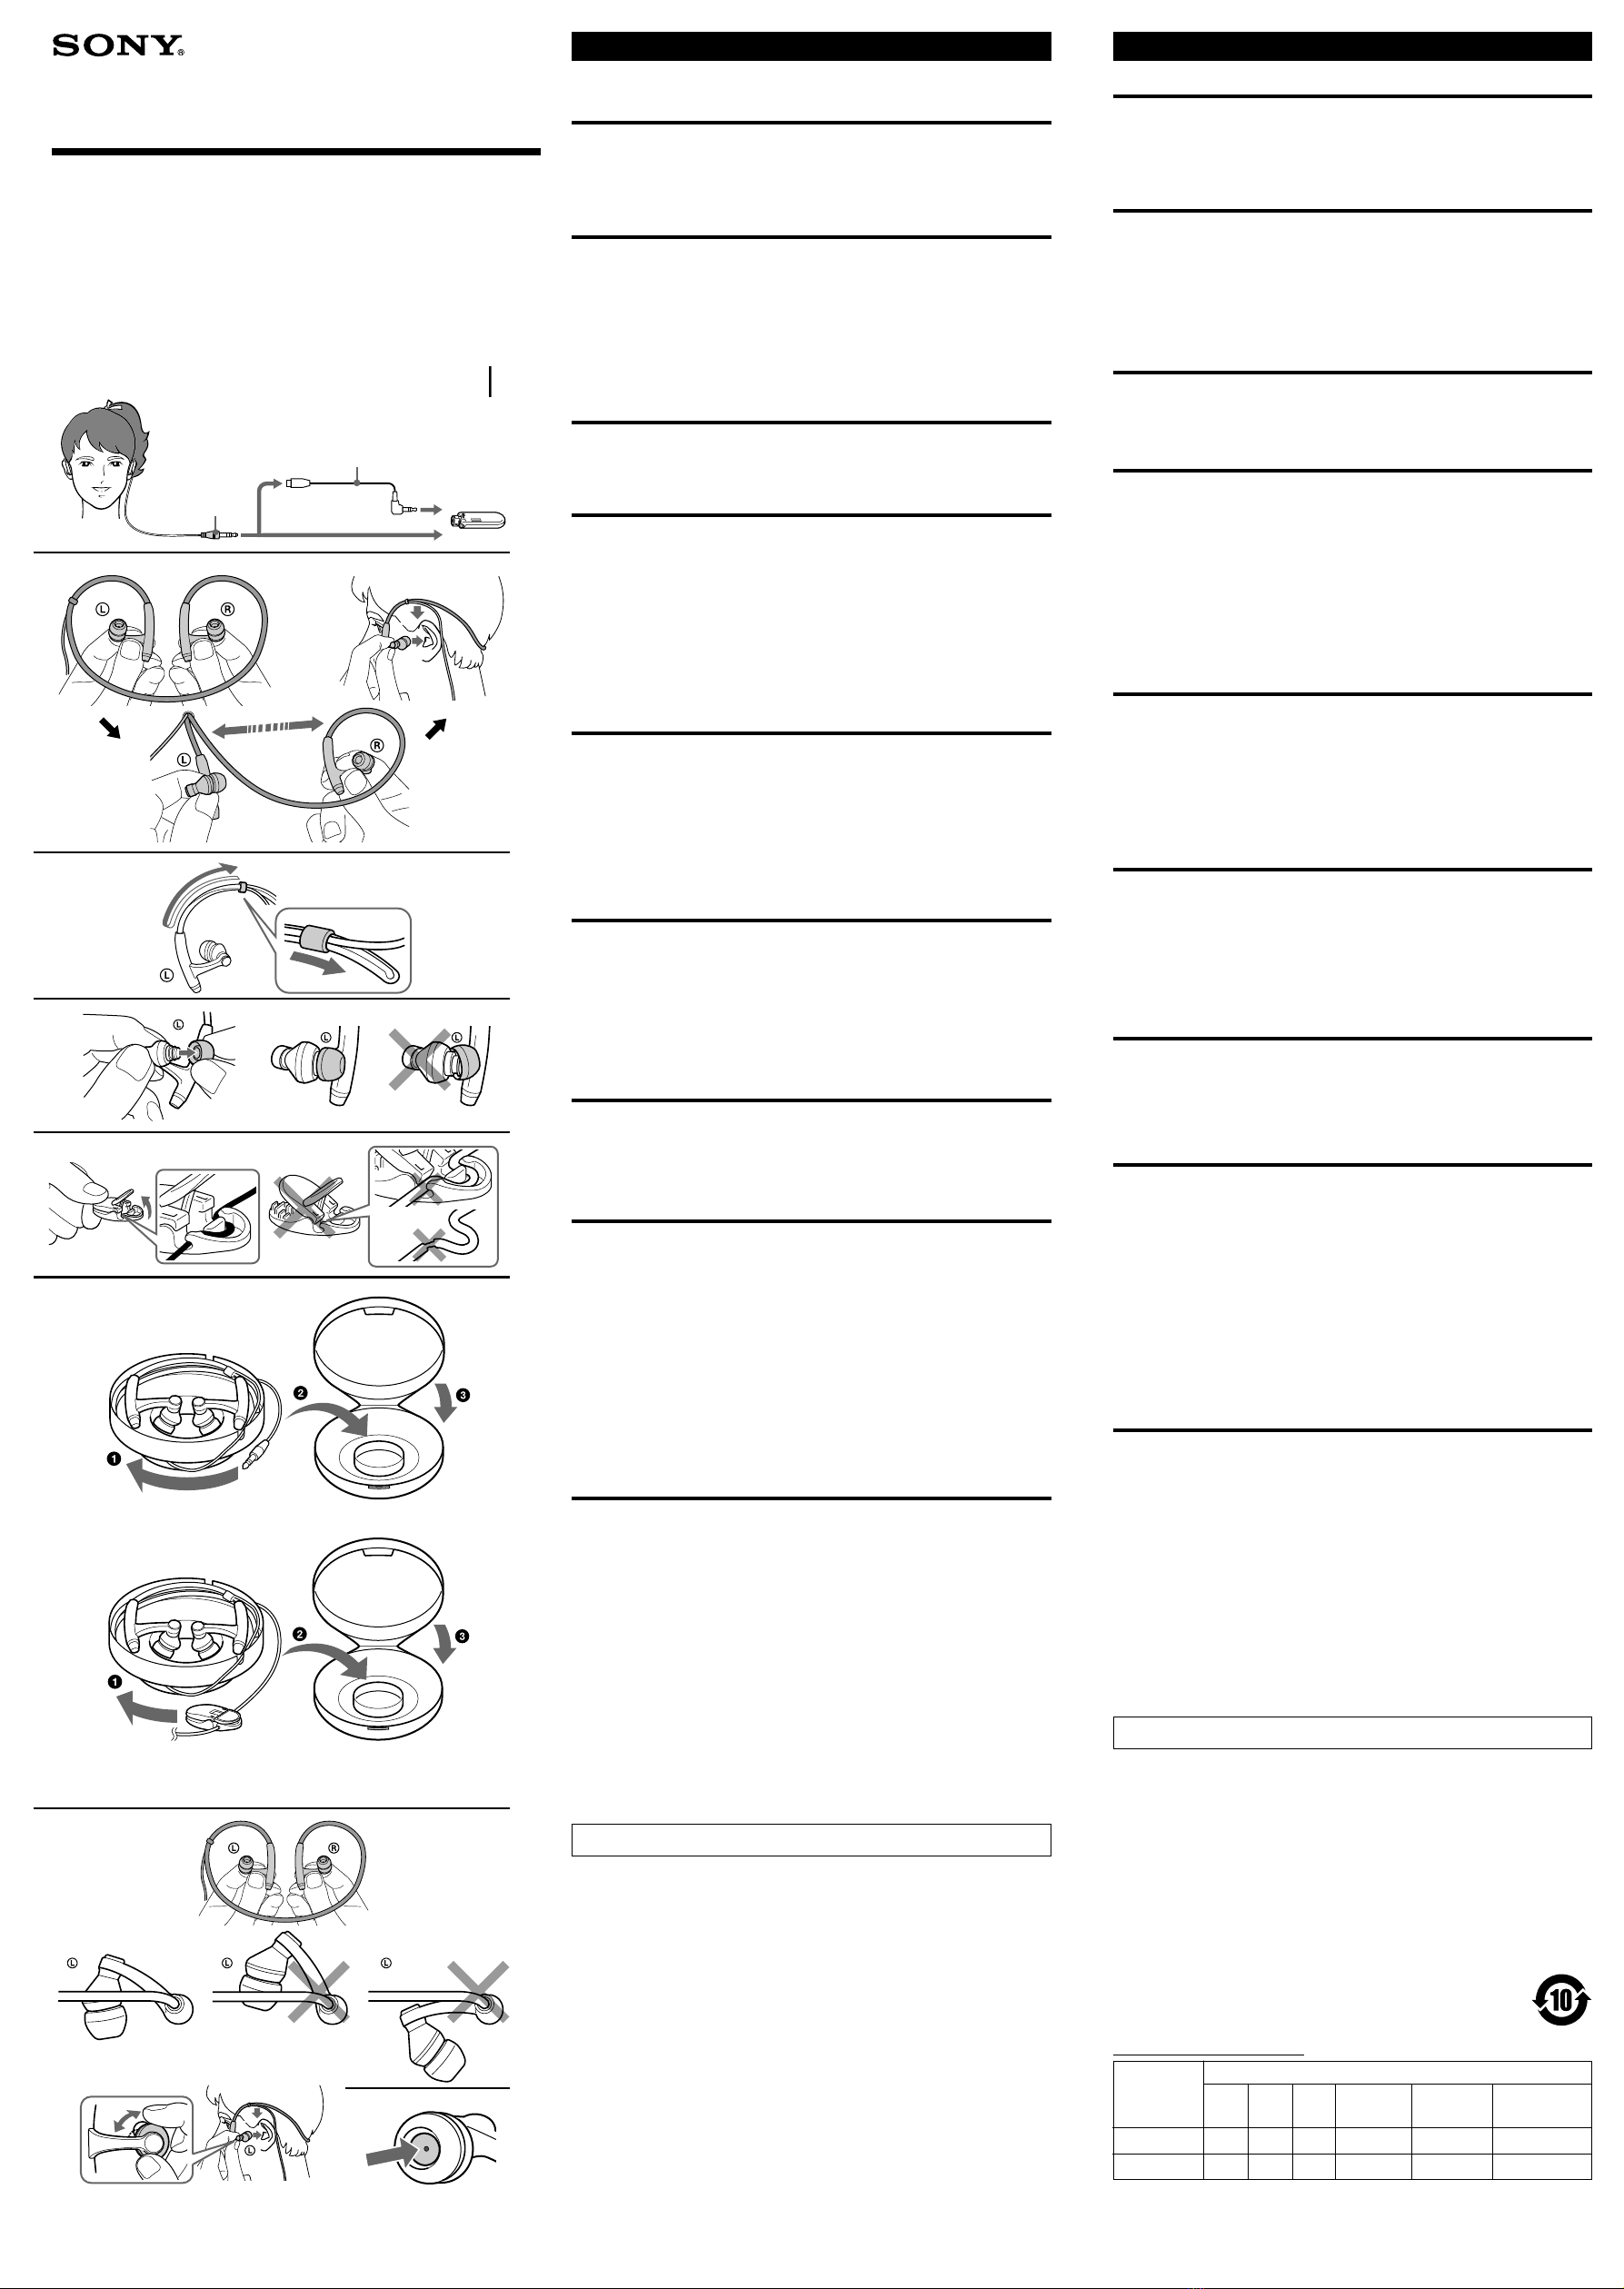
헤드폰 착용(그림 A 참조)
1그림과 같이 헤드폰을 잡습니다.
2목 밴드를 목덜미에 두르고, 오른쪽 귀와 왼쪽 귀에 각각 R과 L 표시
가 오도록 이어피스를 끼웁니다.
코드 및 위치 조정(그림 B 참조)
코드 길이와 위치를 조정할 수 있습니다. 먼저 코드 조정 장치를 목 밴드
왼쪽으로 민 다음 원하는 위치로 다시 미십시오.
코드를 너무 짧게 조정하면 목 밴드의 홈에 코드가 끼게 됩니다.
사용하기 전에 목 밴드에 코드가 끼어 있는지 확인하십시오.
z 팁
코드 조정 장치가 귀뿌리 쪽으로 걸쳐지도록 하는 것이 좋습니다.
주의점
•코드를 조정하기 전에 헤드폰을 벗으십시오.
•목 밴드가 팽팽하게 당겨지거나 코드가 목 밴드 홈 통에 제대로 들어가
지 않을 경우 코드가 홈에서 빠져 나올 수 있습니다.
이어버드의 올바른 설치 방법(그림 C 참조)
이어버드가 귀에 딱 맞지 않으면 저음 부분이 들리지 않을 수도 있습니다.
더 좋은 음질을 즐기려면 크기가 다른 이어버드로 바꾸거나, 이어버드 위
치를 조절해서 귀에 편안하고 안정감 있게 놓이도록 하십시오. M 사이즈
의 이어버드가 헤드폰에 부착된 상태로 출시됩니다. M 사이즈의 이어버
드가 귀에 맞지 않을 경우에는 제공된 S 또는 L 사이즈의 이어버드로 교
체하십시오. 이어버드를 교체할 경우에는 이어버드가 귓속에서 빠지지 않
도록 헤드폰에 단단히 설치하여 주십시오.
이어버드 청소하기
이어버드를 헤드폰에서 빼서 묽은 중성세제로 세척해 주십시오.
코드를 클립에 다시 끼우는 방법(그림 D 참조)
1닫힌 클립을 잡고 클립의 레버를 위로 약간 당깁니다.
2레버 아래쪽의 홈에 코드를 끼웁니다.
주의점
•닫힌 클립을 잡지 않고 클립의 레버를 위로 당기거나, 닫힌 클립을 잡고
레버를 너무 많이 당겨서 벌린 경우 코드를 레버 아래쪽의 홈에 끼울 수
없습니다.
•코드가 클립의 돌출부에 끼게 하거나 코드를 홈에 억지로 끼워넣지 마십
시오. 코드의 전선이 손상될 수 있습니다.
헤드폰 휴대 방법(그림 E 참조)
1내부 케이스에 헤드폰을 넣습니다.
2코드를 내부 케이스의 측면에 감은 다음, 휴대용 케이스에 내부 케이스
를 넣습니다.
클립을 코드에 부착한 상태로 헤드폰 보관하기
클립 위쪽 면이 위를 향한 상태로 코드를 내부 케이스의 측면에 감은 다
음, 휴대용 케이스에 내부 케이스를 넣습니다.
문제 해결
헤드폰이 귀에 잘 맞지 않거나 이어피스가 귀 밖으로 스르르 빠질 경우 이
동 중에 목 밴드가 틀어진 것이 원인일 수 있습니다.
다음과 같은 점검 순서를 따르십시오:
점검 1
그림과 같이 헤드폰을 잡고(그림 F-1 참조) 헤드폰의 좌우가 대칭이 맞
는지 확인하십시오.
목 밴드가 심하게 변형된 경우 손으로 목 밴드를 구부려 위치를 바로 잡으
십시오.
점검 2
목 밴드 아래쪽이 변형되지 않았는지 확인하십시오(그림 F-2 참조).
목 밴드가 심하게 변형된 경우 손으로 목 밴드를 구부려 위치를 바로 잡으
십시오.
이어피스의 각도가 귀에 맞지 않을 경우
하우징을 돌려 조정하십시오. 하우징을 최대 40도 정도까지 위로 돌릴 수
있습니다(그림 F-3 참조).
유의사항
•헤드폰 볼륨을 크게 하면 청각에 나쁜 영향을 줄 수 있습니다. 교통 안전
을 위해 운전 중이거나 자전거를 타는 중에는 사용하지 마십시오.
•장기간 보관할 때에는 헤드폰이 변형되지 않도록 헤드폰 위에 무거운 물
건을 올려 놓거나 누르지 마십시오.
•이어버드를 장기간 보관하거나 사용하면 품질이 저하될 수 있습니다.
•헤드폰은 항상 청결하게 보관하시고 특히 고무 재질의 이어버드 안쪽을
청결하게 유지하십시오. (그림 G 참조)
이어버드 안쪽 부분에 먼지나 귀지가 있을 경우 소리가 잘 안 들릴 수도
있습니다.
•이어버드를 헤드폰에 단단히 끼우십시오. 이어버드가 실수로 빠져서 귀
속에 남게 되면 상처를 입을 수 있습니다.
•목 밴드의 특정 부분을 반복해서 구부릴 경우 끊어질 수 있습니다. 목 밴
드가 끊어지면 속에 있던 철사처럼 생긴 금속이 튀어나와 성처를 입을
수 있습니다. 이런 일이 발생할 경우 헤드폰 사용을 중지하십시오.
정전기에 관한 주의
특히 건조한 환경에서는 약하게 따끔따끔한 느낌이 귀에서 느껴질 수 있습니다. 이것
은 헤드폰의 고장 때문이 아니라 신체에 누적된 정전기로 인해 발생하는 것입니다.
천연 소재로 만든 옷을 입으면 이러한 현상이 감소될 수 있습니다.
옵션 대체품으로 사용 가능한 이어버드로는 EP-EX1(별매품)이 있습
니다.
English
Stereo headphones
Features
• Lightweight active style headphones with soft and flexible spiral behind-the-
neck band.
•Earbud-style headphones deliver rich sound with deep bass.
•Splash proof.*1
*1The product's functions will not be affected with exposure to some rain or drops of water.
Specifications
Type: Closed, dynamic / Driver unit: 9 mm, dome type (CCAW adopted) / Power
handling capacity: 100 mW (IEC*
2
) / Impedance: 16 Ωat 1 kHz / Sensitivity:
100
dB/mW / Frequency response: 9 - 23,000 Hz / Cord: Approx. 0.6 m
(23 5/8in), OFC litz cord / Plug: Gold-plated stereo mini plug / Mass: Approx.
13 g (0.46 oz) without cord / Supplied accessories: Carrying case (1),
Extension cord (Approx. 0.6 m, 23 5/8in) (1), Earbuds (S ×2, M ×2, L ×2),
Clip(1)
*2IEC = International Electrotechnical Commission
Design and specifications are subject to change without notice.
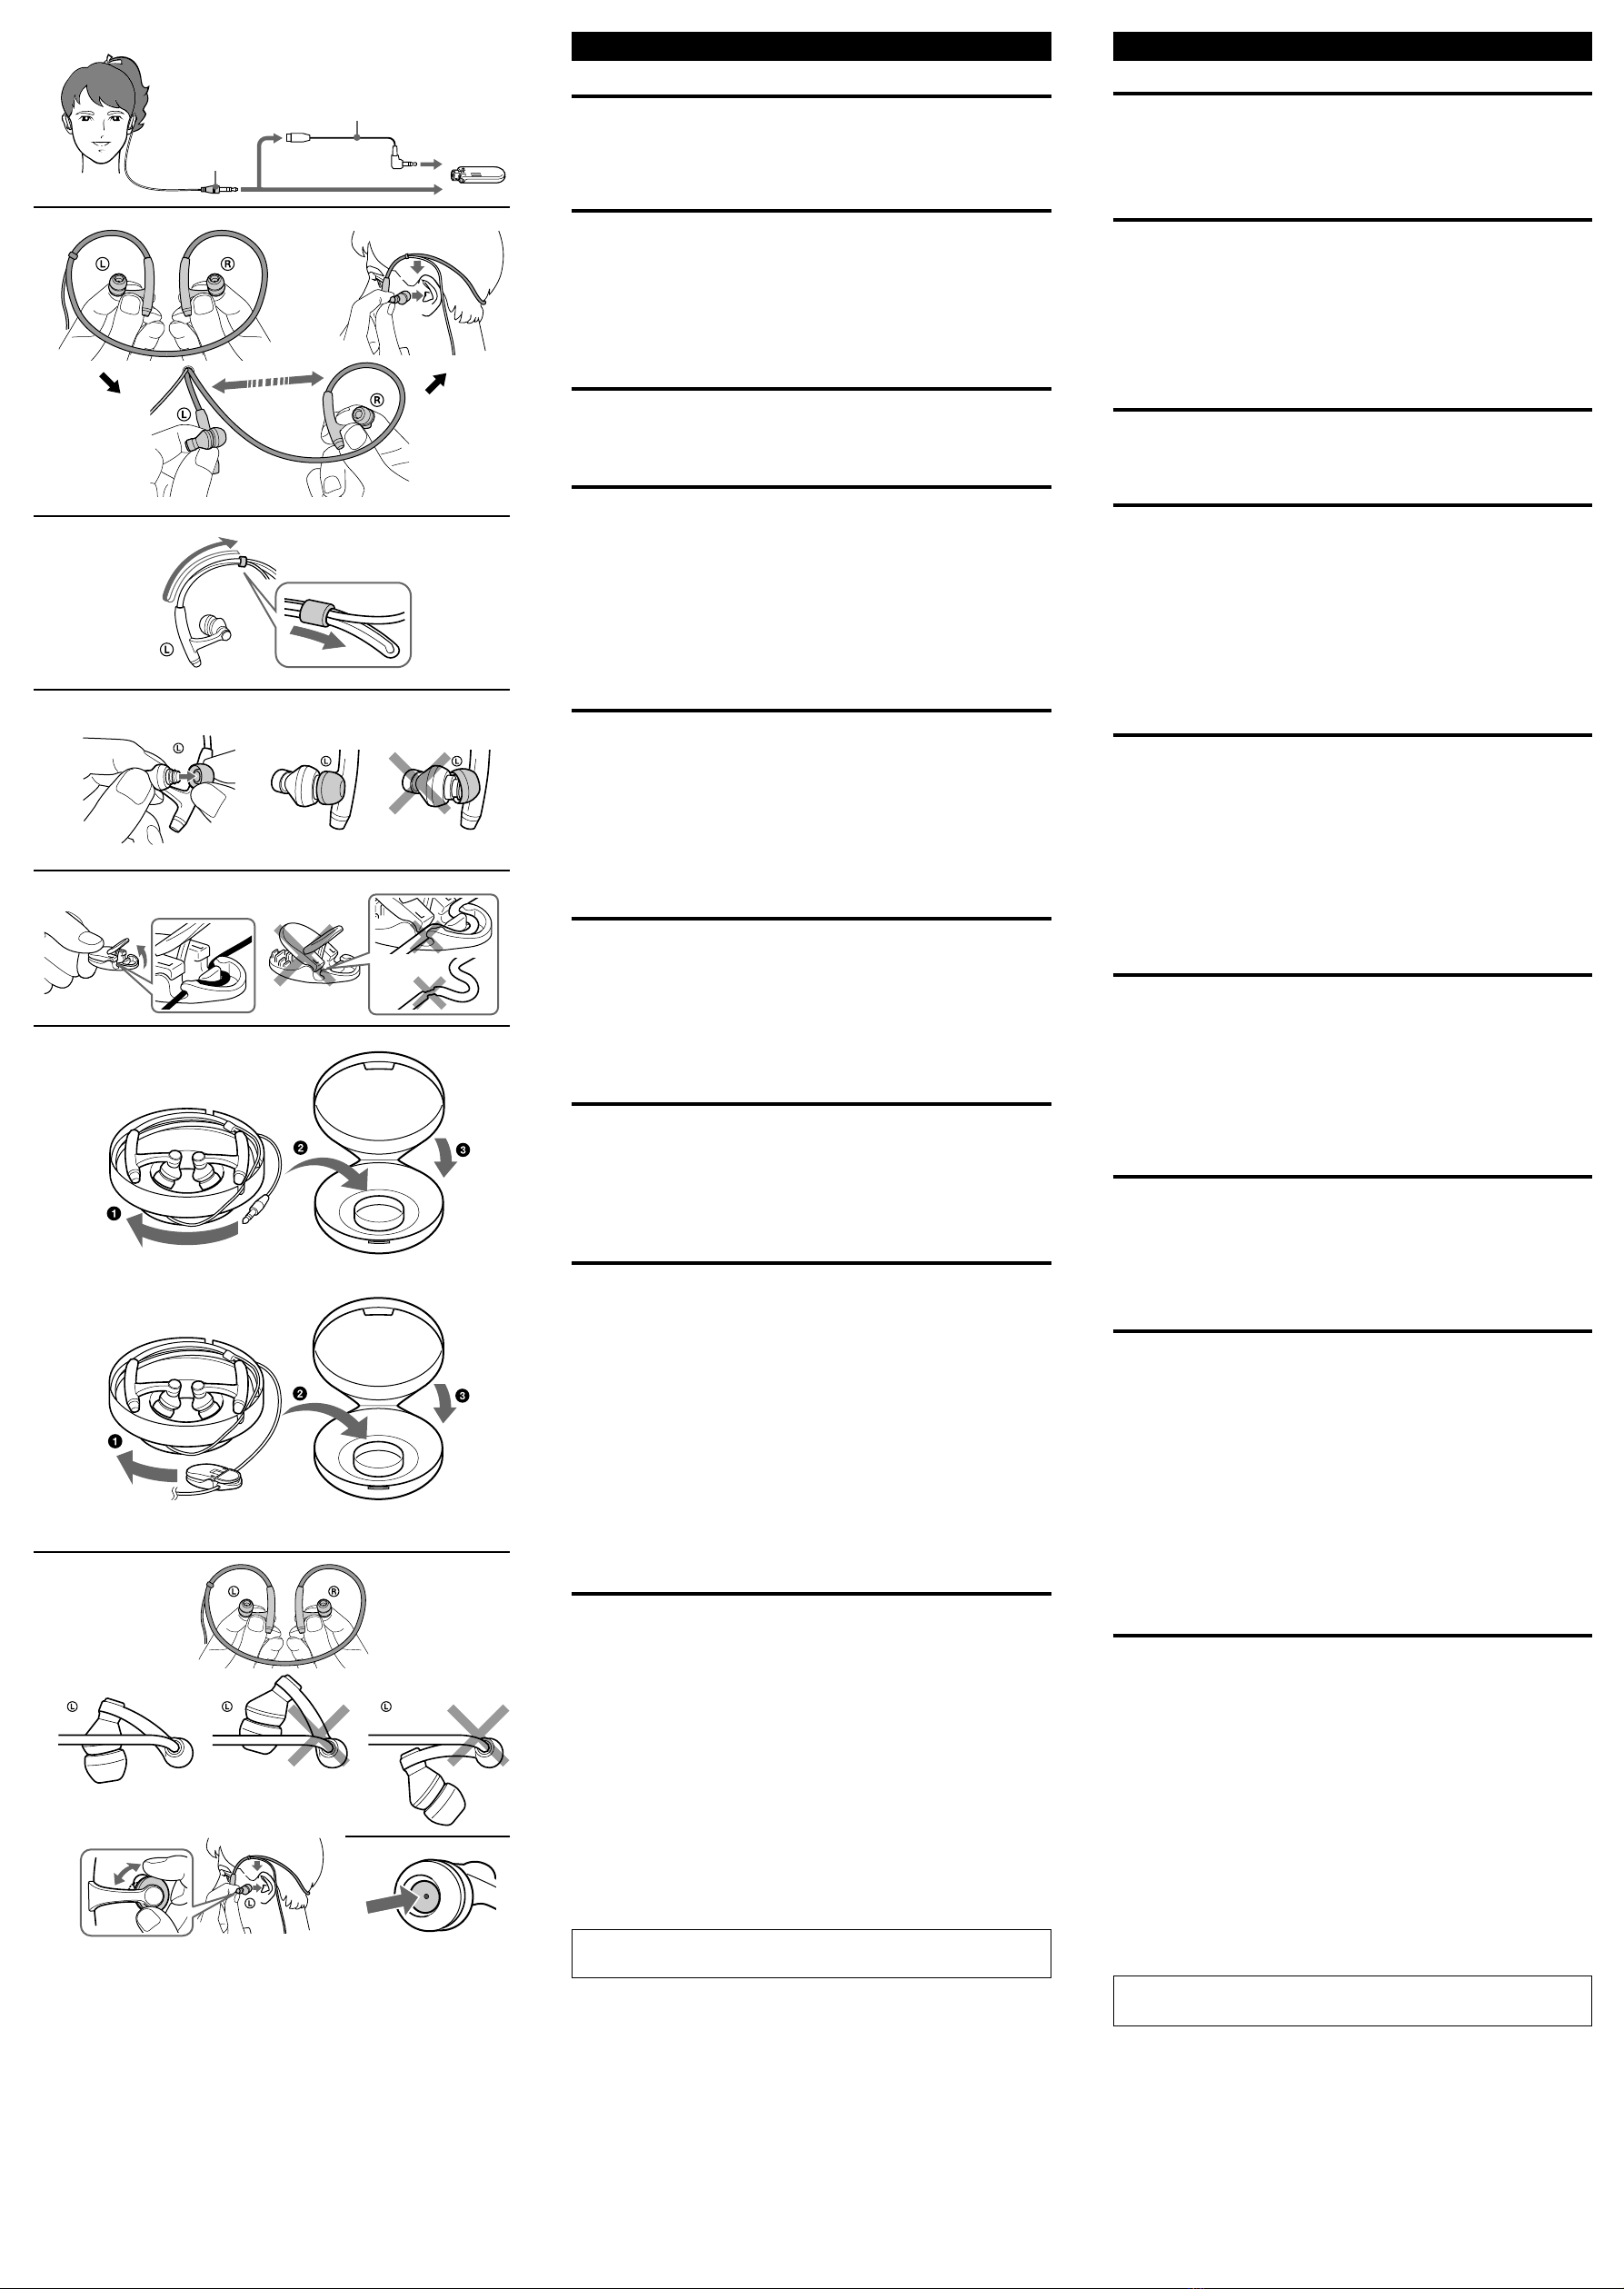
Wearing the headphones (see fig. A)
1Hold the headphones as illustrated.
2Wear the neckband around the back of your head, and insert the earpiece
marked Rin your right ear and the one marked Lin your left ear.
Adjusting the cord and position (see fig. B)
The cord length and position can be adjusted. Slide the cord adjuster to the left
side of the neckband first, and slide it back to your desired position.
When the cord is adjusted short, it is stored in the groove of the neckband.
Check the cord stored in the neckband before use.
zTip
It is recommended that the cord adjuster is positioned across the root of your
ear.
Notes
•Before adjusting the cord, take the headphones off.
• If the neckband is pulled hard or the cord is not stored in the ditch of the
neckband correctly, the cord may come out of the groove.
How to install the earbuds correctly (see
fig. C)
If the earbuds do not fit your ears correctly, low-bass sound may not be heard.
To enjoy better sound quality, change the earbuds to another size, or adjust the
earbuds position to sit on your ears comfortably and fit your ears snugly. The M
size earbuds are attached to the headphones before shipment. If you feel the M
size earbuds do not suit your ears, replace them with the supplied S or L size
earbuds. When you change the earbuds, install them firmly on the headphones
to prevent the earbuds from detaching and remaining in your ear.
Cleaning the earbuds
Remove the earbuds from the headphones, and wash them with a mild
detergent solution.
How to re-attach the cord to the clip (see
fig. D)
1Hold the clip closed, and pull up the lever on the clip just a little.
2Put the cord into the groove under the lever.
Notes
• If you pull up the lever on the clip without holding the clip closed, or holding
the clip closed but opening the lever too much, you cannot put the cord into
the groove under the lever.
• Do not catch the cord on the projection of the clip or do not wedge it into the
groove. It may damage the wires of the cord.
How to carry the headphones (see fig. E)
1Place the headphones in the inner case.
2Wind the cord around the side of the inner case and then put the inner case
in the carrying case.
Storing the headphones with the clip attached to the cord
With the clip top side facing up, wind the cord around the side of the inner case
then put the inner case in the carrying case.
Troubleshooting
If the headphones do not sit comfortably on your ears, or the earpieces tend to
slip off your ears, this may be caused by the neckband becoming distorted
during transportation.
Tr y the following check steps:
Check 1
Hold the headphones as illustrated (see fig F-1), and see if the headphones
are mostly symmetrical.
If the neckband is extremely-deformed, bend it to the correct position by hand.
Check 2
Check that the base of the neckband is not deformed (see fig F-2).
If the neckband is extremely-deformed, bend it to the correct position by hand.
If the angles of earpieces do not fit in with your ears
Adjust them by swiveling the housings. You can turn them to upwards approx.
40 degrees or less (see fig F-3).
Precautions
•Listening with headphones at high volume may affect your hearing. For traffic
safety, do not use while driving or cycling.
•Do not put weight or pressure on the headphones as it may cause the
headphones to deform during long storage.
• The earbuds may deteriorate due to long-term storage or use.
• Please keep your headphones clean at all times especially inside the rubber
earbud. (see fig. G)
If any dust or ear wax is inside the earbud, you may experience some
listening difficulties.
•Install the earbuds firmly onto the headphones. If an earbud accidentally
detaches and is left in your ear, it may cause injury.
•If you bend the neckband at the same part repeatedly, it may break. If it
breaks, a wire-like metal may be projected from the covering and you could
injure yourself. If this happens, stop using the headphones.
Note on static electricity
In particularly dry air conditions, mild tingling may be felt on your ears. This is a
result of static electricity accumulated in the body, and not a malfunction of the
headphones.
The effect can be minimized by wearing clothes made from natural materials.
There is EP-EX1 available (sold separately) as an optional replacement
earbuds.