Sony WF-1000XM3 User manual

SERVICE MANUAL
Conditions of Use:
(1) Please use this information only for the purpose of performing repair, maintenance and/or configuration services of the Sony products (hereinafter the “Repair services”) under the ser-
vice agreement entered into with the Sony group company (hereinafter the “Service agreement”). Using this information for any purpose other than the purpose described foregoing is
forbidden.
(2) Only the Authorized Servicer’s officers, employees or subcontractors (including their officers and employees) whose duties justify a need-to-know and who have agreed to hold
confidential this information (collectively hereinafter the “Permitted users”) are permitted to access and use this information. To disclose or disseminate to any person other than the
Permitted users is forbidden.
(3) Destroy or erase any and all portion of this information promptly in an irrecoverable and secure fashion after achieving the purpose described in Section (1) above.
(4) Do not copy, replicate, reproduce, alter, translate, transmit, sell, lease, or distribute this information in whole or in part without the prior written permission of the author.
(Notwithstanding foregoing, it is permitted to copy and distribute this information to the Permitted users.)
(5) Please notify immediately any leakage, loss, theft, misappropriation, or other misuse of this information by e-mail to the following address:
(6) In addition to the above, the terms and conditions of the Service agreement shall be applied to using this information.
Revision of Information:
This information may be changed or updated at any time without any prior notice. Please confirm that this information is up-to-date before using it.
Sony CONFIDENTIAL
For Authorized Servicer
Sony Home Entertainment &
Sound Products Inc.
9-896-595-01
2019F33-1
© 2019.06
WF-1000XM3
BC-WF1000XM3/WF-1000XM3L/1000XM3R
CAUTION
Danger of explosion if battery is incorrectly replaced.
Replace only with the same or equivalent type.
注意
如果电池更换不当会有爆炸危险
只能用同样类型或等效类型的电池来更换
IMPORTANT NOTE:
WF-1000XM3 sold in Korea and Taiwan area are replaced rather
than repaired.
For Korea and Taiwan area, refer to the separately issued service
manual dedicated for the Korean and Taiwan area models.
Information on Korean and Taiwan area models are not included
in this service manual.
SYSSET
2020/04/0306:12:21(GMT+09:00)

SERVICE MANUAL
Sony CONFIDENTIAL
For Authorized Servicer
US Model
Canadian Model
AEP Model
UK Model
E Model
Australian Model
Chinese Model
Tourist Model
PX Model
SPECIFICATIONS
Ver. 1.0 2019.06
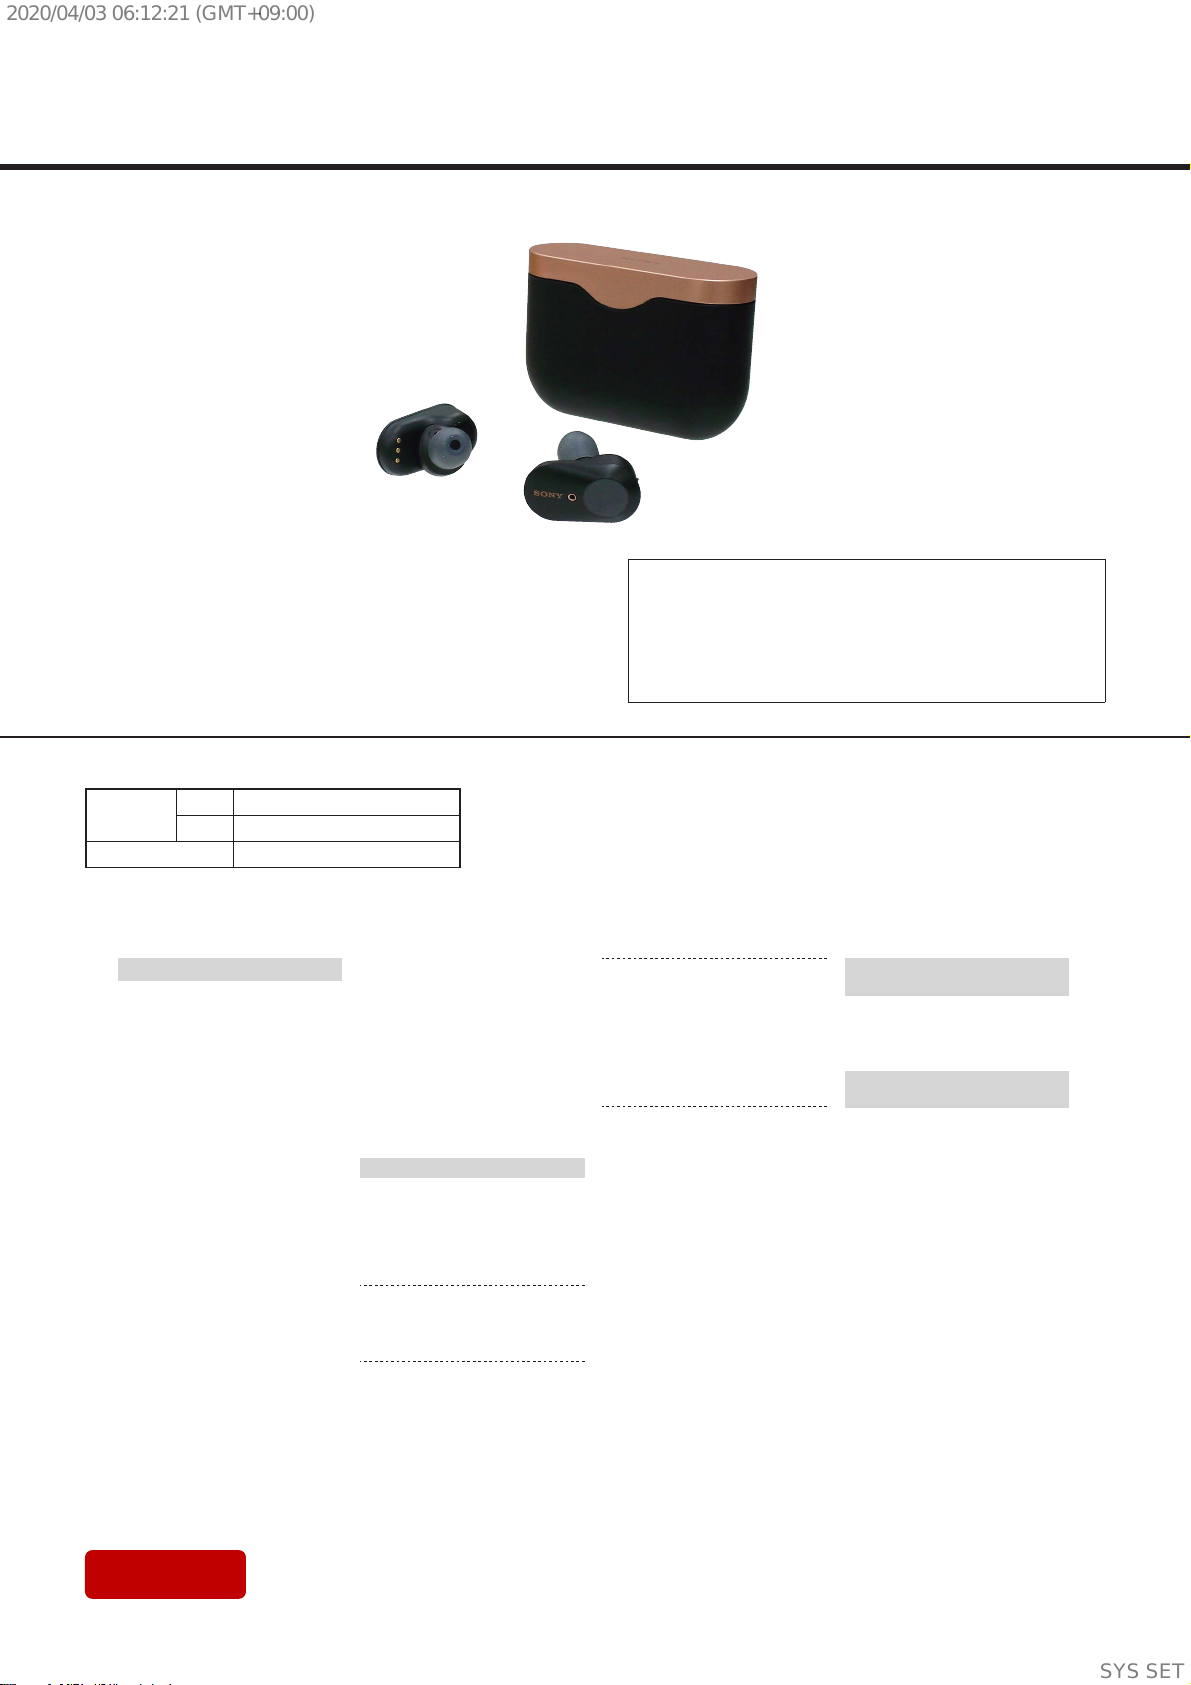
• All of the units included in the WF-1000XM3 (WF-
1000XM3L/WF-1000XM3R/Charging case) are re-
quired to repairing of this unit. Check in advance that
you have all of the units.
WF-1000XM3
BC-WF1000XM3/WF-1000XM3L/1000XM3R
IMPORTANT NOTE:
WF-1000XM3 sold in Korea and Taiwan area are replaced rather
than repaired.
For Korea and Taiwan area, refer to the separately issued service
manual dedicated for the Korean and Taiwan area models.
Information on Korean and Taiwan area models are not included
in this service manual.
Photo: Headset (R-ch)
Photo: Charging case
Photo: Headset (L-ch)
COMPONENT MODEL NAME (WF-1000XM3)
Headset L-ch WF-1000XM3L
R-ch WF-1000XM3R
Charging case BC-WF1000XM3 (See Note)
WF-1000XM3/1000XM3L/1000XM3R
WIRELESS NOISE CANCELING STEREO HEADSET
BC-WF1000XM3
CHARGING CASE
Note: The charging case for US, CND, E, AUS, JE, PX, RU and LA models are not written as “BC-WF1000XM3”. The charging case is written as “WF-
1000XM3”.
Headset
Power source:
DC 3.7 V: Built-in lithium-ion rechargeable
battery
DC 5 V: When charged using USB
Operating temperature:
0 °C to 40 °C (32 °F to 104 °F)
Rated power consumption:
1 W (Headset), 3 W (Charging case)
Usage hours:
When connecting via the Bluetooth device
Music playback time: Max. 6 hours (NC
ON), Max. 6 hours (Ambient Sound
Mode), Max. 8 hours (NC OFF)
Communication time: Max. 4 hours (NC
ON), Max. 4 hours (Ambient Sound
Mode), Max. 4.5 hours (NC OFF)
Standby time: Max. 9 hours (NC ON),
Max. 8.5 hours (Ambient Sound Mode),
Max. 15 hours (NC OFF)
Note: Usage hours may be shorter
depending on the Codec and the
conditions of use.
Charging time:
Approx. 1.5 hours (Headset)
(About 90 minutes of music playback is
possible after 10 minutes charging.)
Approx. 3.5 hours (Charging case)
Note: Charging and usage hours may be
dierent depending on the conditions of
use.
Charging temperature:
Mass:
Approx. 8.5 g × 2 (0.3 oz × 2) (Headset)
5 °C to 35 °C (41 °F to 95 °F)
Approx. 77 g (2.8 oz) (Charging case)
Included items:
Wireless Noise Canceling Stereo Headset (1)
USB Type-C™ cable (USB-A to USB-C™)
(approx. 20 cm (7.88 in.)) (1)
Long hybrid silicone rubber earbuds (SS (1
line) (2), S (2 lines) (2), M (3 lines) (attached
to the unit at the factory) (2), L (4 lines) (2))
Triple-comfort earbuds (S (orange) (2),
M (green) (2), L (light blue) (2))
Charging case (1)
Compatible Bluetooth profiles2):
A2DP / AVRCP / HFP / HSP
Supported Codec3):
SBC / AAC
(CH)
Communication specification
Communication system:
Bluetooth Specification version 5.0
Output:
Bluetooth Specification Power Class 1
Maximum communication range:
Line of sight approx. 10 m (30 ft)1)
Frequency band:
2.4 GHz band (2.4000 GHz - 2.4835 GHz)
(AEP, UK)
Operating frequency:
Bluetooth: 2,400 MHz - 2,483.5 MHz
NFC: 13.56 MHz
Maximum output power:
Bluetooth: < 10 dBm
Transmission range (A2DP):
20 Hz - 20,000 Hz (Sampling frequency 44.1
kHz)
1) The actual range will vary depending on
factors such as obstacles between devices,
magnetic fields around a microwave oven,
static electricity, reception sensitivity,
antenna’s performance, operating system,
software application, etc.
2) Bluetooth standard profiles indicate the
purpose of Bluetooth communications
between devices.
3) Codec: Audio signal compression and
conversion format
Design and specifications are subject to change
without notice.
System requirements for
battery charge using USB
USB AC adaptor
A commercially available USB AC adaptor
capable of supplying an output current of 0.5 A
(500 mA) or more
Compatible iPhone/iPod
models
iPhone X, iPhone 8 Plus, iPhone 8, iPhone 7 Plus,
iPhone 7, iPhone SE, iPhone 6s Plus, iPhone 6s,
iPhone 6 Plus, iPhone 6, iPhone 5s, iPod touch
(6th generation)
(As of May 2019)
柵䋫㱆㬙;
3/5!HI{㱆㬙濃3/5111!HI{!
.!3/5946!HI{濄
柵䋫剧♘濕
3511!NI{!.!3594/6!NI{
⌵⭨∃䋫濕
≤!31!eCn!)FJSQ*
SYSSET
2020/04/0306:12:21(GMT+09:00)

WF-1000XM3
3
Sony CONFIDENTIAL
For Authorized Servicer
1. SERVICING NOTES ................................................ 4
2. DISASSEMBLY
2-1. Disassembly Flow.............................................................. 19
2-2. Ornament Hinge Assy........................................................ 19
2-3. Case Inner Block................................................................ 20
2-4. Indicator LED .................................................................... 21
2-5. CASE NFC Board.............................................................. 21
3. EXPLODED VIEWS
3-1. Headset Section (WF-1000XM3L/1000XM3R) ............... 22
3-2. Charging Case Section....................................................... 23
4. ACCESSORIES .......................................................... 24
TABLE OF CONTENTS
Trademarks
ŞApple,K2JQPe,K2QFCPFK2QFtQWEJCrG
trCFGOCTkUQH#RRNG+PE,rGIKUtereFKPVJGU5
CPFQVJGTEQWPVTKGU
Ş7UGQHVJG/CFGHQT#RRNGDCFIGOGCPUVJCV
CPCEEesUQr[JCUDeGPFGUKIPeFtQEQPPeEV
speEKīECNN[tQVJG#RRNGRrQFWEVUKFGPVKīeFKP
VJGDCFIe,CPFJCUDeGPEerVKīeFD[VJG
FGXGNQRGTtQOeeV#RRNGRGrHQTOCPEG
stCPFCrFU#RRNGKUPQVrGURQPUKDNGHQTVJG
QRGrCVKQPQHVJKUFGXKEGQTKVUEQORNKCPEGYKVJ
UCHeV[CPFrGIWNCtQr[UtCPFCrFU
Ş)QQINGCPF#PFrQKFCrGVrCFGOCTkUQH)QQING
LL%
Ş6JG$NWetQQVJŧYQrFOCTMCPFNQIQUCrG
rGIKUtereFVrCFGOCTkUQYPeFD[VJG$NWetQQVJ
5+),+PECPFCP[WUGQHUWEJOCTkUD[5QP[
CQTRQrCVKQPKUWPFGTNKEGPUe
Ş6JG0/CTMKUCVrCFGOCTMQTrGIKUtereF
trCFGOCTMQH0(%(QTWO,+PEKPVJG7PKteF
5tCtGUCPFKPQVJGTEQWPVTKGU
Ş75$T[RG%ŨCPF75$%ŨCrGVrCFGOCTkUQH
75$+ORNGOGPtGTU(QTWO
Ş1VJGTtrCFGOCTksCPFtrCFGPCOGUCreVJQUGQH
VJGKTrespeEVKXGQYPGTU
Notes on the License
6JKURrQFWEVEQPtCKPUUQHVYCrGVJCV5QP[WUGU
WPFGTCNKEGPUKPICIreGOGPVYKVJVJGQYPGTQH
KVUEQR[TKIJVWGCrGQDNKICteFtQCPPQWPEGVJG
EQPtGPVUQHVJGCIreGOGPVtQEWUtQOGTUWPFGT
reSWKrGOGPVD[VJGQYPGTQHEQR[TKIJVHQTVJG
UQHVYCre
2NGCUGCEEesUVJGHQNNQYKPI74.CPFrGCFVJG
EQPtGPVUQHVJGNKEGPUe
JVVRUrFUQPyPeVJGNROFTUND
SYSSET
2020/04/0306:12:21(GMT+09:00)

WF-1000XM3
4
Sony CONFIDENTIAL
For Authorized Servicer
SECTION 1
SERVICING NOTES
The SERVICING NOTES contains important information for servicing. Be sure to read this section before repairing the unit.
ADVANCE PREPARATION WHEN REPAIRING
All of the units included in the WF-1000XM3 (WF-1000XM3L/
WF-1000XM3R/Charging case) are required to repairing of this
unit. Check in advance that you have all of the units.
DESTINATION ABBREVIATIONS
The following abbreviations for model destinations are used in this
service manual.
• Abbreviations
AEP : European area, East European area, CIS area (Moldova)
and Middle East area (Israel) models
AUS : Australian (Oceania area) model
CH : Chinese model
CND : Canadian model
E : Middle East area (Except for Israel), South East Asian area
(Except for India), East Asian area (Except for China, Ko-
rea, Taiwan area) and African area models
JE : Tourist model
LA : Latin American area model
RU : Russian (CIS area: Except for Moldova) model
IMPORTANT NOTE:
WF-1000XM3 sold in Korea and Taiwan area are replaced rather than
repaired.
For Korea and Taiwan area, refer to the separately issued service manual
dedicated for the Korean and Taiwan area models.
Information on Korean and Taiwan area models are not included in this
service manual.
MODEL IDENTIFICATION
When identifying the destination of this unit, referring to the writ-
ing contents on the model number label etc. on the inner side of the
charging case.
Note 1: Writing contents of the model number label may be changed in the
midway of production.
Note 2: Can not identifying the destination by referring to the main unit of
the left and right headset (WF-1000XM3L/1000XM3R).
US, CND, PX, LA
AEP, UK
E, AUS, JE, RU
CH
COLOR VARIATIONS
(B) Black, (S) Platinum Silver
SYSSET
2020/04/0306:12:21(GMT+09:00)

WF-1000XM3
5
Sony CONFIDENTIAL
For Authorized Servicer
SERIAL NUMBER CHECKING METHOD
When checking the serial number, open the charging case lid and
refer to the position shown in the figure below on the model number
label engraved on the inside of the hinge.
Note: Serial numbers are not written on the left and right headset (WF-
1000XM3L/1000XM3R).
Serial number
THE EACH UNIT MODEL NAME CHECKING METHOD
When checking the model name of each unit, refer to the figure be-
low.
Note: The model name of the charging case is written as “BC-WF1000XM3”
only for AEP, UK and CH models.
Other destination models are written as “WF-1000XM3”.
Charging case (US, CND, PX, LA)
Left side headset
WF-1000XM3L
WF-1000XM3
WF-1000XM3R
Right side headset
Charging case (AEP, UK, CH)
Charging case (E, AUS, JE, RU)
BC-WF1000XM3
WF-1000XM3
OPERATION CHECK OF THE NFC FUNCTION AFTER
COMPLETING THE REPAIRS
After completing the repairs of this unit, follow the procedure below
to check normal operation of the NFC.
Preparation:
• NFC compatible device (smartphone or music player etc.)
Procedure:
1. Turn on the NFC function of the NFC compatible device.
(For details, refer to the instruction manual of your NFC com-
patible device. The figure below is a reference example)
2. Remove the left and right headset from the charging case.
(The unit power is turns on (blue flashing) automatically)
Note 1: If it is already removed the left and right headset from the charg-
ing case and the power is off, put it in the charging case again and
remove it.
LR
blue blue
3. Touch the N-mark part of the NFC compatible device to the N-
mark part of the charging case, the blue flashing changes from
slow to fast, and the connection is completed.
(After connection is complete, the blue flashing is return to slow)
Note 2: If the screen of the NFC compatible device is locked, please unlock
it and then touch it.
LR
(slow)
(N-mark touch)
(connected)
(fast)
(slow)
– Continued on next page –
SYSSET
2020/04/0306:12:21(GMT+09:00)

WF-1000XM3
6
Sony CONFIDENTIAL
For Authorized Servicer
4. Attach the left and right headset to your ears. Then the audio
playback from the NFC compatible device, and check that the
sound is output from the left and right headset.
Note 3: Sound is not output just by attaching a headset on one side. Be sure
to attach the left and right headset.
LR
R
or
tap once
5. Touch the N-Mark part of the charging case with N-Mark of the
NFC compatible device again to disconnect the connection, and
complete the operation check.
Note 4: Before returning the product to the customer, refer to “INITIALIZ-
ING METHOD” on page 7 and delete the Bluetooth device pairing
information.
RESETTING METHOD
If this unit does not operate properly, perform the reset.
Note 1: Even if this work is performed, device pairing information is not
deleted. Also, other settings are retained.
Resetting procedure:
1. Attach the left and right headset to the charging case.
LR
2. Touch and hold the touch sensor control panel on the left side
headset (WF-1000XM3L), and the indicator changes from red
lighting to red flashing, then check the indicator is turn off and
the then release your finger.
Note 2: It takes about 20 seconds to touch and release the touch sensor con-
trol panel.
Touch sensor
control panel
Red lighting: Touch and hold
LR
Red flashing: Touch and hold
LR
Turn off: Release your finger
LR
3. Touch and hold the touch sensor control panel on the right side
headset (WF-1000XM3R), and the indicator changes from red
lighting to red flashing, then check the indicator is turn off and
the then release your finger.
Note 3: It takes about 20 seconds to touch and release the touch sensor con-
trol panel.
Red lighting: Touch and hold
LR
Touch sensor
control panel
Red flashing: Touch and hold
LR
Turn off: Release your finger
LR
4. The reset is complete.
SYSSET
2020/04/0306:12:21(GMT+09:00)

WF-1000XM3
7
Sony CONFIDENTIAL
For Authorized Servicer
INITIALIZING METHOD
After completing the repair, be sure to initialize this unit according
to the following procedure.
Note 1: When this work is performed, all device pairing information is
deleted and settings return to factory defaults.
Procedure:
1. Attach the left and right headset to the charging case.
LR
2. Touch and hold the touch sensor control panel on the left and
right headset simultaneously, and the indicator changes from red
lighting to red flashing, then release the your finger while red
flashing state.
Note 2: It takes about 10 seconds to touch and release the touch sensor con-
trol panel.
Red lighting: Touch and hold
LR
Touch sensor
control panel
Red flashing: Release your finger
LR
3. The left and right headset indicator automatically changes from
red flashing to 4 times of blue flashing, and when the indicator is
turn off, initialization is complete.
Note 3: When this operation is performed, it might not be able to connect to
iPhone or PC.
In that case, delete the registration of this unit on iPhone or PC,
register the device again.
LR
Turn offBlue flashing (4 times)
LR
ABOUT REPAIR OF EACH UNIT
All units included in this unit can not be disassembled and repaired.
Refer to the following according to the unit which has broken re-
spectively.
Note: It is necessary to disassemble the charging case only when repairing
and replacing the left side headset (WF-1000XM3L).
Left side headset : REPAIRING AND REPLACING OF THE
LEFT SIDE HEADSET (WF-1000XM3L) (re-
fer to the following)
Right side headset : REPAIRING AND REPLACING OF THE
RIGHT SIDE HEADSET (WF-1000XM3R)
(refer to page 9)
Charging case : REPAIRING AND REPLACING OF THE
CHARGING CASE (refer to page 10)
REPAIRING AND REPLACING OF THE LEFT SIDE
HEADSET (WF-1000XM3L)
The left side headset (WF-1000XM3L) will be replaced in the state
of the finished product. It can not be repaired by disassembling the
left side headset (WF-1000XM3L).
Also, if you replaced the left side headset (WF-1000XM3L), neces-
sary to disassemble the charging case and replace the CASE NFC
board at the same time.
When replacing the left side headset (WF-1000XM3L), perform the
work for according to the following procedure.
Note 1: The repair parts of the left side headset (WF-1000XM3L) are in-
cluding the CASE NFC board (with NFC sheet, adhesive sheet
NFC) paired with the new WF-1000XM3L besides the new WF-
1000XM3L.
Check in advance:
• Check that you have all of the left and right headset (WF-1000
XM3L, WF-1000XM3R) and charging case, included in the WF-
1000XM3.
• Be sure to check that there are no WF-1000XM3 in the surround-
ings (within about 50 cm). If using WF-1000XM3 in the sur-
roundings (within about 50 cm), it may connect to another WF-
1000XM3.
Replacing procedure of left side headset (WF-1000XM3L):
1. Replace the broken left side headset with the new left side head-
set.
Note 2: Change the long hybrid silicone rubber earbud or triple-comfort
earbud to new WF-1000XM3L from the broken WF-1000XM3L.
L
L
– Continued on next page –
SYSSET
2020/04/0306:12:21(GMT+09:00)

WF-1000XM3
8
Sony CONFIDENTIAL
For Authorized Servicer
2. Refer to “2. DISASSEMBLY” on page 19, disassemble the charg-
ing case and replace the inside CASE NFC board with the new
CASE NFC board and assemble as it was before.
(The figure below is an image figure)
Note 3: The repair parts of the left side headset are including the CASE
NFC board (with NFC sheet, adhesive sheet NFC) paired with the
new WF-1000XM3L besides the new WF-1000XM3L.
Note 4: If you disassemble the charging case in order to replace the CASE
NFC board, reuse the removed parts other than CASE NFC board
(with NFC sheet, adhesive sheet NFC), adhesive sheet hall for fix-
ing the case inner block and ornament hinge.
Disassemble
Assemble
Remove the CASE NFC board.
(Does not use the removed CASE
NFC board)
Attach the new CASE NFC board.
(The new CASE NFC board is
included in the left side headset
(WF-1000XM3L) for repair parts)
3. Attach the left and right headset to the charging case.
Note 5: The left and right headset will display a warning message (3 times
red flashing repeat), but proceed to the next step as it is.
LR
warning message
(3 times red flashing repeat)
4. Touch and hold the touch sensor control panel on the left and
right headset simultaneously, and the indicator changes from
warning message (3 times red flashing repeat) to red flashing
(slow), in this state release the your finger.
Note 6: It takes about 10 seconds to touch and release the touch sensor con-
trol panel.
LR
Touch sensor
control panel
LR
Warning message (3 times
red flashing repeat):
Touch and hold
Red flashing (slow):
Release your finger
5. The left and right headset indicator automatically changes from
red flashing to 4 times of blue flashing, and when the indicator is
turn off, pairing of left and right headset is complete.
Note 7: When this operation is performed, it might not be able to connect to
iPhone or PC.
In that case, delete the registration of this unit on iPhone or PC,
register the device again.
LR
Turn offBlue flashing (4 times)
LR
6. Check the operation of this unit and complete the left side head-
set replacement work.
SYSSET
2020/04/0306:12:21(GMT+09:00)

WF-1000XM3
9
Sony CONFIDENTIAL
For Authorized Servicer
REPAIRING AND REPLACING OF THE RIGHT SIDE
HEADSET (WF-1000XM3R)
The right side headset (WF-1000XM3R) will be replaced in the state
of the finished product. It can not be repaired by disassembling the
right side headset (WF-1000XM3R).
When replacing the right side headset (WF-1000XM3R), perform
the work for according to the following procedure.
Check in advance:
• Check that you have all of the left and right headset (WF-1000
XM3L, WF-1000XM3R) and charging case, included in the WF-
1000XM3.
• Be sure to check that there are no WF-1000XM3 in the surround-
ings (within about 50 cm). If using WF-1000XM3 in the sur-
roundings (within about 50 cm), it may connect to another WF-
1000XM3.
Replacing procedure of right side headset (WF-1000XM3R):
1. Replace the broken right side headset with the new right side
headset.
Note 1: Change the long hybrid silicone rubber earbud or triple-comfort
earbud to new right side headset (WF-1000XM3R) from the broken
right side headset (WF-1000XM3R).
R
R
2. Attach the left and right headset to the charging case.
Note 2: The left and right headset will display a warning message (3 times
red flashing repeat), but proceed to the next step as it is.
LR
warning message
(3 times red flashing repeat)
3. Touch and hold the touch sensor control panel on the left and
right headset simultaneously, and the indicator changes from
warning message (3 times red flashing repeat) to red flashing
(slow), in this state release the your finger.
Note 3: It takes about 10 seconds to touch and release the touch sensor con-
trol panel.
LR
Touch sensor
control panel
LR
Warning message (3 times
red flashing repeat):
Touch and hold
Red flashing (slow):
Release your finger
4. The left and right headset indicator automatically changes from
red flashing to 4 times of blue flashing, and when the indicator is
turn off, pairing of left and right headset is complete.
Note 4: When this operation is performed, it might not be able to connect to
iPhone or PC.
In that case, delete the registration of this unit on iPhone or PC,
register the device again.
LR
Turn offBlue flashing (4 times)
LR
5. Check the operation of this unit and complete the right side
headset replacement work.
SYSSET
2020/04/0306:12:21(GMT+09:00)

WF-1000XM3
10
Sony CONFIDENTIAL
For Authorized Servicer
REPAIRING AND REPLACING OF THE CHARGING CASE
The charging case will be replaced in the state of the finished prod-
uct. It can not be repaired by disassembling the charging case.
When replacing the charging case, perform the work for according
to the following procedure.
Check in advance:
• Check that you have all of the left and right headset (WF-1000
XM3L, WF-1000XM3R) and charging case, included in the WF-
1000XM3.
• Be sure to check that there are no WF-1000XM3 in the surround-
ings (within about 50 cm). If using WF-1000XM3 in the sur-
roundings (within about 50 cm), it may connect to another WF-
1000XM3.
Preparation:
• Windows PC with the Bluetooth function
• NFC compatible smartphone that installed the NFC Tag Data Writ-
ing Application
Note 1: For the NFC Tag Data Writing Application, refer to “BLUETOOTH
INFORMATION WRITING METHOD” on page 11.
Note 2: Confirm the method of obtaining the NFC Tag Data Writing Ap-
plication and its latest version with the each service headquarters.
Replacing procedure of charging case:
1. Replace the broken charging case with the new charging case.
2. Attach the left and right headset to your ears, then touch and
hold the touch sensor control panel on the left and right headset
simultaneously for about 7 seconds to entering the pairing mode
state.
(Voice guidance of “Bluetooth pairing” is heard from the left
side headset, and it entering the pairing mode)
LR
about 7
seconds
touch sensor control panel
3. Connect with the PC with the Bluetooth function.
Note 3: In order to check the Bluetooth address, it is necessary to connect
the PC and this unit. It is also possible to display the Bluetooth
address, by the Bluetooth connect to the walkman (NW-S series
or NW-A series etc.) with Bluetooth function. In this example, de-
scribes how to display Bluetooth address using the PC.
Note 4: For the Bluetooth connection method of the PC, refer to the manual
of the PC to be used.
LR
4. Display the device information of this unit connected via Blue-
tooth on the screen of a PC. Then open the “Properties”, check
the Bluetooth address of this unit, and take a memorandum the
Bluetooth address.
Note 5: The figure below is a reference example. The display method of
Bluetooth address may be different depending on Windows OS. If
your using PC’s OS is Windows 8.1, open the “Control Panel →
Device and Printers” in this order, right click the icon showing the
model name (WF-1000XM3) of this unit and open its “Properties”.
Note 6: Check the device name carefully so as not to confuse Bluetooth
address with other devices, and take a memorandum.
“Device and Printers” screen on PC
Right click and
select the “Properties”.
WF-1000XM3
“Properties” screen
WF-1000XM3 Properties
WF-1000XM3
5. Write the Bluetooth information recorded in step 4 to the charg-
ing case using NFC compatible smartphone that installed the
NFC Tag Data Writing Application.
(Refer to “BLUETOOTH INFORMATION WRITING METH-
OD” on page 11)
– Continued on next page –
SYSSET
2020/04/0306:12:21(GMT+09:00)

WF-1000XM3
11
Sony CONFIDENTIAL
For Authorized Servicer
6. After writing the Bluetooth information, attach the left and right
headset to the charging case.
LR
7. Touch and hold the touch sensor control panel on the left and
right headset simultaneously, and the indicator changes from red
lighting to red flashing, then release the your finger while red
flashing state.
Note 7: It takes about 10 seconds to touch and release the touch sensor con-
trol panel.
Red lighting: Touch and hold
LR
Touch sensor
control panel
Red flashing: Release your finger
LR
8. The left and right headset indicator automatically changes from
red flashing to 4 times of blue flashing, and when the indicator
is turn off, the pairing information with the PC is deleted and
initialization is complete.
Note 8: When this operation is performed, it might not be able to connect to
iPhone or PC.
In that case, delete the registration of this unit on iPhone or PC,
register the device again.
LR
Turn offBlue flashing (4 times)
LR
9. Check the operation of this unit.
10. Select the device (WF-1000XM3) displayed on the PC, right
click and select “Remove device” from the displayed menu and
delete the device (WF-1000XM3).
Note 9: When another WF-1000XM3 is connected to the PC by Bluetooth
connection, a new device (WF-1000XM3) will be added.
If there are plural devices (WF-1000XM3), you may errone-
ously reference and write the Bluetooth address of another WF-
1000XM3. Therefore, delete the existing device before adding a
new device.
11. Complete the replacement work on the charging case.
BLUETOOTH INFORMATION WRITING METHOD
When the charging case is replaced, it is necessary to perform writ-
ing of Bluetooth information.
Write the Bluetooth information according to the procedure below.
Preparation:
• Windows PC with the Bluetooth function
• NFC compatible smartphone that installed the file manager ap-
plication (ASTRO File Manager, File Expert, etc.)
• USB cable for the smartphone
• NFC Tag Data Writing Application
(Application name: mdr-nfc-tag-writer_2.0.1.apk)
Note 1: “2.0.1” in the file name indicates the version of NFC Tag Data Writ-
ing Application. Always use the latest version of the NFC Tag Data
Writing Application.
Example: mdr-nfc-tag-writer_2.0.1.apk
version
Note 2: Confirm the method of obtaining the NFC Tag Data Writing Ap-
plication and its latest version with the each service headquarters.
Notes on the use of the NFC Tag Data Writing Applica-
tion
• The NFC Tag Data Writing Application may be updated ir-
regularly.
Always use the latest version of the NFC Tag Data Writing
Application.
The version of NFC Tag Data Writing Application is repre-
sented by the file name of NFC Tag Data Writing Applica-
tion.
Example: mdr-nfc-tag-writer_2.0.1.apk
version
• Be sure to uninstall older versions of the NFC Tag Data
Writing Application before installing the latest version.
• The NFC Tag Data Writing Application is also used in mod-
els other than the headphone category, and there are multiple
types. If multiple NFC Tag Data Writing Applications are
installed on a smartphone, do not launch more than one at
the same time.
• The NFC Tag Data Writing Application varies depending on
your model.
Be sure to use the specified NFC Tag Data Writing Applica-
tion.
Use of not specified NFC Tag Data Writing Application is
strictly prohibited.
1. Installing the NFC Tag Data Writing Application
Install the NFC Tag Data Writing Application on the smartphone
for writing of Bluetooth information.
If the NFC Tag Data Writing Application is already installed,
confirm the following.
• Be absolutely sure that the NFC Tag Data Writing Ap-
plication supports your model.
• Confirm that the NFC Tag Data Writing Application is
the latest version.
The version of NFC Tag Data Writing Application is rep-
resented by the file name.
Example: mdr-nfc-tag-writer_2.0.1.apk
version
SYSSET
2020/04/0306:12:21(GMT+09:00)

WF-1000XM3
12
Sony CONFIDENTIAL
For Authorized Servicer
Procedure:
1. Prepare the NFC Tag Data Writing Application on the PC.
Note 1: Be absolutely sure that the NFC Tag Data Writing Application sup-
ports your model and that it is the latest version.
2. Using the USB cable for the smartphone, connect the smart-
phone and the PC, and transfer the NFC Tag Data Writing Ap-
plication to the smartphone.
USB cable
3. When tapping the “Settings” →“Security” on the screen of the
smartphone, and check the “Unknown sources” checkbox.
(The figure below is a reference example)
Note 2: Depending on the version of Android OS, this setting may not exist.
In that case, skip this step and proceed to the next step.
Put a check
4. Disconnect the smartphone from the PC.
USB cable
5. Use the file manager application to open the saved location of
the NFC Tag Data Writing Application on the smartphone.
6. Tap on the NFC Tag Data Writing Application to open it, and
install the NFC Tag Data Writing Application to the smartphone.
(The figure below is a reference example)
Tap Tap
2.0.1
7. When tapping the “Settings” →“Security” on the screen of the
smartphone, and uncheck the “Unknown sources” checkbox.
(The figure below is a reference example)
Note 3: Depending on the version of Android OS, this setting may not exist.
In that case, skip this step and proceed to the next step.
Uncheck
8. Complete install of NFC Tag Data Writing Application.
(The figure below is a reference example)
NFC Tag Data
Writing Application
–
Screen after the installation
for reference –
This completes the Installing the NFC Tag Data Writing Applica-
tion.
Please proceed to the “2. Writing the NFC Tag Data” on page 13.
SYSSET
2020/04/0306:12:21(GMT+09:00)

WF-1000XM3
13
Sony CONFIDENTIAL
For Authorized Servicer
2. Writing the NFC Tag Data
Write NFC tag data (Bluetooth information) to the CASE NFC board
inside the charging case.
Procedure:
1. Prepare the Bluetooth address (BD_ADDR) recorded in step
4 of “REPAIRING AND REPLACING OF THE CHARGING
CASE” on page 10.
2. Open the “NFC setting” from “Settings” on the smartphone screen
and turn on the NFC function of the smartphone.
(The figure below is a reference example)
Note 1: Locations and names with settings may differ depending on the ver-
sion of Android OS. Refer to the instruction manual of smartphone
for more details.
Tap
Put a
check
3. Start the NFC Tag Data Writing Application on the smartphone.
(The figure below is a reference example)
NFC Tag Data
Writing Application
4. Tap the “Write” button.
Tap
5. Tap the “List” button and select the model name of the applica-
ble to this unit from the list, or tap the “Bluetooth Local Name”
to input the model name with the keyboard on the smartphone.
When selecting the
model name.
When input to directly
with the keyboard.
Do not tap “Write”
button in this step.
6. Tap the “Bluetooth Device Address” and input the Bluetooth ad-
dress prepared in step 1 directly with the keyboard on the smart-
phone.
Note 2: In the case of this unit, “QR” button is not used.
Not used
When input to directly
with the keyboard.
Do not tap “Write”
button in this step.
WF-1000XM3
7. Check the “Read-only” checkbox is unchecked, and tap the
“Write” button and check that “Writable” is displayed.
Unchecked
Tap
Check
WF-1000XM3
WF-1000XM3
– Continued on next page –
SYSSET
2020/04/0306:12:21(GMT+09:00)

WF-1000XM3
14
Sony CONFIDENTIAL
For Authorized Servicer
8. In the state of step 7, touch the N-mark part of the smartphone to
the N-mark part of the charging case.
Note 3: Be sure to touch the new charging case of repair parts. If you touch
the charging case other than the one for repair, such as the charging
case before replacement, an error will be displayed in the next step.
9. Check that “Success!” is displayed on the screen of the smart-
phone and tap “OK” button.
Tap
Check
Note 4: When “Success!” is not displayed, refer to “3. Error Display” on
page 16.
Note 5: In the step 8, if you touch the charging case other than the one for
repair, such as the charging case before replacement, an error will
be displayed. In this case, restart from step 8 again.
10. End the NFC Tag Data Writing Application.
11. Check the operation of connecting smartphone and this unit with
NFC function.
(Refer to “OPERATION CHECK OF THE NFC FUNCTION
AFTER COMPLETING THE REPAIRS” on page 5)
12. Start again the NFC Tag Data Writing Application.
(The figure below is a reference example)
NFC Tag Data
Writing Application
13. Tap the “Write” button.
Tap
14. Check the “Read-only” checkbox is checked, and tap the “Write”
button and check that “Read-only” is displayed.
Put a
check
Tap
Check
WF-1000XM3
WF-1000XM3
15. In the state of step 14, touch the N-mark part of the smartphone
to the N-mark part of the charging case.
Note 6: Be sure to touch the new charging case of repair parts. If you touch
the charging case other than the one for repair, such as the charging
case before replacement, an error will be displayed in the next step.
– Continued on next page –
SYSSET
2020/04/0306:12:21(GMT+09:00)

WF-1000XM3
15
Sony CONFIDENTIAL
For Authorized Servicer
16. Check that “Success!” is displayed on the screen of the smart-
phone and tap “OK” button.
Tap
Check
Note 7: When “Success!” is not displayed, refer to “3. Error Display” on
page 16.
Note 8: In the step 15, if you touch the charging case other than the one for
repair, such as the charging case before replacement, an error will
be displayed. In this case, restart from step 15 again.
17. Tap the “Read” button.
Tap
18. In the state of step 17, touch the N-mark part of the smartphone
to the N-mark part of the charging case.
19. Check that “BD_ADDR” displayed on the screen of the smart-
phone matches the Bluetooth address checked in step 1 and the
“MODE” column is “0000 (Read-only)”.
Check
20. End the NFC Tag Data Writing Application.
21. Check the operation of connecting smartphone and this unit with
NFC function.
(Refer to “OPERATION CHECK OF THE NFC FUNCTION
AFTER COMPLETING THE REPAIRS” on page 5)
22. Complete writing the NFC tag data.
Refer to the following as necessary.
“3. Error Display” (page 16)
“4. Check Method of the NFC Tag Data” (page 17)
“5. The Factor that One Touch Connection (NFC function) is Impos-
sible” (page 18)
SYSSET
2020/04/0306:12:21(GMT+09:00)

WF-1000XM3
16
Sony CONFIDENTIAL
For Authorized Servicer
3. Error Display
When the writing of the NFC tag data has failed, “Error” is dis-
played on the screen of the smartphone.
When “Error” is displayed, operate according to the procedure be-
low.
Procedure:
1. Tap “OK” button of “Error” display screen.
Tap
When error is displayed in
step 9 of “2. Writing the NFC
Tag Data”.
When error is displayed in
step 16 of “2. Writing the
NFC Tag Data”.
WF-1000XM3
WF-1000XM3
2. When error occurs in step 9 of “2. Writing the NFC Tag Data” on
page 14, operate the procedure from step 8 on page 14 again.
When error occurs in step 16 of “2. Writing the NFC Tag Data”
on page 14, operate the procedure from step 15 on page 14
again.
3. If “Error” is displayed again in step 9 or step 16 of “2. Writing
the NFC Tag Data” on page 14, after tapping “OK” button on
“Error” display screen, tap “ ” (or “g” etc.) twice and return to
the first screen.
(The figure below is a reference example of an error case in step
9 on page 14)
Tap Tap twice
WF-1000XM3
4. Tap the “Read” button.
Tap
5. In the state of the above step 4, touch the N-mark part of the
smartphone to the N-mark part of the charging case.
6. Check that the “MODE” column is other than “0000 (Read-on-
ly)”.
Check
Note: If “MODE” column is displayed as “0000 (Read-only)”, NFC tag data
can not be written.
Prepare another new charging case again, and start to all over again
writing the NFC tag data. (The charging case indicated as “0000
(Read-only)” can not be used)
SYSSET
2020/04/0306:12:21(GMT+09:00)

WF-1000XM3
17
Sony CONFIDENTIAL
For Authorized Servicer
4. Check Method of the NFC Tag Data
If you want to check the NFC tag data of this unit after completing
writing NFC tag data, check to the following procedure.
Preparation:
• Windows PC with Bluetooth function
• NFC compatible smartphone that installed the NFC Tag Data
Writing Application
Procedure:
1. Attach the left and right headset to your ears, then touch and
hold the touch sensor control panel on the left and right headset
simultaneously for about 7 seconds to entering the pairing mode
state.
(Voice guidance of “Bluetooth pairing” is heard from the left
side headset, and it entering the pairing mode)
LR
about 7
seconds
touch sensor control panel
2. Connect with the PC with the Bluetooth function.
Note 1: In order to check the Bluetooth address, it is necessary to connect
the PC and this unit. It is also possible to display the Bluetooth
address, by the Bluetooth connect to the walkman (NW-S series
or NW-A series etc.) with Bluetooth function. In this example, de-
scribes how to display Bluetooth address using the PC.
Note 2: For the Bluetooth connection method of the PC, refer to the manual
of the PC to be used.
LR
3. Display the device information of this unit connected via Blue-
tooth on the screen of a PC. Then open the “Properties”, check
the Bluetooth address of this unit.
Note 3: The figure below is a reference example. The display method of
Bluetooth address may be different depending on Windows OS. If
your using PC’s OS is Windows 8.1, open the “Control Panel →
Device and Printers” in this order, right click the icon showing the
model name (WF-1000XM3) of this unit and open its “Properties”.
Note 4: Check the device name carefully so as not to confuse Bluetooth
address with other devices.
“Device and Printers” screen on PC
Right click and
select the “Properties”.
WF-1000XM3
“Properties” screen
WF-1000XM3 Properties
WF-1000XM3
4. Open the “NFC setting” from “Settings” on the smartphone
screen and turn on the NFC function of the smartphone.
(The figure below is a reference example)
Note 5: Locations and names with settings may differ depending on the ver-
sion of Android OS. Refer to the instruction manual of smartphone
for more details.
Tap
Put a
check
– Continued on next page –
SYSSET
2020/04/0306:12:21(GMT+09:00)

WF-1000XM3
18
Sony CONFIDENTIAL
For Authorized Servicer
5. Start the NFC Tag Data Writing Application on the smartphone.
(The figure below is a reference example)
NFC Tag Data
Writing Application
6. Tap the “Read” button.
Tap
– Continued on upper right –
7. In the state of step 6, touch the N-mark part of the smartphone to
the N-mark part of the charging case.
8. Check that the alphanumeric characters of “BD_ADDR” dis-
played on the screen of the smartphone matches the Bluetooth
address displayed on the PC in step 3.
In addition, if “0000 (Read-only)” is displayed in the “MODE”
column of the screen of the smartphone, NFC tag data has been
written without any problem and can not be changed.
Smartphone screen
0000 (Read-only):
There is no problem in writing.
Matched
“Properties” screen of PC
9. Select the device (WF-1000XM3) displayed on the PC, right
click and select “Remove device” from the displayed menu and
delete the device (WF-1000XM3).
Note 6: When another WF-1000XM3 is connected to the PC by Bluetooth
connection, a new device (WF-1000XM3) will be added.
If there are plural devices (WF-1000XM3), you may errone-
ously reference and write the Bluetooth address of another WF-
1000XM3. Therefore, delete the existing device before adding a
new device.
10. End the NFC Tag Data Writing Application on the smartphone.
Also, end the “Properties” screen of the PC, and the check of the
NFC tag data is completed.
5. The Factor that One Touch Connection (NFC function) is Impossible
The four following factors are considered as the factor that one touch connection (NFC function) is impossible.
Guess and check the defective factor by each checking result.
Note: The four failure factors are examples.
Factor Bluetooth manual con-
nection check by user NFC tag data check Bluetooth manual connec-
tion check by servicing
NFC one touch connection
check with smartphone
1WF-1000XM3L
(L-ch) defect NG ―NG NG
2CASE NFC board
defect OK NG OK NG
3NFC tag data writing
failure OK NG OK NG
4 Smartphone trouble OK OK OK NG
SYSSET
2020/04/0306:12:21(GMT+09:00)

WF-1000XM3
19
Sony CONFIDENTIAL
For Authorized Servicer
SECTION 2
DISASSEMBLY
• This set can be disassembled in the order shown below.
2-1. DISASSEMBLY FLOW
Note: Follow the disassembly procedure in the numerical order given.
2-2. ORNAMENT HINGE ASSY
SET (CHARGING CASE)
2-4. INDICATOR LED
(Page 21)
2-3. CASE INNER BLOCK
(Page 20)
2-2. ORNAMENT HINGE ASSY
(Page 19)
2-5. CASE NFC BOARD
(Page 21)
JIG
When disassembling the unit, use the following jig.
Part No. Description
9-913-402-33 TOOL FOR DISASSEMBLING
Note: It is necessary to disassemble the charging case only when repairing and replacing the left side headset (WF-1000XM3L).
This section only describes how to remove the CASE NFC board.
For details, refer to “REPAIRING AND REPLACING OF THE LEFT SIDE HEADSET (WF-1000XM3L)” on page 7.
1Remove the ornament hinge
assy while slowly peeling off
the adhesive sheet ornament.
2ornament hinge assy
Note: When installing the ornament
hinge assy, align the two bosses
and two holes.
boss
hole
ornament
hinge assy
rear side
top side
boss
hole
front side
adhesive sheet
ornament
SYSSET
2020/04/0306:12:21(GMT+09:00)

WF-1000XM3
20
Sony CONFIDENTIAL
For Authorized Servicer
2-3. CASE INNER BLOCK
2claw
5claw
5claw
1Insert the jig into the space
and remove the two claws.
Note 1: When using a jig, please work
carefully so as not to damage
the case outer and lid.
3Open the lid.
Turn around.
rear side
top side
7Peel the adhesive sheet hall
off of the case outer.
8case inner block
6Lift up the case inner block
in the direction of the arrow.
case outer
2claw
4Insert the jig into the space
and remove the two claws.
Note 2: When using a jig, please work
carefully so as not to damage
the case outer and case inner.
case outer
case inner
case outer
lid
lid
7Peel the adhesive sheet hall
off of the case outer.
guide line
guide line
3DVWLQJSRVLWLRQRIWKHDGKHVLYH
VKHHWKDOO
adhesive sheet hall
3DVWLQJSRVLWLRQRIWKHDGKHVLYH
VKHHWKDOO
adhesive sheet hall
guide line
guide line
front side
bottom side
bottom side
rear side
top side
front side
SYSSET
2020/04/0306:12:21(GMT+09:00)
Other manuals for WF-1000XM3
8
This manual suits for next models
3
Table of contents
Other Sony Headset manuals

Sony
Sony LinkBuds S YY2950 User manual

Sony
Sony MDR-AS800BT Reference guide

Sony
Sony WF-1000XM5 User manual

Sony
Sony DR-BT21G Marketing s (DR-BT21G/B) User manual

Sony
Sony XEA10 User manual

Sony
Sony WH-CH520 User manual

Sony
Sony XBA-3IP User manual

Sony
Sony CECHYA-0083 User manual

Sony
Sony MDR-XB950BT User manual

Sony
Sony MDR-ZX750BN User manual