Speaker Stand
©2008 Sony Corporation Printed in Malaysia
4-115-866-11(1)
Operating Instructions
Mode d’emploi
WS-IT1000F
2
3
-
-
continued
suite
4
Screw
Vis
or
ou
1
Dessous de
Bottom of
English
Precautions
On using the speakers
When moving the
speakers, hold the pole
and the base.
The following actions may damage
the speaker.
Toppling the speaker.
Shaking the speaker.
Swinging the speaker.
Pushing on the speaker.
Hitting the speaker.
On safety
The speaker stands are for the Sony
BDV-IT1000ES speaker system.
Be sure to place the stands in a flat,
horizontal place.
On cleaning
Clean the speaker stands with a soft
cloth slightly moistened with a mild
detergent solution. Do not use any
type of abrasive pad, scouring
powder or solvent such as thinner,
benzine or alcohol.
If you have any questions or
problems concerning the system,
please consult your nearest Sony
dealer.
Note on placement
Use caution when placing the
speaker stands on a specially treated
(waxed, oiled, polished, etc.) floor,
as staining or discoloration may
result.
Supplied items
Floor bases (2) Poles (2)
Long screws (4, black) Short screws (8, silver)
Required items from Sony BDV-IT1000ES for
setup
For the front speakers
Front speakers (2) Desktop stands (2)
Baffle covers (2, short) Speaker cords (2, white/red)
Grilles (2)
For the surround speakers
Surround speakers (2) Desktop stands (2)
Baffle covers (2, long) Speaker cords (2, blue/gray)
Grilles (2)
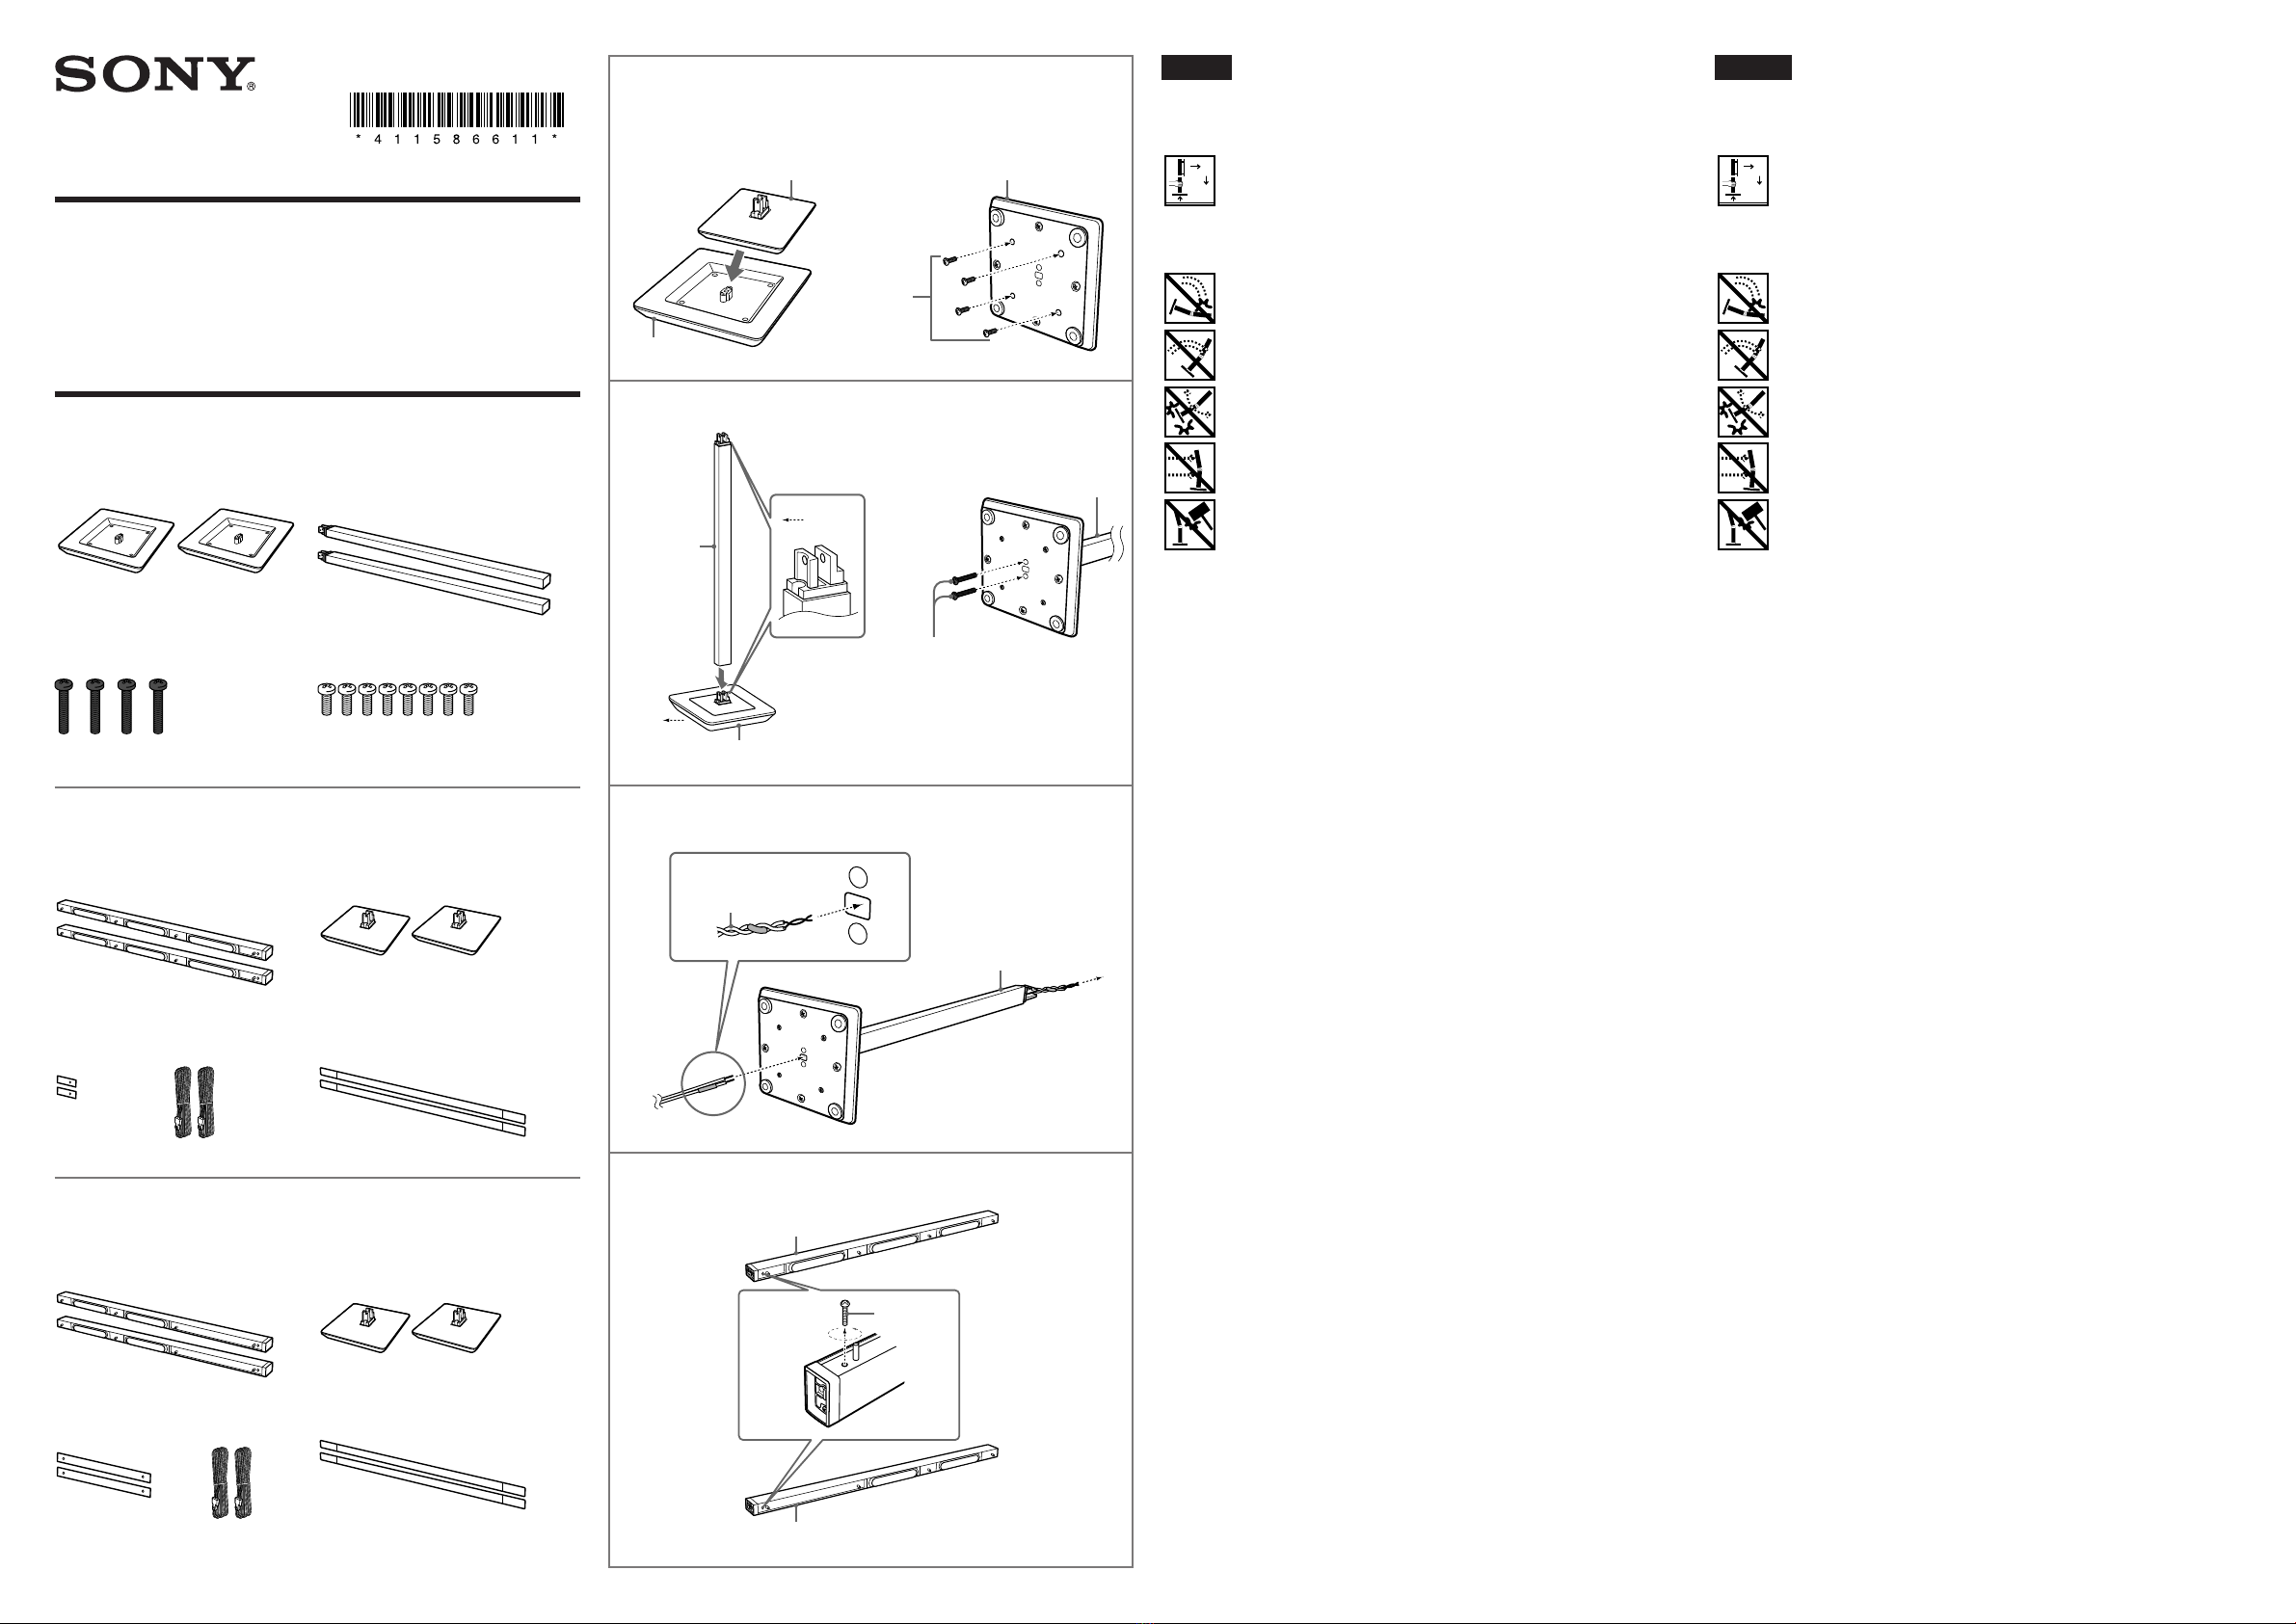
Assembly
Refer to the illustrations on the left and the flip page during the assembly
process.
1Set the desktop stand () in the floor base () and secure with
four short silver screws (, supplied).
2Attach the pole () to the floor base (). Be careful with their
orientation.
When attaching, match the orientation of the protruding parts of the
pole and the base.
Secure the pole to the floor base with two long black screws (,
supplied).
3Thread the speaker cord (or ) through the hole in the
bottom of the floor base and pull the cord out from the top of the
pole.
Twist the split ends of the speaker cord (or ) together before you
thread the cord.
4Remove the screw from the speaker (or ).
The removed screw is used to attach the speaker to the pole, so be
careful not to lose it.
(1)
Français
Précautions
Utilisation des enceintes
Lorsque vous déplacez les
enceintes, saisissez le
pôle et la base.
Les actions suivantes risqueraient
d’endommager l’enceinte.
Renverser l’enceinte.
Secouer l’enceinte.
Faire pivoter l’enceinte.
Appuyer sur l’enceinte.
Heurter l’enceinte.
Sécurité
Les socles d’enceinte sont destinés
aux enceintes Sony BDV-IT1000ES.
Veillez à les poser sur une surface
plane et horizontale.
Entretien
Nettoyez les socles d’enceinte avec
un chiffon doux légèrement
imprégné d’une solution détergente
neutre. N’utilisez pas de tampons
abrasifs, de poudre à récurer ou de
solvant tel que des diluants, de
l’alcool ou de la benzine.
Pour toute question ou tout
problème concernant le système,
n’hésitez pas à consulter votre
revendeur Sony le plus proche.
Remarque sur l’installation
Faites attention lors de la mise en
place des socles d’enceinte si le
plancher est traité (ciré, encaustiqué,
poli, etc.), car cela peut provoquer
une décoloration ou des taches.
Eléments fournis
Bases de plancher (2) Pôles (2)
Longues vis (4, noires) Vis courtes (8, argentées)
Eléments nécessaires à l’installation des
enceintes Sony BDV-IT1000ES
Pour les enceintes avant
Enceintes avant (2) Socles de bureau (2)
Caches d’enceinte (2, courts)
Cordons d’enceinte (2, blanc/rouge)
Grilles (2)
Pour les enceintes surround
Enceintes surround (2) Socles de bureau (2)
Caches d’enceinte (2, longs) Cordons d’enceinte (2, bleu/gris)
Grilles (2)
Assemblage
Pendant la procédure d’assemblage, reportez-vous aux illustrations ci-contre
et sur la page volante.
1Installez le socle de bureau () dans la base de plancher () et
fixez-le avec quatre vis courtes argentées (, fournies).
2Fixez le pôle () à la base de plancher (). Soyez attentif à leur
orientation.
Lors de la fixation, orientez les parties saillantes du pôle et de la base
dans le même sens.
Fixez le pôle à la base de plancher à l’aide de deux longues vis noires (,
fournies).
3Faites passer le cordon d’enceinte (ou ) à travers l’orifice
situé sur le dessous de la base de plancher et tirez le cordon pour
l’extraire du dessus du pôle.
Tordez les extrémités sectionnées des cordons d’enceinte (ou )
ensemble avant d’acheminer le cordon.
4Retirez la vis de l’enceinte (ou ).
La vis retirée permet de fixer l’enceinte au pôle. Par conséquent, veillez à
ne pas la perdre.
Front
Avant
Front
Avant


 User manual")


