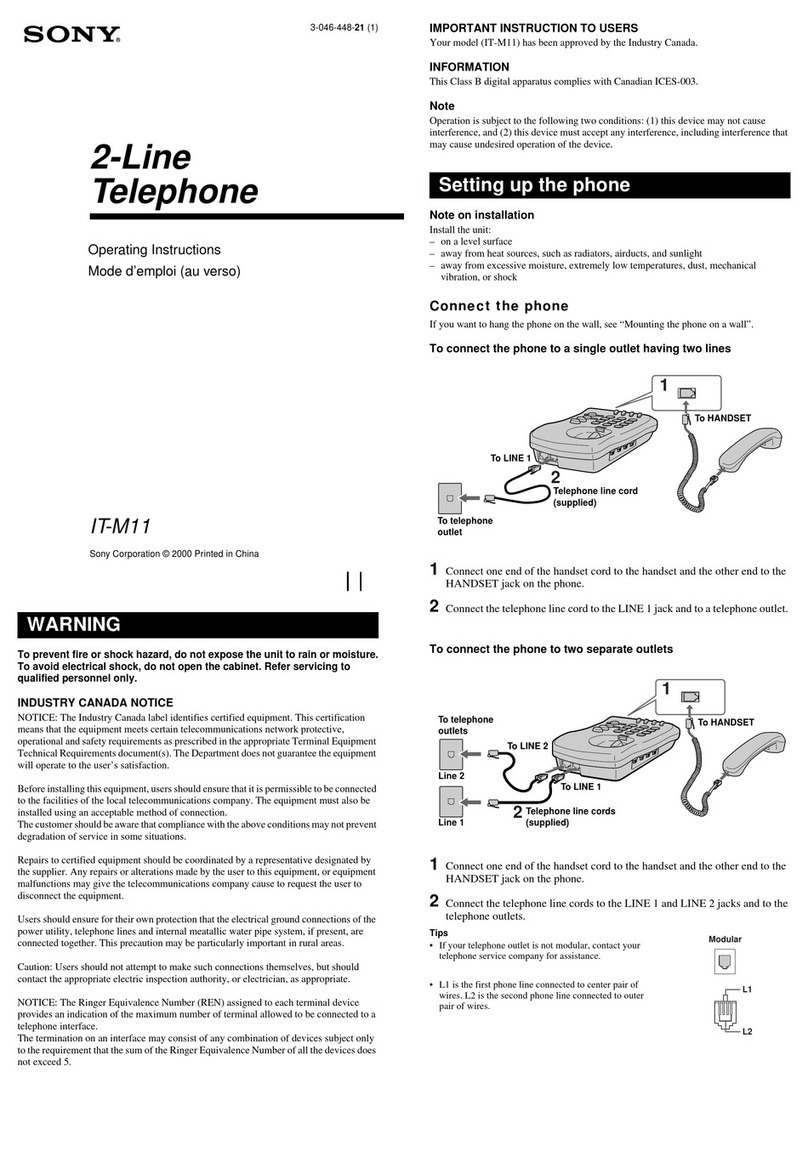
Sony CM-SB200 User manual

Operating Instructions
CM-SB200
CDMA PCS
Telephone
3-867-100-11
©1999 Sony Electronics Inc.
SB200 01-03 toc 4/9/99, 2:21 PM1

2
Before operating your portable dual band telephone, please read this
manual thoroughly and retain it for future reference.
If your usage includes in-vehicle operation, refer to the Installation/
Connections/Operation manual for the optional accessory kits.
WARNING
To prevent fire or shock hazard, do not expose the unit to rain or moisture.
FCC CAUTION STATEMENT
You are cautioned that any changes or modifications not expressly approved
in this manual could void your authority to operate this equipment.
Owner’s record
The model number, regulatory number, and serial number are located on a
nameplate inside the battery compartment. Record the serial number in the
space provided below. Refer to these numbers whenever you call your
dealer regarding this product.
Model No.: ____________________ Serial No.: ___________________
©1999 Sony Electronics Inc. All rights reserved. Reproduction without written consent
expressly prohibited. Sony, Jog Dial, D-WAVE logo and D-WAVE Astra are trademarks of Sony.
Third party trademarks are the property of their respective holders. Design and specifications
are subject to change without notice. Talk and standby times are subject to change.
®
DISPOSAL OF LITHIUM ION BATTERY
LITHIUM ION BATTERY.
DISPOSE OF PROPERLY.
You can return your unwanted lithium ion batteries to your nearest
Sony Service Center or Factory Service Center.
Note: In some areas the disposal of lithium ion batteries in
household or business trash may be prohibited.
For the Sony Service Center nearest you call 1-800-222-SONY
(United States only).
For the Sony Factory Service Center nearest you call 416-499-SONY
(Canada only).
SB200 01-03 toc 4/9/99, 2:21 PM2

3
Table of Contents
Navigating Getting StartedMaking &
Receiving Calls
Phone BookMenu SettingsCarrier FeaturesAdditional Info
Getting Started
Unpacking your phone ................. 4
Looking at your phone ................. 5
Charging the battery ..................... 6
Turning the phone on.................... 9
Activating your phone ................ 11
Navigating
Navigating .................................... 12
Jog Dial™ navigator ............... 12
Navigating keys ...................... 12
Menu map ................................ 13
List of menu items ....................... 14
Quick tips and features............... 16
First things first ............................ 18
Selecting a language ............... 18
Getting your phone number.. 18
Alphanumeric table ................ 19
Making & Receiving Calls
Calling fundamentals.................. 20
Basic calling.............................. 20
Related calling functions ........ 20
Limiting outbound calls ............. 21
Calling from the Phone Book ..... 22
Manually .................................. 22
Speed dialing ........................... 22
Touch dialing ........................... 22
Fast 4 dialing ............................ 23
Call prefixing ........................... 23
Calling from the Calls List.......... 24
Additional Calls List info....... 24
Saving to your Phone Book ... 24
Incoming calls .............................. 25
Basic call answering ................ 25
Related answering functions . 25
Setting all keys to answer ...... 25
Setting automatic answer....... 26
Caller ID ................................... 26
Missed Calls ............................. 26
Using the scratch pad.................. 26
Phone Book Functions
Storing information ..................... 27
Basic storage............................. 27
If the Phone Book is full ......... 27
Special storage functions........ 28
Searching your Phone Book ....... 30
Alphabetically.......................... 30
By memory location ................ 31
For a phone number ............... 31
Editing Phone Book entries ........ 32
Erasing Phone Book entries ....... 33
Restricting Phone Book entries .. 34
Menu Settings
Sounds menu................................ 35
Display menu ............................... 38
Security menu .............................. 40
Network menu ............................. 42
Extras menu .................................. 45
Timers menu................................. 46
Carrier provided features
and services
Short Messaging Service ............. 48
Receiving messages ................ 48
Message capacity..................... 49
Message format ....................... 50
Accessing messages ................ 50
Text messages .......................... 51
Voice mail ................................. 52
Sending and receiving data........ 53
Additional information
Troubleshooting ........................... 55
Specifications ................................ 56
Optional accessories .................... 57
Rules and regulations ................. 58
Safety precautions ....................... 59
Glossary ........................................ 62
Index .............................................. 64
Warranty Card.............................. 69
Quick Reference Card ................. 71
SB200 01-03 toc 4/9/99, 2:21 PM3
4
Unpacking Your Phone
Carefully unpack your phone and check the contents using this list. If
something is missing, please contact your nearest Sony dealer.
Portable Cellular/PCS Telephone (1)
QN-400BPL2 Extended Life Lithium-Ion Battery (1)
QN-301TA Travel Adapter (1)
SB200 04-11 prep 4/9/99, 2:21 PM4

5
Getting Started
!¢
!∞
!§
CLR PWR
213
456
789
0#
*
END
SEND
4
!º
5
8
7
!¡
1
3
2
!™
!£
6
9
Looking at Your Phone
For more information, refer to the page numbers in parentheses ( ).
1Antenna (18)
2Red/Green LED (XX)
Alerts for incoming calls/messages
and identifies charging status.
3Earpiece
4Jog Dial™ navigator (14)
Turn (scroll) and press (select) to
access menus and settings.
5Display (14)
6Ringer speaker
7
SEND
key (21 to 23)
Press to make or receive calls.
8
key (78)
Press to access messages.
9
CLR
key (19, 21, 40)
Press to clear characters on the display
or exit the current operation.
!º Number and / keys
(21, 25, 49)
Use the keypad to enter numbers
and letters. Use and to
move the cursor.
!¡ Microphone
!™
PWR
key (18)
Press to turn the phone on or off.
!£
END
key (19, 21, 23)
Press to end calls or cancel
operations and return to standby
mode.
!¢
Battery release tab (15)
Slide up to remove the battery.
!∞ Battery (15)
!§ Connector (16)
Connects the phone to the travel
adapter or other accessory.
SB200 04-11 prep 4/9/99, 2:21 PM5

6
Charging the Battery
A new battery is not fully charged so it’s best to charge the battery
before using the phone. The following instructions show you how to
attach/detach the battery and connect the supplied travel adapter.
To attach the battery
1 Hook the battery onto the
bottom of the phone 1, then
lower the top down 2.
2 Press down firmly on the thumb
indent to secure the battery in
place.
To remove the battery
1 Place your thumb on the battery
release tab and press upward.
2 Lift the top of the battery 1, then
remove it from the back of the
phone 2.
1
2
1
2
SB200 04-11 prep 4/9/99, 2:21 PM6

7
Getting Started
Charging the battery
Connect the travel adapter to the phone connector 1, then plug it into a
standard 120V AC outlet 2. Charging time is about 5 hours. Charging
will take longer if the phone is turned on.
What you’ll see when the battery is being charged
plug
into
an AC
outlet
attach to the phone connector
(thumb indent faces up)
2
1
During charging
Battery
fully charged
When phone is ON
•flashes
•CH is displayed in the
upper left corner of the
standby display
•LED is not lit
•stops flashing
•FCH is displayed in the
upper left corner of the
standby display
•LED is not lit
When phone is OFF
•flashes
•
Battery is Charging
is
displayed on the
display screen
•LED flashes red
•stops flashing
•
Charging is Complete
is
displayed on the
display screen
•LED turns green
Cautions
• Use only Sony-approved batteries and use only as intended. Don’t try to
disassemble or dispose of them in a fire (possible personal injury).
• Avoid charging for long periods of time, in places with high humidity, direct
sunlight or extreme temperatures (below 32°F /0°C or over 104°F /40°C).
• The battery may become warm during charging or after use.
• Replace the supplied AC adapter if necessary. It is not intended to be serviced.
• The AC Adapter allows you to turn on your phone without a battery attached.
But without a battery attached, you won’t be able to make or receive calls.
SB200 04-11 prep 4/9/99, 2:21 PM7

8
nnn
Full
n n
Empty
Battery life
Standard battery
CDMA mode Analog mode
Standby mode 72.0 hours 14.0 hours
Talk time 3.0 hours 1.5 hours
Extended battery
CDMA mode Analog mode
Standby mode 144.0 hours 28.0 hours
Talk time 6.0 hours 3.0 hours
Battery condition
The battery icon indicates the approximate charge level remaining in the
battery.
Energy consumption varies depending on conditions of use
(including ambient temperature, network coverage and usage patterns).
The fewer lines you see inside the battery icon body, the less charge it has.
When the battery is empty
When your battery charge is very low, the icon flashes and a warning
message is displayed to remind you. The phone automatically turns off when
the battery runs out of energy. If this happens during a call, you will hear a
beep and the call will be cut off. Recharge the battery as soon as possible.
SB200 04-11 prep 4/9/99, 2:21 PM8

9
Getting Started
PWR
My Phone
12:34P 12/25
:Saved #s
:Features
Sony
555-1212
:Options
END
SEND
#
*
PWRCLR
123
45 6
789
0
Turning the Phone On
Extending and retracting
the antenna
Extend the antenna to maximize signal
strength and minimize interference. When
you make or receive a call, hold the end of
the antenna and pull up until fully
extended. When you are not in a call, push
the antenna down until fully retracted.
Powering on
To turn your phone on, hold down
PWR
for about two seconds. Powering On
appears on the screen, the LED flashes
green, the phone beeps and searches for a
signal. When a service signal is found, the
standby display appears. Your phone is
ready to use.
Powering off
Hold down
PWR
for about two seconds.
The phone beeps and displays the message
To turn off: Hold down the POWER
key. You hear a second beep, then Powering
off appears on the screen. When you release
PWR
, the phone turns off.
Display screen
Your phone’s display screen has five information lines. Each line can
display up to 12 characters. The top line displays icons which tell you
the status of your phone. Lines two through five change depending on
the current operation. The bottom line is usually a prompt for an
operation. See the following basic examples:
Standby mode Phone Book
phone status phone status
“banner” name
time and date
menu prompt phone #
menu prompt menu prompt
The next page provides detailed information regarding your phone’s display.
LED
SB200 04-11 prep 4/9/99, 2:21 PM9

10
888
1 2 3 4 5 6 7
8
1Short character display
Identifies the display based
on the current operation.
• Features menus/submenus
begin with “F”.
• Calls List memory locations
begin with “C”.
• Phone Book memory
locations are all digits.
2(in-use) /
(out-of-service) icon
(18, 21, 23, 71)
Indicates within or outside a
service area. A phone icon
( )
appears during a call. A slash
through it ( ) appears when
no signal is received, which
means you cannot make or
receive calls. The phone will
search for a service signal. If
it can’t find one, it enters
power save mode and
“wakes up” automatically (at
intervals based on carrier
network settings) to search
for a service signal.
3(digital) icon
Appears when your phone is
operating in digital (CDMA)
mode.
4
(signal strength) icon (18)
Shows the approximate
strength of the signal being
received. The more lines
displayed, the stronger the
signal. The icon changes if
the signal strength fluxuates.
It’s best when the signal is
strong, but calls can be made
when it’s weak.
5(roam) icon (71)
Appears when you are
roaming outside your home
service area.
6(message) icon (77)
Appears when you have new
text or voice mail messages.
The icon flashes if the new
message is urgent.
7
(battery) icon (16, 17)
Shows the approximate amount
of energy remaining in the
battery. Recharge the battery
before it is fully discharged.
8Character display
Displays phone numbers and
names, prompts various
actions and displays results.
SB200 04-11 prep 4/9/99, 2:21 PM10

11
Getting Started
Activating Your Phone
First time activation
In order to make and receive calls, you need to establish telephone
service from a service provider. Many companies provide service.
Choose a service provider that will meet your calling needs.
Self-activating your phone
Some service providers have a service feature called OTASP (Over-The-
Air Service Provisioning) which allows you to self-activate your phone
with a new service. Your phone supports this service feature. Contact
your service provider to see if this service is available in your area.
1 From the Network menu, scroll and select Activation.
2 Scroll and select which system block to activate the
service on.
A display appears prompting you for confirmation. To go back one
step, press
CLR
. To cancel activation and return to the standby
display, press
END
.
3 Press
1
to confirm.
The phone calls up a service provider. When a service provider is
contacted, a message appears and you are connected to an
operator. When activation is complete, a confirmation message
appears followed by the standby display.
If activation fails
A message appears advising you that activation failed. Push Jog Dial to
retry or press
END
to return to the standby display.
SB200 04-11 prep 4/9/99, 2:21 PM11

12
Navigating
Jog Dial navigator: scroll and select
Your Sony portable phone is easy to use thanks to the
Jog Dial navigator
.
The instructions in this manual will tell you to “scroll and select”. To
scroll, turn Jog Dial up or down. When the flashing arrow points to the
item you want to select, push Jog Dial in toward the phone.
Navigating keys
Key Action Destination
CLR
Press previous menu
CLR
Hold down standby display
END
Press standby display
Note
The phone automatically
returns to standby after 30
seconds of inactivity (e.g., you
haven’t scrolled, selected or
pressed any key).
IT'S A SONY!
12:34P 12/25
:Saved #s
:Features
Standby display
OPTIONS
Send
Duration
Time/Date
View Number
Number Tone
Save
Saved #s display
SAVED #S
:Calls List
:Phone Book
:Find Name
+
CALL TO
Office
555-1212
:Options
C01
Calls List
Home
555-1234
:Options
001
Phone Book
SEARCH FOR
(Enter Name)
:Find
Sony
555-4321
:Options
005
CALLING....
Office
555-1212
C01
OPTIONS
Send
Edit
Restriction
View Number
Number Tone
Erase
Phone Book
–
–
+
or
SEND
Features menu
FEATURES
Sounds
Timers
Directory
Extras
Security
Display
Network
SOUNDS
Ringer Vol
Mute/Unmute
Keybeep Vol
EarpieceVol
Ringer Type
Key Sound
Beep Length
Message Ring
DIRECTORY
My Number
Save
Erase
Edit
Find Name
Phone Book
Calls List
TIMERS
All Calls
RecentCalls
Roam Calls
MinuteAlert
Auto-Off
EXTRAS
Key Guard
Touch Dial
Auto-Retry
Auto-Answer
AnyKey Answ
Recv. Data
Fast 4 Dial
Scratch Pad
SECURITY
Lock Phone
New Code
Restrict #
RestrictAll
MasterReset
Erase Book
Erase Calls
Emergency #
Limit Calls
NETWORK
Set Analog
Roam Alert
Drop Alert
Priv. Alert
Auto-N.A.M.
Set N.A.M.
Set System
Force Call
DISPLAY
Banner
Backlight
Auto-Hyphen
Sort Book
Language
Menu Length
Msg Format
Call any number that's displayed
1
SB200 12-21 navigate 4/9/99, 2:21 PM12

13
Navigating
Menu Map: How do I get there?
There are three navigation routes from the standby display:
1Turn Jog Dial
in either direction to access numbers saved in memory.
2Press Jog Dial to access the Features menu.
3Enter a digits.
To see the complete list of menus, submenus and corresponding settings,
see the “Menu list” on pages 12 and 13.
IT'S A SONY!
12:34P 12/25
:Saved #s
:Features
Standby display
t
e
m
ber
T
one
Saved #s display
SAVED #S
:Calls List
:Phone Book
:Find Name
+
-
1212
s
L
ist
Home
555-1234
:Options
001
Phone Book
SEARCH FOR
(Enter Name)
:Find
Sony
555-4321
:Options
005
OPTIONS
Send
Edit
Restriction
View Number
Number Tone
Erase
Phone Book
–
–
+
or
OPTIONS
Send
Save
Enter Pause
Enter Link
EnterHyphen
Find Number
Options menu
555-1212
:Options
Calling...
555-1212
SEND
Dials the number
Features menu
FEATURES
Sounds
Timers
Directory
Extras
Security
Display
Network
SOUNDS
Ringer Vol
Mute/Unmute
Keybeep Vol
EarpieceVol
Ringer Type
Key Sound
Beep Length
Message Ring
DIRECTORY
My Number
Save
Erase
Edit
Find Name
Phone Book
Calls List
TIMERS
All Calls
RecentCalls
Roam Calls
MinuteAlert
Auto-Off
EXTRAS
Key Guard
Touch Dial
Auto-Retry
Auto-Answer
AnyKey Answ
Recv. Data
Fast 4 Dial
Scratch Pad
SECURITY
Lock Phone
New Code
Restrict #
RestrictAll
MasterReset
Erase Book
Erase Calls
Emergency #
Limit Calls
NETWORK
Set Analog
Roam Alert
Drop Alert
Priv. Alert
Auto-N.A.M.
Set N.A.M.
Set System
Force Call
DISPLAY
Banner
Backlight
Auto-Hyphen
Sort Book
Language
Menu Length
Msg Format
Enter digits
23
SB200 12-21 navigate 4/9/99, 2:21 PM13

14
Features menu 1
F-1 Sounds
Features menu 2
F-2 Timers
Features menu 3
F-3 Directory
List of Menu Items
The Features menu allows you to personalize the way your phone
functions. This menu list shows the entire Features menu (a.k.a. long
menu). The Features menu includes seven categories of menus. Within
each of these menus are submenus identified by a “menu item number”
(they begin with the letter “F” (Features) followed by two digits). Menu
item numbers allow you to quickly access any menu from the Features
menu (for example, to access the earpiece volume menu press
1
4GHI ).
Current submenu settings are indicated by a check mark (✓) and
displayed in capital letters.
Submenu Settings Page
F11 Ringer Vol. off/low/med./high/escalate/vibrate 41
F12 Mute/UnMute mutes or unmutes the microphone 42
F13 Keybeep Vol off / low / med. / high 42
F14 Earpiece Vol 1 / 2 / 3 / 4 / 5 / 6 / 7 43
F15 Ringer Type option 1 to 5 / melody 1 to 5 43
F16 Key Sound tones / clicks 44
F17 Beep Length standard / long 44
F17 Msg Ringer on / off / +reminder 44
F21 All Calls total call time,
number of calls 45
F22 Recent Calls total call time,
number of calls 45
F23 Roam Calls total call time,
number of calls 46
F24 Minute Alert before min/each min/every 5 min/off44
F25 Auto-Off in 3 hrs / in 2 hrs / in 1 hr /
in 30 mins / never 47
F31 My Number —48
F32 Save —48
F33 Erase —50
F34 Edit —51
F35 Find Name —52
F36 Phone Book No default entries 54
F37 Calls List No default entries 55
SB200 12-21 navigate 4/9/99, 2:21 PM14

15
Navigating
Features menu 6
F-6 Display
Features menu 7
F-7 Network
Features menu 5
F-5 Security
Features menu 4
F-4 Extras
Sub Menu Settings Page
F41 Keyguard —56
F42 Touch Dial on / off 57
F43 Auto-Retry off / on 10 sec / on 30 sec / on 60 sec 57
F44 Auto-Answer on / off 58
F45 AnyKey Answ on / off 58
F45 Recv. Data off / fax / modem / PC Control 58
F46 Fast 4 Dial on / off 58
F47 Scratch Pad —59
F51 Lock Phone never / on power-up / right now 60
F52 New Code 0000 61
F53 Restrict # No default on restricted numbers 62
F54 Restrict All on / off 63
F55 Master Reset —64
F56 Erase Book —64
F57 Erase Calls —65
F58 Emergency # No default emergency numbers 65
F59 Limit Calls Off/ incoming/ to loc 1-9/ to loc 1-99 65
F61 Banner No default banner 66
F62 Backlight always off / for 7 secs / for 15 secs /
for 30 sec / always on 67
F63 Auto-hyphen on / off 68
F64 Sort Book by loc. # / alphabetic 68
F65 Language English/ French/ Spanish/ Port 20, 69
F66 Menu Length long / short 69
F67 Msg. Format none/ partial/ full 77
F71 Set Analog disabled / until off / automatic 70
F72 Roam Alert on / off 71
F73 Drop Alert on / off 72
F74 Priv. Alert on / off 73
F75 Auto-N.A.M. on / off 74
F76 Set-N.A.M. N.A.M. 1 / N.A.M. 2 74
F77 Activation on Blocks A thru F 75
F78 System Pref. standard / home only 76
SB200 12-21 navigate 4/9/99, 2:21 PM15

16
Quick Tips and Features
Here is a list of your phone’s features which simplify your calling experience.
MAKING CALLS
Calling displayed phone
numbers
Speed dialing
Touch dialing
Automatic redial
Searching for a phone
number to call
Muting the microphone
Call prefixing
Viewing long phone
numbers
Emergency numbers
• Push
SEND
to call a phone number anytime
it’s displayed on the screen.
• Your phone is able to speed dial phone
numbers stored in your Phone Book:
Enter the memory location number and
press [send].
• Your phone is able to dial at the touch of
the memory location number:
Enter the memory location number, but
keep pressure on the last digit until
connecting appears on the display.
• Need to get through to a difficult number?
Set your phone to automatically redial until
successful!
• There are several ways to search for a
phone number:
- Scroll through your entire Phone Book or
Calls List
- Quick alphabetic search
- Alphabetic search
- Number search
• Push and hold Jog Dial to quickly mute and
unmute the microphone during a call.
• Quickly add a prefix to local numbers
stored in your Phone Book. This is helpful
when you’re traveling outside your area
code.
• If a number is too long to fit on the screen,
view the overflow digits by selecting View
Number on the Options menu.
• You can call 911 and your three stored
emergency numbers even if your phone is
locked or calls are limited.
SB200 12-21 navigate 4/9/99, 2:21 PM16

17
Navigating
RECEIVING CALLS
AnyKey Answer
Setting your phone to
answer calls
automatically
Muting the ringer
•
You can set your phone to answer
incoming calls with any key except
PWR
.
• A Hands-Free Car Kit ia a handy
accessories that allows you to set your
phone to answer calls automatically on
the second ring.
• Quickly mute the ringer by turning Jog
Dial down or pressing the [end] key.
SB200 12-21 navigate 4/9/99, 2:21 PM17

18
PHONE FEATURES and FUNCTIONS
Navigating
Stored information
Backlight
• Quick menu access
Each menu item can be accessed quickly
from the standby display by pushing Jog
Dial, entering the menu item number, then
pressing Jog Dial again.
• Previous menu
Press [clr] to quickly go back to the
previous menu.
• Return to standby
Press [end] or hold down [clr] to quickly
return to standby.
The display automatically returns to
standby after 30 seconds of inactivity.
• Phone Book (permanent storage of
information)
Your phone can store up to 199 entries.
You can make calls from your Phone Book.
You can view your Phone Book from the
standby display or the Directory menu.
• Calls List (temporary information)
Your phone stores a list of your 10 most
recent calls.
You can make calls from your Calls List.
You can save information from your Calls
List to your Phone Book.
You can view the Calls List from the
standby display or from the Directory menu.
• DTMF signals
You can store DTMF signals in your Phone
Book and send them automatically.
• Your phone has two backlight settings: one
in charging mode and one in battery mode.
For faster charging while in charging mode,
you may want to change the setting from
always on (which is set at the factory).
• You can activate the backlight while
KeyGuard is on:
Push and hold Jog Dial.
SB200 12-21 navigate 4/9/99, 2:21 PM18

19
Navigating
• Turn Jog Dial up or down to quickly adjust
the earpiece volume during a call.
• Turn Jog Dial up or down to quickly adjust
the ringer volume while the phone is
ringing.
• Turn Jog Dial down or press [end] when the
phone is ringing to mute the ringer.
• Press and hold Jog Dial to mute the
microphone during a call.
• Push and hold Jog Dial to quickly lock the
keypad.
• You can lock the keypad even when the
phone itself is locked.
• The keypad unlocks when you answer a
call then relocks when the call is finished.
• Keyguard prevents the keys from
accidentally being pushed. This is
particularly helpful when you transport
your phone.
• Lock phone prevents anyone from using
your phone unless a security code is
entered. This is important not only to
ensure phone calls are made with your
permission, but also to ensure the privacy
of information contained in your phone’s
memory.
• Limit calls doesn’t lock the keys or the
phone, but allows you to limit the calls that
can be made from your phone.
Volume
Locking the keypad
Keyguard vs lock phone
vs limit calls
SB200 12-21 navigate 4/9/99, 2:21 PM19

20
First Things First
Selecting a language
When you receive your phone, the menus are displayed in English, but
you can change the menu language. To change the menu language,
follow the instructions below.
1 From the Features menu, scroll and select Display.
2 Scroll and select Language.
3 Scroll and select English, French, Spanish or Portuguese.
Getting your phone number
Your phone number has its own submenu; just in case you forget it.
1 From the Directory menu, scroll and select My Number.
2 Push Jog Dial to exit.
Entering information
Entering numbers: To enter numbers, just press the numbers on the
keypad.
Entering characters: You can enter characters as well as numbers using
the keypad. When prompted to enter characters, press the key that has
the character you want to enter printed on it. Continue pressing it until
the character is displayed (lower case letters follow capitals). Refer to the
alphanumeric table on the next page to see a complete list of numeric
keys and corresponding characters. Each menu language has its own
alphanumeric table. Once entered, special language characters (e.g.,
letters with accents) display regardless of the current menu language!
Moving the cursor: To enter the next character, press the corresponding
key. If it’s the same as the last, wait three seconds and the cursor will
move automatically. Or, manually move the cursor to the next space with
Jog Dial or arrow keys ( / ).
For example, to enter “SONY”:
Press
7
RS
PQ
four times to enter an “S”.
Press 6MNO three times to enter an “O”.
Press 6MNO twice to enter an “N”.
Press
9
YZ
WX
three times to enter a “Y”.
SB200 12-21 navigate 4/9/99, 2:21 PM20
Table of contents
Other Sony Telephone manuals

Sony
Sony IT-B7 - Telephone User manual

Sony
Sony IT-B7 - Telephone User manual

Sony
Sony IT-B7 - Telephone User manual

Sony
Sony SPP-A900 Primary User manual

Sony
Sony SPP-C303 User manual

Sony
Sony IT-D10 User manual

Sony
Sony SPP-VT11 User manual

Sony
Sony ID Telephone IT-ID70 User manual

Sony
Sony PCSXL55 User manual

Sony
Sony D6643 User manual

Sony
Sony CM-B1200 User manual

Sony
Sony IT-B1 User manual

Sony
Sony CM-S1100 User manual

Sony
Sony IT-M602 - Telephone With Speaker Phone User manual

Sony
Sony SPP-VC111 User manual

Sony
Sony Xperia XA Ultra F3212 User manual

Sony
Sony GD910 User manual

Sony
Sony IT-M202 - Telephone User manual

Sony
Sony IT-B7 - Telephone User manual

Sony
Sony SPP-SS950 User manual