Sound Devices 664 User manual

12-Input Mixer with
Integrated 16-Track Recorder
QUICK START GUIDE
664

Quick Start Guide
664 Mixer & Recorder
Welcome
Thank you for purchasing the 664, a 12-input portable production audio mixer with 16-track recorder.
The 664 is an extremely versatile device with many advanced features and capabilities. It records 16-
or 24-bit polyphonic or monophonic broadcast WAV les, with extensive metadata, to SD and Compact-
Flash memory cards. It can also simultaneously record MP3 les.
Included with your purchase:
Quantity item
1 664 Portable Mixer and Recorder
1Cable (USB standard A to USB standard B) 2M length RoHS
1Connector (USB 2.0 A female to A female)
2 Link port cover
1LCD protective cover
4 Adhesive rubber “bumpers”
>1 Colored dot stickers
>1 Promo stickers
1 Product registration card
1 664 Quick Start Guide
This Quick Start Guide provides the initial steps necessary to set up and begin using the 664 right
out of the box. It also provides a brief overview of features, plus warranties and licensing information.
For a full description of all product features, user-based procedures, specications, and any safety
information, please refer to the product’s User Guide located on the Sound Devices website; use the
QR code or respective link to access and download the guide.
Read and Register...
Sound Devices strongly encourages you to register your product. Registration extends your warranty
and ensures you will receive timely product updates.
Full User Guide:
http://www.sounddevices.com/download/guides/664ug_en.pdf
Register Your 664:
www.sounddevices.com/support/registration/
Email Support:
Call Support:
1-608-524-0625
1-800-505-0625
23

Quick Start Guide
664 Mixer & Recorder
To insert AA batteries:
1. Unscrew the battery cap (counter-clockwise).
2. Insert ve AA NiMH batteries (not included) into the battery tube. Orient the batteries with the
positive (+) end facing in and the negative (-) end facing out.
664 Key Features
• 16-track mixer/recorder
• Six high-bandwidth, low noise microphone preampliers with phantom, limiters, high-pass lters,
pan, and direct outputs per channel; direct outputs can be switched to operate as additional line
inputs 7-12.
• Expandable with optional CL-12 linear fader controller, which adds 12 smooth-gliding linear fader
controls, sunlight-viewable LED metering, back-lit Record / Stop transport controls, and many
other illuminated quick-access buttons for key functionality
• Expandable with optional CL-6 input controller, which adds six dedicated, full-sized, rotary fader
controls for channels 7-12, sunlight-viewable LED metering, and back-lit Record / Stop transport
controls
• High-precision Ambient™ timecode generator and reader supporting all common rates and
modes, with auto-recharging of internal TC battery
• Expanded return monitoring capabilities, with three camera returns, plus built-in slate micro-
phone and external slate microphone input connector
1. Connect Power
The 664 is powered from any external DC power source (from 10-to-18 V DC) or from internal AA
batteries. When both sources are connected, the 664 will use one source at a time, using rst external
power, then the AA batteries.
To connect the 664 to external power:
▶Connect a DC power source (not included) to the 10-18 V DC input on the right panel.
Note: Pin-4 of the locking, Hirose connector is positive (+) and pin-1 is negative (-).
The 664 uses ve AA-sized batteries as a back-up in the event that external power is removed or
depleted. While alkaline AA batteries may be used, NiMH batteries are preferred.
Depending on the battery, run times could vary. For alkaline, run time will be limited to between 10 and
15 minutes, based on settings. NiMH and lithium batteries offer up to 90 minutes of run time.
2. Power Up
The Power switch selects the power source, either internal or external. There
is a large enough power reserve to switch back and forth from one source to
the other without interrupting mixer operation.
To turn on the 664:
▶Slide the Power button to the right for external power.
▶Slide the Power button to the left internal battery power.
The power LED illuminates yellow then green. The Sound Devices splash
screen appears briey on the LCD, and then the Main screen will be dis-
played.
Note: The rmware version is shown on the splash screen at startup and via Menu >
System > Version Info. Ensure you are using the latest rmware, which is available as a
free download from the Sound Devices website.
Power LED
45

Quick Start Guide
664 Mixer & Recorder
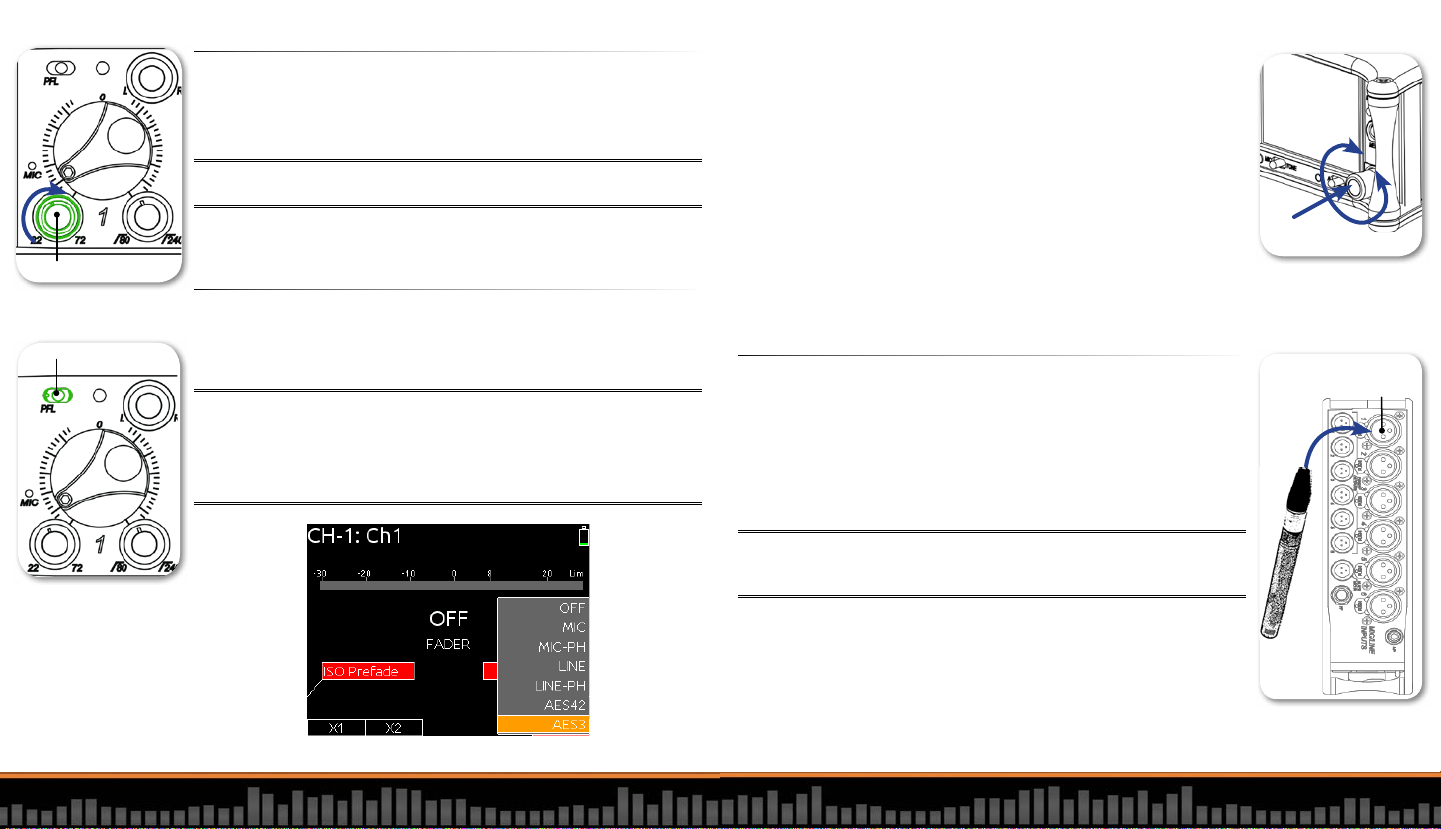
3. Activate an Input
To activate an input:
1. If the Trim control for an Input is recessed, push it in and it will pop out.
2. Turn the Trim control clockwise until it clicks to activate the input.
Note: The input is deactivated whenever the Trim control is fully rotated counter-
clockwise.
4. Select an Input Type
To select an input type:
1. Slide the Pre-Fade Listen (PFL) switch to the right to access the Input
Settings screen for that input (1-6).
Note: Step 1 is based on factory defaults, in which case the Input Mode is set to 6
Channels, so sliding the switch to the left activates PFL on the input wihtout leaving
the Main screen, and sliding it to the right displays the Input Settings screen for inputs
1-6. An alternative 12 Channel option sets the PFL switch so that sliding it left activates
PFL and displays the Input Settings screen for inputs 1-6, and sliding the switch right
activates PFL and displays the Input Settings screen for inputs 7-12, respectively.
2. Press the Headphone encoder to display the list of available input types.
Trim Control
3. Turn the encoder to highlight an input type and press it in to make your
selection.
• OFF – Use to deactivate an input without having to change trim.
• MIC – Use for dynamic microphones or mic-level sources.
• MIC-PH – Use for microphones requiring phantom power.
• LINE – Use for analog line level sources.
• LINE-PH – Use for phantom-powered condenser microphones.
Provides 48V or 12V phantom power, but at a line-level gain range.
Useful in high sound-pressure-level environments.
• AES42 – Use for digital AES42 (Mode 1) microphones.
• AES3 – Use for a digital AES3 source.
4. Slide the PFL switch to the left again to return to the Main screen.
PFL Switch
Headphone
Encoder
Input 1
XLR Connector
5. Connect Audio Source
On the left panel, there are six XLR-3F connectors for balanced microphone
or line-level inputs, and six TA3-F connectors for direct outputs of 1-6 or for
additional line level inputs (7-12).
To connect an audio source:
▶Use a standard XLR cable and connect a microphone or line level analog
source to an Input XLR connector.
Note: Input 1 or 6 can also accept AES3 or AES42 (Mode 1) signal. If set, then 2 and 5
will allow AES3 or AES42 signals via 1 and 6 XLR. [Pin-1 ground, pin-2 positive, pin-3
negative.]
67

Quick Start Guide
664 Mixer & Recorder
7. Select a Headphone Source
To set up the headphone source:
1. Press the Headphone encoder to display the list of available sources.
The list will auto-close if no selection is made within a few seconds.
2. Turn the encoder to choose LR ST, the master left and right stereo bus.
3. Press the encoder to conrm selection.
8. Adjust Trim and Fader Controls
The gain of an input is adjusted by two controls, Trim and Fader.
This two-stage architecture is identical to the topology of large
mixing consoles and provides a great deal of control. Trim is often
thought of as a coarse gain control and the Fader as the ne gain
control.
To adjust trim and fade:
1. Set Fader control to 0 dB (12 o’clock).
2. Adjust Trim control clockwise until optimal level is achieved on
metering and in headphones.
Fader (1-6)
Pan (1-6)
PFL switch
Trim (1-6)
PFL status / Activity LED (1-6)
HP Filter (1-6)
6. Connect Headphones
Be careful of high headphone levels when connecting your headphones.
To connect headphones:
1. Prior to connecting your headphones, turn the Headphone encoder counter-clockwise until the LCD
shows the headphones off.
2. Connect headphones to either the ¼-inch or 3.5 mm headphone outputs, located on the left panel
of the 664.
3. Turn the Headphone encoder clockwise slowly until the level you want is reached.
¼-inch
3.5 mm
Headphone
Encoder
89

Quick Start Guide
664 Mixer & Recorder
To format an SD or CF card:
1. Press the MENU button to view the Main menu.
Note: On the 664, the Main Menu screen displays both internal and external voltage
levels to the left and right of the MAIN MENU header, respectively. In the sample image,
these numerical readings show battery power (4.8v) and 11.9 volts of external power.
2. Turn the Headphone encoder and press it to select File Storage.
3. Do either of the following:
• Select Erase/Format CF to reformat a CompactFlash card.
• Select Erase/Format SD to reformat an SD, SDHC, or SDXC card.
4. Press the Headphone encoder to begin the formatting process.
5. Follow the message(s) that appear on screen and press the Headphone
encoder to continue.
6. Press the METERS button to return to the Main screen.
METERS
Button
Headphone
Encoder
MENU
Button
Transport
Control
9. Insert and Format Media
The slots for CompactFlash (CF) or Secure Digital (SD) memory cards are
located on the right panel behind the Media Door, which is held closed
magnetically.
To install media:
1. Firmly pull open the Media Door.
2. Insert your choice of media memory card into the slots provided.
When inserting the SD card, ensure the bottom of the card (the side with
metal contacts visible) is facing the rear of the unit. When inserting a CF
card, ensure the top of the card (the side with the branding label) is facing
the rear of the unit.
Note: Sound Devices Quality Assurance engineers perform extensive testing to ensure
media approved for use with the 664 works reliably and provides the best perfor-
mance. When choosing media, please refer to the Approved Media List available on
the Sound Devices website at: www.SoundDevices.com/Approved.
The SD or CF card must be formatted by the 664 before recording.
Warning: Reformatting a card will erase all data on the card.
Media Door
CF Memory
Card Slot
SD Memory
Card Slot
10 11

Quick Start Guide
664 Mixer & Recorder
Main Screen
The Main screen displays important information at-a-glance. The Main screen can be accessed
quickly from any other screen by pressing the METERS button. Press and hold the METERS button,
and then slide the AB/C switch (below the screen) to the left to toggle between display of timecode
frame rate and sample rate. This sample image shows default settings.
Current Take
Active playback media
Media time remaining and audio le format
Power source and level
Powered off input
Monitor (Headphone)
RTN levelsSample rate information
Absolute recording time
SMPTE timecode
Input limiting
activity
Armed track
Unarmed track
Meter View
Meter style can be changed to solid, and track names can optionally be shown in the meters.
Pressing the METERS button from the Main screen cycles through three Meter Views. Use the Main
menu option: System > Meter Views to dene which one of various congurations is used by each
Meter View.
For complete information on the features of the 664 as well as procedures, tips and more, read the
664 User Guide, available in PDF format from the company’s website:
http://www.sounddevices.com/download/guides/664ug_en.pdf
Stop (press in)
Record (push up)
10. Start and Stop Recording
To begin recording:
▶Push up the Transport control to record.
To stop recording:
▶Press in the Transport control to stop recording.
While recording, both the Take name background color (top of Main screen)
and Timecode counter (bottom left of Main screen) are red, and the absolute
time counter (bottom of Main screen) runs. Additionally, the CF and SD indi-
cators will glow amber when media is being accessed.
11. Remove Media to Transfer Files
When recording is complete, ensure the CF and SD indicators (in top right
corner of Main screen) are no longer glowing amber before removing the
memory card(s). Once removed from the 664, the memory cards may then
be connected to a computer for transfer and backup of recorded les.
To remove the CF card:
▶Open the Media Door and pull out the card.
To remove the SD card:
1. Open the Media Door.
2. Push it in to release the card, and then pull it out.
Media Door
12 13

Quick Start Guide
664 Mixer & Recorder
Accessories
The 664 works with various accessories which may be purchased separately and used to further
enhance your eld mixing and recording experience.
aCCeSSORy PHOtO DeSCRiPtiOn
CL-12 This optional linear fader controller attaches to the
the 664 and adds 12 dedicated, smooth-gliding linear
faders, sunlight-viewable LED metering, big, back-lit
Record and Stop controls, and other illuminated
quick-access buttons for key functionality.
CL-6 This optional input controller attaches to the top or
bottom of the 664 and adds six full-sized tactile fader
controls, sunlight-viewable LED metering and big,
back-lit Record and Stop controls. When the CL-6 is
attached to a 664, inputs 7-12 have dedicated fader
controls, PFL switches and LEDs to indicate various
input signal and track activity.
CS-664 This production case (designed by CamRade for
Sound Devices) may be used for either the 664 or
688 and one attached accessory, such as the SL-6
or CL-6 (pictured here with the 664). Case has a
detachable accessory compartment and a battery
compartment for NP-type batteries on the bottom.
(Strap sold separately.)
Wave Agent Sound Devices Wave Agent, a le librarian for
computers, provides a comprehensive range of tools
for preparing audio les for problem-free passage
through complex production workows. For more a
free download, visit www.waveagent.com.
aCCeSSORy PHOtO DeSCRiPtiOn
XL-TA55 A 12-inch TA5F to TA5F cable, used to link the 664 to
another 664 or 552 mixer.
Other such cables for linking mixers, which may be
used with the 664, include the XL-TA25 and XL-TA35.
XL-2 A 25-inch TA3-F to XLR-3M cable, used to connect the
TA3 auxiliary outputs to third-party devices with XLR-
3F inputs. Each package contains two cables.
XL-2F A 25-inch XLR-3F to TA3-F cable, used to connect
mixers and other devices with XLR-3M outputs to the
TA3 7-12 inputs on the 664. Each package contains
two cables.
XL-4 Bag of four (4) TA3-F-type connectors.
XL-H Bare Hirose 4-pin locking DC connector (HR10-7P-4P).
XL-NPH An NP-type battery cup with 24-inch cable terminated
in Hirose 4-pin locking DC connector (HR10-7P-4P).
14 15

Quick Start Guide
664 Mixer & Recorder
aCCeSSORy PHOtO DeSCRiPtiOn
XL-WPH3 The XL-WPH3 is an AC-to-DC (in-line) 100-240V power
supply unit with 50/60 Hz input, a 12 VDC 3.75 A
(45 W) output, and a Hirose 4-pin DC plug. It comes
supplied with a 3-pin IEC cord.
XL-LL LEMO®-5 to LEMO-5 coiled cable for timecode
interconnection between the 664 and other devices.
XL-LB2 LEMO-5 to BNC input and BNC output for timecode
interconnection between the 664 and other devices.
XL-LX LEMO-5 to XLR-3F input and XLR-3M output for
timecode interconnection between the 664 and other
devices.
XL-10 Hirose 10-pin to two-XLR (balanced L/R) and 3.5
mm plug (stereo return A and C) breakout cable;
includes in-line 20-foot extension cable. The XL-10
is a high-quality multi-pin breakout and extension
cable designed specically for Sound Devices
eld production mixers. It provides easy access to
the balanced outputs and stereo return A and C
connections.
This table is not an all-inclusive list of accessories available for use with the 664. For the latest information, visit the
Sound Devices website at: www.sounddevices.com.
Declaration of Conformity
Manufacturer’s Name: Sound Devices, LLC
Manufacturer’s Address: E7556 State Road 23 and 33
Reedsburg, WI 53959
USA
Declares under sole responsibility that the product as delivered
Product Name: 664 Portable Mixer and Recorder
Model Number: 664
Description: 12-input eld production mixer with integrated 16-track recorder.
Product Options: This declaration covers all options of the above product.
complies with the essential requirements of the following applicable European Directives,
and carries the CE marking accordingly:
EMC Directive (2014/30/EU)
EN 55022:2010
EN 55103-2:2009
This Declaration of Conformity applies to the above-listed product(s) placed on the EU market after:
August 29, 2012
Date
Matt Anderson
President
Sound Devices, LLC
16 17

Quick Start Guide
664 Mixer & Recorder
Warranty and Service
Sound Devices, LLC warrants the 664 against defects in materials and workmanship for a period of ONE (1) year from date of original
retail purchase. Users who register their product directly with Sound Devices Technical Support by mail, online, or phone will receive an
additional ONE (1) year of warranty coverage, extending the complete warranty period to TWO (2) years from the date of original retail
purchase. In order to extend the warranty coverage period, registration must be completed within the initial ONE (1) year warranty peri-
od. Products must be purchased through authorized Sound Devices resellers to qualify for Warranty coverage. Damage resulting from
the opening of a Sound Devices product or attempted repairs by a non-authorized Sound Devices repair technician will void warranty
coverage.
This is a non-transferable warranty that extends only to the original purchaser. Sound Devices, LLC will repair or replace the product at its
discretion at no charge. Warranty claims due to severe service conditions will be addressed on an individual basis.
THE WARRANTY AND REMEDIES SET FORTH ABOVE ARE EXCLUSIVE. SOUND DEVICES, LLC DISCLAIMS ALL OTHER WARRANTIES, EX-
PRESS OR IMPLIED, INCLUDING WARRANTIES OF MERCHANTABILITY AND FITNESS FOR A PARTICULAR PURPOSE. SOUND DEVICES,
LLC IS NOT RESPONSIBLE FOR SPECIAL, INCIDENTAL, OR CONSEQUENTIAL DAMAGES ARISING FROM ANY BREACH OF WARRANTY OR
UNDER ANY OTHER LEGAL THEORY. Because some jurisdictions do not permit the exclusion or limitations set forth above, they may not
apply in all cases.
For all service, including warranty repair, please contact Sound Devices for an RMA (return merchandise authorization) before sending
your unit in for repair. Product returned without an RMA number may experience delays in repair. When sending a unit for repair, please
do not include accessories, including SSD drives, CF cards, batteries, power supplies, carry cases, cables, or adapters unless instructed
by Sound Devices. Sound Devices repairs and replacements may be completed using refurbished, returned or used parts that have been
factory certied as functionally equivalent to new parts.
Sound Devices, LLC
Service Repair RMA #XXXXX
E7556 State Road 23 and 33
Reedsburg, WI 53959 USA
Telephone: (608) 524-0625
Technical Support / Bug Reports
For technical support and bug reporting on all Sound Devices products contact Sound Devices, LLC at:
Website: www.sounddevices.com/support/ email: techpubs@sounddevices.com
Phone: +1 (608) 524-0625
Toll-free: +1 (800) 505-0625 — in USA only
Fax: +1 (608) 524-0655
Sound Devices hosts a user support forum. The URL is: http://forum.sounddevices.com.
Legal Notes
Product specifications and features are subject to change without prior notification.
Copyright © 2016
Sound Devices, LLC.
All rights reserved.
This document is protected under copyright law. An authorized licensee of this product may reproduce this publication for the licensee’s
own personal use. This document may not be reproduced or distributed, in whole or in part, for commercial purposes, such as selling
copies or providing educational services or support. This document is supplied as a technical guide for 664. Special care has been taken
in preparing the information for publication; however, since product specications are subject to change, this document might contain
omissions and technical or typographical inaccuracies. Sound Devices, LLC does not accept responsibility for any losses due to the use
of this guide.
Limitation of Liability
LIMITATION ON SOUND DEVICES’ LIABILITY. SOUND DEVICES, LLC SHALL NOT BE LIABLE TO THE PURCHASER OF THIS PRODUCT OR
THIRD PARTIES FOR DAMAGES, LOSSES, COSTS, OR EXPENSES INCURRED BY PURCHASER OR THIRD PARTIES AS A RESULT OF: ACCI-
DENT, MISUSE, OR ABUSE OF THIS PRODUCT OR UNAUTHORIZED MODIFICATIONS, REPAIRS, OR ALTERATIONS TO THIS PRODUCT, OR
FAILURE TO STRICTLY COMPLY WITH SOUND DEVICES, LLC’S OPERATING AND INSTALLATION INSTRUCTIONS. TO THE FULLEST EXTENT
PERMITTED BY LAW, SOUND DEVICES SHALL HAVE NO LIABILITY TO THE END USER OR ANY OTHER PERSON FOR COSTS, EXPENSES,
DIRECT DAMAGES, INCIDENTAL DAMAGES, PUNITIVE DAMAGES, SPECIAL DAMAGES, CONSEQUENTIAL DAMAGES OR OTHER DAMAGES
OF ANY KIND OR NATURE WHATSOEVER ARISING OUT OF OR RELATING TO THE PRODUCTS, THESE TERM/S AND CONDITIONS OR THE
PARTIES’ RELATIONSHIP, INCLUDING, WITHOUT LIMITATION, DAMAGES RESULTING FROM OR RELATED TO THE DELETION OR OTHER
LOSS OF AUDIO OR VIDEO RECORDINGS OR DATA, REDUCED OR DIMINISHED AUDIO OR VIDEO QUALITY OR OTHER SIMILAR AUDIO OR
VIDEO DEFECTS ARISING FROM, RELATED TO OR OTHERWISE ATTRIBUTABLE TO THE PRODUCTS OR THE END USER’S USE OR OPERATION
THEREOF, REGARDLESS OF WHETHER SUCH DAMAGES ARE CLAIMED UNDER CONTRACT, TORT OR ANY OTHER THEORY. “CONSEQUEN-
TIAL DAMAGES” FOR WHICH SOUND DEVICES SHALL NOT BE LIABLE SHALL INCLUDE, WITHOUT LIMITATION, LOST PROFITS, PENALTIES,
DELAY DAMAGES, LIQUIDATED DAMAGES AND OTHER DAMAGES AND LIABILITIES WHICH END USER SHALL BE OBLIGATED TO PAY OR
WHICH END USER OR ANY OTHER PARTY MAY INCUR RELATED TO OR ARISING OUT OF ITS CONTRACTS WITH ITS CUSTOMERS OR OTHER
THIRD PARTIES. NOTWITHSTANDING AND WITHOUT LIMITING THE FOREGOING, IN NO EVENT SHALL SOUND DEVICES BE LIABLE FOR
ANY AMOUNT OF DAMAGES IN EXCESS OF AMOUNTS PAID BY THE END USER FOR THE PRODUCTS AS TO WHICH ANY LIABILITY HAS BEEN
DETERMINED TO EXIST. SOUND DEVICES AND END USER EXPRESSLY AGREE THAT THE PRICE FOR THE PRODUCTS WAS DETERMINED
IN CONSIDERATION OF THE LIMITATION ON LIABILITY AND DAMAGES SET FORTH HEREIN AND SUCH LIMITATION HAS BEEN SPECIFICALLY
BARGAINED FOR AND CONSTITUTES AN AGREED ALLOCATION OF RISK WHICH SHALL SURVIVE THE DETERMINATION OF ANY COURT OF
COMPETENT JURISDICTION THAT ANY REMEDY HEREIN FAILS OF ITS ESSENTIAL PURPOSE.
Trademarks
The “wave” logo and USBPre are registered trademarks, and SuperSlot, MixAssist, PowerSafe, Quick-
Boot are trademarks of Sound Devices, LLC.
Mac and OS X are trademarks of Apple Inc., registered in the U.S. and other countries. Windows is a
registered trademark of Microsoft Corporation in the United States and other countries.
18 19

www.sounddevices.com
Part # 6579.001
Other manuals for 664
6
Table of contents
Other Sound Devices Music Mixer manuals

Sound Devices
Sound Devices 633 User manual

Sound Devices
Sound Devices 664 Manual

Sound Devices
Sound Devices 552 Manual

Sound Devices
Sound Devices 664 User manual

Sound Devices
Sound Devices MixPre-10M User manual

Sound Devices
Sound Devices 633 Manual

Sound Devices
Sound Devices 664 Manual

Sound Devices
Sound Devices 664 Manual

Sound Devices
Sound Devices 688 User manual

Sound Devices
Sound Devices 664 User manual