sparkfun Gator:soil Technical document

SparkFun gator:soil Hookup Guide
Introduction
Do you have a science experiment involving plant growth?
The gator:soil is the perfect tool to monitor the moisture content of the soil of your test subjects. This tutorial will
show you how to get started using this soil moisture sensor with the gator:bit (v2) in the micro:bit development
environment.
SparkFun gator:soil - micro:bit Accessory Board
SEN-15272
Product Showcase: gator:boards - micro:bit Accessory BoardsProduct Showcase: gator:boards - micro:bit Accessory Boards

Required Materials
To get started, you'll need a micro:bit to control everything. Each of the products below includes a micro:bit, but the
kit and bundle also include some additional accessories that you may want as well.
To easily use the gator board ecosystem, the gator:bit (v2) will help breakout the necessary pins. You will also
need alligator cables to connect the gator:bit to the gator:soil.
SparkFun Inventor's Kit for micro:bit
KIT-14542
micro:bit Go Bundle
DEV-14336
micro:bit Board
DEV-14208
SparkFun gator:bit v2.0 - micro:bit Carrier Board Alligator Test Leads - Multicolored (10 Pack)

Suggested Reading
There isn't much to learning how to use the gator:soil (moisture sensor). However, you may find the following
concepts useful along the way.
If you aren't familiar with the micro:bit, we recommend reading here for an overview.
DEV-15162 PRT-12978
Voltage, Current, Resistance, and Ohm's Law
Learn about Ohm's Law, one of the most fundamental
equations in all electrical engineering.
Analog to Digital Conversion
The world is analog. Use analog to digital conversion to
help digital devices interpret the world.
Soil Moisture Sensor Hookup Guide
A quick hookup guide and project to get you started
with the Soil Moisture Sensor from SparkFun.
micro:climate Kit Experiment Guide
A weather station kit that is built on top of the
inexpensive, easy-to-use micro:bit and Microsoft
MakeCode.

micro:bit Ecosystem
We would also recommend taking a look at the following tutorials if you aren't familiar with them.
Product Showcase: micro:bit and SparkFun bitsProduct Showcase: micro:bit and SparkFun bits
Getting Started with the micro:bit
The BBC micro:bit is a compact, powerful programming
tool that requires no software installation. Read on to
learn how to use it YOUR way!
Getting Started with MicroPython and the
SparkFun Inventor's Kit for micro:bit
Learn MicroPython with the micro:bit.
SparkFun gator:bit v2 Hookup Guide

Hardware Overview
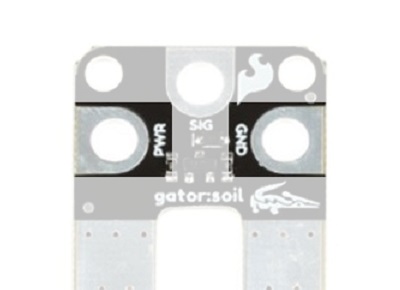
The gator:soil consists of two probes and three pads (PWR, GND, and SIG).
Note: For more in-depth information on the circuitry, check out the blog post for the circuit that this sensor is
based off.
Contacts Description
PWR INPUT: Power to the sensor (3.3V - 5V).
SIG OUTPUT: Analog voltage representing the conductivity between the probes.
GND REFERENCE: Ground reference (0V).
Probes Used to sample soil moisture content for sensor.
Power
We recommend powering the gator:soil with between 3.3V - 5V. Please note that the analog value returned will
vary depending on what voltage is provided for the sensor.
Power connection pads.
For use with the gator:bit (v2) and micro:bit, you should provide 3.3V through the PWR and GND pads. We
recommend not powering the sensor constantly to reduce corrosion of the probes; this can be controlled through
one of the digital pins of the gator:bit (v2).
Caution: One commonly known issue with soil moisture senors is their short lifespan due to corrosion of the
electrodes from electrolysis. To combat this, we've had the PCB coated in Gold Finishing (Electroless Nickel
Immersion Gold), which has a high decomposition potential. However, the life span of the sensor is limited.
How to Load MicroPython on a Microcontroller
Board
This tutorial will show you how to load the MicroPython
interpreter onto a variety of development boards.
The gator:bit v2 is a breakout board for the BBC
micro:bit. The gator:bit exposes almost every pin on the
micro:bit to clippable pad with circuit protection. It also
has as built-in addressable LEDs and a built-in buzzer.

Applying a higher input voltage, taking frequent readings, and/or leaving the sensor on for extended
periods of time will decrease the lifespan. For example, a simple way to extend the lifespan of your sensor
is to only power it when you take a reading.
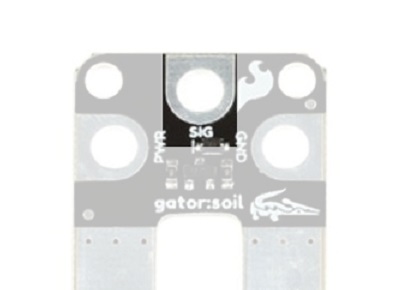
Output Signal
The two probes are used to measure the conductivity of the soil. SIG provides an analog voltage out that can be
attached to an ADC pad on the gator:bit (v2).
Analog signal connection pad.
The value read on SIG is dependent several variables such as soil composition, contact on the probes, soil
compaction, amongst other factors. For example, if you have a high alkaline content in your soil, it will be more
conducive and give you a high baseline reading. In most cases, you will probably need to calibrate your sensor
reading for each soil sample and sensor. Once calibrated, for a fixed sensor, the primary variables to the measure
conductivity in the soil will be the power input and moisture content of the soil.
Hardware Assembly
Note: Unfortunately, the design of this sensor isn't intended for long term exposure to outdoor environments.
It is primarily intended for the classroom setting. This is due to the limitations in waterproofing the sensor and
its connections.
Connecting your gator:soil to the gator:bit (v2) is simple. Connect GND to GND, SIG to an analog pin (P0-P2) ,
and PWR to either 3.3V OUT or to a digital pin that is not in use (P0-P2, P8, P16, or P5). This can easily be done
with alligator cables.
1
Example of connections used in example. Click to enlarge.

gator:soil gator:bit (v2)
PWR 3.3V OUT or
Digital Pin: P0 - P2, P8, P16, or P5
SIG Analog Pin: P0 - P2
GND GND
Note: If accessible, pins P3, P4, and P10 can be used in addition for ADC measurements.↩
Adding the MakeCode Extension
Note: This tutorial assumes you are familiar with MakeCode, the gato:bit (v2), and the micro:bit board.
If you have not previously used MakeCode, please check out the Quick Start Guide fro micro:bit.
If this is your first time using a micro:bit, please review our Getting Started with the micro:bit guide.
If this is your first time using the gato:bit (v2), please review our SparkFun gator:bit v2 Hookup Guide.
The easiest way to get started using the gator:soil is to use Microsoft MakeCode, a web-based block editor. This
tutorial assumes you are familiar with the with MakeCode, the gato:bit (v2), and the micro:bit development board. If
this is your first time check out this guides linked in the suggested reading section (above).
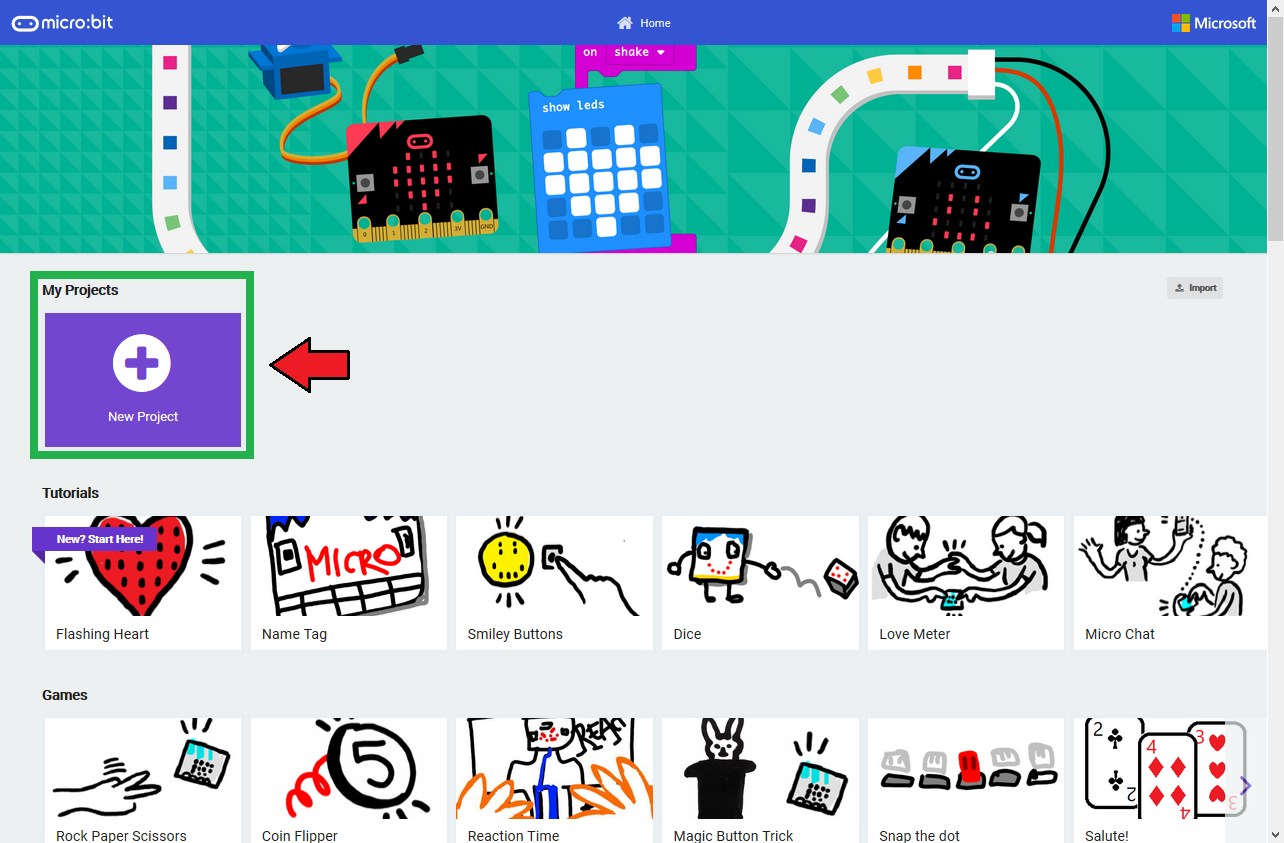
Installing Extensions
To get started with using MakeCode with the miccro:bit, head over to the MakeCode for micro:bit website by
Microsoft. Then, click the New Project button to start a new project and open the Editor. (*Yes, all you only need
to get start coding is a computer with internet access, an up-to-date web browser, and an available USB port!)
Example of gator:soil in use application. Click to enlarge.

Click the New Project button to start a new project and open the Editor. Click on image to enlarge.
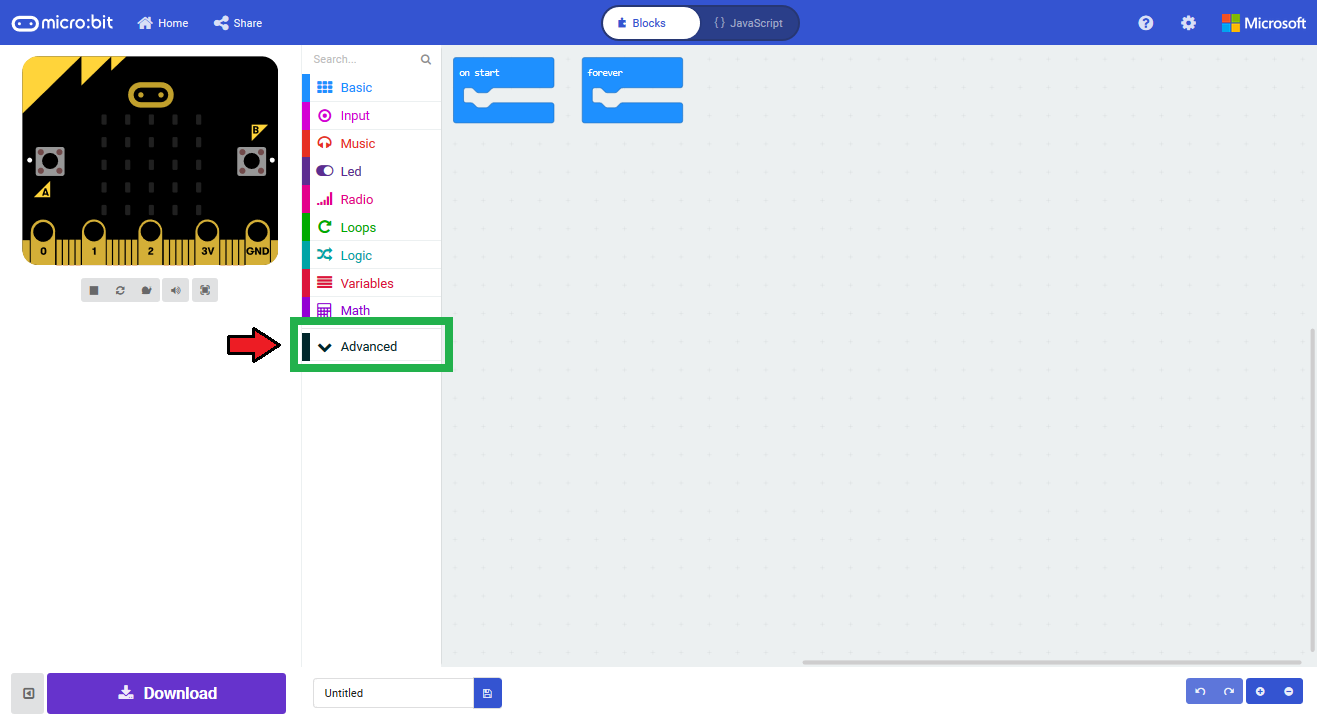
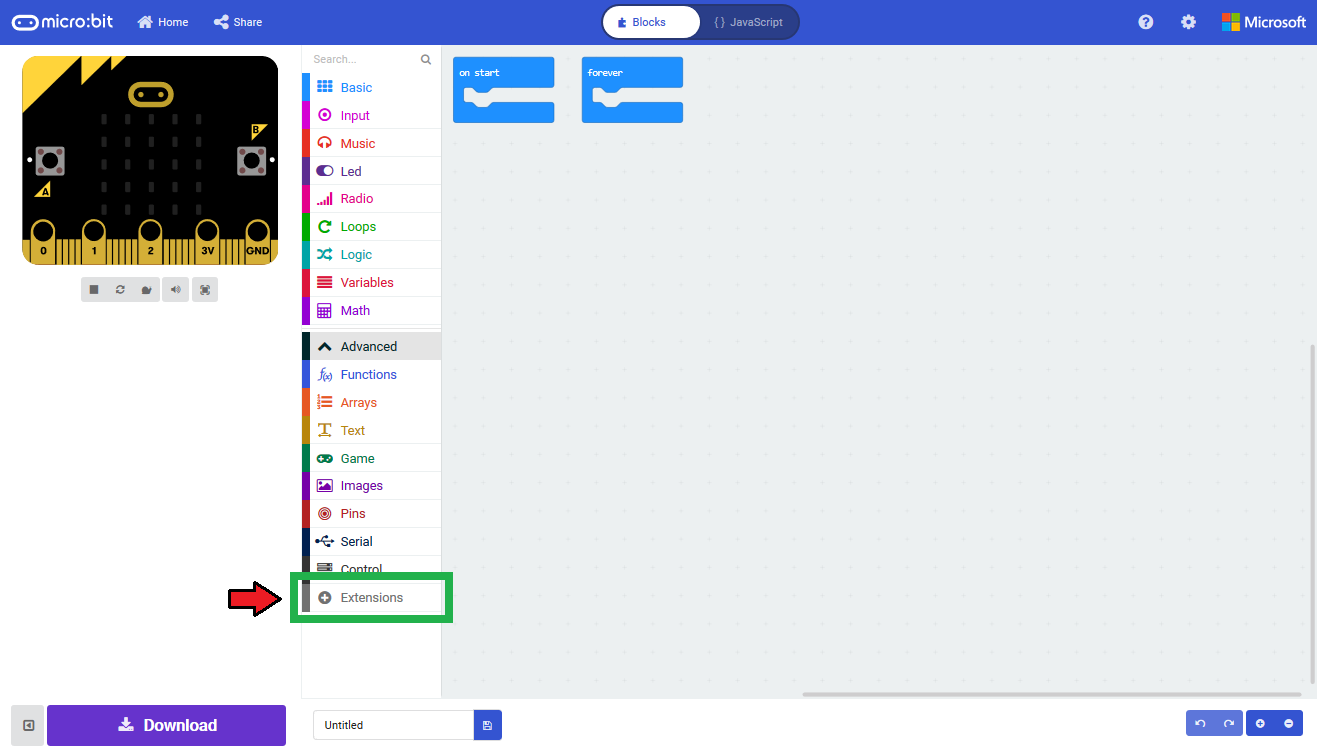
Once you have the editor up, click on the the Advanced block in the block library to reveal the drop down menu.
Click on the the Advanced block in the block library to reveal the drop down menu. Click on image to enlarge.
Finally, click on the Extensions block. This should bring up the extensions page. (*Alternatively, you could also
click on the extensions link from the settings menu.)
Click on the the Extensions block to open the extensions page. Click on image to enlarge.
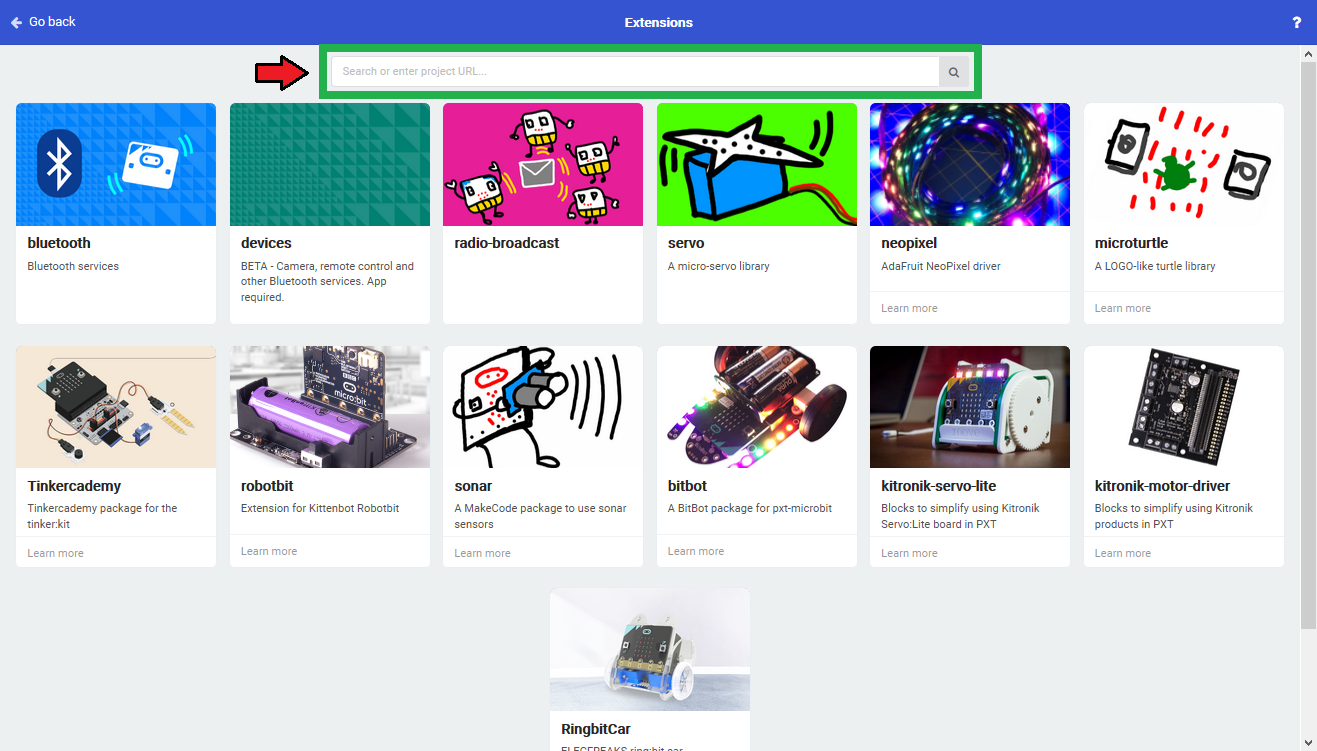
There are two methods for finding the gator:soil extension:
Search for the name used on the extension .
Use the link to the GitHub repository for the pxt-package as the search term.
Use the search bar to find the extension you want to install. Click on image to enlarge.
2

Note: Unfortunately, it does take time to get an extension approved by the micro:bit Educational Foundation before it can be searchable
by name. Part of the requirements for the approval process involves a live product page. Therefore, at the time of the launch of this
product, the extension has not been approved yet and the only method of adding the extension is to use the link to the GitHub repository
of the pxt-package. We will update this tutorial as soon as the extension has been approved.↩
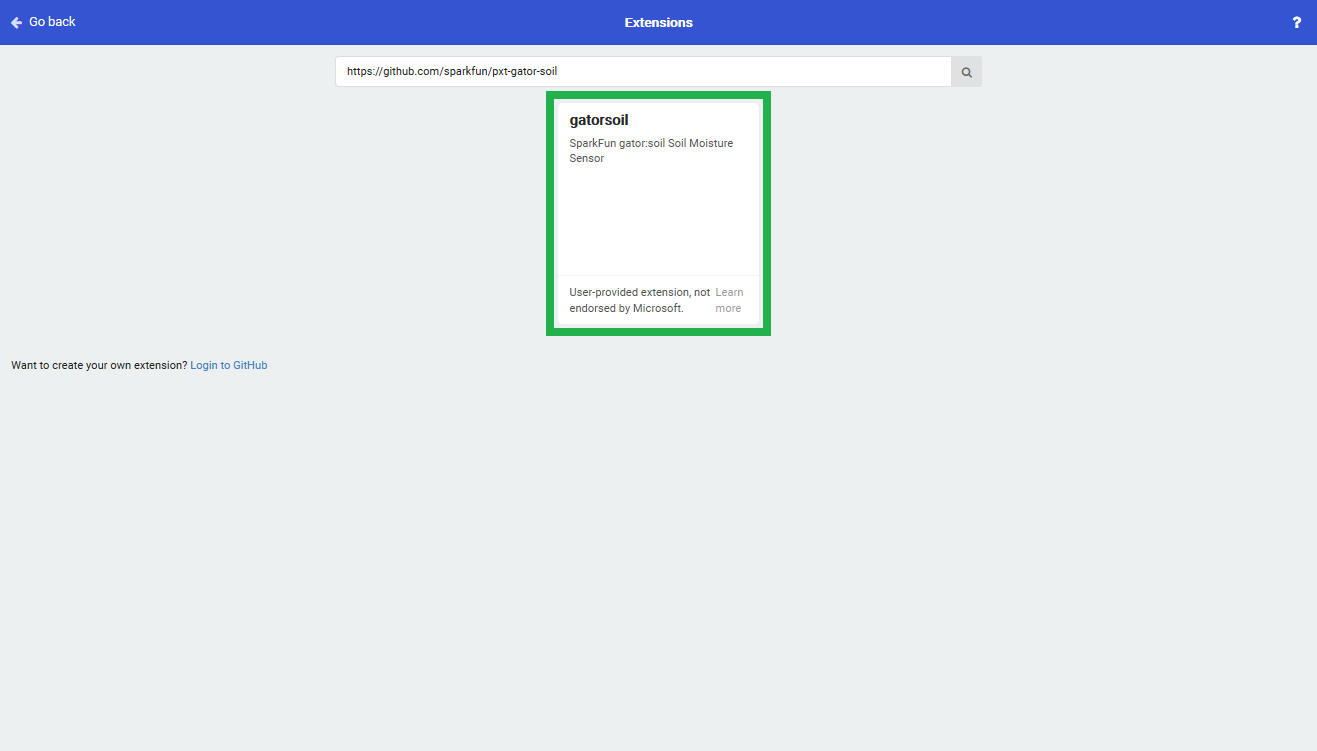
Search for the PXT-Package
Search for the gator:soil extension using the GitHub repository link to the pxt-package:
https://github.com/sparkfun/pxt-gator-soil
Search for Extension. Then, click on the box to add it to the block library. Click on image to enlarge.
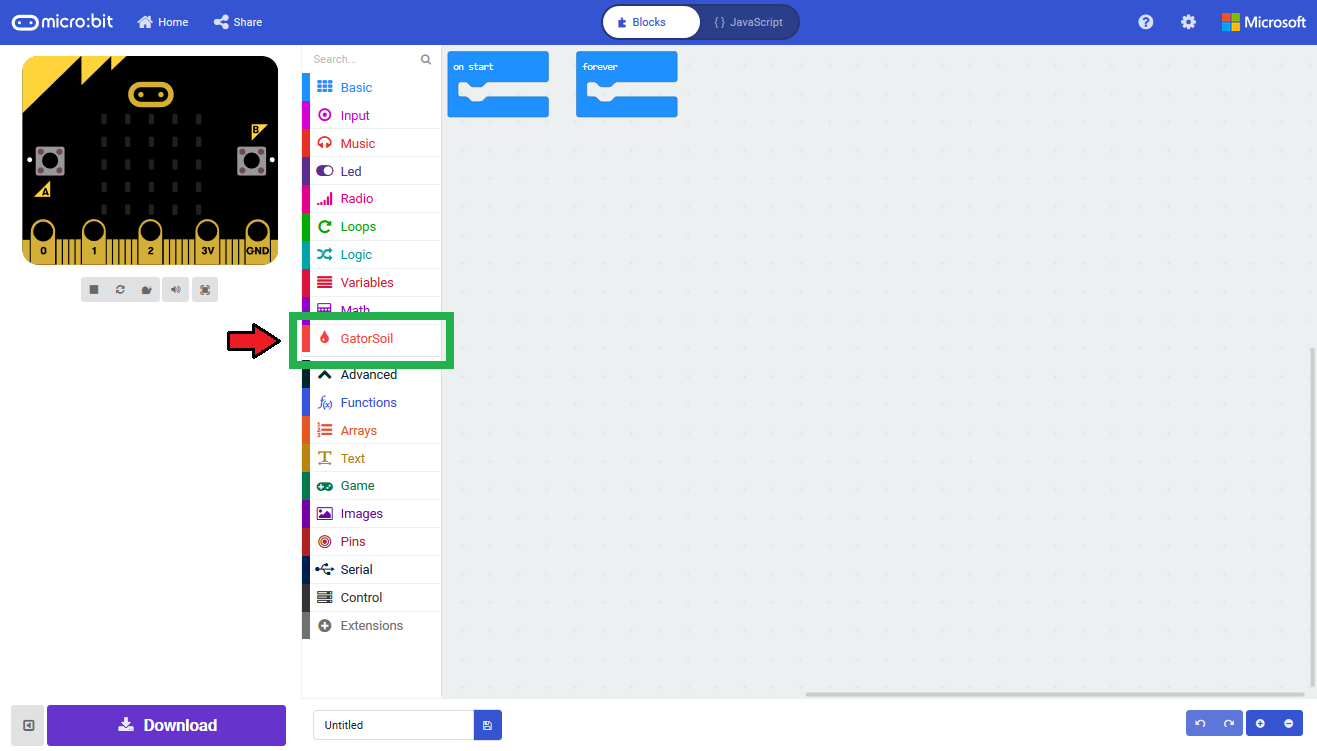
Then, click on the box for the extension to add it to the block library. The gator:soil extension should now appear in
the block library.
Extension in the block library; click on the block to open menu options. Click on image to enlarge.
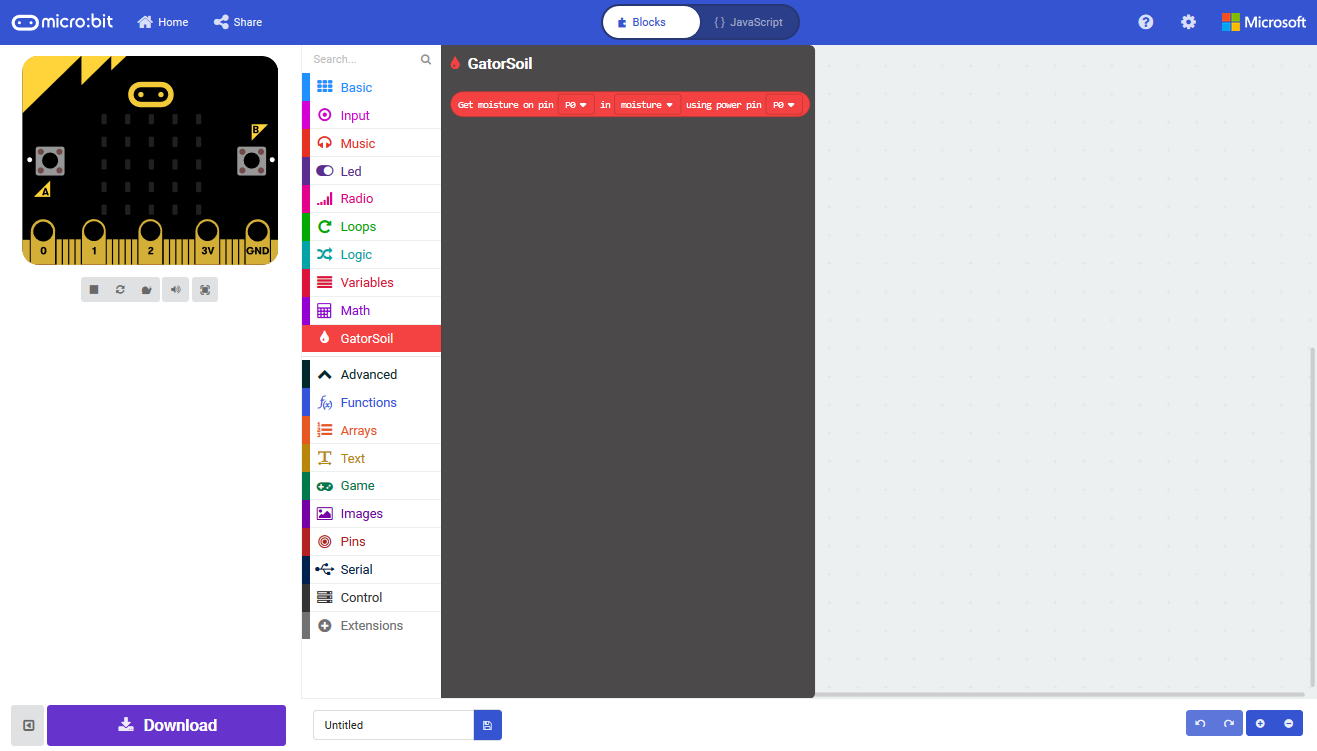
To verify that you have added the extension, click on the gator:soil block to make sure that your drop down
menu options match the image below.
Available blocks for the gator:soil extension. Click on image to enlarge.
MakeCode Example

Now that you have added the gator:soil extension to the Editor, lets start with some example code. Plug the
micro:bit into your computer using an USB micro-B cable after you have assembled your hardware with the
instructions from the previous section. The micro:bit should appear on your computer as a removable storage
device.
The micro:bit showing up as a USB drive on a Windows computer. Click to enlarge.
To upload new code, this is where you will be copying the downloaded .hex file to later.
Block Function
Get moisture on pin _____ in _____ using power pin _____
This is a value block as indicated by the block's shape. There are three drop down menus with selectable options
for how the sensor is wired and the output value of the block. Below is a description of the available menu options
(from left to right):
1. ADC or SIG Read Pin- This pin is used to read the SIG output of the sensor. The pin options are as follows:
P0 to P20
P5 to P9 & P11 to P20 : Digital pins that can't be used as indicated with (write only) .
Pins P0 to P4 and P10 : Analog pins that can be used, but the only pins that are available on
the gator:bit (v2) are P0 , P1 , and P2 .
2. Measurement Value
This designates the output value that is read. There are two options:
moisture - A value ranging between 0 and 1.
adcvalue - A 10-bit integer value from micro:bit ADC ranging between 0 and 1023.
3. Power Control Pin
This pin is used to control when the sensor input power ( PWR ). The pin options are as follows:
P0 to P20
Only pins P0 - P2 , P5 , P8 , P11 , P13 - P16 , and P19 - P20 are available on the gator:bit
(v2).
Note: Each measurement is taken with the shortest instance possible so that the power pin doesn't need to
be toggled on and off. However, control logic or time delays should be added to reduce the frequency of
these measurements. Without such controls, the sensor will be constantly polled in the forever loop,
reducing the life span of the probes.
System Calibration
To get any sort of useful data out of your Soil Moisture Sensor, it is advised that you calibrate it to whatever soil
you plan to monitor. Different types of soil can affect the sensor, and you may get different readings from one
composition to the next. Before you start storing moisture data or triggering events based on that value, you
should see what values you are actually getting from your sensor.

Once you have an idea what values your sensor is outputting in completely dry and completely wet situations, it's
time to calibrate your sensor for the specific soil you want to monitor. Test your soil when it is as dry as possible,
then measure it when the soil is completely saturated with moisture. Getting these values and comparing them to
the ones from the previous calibration will give you the best insight into what values mean for your specific plant
and soil. This test may take some trial and error and patience. Be careful not to splash water onto the sensor or
over-water/under-water your plants during these tests.
Once you have a good handle on the values you can expect, you can map function under the Pins library block
to adjust your results.
Basic Read
Below, is a simple example of how to take simple measurements from the sensor. The example uses a extremely
short 10 second delay between measurements, primarily for demonstration purposes. To use this example, there
are multiple options for accessing the .hex file:
Replicate the block functions from the display below to copy the example project. Then download the .hex
file.
Expand the display widow to pull up the example project. Then download the .hex file.
Use this link to pull up the example project. Then download the .hex file.
Download the .hex file from the button below or the link on the bottom of the display.
DOWNLOAD .HEX FILE FOR EXAMPLE
serial redirect to USB
on start
forever
Microsoft MakeCode Terms of Use Privacy Download
Edit
Simulator
Blocks
JavaScript
Learn more
This site uses cookies for analytics, personalized content and ads. By continuing to browse this site, you agree to this
use.

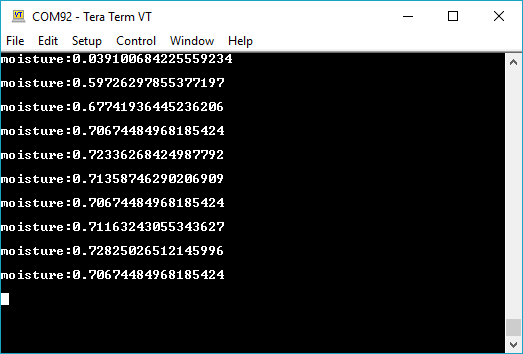
The output is redirected over the serial port to avoid conflicts on pins P0 and P1 , which are also used for serial
communication. To read the sensor values, pull up your favorite serial terminal emulator. Then, connect to the
serial port that the micro:bit is on; the default baud rate is 115200 bps. Below, is an example of the sensor output
for the example code.
Example of readings from the sensor.
Note: In application, to maximize the life of the sensor with daily monitoring, measurements should be limited
to less than 3 measurements a day.
Troubleshooting Tips
Here are a few tips for troubleshooting this device.
Sensor Corrosion
A commonly known issue with soil moisture senors is their short lifespan due to corrosion of the electrodes from
electrolysis. To combat this, we've had the PCB coated in Gold Finishing (Electroless Nickel Immersion Gold),
which has a high decomposition potential. However, the life span of the sensor is limited. Applying a higher input
voltage, taking frequent readings, and/or leaving the sensor on for extended periods of time will decrease the
lifespan.
A simple way to extend the lifespan of your sensor is to only power it for the short period of a reading.
Waterproofing
A commonly known issue with soil moisture senor is that it may be exposed to water when you water your plants.
Unfortunately, water and electronics do not mix. To prevent shorting out your board and sensor, you should always
disconnect your cables when watering your plant. (*You can remove the sensor, but then you will need to
recalibrate the sensor every time and this will affect the consistency of your readings.)
Calibration
To get any sort of useful data out of your sensor, it is advised that you calibrate it to whatever soil you plan to
monitor. Different types of soil have various affects on the sensor; you may get different readings from one soil
sample to the next. Before you start storing moisture data or triggering events based on that value, you should see
what values you are actually getting from your sensor.
If you still have questions or issues with this product, please create a post on our forum under the
Gator Products topic.

Additionally, if you are an educator and you have class or application based questions, please
create a post on our forum under the Educational Products topic.
Resources and Going Further
For more product information, check out the resources below:
Schematic (PDF)
Eagle Files (ZIP)
gator:soil PXT Package
GitHub Product Repo
micro:bit Landing Page
SFE Product Showcase
Interested in the micro:bit? Check out some of these other micro:bit products:
Need some inspiration for your next project? Check out some of these other micro:bit product tutorials:
SparkFun Inventor's Kit for micro:bit Lab Pack
LAB-15229
SparkFun gator:bit v2.0 - micro:bit Carrier Board
DEV-15162
micro:bit Educator Lab Pack
LAB-15230
SparkFun Inventor's Kit for micro:bit
KIT-14542

micro:climate Kit Experiment Guide
A weather station kit that is built on top of the
inexpensive, easy-to-use micro:bit and Microsoft
MakeCode.
Gator:starter ProtoSnap Hookup Guide
Get started clipping sensors and lights to the micro:bit
with the gator:starter gator:board from SparkFun!
Wireless Remote Control with micro:bit
In this tutorial, we will utilize the MakeCode radio
blocks to have the one micro:bit transmit a signal to a
receiving micro:bit on the same channel. Eventually, we
will control a micro:bot wirelessly using parts from the
arcade:kit!
SparkFun gator:bit v2 Hookup Guide
The gator:bit v2 is a breakout board for the BBC
micro:bit. The gator:bit exposes almost every pin on the
micro:bit to clippable pad with circuit protection. It also
has as built-in addressable LEDs and a built-in buzzer.
Table of contents
Other sparkfun Computer Hardware manuals

sparkfun
sparkfun NEO-M8P-2 Technical document

sparkfun
sparkfun DEV-17272 Technical document

sparkfun
sparkfun MicroMod Artemis Processor User manual

sparkfun
sparkfun FTDI SmartBasic Technical document

sparkfun
sparkfun AST-CAN485 Technical document

sparkfun
sparkfun WIG-13660 User manual

sparkfun
sparkfun RTK Express Technical document

sparkfun
sparkfun MicroMod SAMD51 Technical document

sparkfun
sparkfun DEV-14034 Technical document

sparkfun
sparkfun H3LIS331DL User manual


