Spartan PROvision Touch User manual

SPARTAN TOOL L.L.C.
8 0 0 . 4 3 5 . 3 8 6 6
WWW.SPARTANTOOL.COM
PROvision Touch
V i d e o I n s p e c t i o n S y s t e m
Owner’s Manual
63039900 4-1-11 © 2011 Spartan Tool LLC
SPSP
SPSP
SPARTART
ARTART
ARTANAN
ANAN
AN

Page 2
Warning
SPARTAN TOOL L.L.C.
1506 W. Division Street
Mendota, IL 61342
800.435.3866 Fax 888.876.2371
www.spartantool.com
— Read the safety and operating instructions before using any Spartan Tool products.
Drain and sewer cleaning can be dangerous if proper procedures are not followed and appropri-
ate safety gear is not utilized.
— Before starting unit, be sure to wear personal protective equipment such as safety
goggles or face shield and protective clothing such as gloves, coveralls or raincoat, rubber boots
with metatarsal guards, and hearing protection.
— Drains and sewer can carry bacteria and other infectious micro-organisms or
materials which can cause death or severe illness. Avoid exposing eyes, nose, mouth, ears,
hands and cuts and abrasions to waste water or other potentially infectious materials during drain
and sewer cleaning operations. To further help protect against exposure to infectious materials,
wash hands, arms and other areas of the body, as needed, with hot, soapy water and, if neces-
sary, flush mucous membranes with water. Also, disinfect potentially contaminated equipment by
washing such surfaces with a hot soapy wash using a strong detergent.
— For any questions contact the company at the address shown below.
“California Prop. 65: This product may contain an extremely small amount of lead in the coating.
Lead is a material known to the State of California to cause cancer or reproductive toxicity.”

Page 3
Contents
Operating Section
PROvision Touch Features ......................................................................................................... 4-5
Unpacking ..................................................................................................................................... 6
Description ................................................................................................................................... 6
Safety Instructions ...................................................................................................................... 6-8
Familiarization ......................................................................................................................... 9-10
PROvision Touch Interface ............................................................................................................11
Interface - Main Screen ............................................................................................................... 12
Interface - Camera Lights ............................................................................................................ 13
Interface - Record ........................................................................................................................ 14
Interface - Features while Recording ........................................................................................... 15
Interface - Playback ................................................................................................................ 16-17
Interface - Snapshot .................................................................................................................... 18
System Options...................................................................................................................... 19-21
Accessing the Thumbdrive with Computer ................................................................................... 22
Video Files - Windows Compatibility ........................................................................................... 22
Video Sharing and Utilities .......................................................................................................... 23
Battery Operation and Charging ..................................................................................................24
External Video Reel (optional) ................................................................................................ 25-26
Operating Instructions & Tips ..................................................................................................... 27
Maintenance ............................................................................................................................... 28
PROvision 2.0 Troubleshooting ................................................................................................... 29
Parts Section
PROvision Touch Components ............................................................................................... 30-34
Flex Link Components ................................................................................................................ 35
Product Information ..................................................................................................................... 36
Note Space ................................................................................................................................. 37
Warranty Information .................................................................................................................... 38

Page 4
PROvision Touch Features
MONITOR SCREEN
15” (38.1cm) Color LCD (Liquid Crystal Display) screen
8wire Glass-Film-Glass touch panel
Auto-sensing brightness control
Increasing Brightness of LCD to 1000nits for sunlight readability
Anti Reflection Treatment
Single Board Atom Processor Computer
Screen is hinged for optimal viewing angle
CASE FEATURES
Rugged molded design
Protective Lid design with easy access quick-release latches
Quick Guide Instructions
Pivoting display using counterbalanced constant torque hinges
Telescoping handle
Built-in wheels
Totally enclosed, self contained circuitry
Integrated power cord storage
Easy access fuse protection
Easy access push rod
System dimensions: 21” x 21” x 11”
BATTERY
PUSH CABLE
Batteries can be charged at any time or power level
Batteries can be charged from 110 / 220 Volt AC
Fully Charged batteries offer 4 hours of operation
Kevlar reinforced cable jacket
Abrasion resistant jacket 100 foot length
Mounted in reel for ease of feed and retrieval
Optional external reel system available for 200 foot lengths

Page 5
INCLUDED ACCESSORIES
One 4 GB memory thumbdrive
Centering Guide
Flex-link with 512 Hz beacon
SELF-LEVELING COLOR CAMERA HEAD
1.375” diameter
2.28” length
0.5 LUX sensitivity (without lights)
3.7 mm wide angle lens
768 Effective Pixel (horizontal)
494 Effective Pixel (vertical)
Optical grade, scratch resistant, clear sapphire lens
12 fully adjustable super bright white LEDs
Even light placement eliminates “hot spots”
Heavy duty, machined stainless steel housing
Automatic self-leveling picture
Remarkable picture clarity and focus in lines up to 6” diameter
Operates in 1-1/2 “ straight runs, 3” sweeps and 90 degree bends
PROvision Touch Features
TOUCHSCREEN INTERFACE
Full screen touchscreen
Simple one-press control buttons
Movable/hideable on-screen distance counter
Movable/hideable on-screen date/time box
Reset option for distance counter
Hideable control overlay for full screen viewing
LED camera light control
Full keyboard for file naming
Live onscreen text typing plus drawing telestrator
Automatic file organizing by date
Quick snapshot feature for taking still images
Easy access system options
System upgradeable through website
Built in product manual

Page 6
Unpacking
Before signing the shipping receipt, check and inspect unit for visible damage. If there is visible damage,
note so on the shipping receipt.
Description
The system is composed of a miniature closed circuit television camera and color LCD touchscreen
monitor connected through flexible push type cable.
This unit operates on internal battery power and 110/220 Volt AC electrical current.
WARNING: READ THE “OPERATOR’S MANUAL” THOROUGHLY BEFORE USING ANY SPARTAN
TOOL PRODUCT. DRAIN/SEWER CLEANING CAN BE DANGEROUS IF PROPER PROCEDURES
ARE NOT FOLLOWED. KNOW THE PROPER OPERATION, CORRECT APPLICATIONS AND THE
LIMITATIONS OF ALL SPARTAN TOOL PRODUCTS BEFORE USE.
CAUTION #1
Use of any electrical equipment in a wet environment can cause fatal shock if equipment is
not properly grounded, adequately maintained, and if care is not used by the operator.
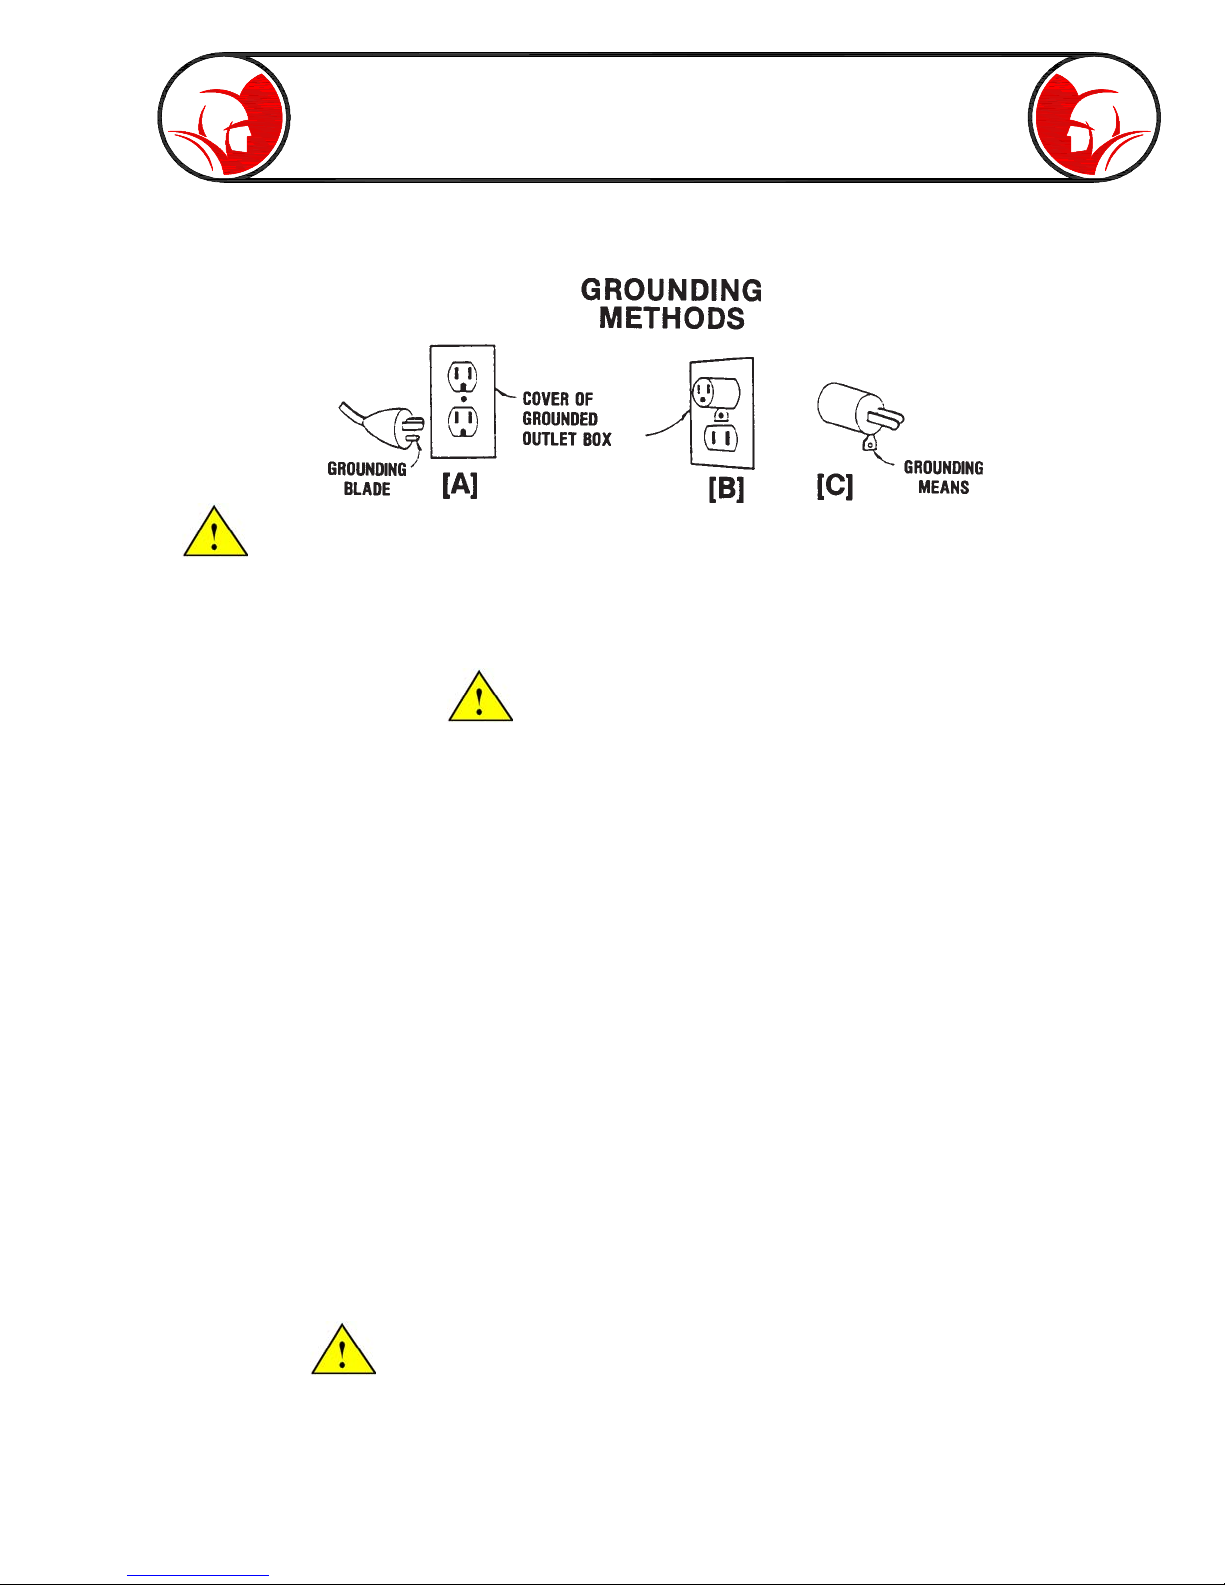
A. GROUNDING INSTRUCTIONS —
Before charging your Spartan PROvision Touch, make sure a properly grounded, three hole electrical
outlet is available. If not, as in some older homes, use a three-prong adapter and connect the
green pigtail (or grounding lug) to a known ground such as a cold water pipe. Never cut off the
grounding prong for use in a two hole outlet receptacle. By doing so, you have cut off your protection
from shock.
The Spartan PROvision Touch must be grounded while charging or operating using the 110V
power cord to protect the operator from electrical shock. The Spartan PROvision Touch comes
with a three-conductor cord and three-prong grounding type plug to fit the properly grounded
receptacle. An adapter, see sketches (B) and (C), is available for connecting, sketch (A) type
plugs, to a two-prong receptacle, except in Canada.
Safety Instructions
Page 7
The green-colored rigid ear (or lug), extending from the adapter must be connected to a permanent
ground such as a properly grounded outlet box.
Don’t assume that all three-hole outlets are properly installed. Check the outlet and
also the adapter, if used, with an outlet testing device which quickly indicates if a ground is connected.
Correct a faulty test indication before proceeding. The use of a Ground Fault Interrupter is the
safest means to check for proper grounding.
B. EXTENSION CORDS —
Plug the power cord attached to the PROvision Touch directly into an inspected outlet. If an extension
cord must be used, it must be of an approved three-wire type in good condition, equipped with a
three-prong plug. Never cut off the grounding prong for use in a two hole outlet receptacle. By doing
so you have cut off your protection from shock.
C. OUTDOOR EXTENSION CORDS —
When Spartan Tool equipment is used outdoors, use an extension cord intended for use outdoors
and so marked.
D. AVOID ELECTRICAL CORD ABUSE —
Never move or lift Spartan Tool equipment by the cord. Do not yank cord at one end to disconnect
it from the receptacle. Keep cord away from heat, oil and sharp edges to avoid damage. Always
replace or repair damaged cords.
E. ALWAYS WEAR RUBBER BOOTS IN WET AREAS FOR ADDED PROTECTION
WARNING: SPARTAN TOOL PRODUCTS ARE NEVER TO BE OPERATED IN AN EXPLOSIVE
ENVIRONMENT.
CAUTION #2
Avoid eye or skin contact with acids or caustic substances while inspecting drains/sewers.
A. Always wear safety goggles when inspecting drain/sewers to avoid injury to eyes.
Safety Instructions (cont)
Page 8
B. Before beginning work, ask the customer if either acids or caustic substances are present in the
pipe. If in doubt, litmus paper used at the opening of the pipe may give an indication of the type of
substance in the line. Litmus paper (acids/caustics) can be purchased at most pharmacies.
C. Exposure to acids or caustic substances can cause the push cable to break or to become brittle.
Depending upon the concentration of acids or caustic substances in the drain/sewer, push cables
may break or become brittle in the drum, in the pipe, or when placing the cable back into the drum.
If the push cable remains exposed to acids or caustic substances for any length of time, the cable
can continue to be damaged.
CAUTION #3
Drains/sewers carry bacteria and the possibility of infectious disease exists, if exposed.
A. Always wear safety goggles and Spartan Tool riveted gloves with rubber gloves inside the riveted
gloves to minimize exposure to infection from bacteria in pipes.
B. Avoid contact with ears, eyes, or mouth with contents of pipe to lower the risk of infection. DO NOT
SMOKE!
C. Avoid exposing any cuts to drains/sewers and sewer inspecting equipment
CAUTION #4
Follow all rules of safety and good housekeeping.
A. Keep work area clean.
B. Stay alert.
C. Place the unit and controls in a stable and accessible position for safe operation.
D. Properly store the tools.
E. Keep children away from all equipment.
F. Use only recommended equipment and accessories. Maintain tools in original working condition.
G. Do not exceed limitation of equipment or accessories.
H. Always wear recommended safety gear
I. Always lift with legs and not your back.
Safety Instructions (cont)

Page 9
Familiarization
Fig. 9-3
Fig. 9-2
Fig. 9-1
Telescoping Handle
Touchscreen
Monitor
Lid Latch
Quick Guide
Instructions Lift Handle
Push Rod
Camera
Home
External Reel
Connector
Battery Fuse
Lid Catch
AC Cord
AC Fuse
Block
Thumbdrive
Memory
System Power
Toggle Switch
Fig. 9-4 Fig. 9-5

Page 10
Familiarization (cont)
100 Feet Push Rod
Flex Link with 512 Hz
Beacon Assembly
Self Leveling
Camera Head
12 High Intensity
LED’s
Centering Guide
Fig. 10-2
Fig. 10-1
Centering Guide
Locking Ring
Page 11
PROvision Touch Interface
SYSTEM INTERFACE
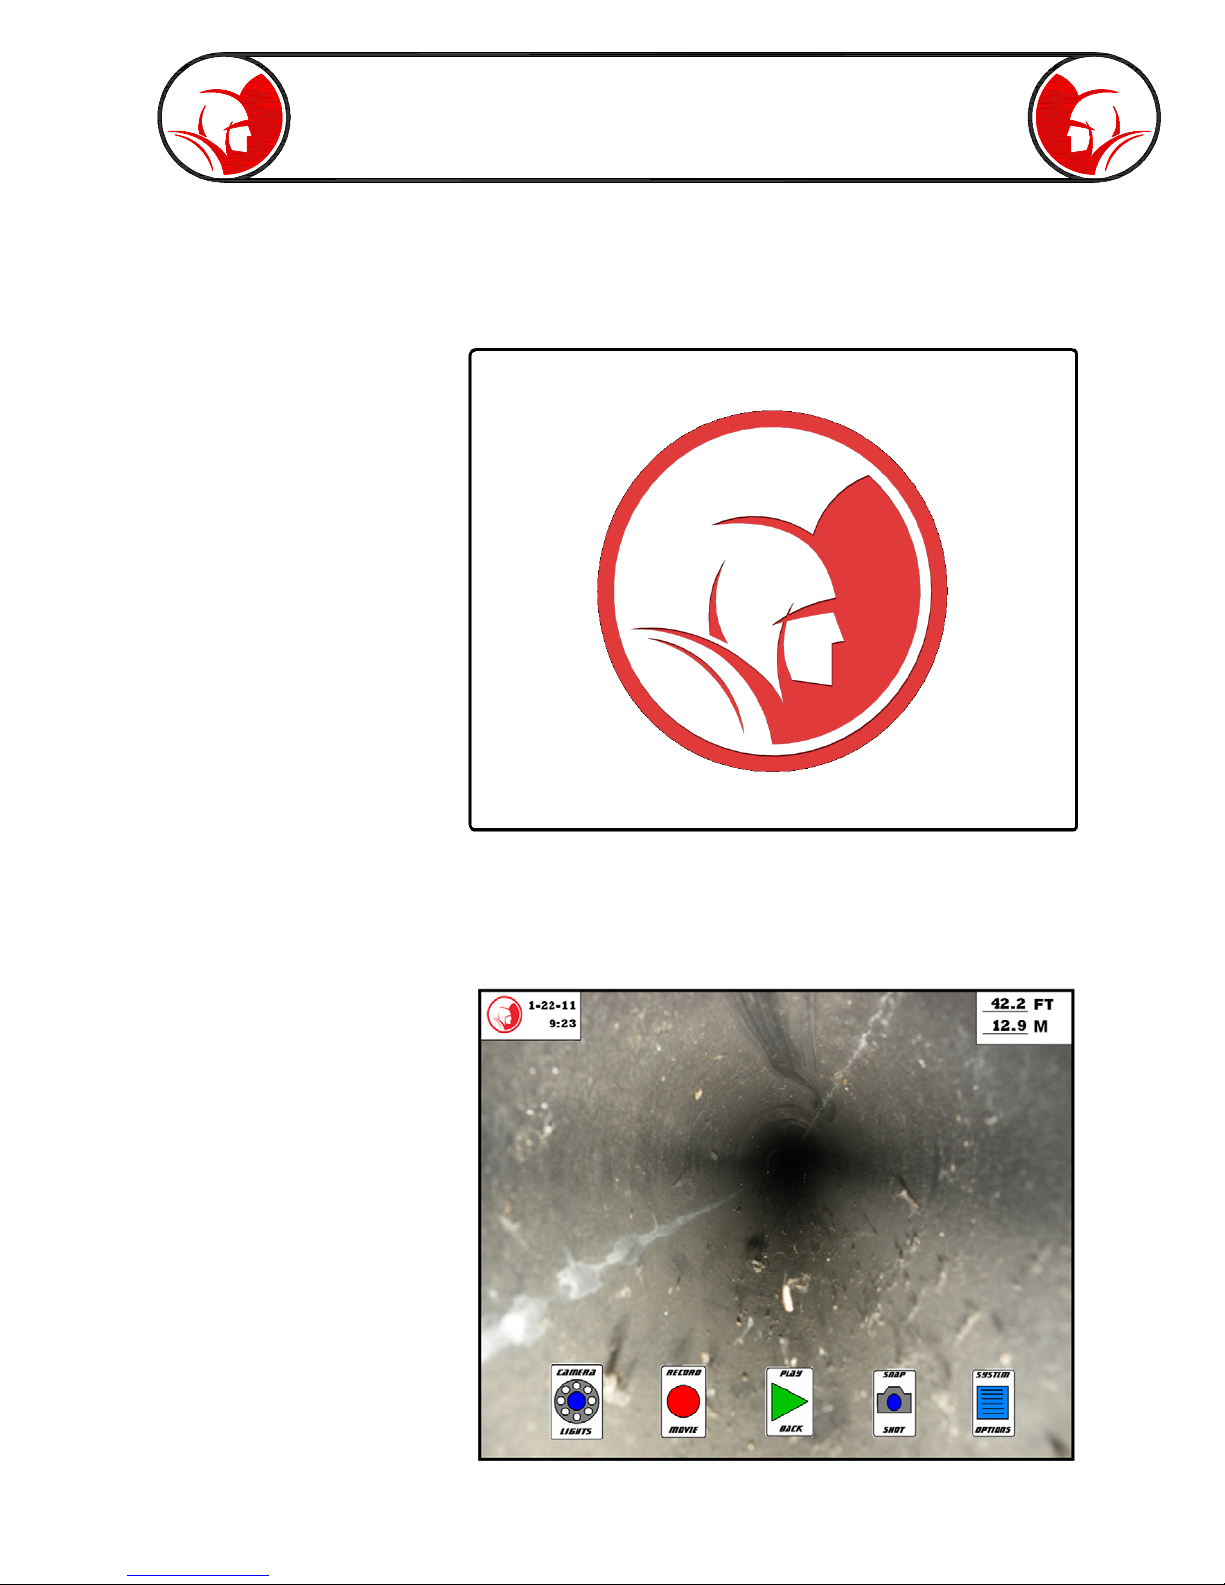
Lift the Monitor to access the power switch. Turn power on and wait for the boot screens to complete.
Fig. 11-1
The system is done booting up when the Spartan Logo appears on the screen. The logo will disappear
and the main screen overlay will appear.
Fig. 11-2
Interface Start-up Screen
Main Screen Overlay

Page 12
Interface - Main Screen
The Main Screen Overlay allows one-touch access to all of the main PROvision Touch features: LED
intensity control, record, playback, snapshot, options, date/time, and distance counter.
The Date/Time box and the Distance Counter box each have their own options menu, which can be
accessed by pressing the respective box one time.
The main control buttons can be hidden
and brought back at any time. To hide the
main control buttons, press the screen
(anywhere except icons) and hold it for 2
seconds. When you release your finger, the
icons will drop away. To bring the icons
back, repeat.
By pressing “Move” the Date/Time box will unlock from its current position. Tap
anywhere on the screen to move the box or drag the box to the preferred location.
By pressing “Hide,” the Date/Time box will disappear. To make it reappear tap
the screen in the upper left corner to open menu or press the “Unhide Boxes”
button on the right side of the screen (it will appear whenever the boxes are
hidden).
By pressing “Move” the Distance Counter box will unlock from its current
position. Tap anywhere on the screen to move the box or drag the box
to the preferred location.
By pressing “Hide,” the Distance Counter box will disappear. To make it
reappear tap the screen in the upper left corner to open options box or
press the “Unhide Boxes” button on the right side of the screen (it will
appear whenever the boxes are hidden).
Press “Reset” to set the counter to zero.
Date/Time Menu
Distance Counter Menu
Page 13
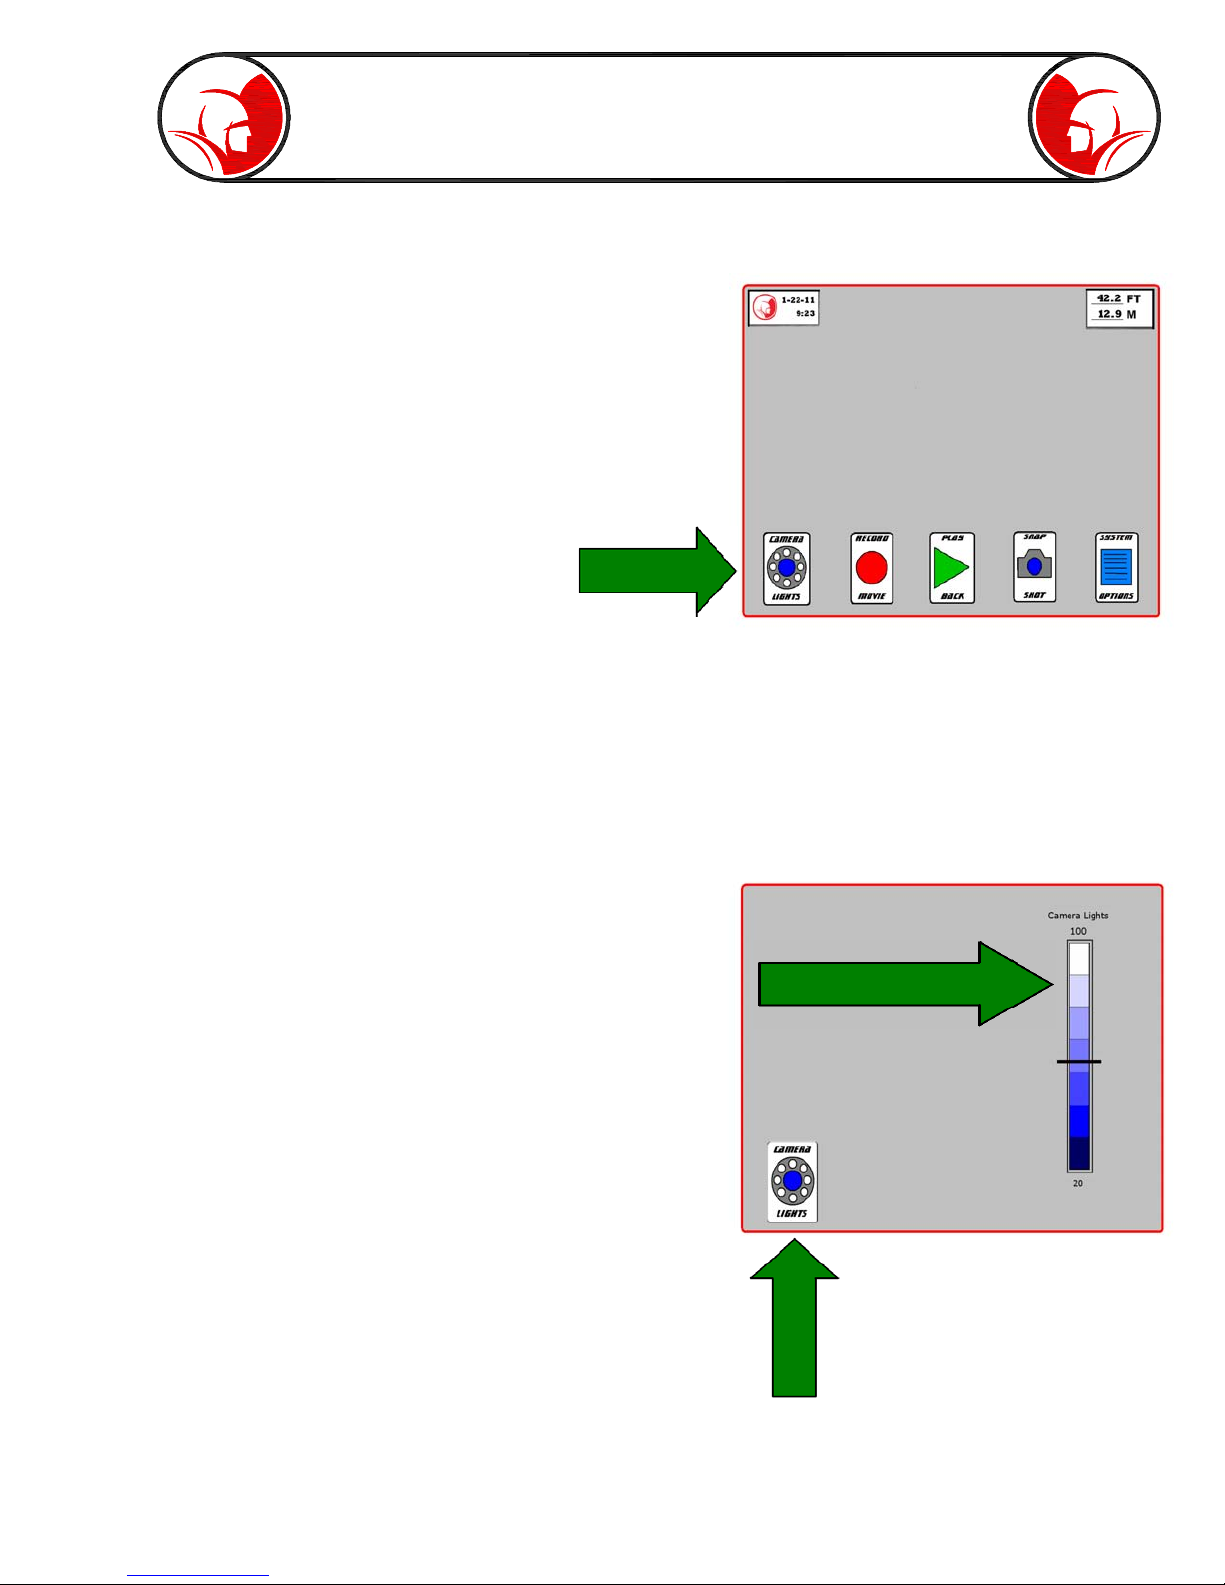
Interface - Camera Lights
Press the Camera Lights button to
open up the light intensity slide bar.
To adjust the camera head light intensity, press your
finger on the black slider and drag it to the desired
intensity. The intensity can also be changed by tapping
above or below the slider.
SLIDER
Press the Camera Lights button to
return to the Main Screen.

Page 14
Interface - Record
Press “Record Movie” to enter
recording mode.
Press “Continue” to proceed to File Name
screen, or press “Cancel” to return to the Main
Screen.
Use the keyboard to enter a file name (press
enter when complete) or press “Skip” to skip
file naming step. Note: if the file naming step is
skipped, the file will be named according to the
system clock date and time.
Press “Yes” to begin recording, press “Back” to
return to the file naming screen, or press “Cancel”
to return to the Main Screen.
To end the recording, press the “End Movie” icon.
A box will then pop up. Choose “Yes” to end the
recording or choose “Cancel” to continue recording.
While recording, a red dot in the upper right
corner will indicate the system is recording.

Page 15
Interface -
Features while Recording
Press the Camera Lights button to access the
light intensity slider bar.
Press the “Record Audio” button to activate the
microphone.
Press the “Snap Shot” button to create a still
image photo from the camera view. See page
18 for more information on the snap shot feature.
Press the Keyboard/Draw button to start the
telestrator overlay. A message box will appear
to give a brief explanation of the telestrator
functions. Press “Ok” to remove the message
box.
TELESTRATOR CONTROLS
The primary commands while the telestrator is active are the tap command and the tap-and-hold
command.
Texting
- To create on screen text information, press your finger and hold it on the screen for 2 seconds. When
you release, the keyboard will appear. Type in any desired message. When complete, press enter.
- The text will be docked wherever you pressed to initiate the keyboard option. The text can be moved
afterward by tapping the text. This will bring up a small box with two choices.
- To move the text, choose “Move Text” and then tap the location you would like the text to move to.
- To delete the text, choose “Delete Text”
Drawing
- To draw, drag your finger anywhere on the screen to create a drawing line.
- Each drawing line (a drawing line is created the instant your finger lifts from the screen) can be moved
to a different location. To move the drawing lines, tap the drawing line to highlight it (dotted box surrounds
drawing line). Press finger against the highlighted drawing line and drag to a new location.
- To delete a drawing line, tap the drawing line to highlight it. Then press and hold finger on highlighted
drawing line for 2 seconds. After releasing finger, a small box will pop up that says “Delete Drawing.”
Press the “Delete Drawing” to remove drawing line.

Page 16
Interface - Playback
To view the videos and
images, press the “Play
Back” button.
Left pane displays the
thumbdrive folder names
Right pane displays the video
and image files contained in
the selected folder.
To select a video file or view
an image, first choose the
folder that contains the file.
Choose your video or
image file.
After selecting the file, there are three options: “Play,” “Delete,” and “Rename”.
- Press “Play” to start the media player application
- Press “Delete” to remove the file. Warning: the file will be permanently
deleted and unrecoverable.
- Press “Rename” to open up the on screen keyboard and create a
new file name.

Page 17
Interface - Playback cont.
After selecting a file, and pressing the “Play” button, the media player starts and the video (or image)
will automatically appear.
Press the “Exit Playback” button to return
to the Main Screen
Video playback controls: rewind, play, pause,
stop, fast forward, and back (back to file menu).
The slide bar can be tapped or dragged to jump
to a specific video segment.
Press the record audio to turn the sound on or off.
Press the “Snap Shot” button to capture still image of the video
file (whatever is on screen when the button is pressed). See
page 18 for more information about the Snap Shot functions.
Press the Keyboard/Draw button to activate the telestrator. See page 15 for
telestrator instructions. This feature is for viewing only and therefore no text
or drawings will be saved to the video file. To save telestrations, use the
snapshot feature and choose to Edit when prompted.

Page 18
Interface - Snapshot
Press “Snap Shot” to take a still
image of the current video.
Press “Continue” to proceed to File Name
screen, or press “Cancel” to return to the Main
Screen.
Use the keyboard to enter a file name (press
enter when complete) or press “Skip” to skip
file naming step. Note: if the file naming step is
skipped, the file will be named by the system
clock date and time.
Press “Yes” to activate the telestrator for editing
(see page 15), press “No” to continue.
Image will remain on the screen in freeze frame
mode. To return to the main menu, press the
“Snap Shot” button.

Page 19
Interface - System Options
Press “System Options” to access
options menu.
Press “Playback Volume” to access
the PROvision Touch system volume.
Adjust the sound to the desired
output level.
Press “Delete All Files” to erase everything from
the thumbdrive. A warning box will appear to confirm
that all files should be deleted. Warning - once all
the files are deleted, they will not be recoverable.
Brightness control -
See page 21
System update - See
page 21
Press “Set Date/Time” to
access the system clock
settings. The defined clock
setting will be used for all
default file naming and will
be displayed in the Date/
Time box on the main screen.
To return to the main
screen, press “Exit
Menu.”

Page 20
By pressing “Restore Factory
Settings” any user defined
adjustments (ex. brightness or
volume levels) will be returned to
their original factory settings.
Opens PROvision
Touch Manual
Displays remaining battery life.
See page 22 for more information
on battery life and charging.
For system updates,
the “Restart System”
button should be used
to confirm any
changes take effect.
Interface -
System Options cont.
Accesses touchscreen
calibration. See page
21 for more info.
Table of contents
Other Spartan Analytical Instrument manuals


Popular Analytical Instrument manuals by other brands


Tesla
Tesla Tera TSR4M Technical Specifications & Operation Manual

Troglotech
Troglotech T804 WiFi System operating instructions

iSystem
iSystem Infineon TC397XE user manual

Parkside
Parkside 20 M PLEM 20 A4 Operation and safety notes

Kistler
Kistler 9260AA Series instruction manual

Wetekom
Wetekom SW-638N instruction manual


