Spidem Villa SUP 018M User manual

Português English
OPERATING INSTRUCTIONS
INSTRUÇÕES DE USO
TYPE SUP 018M

Congratulations!
Thank you for purchasing this highest quality espresso coee machine
and for your condence in our company. Before operating the machine,
we recommend carefully reading the operating instructions that explain
how to use, clean and maintain it in perfect working order. Please refer
to the dealer or to our company, if you have any questions. We will be
happy to clear any doubts you may have.
Parabéns!
Obrigado por ter adquirido esta máquina de café expresso, de quali-
dade superior, e pela conança demonstrada. Antes de pôr a funcio-
nar a máquina, aconselhamos a ler atentamente as instruções de uso
nas quais é explicado como utilizá-la, limpá-la e mantê-la em perfeita
eciência. Para outros esclarecimentos, dirija-se ao revendedor ou direta-
mente ao fabricante. Teremos o prazer em esclarecer quaisquer outras
dúvidas.

3
12
9
14
4
3
6
7
8
11
13
10
5 23 18 19 20 21 15
17 22
1
2
16

4
+
-
5
6
7
English
GENERAL INFORMATION - TECHNICAL DATA
1 GENERAL INFORMATION
The coee machine is suitable to make espresso coee using
coee beans and is equipped with a device for the distribution
of steam and hot water.
Warning. No liability is assumed for any damage
caused by:
• incorrect use not in accordance with the intended
uses;
• repairs not carried out by Authorized Service Centres;
• tampering with the power cable;
• tampering with any part of the machine;
• the use of non-original spare parts and accessories.
Inthesecases, the warrantyisnotvalid.
1.1 To facilitate reading
A warning triangle draws the attention to all the
instructions that are important for the user’s safety.
Please carefully follow these instructions to avoid
serious injury.
(Fig. 2) - Reference to gures, parts of the machine and
controls is indicated by numbers or letters, like the reference to
gure 2 in this section.
This symbol is used to highlight the information that
is particularly important for ensuring an optimal use
of the machine.
Figures corresponding to the text may
be found on the inside cover.
Keep this page open while reading the
instructions.
1.2 How to use these operating
instructions
Keep these operating instructions in a safe place and
make them available to anyone else who would use the
coee machine.
For further information or in case of problems that are not
included or not completely explained in these instructions,
please contact the Authorized Service Centres.
2 TECHNICAL DATA
• Nominal voltage
See label on the equipment
• Power rating
See label on the equipment
• Power supply
See label on the equipment
• Shell material
Thermoplastic
• Size (mm)
355 x 385 x 337
•Weight (kg)
8,5
• Cable length (mm)
1200
• Control panel
Front
•Water tank
1,7 (l) - Removable
• Coee bean hopper capacity (g)
350 g of coee beans
• Pump pressure (bar)
15
• Boiler
Stainless steel
• Safety devices
Boiler pressure safety valve;
safety thermostat.
Subject to engineering and manufacturing changes due
to technological developments.

8
O I L
sizes in millimeter
SAFETY REGULATIONS

9
English
3 SAFETY REGULATIONS
Never place live parts in contact with water: danger of
short circuit! Steam and hot water may cause scalding!
Do not direct the steam or hot water jet toward parts of
the body; handle the steam/hot water spout with care:
danger of scalding!
Intended use
Do not make any technical changes or use the machine for
unauthorized purposes since this would create serious hazards!
The equipments is not to be used by persons with reduced phy-
sical, mental or sensory abilities or with scarce experience and/
or expertise, unless they are supervised by a person responsible
for their safety, or they are instructed by this person on how to
properly use the machine.
Power supply
Only connect the coee machine to a suitable power socket.
The voltage must correspond to the indication on the machine’s
label.
Power cable
Never use the coee machine if the power cable is defective.
If damaged, the power cable must be replaced by the manufac-
turer or its customer service department.
Do not pass the cable around corners, over sharp edges or over
hot objects and keep it away from oil.
Do not use the power cable to carry or pull the coee machine.
Do not pull out the plug by pulling on the power cable or touch
it with wet hands.
Do not let the power cable hang freely from tables or shelves.
Protecting others
Make sure that the coee machine is use for operator instruc-
ted by person on how to properly use equipments.
Danger of burning
Never direct the jet of hot steam and/or hot water towards
yourself and/or others: danger of scalding!
Always use the handles or knobs provided.
Location
Position the coee machine in a safe place, where nobody may
overturn it or be injured.
SAFETY REGULATIONS
Do not use the coee machine outdoors. Do not place the
machine on hot surfaces and close to open ames to prevent
the body from melting or being damaged.
Cleaning
Before cleaning the machine, the main power button (5) must
be switched to the -0- position and the plug must be removed
from the socket.
Then wait for the machine to cool down.
Never immerse the machine in water!
It is strictly forbidden to tamper with the inside of the machine.
Space foruse and maintenance
To ensure that the coee machine works properly and ecien-
tly, the following conditions are recommended:
• Choose a level surface;
• Select a location that is suciently well-lit, clean and near
an easily reachable socket;
• Allow for a minimum distance from the sides of the machine
as shown in the gure.
Storing the machine
If the machine is to remain out of use for a long time, turn it
o and unplug it. Store it in a dry place, keep it protected from
dust and dirt.
Servicing / Maintenance
In case of failure, faults or a suspected fault after dropping,
immediately remove the plug from the socket. Never attempt
to operate a faulty machine.
Servicing and repairs may only be carried out by Authorized
Service Centres. Repairs must only be carried out by an Autho-
rised Service Centre. All liability for damages caused by works
not carried out in a professional manner is declined.
Fire safety
In case of re, use Carbon Dioxide extinguishers (CO2). Do not
use water or dry-powder extinguishers.
10 SAFETY REGULATIONS - INSTALLATION
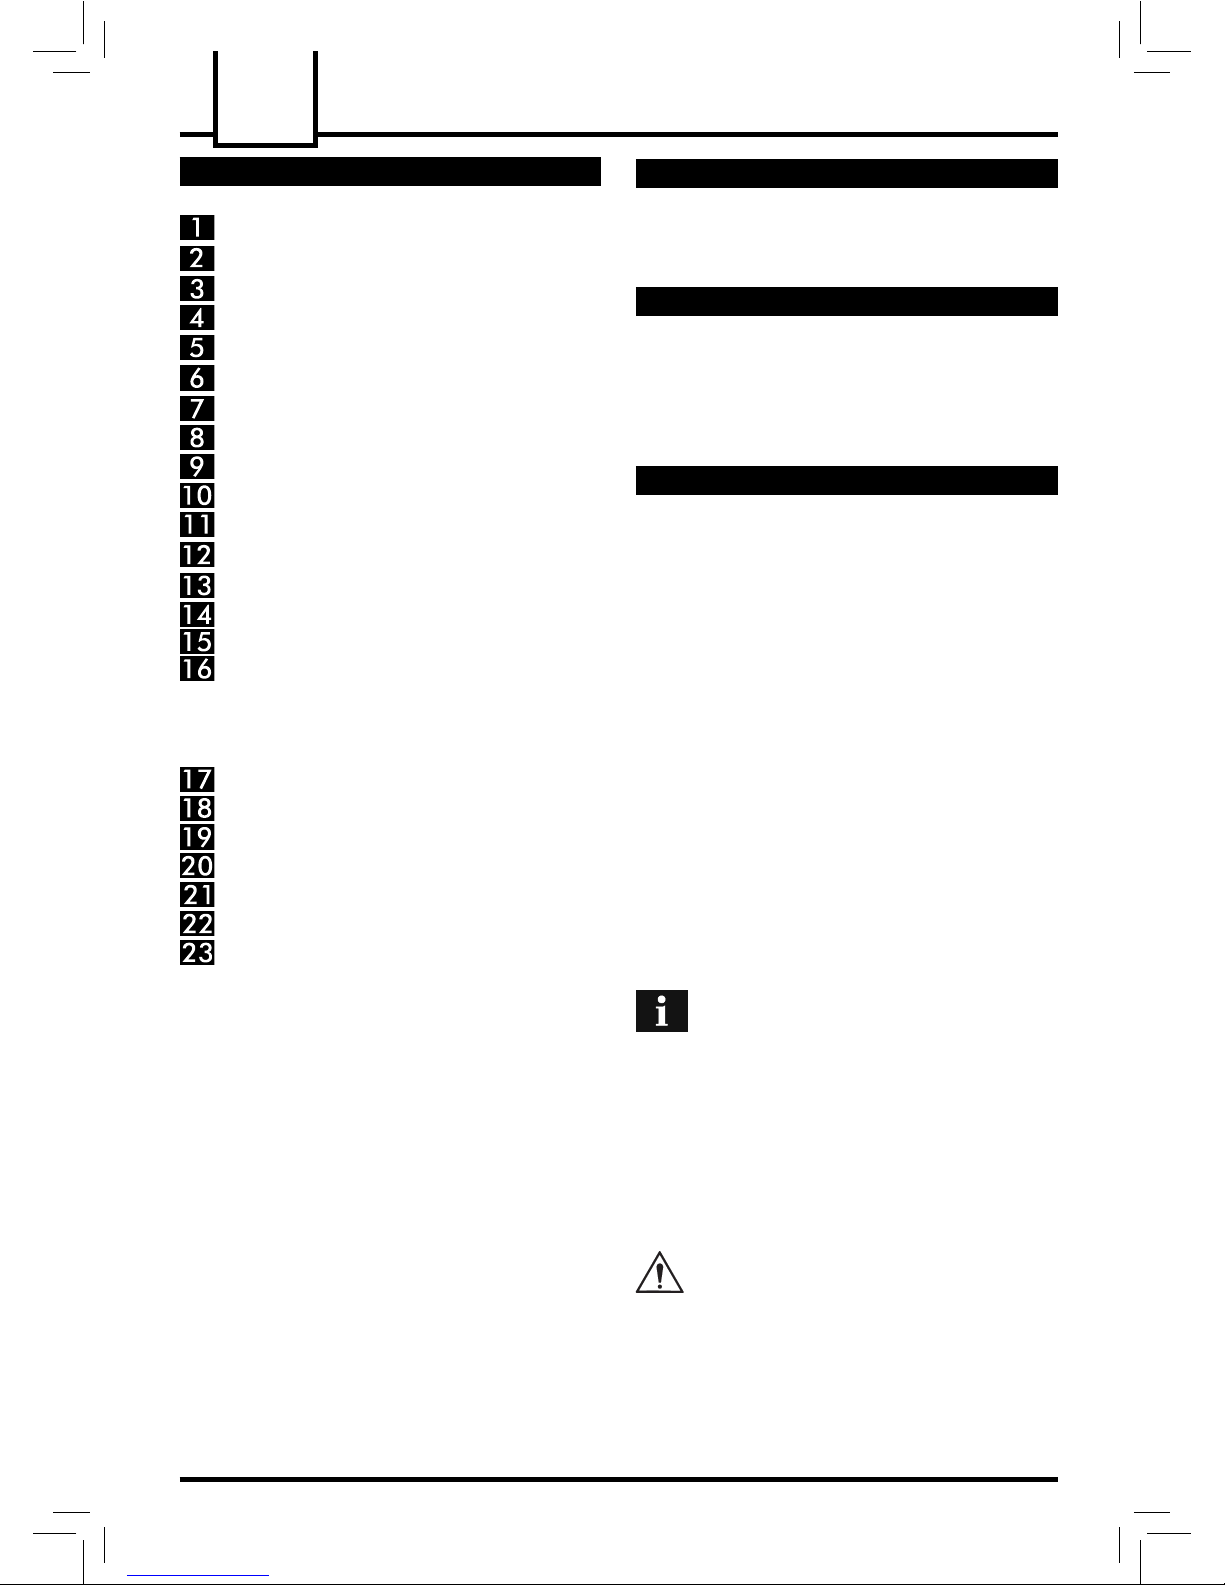
Key to machine components
Coffee bean hopper
Coffee bean hopper cover
Grinder adjustment knob
Coffee dose adjustment knob
Main power button (ON/OFF)
Water tank cover
Water tank
Grounds drawer
Power cable
Drip tray + grill
Height-adjustable dispensing spout
Steam/hot water spout with pannarello
Front door
Steam knob
Coffee Brew Group
Cleaning brush
Control panel
Coffee dose per cup adjustment knob
Coffee button
Temperature ready / coffee function light
Steam function button
Steam temperature light
Alarm light
Machine on light
4 INSTALLATION
For your safety and other people's safety, carefully
follow the "Safety Regulations" in section 3.
4.1 Packaging
The original packaging has been designed and constructed to
protect the machine during transport.
We recommend keeping the packaging material for possible
future transport.
4.2 Preliminary Operations
• Remove the drip tray (10) with grill from the packaging.
• Remove the coee machine from the packaging and
position it in a proper place in compliance with the require-
ments described in the safety regulations (section 3).
• Insert the drip tray (10) into the appropriate seat. Make sure
that the drip tray, the coee grounds drawer (8) and the
coee brew unit (15) are correctly placed and that the front
door (13) is closed.
• Fit the cover of the coee bean hopper (2) onto the coee
bean hopper (1). Keep the cleaning brush (16) to hand.
• Before plugging in the machine, make sure that the power
button (5) is switched to -0-.
If the red light (22) ashes when the machine is turned on, it
means that one of the above mentioned parts is not placed
correctly.
Important Note: Carefully read the explanation
of all the warnings displayed by the machine
to the user by means of the lights on the control panel
(section 13).
• (Fig.25) - Lift and extract the water tank (7) and remove
the cover (6). Rinse and ll it with fresh water taking care
not to overll it. Reinsert the water tank into the appropria-
te seat and replace the cover (6) on top of it.
Always use only fresh, non-sparkling water to ll
the tank (7). Hot water or any other liquid may
damage the tank and/or the machine. Do not turn on
the machine without water: make sure there is enough
water in the tank.

11
English
INSTALLATION - COFFEE GRINDER
• (Fig.24) - Remove the cover (2) and add the coee beans.
Always add only coee beans in the coee bean
hopper (1). Ground coee, instant coee or any
other object may damage the machine.
• Replace the cover (2) on the coee bean hopper (1).
• Insert the plug into a suitable socket.
4.3 Circuit Priming
In the beginning, after dispensing steam or when the water
tank is empty, the machine’s water circuit must be primed.
• The power button (5) is switched to -0-. Press button (5) to
turn on the machine.The light (23) on the control panel will
turn on.
• (Fig.26) - Place a container beneath the steam wand
(Pannarello)(12) to prime the circuit. Turn the knob (14)
counter-clockwise and wait until water ows steadily out of
the steam wand (Pannarello).Turn the knob (14) clockwise
to stop water dispensing.
• The circuit is now primed.
4.4 Using the machine for the rst time
or after a period of inactivity
This simple operation ensures optimum brewing and must be
performed:
- At rst start-up;
- When the machine remains inactive for a long time (more
than 2 weeks).
Dispensed water must be emptied into an
adequate drain. It is not suitable for food use. If
the container lls up, stop dispensing water during the
cycle and empty it before resuming the operation.
1(Fig.25) - Make sure that the water tank (7) is lled with
drinking water; otherwise, empty the tank and replace with
fresh water.
2 Place a container beneath the steam wand (Pannarello) (12)
and turn the knob (14) counter-clockwise.
3 After 30 seconds (or when the container is full) stop dispen-
sing water by turning the knob (14) clockwise.
4Wait about 60 seconds. Repeat the operations from step 2
until emptying out the tank.
5(Fig.25) - Once run out of water, ll the tank again (7) and
carry out a new cycle from step (2) as previously mentioned.
6Once emptied the tank for the second time, ll it again with
water; the machine is now ready for use.
Note: if required, prime the circuit.
• To brew coee, dispense hot water or steam, and for a
proper use of the machine, carefully follow the instructions
provided.
5 COFFEE GRINDER
Caution! The grinder adjustment knob, inside
the coee bean hopper, must be turned only
when the grinder is working. Do not pour ground and/
or instant coee into the bean hopper.
Do not insert any material other than coee beans
into the hopper. The grinder contains moving parts
that may be dangerous. Therefore, do not insert ngers
and/or other objects. Turn the main power button to o
and remove the plug from the socket before carrying out
any type of operation inside the bean hopper. Do not pour
coee beans when the grinder is working.
The quality and avour of coee depend on the grind, as well
as on the blend used.The machine has a knob (3) to adjust
the coee grind.Turn the knob when the grinder is working to
adjust the grind.The digits on the knob indicate the grind.
The manufacturer congures each equipment on an interme-
diate grind setting: if the grind is too ne, rotate the knob to
a higher setting; if the grind is too coarse, turn the knob to a
lower setting.
The variation in grind will only be seen when three/four coees
have been brewed.
Use coee bean blends for espresso machines. Try not to use
very high or very low grind settings (e.g. 1 - 16). Use dierent
12 COFFEE BREWING - HOT WATER DISPENSING
coee blends for dierent settings. Keep coee in a fresh place
in a sealed, airtight container.
The grind must only be regulated if coee is not brewed
properly:
Too fast brewing = too coarse grind > Rotate the knob to a
lower setting;
Drip and/or absent brewing = too ne grind > Rotate the knob
to a higher setting.
6 COFFEE DOSE ADJUSTMENT KNOB
(Fig. 24) -The desired coee quantity (dose) to be ground may
be set in the machine.
The dose is set by the manufacturer to a medium value that
meets all tastes. Reference (A) in correspondence with reference
(B). By turning the knob (4) inside the coee bean hopper
counterclockwise the quantity of ground coee is increased;
by turning the knob clockwise the quantity of ground coee is
decreased.
The dose adjustment must be performed before pressing the
coee button.
This system allows an optimal brewing with any kind of coee
on the market.
7 COFFEE BREWING
Note: If the machine does not brew coee,
make sure that the water tank contains enough
water by verifying the water level on the left side of the
machine.
Before brewing coee, make sure that the gre-
en temperature ready light (19) is permanently
on and that the water tank and the coee hopper are
full.
• (Fig. 27 - 28) - Place 1 or 2 cups beneath the dispensing
spout (11).You may adjust the height of the dispensing
spout to your cups.
• Adjust the desired quantity of coee to be brewed by means
of the knob (17): by turning the knob clockwise the quantity
of coee to be brewed is increased; by turning the knob
counterclockwise the quantity of coee to be brewed is
decreased.
• Press the button (18) to brew coee.The brewing cycle
starts: press the button (18) once to brew 1 coee. Press it
twice to brew 2 coees.
In this operation mode, the machine grinds and
measures automatically the right quantity of
coee. Two coees require two grinding and brewing
cycles that are automatically managed by the machine.
• After the prebrewing cycle, coee begins to come out of the
dispensing spout (11).
• On reaching the dose programmed with the knob (17), the
machine will automatically stop brewing. It is nevertheless
possible to interrupt coee brewing by pressing the button (18).
8 HOT WATER DISPENSING
Warning: at the beginning, short spurts of hot
water may come out: danger of scalding. The hot
water spout may reach high temperatures: do not touch
it with bare hands.
• Before dispensing hot water, make sure that the green
temperature ready light (19) is on.
When the machine is ready to brew coee, proceed as follows:
• Place a cup and/or a container beneath the hot water/steam
spout (12).
• (Fig. 29) - Open the knob (14) by turning it counterclockwi-
se.
• When the desired quantity of hot water has been dispensed,
turn the knob (14) clockwise to stop dispensing. The machi-
ne returns to the normal operating mode.
13
English
STEAM EJECTION - CLEANING AND MAINTENANCE
9 STEAM EJECTION / PREPARING A
CAPPUCCINO
Steam may be used to froth milk for cappuccino and to heat
beverages.
Danger of scalding! At the beginning, short
spurts of hot water may come out. The steam
spout may reach high temperatures: do not touch it
with bare hands.
• When the machine is ready to brew coee, press the button
(20).The machine needs a heating phase.
• Before steam ejection, wait until the green temperature
ready light (21) is permanently on.
• (Fig. 26) - Place a container beneath the steam spout
(pannarello) (12) and open the“hot water/steam”knob (14)
for a few seconds so as to let the remaining water come out
of the steam spout (pannarello). In a short time, only steam
will come out of the spout.
• Close the knob (14).
• Fill 1/3 of the container you wish to use to prepare the
cappuccino with cold milk.
Use cold milk and a cold cup for better results
when preparing a cappuccino.
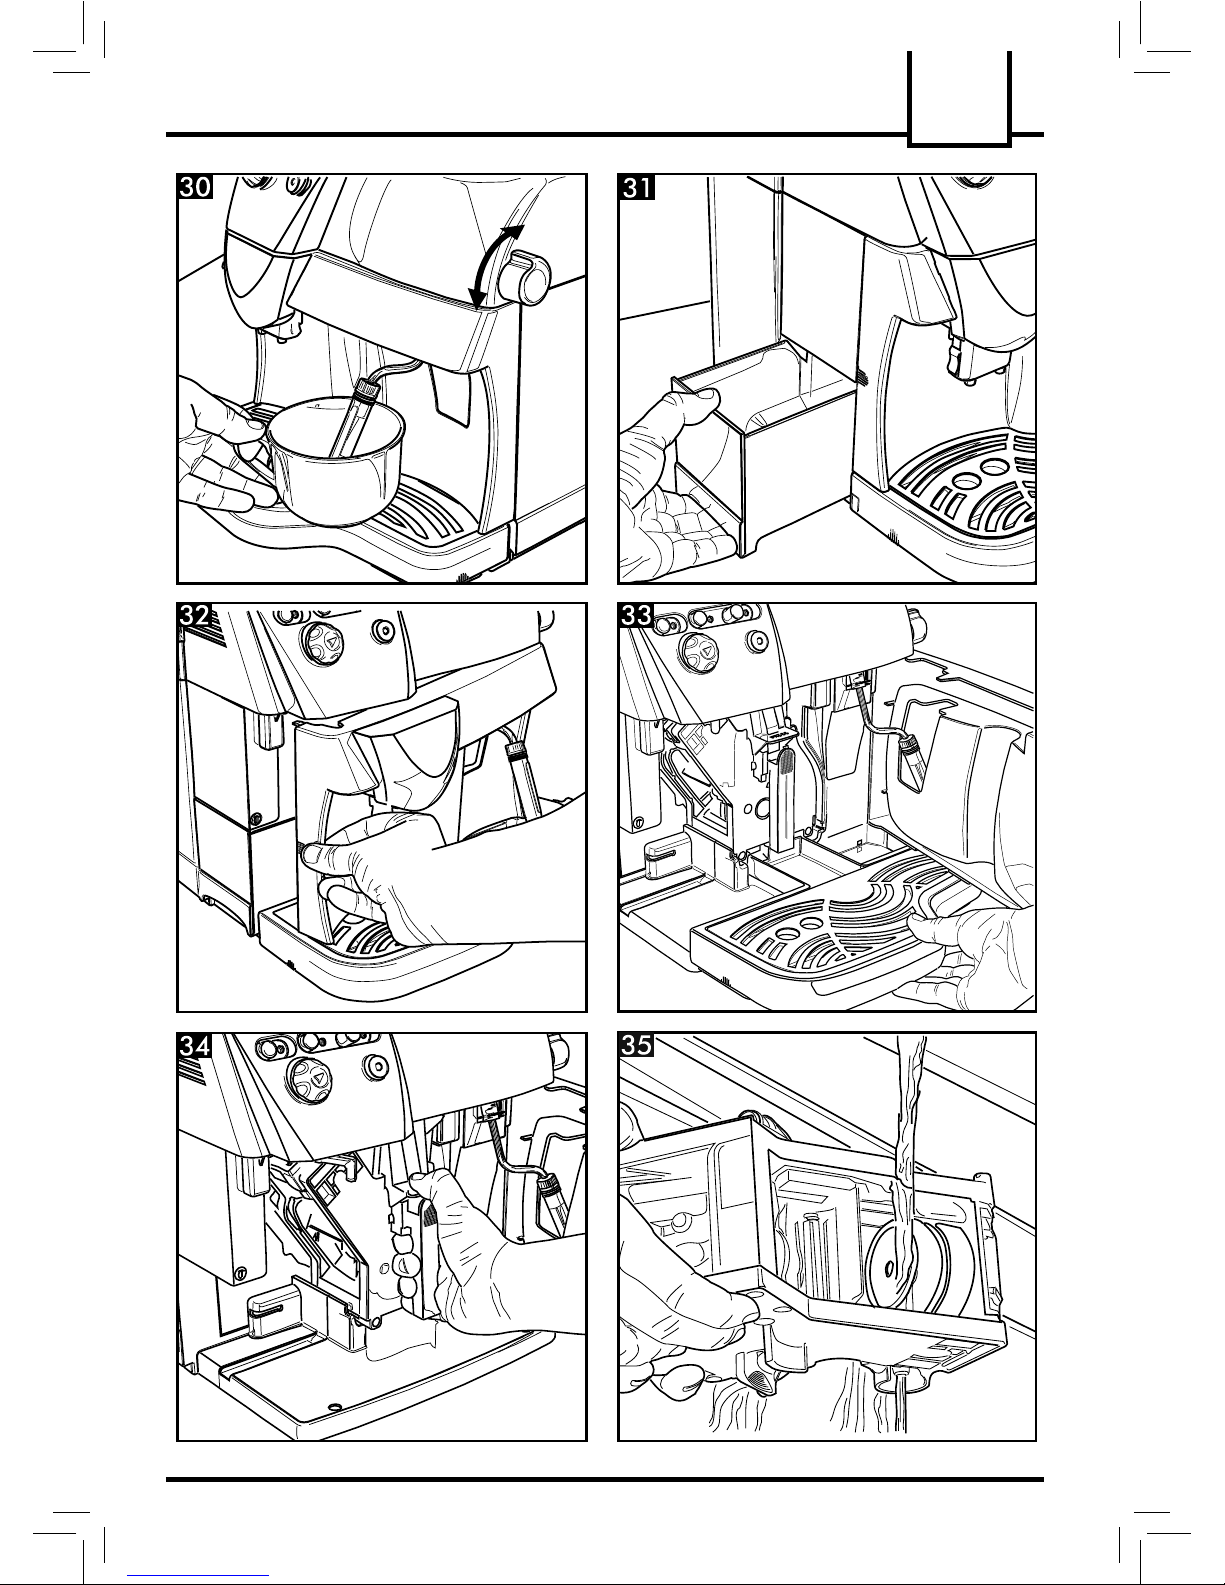
• (Fig. 30) - Immerse the steam spout (pannarello) in the
milk to be heated and open the knob (14). Move the contai-
ner gently up and down to level the foam formation.
• After using the steam for the desired time, close the knob
(14).
• The same system may be used to heat other beverages.
After using the steam spout (pannarello), clean it as described
in the“Cleaning and Maintenance" section.
9.1 Steam/coee switchover
• Press the button (20) to brew coee.
• During the switchover from steam to coee brewing, the
lights (19) and (21) ash simultaneously showing the
machine’s overtemperature. Coee may not be brewed.
• Discharge water to brew coee. Place a container beneath
the steam spout (pannarello) (12).Turn the steam knob (14)
counterclockwise and wait until only the green temperature
ready light (19) is permanently on.Then close the knob by
turning it clockwise.
10 CLEANING AND MAINTENANCE
General cleaning
• Maintenance and cleaning operations may only be carried
out when the machine has cooled down and has been
disconnected from the power supply.
• Do not immerse the machine in water or place any of its
parts in a dishwasher.
• Do not use sharp objects or harsh chemical products
(solvents) for cleaning.
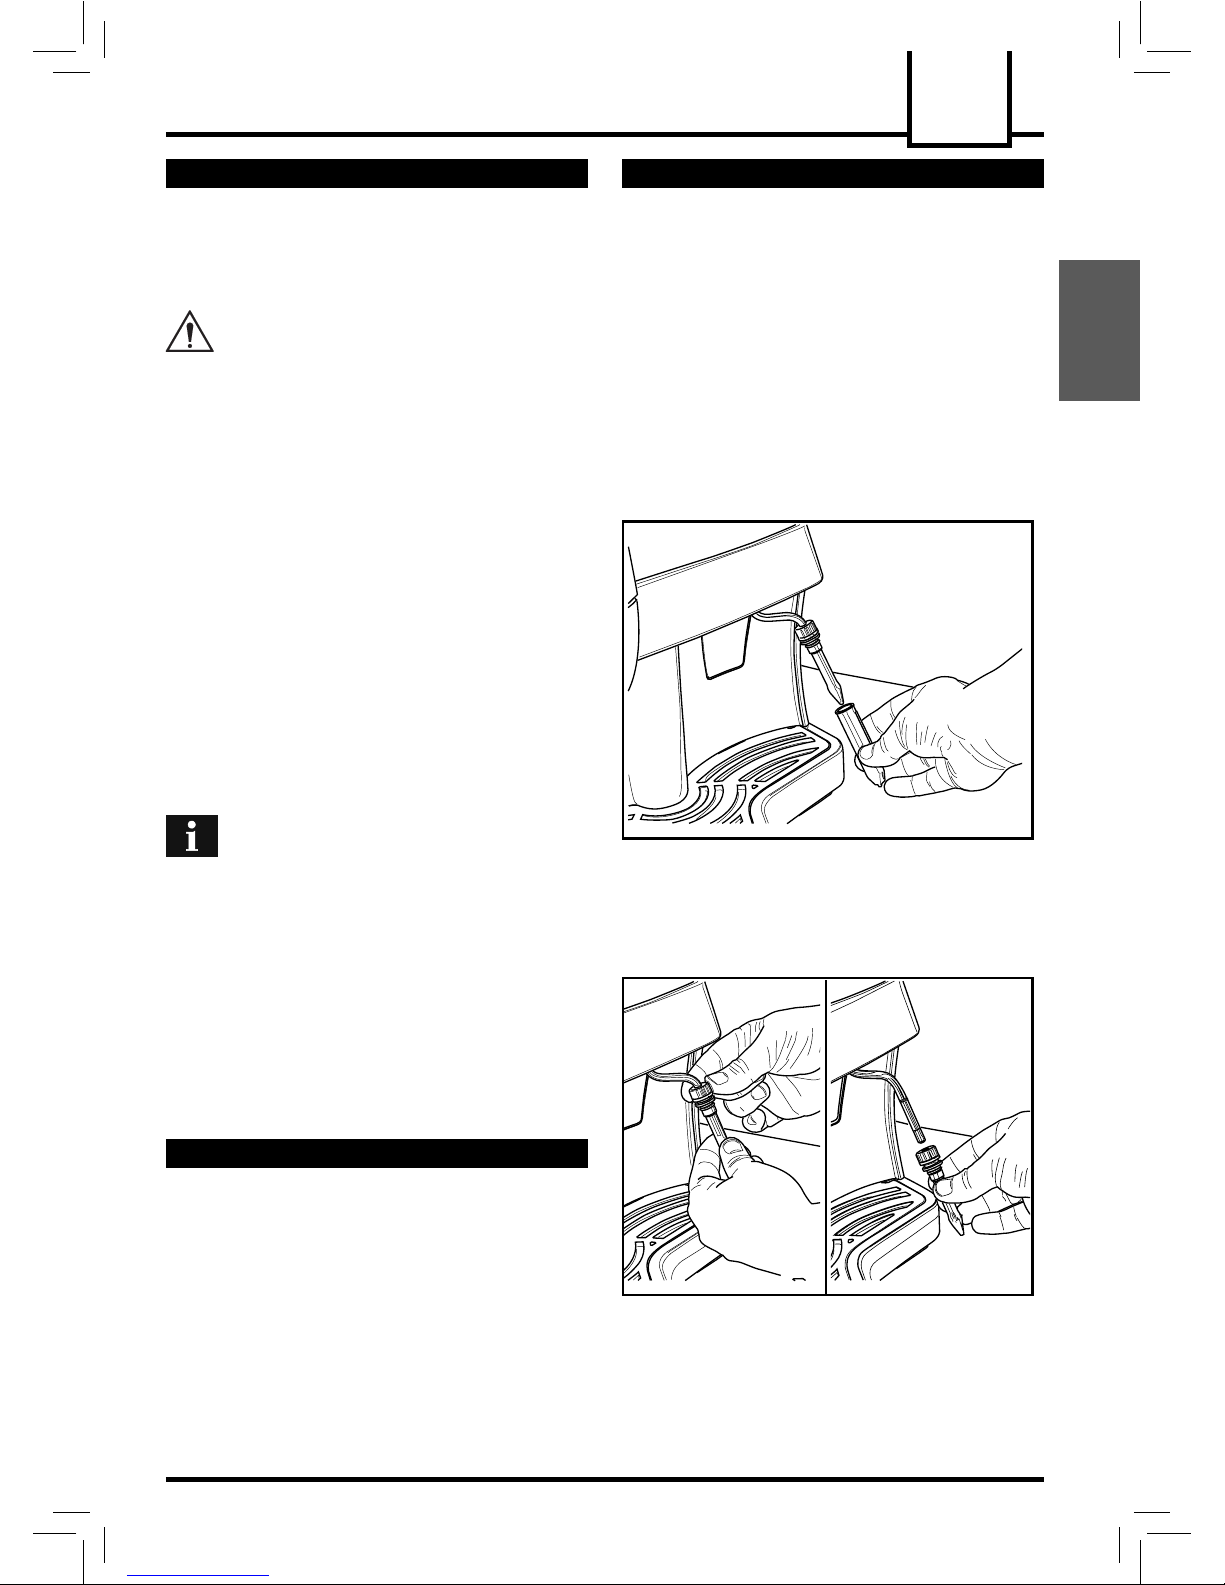
• Clean the pannarello after every use. Remove the external
part of the pannarello.
Wash the external part of the pannarello under running
water.
• For a thorough cleaning, remove the pannarello from the
steam spout.
Loosen the ring nut and remove the internal part of the
pannarello. After washing it thoroughly, reassemble it
taking care to position it as shown in the gure.

14 CLEANING AND MAINTENANCE - DESCALING
(Fig. 25) - Clean the water tank on a daily basis.
- Remove the lter in the water tank and wash it under
drinking running water.
- Reinsert the lter into its seat by gently pressing and
turning it.
- Fill the tank with fresh drinking water.
• Use a soft cloth moistened with water to clean the equip-
ment.
• Do not dry the machine and/or its components using a
microwave and/or conventional oven.
• (Fig. 31 - 33) - Clean the dispensing outlet.We recommend
emptying and cleaning (on a daily basis):
- the grounds drawer (8)
- the drip tray (10)
10.1 Brew Group
• The Brew Group (15) must be cleaned every time the coee
bean hopper is lled or at least once a week.
• Turn o the machine by pressing the main power button (5)
to -0- and remove the plug from the socket.
• (Fig. 31 - 33) - Remove the grounds drawer (8) and the drip
tray (12).Then open the service door (13).
• (Fig. 34) - Remove the Brew Group (15) by the handle and
press the «PRESS» key. The Brew Group must be cleaned
only with warm water and no detergents.
• (Fig. 35) -Wash the Brew Group with lukewarm water and
carefully clean the upper lter.
• Thoroughly wash and dry all the parts of the Brew Group.
• Thoroughly clean the dispensing outlet.
• Reinsert the Brew Group in the dispensing outlet clicking it
into place without pressing the“PRESS" key.
• Close the door, insert the grounds drawer and the drip tray.
11 DESCALING
Limescale normally forms with the use of the appliance.
Descaling is necessary every 1 - 2 months or if you notice a
reduction in water ow.
In case of conict, priority must be given
to what is indicated in the operation and
maintenance manual over the instructions provided on
separately sold accessories and materials.
Use the Saeco descaling
product. Its formula
has been designed to ensure
better machine performance and
operation for its whole operating
life. If correctly used, it also
avoids alterations in the brewed
product.
Warning! Never drink the
descaling solution or any products dispensed
until the cycle has been carried out to the end. Never
use vinegar as a descaling solution.
Before descaling, remove the Pannarello from the steam wand
as described in the“Cleaning and Maintenance" section.
1Pour the entire content of the Saeco concentrated descaling
solution into the water tank (7), and then ll the tank with
fresh drinking water up to the MAX level.
2(Fig.26) -Turn on the machine at the main power button
(5).
3Using the steam wand, (12) brew 2 cups of descaling solu-
tion (approx. 150 ml each) as described in section 8 "HOT
WATER DISPENSING".
4Disconnect the machine at the main power button (5).
5 Allow the descaling solution to take eect for about 15-20
minutes.
6Repeat steps 2, 3 and 4 at intervals of 3 minutes, until there
is no descaling solution left in the water tank.
7Make sure the machine is on.
8(Fig.25) - Rinse the water tank (7) and ll it with fresh
water.
9(Fig.26) - Rinse the appliance circuits with fresh water until
the tank (7) is empty, by dispensing the water through the

15
English
DISPOSAL
steam wand (12) as described in section 8 "HOT WATER
DISPENSING".
10Repeat the rinse cycle (step 8 and 9) twice consecutively.
Only once reached this step, the descaling cycle is complete.
Note: if required, prime the circuit (Section 4.3).
The descaling solution must be disposed of
according to the manufacturer's instructions
and/or regulations in force in the country of use.
12 DISPOSAL
This product complies with EU Directive 2002/96/EC.
The symbol on the product or on its packaging indi-
cates that this product may not be treated as commons waste.
Instead it shall be handed over to the applicable collection
point for the recycling of electrical and electronic equipment.
By ensuring this product is disposed of correctly, you will help
prevent potential negative consequences for the environment
and human health, which could otherwise be caused by
inappropriate waste handling of this product. For more detailed
information about recycling of this product, please contact your
local city oce.
16 CONTROL PANEL LIGHTS
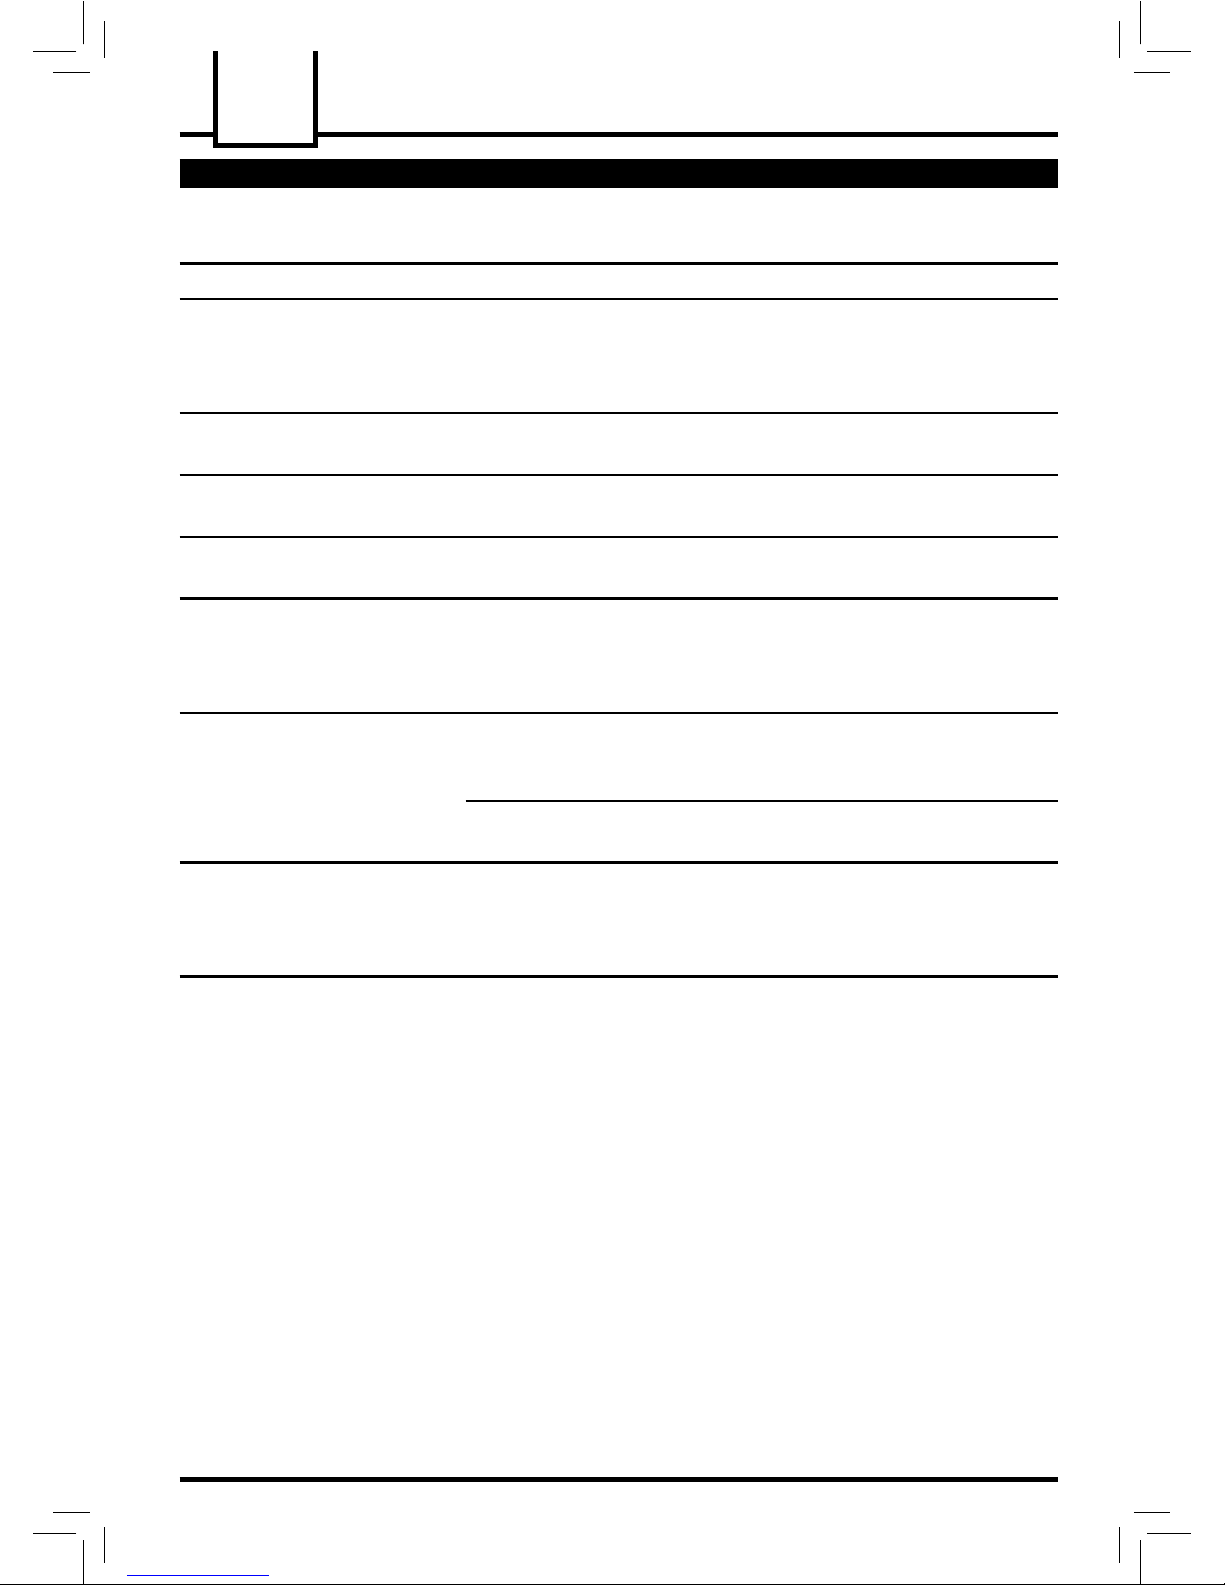
13 CONTROL PANEL LIGHTS
Warnings Causes Solutions
Green light (23) The machine is on.
Fixed green light (19) The machine has reached the right
temperature and is now ready:
- for coee brewing;
- for hot water dispensing.
Flashing green light (19) The machine is warming up to brew
coee and dispense hot water.
Fixed green light (21) The machine has reached the right
temperature to eject steam.
Flashing green light (21) The machine is warming up to eject
steam.
Green light (19) and
green light (21)
are ashing simultaneously
Machine’s overtemperature: coee may
not be brewed.
Discharge water into the drip tray by tur-
ning the steam knob (14) until the green
temperature ready light (19) is permanen-
tly on and green light (21) turns o.
Fixed red light (22) The water in the tank is insucient. Fill the tank with fresh drinking water,
prime the circuit and start the procedure
again.
The coee bean hopper is empty. Fill the hopper with coee beans and start
the procedure again.
Flashing red light (22) The Brew Group, the grounds drawer,
the drip tray and the front door are
in a wrong position for the machine’s
operation.
Make sure that all components have been
correctly inserted and closed.The xed red
light will now turn o.

17
English
PROBLEMS - CAUSES - SOLUTIONS
Problems Causes Solutions
The machine does not turn on The machine is not connected to the
power supply.
Connect the machine to the power supply.
The service door is open. Close the service door.
Coee is not hot enough The cups are cold. Warm the cups.
No hot water or steam is
dispensed
The hole of the steam spout is clogged. Clean the hole of the steam spout using a pin.
Coee has little foam The coee blend is unsuitable, the
coee is not freshly roasted or the grind
is too coarse.
Change coee blend or adjust the grind (section 5).
Increase the dose (section 6).
The machine takes a long time
to warm up or the amount of
water dispensed from the spout
is too little.
The machine’s circuit is obstructed by
limescale.
Descale the machine.
The Brew Group does not come
out.
The Brew Group is out of place. Turn on the machine. Close the service door. The
Brew Group is automatically placed in the correct
position.
The grounds drawer is inserted. Remove the grounds drawer before removing the
Brew Group.
Coee is not brewed There is no water. Fill the water tank and prime the circuit again
(section 4.3).
The Brew Group is dirty. Clean the Brew Group (section 10.1).
The dose setting is high. Decrease the dose setting (section 6).
The circuit is not primed. Prime the circuit again (section 4.3).
Coee is brewed slowly The dose setting is high. Decrease the dose setting (section 6).
The coee is too ne. Change coee blend or adjust the grind (section
5). Decrease the dose setting (section 6).
The circuit is not primed. Prime the circuit again (section 4.3).
The Brew Group is dirty. Clean the Brew Group (section 10.1).
Coee leaks out of the dispen-
sing spout
The dispensing spout is in a wrong
position.
Replace the dispensing spout in its correct
position.
The dispensing spout is clogged. Clean the dispensing spout and its holes.
Please contact an Authorized Service Centre for any faults not covered in the above table or when the suggested
solutions do not solve the problem.

18

19
Português
GENERALIDADES - DADOS TÉCNICOS
1 GENERALIDADES
A máquina de café é indicada para a preparação de café
expresso, utilizando café em grãos e possui um dispositivo para
o fornecimento de vapor e de água quente.
Atenção. Não assumimos qualquer respon-sabili-
dade para danos eventuais em caso de:
• usoerradoounãoconformecom as nalidades previstas;
• consertos nãorealizados noscentros deassistência
autorizados;
• alteração do cabodealimentação;
• alteração de qualquer componente da máquina;
• usodepeças sobresselentes e acessórios não originais.
Esses casos invalidarão a garantia.
1.1 Para facilitar a leitura
O triângulo de advertência indica todas as instru-
ções importantes para a segurança do utilizador.
Siga atentamente estas indicações para evitar
ferimentos graves!
(Fig.2) - A referência a ilustrações, partes da máquina e órgãos
de comando acontece através de números e letras, como, por
exemplo, a referência à ilustração 2 deste parágrafo.
Este símbolo evidencia as informações a ter em vista,
para uma melhor utilização da máquina.
As ilustrações correspondentes ao tex-
to encontram-se no interior da capa.
Mantenha esta página aberta durante
a leitura do manual de instruções.
1.2 Utilização dessas instruções de uso
Guarde estas instruções de uso em lugar seguro e
anexe-as à máquina de café se por acaso uma outra
pessoa precisar utilizá-la.
Para mais informações ou em caso de problemas não tratados
totalmente ou apenas insucientemente nas presentes instru-
ções, contacte os Centros de Assistência Autorizados.
2 DADOS TÉCNICOS
•Tensão nominal
Veja plaqueta posicionada no aparelho
• Potência nominal
Veja plaqueta posicionada no aparelho
• Alimentação
Veja plaqueta posicionada no aparelho
• Material do corpo
Termoplástico
• Dimensões (mm)
355 x 385 x 337
• Peso (Kg)
8,5
• Comprimento do cabo (mm)
1200
• Painel de comando
Frontal
• Reservatório de água
1,7 (l) - Extraível
• Capacidade do recipiente de café (g)
350 de café em grãos
• Pressão da bomba (bares)
15
• Caldeira
Aço inox
• Dispositivos de segurança
Válvula de segurança de pressão da caldeira;
termóstato de segurança
Sob reserva de alterações de construção e realização
devidas ao progresso tecnológico.

20
O I L
Medida en Milímetros
NORMAS DE SEGURANÇA
Other manuals for Villa SUP 018M
1
Table of contents
Languages:
Other Spidem Coffee Maker manuals

Spidem
Spidem 035DR User manual

Spidem
Spidem Villa User manual

Spidem
Spidem 741452807 User manual

Spidem
Spidem 740617323 User manual

Spidem
Spidem 10002881 User manual

Spidem
Spidem 741453207 User manual

Spidem
Spidem 10001830 User manual

Spidem
Spidem SUP025PY User manual

Spidem
Spidem 741455012 User manual

Spidem
Spidem Villa SUP 018M User manual


