Spinlock ALTO User manual

COMPACT INFLATABLE EMERGENCY FLOTATION
ALTO
REGISTER YOUR ALTO
FOR THROUGH LIFE SUPPORT
USCG and Transport Canada Approved
Approuvé par USCG et Transport Canada
UL 12402-5 - Level 70N (15.7lbs)
UL 12402- 5 - Niveau 70N (15.7lbs)
Halkey Roberts Manual inator with 16g CO2 Cylinder
Goneur manuel Halkey Roberts avec cylindre de CO2 de 16g
One Size / Taille unique
FLOTTAISON D'URGENCE COMPACTE ET GONFLABLE

1
Contents Page no:
W h y a r e P F D s R e q u i r e d S a f e t y E q u i p m e n t 1
How to check ination system status / Donning and inating the device 2
Re-arming and Re-packing the device 3
C a r e a n d M a i n t e n a n c e I n s t r u c t i o n s 4
C l e a n i n g , M a i n t a i n i n g , S t o r a g e 5
H o w a n d w h y t o t e s t y o u r P F D 6
How do you test your PFD using the Manual Inator? 8
How do you test your PFD using the Oral Inator? 8-9
Hypothermia 10
Additional information 12
Inspection record 26
Instructions en francais 14
Approval Conditions and Carriage Regulations
This inatable otation device is approved by Transport Canada and the U.S. Coast Guard. It is not
approved for white water paddling, water skiing or other high impact, high speed activities. This
inatable otation device was designed to be more comfortable and less restrictive to wear than
inherently buoyant otation devices. When worn, used, and serviced according to this owner’s manual,
this otation device can greatly increase your chances of survival in the water. Not recommended for
non-swimmers or weak swimmers. Users of this inatable otation device must be at least 16 years old.
Mandatory Carriage Requirements
The U.S. Coast Guard and Transport Canada require you to carry approved otation devices of the
correct size for each person on board that are legibly marked with an approval number and are in
good and serviceable condition. To be considered serviceable, this otation device shall not exhibit
deterioration that could diminish its performance such as broken or deformed hardware, detached
webbing, rotted structural components, air leaks or non-functional oral ination tube. Unless worn
inated, this otation device must also be properly armed with a full Co
2
cylinder, ination system
status indicator and an accessible manual ination lanyard.
A otation device which is “approved only when worn” or “required to be worn” must be worn under
the specied conditions”
Why are Flotation Devices Required Safety Equipment
Drowning is the leading cause of fatalities involving recreational boating. In over 80 percent of fatal
incidents the person was not wearing otation and most of these occurred after falls overboard
or capsize of small boats. An approved otation device, when worn, helps raise your head above
water in the rst critical moments of immersion. Some devices are designed to keep you to face
up in the water, and increase your chances for survival and rescue. Different body types oat
differently and some boating activities require special features in a otation device.

HOW TO CHECK INFLATION SYSTEM STATUS
1. Open cover and check the firing unit is armed
Check Green indicator clip is in place
Check 16g cylinder has not been
pierced before use and ensure the
cylinder is screwed in hand tight
DONNING AND INFLATING THE DEVICE
1. 2.
4. 5.
3.
To inflate device
pull manual handle
Position device
around waist
Once inflated position the
bladder under the arms
Secure buckle
and tighten webbing
according to waist size
To inflate via oral
tube, remove cap
and blow into tube
Pour le texte en
français, veuillez
consulter la page 15
2
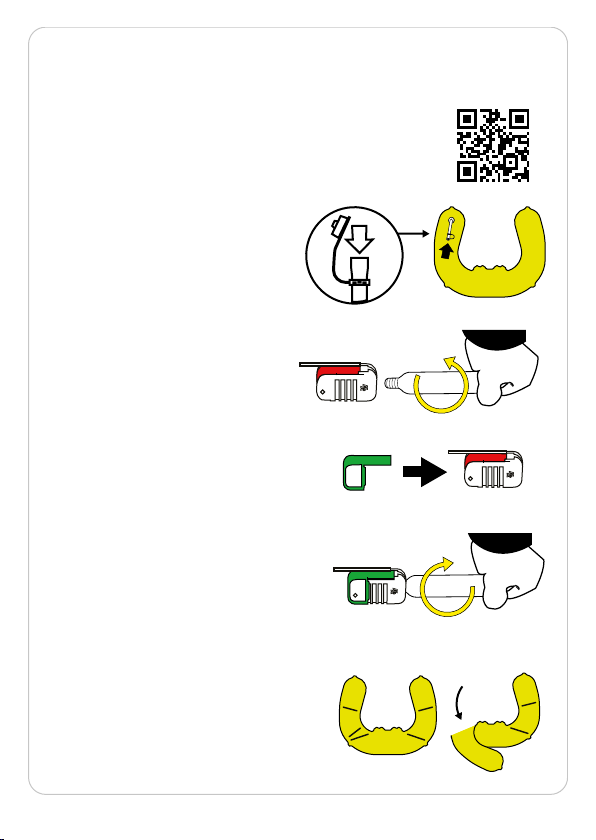
RE-ARMING AND RE-PACKING YOUR DEVICE
2. Remove cylinder from device by
unscrewing counter clockwise
3. Close the red manual arm and
insert new green indicator clip
4. Check gasket where cylinder is
threaded into firing unit and
replace if worn.
Install new 16g cylinder, checking
it has not been pierced and hand
tighten clockwise into unit.
1. Deflate bladder via oral tube
whilst gently squeezing bladder
5. Fold bladder along the markers
in order of 1 to 7
Pour le texte en français,
veuillez consulter la page 15
Re-arming kit required - DW-RAK75
Re-packing video can be found via scanning QR code
3

4
Is your PFD in good and serviceable condition?
Check your otation device between outings to be sure that it is:
properly armed, that it is free of rips, tears or holes, that all seams are securely sewn, and
that the fabric, straps and hardware are still strong. Inspect the inatable portion of the
PFD in accordance with (Care and Maintenance instructions) below.
Care and maintenance instructions
Maintaining your ALTO
Maintaining this device should be the responsibility of one sole user. As the user you are
strongly advised to familiarise yourself fully with the ALTO before using it as a buoyancy Aid.
We advise that you follow a 3-level checking routine, easily carried out by yourself:
1. During Use, check buckles and other fastenings regularly.
2. Before and after use, examine for damage or excessive abrasion, wear, tear or
contamination. Particular attention must be paid to the stitching and webbing, including
the less accessible areas.
Remove the cylinder and check it is unused before use. Ensure the cylinder is tight.
Warning - If the cylinder is not checked to ensure it is unused or it is loose, this could put
you at risk of drowning as the device will not inate. It is your responsibility to check the
status of the cylinder.
3. Every three months, carry out a complete inspection, checking:
a. The fabric: for cuts, tears, abrasion and damage caused by heat, chemicals etc.
b. The bladder: to check for leaks, inate the bladder through the oral tube until rm and
leave for 24hrs. Any loss of rmness indicates leakage and means it is unsafe. To check
the oral valve, fully inate the bladder and hold the tube under water. If bubbles appear,
deate and re-inate to test. If a leak persists, do not use your device until it has been
professionally serviced at your nearest service centre.
Usage below freezing
When the temperature is below freezing, even a fully charged cylinder may not adequately
inate your device. If this occurs use the oral tube to manually top up your device after the
CO2 has been discharged (and not before).

5
Note:
When the device is inated with carbon dioxide (CO2) it can permeate the bladder
more quickly than when inated with air. A reduction in bladder pressure will occur over
several hours therefore it must be topped up by means of the oral tube.
WARNING: Do not fully inate the device orally and then activate the CO2
cylinder. The resulting overpressure could seriously damage the device
resulting in loss of otation.
WARNING:
If in doubt, send your Alto to your nearest service center for evaluation and/
or servicing.
If you are not completely condent about undertaking the self-inspection
and servicing in accordance with these instructions, you must not use your
device again until it has been professionally inspected and serviced.
(For details of your nearest service center see www.spinlockusa.com).
Any modication or repair to any part of the device is expressly forbidden
unless carried out by Spinlock Ltd.
REMEMBER: RE-ARM AND RE-PACK THE DEVICE IN ACCORDANCE WITH
THESE INSTRUCTIONS - See video at www.spinlockusa.com
The ALTO uses a 16g cylinder and requires re-arming kit DW-RAR/75
UNSCREW AND INSPECT THE THREADED END OF THE CO2 CYLINDER
TO CONFIRM IT IS UNUSED.
Cleaning, Maintenance, Storage
Remove gas cylinder and automatic components and then clean by hand and rinse in
clean fresh water (maximum temperature 86 F (30° C)). Dry in a cool, ventilated dark
room. Grease spots may be removed with trichlorethylene. Webbing shrinks very slightly
in drying. Though UV protected, this product is best stored away from direct light, in a well
ventilated place away from extreme temperatures.

6
Chemicals
All chemicals (including petrol, battery acid, corrosive materials and solvents) should be
regarded as harmful. If your Alto comes in contact with chemicals, please notify Spinlock,
stating the precise chemicals concerned. We will investigate and give our advice.
Use at cold temperatures
As temperatures approach freezing the inatable portion of your otation device will
provide less buoyancy and will inate more slowly. The oral inator can then be used to
adequately top up the otation device after CO2 ination.
Inatable otation devices are not recommended for use in temperatures below freezing
How and why to test your otation device?
An inatable otation device does not have inherent buoyancy, meaning that it must be
inated to provide otation. You must understand how to arm, inate and maintain your
inatable device. Familiarize yourself with the use of your inatable so you know what to
do in an emergency.
Always test your otation device in a safe manner, under controlled conditions and where
help is readily available.
Inate your otation device and try it out in a pool, or some other calm protected water
with proper supervision.
• Make sure it oats you:
- Comfortably (When worn properly)
- Adequately for expected wave conditions (Body shapes/densities affect performance)
• Make sure it works:
- A ow of bubbles should not appear (see page 10 for leak tests)
- It should inate quickly and easily
• Learn how it works by:
Activating the CO2 ination system
Rearming the CO2 ination system
Using the Oral inator tube
7
To properly test your otation device and to ensure you have a replacement re-arming
kit, you should purchase two rearming kits. One to be used immediately in testing and
the other to carry onboard as a space. Remember you must rearm your inatable after
discharging the CO2 cartridge.
Check of the manual ination system (with CO2 cylinder and green indicator tab removed)
to determine that the lever arm and piercing pin move freely when moving the lever
(attached to the manual handle) several times down and up. There should be no binding
of the mechanical parts.
Trying Your PFD
Try on your PFD to see if it ts comfortably snug. Then test it in shallow water to see how
it handles.
To check the buoyancy of your PFD in the water, relax your body and let your head tilt
back. Make sure your PFD keeps your chin above water and you can breathe easily.
Be aware: your PFD may not act the same in swift or rough water as in calm water. The
clothes you wear and the items in your pockets may also change the way your PFD works.
If your mouth is not above the water, get a new PFD or one with more buoyancy.
A PFD is designed not to ride-up on the body when in the water. But, when a wearer’s
stomach is larger than the chest, ride-up may occur. Before use, let this PFD in the water
to establish that excessive ride-up does not impair PFD performance.
Fig. 1

8
How do you test your otation device using the Manual Inator?
Always test your otation device in a safe manner, under controlled conditions, and where
help is readily available.
1) To test your inatable otation device, you will need:
• Your fully armed otation device, and
• Rearming kit approved for your otation device.
2) Put on the otation device.
3) Activate the ination system by jerking rmly on the pull tab.
The otation device should fully inate within 5 seconds.
4) Get into shallow water, just deep enough that you can stand with your
head above the surface.
5) See if the otation device will oat you on your back or just slightly back
of vertical. In a relaxed oating position, verify that your mouth is well
above the water’s surface. Note the effect of where you hold your legs on how you
oat.
6) Get out of the water and remove the otation device. Remove the
used CO2 cylinder from the otation device inator. Completely deate
the otation device using the oral inator.
7) Let the otation device dry thoroughly. REARM AND REPACK the otation device in
accordance with the manufacturer’s instructions!
How do you test your otation device using the Oral Inator?
Always test your otation device in a safe manner, under controlled conditions, and where
help is readily available.
1) You will not need any spare parts, or rearming kits, to test your inatable
otation device with oral ination, and it gives you the opportunity to learn about
how much ination is needed to oat you.

9
2) For devices where the CO
2
cylinder is accessible, remove the CO
2
cylinder,
to prevent inadvertent activation of the manual ination system which could potentially
damage the otation device. Inspect the threaded end to conrm that it has not been
pierced and is unused.
3) Put on the otation device. Locate and release the oral tube from its cover.
4) Get into shallow water, just deep enough that you can stand with your
head above the surface.
5) To learn how much ination is needed to oat you, blow a full breath into the oral tube
and then try lifting your feet from the bottom to see if your airway stays clear of the
water. If not, try adding another breath and lifting your feet, and then another if
needed and so forth so that you are supported well enough to be able to complete
ination without touching bottom or treading water. There may be situations where
you wish to wear your device partially inated such as activities or conditions in which
accidental ination would present a signicant risk. The device must be fully inated to
function as designed and approved.
6) Remember as your breath air cools down it contracts in volume. You may require more
topping up breaths to maintain this level. This level of ination may also be useful in
cold conditions where ination could be delayed.
7) Then see if the turning characteristics of the PFD are different with this level of
otation, as it most likely will be.
8) Fully inate the otation device using the oral inator.
9) See if the otation device will oat you on your back or just slightly back of
vertical. In a relaxed oating position, verify that your mouth is well above the water’s
surface. Note the effect of where you hold your legs on how you oat.
10) Get out of the water and remove the otation device. Completely deate the otation
device using the oral inator.
11) Let the otation device dry thoroughly. REARM AND REPACK the otation device in
accordance with the manufacturer’s instructions!

10
Choose a otation device that you will want to wear
A good choice for a otation device is one that will offer sucient buoyancy for your
size and body type to raise your airway (mouth and nose) above water. Also important
is comfort and mobility out of the water so that it can be worn at all times during your
boating activity. An increased performance level (more otation and turning) should be
considered when in rougher waters or when further offshore where rescue assistance
may be a long time coming. Some activities require special features or accessories for
better visibility, for a more secure t in wave conditions and for thermal protection.
Cold Shock
Unexpected immersion (even in moderately cold water) can cause involuntary gasping and
loss of muscle control. It can take one minute or more for these reactions to subside and
there is a risk of inhaling water. You really need the support of a otation device in this
situation. In colder water, swim failure can occur even for strong and experienced swimmers.
Trying to put on and fasten a otation device after immersion can be impossible. Remember
that on a hot sunny day the water can still be cool and the effect of sudden immersion
shocking to the nervous and breathing systems. Choosing a comfortable device and being
diligent about wearing it can save you in these critical rst moments.
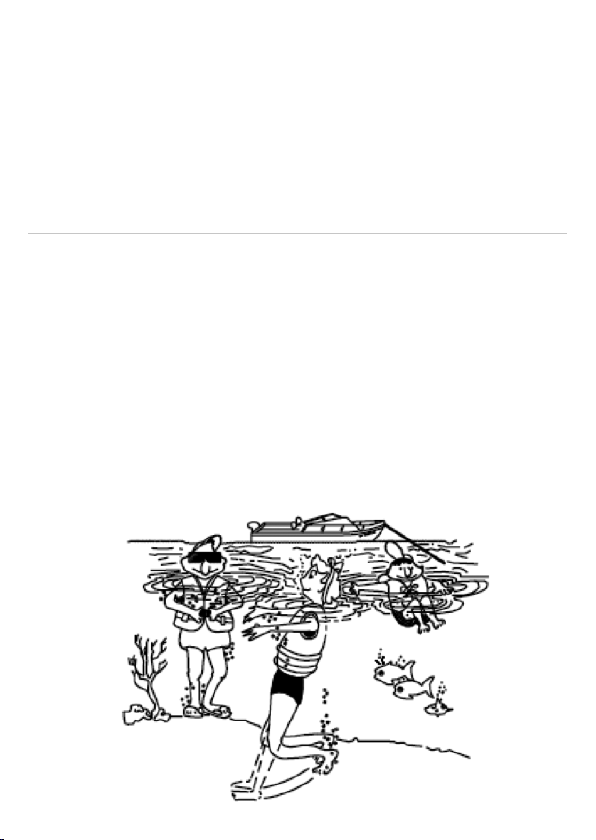
Hypothermia
Prolonged immersion in cold water (after one hour or more) leads to a loss of body heat.
Over time (depending on water temperature, body type and thermal protection) the core
temperature of the body decreases. This produces a condition called hypothermia which
is very serious and can lead to unconsciousness and circulatory failure. Swimming and
treading water accelerates heat loss. Wearing a otation device is essential to help you
conserve body energy and increase your survival time. It enables you to oat quietly and
curl up arms and legs in a Heat Escape Lessening Posture (HELP), with the head out of
water, also reducing heat loss from the head, under the arms, and the groin area.

11
If there is more than one person in the water, gathering together in a huddle is
recommended while waiting to be rescued. See HELP and Huddle below:
Preparation, good safety practices and strong spirit are the keys to survival.
Stay Calm and Don’t Give Up.
HELP and Huddle
For your otation device to function properly, follow these suggestions to verify that it ts,
oats, and remains in good condition.
1) Check the ination mechanism status indicators before each use.
2) Get in the habit of rearming the ination mechanism right after each ination.
3) Try your wearable otation device on and adjust it until it ts comfortably
in and out of the water.
4) Mark your otation device with your name if you are the only wearer.
5) Do not alter your otation device. If it doesn’t t properly, get one that does. An
altered device is no longer approved.
6) Your otation device is not intended for use as a fender or kneeling pad.
7) If your otation device is wet, allow it to dry thoroughly before storing it.
Store it in a well-ventilated area.
8) Do not dry your otation device in front of a radiator or other source of direct heat.
Fig. 2 Fig. 3

12
Additional Information
For information about lifejackets and boating safety consult:
www.wearitlifejacket.org
US Coast Guard uscgboting.org
Transport Canada http://www.tc.gc.ca/
Canadian Red Cross http://canadian.redcross.ca/canadian-red-cross-society/
American Red Cross http://www.redcross.org/
Canadian Safe Boating Council www.csbc.ca
National Safe Boating Council www.safeboatingcouncil.org
US Power Squadrons http://usps.org/
Canadian Power and Sail Squadrons www.cps_ecp.ca
Do not attach your otation device to your boat
Each otation device has straps, hooks, buckles, or other means for securing the device
in place on the wearer. Some otation devices also incorporate decorative D-rings or tabs.
Such items are not to be used to attach the device to the boat. Attaching the device to the
boat will not permit it to perform as intended.
General Information
Important notice: Specic training is essential before use. Read before use.
This technical notice illustrates ways of using this product. Many types of misuse
exist which are impossible to list or even imagine. In case of doubt or any problem of
understanding, contact Spinlock. Water sports are dangerous activities which may lead
to severe injuries or even death. Adequate training in appropriate safety techniques and
methods is essential and acquiring this training is your own responsibility.
You personally assume all risks and responsibilities for all damage, injury or death which
may occur during or following wrong use of our products in any manner whatsoever. If
you are not able, or are not in a position to assume this responsibility or to take such
risks do not use this equipment. Spinlock is not responsible for the consequences, direct,
indirect or accidental, or any type of damage befalling or resulting from the use of its
products.

13
USE
This product must only be used by competent and responsible persons, or those placed
under the direct and visual control of a competent and responsible person. Check that
this product is compatible with other components of your equipment. To prolong the life
of this product, care in use is necessary. Avoid rubbing against abrasive surfaces or sharp
edges. Full performance may not be achieved if using watertight/waterproof clothing.
Gas cylinders are dangerous goods and should be kept away from children and not
misused. Do not use as a cushion. Train yourself in the use of this device. Not compatible
with a safety harness.
LIFETIME = SHELF LIFE + USEFUL LIFE
After rst use this product should last 5 years. Certain environmental elements will
considerably accelerate wear: salt, sand and chemicals.
In exceptional circumstances, wear or damage could occur on the rst use which reduces
the lifetime of the product to that one, single use. Shelf-life of this product in good
condition is up to 3 years before rst use.
TEMPERATURE
Use this product only above a minimum of 32 F (-0° C) and below a maximum of 140 F
(60° C).
DISINFECTING THE PRODUCT
When necessary, use a disinfectant that is compatible with polyamide, polyester,
polycarbonate, PVC etc. Use diluted with clean water at a maximum temperature of 86 F
(30° C). After soaking for an hour, rinse in clean cold water. Dry slowly, away from direct
heat.
WARRANTY
This Device qualies for a Spinlock Warranty lasting one year as rst owner.
Certain environmental elements will considerably accelerate wear: salt, sand, moisture,
chemicals. In exceptional circumstances, wear or damage could occur on the rst use
which reduces the lifetime of the product to that one single use.
See www.spinlockusa.com for full details.
WARNING : WHEN NOT CORRECTLY FITTED, THIS DEVICE MAY NOT PERFORM AS
A BUOYANCY AID AND MAY ENDANGER THE USER.

14
FRANÇAIS
Conditions d’approbation et règlements de transport
Cet équipement de ottabilité gonable est approuvé par transport Canadas et la Garde côtière
des États-Unis. II n’est pas approuvé pour sports de pagaie en eau vive, le ski nautique et les
autres activités à fort impact se déroulant à de grandes vitesses. Cet équipment de ottabilité
gonable est conçu pour fournir plus de confort et moins entraver les mouvements que les
équipements à ottabilité inhérente. Lorsque porté, utilisé et entretenu conformément au
manuel du propriétaire, cet équipment de ottabilité peut grandement accroître vos chances
de survie dans l’eau. II n’est pas recommandé pour les non nageurs ou les faibles nageurs. Les
utilisateurs de cet équipement de ottabilité gonable doivent être âgés d’au moins 16 ans.
Exigences de transport obligatoires
La Garde
côtière
des
Ètats-unis
et Transport Canadas exigent que vous transportiez des
é
quipments de ottabilit
é
qui soient de la bonne taille pour chaque personne
à
bord,
marqu
é
s lisiblement avec un num
é
ro d’approbation et en bonne condition et fonctionnels.
Pour
être
consid
é
r
é
comme fonctionnel, un
é
quipement de ottabilit
é
ne doit pas pr
é
senter
de signes de d
é
t
é
rioration pouvant diminuer sa performance, p. ex. des pi
è
ces bris
é
es ou
d
é
form
é
es, des sangles d
é
tach
é
es, des composants structurels pourris, des fuites d’air ou
des tubes de gonage buccal non fonctionnels.
Sauf s’il est port
é
gon
é
l’
é
quipement de ottabilit
é
doit aussi
être
correctement enclench
é
avec une bouteille de CO2 pleine, un indicateur d’
é
tat du syst
è
me de gonage et un cordon
de gonage manuel accessible.
Un
é
quipment de ottabilit
é
qui est “approuv
é
seulement lorsque port
é
“ ou dont “le port est
exig
é
” doit
être
port
é
sous les conditions sp
é
ci
é
es.
Pourquoi les dispositifs de ottaison sont-ils nécessaires équipement de sécurité
La noyade est la principale cause de décès liée a la navigation de plaisance.
Dans plus de 80 % des accidents mortels, la personne ne portait pas d’équipement de
ottabilité et, dans la plupart des cas, l’accident s’est produit apr
è
s une chute pardessus
bord ou le chavirement d’une petite embarcation.
Un équipement de ottabilité approuvé, lorsque vous le portez, aide
à
maintenir votre tête
hors de l’eau dans les premiers instants critiques suivant l’immersion.
Certains équipments sont conçus pour vous maintenir en position sur le dos lorsque vous
êtes dans l’eau, ce qui augmente vos chances de survie et de sauvetage.
Les différents types de corps humain ne ottent pas tous de la même mani
è
re et
certaines activités de navigation nécessitent des équipments de ottabilité possédant des
caractéristiques spéciales.

15
COMMENT VÉRIFIER L’ÉTAT DU SYSTÈME DE GONFLAGE - Page 2
1. Ouvrez le produit et vériez que l’unité de mise à feu est armée. Vériez que le clip
indicateur vert est en place
Vériez que le cylindre de 16g n’a pas été percé avant utilisation et assurez-vous que le
cylindre est bien vissé à la main
REVÊTIR ET GONFLER L’APPAREIL
1. Placez l’appareil autour de la taille
2. Fixez la boucle et serrez la sangle en fonction du tour de taille
3. Pour goner l’appareil, tirez sur la poignée
4. Pour goner via un tube oral, retirez le capuchon et souez dans le tube
5. Une fois goné, positionnez la vessie sous les bras
RÉARMEMENT ET RÉEMBALLAGE DE VOTRE APPAREIL - Page 3
La vidéo de réemballage peut être trouvée en scannant le code QR
Kit de réarmement requis - DW-RAK75
1. Dégoner la vessie via le tube oral tout en pressant doucement la vessie
2. Retirez le cylindre de l’appareil en dévissant dans le sens inverse des aiguilles
d’une montre
3. Fermez le bras manuel rouge et insérez un nouveau clip indicateur vert
4. Vériez le joint à l’endroit où le cylindre est vissé dans l’unité d’allumage et
remplacez-le s’il est usé. Installez un nouveau cylindre de 16 g, en vériant qu’il
n’a pas été percé et serrez à la main dans le sens des aiguilles d’une montre dans
l’unité.
5. Plier la vessie le long des repères dans l’ordre de 1 à 7
Utilisation en dessous de zéro degré
Lorsque la température est inférieure à zéro, même une bouteille complètement
chargée peut ne pas goner adéquatement votre gilet de sauvetage. Si cela se
produit, utilisez le tube oral pour recharger manuellement votre gilet de sauvetage
après que le CO2 a été déchargé (et pas avant).

16
VOTRE VESTE DE FLOTTAISON EST-ELLE EN ÉTAT DE FONCTIONNER?
Vériez votre équipement de ottabilité entre chaque sortie pour vous assurer qu’il est
bien enclenché:
Qu’il n’a pas d’accrocs, de déchirures ou de trous, Que toutes les coutures sont en bon
état, et que les matériaux, les sangles et les piéces sont robusters.
Inspectez la partie gonable du gilet de sauvetage conformément aux instructions
d’entretien ci-dessous.
Instructions d’entretien et de maintenance
Entretenir votre ALTO
L’entretien de cet appareil doit être la responsabilité d’un seul utilisateur. En tant
qu’utilisateur, il est fortement conseillé de vous familiariser avec l’ALTO avant de l’utiliser
comme aide à la ottabilité.
Nous vous conseillons de suivre une routine de contrôle à 3 niveaux, facilement
réalisable par vous-même :
1. Pendant l’utilisation, vériez régulièrement les boucles et autres attaches.
2. Avant et après utilisation, vériez l’absence de dommages ou d’abrasion excessive,
d’usure, de déchirure ou de contamination. Une attention particulière doit être portée
aux coutures et sangles, y compris les zones les moins accessibles.
3. Tous les trois mois, effectuer un contrôle complet en vériant :
a. Le tissu : pour des coupures, des déchirures, l’abrasion et les dommages causés par
la chaleur, les produits chimiques, etc.
b. Le gilet de sauvetage : pour vérier les fuites, goner la vessie par le tube oral jusqu’à
ce qu’elle soit ferme et laisser reposer 24h. Toute perte de fermeté indique une fuite et
signie qu’elle est dangereuse. Pour vérier la valve oral, gonez complètement le gilet
de sauvetage et maintenez le tube sous l’eau. Si des bulles apparaissent, dégonez et
regonez pour tester. Si la fuite persiste, n’utilisez pas votre gilet de sauvetage tant qu’il
n’a pas été réparé par un professionnel dans votre centre de service le plus proche.
c. Les composants : retirer et inspecter la bouteille de CO2

17
Noter: Lorsque l’appareil est goné au dioxyde de carbone (CO2), il peut pénétrer la
vessie plus rapidement que lorsqu’il est goné à l’air. Une diminution de la pression
vésicale se produira sur plusieurs heures, il faut donc la compléter au moyen du
tube oral.
Avertissement: N’activez pas la bouteille de CO2 aprés avoir goné
complétement l‘équipement par la bouche. La surpression causée pourrait
considérablement endommager l’équipement, ce qui provoquerait une perte
de ottabiIité.
ATTENTION :
En cas de doute, envoyez votre ALTO dans votre centre de révision le plus
proche pour le faire évaluer et/ou réviser.
Si vous n’êtes pas sûr de pouvoir entreprendre l’inspection vous-
même et de pouvoir entretenir votre gilet de sauvetage selon
ces instructions, vous ne devez plus utiliser votre gilet de sauvetage avant
de l’avoir fait inspecté et révisé par un professionnel. (Pour les coordonnées
de votre centre de révision le plus proche, consultez www.spinlockusa.com)
Toute modication ou réparation de toute partie du Deckvest est formellement
interdite à moins d’être effectuée par Spinlock Ltd.
N’OUBLIEZ PAS: RÉARMER ET RÉEMBALLER L’APPAREIL CONFORMÉMENT
À CES INSTRUCTIONS - Voir la vidéo sur www.spinlockusa.com
DÉVISSEZ ET INSPECTEZ L’EXTRÉMITÉ FILETÉE DU CYLINDRE DE CO2 POUR
CONFIRMER QU’ELLE N’EST PAS UTILISÉE.
L’ALTO utilise un cylindre de 16g et nécessite un kit de réarmement DW-RAR/75
Nettoyage, entretien, stockage
Retirez la bouteille de gaz et les composants automatiques, puis nettoyez-les à
la main et rincez-les à l’eau douce et propre (température maximale de 86 F (30
°C)). Sécher dans une pièce sombre, fraîche et ventilée. Les taches de graisse
peuvent être éliminées avec du trichloréthylène. La sangle rétrécit très légèrement
au séchage. Bien que protégé contre les UV, ce produit est mieux stocké à l’abri de
la lumière directe, dans un endroit bien ventilé à l’abri des températures extrêmes.

18
Produits chimiques
Tous les produits chimiques (y compris l’essence, l’acide de batterie, les matériaux
corrosifs et les solvants) doivent être considérés comme nocifs. Si votre Deckvest entre
en contact avec des produits chimiques, veuillez en informer Spinlock en précisant les
produits chimiques concernés. Nous allons enquêter et donner nos conseils.
Un équipment de ottabilite gonable n’a pas de ottabilité inhérente, c’est a-dire qu’il
doit
ê
tre goné pour fournir une ottabilité.
Vous devez savoir comment enclencher, goner et entretenir votre equipment gonable.
familiarisez-vous avec l’utilisation de votre equipment gonable pour savoir qoui faire
en cas de detresse.
Ii est important de toujours essayer l'équipement de ottabilité de façon securitaire dans
des conditions contrôlées, ou de l’aide se trouve à proximité
Goner votre équipement de ottabilité et faites-en l’essai dans une piscine ou tout autre
plan d’eau calme et protegé, sous une supervision adéquate:
• II doit vous faire otter :
- Confortablement
- (Lorsque I’équipement est porté correctement)
- Adéquatement, selon les conditions de mer prévues (Les types de corps humain et le
poids ont un impact sur la performance)
• II doit
ê
tre fonctionnel :
- Un ux de bulles ne doit pas apparaître (voir Entretien et maintenance, pour un test
d’étanchéité)
- II doit se goner rapidement et facilement
Comment et pourquoi tester votre vêtement de ottaison ?
UTILISER À DE BASSES TÉMPERATURES
Quand la température avoisine le point de congélation, l’éqiuipement de ottabilité
gonable offre un degré moins élevé de ottabilité et se gone moins rapidement.
Quand la temperature frôle le point de congélation, l’équipement doit être porté
partiellement goné pour garantir une ottabilité immédiate en cas de chute par-dessus
bord.
Le mécanisme de gonage buccal peut être utilisé pour atteindre le degré de ottabiIité
maximal de l’équipement aprés le gonage par CO2.
L’ utilisation d’un équipment de ottabilité gonable n’est pas recommandée lorsque la
températre est sous le point de congélation.

19
Pour essayer correctement votre équipement de ottabilité et pour vous assurer d'avoir
une trousse de réarmement de rechange, vous devriez acheter deux trousses de
réarnement. Utilisez la premi
è
re sans tarder pour l'essai du syst
è
me de gonage.
(voir COMMENT ESSA YER L'
È
QUIPEMENT DE FLOTTABILIT
È
AVEC LE M
È
CANISME
DE GONFLAGE AUTOMA TIQUE?) et apportez la seconde
à
bord comme trousse de
rechange. N'oubliez pas d'enclencher
à
nouveau votre
è
quipement gonable lorsque la
cartouche de CO2 est vide.
Vénez le syst
è
me de gonage manuel (apr
è
s avoir retiré la boutellle de CO2 et la tige
indicatrice verte) pour déterminer si le levier et la pointe bougent librerment lorsque vous
dépiacez le levier (attaché
à
la tirette) plusieurs fois vers le haut et le bas. Les pi
è
ces
mécaniques ne devraient pas se coincer.]
Essayez sur votre VFI
Essayez sur votre VFI pour voir si elle tient confortablement serré.
Puis le tester dans l'eau peu profonde pour voir comment il geré.
Pour vérier la ottabilité de votre VFI dans l’eau, se détendre votre corps et laissez votre
inclinaison de la téte en arriére. Assurez-vous que votre VFI garde votre menton
au-dessus de l’eau et vous pouvez respirer facilement.
Soyez conscient: votre VFI peut pas agir de la m
ê
me dans l’eau rapide ou rugueuse que
dans l’eau calme. Les v
ê
tements que vous portez et les objets dans vos poches peuvent
aussi changer la façon dont fonctionne votre VFI.
Si votre bouche est pas au-dessus de l’eau obtenir un nouveau VFI ou un avec plus de
ottabilité.
Un VFI est conçu pour ne pas rouler-up sur le corps quand dans l’eau. Mais, quand
l’estomac d’un porteur est supérieure
à
la poitrine, rouler-up peut se produire. Avant
l’utilisation, que ce VFI dans l’eau pour établir que excessive tour-up ne nuise pas
à
la
performance VFI.
Voir Fig. 1 – Page 7
• Apprenez: son fonctionnement
- Activez le syst
è
me de gonage au CO2!
- Enclenchez: à nouveau le syst
è
me de gonage au CO2
- Utilisez le tube de gonage buccal
Other manuals for ALTO
1
Table of contents
Languages:
Other Spinlock Safety Equipment manuals

Spinlock
Spinlock 170N User manual

Spinlock
Spinlock NEMO + User manual

Spinlock
Spinlock DECK PRO User manual

Spinlock
Spinlock DURO SOLAS User manual

Spinlock
Spinlock DECKVEST LITE User manual

Spinlock
Spinlock Deckvest LITE User manual

Spinlock
Spinlock Deckvest 150N User manual

Spinlock
Spinlock MAST PRO User manual

Spinlock
Spinlock deckware Series User manual

Spinlock
Spinlock XAS Series Quick start guide


(12) instruction manual")


