manuals.online logo
Brands
  1. Home
  2. •
  3. Brands
  4. •
  5. SportRack
  6. •
  7. Automobile Accessories
  8. •
  9. SportRack FRONTIER A21004S User manual

SportRack FRONTIER A21004S User manual

Installation Manual
Manuel d’installation
Manual de instalaci n
Please rea the Safety Proce ures &
Warranty Sheet before using this pro uct.
Sírvase leer las Reglas e Seguri a y la
Garantía antes e usar este pro ucto.
Lisez la feuille de Procédures de
Sécurité et de Garantie avant d utiliser ce produit.
REF 4 & 5
Ma e in China - Fabriqué en Chine - Hecho en China
©SportRack 12-09
A21004S
040-1079-2
A21005S
040-1080-6
DRIVE SAFE. THEHANDLING CHARACTERISTICS OF YOUR VEHICLE WILL BE AFFECTEDWHEN CARRYING LOADS
(CORNERING, BRAKING, CROSSWINDS, ETC...)
All SportRackproducts carry a one-yearlimited warrantyfrom the original date ofpur chaseagainst defects inworkmanship or materials.
If any defectappears in SportRack product during warranty, the SportRackproduct must be returned shipping paid to the manufacturer or
distributor.Repairedor replaced products willbe shipped by the manufacturer ordistributor. Requestmust be by letter bearingyour name and
addressand explainingthe problem and beaccompanied by proofof purchase.
This war rantywill not apply if thepr oduct has been modifi ed, dama ged or misused.
Any and allimplicit warranties, includingany implied warranty of merchantabilityof fitness fora particularpurpose, shall not exceed in
durationthe term of limited war ranty. In no event shall the manufacturer or the distributorbe liable for fortuitousor indire ct dama ges.
EXCLUSIONS TO WARRANTY
LIMITED WARRANTY
T
ousles produits SPORT RACK co mpor tent unegarantie limitée d'unan, à partir de ladate d'achatinitial,contre les défautsde matériau et de
fabrication. Si au coursde la période de garantie,le pr oduit SPOR TRACK présenteune quelconque défectuosité, il doit êtrer etourné au
fabricantou au distributeur, frais depor t payés. Celui-ci se chargera de payer le port der etourde l'article peu impor te qu'ilsoit réparéou
r
emplacé.Pour cefaire, vous devezjoindreunelettre portantvotre nom etadresseexpliquantle problème, accompagnéede la preuve d'achat.
Cettegarantie n'est pas validesi le produit a été modifié, endommagé ou mal utilisé. Toutesles garanties implicites,y compristoute garantie
implicite liéeà la qualitémarchande ou à l’adaptation à un usage particulier, n’excéderont pasla période de cette garantielimitée.
En aucuncas, le fabricant oule détaillant ne seront tenus resp onsables des dom mages for tuits ouindirects.
EXCLUSIONS
GARANTIE LIMITÉE
COND UISEZ PRU DEMMENT, LA TENUE DE ROUTE DE VOTRE VÉHICULE PEUT ÊTREAL TÉRÉE QU AND VOUS TR ANSPORTEZ UN E CHARGE
(EN CAS DE VIRAGES, FREINAGE, VENTS LATÉRAUX,ETC.)
EXCLUSIONS
GARANTÍA LIMITADA
CONDUZCA CON PRUDENCIA. CUANDO TRANSPORT
A CARGAS, LAS CARACTERÍSTICAS DE MARCHA VARIARÁN
(AL DOBLAR, FRENAR, EN PRESENCIA DE VIENTOS LATERALES,ETC.)
T
odos lospr oductos SPOR TRACKtienen una garantíalimitada de un año, a partirde la fechade compraoriginal,que cubre cualquierdefecto
de fabricación o de material.Si necesita utilizarel servicio de garantía, envíeel pr oducto Spo rtrack y la factura con franqueo pagado dentr o
del períodode garantía al fabricante o al distribuidor. Éste sehará cargo del envío de lospr oductosr eparados o re emplazados.
Adjunteuna car ta indicando su nombre, direccióny el defecto del producto.
Estagarantía notendrá validez cuandoel producto haya sidomodificado, dañado o sehaya utilizado inadecuadamente. Cualquier otra
garantíaaplicable, inclusouna garantía implícita de aptitudpara la comercialización noexcederá la vigenciade la garantía
limitada.El fabricantey el distribuidor no seránr esponsables por los daños directos o indirectos.
7
































































































Y
Locate clamp plate an pa as shown. Tighten bolts Yalternately.
Plaquer les contre-pattes contre le pavillon et serrer
alternativement les vis Y.
Localice la placa e abraza eras y la almoha illa como ilustra o.
Apriete los pernos Yuno tras el otro.
8
9






























































1
2
3
4
5
6
7
8
9
10
11
12
13
14
15
16
17
18
19
20
21
22
23
24
25
26
27
28
29
30
31
32

21


12
3
45
































































































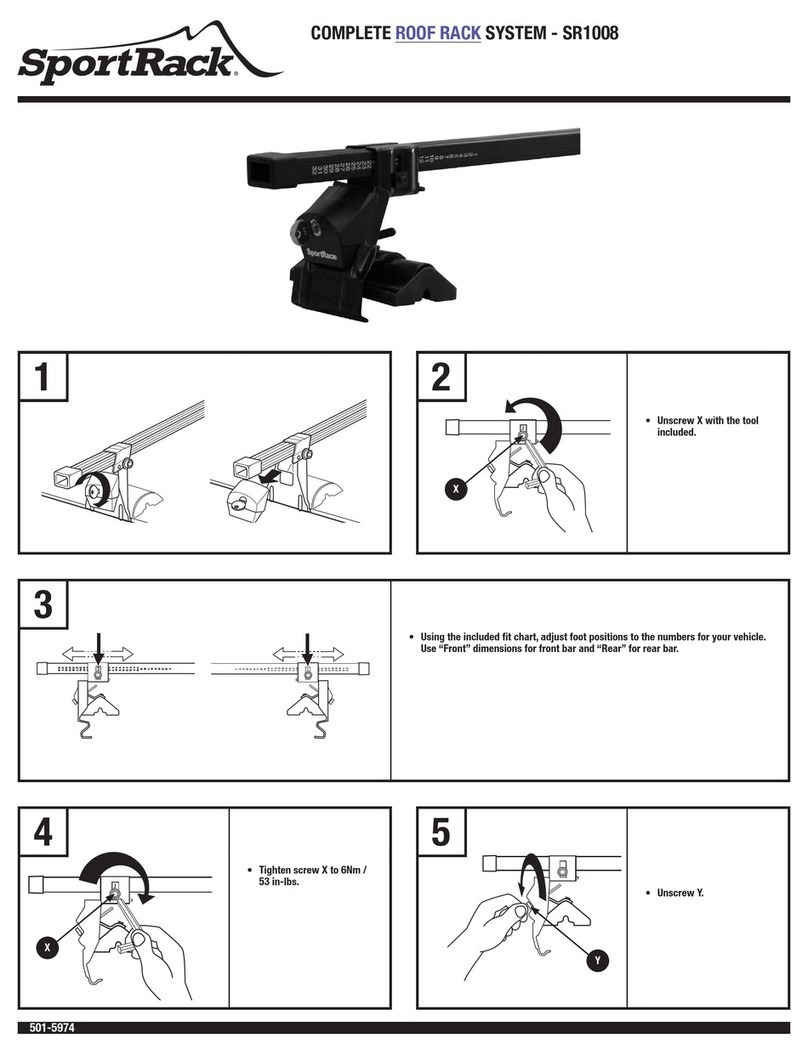
Unscrew Xwith the tool inclu e .
Desserrer les vis Xavec la clé fournie.
Destoernille Xcon la herramienta
X
































































































































































































Unscrew Y.
Desserrer les vis Y.
Destornille Y.
Y
6
B
A
B
A
B
A
X
































































































Check all fittings are secure an correctly positione .
Vérifier le bon positionnement et la bonne tenue de l'ensemble.
Verifique que to os los accesorios estén firmes y
coloca os correctamente.
Stick protective a hesive on the clamp plate.
Coller les adhésifs sur les contre-pattes.
Pegue el a hesivo protector en la placa e abraza eras.
10
Using the inclu e fit chart, a just foot positions
to the numbers for your vehicle. Use “Front”
imensions for front bar an “Rear” for rear bar.
En tilisant le tablea d’aj stement incl s, aj stez la
position des pieds a n méro q i correspond à votre
véhic le. Utilisez les dimensions “Front” po r la barre
avant et les dimensions “Rear” po r la barre arrière.
Utilizan o la tabla e mo elos, ajuste la posición e los
pies e acuer o con los números para su vehículo.
Utilice las me i as “Front” para la barra elantera y
la “Rear” para la barra trasera.
Tighten screw X to 6Nm / 53 in-lbs.
Serrer fortement les vis Xà 6 Nm/53 po-lb.
Apriete el tornillo Xcon un torque e 6Nm / 53 pulg/lbs.
Position the rack on your vehicle accor ing to istance A and B in icate for your vehicle in the inclu e fit chart.
Placez le s pport s r votre véhic le selon la distance A et B indiq ée po r votre véhic le dans le tablea d’aj stement.
Ubique el portaequipajes en su vehículo e acuer o con la istancia A y B in ica a para su vehículo
utilizan o la tabla e mo elos.

This manual suits for next models

3

Other SportRack Automobile Accessories manuals

SportRack SR2404B User manual

SportRack

SportRack SR2404B User manual

SportRack HORIZON CARGO BOX SR7011 User manual

SportRack

SportRack HORIZON CARGO BOX SR7011 User manual

SportRack SR2901 User manual

SportRack

SportRack SR2901 User manual

SportRack Frontier A21010S User manual

SportRack

SportRack Frontier A21010S User manual

SportRack SR9035 User manual

SportRack

SportRack SR9035 User manual

SportRack A30603 User manual

SportRack

SportRack A30603 User manual

SportRack SR1010 User manual

SportRack

SportRack SR1010 User manual

SportRack SR5528 User manual

SportRack

SportRack SR5528 User manual

SportRack A1124SP User manual

SportRack

SportRack A1124SP User manual

SportRack VOYAGER XL User manual

SportRack

SportRack VOYAGER XL User manual

SportRack EXPLORER A90095 User manual

SportRack

SportRack EXPLORER A90095 User manual

SportRack SR2901BLR User manual

SportRack

SportRack SR2901BLR User manual

SportRack UPSHIFT PLUS Series User manual

SportRack

SportRack UPSHIFT PLUS Series User manual

SportRack A25375CS User manual

SportRack

SportRack A25375CS User manual

SportRack HORIZON Operating and maintenance instructions

SportRack

SportRack HORIZON Operating and maintenance instructions

SportRack Sherpa 13 User manual

SportRack

SportRack Sherpa 13 User manual

SportRack SR3141 User manual

SportRack

SportRack SR3141 User manual

SportRack SKYLINE XL User manual

SportRack

SportRack SKYLINE XL User manual

SportRack 28-7228 User manual

SportRack

SportRack 28-7228 User manual

SportRack SR1008 User manual

SportRack

SportRack SR1008 User manual

SportRack SR3161 User manual

SportRack

SportRack SR3161 User manual

SportRack SR2901B User manual

SportRack

SportRack SR2901B User manual

SportRack SR7095 User manual

SportRack

SportRack SR7095 User manual

SportRack A30404TW200 User manual

SportRack

SportRack A30404TW200 User manual

Popular Automobile Accessories manuals by other brands

Accessory Power TabGRAB instruction manual

Accessory Power

Accessory Power TabGRAB instruction manual

Simplicity 202 parts list

Simplicity

Simplicity 202 parts list

BrandMotion FLEETWORKS FLTW-7610 installation instructions

BrandMotion

BrandMotion FLEETWORKS FLTW-7610 installation instructions

Belkin TuneBase user manual

Belkin

Belkin TuneBase user manual

Clifford GPS1 owner's guide

Clifford

Clifford GPS1 owner's guide

Boss Audio Systems BE7ACP-FT user manual

Boss Audio Systems

Boss Audio Systems BE7ACP-FT user manual

InCarTec 27-578 instruction manual

InCarTec

InCarTec 27-578 instruction manual

Dometic RM 4601 Installation & operating instructions

Dometic

Dometic RM 4601 Installation & operating instructions

Audi 8XA.071.609 manual

Audi

Audi 8XA.071.609 manual

Lexus ES350 quick start guide

Lexus

Lexus ES350 quick start guide

DK2 BCR690E user manual

DK2

DK2 BCR690E user manual

Thule Kit 1001 Fitting instructions

Thule

Thule Kit 1001 Fitting instructions

Stenhoj Maestro 2.20 Operation and maintenance instructions

Stenhoj

Stenhoj Maestro 2.20 Operation and maintenance instructions

Phonocar 4/031 Mounting instructions

Phonocar

Phonocar 4/031 Mounting instructions

Hamlet XPWC545CAR user manual

Hamlet

Hamlet XPWC545CAR user manual

Thule Excellence Fitting instructions

Thule

Thule Excellence Fitting instructions

Clam Corp 8241 Assembly instructions

Clam Corp

Clam Corp 8241 Assembly instructions

Carefree of Colorado OMEGA II quick start guide

Carefree of Colorado

Carefree of Colorado OMEGA II quick start guide

manuals.online logo
manuals.online logoBrands
  • About & Mission
  • Contact us
  • Privacy Policy
  • Terms and Conditions

Copyright 2025 Manuals.Online. All Rights Reserved.