Ssl SGR3 User manual


Installation
.
INSTALLATION INSTRUCTIONS
1.This player should be installed by professional audio installer.
2. Please read the instruction and operation of equipment carefully before
installing.
3. To avoid short circuit. Please make sure all the exposed wire is
insulated.
4. To avoid potential shorts in the electrical system, be sure to disconnect
the (-) battery cable before installation. Use this unit with a 12-Volt battery
and negative grounding only. Failure to do so may result in a fire or
malfunction.
5. This player is only fit for 12V DC applications.
6. Please make sure to connect the yellow constant power wire to the
positive post of the battery (+).
7. When changing the fuse, please make sure the fuse ratings are the
same.
8. Using good quality 4-8 Ohm speakers is recommended for best results.

Installation
WIRING CONNECTION
1. This player is compatible with 12V DC application only.
2. Do not connect the battery terminals until the player is fully connected.
3. Please make sure a constant 12V source, like the positive post of the battery (+).
4. When changing the fuse. Please make sure use ratings are the same.
5. Using good quality speaker with 4-8 ohm can result in the best effect of the equipment.

KEY FUNCTION
LOCATION OF KEYS
1. BAND button
2. Seek down button
3. POWER/SRC button
4. Seek up button
5. Pause button
6. MENU button
7. VOL +/VOL - button
8. CLK/BACK button

OPERATION
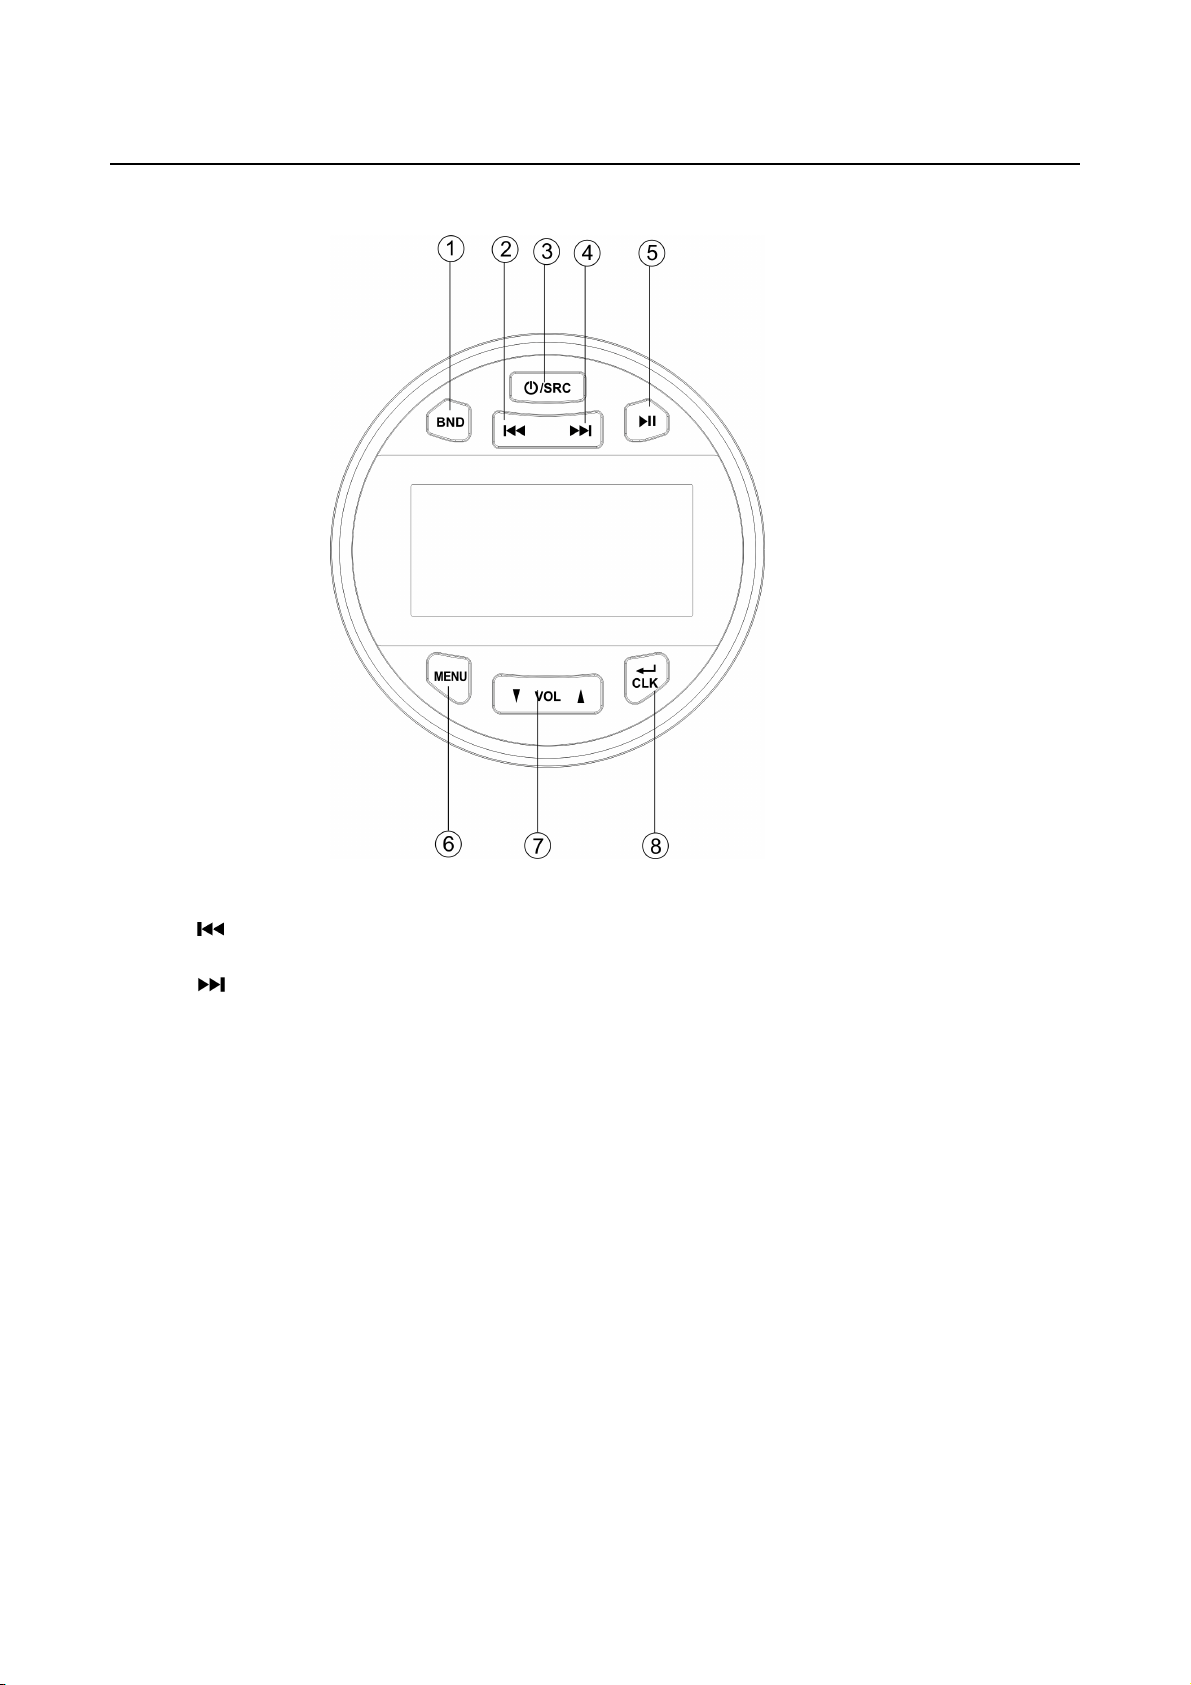
Turning On/Off the unit
Press button to turn ON the unit. When the unit is ON. Press and hold it for 2 seconds to
turn Off the unit.
Sound and setting adjustment
Press and hold the MENU button to enter the Settings Menu:
BAL-FAD-EQ-LOUD-BEEP-CLOCK (12/24) - P_VOL- AREA-DX-STEREO
In each Setting, press the VOL+/- buttons to adjust settings. In the menu setting press the
CLK button to exit the Settings Menu.
EQ: In the EQ Setting, press VOL button to select below preset mode:EQ1/EQ2/EQ3/EQ4/EQ
OFF.
LOUD: In low volumes, set it on to reinforce the bass output. The sound will be enhanced
BEEP: Select ON/OFF to set the system tone.
CLOCK (24/12): In the CLOCK Setting, press the VOL button to set the time to 24H or 12H
format.
P-VOL (Preset VOL): In P-VOL press the VOL button to set the default power on volume, If
the volume at shutdown is less than the P-VOL value, next time the unit is turned On, the
unit volume will be maintained as it was at shutdown. If the volume at shutdown is greater
than the P-VOL value. The next time the unit is turned on, the unit volume will default to the
P-VOL value.
AREA: In the AREA Setting, press VOL button to choose USA or EUROPE frequency.
DX/LOC: DX: In urban areas, most stations are strong enough and “LOCAL ON” mode
should be selected. Switch to DX mode to search for stations with weaker signals."
STEREO/MONO: STEREO: Receives FM stereo signal. MONO: Change FM stereo to
monochrome, it can reduce the noise when the signal is weak.
Display the clock or information
Shortly press CLK button to show the clock or source information.
Clock setting
Press and hold CLK button for 2 seconds. “HH” will flash. Press VOL+/- button to change the
hour. After that press CLK button “MM” will flash. Press VOL+/- button to change the minute.
Then press CLK button to confirm.
Reset the unit
In AUX IN mode press and hold for 5 seconds to reset the unit. Reset the unit when:
a) Unit malfunctions or freezes.
b) Error symbol shows on the display.
Note: If the RESET function is activated, all the memory will be lost.

OPERATION
Radio Operation
Press the SRC button to select radio mode. Then press BND button to select desired band.
Short press / to select the desired radio station. Press and hold / to
manually tune the frequency.
Auto Store:
Press the BND button for 2 seconds to auto store stations to bands 1~3.
Manually store station
Select a desired station, Short press the MENU button 2 times. It will display “SAVE P1”.,
Press VOL+/- buttons to select P1~P6, then press CLK to save the station.
Listening to Preset Stations
In the RADIO band. Press the MENU button. It will show “PRE 87.5”. Press VOL+/- buttons
to select P1~P6.
USB Operation
When an USB flash drive is inserted to the unit, the unit will play the MP3/WMA file
automatically. If a USB flash drive is already inserted in the unit, short press the SRC button
until the USB source appears on the display.
Select a File
Press / to skip to next/previous files. Hold / to fast forward or fast
reverse.
Play/Pause
Press button to pause/play the file.
Repeat function
When playing MP3/WMA, Press the MENU button, it will show ”RPT ALL”, Then press
VOL+/- button to select RPT ONE/RPT FOLD/ RPT ALL.
Random function
When playing MP3/WMA, Press the MENU button 2 times, it will show “RDM ON”. Press
VOL+/- button to select between RDM ON/OFF.
DIR+/- function
When playing MP3/WMA, Press the BND button, it will show “DIR SCH”, press VOL+/-
buttons to select 1’st song of the upward/downward folder.
Search song
When playing MP3/WMA, Press the BND button 2 times, it will show “NUM ****”, press
VOL+/- buttons to enter the numbers, then press the CLK button to play. (Note: after one
number is entered, you will need to wait 3 seconds to enter the next number.)
AUX IN operation
Connect a male RCA to 3.5mm AUX in cable to the RCA AUX inputs on the rear of the unit.
Then press SRC button to switch to AUX IN mode.

OPERATION
Bluetooth Operation
Pairing
On your mobile device, go into the Bluetooth settings. Search and select Bluetooth name:
"SSL MGR3". If prompted, enter "0000" for password. When successful connected, the
Bluetooth logo will be displayed on the SGR3’s display.
Bluetooth Audio
Press the SRC button to switch to Bluetooth mode. It will play a song of your mobile phone
automatically. Press key to pause/play the song. Press / button to select
next/previous song.
Disconnecting Bluetooth
When your mobile device is paired with the unit, you can disconnect Bluetooth by pressing
the MENU button and selecting "BT OFF" by pressing the CLK button. Note, you must be in
the Bluetooth source to disconnect Bluetooth this way.
Reconnecting Bluetooth
In Bluetooth Mode, press the MENU button so it shows "BT RECON". Press the CLK button
to reconnect to your previously paired device.

TROUBLESHOOTING
GENERAL
Power Supply Requirements : DC 12 Volts, Negative Ground
Chassis Dimensions : 3.9 (W) x 4.0 (D) x 2.75(H) Inches
Tone Controls
- Bass (at 100 Hz) : ±10 dB
- Treble (at 10 kHz) : ±10 dB
Maximum Output Power : 4 x 60 watts
Current Drain : 10 Ampere (max.)
RADIO FM AM
Frequency Coverage 87.5 to 108 MHz 520 to 1710 kHz
IF 10.7 MHz 450 KHz
Sensitivity 4μV(S/N=30dB) 36dBuV(S/N=20dB)
Stereo Separation >25dB /
TROUBLESHOOTING
Before going through the checklist, check wiring connection. If any of the problems persist
after checklist has been made, consult your nearest service dealer.
Symptom Cause Solution
No power. The car ignition switch is
not on.
If the power supply is
connected to the car accessory
circuits, but the engine is not
moving, switch the ignition key
to “ACC”.
The fuse is blown. Replace the fuse.
No sound. Volume is in minimum Adjust volume to a desired level.
Wiring is not properly
connected.
Check wiring connection.
The operation
keys do not
work.
The built-
in microcomputer
is not operating properly
due to noise.
Press the reset button.
The radio
does
not Work. The
radio station
automatic
selection does
not work.
The antenna cable is not
connected.
Insert the antenna cable firmly.
The signals are too weak. Select a station manually.

Table of contents