Stahl ST05 User manual

Chain Hoists
Original instructions


01.2019 3
ba-o.1.8.0-en-3.1
Content
1General information ................................................................................................................................................................................................ 5
1.1 Copyright................................................................................................................................................................................................................... 5
1.2 Symbols..................................................................................................................................................................................................................... 5
1.3 Warranty.................................................................................................................................................................................................................... 6
1.4 Declaration of conformity / declaration of incorporation.................................................................................................................................6
1.5 Spare parts................................................................................................................................................................................................................ 6
1.6 Terminology.............................................................................................................................................................................................................. 6
1.7 Test book / crane logbook ..................................................................................................................................................................................... 7
1.8 Transport and storage............................................................................................................................................................................................ 7
1.9 Weight........................................................................................................................................................................................................................ 7
1.10 Installation, commissioning, maintenance and repairs................................................................................................................................... 8
1.11 After-sales service................................................................................................................................................................................................... 8
1.12 Periodic tests............................................................................................................................................................................................................ 8
1.13 Environmental information.................................................................................................................................................................................... 9
1.13.1 Life cycle assessment..................................................................................................... 9
1.13.2 Energy consumption ....................................................................................................... 9
2Safety instructions ................................................................................................................................................................................................10
2.1 Use for intended purpose ....................................................................................................................................................................................10
2.2 Inappropriate use...................................................................................................................................................................................................10
2.3 Residual dangers...................................................................................................................................................................................................11
2.4 Organisational safety precautions.....................................................................................................................................................................11
2.5 General regulations...............................................................................................................................................................................................12
2.6 Personal protective equipment...........................................................................................................................................................................12
2.7 Protection against falling .....................................................................................................................................................................................12
2.8 Sound pressure level............................................................................................................................................................................................12
2.9 Fire safety................................................................................................................................................................................................................12
2.10 Safety-conscious operation ................................................................................................................................................................................13
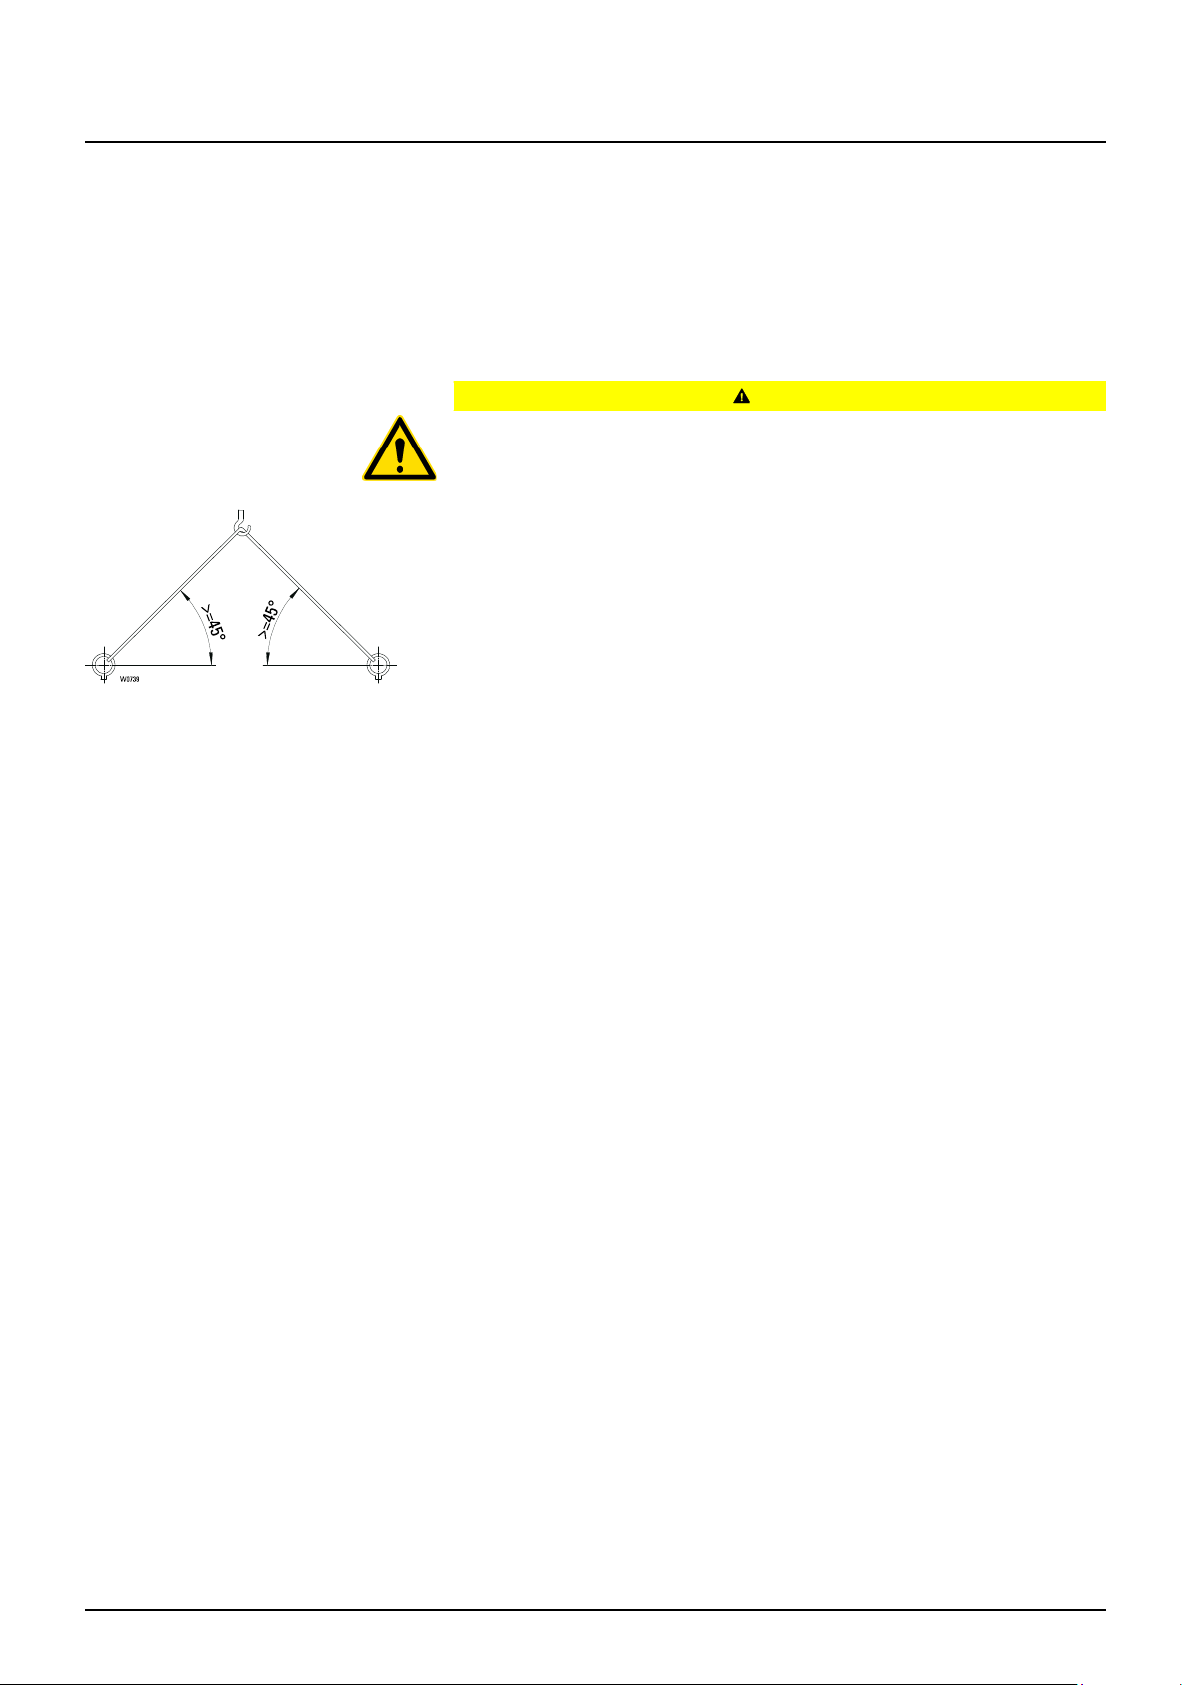
2.11 Attaching load ........................................................................................................................................................................................................13
3Introduction ............................................................................................................................................................................................................14
4Installation...............................................................................................................................................................................................................15
4.1 Stationary chain hoist...........................................................................................................................................................................................15
4.2 Chain hoist with trolley.........................................................................................................................................................................................16
4.2.1 Assemble the trolley......................................................................................................16
4.2.2 Adjust trolley to runway width .......................................................................................19
4.3 Installing trolley on chain hoist...........................................................................................................................................................................21
4.4 Attach the trolley to the runway beam...............................................................................................................................................................23
4.5 Connecting electric trolley...................................................................................................................................................................................24
4.6 Mounting guide rollers .........................................................................................................................................................................................24
4.7Mounting support rollers .....................................................................................................................................................................................24
4.8 Runway endstop....................................................................................................................................................................................................25
4.9 Disassemble and assemble chain bucket ........................................................................................................................................................25
4.9.1 Disassemble chain bucket............................................................................................25
4.10 Mounting control pendant ...................................................................................................................................................................................27
4.11 Connecting to mains.............................................................................................................................................................................................27
4.11.1 Protective conductor......................................................................................................27
5Commissioning......................................................................................................................................................................................................28
6Operating.................................................................................................................................................................................................................29
6.1 Duties of crane operator.......................................................................................................................................................................................29
6.2 Operating control pendant...................................................................................................................................................................................30
6.3 Emergency stop.....................................................................................................................................................................................................30
7Inspection and maintenance...............................................................................................................................................................................31
7.1 Inspection intervals...............................................................................................................................................................................................32
7.1.1 Every day .......................................................................................................................32
7.1.2 Every month...................................................................................................................32
7.1.3 Every three months .......................................................................................................32
7.1.4 Every year......................................................................................................................32
7.1.5 Every five years .............................................................................................................32
7.2 Checking function of slipping clutch without load.........................................................................................................................................33

4 01.2019
ba-o.1.8.0-en-3.1
7.3 Adjusting slipping clutch - without load ...........................................................................................................................................................33
7.4 Adjusting slipping clutch with test load............................................................................................................................................................34
7.5 Hoist motor brake..................................................................................................................................................................................................35
7.5.1 Checking brake..............................................................................................................35
7.5.2 Adjusting brake..............................................................................................................35
7.5.3 Replacing brake disc (brake rotor)...............................................................................37
7.6 Travel motor brake ................................................................................................................................................................................................38
7.6.1 Check condition of the chain.........................................................................................38
7.6.2 Check wear of the chains..............................................................................................38
7.7 Lubricate the chain................................................................................................................................................................................................39
7.8 Replacing load chain ............................................................................................................................................................................................39
7.9 Replace the chain stopper...................................................................................................................................................................................40
7.9.1 Disassemble chain stopper ..........................................................................................40
7.9.2 Assemble chain stopper................................................................................................40
7.10 Checking and mounting chain anchorage .......................................................................................................................................................42
7.11 Replace bottom hook block.................................................................................................................................................................................42
7.11.1 Disassemble bottom hook block ..................................................................................42
7.11.2 Assemble new bottom hook block ...............................................................................43
7.12 Replacing two-fall bottom hook block...............................................................................................................................................................43
7.13 Replacing return sheave ......................................................................................................................................................................................43
7.14 Checking hook for wear .......................................................................................................................................................................................44
7.15 Oil change...............................................................................................................................................................................................................44
7.16 Trolley ......................................................................................................................................................................................................................45
7.17 Operating hours counter......................................................................................................................................................................................45
7.18 General overhaul ...................................................................................................................................................................................................45
8Wearing parts.........................................................................................................................................................................................................46
8.1 Hoist.........................................................................................................................................................................................................................46
8.2 Trolley ......................................................................................................................................................................................................................47
8.3 Dismantling.............................................................................................................................................................................................................47
8.4 Scrap disposal .......................................................................................................................................................................................................47
9Technical data........................................................................................................................................................................................................48
9.1 Classification to ISO..............................................................................................................................................................................................48
9.2 Conditions of use ..................................................................................................................................................................................................48
9.3 Hoist.........................................................................................................................................................................................................................49
9.3.1 Hoist motor data 50Hz ..................................................................................................49
9.3.2 Hoist motor data 60Hz ..................................................................................................50
9.4 Specifications for mains connection.................................................................................................................................................................51
9.4.1 Max. length of supply cable 50 Hz...............................................................................51
9.4.2 Max. length of supply cable 60Hz................................................................................52
9.5 Tightening torques for bolted connections......................................................................................................................................................53
9.6 Lubricants...............................................................................................................................................................................................................54
9.7 Lubricants for travel drive....................................................................................................................................................................................54
9.8 Circuit diagrams ....................................................................................................................................................................................................54
9.9 Chain certificate.....................................................................................................................................................................................................55

1 General information
01.2019 5
ba-o.1.8.0-en-3.1
1General information
You have purchased a STAHL CraneSystems product.
This product was constructed in accordance with the applicable European standards and
regulations.
Read carefully and observe the operating instructions. Store the operating instructions
within easy reach at the place of operation.
1.1 Copyright
Copyright STAHL CraneSystems GmbH, 2015. All rights reserved. Reproduction and
copying, including excerpts, not permitted without written permission from the publisher.
No liability for errors.
1.2 Symbols
In these instructions, the safety notices are classified according to the severity of the
danger and the probability of its occurrence.
The procedures described for avoiding danger must be followed without fail.
DANGER
This symbol gives warning of an imminent danger to health and life.
Ignoring these warning notices will lead to severe injuries, possibly resulting in death.
WARNING
This symbol gives warning of situations that are potentially dangerous to health and life.
Ignoring these warning notices may lead to severe injuries, possibly resulting in death.
CAUTION
This symbol gives warning of situations, which are potentially dangerous to health.
Ignoring these warning notices may lead to injuries.
NOTICE
Warns of damage to property or the environment.
Specific symbols:
Warning of electrical voltage
Covers such as hoods and caps which are marked with this symbol may only be opened
by "skilled or qualified personnel".
Contact with live parts can cause death instantaneously.
Warning of suspended load
It is forbidden for persons to stand under suspended loads.
This entails risks to life and limb!
Warning of injuries to hands
Danger of crushing or cutting hands and fingers. The appropriate personal protective
equipment should be worn for this task to avoid injury.

1 General information
6 01.2019
ba-o.1.8.0-en-3.1
Tips / recommendations
Tips for use and other particularly important information.
1.3 Warranty
Observance of the operating instructions is essential for safe operation and achieving the
stated product characteristics and performance features. Non-observance will lead to loss
of warranty for the product and the machine in which the product is installed. In addition
to the instructions given in the operating manual, all official and statutory regulations must
be observed when operating the product. Use the product only for its intended purpose.
Please note also the chapters "Technical data", "Use for intended purpose" and "Inappro-
priate use".
1.4 Declaration of conformity / declaration of incorporation
See separate document.
1.5 Spare parts
WARNING
Incorrect or defective spare parts may lead to damage, malfunctions or the complete
failure of the machine.
➢Only original spare parts must be used.
1.6 Terminology
User
Whoever uses and employs the product or has it operated by suitable trained personnel
is considered to be the user (employer/company).
Trained personnel
Trained personnel are persons who have been instructed and trained in the duties with
which they are entrusted and the risks which may arise from incorrect behaviour, have
been advised on the necessary protective devices, precautions, applicable regulations,
accident prevention regulations and prevailing conditions and have proven their ability.
Skilled electrician
A skilled electrician possesses knowledge and experience on electrical equipment arising
from specialist training and, with knowledge of the applicable standards and regulations,
is able to assess the work with which he is entrusted and detect and avoid possible risks.
The skilled electrician must be familiar with the commissioning and operation of the
product and have been trained on it.
Definition of a qualified person:
A qualified person is one who has gained the specialised knowledge required for testing
the equipment from his/her vocational training, professional experience and recent
professional activity.
This person must be in a position to assess the safety of the system in conjunction with
the application. Qualified persons with the competence to undertake installation, commis-
sioning, periodic tests, certain maintenance work and repairs on our products include the
manufacturer’s service engineers and trained fitters with the corresponding certification.

1 General information
01.2019 7
ba-o.1.8.0-en-3.1
1.7 Test book / crane logbook
A completed test logbook must be kept for each hoist. The results of the periodic tests
must be entered in the logbook and certified by the test engineer.
1.8 Transport and storage
Transport
CAUTION
Danger of falling parts
•Use the marked sling points for transporting the hoist.
•The sling points are designed for a max. diagonal pull ≥45°, see Fig. 1.
Fig. 1
•The product is delivered on a special pallet. This enables it to be loaded and unload-
ed safely with a fork-lift truck.
•If the product is to be transported suspended, it must be attached to the sling points
provided.
•Do not allow the hoist to drop. The product must always be set down on the ground
correctly.
•Avoid damage to the product and its components by loading and unloading it correct-
ly.
Storage
•Store the product and its accessories in a dry place.
•Store it in a stable position, secure it against toppling or overturning.
•Observe environmental protection laws for storage (do not allow oil etc. to leak).
•The ground must be firm and must not permit the machine to sink in.
•Ensure the load is evenly distributed, support the hoist at several points.
•Do not kink the ropes and avoid contact with the ground.
1.9 Weight
See factory certificate.

1 General information
8 01.2019
ba-o.1.8.0-en-3.1
1.10 Installation, commissioning, maintenance and repairs
•Installation, commissioning, maintenance and repairs may be carried out by qualified
persons only.
•We recommend having installation carried out by qualified personnel engaged by the
manufacturer.
•Do not carry out any alterations or modifications.
•Additional fitments must be approved by the manufacturer.
(During welding work, electrode and ground must be in contact with the same com-
ponent!)
•Use only original spare parts for repairs.
•Dismantled guards must be screwed down again and locked.
If the chain hoist is constantly operated out of doors and exposed to the elements without
protection, we recommend fitting a canopy or at least "parking" the hoist under a roof.
1.11 After-sales service
You have purchased a high-quality product. A contracted after sales service will give you
advice on its maintenance and correct use.
In order to maintain the safety and constant availability of the product, we recommend
concluding a maintenance agreement.
1.12 Periodic tests
Hoists and cranes must be inspected by a qualified person (see chapter 1.6) at least once
a year, more frequently if so specified by national regulations.
The results of the test must be recorded and filed in the test logbook.
The remaining service life of the hoist acc. to FEM 9.755 must also be established during
this inspection.
The periodic tests must be adapted to the hoist’s use. Intensive use or adverse environ-
mental conditions entail shorter maintenance intervals.
All tests must always be initiated by the user! (see chap.1.6)

1 General information
01.2019 9
ba-o.1.8.0-en-3.1
1.13 Environmental information
Environmental aspects have been taken into account when developing and manufactur-
ing this equipment. Please note the instructions on safe lubrication and waste disposal to
avoid pollution risks during use. Appropriate use and correct maintenance will improve the
environmental performance of this product.
1.13.1 Life cycle assessment
The stages of the product service life are:
•Production of materials,
•components and energy,
•transport to factory,
•manufacture and assembly,
•transport to customer,
•on-site installation,
•operating phase including maintenance and modernisation,
•dismantling and recycling of materials at end of service life.
1.13.2 Energy consumption
The energy consumption during the operating phase has the highest impact on the
environment. Electricity is required for starting and running the motors and for lighting,
heating, cooling and other optional electrical components and parts of the hoist.

2 Safety instructions
10 01.2019
ba-o.1.8.0-en-3.1
2Safety instructions
2.1 Use for intended purpose
•Chain hoists are intended for lifting freely movable loads. Depending on their design,
they are for stationary or mobile use.
•Chain hoists for "guided loads" have to be specially designed for this type of applica-
tion. Pulling/towing or raising/lowering of a guided load is then only permitted if the
chain hoist or system is designed for that purpose.
•Runways, suspensions and endstops must be of suitable dimensions.
•Any fundamental alterations and modifications to the product, such as e.g. welding on
load-bearing components, structural alterations to load-bearing components, altera-
tion of drives, alteration of speeds and motor outputs, replacing trolleys, etc. must be
authorised by the manufacturer, otherwise the declaration of conformity/declaration of
incorporation will be invalidated.
•Also any work on or additions to the control must be authorised by the manufacturer.
The manufacturer cannot accept any liability for malfunctioning after unauthorised
work on the control.
•Load hoist only up to the maximum working load, following the data on the rating
plate. (Caution: danger of load falling).
•The conditions in the place of use of the hoist must correspond to the operating
conditions for which the hoist was designed (including indoor/outdoor use, ambient
temperature, radiation temperature, wind, dust, splash water, snow, water, etc.
•For hoists which work in combination and have more than one control (tandem
operation), action must be taken to coordinate the controls. This applies also to the
reaction of the protective devices.
•For hoists intended for automatic operation, the control must be designed accordingly
•In the case of chain hoists with multiple load-bearing equipment, ensure that the load
is distributed evenly between the falls. Any asymmetry arising must not exceed the
maximum load stated on the corresponding load capacity plate.
2.2 Inappropriate use
•Use in areas with potentially explosive atmosphere.
•Transporting molten metal.
•Exceeding the maximum working load.
•Transporting persons.
•Use of the hoist in applications where the load during a lifting procedure may exceed
the maximum load-bearing capacity (e.g. single-sided attachment of long items), if no
additional overload safeguard is present.
•Pulling loads loose, pulling or towing loads
•Pulling loads at an angle, dragging loads or moving vehicles with the load or load
suspension equipment
•Do not knot load ropes or chains or shorten them with devices such as bolts, screws
or similar
•Removing the safety latch from suspension and load hooks is not permitted
•Manipulating the slipping clutch
•Operating the hoist with slack chain
•Touching the chain during the hoisting motion
•Operating a damaged hoist
•Operating the hoist with the chain twisted
•Approaching the emergency limit switch in normal operation
•Approaching top and bottom hook position (slipping clutch) in normal operation.
•Manipulating the overload safety device.

2 Safety instructions
01.2019 11
ba-o.1.8.0-en-3.1
•Operating the chain hoist without a phase monitoring relay if a control supplied by the
customer is not installed in an electrical connection box on the chain hoist, but e.g. in
a stationary control cabinet.
•If the product forms "part of a machine," the person placing it on the market must
ensure that the product meets the specific regulations of the application.
•Application of external torques due to forces that are exercised from outside the
system, e.g. with gripper operation or through tilting/bumping of the load, in particular
with the option 4×90° hook locking.
2.3 Residual dangers
The machine has been subjected to a risk analysis. The design and construction based
on this correspond to the state of the art. However, residual hazards remain during
operation and maintenance and these could result in serious or even fatal injuries to
personnel.
•Risk of crushing
•Hazard due to falling parts (attached to the load or on the load)
•Load toppling due to unsuitable or damaged load-bearing equipment
•Risk of electric shock
Preventative measures:
•The machine functions with high voltage.
•Switch the machine off and ensure it cannot be switched on again before carrying out
maintenance, cleaning and repair work.
•Switch off the power supply before all work on the electrical system. Check that the
components to be replaced are free of current and voltage.
•Do not remove any safety devices or override them by manipulating them.
•When lifting or lowering loads ensure that no-one is in the immediate danger area.
•It is forbidden for anyone to stand in the danger area.
2.4 Organisational safety precautions
•The user may only employ persons to operate the product independently (crane
operator), instal or maintain the product if they
1. have reached the age of 18,
2. are capable both physically and mentally,
3. have been instructed in operating and maintaining the crane and have shown him
proof of their competence and
4. may be expected to perform the duties assigned them reliably.
•At regular intervals, check that work is being carried out in a safety-conscious man-
ner.
•Observe the intervals specified for periodic tests. File the test reports in the test
logbook.

2 Safety instructions
12 01.2019
ba-o.1.8.0-en-3.1
2.5 General regulations
•Safety and accident prevention regulations.
•Official and statutory regulations.
•National regulations.
2.6 Personal protective equipment
Fig. 2
Personal protective equipment to be provided by the user
•Safety shoes
•Gloves (only if there is no danger of them being drawn into equipment)
•Protective goggles
•Protective helmet
•Hearing protection
•Closely fitting clothes (danger of clothing being drawn into equipment)
•When operating hoist or standing close to hoist, wire rope or chain there is a danger
of fingers, clothing, jewellery, etc. being drawn into equipment
2.7 Protection against falling
Work over 2 m above the ground may only be performed from work platforms.
Fitters working outside work platforms must be secured with a fall protection system.
2.8 Sound pressure level
Fig. 3
The sound pressure level was measured at a distance of 1 m from the chain hoist. The
mean sound pressure level is calculated for one operating cycle (50% with maximum
permissible load, 50% without load).
Type
[dB A]
ST 05
76
ST 10 - ST 60
74
2.9 Fire safety
WARNING
Never use a powder extinguisher in the presence of high voltages
Only fight the fire if this is possible without subjecting yourself to risk. Switch off the crane
if this is possible. Evacuate the area. Advise other persons on potential danger and call
for help.

2 Safety instructions
01.2019 13
ba-o.1.8.0-en-3.1
2.10 Safety-conscious operation
•ST chain hoists are constructed according to the state of the art and equipped with a
slipping clutch as overload protection. In spite of this, dangers may arise from inap-
propriate use or use for an unintended purpose.
•The user is responsible for ensuring that work is carried out with safety in mind and
avoiding risks, see chap. 1.6.
•Read the instructions before starting to work with the product.
•Standing under a suspended load is forbidden. Danger to life and limb!
•Observe the "Duties of crane operator".
•Before starting work, find out where the emergency stop button is (usually in the
control pendant).
•Do not put your hand between edges that might crush or cut.
•Do not grasp the moving chain.
•Take note of the relevant instructions when attaching loads.
•Do not stand between load and wall.
•Start lifting the load carefully.
•Never attempt to remedy a malfunction while the load is suspended.
•Never use bent, open or distorted load hooks, or attempt to straighten them.
•Have a damaged hook latch repaired.
•Never anneal the hook.
•Never lock the buttons of the control switch in place.
•Never allow the load to drop into the hoist’s load-bearing equipment.
•Before lifting loads, ensure that the stated maximum working load is not exceeded.
•When lifting and setting down loads, ensure that they are in a stable position in order
to avoid accidents due to the load toppling or overturning.
•Secure the load if the power is cut.
•Have a damaged hook safety latch repaired.
•Do not kink or crush control cables.
•Choose a safe place from which to operate the hoist.
•Joining or mending ropes, chains or belts is not permitted.
•Never touch metal components that are colder than 0°C or hotter than 55°C without
wearing protective gloves.
•Report damage and defects to the product (abnormal noises, impaired braking
function, deformations, ...) to the person responsible immediately. Do not use the
product until the faults have been eliminated.
•Do not remove information plates from the product. Replace illegible or damaged
plates.
•Never expose control cables to tensile stress. It is strictly forbidden to move the hoist
by pulling on the control pendant.
•Have hoist inspected by the relevant authority before commissioning.
2.11 Attaching load
•Use only tested and approved slings for attaching the load.
•The rope must not be wound around the load.
•The load must always be suspended from the base of the hook. The tip of the hook
must not be subjected to load.
•Removing the safety latch from suspension and load hooks is not permitted.

3 Introduction
14 01.2019
ba-o.1.8.0-en-3.1
3Introduction
Chain hoists are intended for lifting freely movable loads.
The modular system permits a multitude of combinations of the components.
The hoist drive is a cylindrical rotor motor with a separately activated D.C. brake. Its
design complies with the FEM calculation regulations which are adapted to the require-
ments of hoist operation.
Our certified quality assurance system to DIN ISO 9001/EN 29001 guarantees consistent-
ly high quality.
Fig. 4
1Chain drive
2Motor
3Gear
4Slipping clutch
5Brake
6Panel box
7Chain box
8Plug for control pendant
9Plug for travel drive
10 Plug for mains connection
11 Socket for control pendant
12 Socket for travel drive
13 Socket for mains connection
14 Suspension hook
15 Suspension eye
16 Rigid suspension
17 Single-fall bottom hook block
18 Load hook
19 Two-fall bottom hook block
20 Control pendant
21 Emergency stop

4 Installation
01.2019 15
ba-o.1.8.0-en-3.1
4Installation
4.1 Stationary chain hoist
WARNING
Danger due to falling parts
➢Check correct assembly of the overhead suspension prior to commissioning.
ST 05
ST 10 - ST 60
Fig. 5
Fig. 6
(1)
Threaded connection of the overhead
suspension
Tightening torque of the screws (1) 15 Nm.
For the assembly procedure please refer to the chapter Assemble trolley on chain hoist.

4 Installation
16 01.2019
ba-o.1.8.0-en-3.1
4.2 Chain hoist with trolley
4.2.1 Assemble the trolley
US-G10
Fig. 7
(1)
Trolley side cheek
(2)
Snap ring
(3)
Suspension bolt
(4)
Washer
(5)
Distance washers
(6)
Castellated nut
1. Fit the overhead suspension (if available) on the suspension bolt (3).
2. Fit the washer (4) on the suspension bolt (3).
3. Attach the snap ring (2) to the suspension bolt (3).
4. Set the correct dimension through the symmetrical distribution of the distance wash-
ers (5).
5. Fit the trolley side cheek (1) on the suspension bolt (3).
6. Screw on castellated nut (6) with distance washers (5).
7. Repeat steps 2 to 6 with the second side.
8. Adjust runway width with adjusting washers (see chapter Adjust trolley to runway
width).
➢Overhead suspension must be central to the trolley.
9. Tighten castellated nut and then release to the next cotter pin hole.
10. Attach screw locks.

4 Installation
01.2019 17
ba-o.1.8.0-en-3.1
KFN 10 / 63
KFK 10 / 63
(1)
Screw lock
(2)
Nut
(3)
Distance washer
(4)
Snap ring
(5)
Washer
(6)
Overhead suspension
(7)
Trolley side cheek
Fig. 8
1. Fit the overhead suspension (6) on the suspension bolt.
2. Fit the washer (5) on the suspension bolt.
3. Attach the snap ring (4) to the suspension bolt.
4. Set the correct dimension through the symmetrical distribution of the distance wash-
ers (3).
5. Fit the trolley side cheek (7) on the suspension bolt.
6. Screw the nut (2) with the distance washers (3).
7. Repeat steps 2 to 6 with the second side.
8. Adjust runway width with adjusting washers (see chapter Adjust trolley to runway
width).
➢Overhead suspension must be central to the trolley.
9. Tighten the nut (2) with the specified torque (see table).
10. Attach screw locks (1).
Type
Nm
KFN 10 / KFK 10
130
KFN 63 / KFK 63
1100

4 Installation
18 01.2019
ba-o.1.8.0-en-3.1
Fig. 9
(1)
Suspension bolt with spacer sleeves
(2)
Suspension bolt
KFN 32
KFK 32
Fig. 10
1. Insert the suspension bolt in the overhead suspension.
Insert the suspension bolt (1) in position (1) with spacer sleeves.
➢Set the correct dimension through the symmetrical distribution of the distance wash-
ers and spacer sleeves.
Insert the suspension bolt (2) in position (2) without spacer sleeves.
➢Set the correct dimension through the symmetrical distribution of the distance wash-
ers.
2. Fit the trolley side cheeks on the suspension bolts.
3. Adjust runway width with adjusting washers (see chapter Adjust trolley to runway
width).
➢Overhead suspension must be central to the trolley.
4. Tighten the nut with the specified torque (470 Nm).
5. Attach screw locks.

4 Installation
01.2019 19
ba-o.1.8.0-en-3.1
K.T 22
(1)
Hexagon head screw
(2)
Nut
(3)
Distance washer 3 mm
(4)
Distance washer 1 mm
(5)
Trolley side cheek
B
Runway width
a
Track clearance
Fig. 11
1. Fit the first trolley side cheek (5) on the hexagon head screw (1).
2. Set the correct dimension through the symmetrical distribution of the distance wash-
ers (3, 4).
3. Fit the second trolley side cheek (5) on the hexagon head screw (1).
4. Adjust runway width with adjusting washers (see chapter Adjust trolley to runway
width).
5. Screw the nut (2) with the distance washers (3, 4).
➢Overhead suspension must be central to the trolley.
6. Tighten the nut (2) with the specified torque (52 Nm).
7. Attach screw locks.
4.2.2 Adjust trolley to runway width
WARNING
Danger due to falling parts
The chain hoist must not be operated without screw locks.
Check correct assembly of the overhead suspension prior to commissioning.
•If the runway width deviates from the dimension specified in the order, clarify with the
manufacturer whether the trolley supplied is suitable for the actual runway width.
•Always hang the chain hoist in the centre of the trolley.
•Lubricate the teeth of the running rollers with grease.
•Only perform runway width adjustments with original parts.

4 Installation
20 01.2019
ba-o.1.8.0-en-3.1
(1)
Screw lock
(2)
Nut
(3)
Distance washer 3 mm
(4)
Distance washer 1 mm
(5)
Trolley side cheek
B
Runway width
a
Track clearance
Fig. 12
The trolley is set to the runway width (B) specified in the order. The track clearance (a)
per side is 3 mm. If necessary, the track clearance (a) can be readjusted by moving the
distance washers (3) and (4) as described in the following. The track clearance (a) must
not be greater than 3 mm on one side.
WARNING
Danger due to falling parts
An unsecured chain hoist can cause falls and injuries.
➢Secure chain hoist against falling.
1. Secure chain hoist against falling.
2. Remove screw lock (1).
3. Loosen the nut (2).
4. Remove the trolley side cheek (5) from the suspension bolt.
5. Set the correct dimension through the symmetrical arrangement of the distance
washers (3) and (4).
6. Fit the trolley side cheek (5) on the suspension bolt.
7. Tighten the nut (2) with the specified torque (see table).
8. Attach screw locks (1).
Type
Nm
US-G10
Tighten castellated nut and then release to the next cotter pin hole.
K.T 22
52
KFN 10
KFK 10
130
KFN 32
KFK 32
470
KFN 63
KFK 63
1100
This manual suits for next models
6
Table of contents
Other Stahl Chain Hoist manuals
Popular Chain Hoist manuals by other brands

Holzmann
Holzmann ESZ 250D user manual

Columbus McKinnon
Columbus McKinnon CHESTER HOIST EL-680 Operating and maintenance manual

CM
CM 635 Series Operating, Maintenance & Parts Manual

unicraft
unicraft EKZT Series operating instructions

Toku
Toku TCR Series instruction manual

Grizzly
Grizzly T23102 owner's manual