10
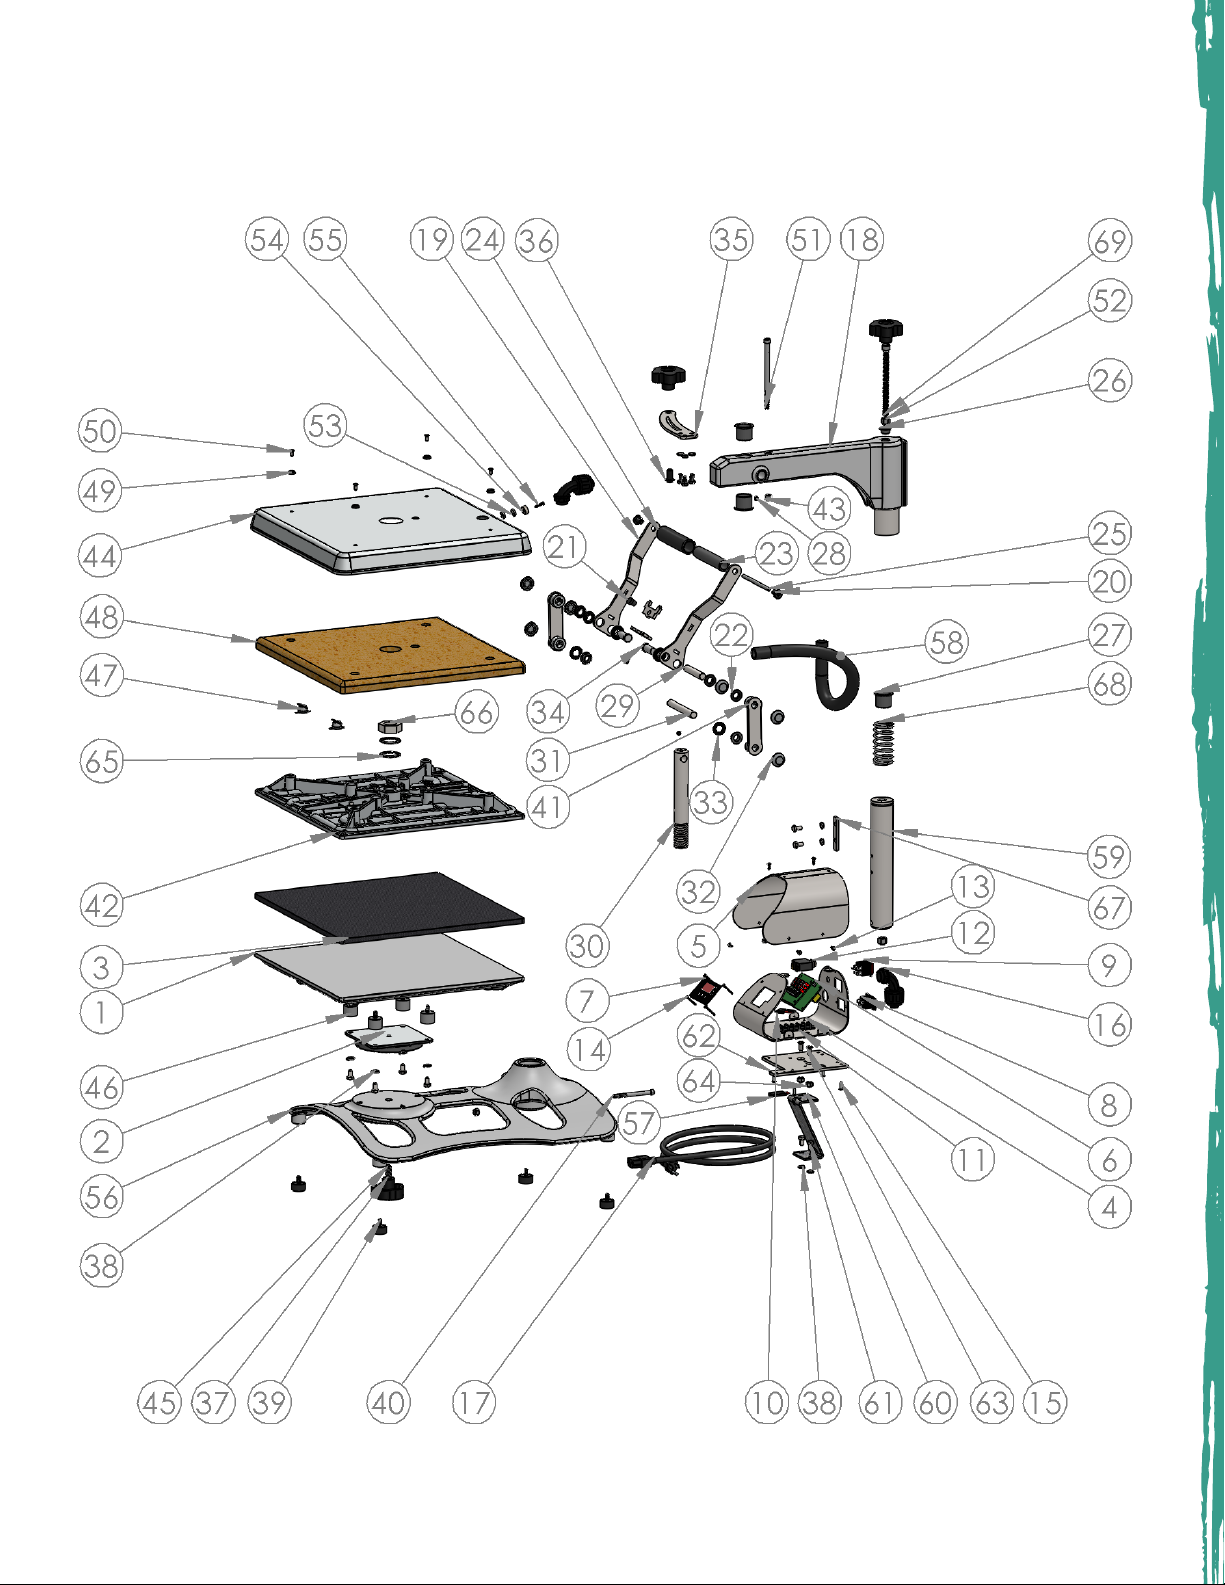
Replacement Parts List
# DESCRIPTION PART # QTY
1 A2Z Lower Platen, 15" X 15" 3-1384 1
2 Skinny Adapter Plate 3-1336-1 1
3 Silicone Pad 15" x 15" Black 1-2622 1
4 A2Z Control Cradle 1-2595 1
5 A2Z Control Cover 1-2594 1
6 Controller, Craft 1-2604 1
7 Controller Overlay, A2Z 1-2623 1
8 Power Inlet 1-1759 1
9 Power Switch 1-2076 1
10 TRIAC, STX/MAXX 2-1675 1
11 Terminal Block, 5 Contact 1-1290 1
12 Circuit Breaker 20A 1-1331-3 1
13 Screw, Machine #6-32 x 1/2" 3-1011-19 8
14 Screw, Pan Phillips #4-40 x 1" 3-1011-130 4
15 Screw, Machine #6-32" x 1/4" 3-1011-25 4
16 Conduit Fitting, 1/2"Elbow HPASC 1-2618 2
17 Power Cord, 120V Locking 2-1671 1
17 Power Cord, 220V 1-2186 1
17 Power Cord, 230V European
Locking 2-1672 1
18 A2Z Arm Casting 3-1382 1
19 A2Z Handle 2
20 JCN Nut, 1/4"-20 2-1006-2 2
21 Rubber Foot, Small Push-In 1-1056 2
22 Nylon Bushing, Flanged 1/2” x 1/4” 1-2627 4
23 PVC Spacer, 1/2” x 4.5” 1-1049-16 1
24 Foam Grip, Black 1-1540 1
25 Threaded Rod 1/4”-20 x 4.50 1-1042-2 1
26 Nylon Bushing, Flanged 1/2"x 3/8" 1-2628 3
27 Nylon Bushing, Flanged 1" x 1" 1-2282 3
28 Set Screw, 1/4"-20 x 1/4" 3-1011-258 2
29 Pin, 1/2" x 2-3/4" 2-1055-30 1
30 A2Z Heater Spindle 3-1387 1
31 Pin, 1/2" x 4" 2-1055-31 1
32 Hub Cap 1/2" 1-1107-1 6
33 Nylon Washer 1-1048-3 4
34 Zinc Plated Clevis Pin, 1/2"D x 1"L
Usable 1-2629 2
35 A2Z Swing Arm 1
# DESCRIPTION PART # QTY
36 3/8-16" x 3/4" HHCS ZINC 3-1011-41 1
37 Knob with Cap, 3/8"-16 Thread 1-2621 3
38 Washer, Split Lock 1/4" 2-1006-44 11
39 Rubber Foot, 1"D with 1/4"-20 Stud 1-2620 4
40 Screw, 1/4"-20 x 3" Socket Head
Cap, Zinc 3-1011-280 1
41 A2Z Pressure Link 2
42 Heater, 15" x 15" A2Z 5-1000-1 1
43 Nylon Bushing, Flanged 7/16" x
3/8" 1-2630 1
44 A2Z Heater Cover, 15" x 15" 3-1351 1
45 Screw, 3/8"-16 x 2", Socket
Head Cap 3-1011-281 1
46 Vibration Damper 1-1056 4
47 Thermostat 1-2076 2
48 Insulation 15" x 15" x 1/2" 1-2257 1
49 Washer, Plastic Finishing 1-1063 4
50 Screw, #10-24" x 1/2", Phillips Flat
Head Thread Rolling 3-1011-217 4
51 Screw, 5/16"-18 x 5", Socket Head
Cap Zinc Plated 3-1011-282 1
52 Nut, Hex 3/8"-16 Nylok 2-1006-10 2
53 Washer, 1/4" Faucet PTFE 2-1006-111 2
54 Magnet, Neodymium
0.625" x 0.25" with #6 CSK 1-2486 1
55 Screw, #6 x 3/4" Self Tapping 3-1011-154 1
56 A2Z Base Casting 3-1381 1
57 Proximity Switch 1-1211 1
58 Conduit, 1/2" x 20" 2-1048-3 1
59 A2Z Spine 1
60 A2Z Control Box Support 1-2596 1
61 Screw, 1/4"-20 x 1/2" Hex
Head Cap 3-1011-11 11
62 A2Z Control Adapter Plate 1
63 Screw, 1/4"-20 x 5/8"Flat
Socket Head 3-1011-283 2
64 1/4”-20 Nylok Nut 2-1006-7 3
65 Nord-Lock Washer 1" 2-1006-94 1
66 Nut, 1"-12 Thin Jam 2-1006-110 1
67 A2Z Swing Stop 1
68 Spring, 1.4" x 3" 1-2631 1
69 Screw, 3/8"-16 x 5", Socket
Head Cap 3-1011-284 1