Stair Climbers Kris User manual
Kris
Instruction Manual
Chair Stair Lift
1

Contents
1 Essential Safety Information 3
2 Technical parameters 5
3 Operation 5
3.1 Loading a User 5
3.2 Moving the Unit on Level Ground 7
3.3 Climbing Stairs 7
3.4 Descending Stairs 9
3.5 Folding the Unit 11
4 Maintenance 13
4.1 Charging the battery pack 13
4.2 Adjusting the Track Tension 14
4.3 Cleaning 14
4.4 Recycling 14
5 Troubleshooting 15
2

1 Essential Safety Information
The following symbols are used throughout this manual
Caution:
Failure to comply with this notice may result in injuries.
Note:
Failure to comply with this notice may result in damage to the
unit or premises.
Before Initial Operation
●Read the user manual and note all warnings and safety
instructions.
●Note technical data as lifting capacity cannot be exceeded.
●Check all electronic functions, safety brakes, and the position of the
climbing track.
General Usage Notes
●The operator of the unit must be trained.
●The operator should be physically capable of operating the unit.
●If the unit has been in temperatures at or below freezing for any
length of time, please wait at least an hour after moving the unit to
a warmer environment before operating the unit.
●Wear non-slip footwear and always operate with both hands.
●Practice operating without a load and at a low speed initially.
●The unit should not be used for the transportation of cargo.
●Ensure the passenger is safely secured with the attached safety
belts.
●Do not use in rain, wet conditions, or on snow or ice.
●Do not use if the wheels or climbing track is broken or if any part of
the frame is loose.
●Do not use on escalators or travelators.
●Turn off the unit when it is being transported to different locations.
●Keep the plug-in elements dry.
●Protect the battery and charging cable by avoiding oil and grease.
●Do not use aggressive cleaning agents.
●Do not use high-pressure cleaning methods.
●Repairs may only be done by certified and experienced personnel
●Keep away from naked flames.
●The battery may interfere with other electronic device’s sensitive
electromagnetic fields (e.g. anti-theft systems in department
stores).
●Only genuine accessories should be used.
While Operating the Unit
3

●Never change settings while climbing or descending stairs.
●Never put any part of a body, especially feet, under the climbing
tracks.
●If the drive elements lock up, turn off the unit immediately.
4
2 Technical parameters
Product size (L*W*H)
80-110*50*110-160 cm
Folded size (L*W*H)
115*50*27 cm
Packing size(L*W*H)
116*55*30.5 cm
Load limit
160 kg
Net Weight.
30 kg
Gross Weight
35 kg
3 Operation
Caution:
Never leave a user unattended in the unit and always use the
supplied safety belts.
Caution:
The unit should only be operated by trained personnel.
Caution:
The unit must be operated with two hands at all times.
Note:
The battery should be fully charged prior to using the unit for
the first time.
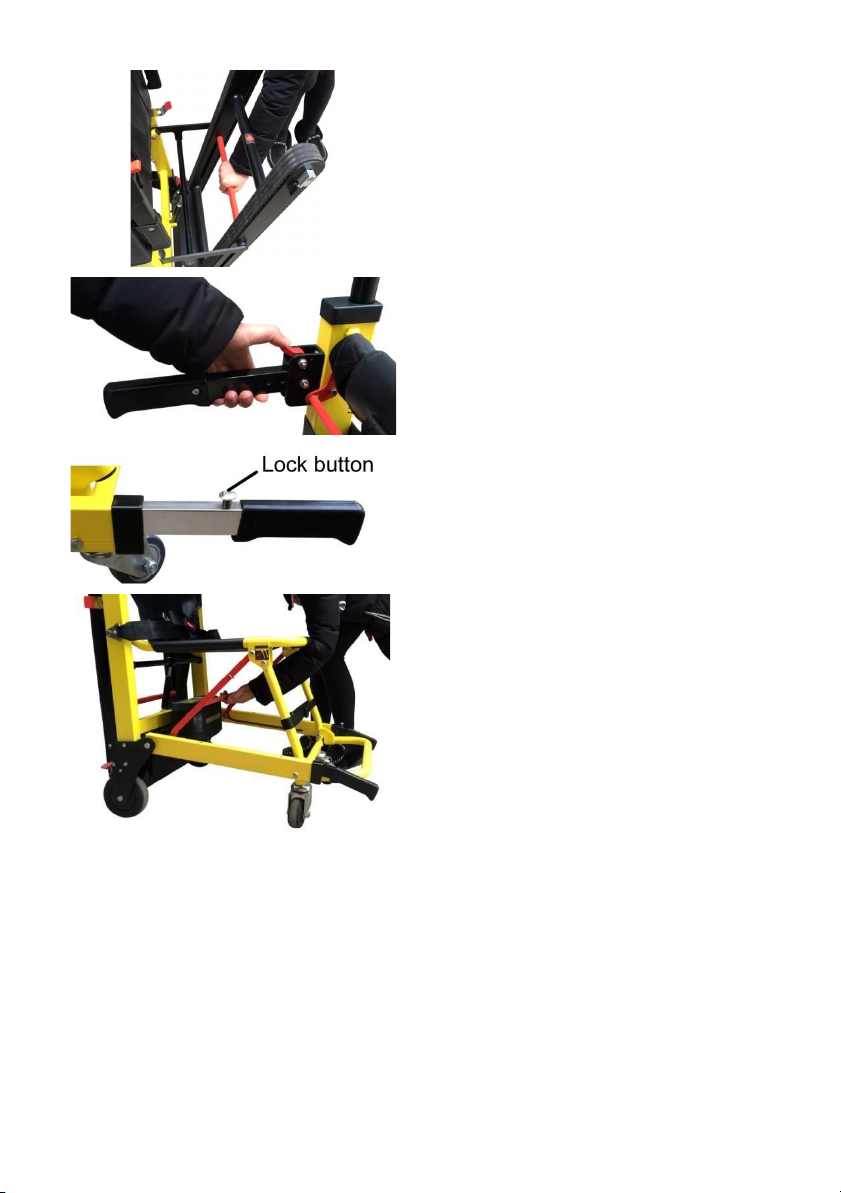
3.1 Loading a User
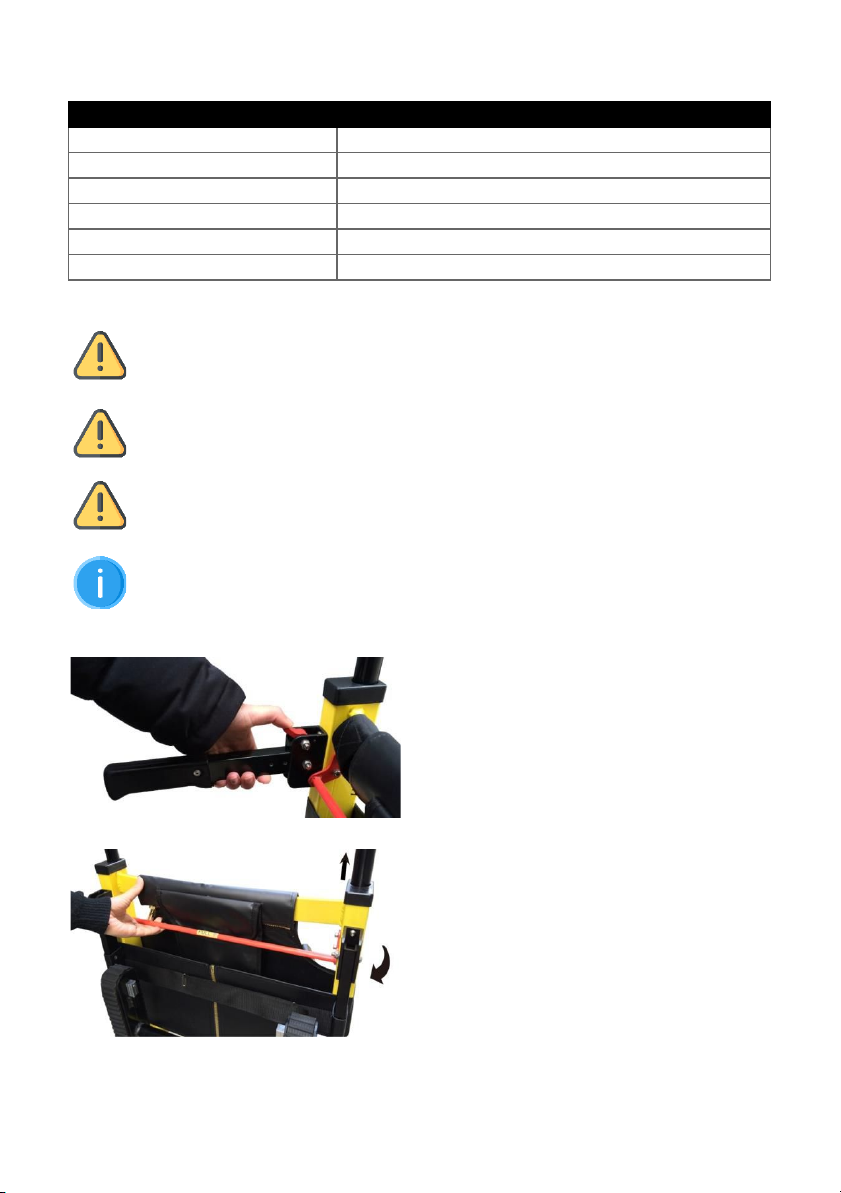
Unfold the rear operating handles
by depressing the red lock button,
and raising the handles until they
automatically lock into position.
Raise the headrest to a suitable
height by pulling the red bar
upwards and sliding the headrest
upwards by pulling on the top
operating handle.
5
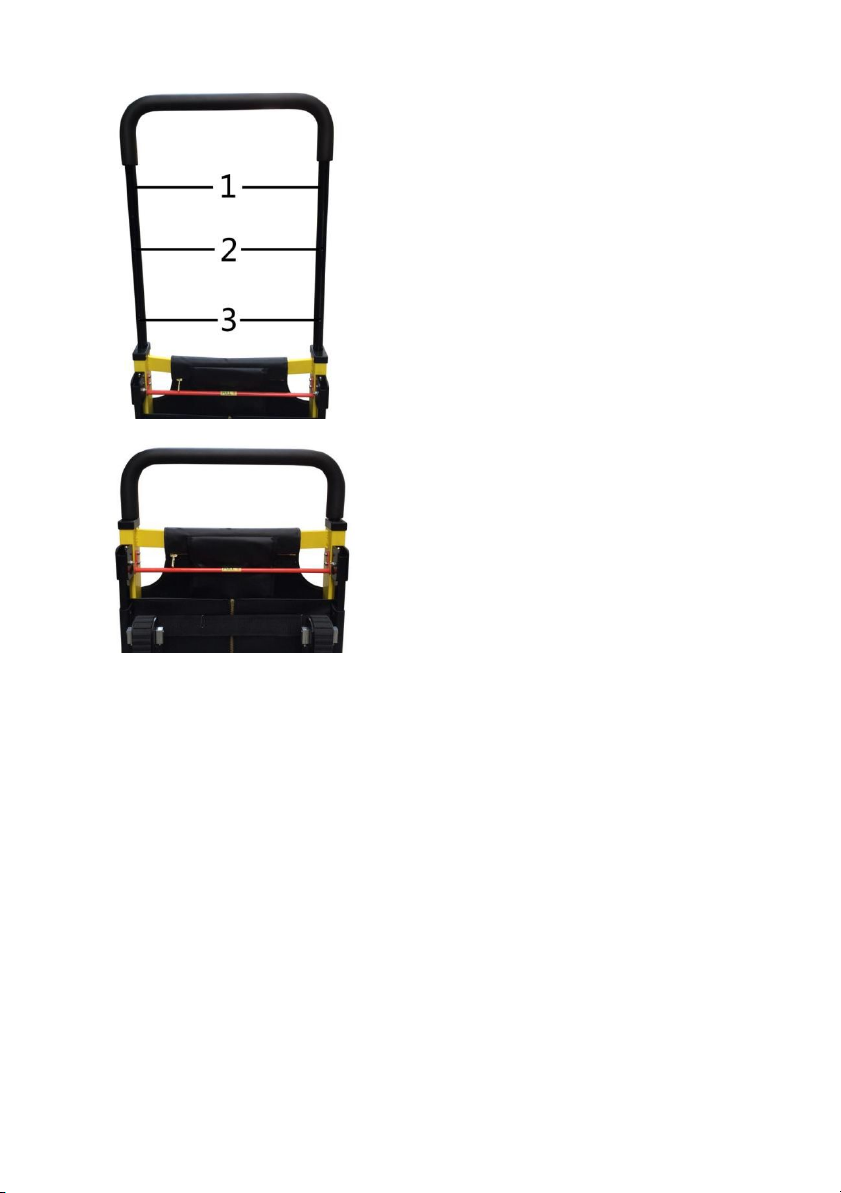
There are three possible positions
for the headrest.
When the desired position is
reached, release the red bar.
Fasten the head cushion around
the headrest tubes using the
Velcro.
Ensure the headrest is locked in
position by pulling on the top
operating handle with the red bar
released.
6
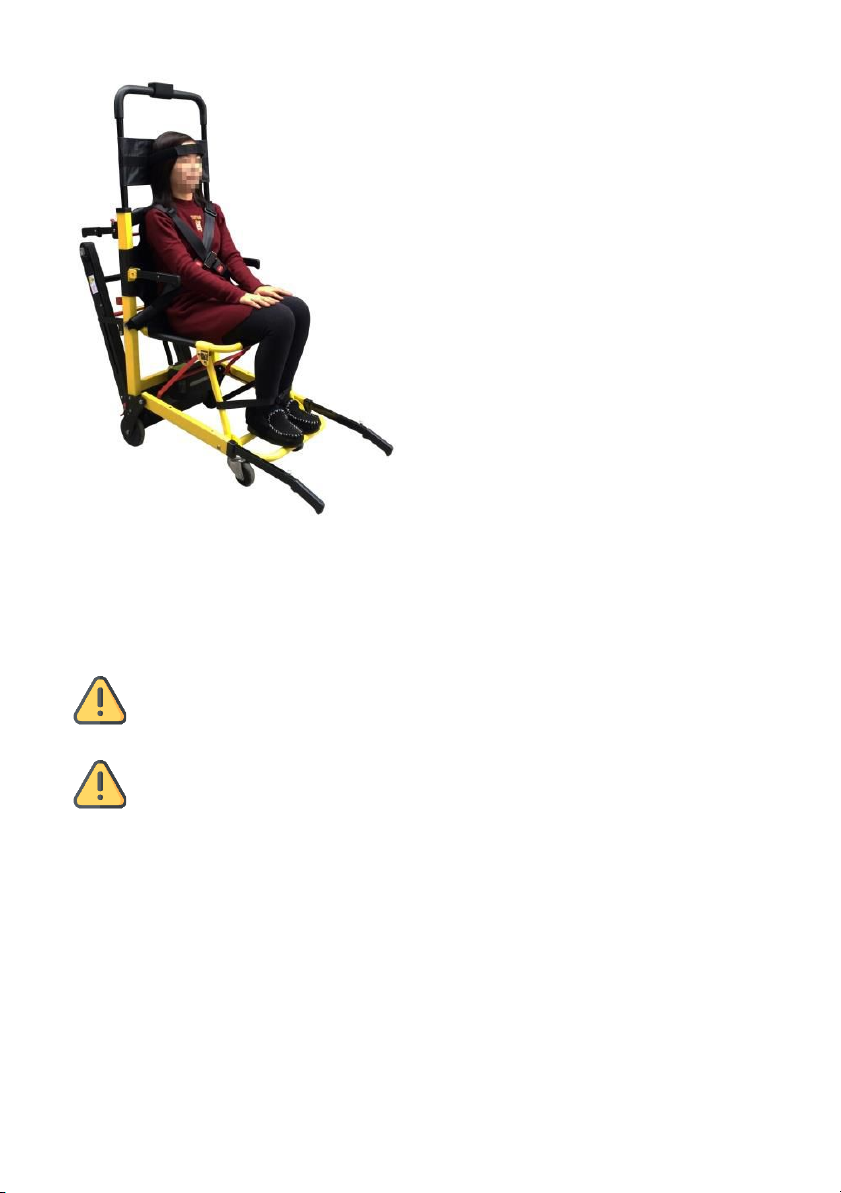
Lock the wheels of the unit and
safely position the user on the
chair.
Once the user is comfortable,
fasten the safety belts tightly.
3.2 Moving the Unit on Level Ground
Push and guide the chair from
behind using the rear operating
handles or headrest tubes.
3.3 Climbing Stairs
Caution:
Never touch any part of the climbing tracks when the unit is
powered.
Caution:
Always ensure that all parts of the unit are securely locked into
place, especially the stair climbing tracks, before climbing stairs.
Position the unit at the base of the
stairs with the treads closest to the
stairs.
Lock the wheels on the unit.
Visually inspect the stairs to ensure
that there are no safety hazards,
including debris, ice, or water.
7

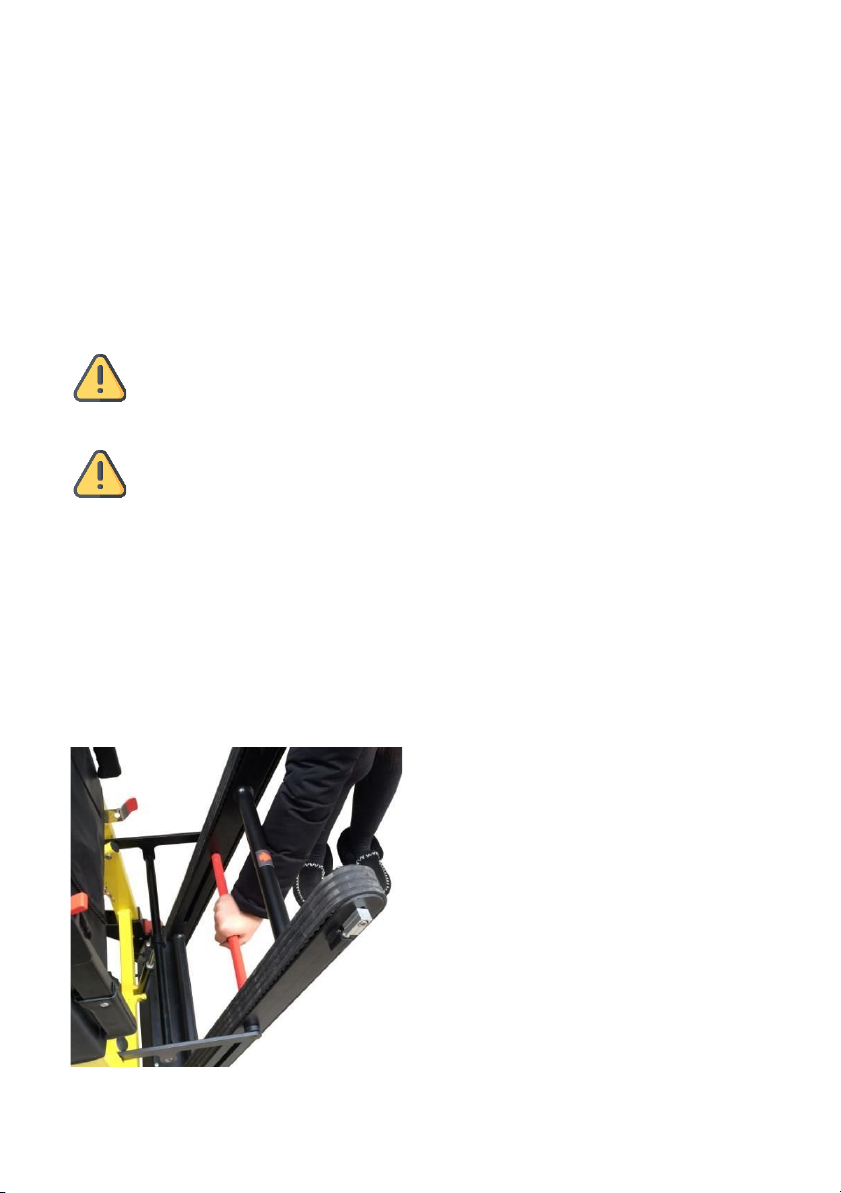
Deploy the climbing tracks by
releasing the red side locks and
pulling the tracks away from the
body of the unit using the black
bar.
Ensure the climbing tracks are as
close to the stairs as possible and
firmly locked in position.
Extend the telescopic front handles
by depressing the silver lock button
and sliding the handles outwards
until the silver lock button locks
into position.
Verify that the handles are locked
into position.
Turn on the control unit by
pressing the POWER button.
Tilt the unit backward until the
climbing track is in contact with the
stairs.
Press the UP button on the control
unit to begin moving.
8
When you have reached the top of
the stairs, manoeuvre the unit
completely onto the landing and
return the unit to an upright
position.
Press the POWER button to turn off
the climbing tracks.
Unlock the wheels on the unit and
move to a safe distance from the
stairs before unloading the user.
3.4 Descending Stairs
Caution:
Never touch any part of the climbing tracks when the unit is
powered.
Caution:
Always ensure that all parts of the unit are securely locked into
place, especially the stair climbing tracks, before descending
stairs.
Position the unit at the top of the
stairs.
Lock the wheels on the unit.
Visually inspect the stairs to ensure
that there are no safety hazards,
including debris, ice, or water.
Deploy the climbing tracks (as
described above) and ensure they
are locked in place.
9

Extend the telescopic front handles
by depressing the silver lock button
and sliding the handles outwards
until the silver lock button locks
into position.
Verify that the handles are locked
into position.
Turn on the control unit by
pressing the red POWER button.
Tilt the unit backward until the
climbing tracks just come into
contact with the floor and carefully
push the unit towards the stairs
until the climbing tracks engage on
the stairs.
If possible, have a second person
positioned on the stairs to steady
the unit as you manoeuvre it into
position.
Press the DOWN button on the
control unit to begin moving.
When you have reached the
bottom of the stairs return the unit
to an upright position and unlock
the wheels on the unit.
Press the POWER button to turn off
the climbing tracks.
Move the unit far enough away
from the stairs to allow the user to
be safely unloaded.
3.5 Folding the Unit
Caution:
Ensure the unit is powered off before attempting to fold.
10
To fold the climbing tracks, pull up
on the red bar as shown and push
the climbing tracks towards the
main unit until they lock into place
with the red side locks.
Fold the rear operating handles by
depressing the red buttons and
folding the handles down until they
lock into place.
Depress the silver locking button
and slide the telescopic front
handles into the main unit.
To fold the main unit, pull the red
cross-bar under the unit along the
slot as you fold the unit.
11

4 Maintenance
4.1 Charging the battery pack
Caution:
Do not use wet hands when operating the equipment.
Notice:
Charge the unit after each use.
Notice:
Protect the charger and the charging wires from oil, grease,
detergent, thinner or any potentially damaging liquids.
Notice:
Always keep sockets dry
Notice:
Follow the operating instructions to charge the battery.
Notice:
The new battery will reach its optimum state after several
charging and discharging cycles.
The battery can be accessed for
charging by unlocking the battery
compartment with the supplied
key.
The battery takes approximately
five hours to charge.
12

4.2 Adjusting the Track Tension
If the climbing track becomes too
tight or too loose, it can be
adjusted as shown using the
supplied Allen wrench.
4.3 Cleaning
Clean the unit and its parts with a clean cloth or soft brush and warm
soapy water. Rinse with warm water and air dry. Do not clean with
products comprising of bleach or phenol. A stiff bristled brush can be
used if necessary.
4.4 Recycling
Stair Climbers products are designed to have a long service life. However, if
your unit is near the end of its life, you can return the unit to the
manufacturer for recycling.
13

5 Troubleshooting
Fault
Detection and solution
The unit won’t start or
can't go up or down
stairs
Ensure the power switch on the control panel
is in the ON position.
Charge the unit.
If the battery has charge remaining, and the
unit is unable to start, please contact the
manufacturer.
The battery can't be
recharged
Please contact the manufacturer.
14

15
ww.stairclimbers.com.au
(03) 8899 6615
16
Table of contents


