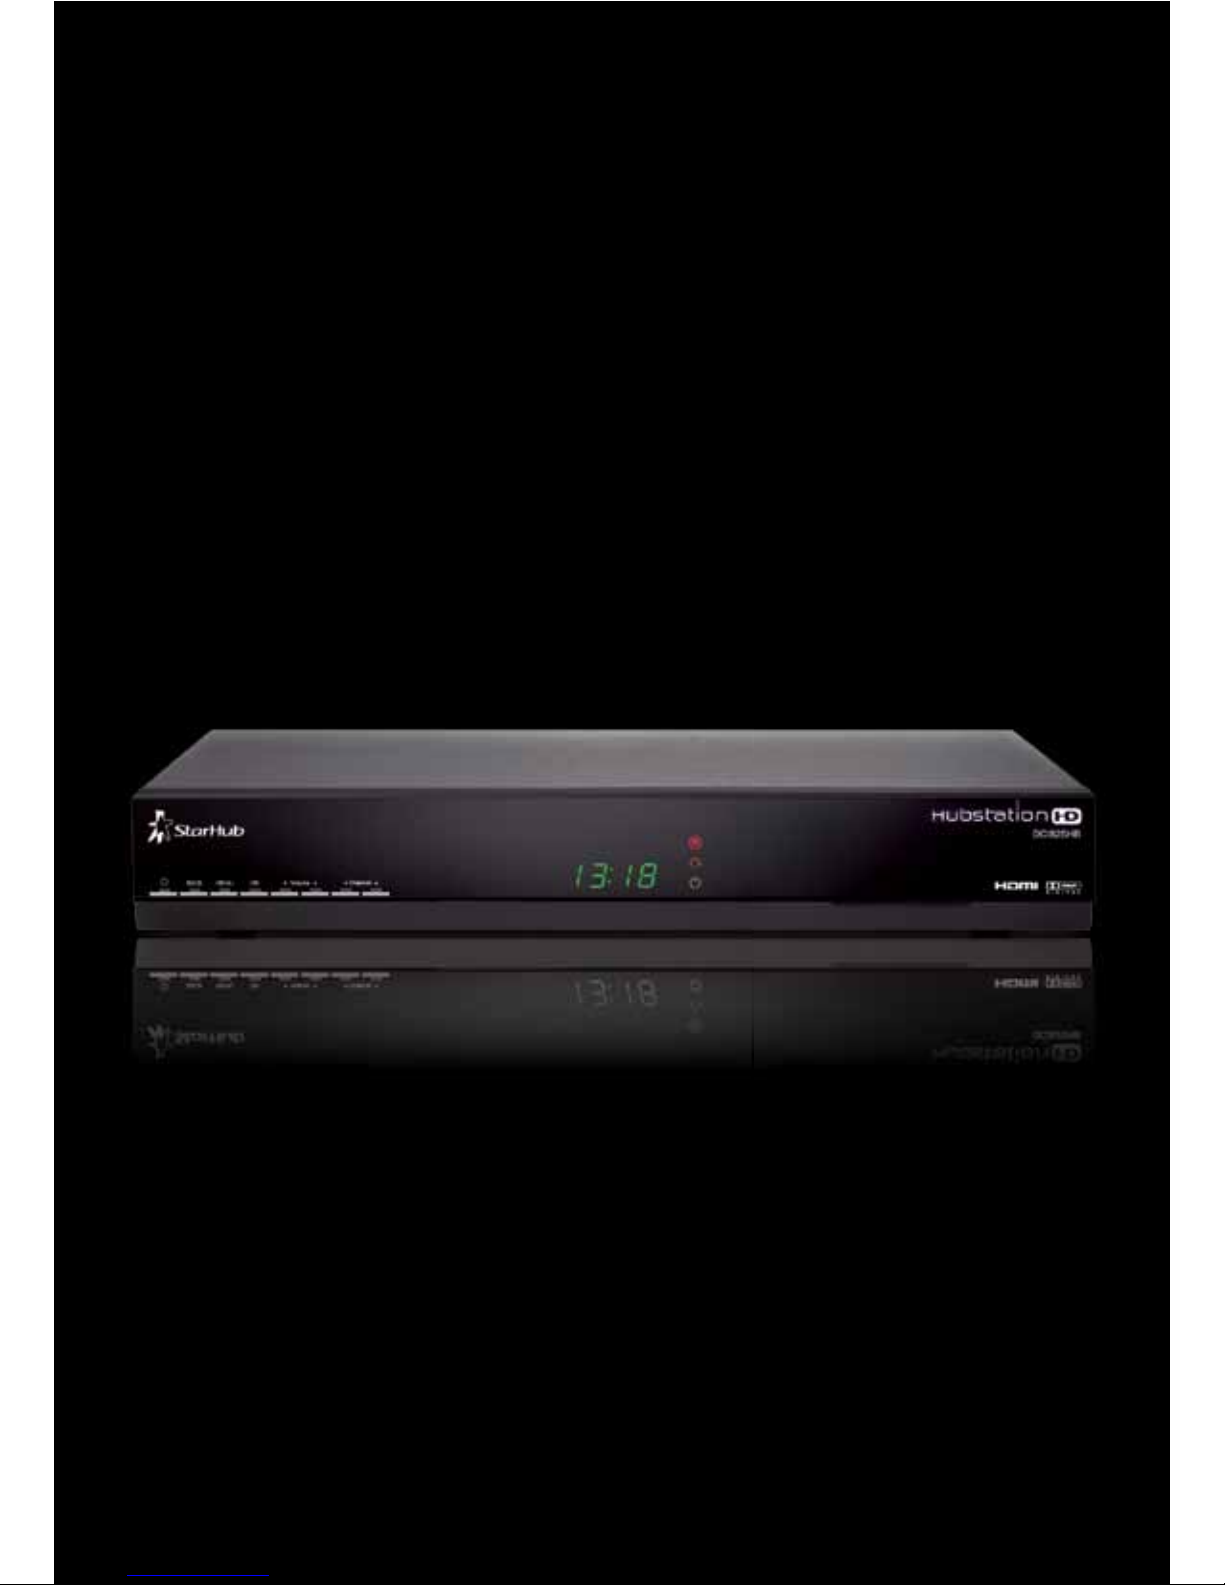
StarHub HubStation HD DCI82SHB User manual
2D Ayer Rajah Crescent
AOS Building
Singapore 139938
Customer care enquiry: For StarHub TV, MaxOnline or Digital Voice postpaid customers, please call 1633 and have your 8-digit
Customer Number ready. For all other customers, please call 1900-911-9110 (chargeable at $0.30 per minute, before GST).
HubStation HD DCI82SHB
User Guide
HubStatnHDHdBkCvr.eps 4cx4c 011108

010810
Contents
1 Getting Started
HubStation HD / 1
StarHub Universal Remote Control / 2
Smart Card / 3
2 Guide To High Definition TV Applications
HDTV / 4
Video Resolution / 5
Surround Sound / 6
3 Guide To Digital Cable Applications
On-Screen TV Guide / 7
Genre Search / 8
Search / 9
More Show Times / 10
Video Mosaic / 11
Info Bar / 12
Programme Information In Chinese / 13
Programme Alert (Set Reminder) / 13
Favourite Channel Setting / 14
Last Channel Recall / 14
Parental Lock Setting / 15
Auto-Tune Setting / 16
Change PIN / 17
Preference Settings / 18
4 Guide To Smart TV™
Smart TV™ / 19
Control “live” TV
- Live TV Progress Bar / 20
- Time-Shift Functions / 21-22
Record Programme
- Record As You Watch / 23
- Record By Show / 24-25
- Record a Whole Series / 26-27
- Record By Time / 28-29
- Recording Schedule / 30-33
Watch Recorded Programmes
- My Playlist / 34-36
- Folder List / 37-38
- Bookmark / 39-40
- Playback Progress Bar / 41-42
Preference Settings / 43-44
010810
2D Ayer Rajah Crescent
AOS Building
Singapore 139938
Customer care enquiry: For StarHub TV, MaxOnline or Digital Voice postpaid customers, please call 1633 and have your 8-digit
Customer Number ready. For all other customers, please call 1900-911-9110 (chargeable at $0.30 per minute, before GST).
HubStation HD DCI82SHB
User Guide
HubStatnHDHdBkCvr.eps 4cx4c 011108

5 Guide to Demand TV
Catalogue Page / 45-46
Buy Options Page / 47
Buy List Page / 48
Info Page / 49
Subscription Lock / 49
6 Guide To Interactive Applications
KaraOK! - Song Catalogue / 50
KaraOK! - Playlist / 51
KaraOK! - Other Features / 52
Instant Buy / 53
Instant Buy - Subscription Lock / 54
Interactive TV / 55
TV Games / 55
eTV / 56
Start Over / 57
TV SMS / 57
i.Mail / 53
Internet Surfing / 58
Voice Solutions / 58
7 Technical Information
Installation Guide
- Option 1: Connection via Component Video & Composite Audio (basic set-up) / 59
- Option 2: Connection via HDMI (High Definition Multimedia Interface) / 60
- Option 3: Connection with Home Theatre System (Digital Audio SPDIF) / 61
- Option 4: Connection with VCD/DVD-R / 62
- Option 5: Connection for PC Internet Broadband Access via Ethernet Port / 63
- Option 6: Connection for PC Internet Broadband Access via Wireless Router / 64
- Option 7: Connection for Digital Voice Home and PC Internet Broadband Access
via wireless IAD (Integrated Access Device) with in-built router / 65
8 Trouble Shooting
Tips for Improving TV reception / 66
9 Signal Leakage
A Reminder / 67
10 General Information
MACROVISION Product Notice / 67
Dolby Digital Product Notice / 67
010810

The HubStation HD provides you with a host of special features, including the menu system,
volume control and channel navigation. You can access these features via the control buttons
on the front of the HubStation HD.
Getting Started
HubStation HD
IMPORTANT
• When you switch off your TV set, you should always put the HubStation HD on stand-by
mode for regular software updates.
• When the HubStation HD is downloading a new software, the progress of the download will
be displayed on the LED (0-100). The Power status LED will be blinking until the update is
completed. Please do not power off the HubStation HD.
• Always place your HubStation HD on a smooth, flat surface.
• Air should circulate freely under and around the box to prevent overheating. Do not place
anything on top of your HubStation HD.
• Do not place the HubStation HD near wet or moist areas.
• If the display flickers and the HubStation HD does not change channels, unplug it from
the wall cable point and wait at least ten seconds before plugging it back again. Press the
ON/OFF button to reactivate the HubStation HD and try again.
• Do not dismantle the HubStation HD to attempt servicing it on your own. Please call 1633 and
have your 8-digit Customer Number ready.
Do not remove or deface the bar code label pasted on the HubStation HD.
Recording Indicator LED
Cable Modem status
( Orange LED will be lighted up if Cable Modem is online successfully )
Power status
( Green LED when DVR is ON and Red LED when DVR is on Standby )
Front Panel Buttons Smart Card Compartment
Clock or Channel display
• Displays Channel Number when a channel is selected
• Displays Time during Power Standby or during normal viewing
• Displays Resolution when changing Output Resolution
• Displays progress during software updates
1
POWER ON/OFF
Pressing button alternates
between ON and STANDBY modes
MENU
Enters and exits MENU system
BACK
Moves back one
level in MENU system
Channel UP
OK
Confirm of Selection
Channel DOWN
Volume UP
Volume DOWN
010810
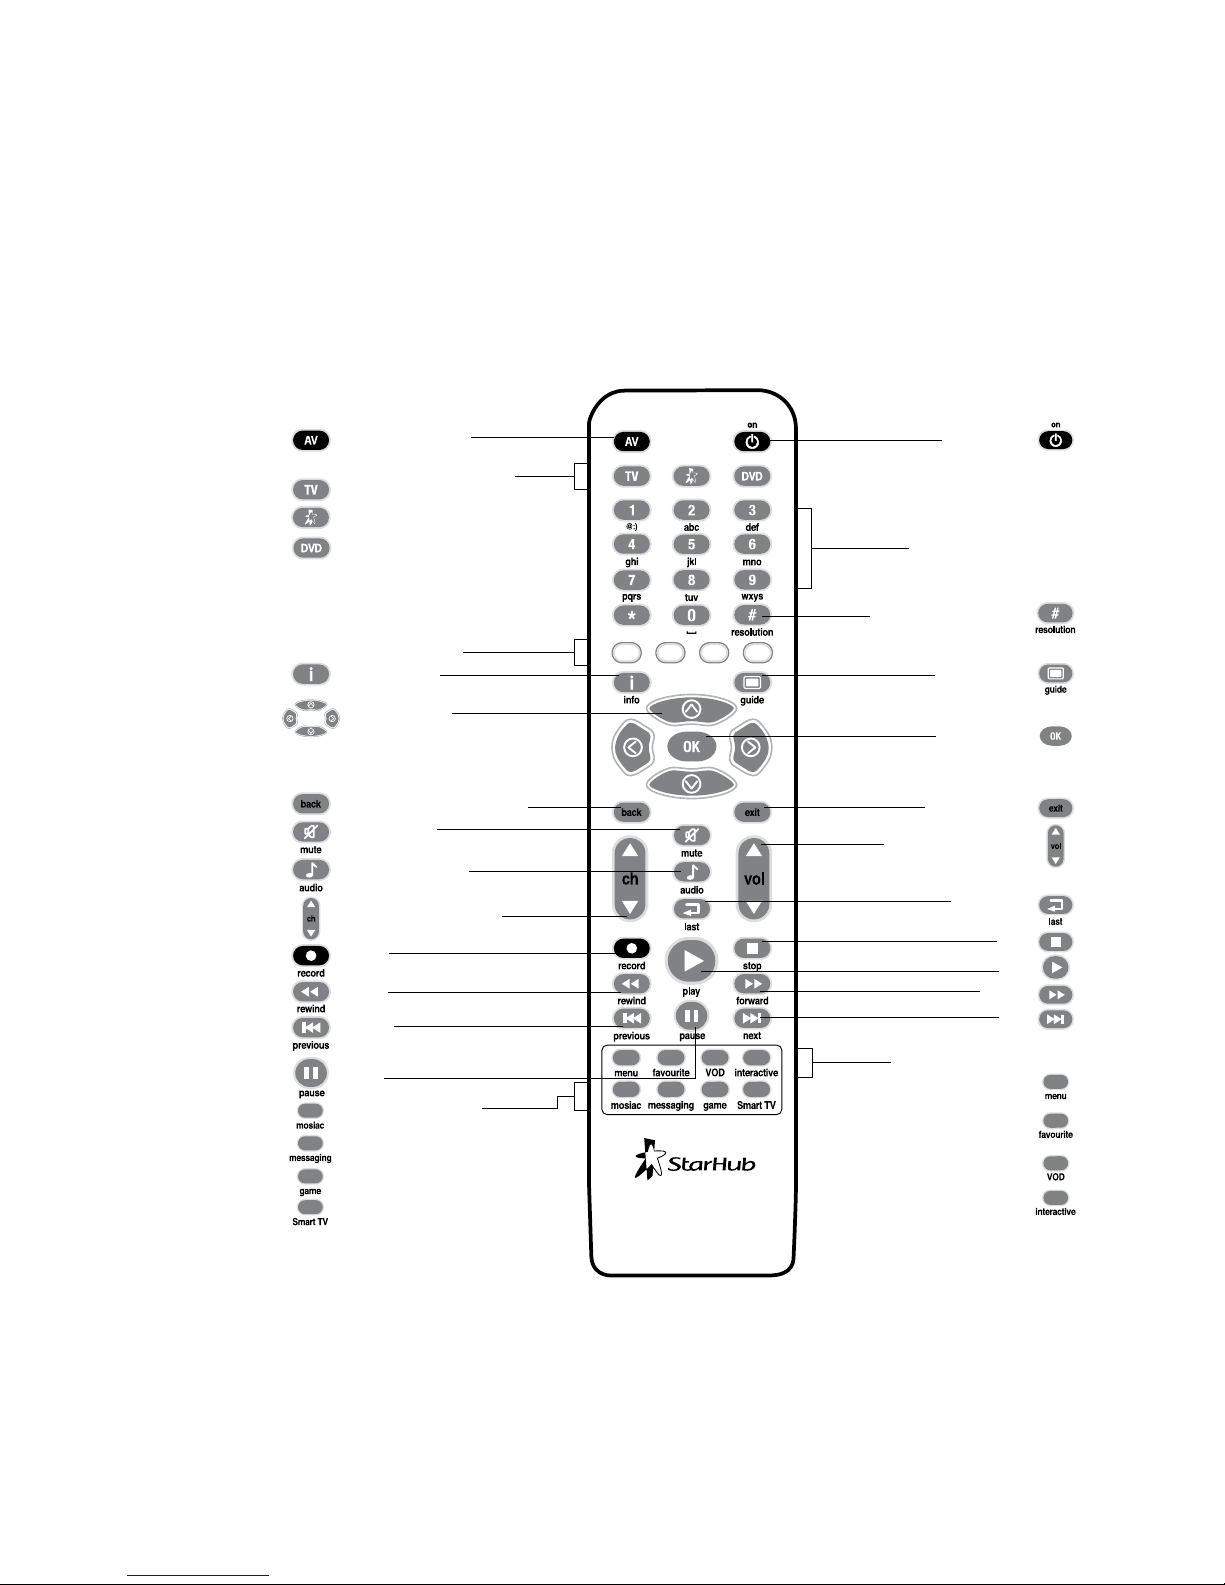
Red Green Yellow Blue
The StarHub universal remote control offers you the convenience of accessing the features available
from the set-top box remotely. It also allows you to control your TV set and DVD player as well.
Please refer to the remote control manual on how to configure and control your TV and DVD player.
Getting Started
StarHub Universal Remote Control
IMPORTANT
• When using the remote control, make sure there are no obstructions between the remote
control and the HubStation HD.
• If the channels can be changed with the HubStation HD and not with the remote control,
check if the remote control batteries are weak.
• If you cannot change channels using either the HubStation HD or the remote control, do not
attempt your own servcing. Please call 1633 and have your 8-digit Customer Number ready.
Audio/Video Selection
Universal Remote Selection
Select TV
Select set-top box
Select DVD player
Colour Function keys
Info Bar On/Off
Navigation buttons
Up/Down/Left/Right
Back one level in Menu system
Mute On/Off
Audio Track Selection
Channel Change – Up/Down
Record
Rewind
Previous
Pause
Quick Navigation keys
- Access Video Mosaic
- Access Messaging application
- Access TV Games
- Access Smart TV options
2
Power On/Off
Alphanumeric keypad
for channel selection
and text entry for
selected applications
Change of Output Resolution:
576i / 576p / 720p / 1080i
Access TV Guide
Confirmation key
Exit Menu system
Volume change Up/Down
TV Viewing or
Last Channel Recall
Stop
Play
Forward
Next
Quick Navigation keys
- Access Menu system
- Access Favourite
Channels list
- Access Demand TV
- Access Interactive TV
010810

3
Every HubStation HD has a designated Smart Card which can be found in the Smart Card slot
in the front of the HubStation HD.
The Smart Card is used to store data about your unique customer subscription package. It
also allows StarHub to provide 'live' updates of programme rights and other application data
directly to your HubStation HD.
How To Insert
If you are inserting your Smart Card, please follow the
directional arrow indicated on the Smart Card. If your Smart
Card is not inserted correctly, an error message will appear on
your TV screen.
IMPORTANT
Please keep the Smart Card in its slot at all times. Removal of Smart Card can lead to
disruption of programmes or interruption of regular software updates from StarHub.
Should you suspect that your Smart Card is faulty, do not attempt to service it yourself.
Please call 1633 and have your 8-digit Customer Number ready.
Getting Started
Smart Card
To avoid service disruption, please do not
remove this smart card from the slot.
This card is the property of
StarHub and must be
returned upon request.
Nagravision is a trademark
of Kudelski SA Switzerland
Smart Card Slot
010810

Guide To High Definition TV Applications
HDTV
High Definition Television (HDTV) marks the most significant milestone in the history of
broadcast technology since colour TV.
With HDTV service on StarHub TV, you and your family will embark on a new level of television
viewing experience as never before. In addition to crystal-clear images that are 4 times
sharper than standard TV and colours that are true to life, you will enjoy HD programmes in
widescreen format just like at the cinema. Dolby® Digital 5.1 Surround Sound (where
available) capability means that you can enjoy multi-dimensional, cinema-quality sound right in
your living room.
What's more, your HubStation HD supports both standard definition (SD) and HD channels.
Hence, you can conveniently access and view both SD and HD programmes using the same box.
Here’s how to enhance your TV viewing experience.
Widescreen Picture (16:9)
Get a panoramic view of the action with 33% more of the picture to see.
True-to-life colours
Be mesmerised by lifelike images with a display of millions more colours.
Crystal Clear Images
You won’t miss a single detail with 4x more sharpness than ever before.
Cinematic Sound
Enjoy Dolby® Digital 5.1 surround sound on selected shows with a compatible speaker
system.
Quality HD Programmes
With the suite of HD channels available on StarHub TV, you can enjoy high definition
entertainment from world-class, award-winning channels.
Note: To enjoy HDTV, you need to be using a HD-ready TV set that meets the following minimum specifications:
- Supports vertical video resolution of at least 720 lines
- Supports 16:9 Widescreen aspect ratio
- Supports the following Video Input types: Component (Y-Pb-Pr) or High Definition Multimedia Interface (HDMI)
- Supports HDCP copy protection.
4
010810

HD programmes are broadcast on a very high visual quality with a vertical resolution of up to
1,080 lines.
In order to obtain the best viewing experience possible, you can adjust the video output of the
HubStation HD using the remote control given.
The following four video output resolutions are available on the HubStation HD:
576i (default), 576p, 720p & 1080i.
To obtain the best visual experience, set the video output resolution to 1080i.
Guide To High Definition TV Applications
Video Resolution
Note: Please note that on some HD-ready TV sets, you may experience problems displaying video output on the 576i
resolution. If you see a black screen on TV, please continue to press the HEX button on your remote control to change
to the next higher video output resolution.
How To Use
Functions Directions
1. To view the current video resolution Press the HEX button on your remote control.
of the HubStation HD The current video output resolution will be shown
momentarily on the LED front panel display.
2. To change Video output resolutions Press the HEX button on your remote control
to 1080i again.
When you have reached the video output resolution
of 1080i, release the HEX button .
5
010810

Where available, HD programmes are broadcast with Dolby® Digital 5.1 Surround Sound
effects.
If you are using a Dolby® Digital 5.1 home theatre system, you can connect the HubStation
HD to your home theatre system to complete your HDTV viewing experience with surround
sound digital audio effects.
In the set-top box Preference Settings screen, enable Dolby® Digital audio output selection.
Guide To High Definition TV Applications
Surround Sound
How To Use
Functions Directions
1. To enable Dolby® Digital 5.1 Press the MENU button on your remote control.
audio output Select Settings followed by General.
Use the UP or DOWN arrow button to scroll
to Dolby® Digital.
Use the RIGHT or LEFT arrow button to
change the selection to YES.
Press the OK button to confirm your selection.
Note: Enable Dolby® Digital audio output selection ONLY if you are using a Dolby® Digital 5.1 home theatre system or if
your HD-ready TV supports Dolby® Digital surround sound.
6
010810

7
The On-Screen TV Guide gives you access to comprehensive information on current and
upcoming programmes including schedules, synopses, cast and crew, available audio tracks
and programme genre for the channel of your choice. (Note: Information may not be available
for some programmes).
To access the On-Screen TV Guide, press the GUIDE button on your remote control. You
will see the Channel Listing on your TV screen as shown below.
How To Use
Functions Directions
1. To choose a channel. The channel you are currently watching is highlighted.
Use the UP or DOWN arrow button on your
remote control to scroll through the list of channels
and press the OK button to go to the channel you
wish to watch.
2. To access current and upcoming Press the RIGHT arrow button on your remote
programmes list. control for Programme Listing. The highlight and arrow
buttons will move to the programme list on the right.
3. To access programme schedules On the Programme Listing Page, press the
for today. UP or DOWN arrow button to scroll.
4. To access programme schedules Press the RIGHT arrow button on your remote
for tomorrow. control.
5. To access programmes schedules Press the RIGHT arrow button on your remote
for the day after tomorrow. control.
6. To access programme schedules Press RIGHT arrow button on your remote control.
from 4th to 7th day. Press LEFT arrow button to return to the previous
day.
7. For additional information on Press the GREEN or INFO button .
programmes.
Note: Additional programme information such
as synopses, cast and audio tracks
may not be available for some programmes.
Guide To Digital Cable Applications
On-Screen TV Guide
Green
010810

8
To help you find your favourite programmes easily, you can sort the channels in
the
On-Screen TV Guide according to their genre.
By default, the channels are arranged according to Channel Number.
Use the YELLOW (SORT) button to sort the channels further. You can sort the channels in
the On-Screen TV Guide in the following sequence:
How To Use
Functions Directions
1. To sort the channels in the Press the GUIDE button on your remote control.
On-Screen TV Guide according The channels are arranged according to Channel
to genre. Number by default. Press the YELLOW (SORT)
button once to arrange the channels according
to Channel Name.
Press the YELLOW (SORT) button again to
display only the Favourites List.
Continue to press the YELLOW (SORT) button to
search through the other genres in the sequence above.
Guide to Digital Cable Features
Genre Search
Channel Number
Channel Name
(Alphabetical Order)
Favourites List 1-5
International/Ethnic
Sports
Kids
Education/Lifestyle
Entertainment
Movies
News
Chinese
Yellow
Yellow
Yellow
Yellow
010810

8
To help you find your favourite programmes easily, you can sort the channels in the
On-Screen TV Guide according to their genre.
By default, the channels are arranged according to Channel Number.
Use the YELLOW (SORT) button to sort the channels further. You can sort the channels in
the On-Screen TV Guide in the following sequence:
How To Use
Functions Directions
1. To sort the channels in the Press the GUIDE button on your remote control.
On-Screen TV Guide according The channels are arranged according to Channel
to genre. Number by default. Press the YELLOW (SORT)
button once to arrange the channels according
to Channel Name.
Press the YELLOW (SORT) button again to
display only the Favourites List.
Continue to press the YELLOW (SORT) button to
search through the other genres in the sequence above.
Guide to Digital Cable Features
Genre Search
Channel Number
Channel Name
(Alphabetical Order)
Favourites List 1-5
International/Ethnic
Sports
Kids
Education/Lifestyle
Entertainment
Movies
News
Chinese
Yellow
Yellow
Yellow
Yellow
010810
9
The Search feature allows you to look for your favourite programmes within the next 7 days. You
can search based on the programme title or by the cast in the show.
Guide to Digital Cable Features
Search
Directions
Press the MENU button on your remote control
Select TV guide followed by Guide.
Press the OK button to confirm your selection.
Press the SEARCH button to launch
Select either Titles or Persons and press the OK
button .
Use the LEFT , RIGHT , UP and DOWN
arrow buttons to highlight the alphabets and
press OK to select them.
To backspace and correct a mistake, select “ ”
and press OK button to correct.
After the entry of the key words, press the BLUE
button to confirm.
Use the UP or DOWN arrow button to
select the correct programme title or person, and
press OK button to list the search results.
How To Use
Functions
1. To access search function
2. To search by Titles or by Persons
Blue
010810

10
More Show Times offers you the ease of checking the alternative show times of your favourite
programme.
Guide to Digital Cable Features
More Show Times
Directions
Press the GUIDE button on your remote control
Press the RIGHT arrow button to select a
programme
Press the GREEN button and select “More Show
Times” to list the alternative show times of the
selected title
How To Use
Functions
1. To access more show times
function
Green
010810
11
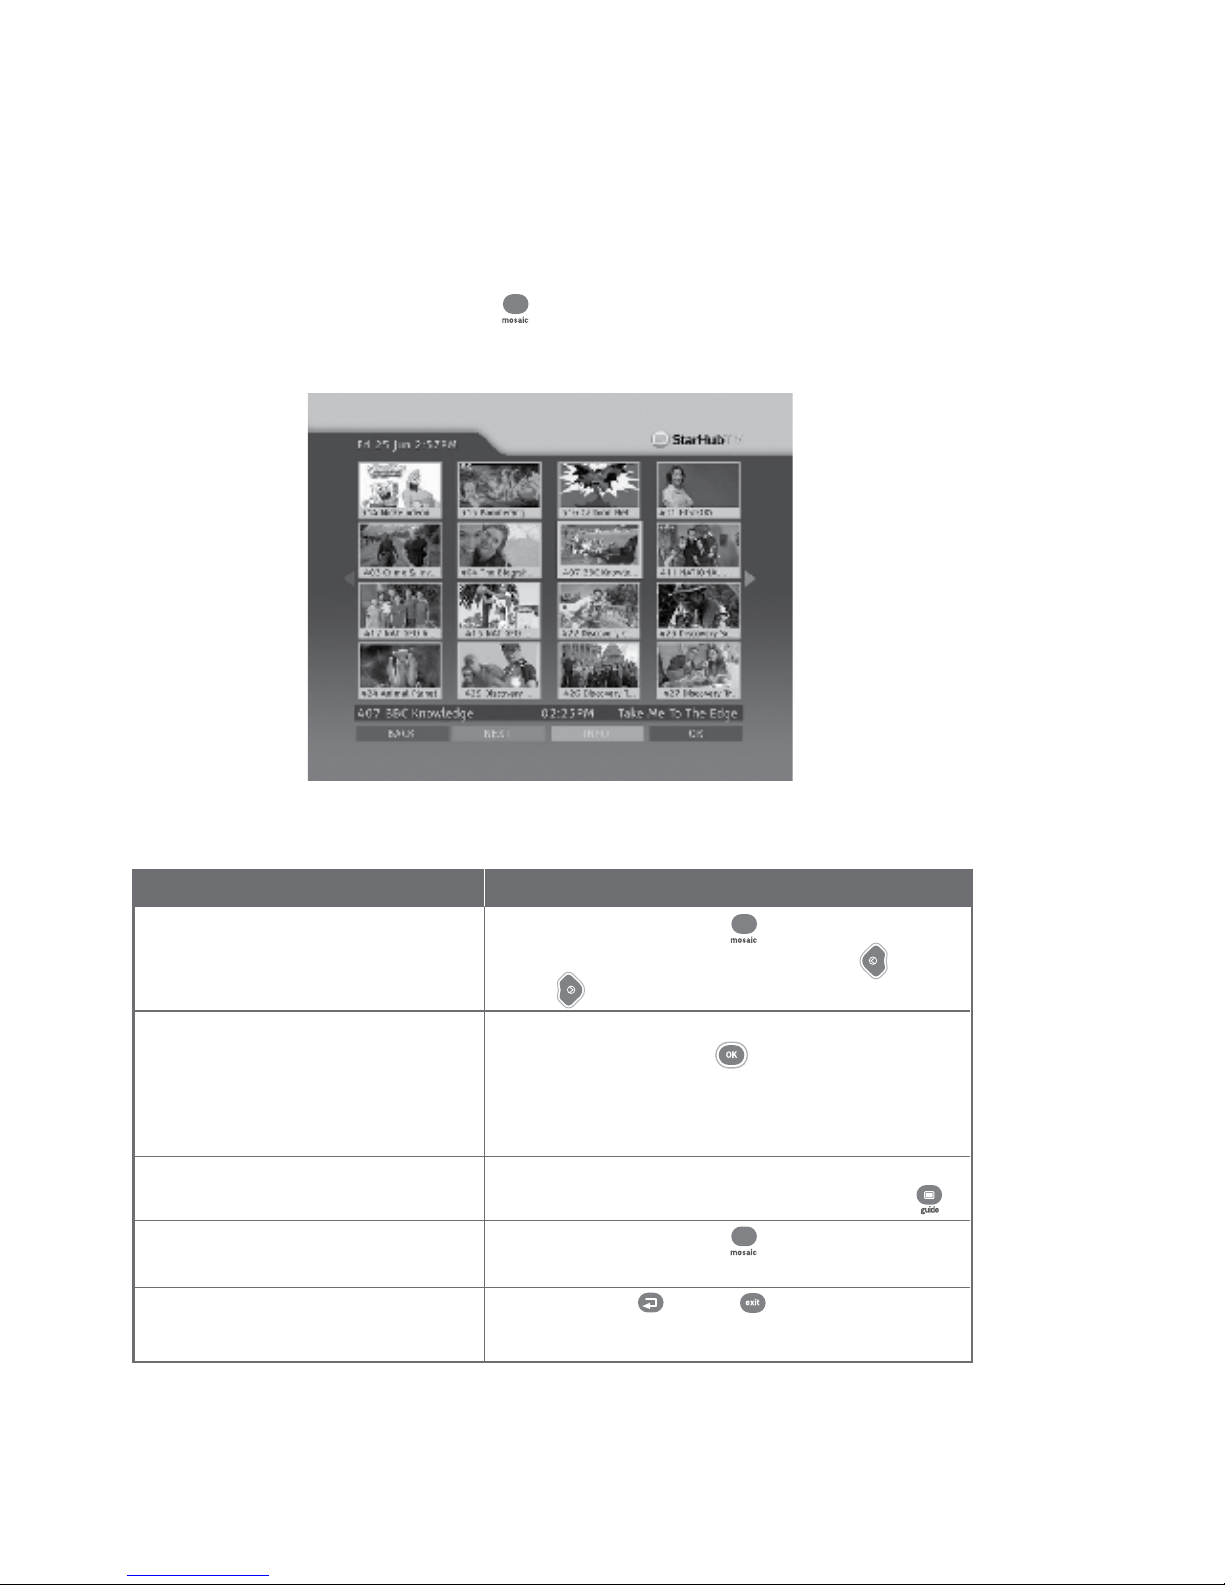
Video Mosaic allows you easy access to your full selection of channels. To access
Video Mosaic, press the MOSAIC button on the remote control. A multiplex of 16 windows
per page will be displayed. Each window represents one channel.
How To Use
Functions Directions
1. To view all channels available. Press the MOSAIC button .
Move the highlighted box using the LEFT or
RIGHT arrow button on your remote control.
2. To select a channel. Move the highlighted box to the selected channel
and press the OK button on your remote
control for a full-screen view. If you have not
subscribed to the selected channels, you will not be
able to have a full-screen view.
3. To access the On-Screen TV Guide Move the highlighted box to the channel
for a channel. you wish to select and press the GUIDE button .
4. To return to Video Mosaic from Press the MOSAIC button .
the On-Screen TV Guide.
5. To exit Video Mosaic and return to Press the LAST or EXIT button.
the last watched channel anytime.
Guide To Digital Cable Applications
Video Mosaic
010810
12
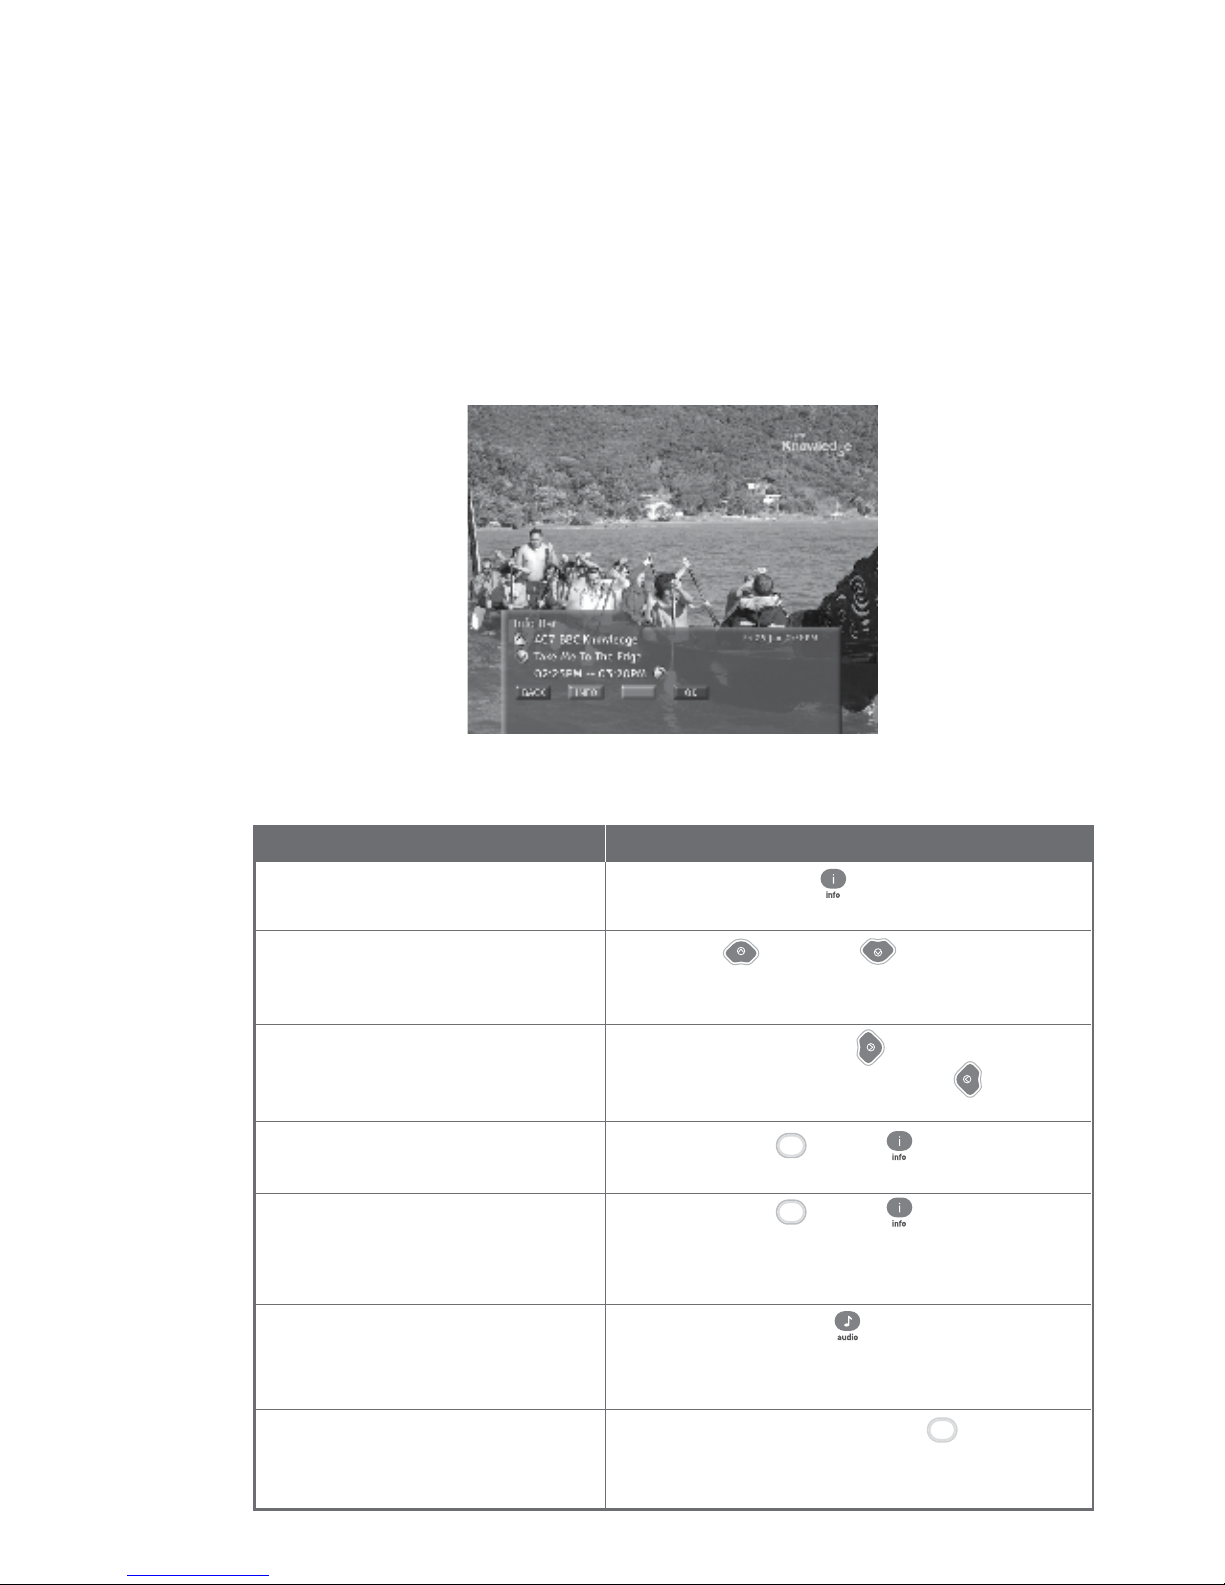
Info Bar gives you details of the programmes you are watching including the channel number,
channel name, programme genre, programme title and programme start and end times.
Details of programmes in the next 24 hours will also be available on the Info Bar.
How To Use
Functions Directions
1. To access the Info Bar for a Press the INFO button on the remote control.
programme you have selected.
2. To access channel information for Use the UP or DOWN arrow button on your
a programme currently showing remote control to scroll through the channel listings.
on another channel.
3. To check the programmes within Press RIGHT arrow button to proceed to the next
24 hours. programme. Press LEFT arrow button to go back
to the previous programme.
4. To access more detailed Press the GREEN or INFO button.
programme information.
5. To access additional programme Press the GREEN or INFO button.
information (Info Page).
Note: For more information, refer to the Info
Page on page 11.
6. To select your preferred audio track Press the AUDIO button .
for the programme.
Note: Selection is possible only if another
language is available.
7. To toggle between English and Press the YELLOW (LANG) button .
Chinese programme information.
Note: Chinese programme information is
available for Chinese programmes only.
Guide To Digital Cable Applications
Info Bar
Green
Yellow
Green
010810

13
How To Use
Functions
1. To change the Preferred
Language.
This mode allows for programme information to be in Chinese text for Chinese channels and
in English text for all other channels.
If you prefer, you may change the Preferred Language Setting to English to view all
programme information in English only.
Guide To Digital Cable Applications
Programme Information In Chinese
You can programme your HubStation HD to prompt you with an on-screen message when
your favourite programmes are about to be shown. You can also set the preferred time for
the message to appear, from 1 to 60 minutes before showtime.
Programme Alert (Set Reminder)
How To Use
Functions
1. To Add/Delete Alert
Directions
Press MENU button , select Settings using the UP
or DOWN arrow buttons.
Press RIGHT arrow button to select General and press
OK button to confirm.
Use the LEFT or RIGHT arrow button to select
Bilingual or English as the Preferred Language Setting.
Note: Chinese programme information is available only for Chinese programmes.
Directions
Press the GUIDE button on your remote control.
Press the UP or DOWN arrow button to select the
channel for programme you want to be alerted of.
Press the RIGHT arrow button, followed by the UP
or DOWN arrow button to select the appropriate
programme time-slot.
Press the YELLOW (ALERT) button to access the Set
Reminder Screen.
Press the GREEN (ADD) button to set your preferred
Alert Duration (i.e. how long before the programme starts for
the alert message to pop up on-screen).
By pressing LEFT or RIGHT button, you can
choose from the following options:
1 min 2 min 5 min 15 min
20 min 30 min 40 min 50 min 60 min
Press the OK button to confirm your selection.
To delete an alert, select the entry you want to delete and
press the YELLOW (DELETE) button . The selected
Programme Alert will be deleted from the list.
010810
14
Press the MENU button on your remote control.
Select TV Guide followed by Favourites on the TV screen.
Choose the Favourite lists by using the UP or DOWN arrow
button.
Use the UP or DOWN arrow button to choose the channels and
press the YELLOW (SELECT) button to select your favourite channels.
Press the OK button to confirm your selection and return to the main
menu.
Press the MENU button on your remote control.
Select TV Guide followed by Favourites on the TV screen.
Choose the Favourite lists by using the UP or DOWN
arrow button.
Press the OK button to confirm your selection and return to the main
Menu.
You can switch within a pre-selected list of preferred channels by pressing the FAVOURITE
button on your remote control. To begin, you must select the channels to be included in
your list of favourite channels. You can select up to 5 Favourite Lists.
Guide to Digital Cable Features
Favourite Channel Setting
How To Use
Option 1
Press the FAVOURITE button on your remote control to access your
favourite channels. Surf your favourite channels by pressing the
FAVOURITE button .
Option 2
Press the GUIDE button while watching TV and your favourite
channels will be listed in alphabetical order. Select the channel you want to
watch and press the OK button .
Press YELLOW button to browse the channels in the other Favourites
List.
Press the MENU button on your remote control.
Select TV Guide followed by Favourites on the TV screen.
Use the YELLOW button to remove your previous selection(s).
Press the OK button to confirm your selection and return to the main
Menu.
Yellow
Yellow
Yellow
Note: The
FAVOURITE button
will only tune to the
channels in the
activated Favourites
List.
Last Channel Recall
For instant access to the channel you were last viewing, press the LAST button .
1. To set a
favourite channel
2. To activate a
favourite list
3. To access a
favourite channel
4. To remove a
favourite channel
Functions Directions
010810
15
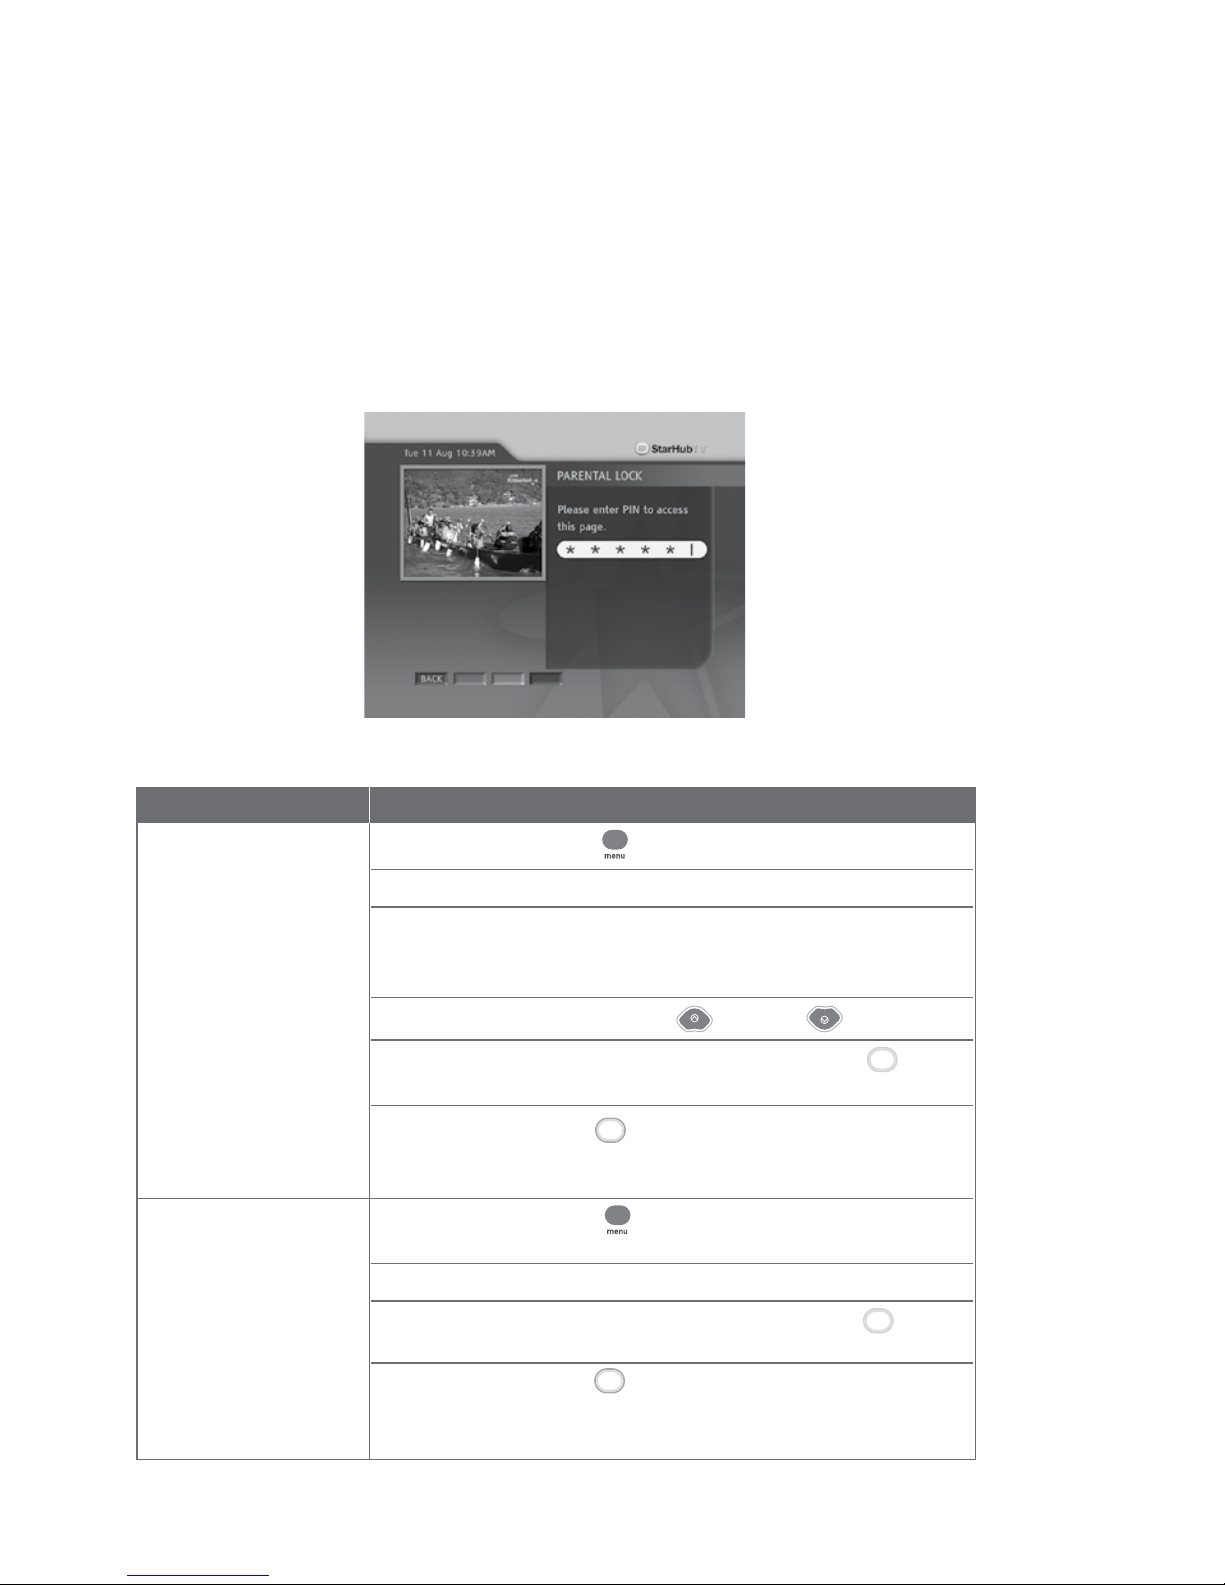
You may choose to lock a number of channels, after which they will only be accessible via a
6-digit (numeric) Personal Identification Number (PIN). This feature allows parents to control
what their children watch.
Guide To Digital Cable Applications
Parental Lock Setting
How To Use
Functions Directions
1. To lock a channel. Press the MENU button on your remote control.
Select TV Guide followed by Parental Lock on the TV screen.
Enter your 6-digit numeric PIN to access the Channel Listing
screen. (The default PIN is 000000). To set a new PIN, see
CHANGE PIN section.
Scroll to the channel using the UP or DOWN arrow button.
In the Channel Listing screen, use the YELLOW button to
select the channels you wish to lock.
Press the BLUE button to confirm and save your selection.
The channels you have selected will now be accessible only by
entering the correct 6-digit numeric PIN.
2. To unlock a channel. Press the MENU button on your remote control. Select TV
Guide followed by Parental Lock on the TV screen.
Enter your 6-digit numeric PIN to access the Channel Listing screen.
In the Channel Listing screen, use the YELLOW button to
select the channels you wish to unlock.
Press the BLUE button to confirm and save your selection.
The channels you have selected are now unlocked and accessible
by anyone.
Yellow
Blue
Yellow
Blue
010810

16
Guide To Digital Cable Applications
Auto-Tune Setting
You may prepare your HubStation HD to switch channels at pre-determined times and dates
for recording purposes.
How To Use
Functions Directions
1. To access Auto-Tune. Press the MENU button on your remote control.
Select TV Guide followed by Auto-Tune on the TV
screen, to access the Auto-Tune event list.
2. To add a new Auto-Tune event. Within the Auto-Tune screen, press the GREEN (ADD)
button to add a new event. You will be required
to set the following:
Frequency Start Date
Start Time Channel
3. To set the Frequency. Use the LEFT or RIGHT arrow button to select
from the following options:
Once
Daily
Weekly
4. To fix Start Date. Use the LEFT or RIGHT arrow button on
your remote control to set the date for Auto-Tune to
activate, e.g. Mon 05 Jan.
5. To confirm Start Time. Using the number buttons on your remote control,
enter the time you want the HubStation HD to switch to
the channel of your choice. The time is displayed in
12-hour format, e.g. 01:30PM or 11:25AM. Use the
RIGHT arrow button to select "AM" or "PM".
6. To select the Channel. Using the LEFT or RIGHT arrow button
on your remote control, select the Channel you want
the HubStation HD to tune to.
When done, press the BLUE button to confirm
and save your options.
7. To view and delete your preset Press the MENU button on your remote control.
event. Select TV Guide followed by Auto-Tune on the TV
screen to access the Auto-Tune event list.
To delete an event on the list, select the event and
press the YELLOW button . The selected event
will be deleted from the list.
010810

17
Guide To Digital Cable Applications
Change PIN
This function allows you to replace the default or old PIN of your HubStation HD with a new
number. The PIN should be kept confidential as it will enable you secured access to selected
services or features.
How To Use
Functions Directions
1. To change/set a new PIN. Press the MENU button on your remote control.
Select Settings followed by Change PIN on the
TV screen.
Enter your current 6-digit numeric PIN. (The default
PIN is set to 000000). Press the BLUE button to
confirm your PIN and access the next screen.
On the next screen, enter and confirm your new PIN.
Press the BLUE (OK) button to save the new PIN.
A message will appear on-screen to inform you if the
change has been successful. Press the BLUE button
again to return to the main Menu.
Blue
Blue
Blue
Note: Please be reminded that the PIN
should be kept confidential.
010810
Table of contents
Other StarHub Set-top Box manuals


