StarHub TV+ User manual
STARHUB TV+ BOX GUIDE
ENGLISH VERSION

1
CONTENTS
What’s included ...................................................................................... Pg2
Using your remote control .................................................................... Pg2
Setting up your StarHub TV+ box ......................................................... Pg3
Using your StarHub TV+ box ................................................................. Pg11
How to create a Hub iD .......................................................................... Pg16
2
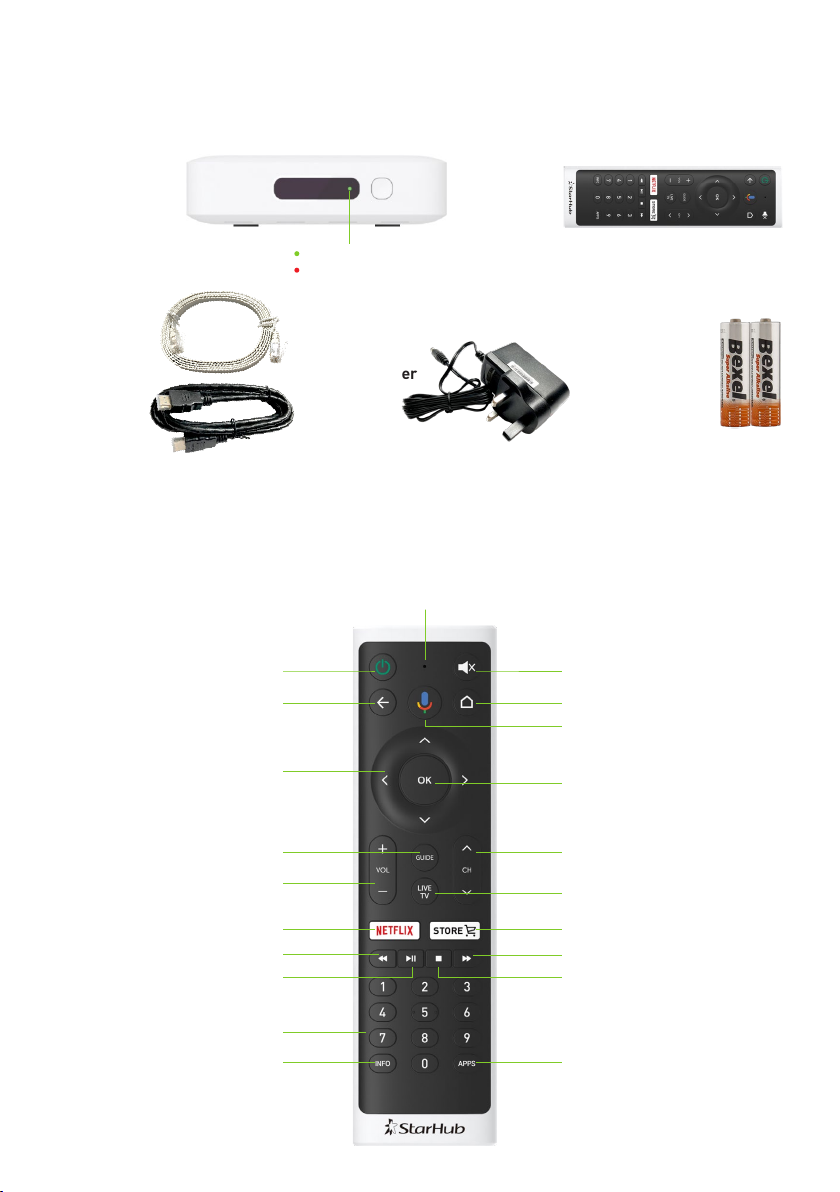
Low Battery Indicator
Power On / Standby
D-Pad Navigation
(Up / Down / Left / Right)
Volume (Up / Down)
TV Guide
Netflix
Rewind
Numeric (0-9)
Info (More Information)
Back
Play/Pause
Mute / Unmute
Google Voice Search
(Press once and speak)
OK (Select / Confirm)
Live TV
Channel (Up / Down)
Store
Fast Forward
Apps (Shortcut)
Home
Stop
USING YOUR REMOTE CONTROL
WHAT’S INCLUDED
HDMI Cable
Ethernet Cable
StarHub TV+ box
with LED indicator
Green : Powered On
Red : Standby Mode
Remote
Control
2 x AAA BatteriesPower Adapter

3
SETTING UP YOUR STARHUB TV+ BOX
STEP 1
Connect the HDMI cable to your
StarHub TV+ box and the HDMI port
on your TV.
STEP 3
Connect the power adapter to your
StarHub TV+ box and a power socket.
Then, switch on the power and
the StarHub TV+ box will turn on
automatically.
STEP 2
Connect the Ethernet cable to your
StarHub TV+ box and the LAN or
Ethernet port on your router.
To enjoy Free-to-air channels on your
StarHub TV+ box, you will need
StarHub Broadband with a StarHub
Smart WiFi or a wired connection to
Linksys EA8100/7500 router. Head to
Page 11 for more information.
Using the Ethernet cable provides
a more stable internet connection.
However, if you prefer to use WiFi
instead, skip this step. You will be
prompted to connect to your WiFi
network in Step 7 (Page 5).
Note: For Wi-Fi connections, streaming quality may
be affected if the Wi-Fi signal strength is weak.
Connect the
Power Adapter
3
1
HDMI cable
HDMI port
StarHub
TV+ Box
Back of the TV
Green : Powered On
Red : Standby Mode
StarHub TV+ with
LED indicator
2
Ethernet cable
StarHub
Smart WiFi
router
LAN port
For StarHub Smart WiFi
via wireless or wired connection
Ethernet cable
Linksys EA8100
Ethernet
port
For Linksys EA8100/7500
via wired connection only
4
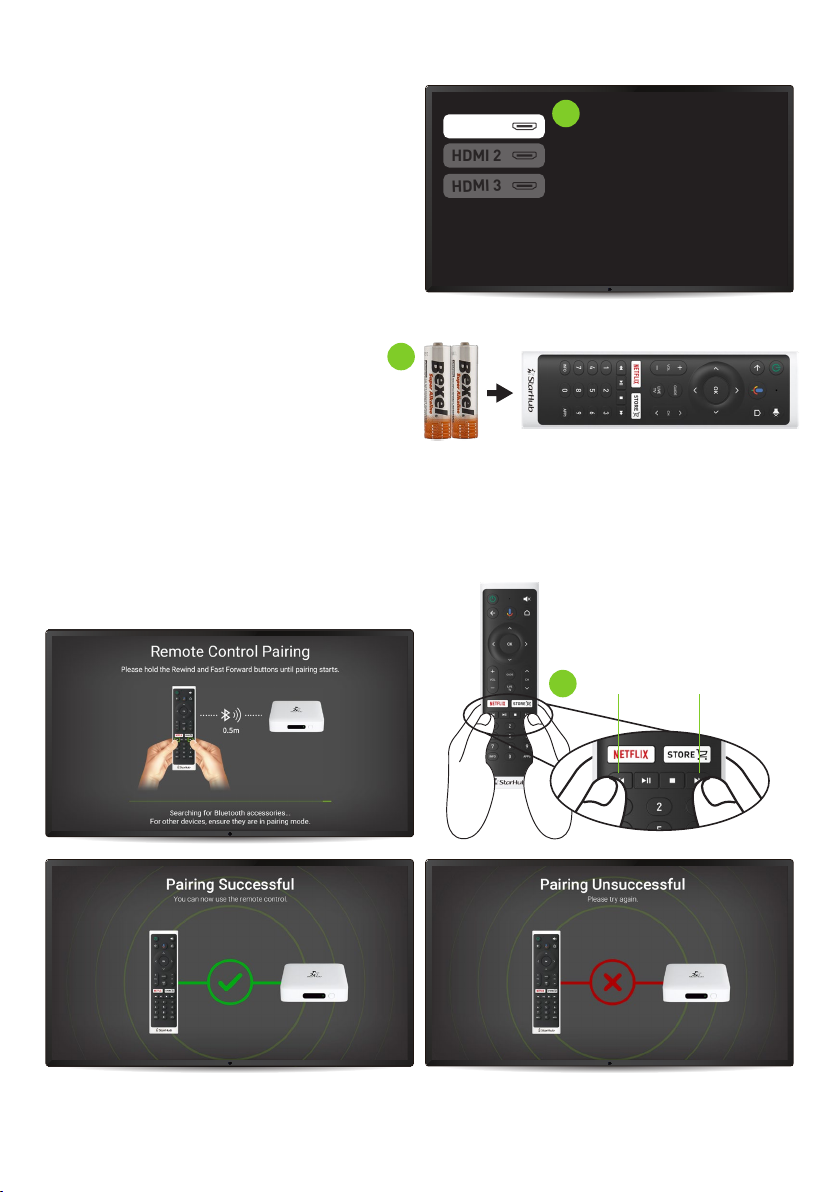
STEP 6
Press and hold the Rewind and Fast Forward buttons on your remote control
at the same time for 5-10 seconds to pair your remote control.
STEP 5
Insert the 2 AAA batteries into
the remote control.
STEP 4
Select the corresponding HDMI
source on your TV using your
TV remote control.
4
HDMI 1
HDMI 2
HDMI 3
When the remote control pairing is
successful, you will see this screen. If the remote control pairing is unsuccessful,
you will see this screen. Please repeat
Step 6 to pair your remote control.
6Fast ForwardRewind
5
AAA Batteries
Note: Newer Smart TV models may
show the TV+ box name NVSH800H1
on the corresponding HDMI source.
5
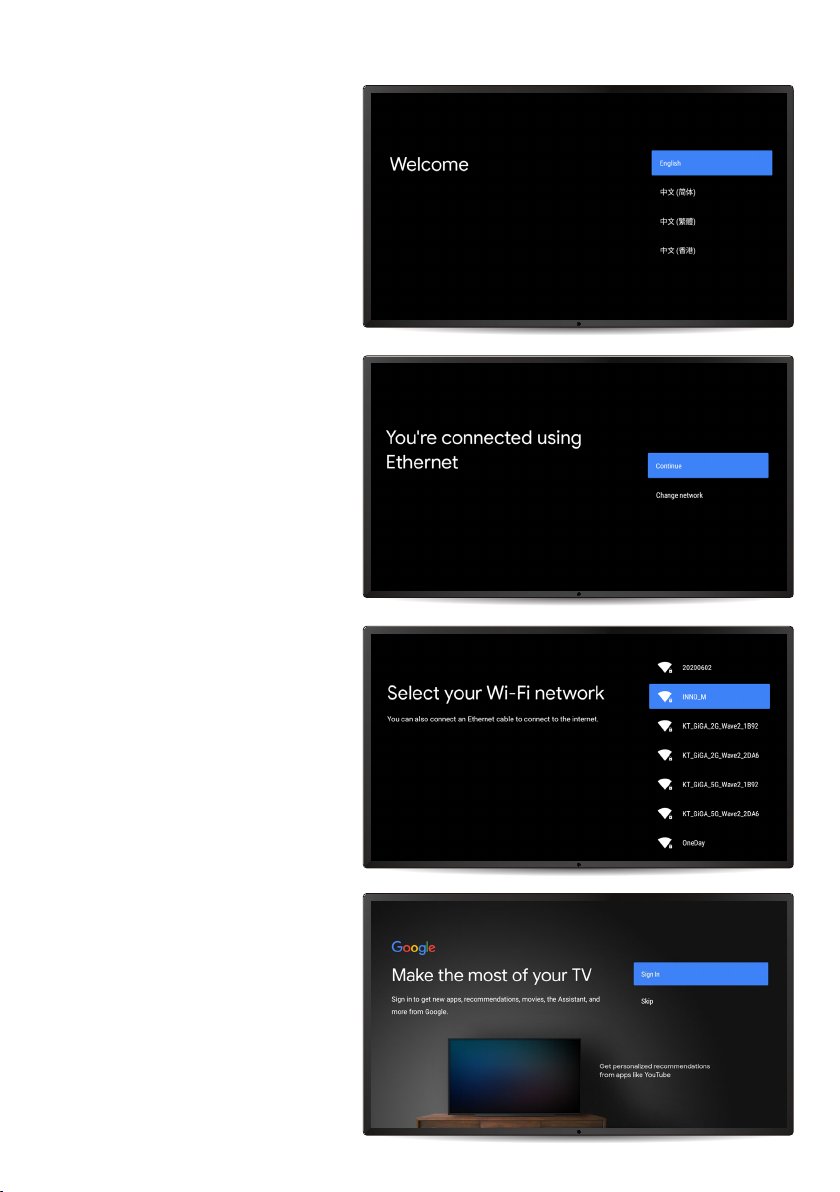
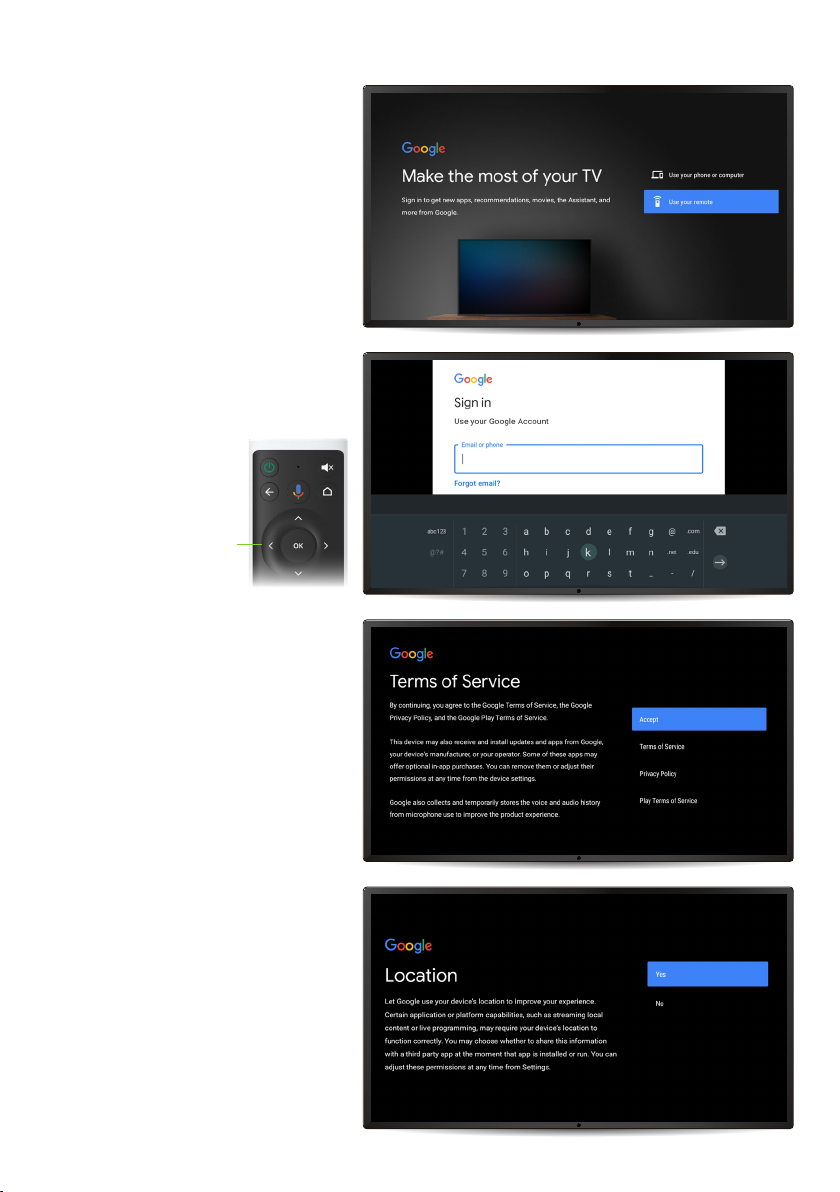
STEP 7
Select your preferred
language for the set-up
process.
If your StarHub TV+ box is
connected to your router
via the Ethernet cable, you
will see this screen. Select
Continue to proceed.
If your StarHub TV+ box is
not connected to your router
via the Ethernet cable, you
will see this screen. Select
your WiFi network and input
the WiFi network password
to proceed.
If you have a Google account,
select Sign In. We recommend
that you sign in to your
account, so you can enjoy
Android TV services such as
the Google Play Store.
If you do not have a Google
account, select Skip. Continue
with Step 9 (Page 6).
6
STEP 8
To sign in using your
remote control, select
Use your remote.
STEP 9
Select Accept to accept the
Terms of Service.
Select Yes to turn on location
services, or select No to turn
off location services.
Using the D-Pad Navigation
on your remote, enter your
Google account log-in
and password.
D-Pad Navigation
(Up / Down / Left / Right)

7
Select Yes to send
diagnostics to Google, or
select No to opt out.
STEP 10
Select Continue on the next
2 screens to set up your
Google Assistant.
Note: If you have skipped the Google
account sign-in proceed to Step 11
(Page 8).
Select Turn on to get
personalized results on your
Google Assistant, or select
No thanks to opt out.
8
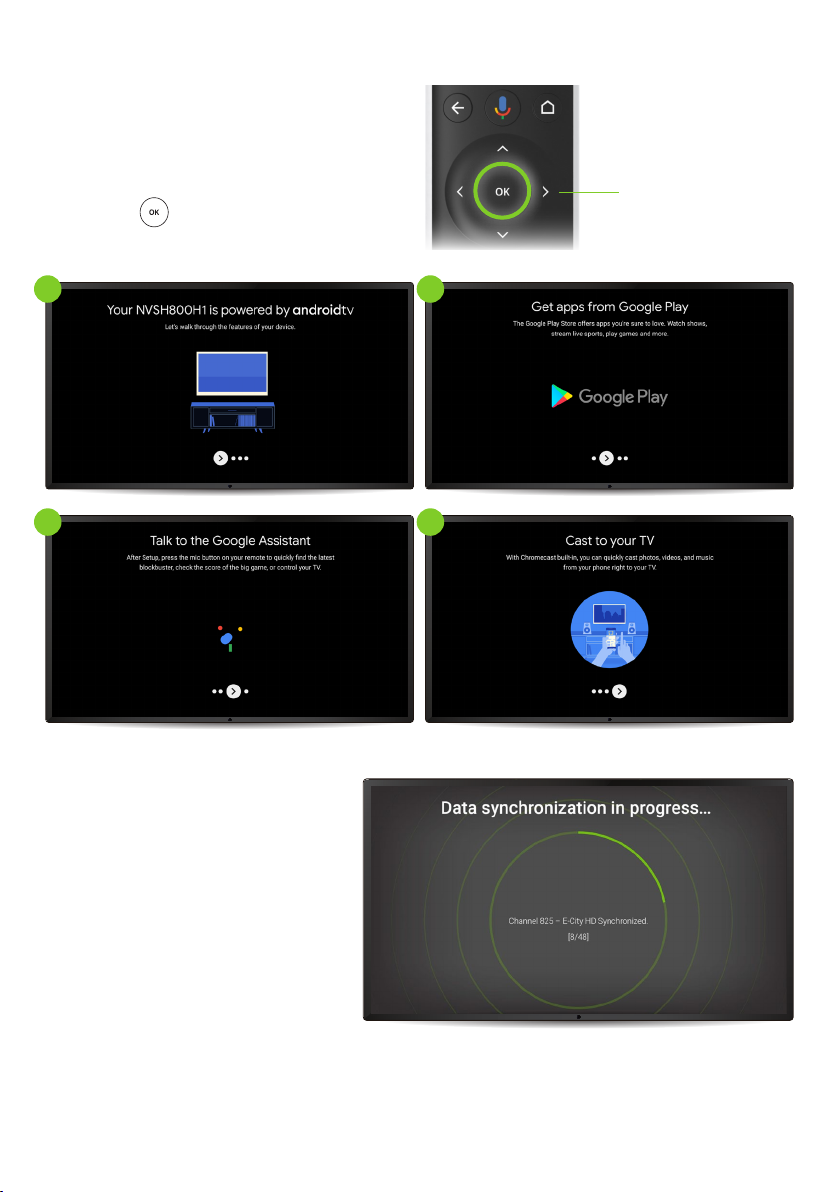
STEP 11
You will be introduced to the
Google features available
on the StarHub TV+ box.
Press the button on your
remote to continue.
Your Google set-up is
now complete.
Now, wait for the Data
Synchronization to finish.
Once it’s done, you will be
prompted to log in to your
Hub iD.
1 2
3 4
OK (Select / Confirm)

9
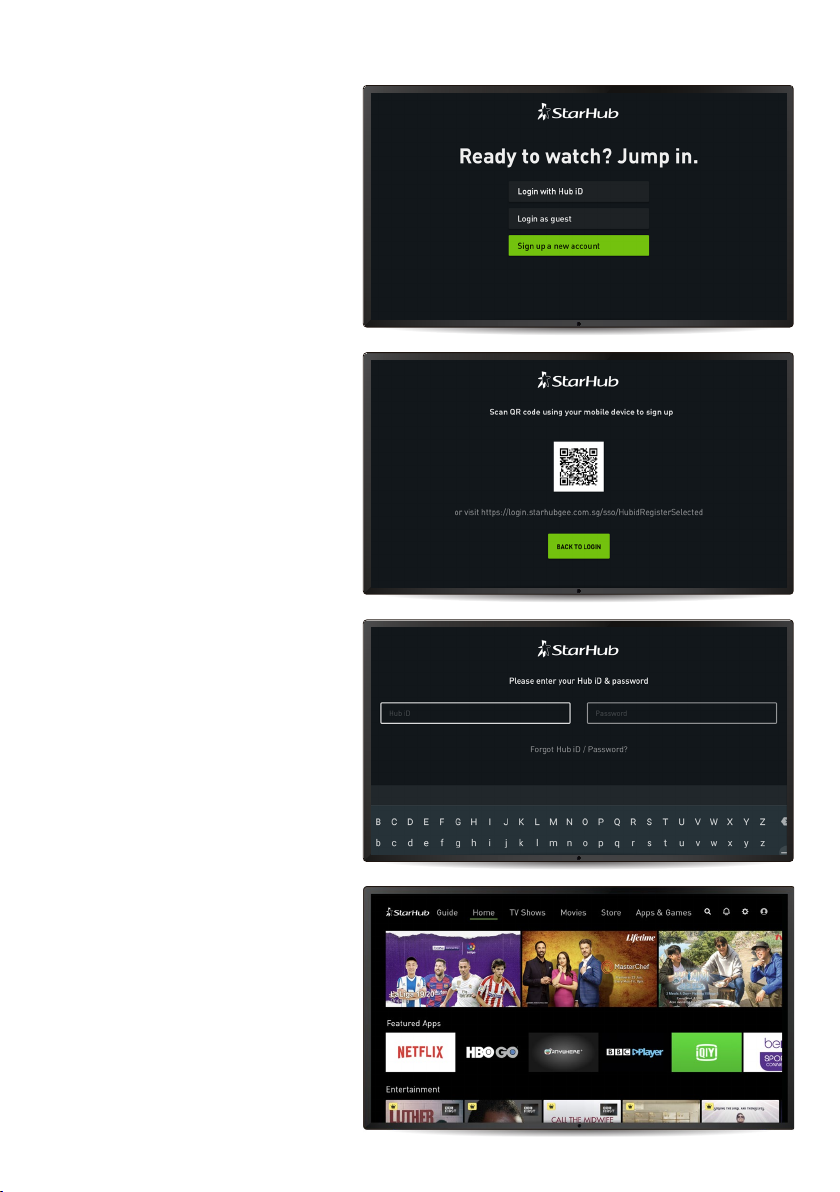
STEP 12
A Hub iD is required to enjoy
StarHub TV+ content.
If you have a Hub iD, select
Login with Hub iD.
If you have a Hub iD:
Enter your Hub iD and
password to sign in.
If you have forgotten your
Hub iD or Password:
Select Forgot Hub iD /
Password?
Use your smartphone to scan
the corresponding QR code
shown on screen. Retrieve
your Hub iD or Password by
following the instructions sent
to your smartphone.
Once you have retrieved your
Hub iD or Password, select
Back to Login on your TV.
10
If you do not have a Hub iD:
Select Sign up a new account.
Once you see this Home
Screen, it means your set-up
is now complete and you’re
ready to start watching!
Enter your new Hub iD and
password to sign in.
Use your smartphone to scan
the QR code shown on screen.
Follow the instructions to
complete your Hub iD
registration. When you’re done,
select Back to Login.
For steps to create a Hub iD, please refer
to page 16-17.

11
Linksys EA7500
USING YOUR STARHUB TV+ BOX
Watching LIVE TV channels
To watch LIVE TV channels, press the button
on your remote. Key in the channel number
using the number pad e.g. 825 for Hub E City.
To enjoy Free-to-air channels on your StarHub TV+ box, you will need StarHub
Broadband with a StarHub Smart WiFi router or a wired connection to Linksys
EA8100/EA7500 router.
Free-to-air channels
Channel 5, Channel 8,
Channel U,
Channel News Asia,
Suria, Vasantham
StarHub Smart WiFi StarHub TV+ box
StarHub
Broadband
via wired connection
via wireless/wired connection
StarHub TV+ box
Linksys EA8100
OR
12
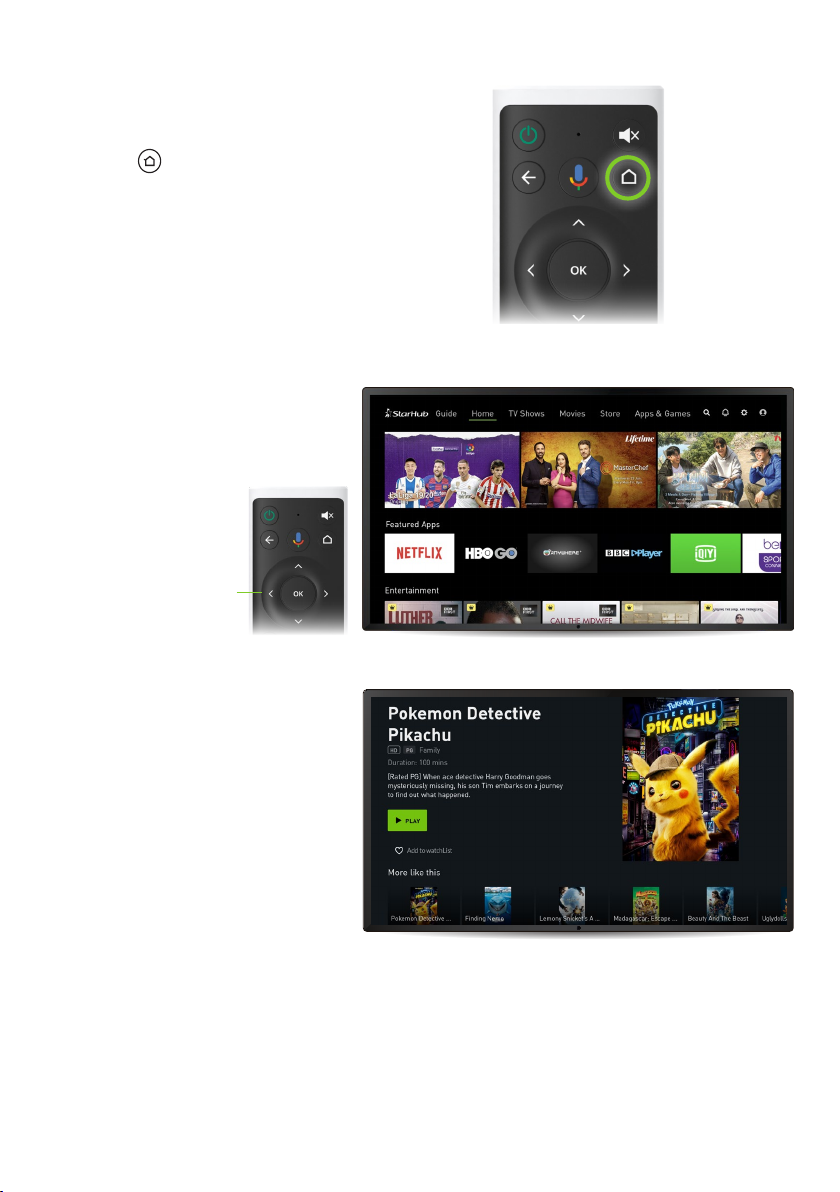
Watching On Demand shows
To watch On Demand shows,
press the button on your
remote to go to the Home Screen.
Use the D-Pad Navigation to
browse and select shows.
Using the D-Pad Navigation,
scroll to the show that you
would like to watch.
Press OK to select
the show.
Using the D-Pad Navigation,
navigate to the Play button and
press OK on your remote.
D-Pad Navigation
(Up / Down / Left / Right)
13
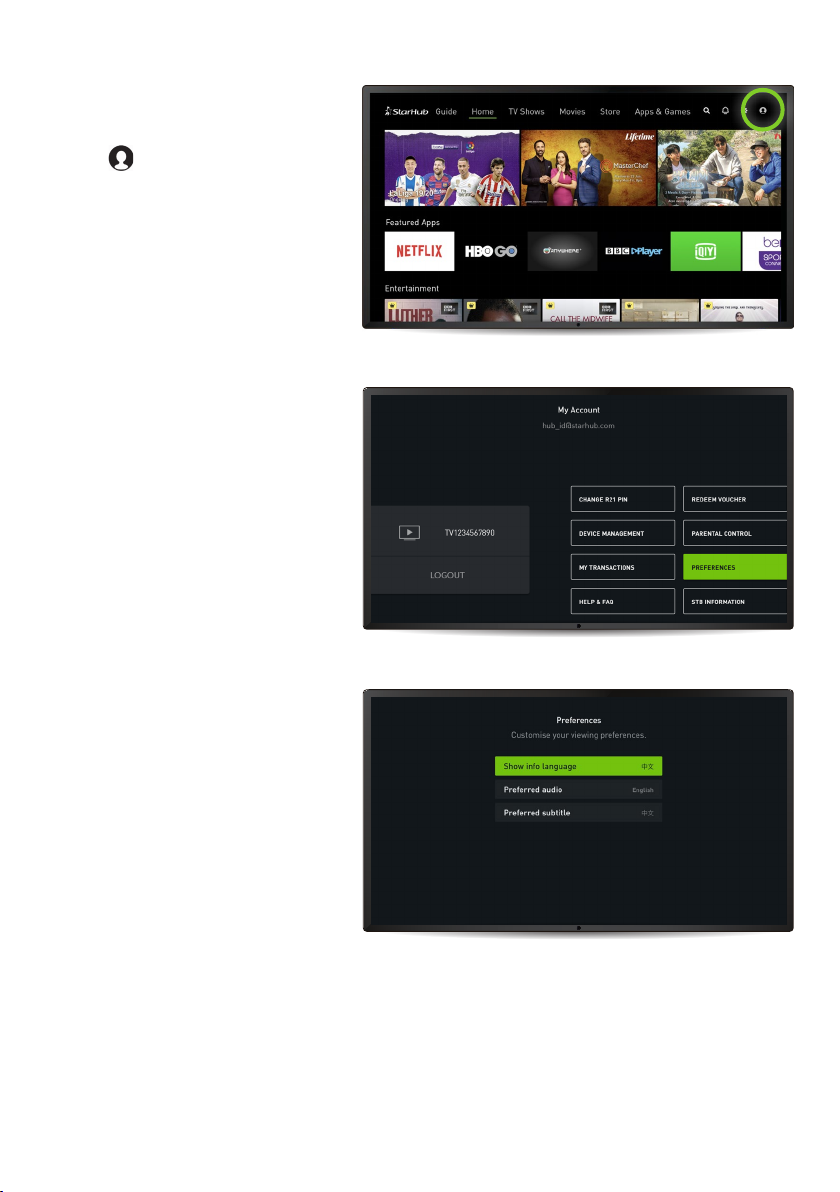
How to change your
Show Info language:
Select to access
My Account.
Select
Preferences.
Select
Show info language.
14
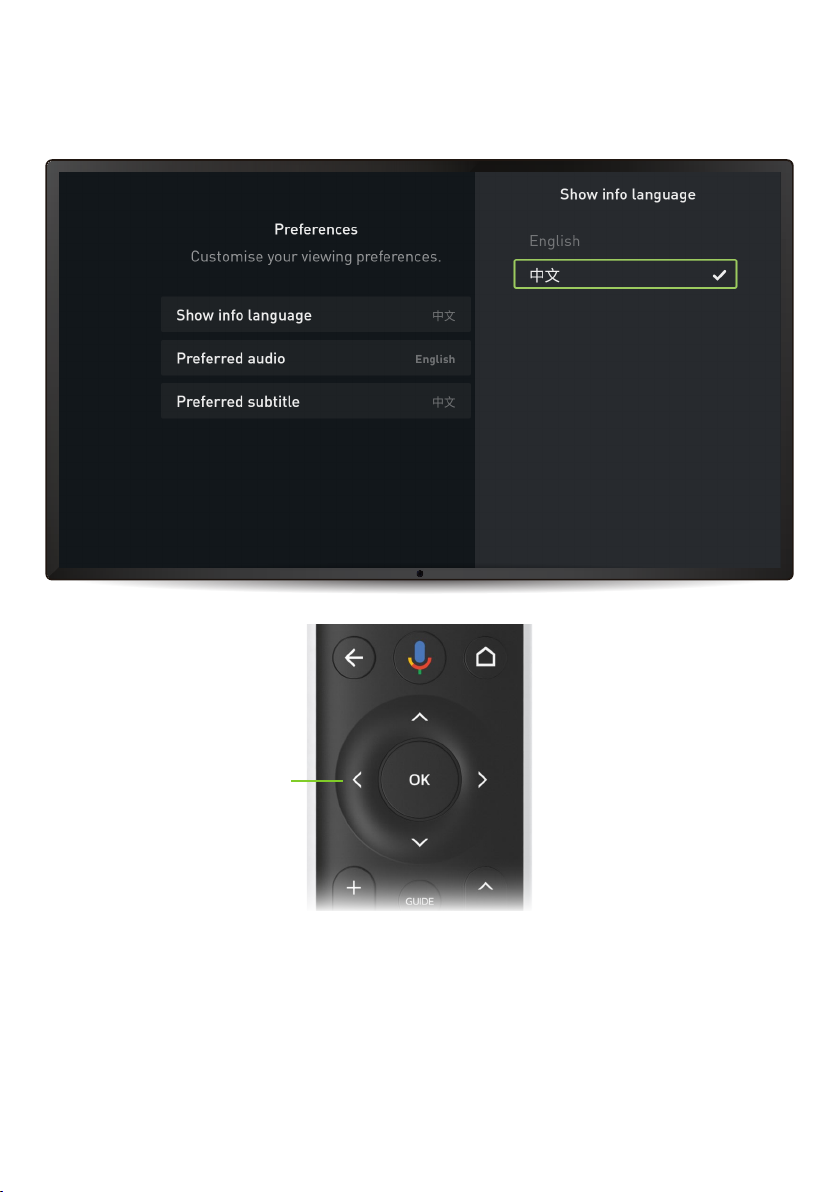
Press the OK button and the D-Pad Navigation on your remote to toggle
between English or Chinese.
D-Pad Navigation
(Up / Down / Left / Right)
Please note that this changes the language of the Show Info only, where
available. English is the default language for the StarHub TV+ interface.
You will also be able to set your preferred audio and subtitles.

15
If you have set your Show Info language to Chinese, the show info will
appear in Chinese where available.
16
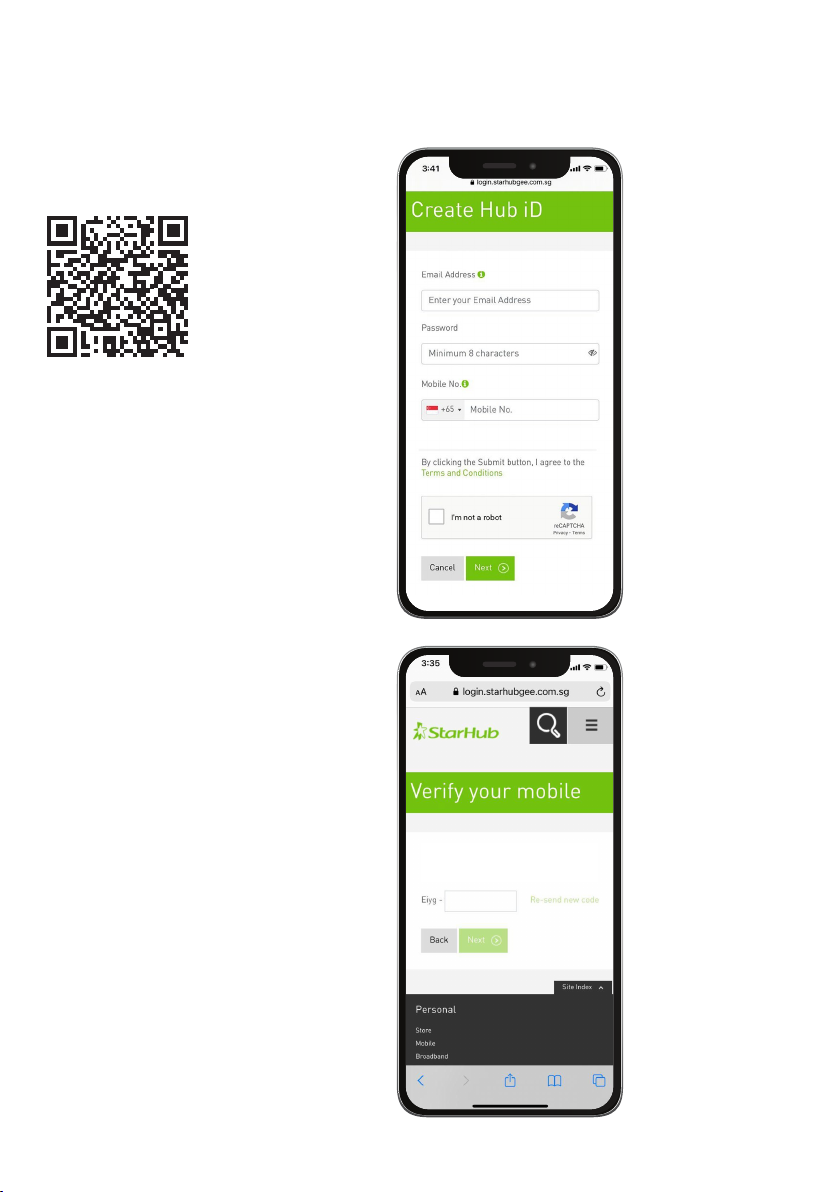
HOW TO CREATE A HUB iD
Or visit starhub.com/hubid-signup
Enter your email address,
password and mobile number.
Check the box beside
I’m not a robot.
Then select Next.
To create a Hub iD, scan this
QR code
Enter the verification code
that was sent to your mobile
number via SMS.
Then select Next.
Please enter the verification code sent to
+65 91234567
The code is valid for 2:56 minutes.

17
Welcome to StarHub family!
Your Hub iD [email protected] has been
created successfully. Click here to view your
Hub iD profile.
Have active StarHub Postpaid service? Link
your account now to view and manage your
services!
Do not have StarHub service? Start browsing
our online offers now!
XXXXX000A
+65-91234567
When you see this screen,
you have completed the
Hub iD creation.
To change your
Hub iD password
Log in to your Hub iD.
Click on
Change password
under Hub iD profile.
Enter your current
and new password
and click Save.
XXXXX000A
+65-91234567

© 2020 StarHub Cable Vision Ltd. All rights reserved.
For further information, please visit
starhub.com/tvplus-box-help
or scan the QR code.
Other manuals for TV+
1
Table of contents
Other StarHub Set-top Box manuals


